

Command of the Week - Array Copy (Week 36)
 Monsen
Administrator 🖼️ 82 images Cartographer
Monsen
Administrator 🖼️ 82 images Cartographer
Index
- List (Basic)
- Symbols Along (Intermediate)
- Fractalise (Intermediate)
- Edit Text (Basic)
- Link with Map/File (Intermediate)
- Offset (Intermediate)
- Measuring Tools (Basic)
- Change like draw tool (Basic)
- Modifiers (Intermediate)
- File Paths (Intermediate)
- Complex Shapes [Combine Path] (Intermediate)
- Complex Shapes [Multipoly] (Intermediate)
- Break (Intermediate)
- Map Notes (Basic)
- Coordinates (Intermediate)
- Macros (Advanced)
- Search Files for Text (Basic)
- Text Justification (Basic)
- Mirrored Polygons (Intermediate)
- Managing Drawing Tools (Intermediate)
- Named Views (Basic)
- Symbol Lookup Sheets (Intermediate)
- Symbol Catalog Settings (Advanced)
- Symbol Catalog Filters (Advanced)
- Symbol Control Points (Advanced)
- Define Symbol (Intermediate)
- Curves (Basic)
- Selections (Intermediate)
- Sort Symbols in Map (Basic)
- Extract Properties (Basic)
- Convert File (Basic)
- Get Extents (Advanced)
- Quick Move (Basic)
- Menu Editing (Advanced)
- Trace (Basic)
- Array Copy (Intermediate)
- Explode (Basic)
- Clipboard Copy (Basic)
- Rename & Reorder (Intermediate)
- Drawtools Edit (Basic)
- Trims (Basic)
- Symbol Attributes (Intermediate)
- Fill Style Selection Mask (Basic)
- Browse Files (Basic)
- Node Editing (Intermediate)
- Automatic Sheet Selection (Basic)
- Scale (Basic)
- Text along a Curve (Basic)
- Shaded Polygons (Intermediate)
- Fill with Symbols (Intermediate)
- Global Sun (Basic)
- Symbols in Area (Intermediate)
This series is called the command of the week, but it could also explain a feature. The explanations will tend to explain the technical parts of the command, and is intended to highlight the basics (and complexities) of the command, and information about how to use it, but won't be a detailed tutorial. It is up to you to use it creatively in your maps.
Week 36 - Array Copy
There are times when you need your entities arranged in neat rows and columns, or circles. Perhaps you need those trees in the garden to be perfectly aligned, or perhaps you need to place those evil altars in a perfect circle. For situations such as these, the two array copy commands of CC3+ is extremely helpful.Where to find them?
Toolbar: Right Click -> Rectangular Array, Circular Array
Command Line: REPEAT, CARY
How to use them?
No matter if you are using a circular or rectangular array, you first need to place the entity to be copied. This is often a symbol, but can also be something drawn manually. It doesn't have to be just a single entity either.Circular Array
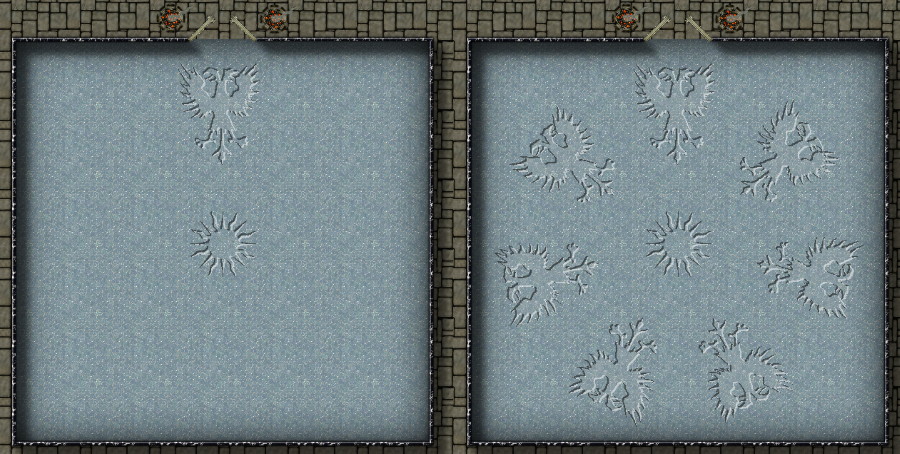 The circular array copies entities around a circle, including several concentric circles if desired. The entities are rotated, so that the same side will always face the center of the circle.
Once you have placed your base entity to be copied, simply start the command, and CC3+ will let you do a selection process as usual. When you are happy with your selection, just hit Do It.
Now, CC3+ will ask you for the number of spokes. This is the number of copies you want in your circle, including the original entity you placed.
After answering the prompt, CC3+ will then ask for the Number of rings. These are the number of concentric circles you wish to draw with your entity. If you only want a single circle, answer 1.
Then, CC3+ needs to know the center of your circle. Here you can either click in the center, or type in the coordinates on the command line. Note that the original entity you started with should already be placed the appropriate distance from your center, as this won't be moved.
The next prompt asks for copy origin. This is usually a point on the entity to be copied, such as the center point. This is the point CC3+ uses for calculation when placing the entities along the circle.
Now, CC3+ will ask for the Angle between spokes. This value is calculated by CC3+ based on the number of spokes, so you should always accept the default value here (just hit enter). Any other value, and the entities will not be evenly distributed along the circle. If you just want a semicircle, then reducing this value will accomplish that.
Finally, if you asked for more than one ring, CC3+ will prompt you for the distance between rings. Either type in a distance, or click two points in the drawing to define it visually.
CC3+ will now think for a short while, then draw your circles on the map. If you are unhappy with the result, you can easly just Undo (Ctrl +Z) and try again with different parameters.
Rectangular Array
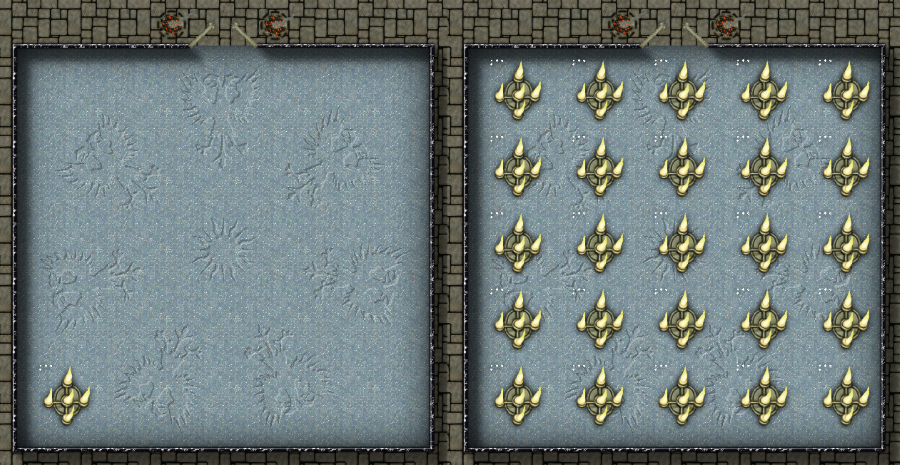
Rectangular arrays are a bit simpler than circular ones, and perhaps not quite as useful, as you can usually accomplish the same using snaps reasonably quickly, although arrays are nice for very large sets of objects. A rectangular array takes an entity and copies it out in a grid pattern, with the specified number of rows and columns.
As with circular arrays, once you start the command, you are prompted to select the entities you wish to include in the command. Once you are done selecting and have hit Do It, CC3+ will first ask for the number of columns, and then number of rows. Simply provide the values you need.
Now, CC3+ will ask for the repeat origin. Technically, you could click anywhere on he screen, but the best is to click on a recognizable feature of the entity in question, such as a corner, center, or prominent point. Once this is done, CC3+ will ask for 2nd row 2nd column. This is the location of the entity in the 2nd row AND 2nd column of your grid. When you provide this position, CC3+ will know both the vertical and horizontal distances. Note that it is the same point of the entity you clicked on for the repeat origin that will end up in the exact spot you clicked now, which is why a recognizable feature made sense. Once you have clicked this point, CC3 will think for a short while, then draw your array.
Note that since you don't get a preview of the entity on the cursor when placing the offset point, I often find it helpful to manually place a copy of the entity there first, and once I am happy with the positioning, I click the same point on this "helper" entity as the origin point on the original entity. This will result in two entities in the second row, second column position, so you need to erase one of them afterwards.