

Command of the Week - Text along a Curve (Week 48)
 Monsen
Administrator 🖼️ 82 images Cartographer
Monsen
Administrator 🖼️ 82 images Cartographer
Index
- List (Basic)
- Symbols Along (Intermediate)
- Fractalise (Intermediate)
- Edit Text (Basic)
- Link with Map/File (Intermediate)
- Offset (Intermediate)
- Measuring Tools (Basic)
- Change like draw tool (Basic)
- Modifiers (Intermediate)
- File Paths (Intermediate)
- Complex Shapes [Combine Path] (Intermediate)
- Complex Shapes [Multipoly] (Intermediate)
- Break (Intermediate)
- Map Notes (Basic)
- Coordinates (Intermediate)
- Macros (Advanced)
- Search Files for Text (Basic)
- Text Justification (Basic)
- Mirrored Polygons (Intermediate)
- Managing Drawing Tools (Intermediate)
- Named Views (Basic)
- Symbol Lookup Sheets (Intermediate)
- Symbol Catalog Settings (Advanced)
- Symbol Catalog Filters (Advanced)
- Symbol Control Points (Advanced)
- Define Symbol (Intermediate)
- Curves (Basic)
- Selections (Intermediate)
- Sort Symbols in Map (Basic)
- Extract Properties (Basic)
- Convert File (Basic)
- Get Extents (Advanced)
- Quick Move (Basic)
- Menu Editing (Advanced)
- Trace (Basic)
- Array Copy (Intermediate)
- Explode (Basic)
- Clipboard Copy (Basic)
- Rename & Reorder (Intermediate)
- Drawtools Edit (Basic)
- Trims (Basic)
- Symbol Attributes (Intermediate)
- Fill Style Selection Mask (Basic)
- Browse Files (Basic)
- Node Editing (Intermediate)
- Automatic Sheet Selection (Basic)
- Scale (Basic)
- Text along a Curve (Basic)
- Shaded Polygons (Intermediate)
- Fill with Symbols (Intermediate)
- Global Sun (Basic)
- Symbols in Area (Intermediate)
This series is called the command of the week, but it could also explain a feature. The explanations will tend to explain the technical parts of the command, and is intended to highlight the basics (and complexities) of the command, and information about how to use it, but won't be a detailed tutorial. It is up to you to use it creatively in your maps.
Week 48 - Text along a Curve
Sometimes that straight line of text just doesn't cut it when you wish to label that winding river or that slightly curved mountain range. Perhaps you also need your text to follow a perfect circle, or even a spiral. For this, CC3+ has the text along a curve command.Where to find it?
Toolbar: right click [Image_9796] -> Text along a curveMenu: Draw -> Text along a curve
Command Line: ATTC
How to use it?
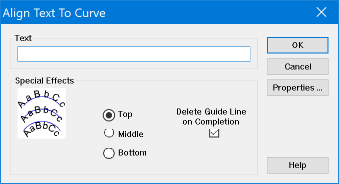
Actual usage of this command is very simple. When you start this command, you are first prompted to select a curve. In practice, you can use any line, arc, path or polygon, but note that the text will always be slightly curved, so even if you use a square, the text won't bend at sharp angles. Once you click on the entity to use, the Align Text to Curve dialog will show.[Image_9798]
This dialog is relatively simple, you can type in the text you wish to use, you can select if the text should be above, below or on the chosen curve, and you can select to delete the guideline. You can also set the text properties from here.
Note that the option to delete the guide line is checked by default. If you have created a temporary line just to define the shape of the text, this should be fine, but if you targeted your actual entity (like a river), make sure to uncheck this.
Text Direction
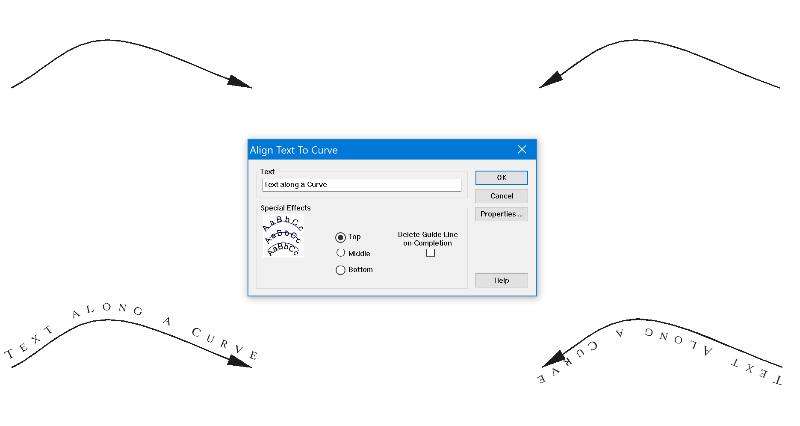
One confusing element for new users of this command is the direction the text takes along the line. Many are confused because the text is upside down below the line instead of the "right way" above the line for example. The important thing to know to use this command correctly is to understand that CC3+ will follow the line in the same direction you drew it. In practice, this means that if you drew the line from left to right, the text will start at the left end of the line, and will appear normally, the right way up. However, if you drew the line from right to left instead, CC3+ will instead treat the right end of the line as the starting point, meaning the text will appear upside down.Also note that what is above and below the line is relative to the line, not the screen, so above on a left to right line will also mean it appear above it on the screen, but above for a right to left line will actually appear below the line on the screen. The image below shows how this looks, the arrows shows the direction the lines were drawn in.
[Image_9799]
Note that this behavior means that you cannot always use your actual entities in the map, it is often better to create a dedicated guide line just for the text instead.
Arcs and Circles
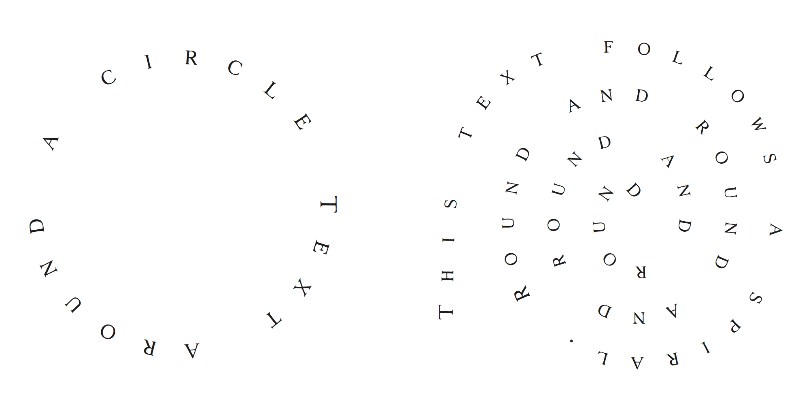
Arcs and circles are a special case, they will always use a clockwise direction, no matter how you drew it. This also means that text at the bottom of a circle will always be upside down, and the text on top of the circle will be the right way up. If this doesn't work for you, you can always use Line to Path [LTP2] on it to convert it to a path, and then mirror it.Closed Paths (Polygons)
Even a closed path will have a first node and a last node. When used on a closed path, the text will start at the first node, and then progress around the shape, ending at the last node. The actual starting point when drawing these entities are therefore important. When using a closed shape (including s circle), you may need to place a single space at the end of the text to prevent the first and last letter form overlapping.Text Spacing
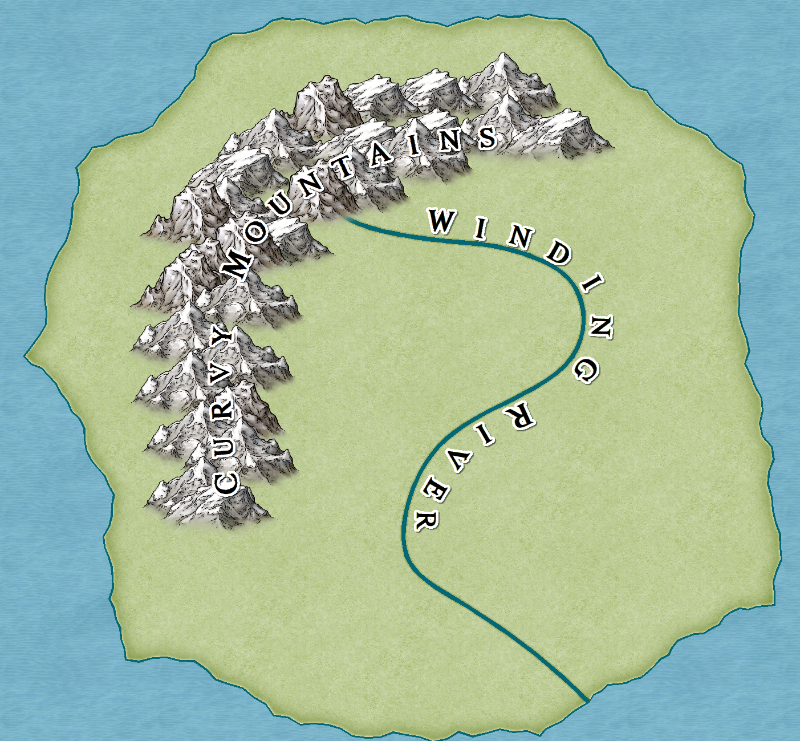
Text is spaced out along the entire entity. This is not always desirable, for example for a very long windy river. The best solution here is to draw a separate guide line for the text of the desired length, and then apply the text to this instead of the main entity. This is also the way you need to do it if you want additional spacing between the text and the curve itself, just draw a guide line slightly outside the curve.Remember that if you need a guide line the same shape as the actual entity, you can make a copy of the entity, and then just trim the ends of this copy to end up with a guideline the same shape as the main entity, but with the desired length for the text.
Editing the Text
For CC3+ to be able to arrange the text into a curve, it needs to break it up into the individual letters. This means that the resulting entity is not an editable text entity, but rather a bunch of letters grouped together, each letter a separate text entity (Try using List on the curved text). This means you cannot use text editing tools to change the text, but you need to delete the curved text and recreate it instead.Examples
[Image_9800][Image_9801]
Comments
Remy you made me dizzy reading that spiral text.
Excellent stuff. Thank you
Or maybe you just enjoy being dizzy??
But seriously - its been so much easier doing and explaining things since you did this mammoth breakdown of the commands