

Command of the Week - Mirrored Polygons (Week 19)
 Monsen
Administrator 🖼️ 82 images Cartographer
Monsen
Administrator 🖼️ 82 images Cartographer
Index
- List (Basic)
- Symbols Along (Intermediate)
- Fractalise (Intermediate)
- Edit Text (Basic)
- Link with Map/File (Intermediate)
- Offset (Intermediate)
- Measuring Tools (Basic)
- Change like draw tool (Basic)
- Modifiers (Intermediate)
- File Paths (Intermediate)
- Complex Shapes [Combine Path] (Intermediate)
- Complex Shapes [Multipoly] (Intermediate)
- Break (Intermediate)
- Map Notes (Basic)
- Coordinates (Intermediate)
- Macros (Advanced)
- Search Files for Text (Basic)
- Text Justification (Basic)
- Mirrored Polygons (Intermediate)
- Managing Drawing Tools (Intermediate)
- Named Views (Basic)
- Symbol Lookup Sheets (Intermediate)
- Symbol Catalog Settings (Advanced)
- Symbol Catalog Filters (Advanced)
- Symbol Control Points (Advanced)
- Define Symbol (Intermediate)
- Curves (Basic)
- Selections (Intermediate)
- Sort Symbols in Map (Basic)
- Extract Properties (Basic)
- Convert File (Basic)
- Get Extents (Advanced)
- Quick Move (Basic)
- Menu Editing (Advanced)
- Trace (Basic)
- Array Copy (Intermediate)
- Explode (Basic)
- Clipboard Copy (Basic)
- Rename & Reorder (Intermediate)
- Drawtools Edit (Basic)
- Trims (Basic)
- Symbol Attributes (Intermediate)
- Fill Style Selection Mask (Basic)
- Browse Files (Basic)
- Node Editing (Intermediate)
- Automatic Sheet Selection (Basic)
- Scale (Basic)
- Text along a Curve (Basic)
- Shaded Polygons (Intermediate)
- Fill with Symbols (Intermediate)
- Global Sun (Basic)
- Symbols in Area (Intermediate)
This series is called the command of the week, but it could also explain a feature. The explanations will tend to explain the technical parts of the command, and is intended to highlight the basics (and complexities) of the command, and information about how to use it, but won't be a detailed tutorial. It is up to you to use it creatively in your maps.
Week 19 - Mirrored Polygons
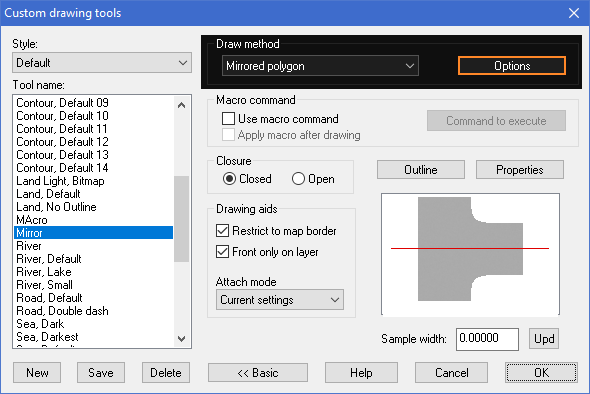
There are a lot of situations you may want symmetry in your maps, for example the hull of ship (water or space), the outline of many buildings and so on. While there are multiple ways to go about doing this, I'll talk about using this using the mirrored polygon option for drawing tools today.Where to find it
Some styles come with pre-defined mirror polygon drawing tools (mostly deckplan styles from Cosmographer), but usually, you will need to set up a drawing tool with this option yourself. (I won't cover creating and managing drawing tools now, that is a topic for another day, but you'll find information about this in the CC3+ User Manual, and the Tome of Ultimate Mapping. Do note that Mirrored Polygon tools support all the same properties and options as all other drawing tools)To make a drawing tool into a mirrored polygon tool, simply change the draw method to Mirrored Polygon. You can then click the Options button to change the angle of the mirror line (Note that the preview window will always display it as horizontal).
[Image_8589]
How to use it?
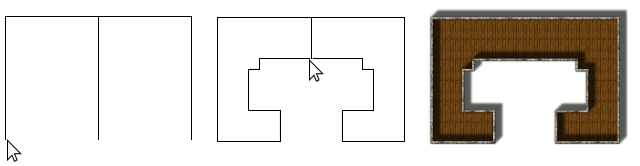
Using a mirrored polygon is just as using any other drawing tool. The main consideration is that the mirror line will start in the same spot as you start drawing, meaning your first node MUST be at the point the two mirrored halves are supposed to meet. When you draw using as mirrored tool, you should see three preview lines being drawn. The first is the line you are actually drawing, then there will be a mirror of it, and down the middle of these two will be the mirror line.Do note that you cannot do a mirrored edit of the shape after creating it. If you try to use the edit feature of the drawing tool, the edit will be mirrored around the location of your edit point, and not the whole polygon.
[Image_8591]
Comments
Thank you
It takes a little practice but can yield terrific results, especially for ship/starship hulls.
[Image_8596]
Keep an eye on the command line to see the drawing options when using a mirrored polygon drawing tool.
Cheers,
~Dogtag
Cheers,
~Dogtag