

Command of the Week - Modifiers (Week 9)
 Monsen
Administrator 🖼️ 82 images Cartographer
Monsen
Administrator 🖼️ 82 images Cartographer
Index
- List (Basic)
- Symbols Along (Intermediate)
- Fractalise (Intermediate)
- Edit Text (Basic)
- Link with Map/File (Intermediate)
- Offset (Intermediate)
- Measuring Tools (Basic)
- Change like draw tool (Basic)
- Modifiers (Intermediate)
- File Paths (Intermediate)
- Complex Shapes [Combine Path] (Intermediate)
- Complex Shapes [Multipoly] (Intermediate)
- Break (Intermediate)
- Map Notes (Basic)
- Coordinates (Intermediate)
- Macros (Advanced)
- Search Files for Text (Basic)
- Text Justification (Basic)
- Mirrored Polygons (Intermediate)
- Managing Drawing Tools (Intermediate)
- Named Views (Basic)
- Symbol Lookup Sheets (Intermediate)
- Symbol Catalog Settings (Advanced)
- Symbol Catalog Filters (Advanced)
- Symbol Control Points (Advanced)
- Define Symbol (Intermediate)
- Curves (Basic)
- Selections (Intermediate)
- Sort Symbols in Map (Basic)
- Extract Properties (Basic)
- Convert File (Basic)
- Get Extents (Advanced)
- Quick Move (Basic)
- Menu Editing (Advanced)
- Trace (Basic)
- Array Copy (Intermediate)
- Explode (Basic)
- Clipboard Copy (Basic)
- Rename & Reorder (Intermediate)
- Drawtools Edit (Basic)
- Trims (Basic)
- Symbol Attributes (Intermediate)
- Fill Style Selection Mask (Basic)
- Browse Files (Basic)
- Node Editing (Intermediate)
- Automatic Sheet Selection (Basic)
- Scale (Basic)
- Text along a Curve (Basic)
- Shaded Polygons (Intermediate)
- Fill with Symbols (Intermediate)
- Global Sun (Basic)
- Symbols in Area (Intermediate)
This series is called the command of the week, but it could also explain a feature. The explanations will tend to explain the technical parts of the command, and is intended to highlight the basics (and complexities) of the command, and information about how to use it, but won't be a detailed tutorial. It is up to you to use it creatively in your maps.
Week 9 - Modifiers
There are many times when we need some precision in our drawing. Maybe we need a river to end exactly at the coastline, two walls to meet at the exact same point or you need to export the exact area inside a rectangle on your map. You could of course just zoom really far in when positioning nodes, but because of CC3+'s (almost) unlimited zoom, this is never going to be exact. In a raster based application it is just a matter of hitting the same pixel, but since CC3+ doesn't operate using pixels, zooming will never give us anything more than an approximation no matter how far you zoom. For some maps, we can work with snap turned on most of the time, ensuring that everything is placed on a snap point, which basically let us sidestep this problem, but not all maps can be designed by just using snaps. In particular, I find that snaps tends to make maps look a bit artificial, because every length in the map is a multiple of the snap distance, so I like to work a bit more freehand, without sacrificing precision.To help with this, we have the modifiers. These are small commands that can be activated in the middle of another command to precisely select things, such as the endpoint of a line, the center of an entity, or simply the nearest point on an entity to name a few.
Where to find them
Toolbar:
Menu: Tools -> Snaps -> Midpoint, Center, Endpoint, Intersection Of, Distance Along, Nearest Point ON, Parallel to, Perpendicular to, % Along, Degrees To, Angle On, Bearing Angle, Tangent To, @ Ref Point, Same X, Same Y
Keyboard: F3 (Midpoint), F4 (Center), F5 (Endpoint), F6 (Intersection of), F8 (Distance Along), F9 (Nearest Point ON), F11 (Parallel to), F12 (Perpendicular To)
Command Line: MID, CEN, EPT, INT, DIST, ON, PRL, PRP, %, DEG, ANG, BRNG, TAN, REF, SAMEX, SAMEY
How to use them?
Now, the first thing about these commands is that you have to use them in the middle of another command. Their whole purpose is to manipulate your input to another command. If you try to execute them by themselves, you are just going to get an error message that CC3 doesn't understand the command.The easiest way to describe these modifiers is with a few examples
Note that in most of these examples, you need to click on a line to select it. Remember that lines are selected by clicking in the center of it, wide lines cannot be selected by clicking on the edges. If you fail to hit a valid target, the modifier will simply be ignored.
Example 1 - Door at the exact middle of the wall
- Draw a wall
- Pick a door symbol from the symbol catalog
- Hit F3 (or click the Midpoint button)
- Select the wall anywhere along it's length
- Notice how the door appeared at the exact halfway point along the wall.

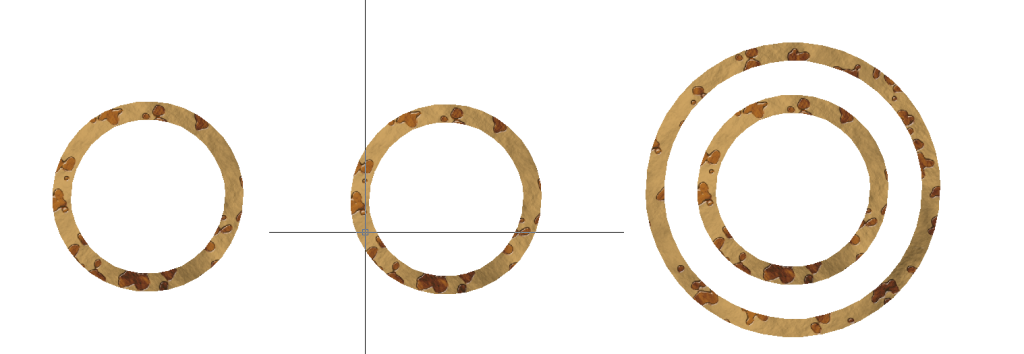
Example 2 - Drawing two concentric circles
- Draw a circle anywhere
- Start the circle command
- Hit F4 (Or click the Center button) [Note: Midpoint select the point midway along the current line segment, center selects the pint in the middle of the entity]
- Select the existing circle. The center point for your new circle is now at the center of the existing one
- Place the outer point on the circle.
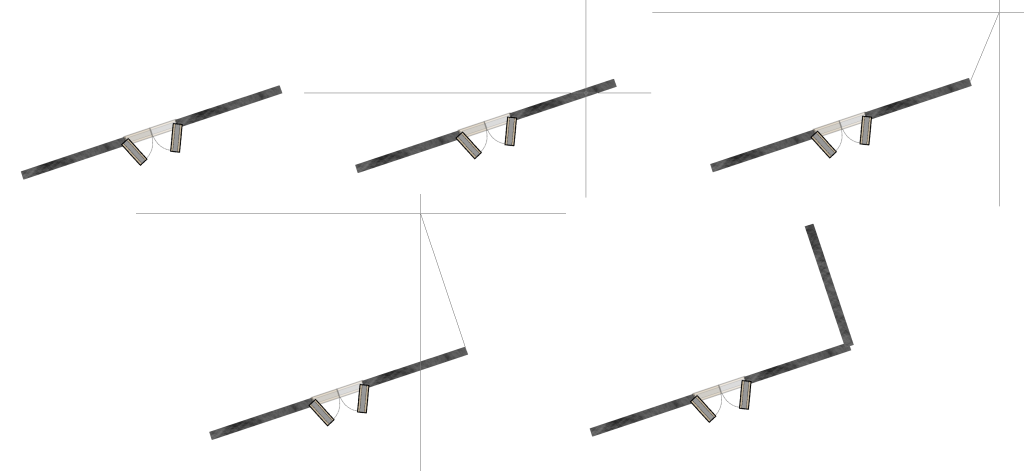
Example 3 - Draw a wall starting at the end of another wall, and perpendicular to it
- Draw a wall
- Activate the wall drawing tool again
- Hit F5 (Or click the endpoint button)
- Click anywhere on the existing wall to select it, you should see from the preview line that your first point is now exactly where the first wall ended.
- Hit F12 (Or click the perpendicular button)
- Click anywhere on the first wall again.
- You'll notice from the preview line that no matter where you move your mouse, it will always be perpendicular to the first wall. Click somewhere to place the second point, then right click to end the drawing command.
These examples only covered a few of the modifiers, but it shows the basics of how they work. Now experiment with the rest


Comments
It also made me discover the "like" modifier, and suddenly the selection of objects by colour took a whole new dimension!
By the way, on my browser, this tutorial doesn't display very nicely: The wide pictures on the right make the text on the left very narrow...