Command of the Week - Symbol Control Points (Week 25)
 Monsen
Administrator 🖼️ 82 images Cartographer
Monsen
Administrator 🖼️ 82 images Cartographer
Index
- List (Basic)
- Symbols Along (Intermediate)
- Fractalise (Intermediate)
- Edit Text (Basic)
- Link with Map/File (Intermediate)
- Offset (Intermediate)
- Measuring Tools (Basic)
- Change like draw tool (Basic)
- Modifiers (Intermediate)
- File Paths (Intermediate)
- Complex Shapes [Combine Path] (Intermediate)
- Complex Shapes [Multipoly] (Intermediate)
- Break (Intermediate)
- Map Notes (Basic)
- Coordinates (Intermediate)
- Macros (Advanced)
- Search Files for Text (Basic)
- Text Justification (Basic)
- Mirrored Polygons (Intermediate)
- Managing Drawing Tools (Intermediate)
- Named Views (Basic)
- Symbol Lookup Sheets (Intermediate)
- Symbol Catalog Settings (Advanced)
- Symbol Catalog Filters (Advanced)
- Symbol Control Points (Advanced)
- Define Symbol (Intermediate)
- Curves (Basic)
- Selections (Intermediate)
- Sort Symbols in Map (Basic)
- Extract Properties (Basic)
- Convert File (Basic)
- Get Extents (Advanced)
- Quick Move (Basic)
- Menu Editing (Advanced)
- Trace (Basic)
- Array Copy (Intermediate)
- Explode (Basic)
- Clipboard Copy (Basic)
- Rename & Reorder (Intermediate)
- Drawtools Edit (Basic)
- Trims (Basic)
- Symbol Attributes (Intermediate)
- Fill Style Selection Mask (Basic)
- Browse Files (Basic)
- Node Editing (Intermediate)
- Automatic Sheet Selection (Basic)
- Scale (Basic)
- Text along a Curve (Basic)
- Shaded Polygons (Intermediate)
- Fill with Symbols (Intermediate)
- Global Sun (Basic)
- Symbols in Area (Intermediate)
This series is called the command of the week, but it could also explain a feature. The explanations will tend to explain the technical parts of the command, and is intended to highlight the basics (and complexities) of the command, and information about how to use it, but won't be a detailed tutorial. It is up to you to use it creatively in your maps.
Week 25 - Symbol Control Points
In CC3+, you'll find something called smart symbols. These are symbols that have a defined behavior on placement, such as automatically aligning themselves to a road, cutting a wall, resizing themselves to fit and so on. All of this is done by adding control points to a symbol. A lot of the official ProFantasy symbols already contain control points, but you can also add this to your own symbols easily. Today, I'll explain how to add control points to your symbol, and what each of the different options does.Where to find it?
Menu: Symbols -> Add Control PointsCommand Line: CTRLP
How to use them?
Control points can be added to a symbol either before or after you define it. If you make a new symbol, you can add them to the drawing immediately, and just make sure to include them in the selection when you define your symbol. Or, to add them to an existing symbol, simply edit the symbol from the symbol manager, add the control points to the symbol in the edit window, and make sure to say yes to saving the changes to the symbol when you close the edit window. The latter is the best option if you make symbols by importing png's.When you execute the command, CC3+ will ask you to define two points, basically a line. The length and placement of this line is very important, since it is this line that defines the size and orientation of the behavior. For example, for a cutting symbol, the cutting will only happen along the length of this line, and not the entire symbol itself, and for a symbol that aligns to a line, it is the direction of this line which determines how to orient the symbol. For these reasons, it is very important that you are careful when placing this line. You may also consider using the various modifiers, like endpoint, to help you place it accurately.
[Image_8930]
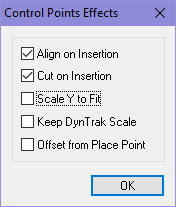
Once you have placed the control line, you will get a dialog popup asking you which control attributes to give the line: [Items in square brackets are examples from official ProFantasy symbols you can test]
- Align on Insertion: This will make the symbol align to any line in your drawing (such as a wall or road). This is especially useful for doors and houses, but also for furniture and other items which is supposed to be up against a wall. [DD3 Doors, CD3 House symbols]
- Cut on Insertion: This option will make the symbol cut away part of the line it is placed over. For example, a door might cut away the wall where it is placed, to make an obvious opening in the wall where the door is placed. [DD3 Doors and Windows]
- Scale Y to fit: This option scales the symbol along the Y-axis to fit the line it aligns to. This is great to have a symbol fit the width of any wall, it doesn't matter if the wall is thin or think, the symbol will resize to fit the width regardless. Do note however that the symbol only scales along the Y-axis, thereby distorting the symbol. This is fine for some symbols, but may not be appropriate for every symbol. Also, for this to work properly, the control point line should be a straight line along the x-axis of the symbol (note that the re-scaling thus happens perpendicular to the control points), otherwise you may get strange results.
- Keep DynTrak Scale: causes symbol to honor dynamic scaling/rotation performed during insertion into linear entities. Hold down the CTRL key during insertion to dynamically scale.
- Offset from Place Point: This option will ask you for an offset value after placing it. For example, if a house was aligned to a road, you don't want the house to end up in the middle of the road, so this option allows a symbol to first align to a line, and then offset it. As with most other values in CC3+, you can either offset the symbol visually using your mouse, or you can type in a value on the command line. [CD3 Houses, DD3 Torches]
If you have trouble getting such a symbol to work properly when placing it, make sure that you don't have snap on, as this can cause the symbol to not be placed exactly on your cursor, and also make sure there are no other conflicting lines to align to at the same location as you are placing your symbol. You may try to hide other sheets to make this easier if there are.
Example
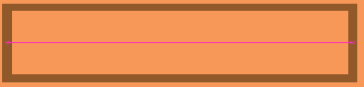
The below image shows a simple symbol. The control points are the pink line running through the middle. This particular symbol have align on insertion and cut on insertion turned on.[Image_8931]
This image show placement of the symbol. To the left is the successfully placed symbol, showing how it made a break in the wall. To the right in the image a symbol currently on the cursor can be seen, and how it automatically aligns to the wall.
[Image_8932]