

Command of the Week - Define Symbol (Week 26)
 Monsen
Administrator 🖼️ 82 images Cartographer
Monsen
Administrator 🖼️ 82 images Cartographer
Index
- List (Basic)
- Symbols Along (Intermediate)
- Fractalise (Intermediate)
- Edit Text (Basic)
- Link with Map/File (Intermediate)
- Offset (Intermediate)
- Measuring Tools (Basic)
- Change like draw tool (Basic)
- Modifiers (Intermediate)
- File Paths (Intermediate)
- Complex Shapes [Combine Path] (Intermediate)
- Complex Shapes [Multipoly] (Intermediate)
- Break (Intermediate)
- Map Notes (Basic)
- Coordinates (Intermediate)
- Macros (Advanced)
- Search Files for Text (Basic)
- Text Justification (Basic)
- Mirrored Polygons (Intermediate)
- Managing Drawing Tools (Intermediate)
- Named Views (Basic)
- Symbol Lookup Sheets (Intermediate)
- Symbol Catalog Settings (Advanced)
- Symbol Catalog Filters (Advanced)
- Symbol Control Points (Advanced)
- Define Symbol (Intermediate)
- Curves (Basic)
- Selections (Intermediate)
- Sort Symbols in Map (Basic)
- Extract Properties (Basic)
- Convert File (Basic)
- Get Extents (Advanced)
- Quick Move (Basic)
- Menu Editing (Advanced)
- Trace (Basic)
- Array Copy (Intermediate)
- Explode (Basic)
- Clipboard Copy (Basic)
- Rename & Reorder (Intermediate)
- Drawtools Edit (Basic)
- Trims (Basic)
- Symbol Attributes (Intermediate)
- Fill Style Selection Mask (Basic)
- Browse Files (Basic)
- Node Editing (Intermediate)
- Automatic Sheet Selection (Basic)
- Scale (Basic)
- Text along a Curve (Basic)
- Shaded Polygons (Intermediate)
- Fill with Symbols (Intermediate)
- Global Sun (Basic)
- Symbols in Area (Intermediate)
This series is called the command of the week, but it could also explain a feature. The explanations will tend to explain the technical parts of the command, and is intended to highlight the basics (and complexities) of the command, and information about how to use it, but won't be a detailed tutorial. It is up to you to use it creatively in your maps.
Week 26 - Define Symbol
Defining something as a symbol in CC3+ makes it easier to reuse, either in the same map, or a different map. Making your own symbols is one of the big ways to make CC3+ your own. To this end, let us look at the different ways you can define your own symbols. Note that in CC3+, we often separate raster symbols from vector symbols, but this is more a map style distinction than anything else, because raster and vector symbols are so different, they usually tend to clash visually if used in the same map, but from CC3+'s perspective, a symbol is a symbol. A raster symbol is just an symbol like any other, but it contains one or more image (PICTR2) entities.Where to find it?
Menu: Symbols -> Define Symbol, Symbols -> Import pngsCommand Line: DEFSYMD, DEFSYM, IMPORTPNGSYM
How to use it?
Let us check out the different ways of defining a symbolUsing the Dialog
[Image_8962]
Before defining your symbol, you need to draw it in your map. Basically, use CC3+'s various tools and draw your symbol just as any other drawing. If you wish, you can also use Draw->Insert File to insert a raster image to be used as part of your symbol. When drawing the symbol, note a couple of things:- Don't use effects in the symbol. The symbol will be exposed to whatever effects are set in the destination map, you cannot embed effects in the symbol itself, so it shouldn't rely on effects to define it's appearance
- Only use a single sheet for all the entities in your symbols (multi-sheet symbols are possible, but these need to be made in a special way)
- Avoid using fills in your symbol. Since the symbol will use the fills defined in the destination map, it will probably not have the same appearance when you place it, unless that fill style is already defined in the map. You may do this if you know the fill style used is always available in the template you base maps this symbols will be used in.
Once the symbol is ready, you can go to Symbols -> Define Symbol [DEFSYMD], select all the entities that make up your symbol, and Do It.
In the dialog that appears, there are a couple of settings:
- Bounding Box: This places a visible border around your symbol. In most cases, you don't want this, but enable it here if you do, and set the color.
- Name: Self-explanatory, but try to make it unique. A map can only contain one symbol of a given name, if you try to add another symbol using the same name as a symbol already in the map, CC3+ will just add another copy of the first symbol, even if you see the second symbol in the symbol catalog.
- Origin: The origin of the symbol is where it will be held at the mouse pointer when placing it. This is especially important for symbols that needs to be aligned to something, like a piece of furniture that is supposed to go up against a wall or similar. This is also the point that will be used when used together with modifiers like endpoint or intersections, and with snaps. Note that the dialog only offers 9 basic choices, for more control, check out the command line version below.
Using the Command Line
To use the command line version of this command, you need to make the symbol first, just like with the dialog above. All the same considerations for creating the symbol apply.Then, run the DEFSYM command. It will ask for the symbol name first, then for a symbol origin, and finally to select the entities that make up the symbol.
Now, why would you use this command over the dialog? Except for dialogs Vs command line is a bit of a personal preference, there is one important difference, you can define the origin point exactly where you need it to be. This allows for far greater flexibility, especially for symbols that have special considerations in regards to placement, such as Character Artist and Perspectives symbols. For some symbols, it is also very helpful to put the origin far away from the actual symbol.
Importing PNGs
[Image_8963]
The last way of defining symbols is by importing raster artwork in the form of .png files. This is done through the Symbols -> Import pngs [IMPORTPNGSYM] command. Executing this command presents you with the dialog that allows you to pick the folder where the source files lives.When importing PNG's, I recommend that you keep your original images in a separate folder, and enable the copy to folder option and create other resolutions. This creates the the various resolutions of the images you need, and put them in a separate folder. The destination folder should be somewhere inside the symbols subdirectory in your CC3+ data directory, such as @Symbols\User\SomeSymbols. I recommend using a separate directory for each set of symbols (symbol catalog) you import.
Also note that it is important to have the option set to make the directory relative to the CC3 path. (This text hasn't been updated for CC3+, but it do refer to the CC3+ data directory.) If your images aren't relative to the CC3+ data directory, it gets really cimbersome when you wish to distribute them or copy them to another computer. See the command of the week entry on File Paths for more information on this topic
Note that for the best result, the source images should be in what CC3+ calls "Very High (VH)" quality. The exact image sizes are listed below. Note that these sizes are listed in pixels per map unit, which means that if you are making an overland symbol (20 pixels/map unit) and it should be 5 map units across at the default symbol scale, it should be 100 pixels in size. For best performance, your original images should match these numbers as close as possible, higher isn't necessarily better.
Overland - 20 pixels/map unit (miles/km)
City - 40 pixels/map unit (feet/meter)
Dungeon/floorplan - 100 pixels/map unit (feet/meter)
Character Artist - 500 pixels/map unit (feet/meter)
Perspectives - 60-120 pixels/map unit (feet/meter)
For the resulting symbols to be scaled properly, it is important to input the correct value for your symbols in the highest resolution input field. If your images do not match the recommended value, it is important that you use the correct values for your symbols. Also note that you should choose the files are Very High option (Unless your source images aren't in the very high quality of course, if so, you can start with high instead, and only let CC3+ have 3 different resolutions.
You may also note that the options for origin here are still limited to the 9 default values. While you can definately use the DEFSYM command to create raster symbols too (as we discussed above, you can use Draw->Insert file and insert an image, then define the symbol), this is cumbersome since it can't import a whole folder of symbols, nor can it automatically create the different resolutions for you. Instead, if you have special needs in regards to the origin, just import the symbols, then open up the symbol manager, select the symbol, hit edit, define the edit window, and finally do a view -> move origin, and position the origin where you need to in the symbol.
Creating a symbol catalog
No matter which of the above commands you used, the symbol will be imported as a definition in the current drawing. To put them in a separate symbol catalog which you can later load into any map and use, simply open up the symbol manager, select the symbols you wish to be in the new catalog, then hit the Save as Catalog button. then store this catalog somewhere convenient (Usually somewhere inside the @Symbols directory, and if used with raster images, it is customary to have the images in a subfolder which is located int he same folder as the symbol catalog file. This makes it easy to redistribute, just copy (or zip up) the symbol catalog file and the accompanying subdirectory, and you have everything you need.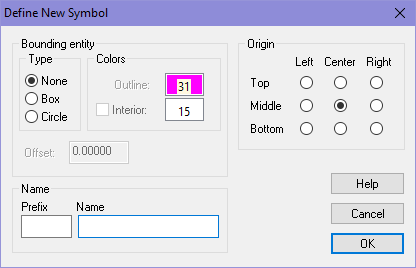

Comments
Making symbols is fun