Command of the Week - Complex Shapes [Part 1] (Week 11)
 Monsen
Administrator 🖼️ 82 images Cartographer
Index
- List (Basic)
- Symbols Along (Intermediate)
- Fractalise (Intermediate)
- Edit Text (Basic)
- Link with Map/File (Intermediate)
- Offset (Intermediate)
- Measuring Tools (Basic)
- Change like draw tool (Basic)
- Modifiers (Intermediate)
- File Paths (Intermediate)
- Complex Shapes [Combine Path] (Intermediate)
- Complex Shapes [Multipoly] (Intermediate)
- Break (Intermediate)
- Map Notes (Basic)
- Coordinates (Intermediate)
- Macros (Advanced)
- Search Files for Text (Basic)
- Text Justification (Basic)
- Mirrored Polygons (Intermediate)
- Managing Drawing Tools (Intermediate)
- Named Views (Basic)
- Symbol Lookup Sheets (Intermediate)
- Symbol Catalog Settings (Advanced)
- Symbol Catalog Filters (Advanced)
- Symbol Control Points (Advanced)
- Define Symbol (Intermediate)
- Curves (Basic)
- Selections (Intermediate)
- Sort Symbols in Map (Basic)
- Extract Properties (Basic)
- Convert File (Basic)
- Get Extents (Advanced)
- Quick Move (Basic)
- Menu Editing (Advanced)
- Trace (Basic)
- Array Copy (Intermediate)
- Explode (Basic)
- Clipboard Copy (Basic)
- Rename & Reorder (Intermediate)
- Drawtools Edit (Basic)
- Trims (Basic)
- Symbol Attributes (Intermediate)
- Fill Style Selection Mask (Basic)
- Browse Files (Basic)
- Node Editing (Intermediate)
- Automatic Sheet Selection (Basic)
- Scale (Basic)
- Text along a Curve (Basic)
- Shaded Polygons (Intermediate)
- Fill with Symbols (Intermediate)
- Global Sun (Basic)
- Symbols in Area (Intermediate)
This series is called the command of the week, but it could also explain a feature. The explanations will tend to explain the technical parts of the command, and is intended to highlight the basics (and complexities) of the command, and information about how to use it, but won't be a detailed tutorial. It is up to you to use it creatively in your maps.
Week 11 - Complex Shapes - Combine Path
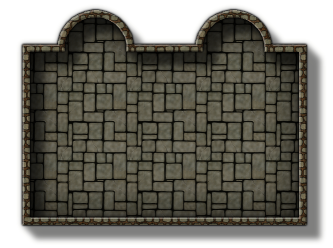
CC3+ has tools for drawing various basic shapes, like rectangles, circles and polygons. While the polygon does allow for a lot of possibilities, it still have it's limits. How can you draw a dungeon room with rounded alcoves for example? The solution is to combine multiple shapes into a more complex shape. In this week's installation, I will look at how to combine paths using the combine paths command to make shapes such as this. There is also another tool, Multipoly, which is great for a different class of complex shape. I will deal with that command next week.The main focus of this installment is to explain the Combine Paths command, but we will also touch upon Line to Path and Path to Poly which are used together with this command
Where to find it?
Toolbar: Right click -> Combine Paths, Line to Path, Path to PolyMenu: Edit Menu -> Transform -> Combine Paths
Command Line: CMB, LTP2, CLOSEPATH
How to use it?
I'll describe this command through a mini-tutorial. Here we will be making a rectangular dungeon room with two circular alcoves.- Start by setting the properties you want your shape to have. I'm starting with the floor, so I set line width to 0 and fill to Flagstone G Bitmap (From DD3) and sheet to FLOORS
- Use tools like Path and Arc to draw the outline of the room using whatever tool is best for the current segment. I recommend using the endpoint modifier to start the next segment at the exact point the previous one ended, but it is not an absolute requirement. You may also skip the final straight line that would close the shape. Not that at this step, you will be drawing everything with very thin lines. In my image below I've used a separate color for each line segment just to visually separate them for the tutorial, you don't want to do that when you make this yourself.
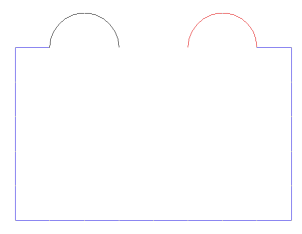
- Use Line to Path to each of the two arcs. This is necessary because arcs are not paths and cannot be combined with other paths, so we need to convert them first. Doing this will cause them to change the fill to the currently selected fill and color, but if you've been using the same fill all the way, the visual difference when converting them will be minimal, but you can use the list command on them to check that they are entities of type "2D Path" and not "2D Arc".
- Start the Combine Paths command. This will ask you to select the first path and then the second path. Once both paths have been selected, the command prompt should read
Select Next Path/[Finish] Flip Selection ('F' - First, 'S' - Second). It should also show the result visually on the screen. Now, if nothing looks different, then everything is ok, but if you see an addition line that wasn't there before, it means that the Combine Paths command tried to connect the wrong ends of the paths. (It will always try to connect the end of the first path to the start of the second path. These ends are determined by the direction you drew these paths initially, not by the fact that they connect at a certain spot). You can press the F and S keys to flip the direction of the first and/or second path around (You may need to flip one of them or both) until the figure looks right (no extra lines you didn't put there).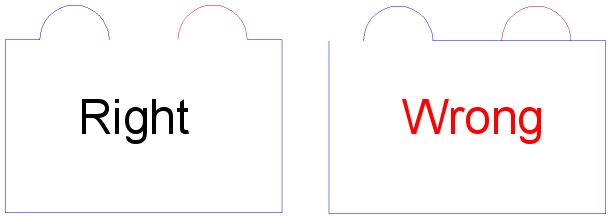
- Once you are happy with how the first two sections combine, click on the third section to combine it with the first two. Again, use F and S as required to flip the paths.
- Once done, right click to finish the command. You can now use list to confirm that the the three entities are now a single entity.
- Now, all you need to do is to convert this path to a polygon. Use Path to Poly on it, and it will close up and turn into a filled polygon (assuming your line width was set to 0, otherwise it will still be hollow).
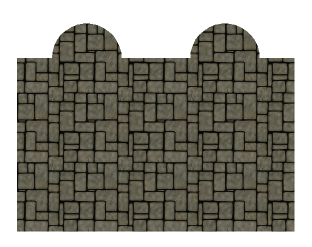
- For a dungeon room, you'll probably want matching walls. This is simple. Just copy our new entity to the WALLS sheet. Now, use change properties, and select by Prior, as this will select our copy. In the dialog, set line width to 1 and use a proper wall fill, like Stonework Cobble


Comments