Command of the Week - Complex Shapes [Part 2] (Week 12)
 Monsen
Administrator 🖼️ 82 images Cartographer
Monsen
Administrator 🖼️ 82 images Cartographer
Index
- List (Basic)
- Symbols Along (Intermediate)
- Fractalise (Intermediate)
- Edit Text (Basic)
- Link with Map/File (Intermediate)
- Offset (Intermediate)
- Measuring Tools (Basic)
- Change like draw tool (Basic)
- Modifiers (Intermediate)
- File Paths (Intermediate)
- Complex Shapes [Combine Path] (Intermediate)
- Complex Shapes [Multipoly] (Intermediate)
- Break (Intermediate)
- Map Notes (Basic)
- Coordinates (Intermediate)
- Macros (Advanced)
- Search Files for Text (Basic)
- Text Justification (Basic)
- Mirrored Polygons (Intermediate)
- Managing Drawing Tools (Intermediate)
- Named Views (Basic)
- Symbol Lookup Sheets (Intermediate)
- Symbol Catalog Settings (Advanced)
- Symbol Catalog Filters (Advanced)
- Symbol Control Points (Advanced)
- Define Symbol (Intermediate)
- Curves (Basic)
- Selections (Intermediate)
- Sort Symbols in Map (Basic)
- Extract Properties (Basic)
- Convert File (Basic)
- Get Extents (Advanced)
- Quick Move (Basic)
- Menu Editing (Advanced)
- Trace (Basic)
- Array Copy (Intermediate)
- Explode (Basic)
- Clipboard Copy (Basic)
- Rename & Reorder (Intermediate)
- Drawtools Edit (Basic)
- Trims (Basic)
- Symbol Attributes (Intermediate)
- Fill Style Selection Mask (Basic)
- Browse Files (Basic)
- Node Editing (Intermediate)
- Automatic Sheet Selection (Basic)
- Scale (Basic)
- Text along a Curve (Basic)
- Shaded Polygons (Intermediate)
- Fill with Symbols (Intermediate)
- Global Sun (Basic)
- Symbols in Area (Intermediate)
This series is called the command of the week, but it could also explain a feature. The explanations will tend to explain the technical parts of the command, and is intended to highlight the basics (and complexities) of the command, and information about how to use it, but won't be a detailed tutorial. It is up to you to use it creatively in your maps.
Week 12 - Complex Shapes - Multipolies
Last week, I dealt with the Combine Paths command, which can be used to combine multiple paths into a single polygon. This week, I will look at another way of combining shapes, the Multipoly comand. This command can be used to accomplish similar things as we did with combine paths, but it can also be used to make holes in shapes, something we cannot do with regular polygons (even when combined manually).However, while multipoly is great, it is also worth noting immediately that it has it's downsides. First of all, once you make a multipoly, you cannot edit the shape anymore without disassembling the multipoly first, edit the components, and then re-assemble it. Also, improper use of multipolies can create weird artifacts.
There are different scenarios when you should just multipolies and when you should combine paths. One of the main differences that is important to consider is how the entities will be joined. When we use combined paths, everything is joined into a single path/polygon, and if there were any gaps between our original entites, combine paths will add the missing line segments to close any such gaps, always creating a single, whole, entity. Multipoly on the other hand preserves any such gaps. This means that if you wish to use multipoly to make a floor like we did in last weeks tutorial, it is even more important to accurately place everything, or we will see gaps where the different polygons are joined. Furthermore, wherever two entities overlap, multipoly creates a hole (this is how we use multipoly to make holes in shapes), but this also means that one entity cannot extend slightly behind another either, because that would result in a gap.
Where to find it?
Toolbar: [Image_8104]Command Line: MPOLY2
How to use it?
A multipoly is basically just a way of grouping entites, but with a special consideration to how this group of entities is rendered on screen. You can at any time dismantle the multipoly (use explode on it) to return to the basic entities, modify these, and then put the multipoly back together. As such, it is not a destructive command.The most basic way to use a multipoly is simply to activate the command, select two or more entities, and then Do It as usual. This joins them together in a multipoly grouping. If there are any overlaps between two entities, this will result in a hole, but three entities overlapping would leave a visible surface (basically, even number of entities in a spot leaves a hole, odd number leaves a surface).
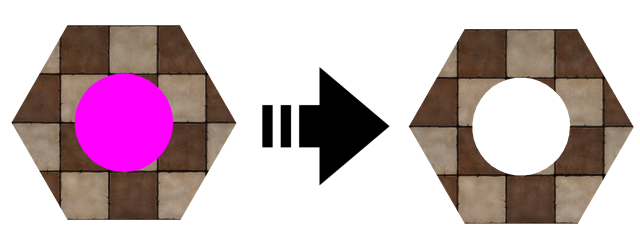
The image below shows how to make a dungeon floor with a hole in it
[Image_7985]
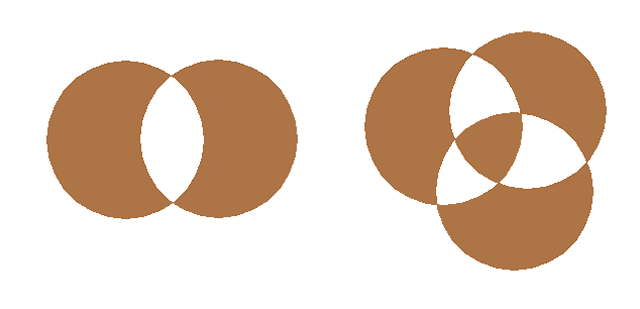
This example shows how overlaps looks. In the first example, two circles overlap, creating a hole, the second shows three circles overlapping, showing how holes appear where any two of the overlap, but the area where all three overlap is a solid surface. From this example you should also easily be able to see that if you wish to add a half-circle extension to a room, you need to use an actual half circle, you cannot just stick a full circle under a floor and extend it halfway out, the part under the floor would create a hole.
[Image_7986]
Multipolies and Fill Styles (and other properties)
A multipoly can only have one set of properties. So you cannot make a multipoly where one of the entities have one fill style. and the other entity another. When you make them into a multipoly, they will all have the same properties. This affects fill style, line width, color, sheet and layer, to mention the most used properties. When you turn entities into multipolies, the multipoly will take on the current properties (as set on the properties bar), and not the individual properties of any one entity. So, before executing the multipoly command, make sure to set your desired properties (If your entities already have the desired properties, use KEEP on one of them to set the current properties easily.). If you forget to do this before executing the command, you'll probably see your entity suddenly change visual style. Of course, you can always use Change Properties on the multipoly to fix this after creating it.It is worth noting that the properties for the entities that make up the multipoly is preserved, so when you explode the multipoly, all the entities return to the whatever they looked like before creating the multipoly. This also means that any customization of properties you did on the multipoly is lost when you explode it.