

Command of the Week - Automatic Sheets for Symbols and Drawing Tools (Week 46)
 Monsen
Administrator 🖼️ 82 images Cartographer
Monsen
Administrator 🖼️ 82 images Cartographer
Index
- List (Basic)
- Symbols Along (Intermediate)
- Fractalise (Intermediate)
- Edit Text (Basic)
- Link with Map/File (Intermediate)
- Offset (Intermediate)
- Measuring Tools (Basic)
- Change like draw tool (Basic)
- Modifiers (Intermediate)
- File Paths (Intermediate)
- Complex Shapes [Combine Path] (Intermediate)
- Complex Shapes [Multipoly] (Intermediate)
- Break (Intermediate)
- Map Notes (Basic)
- Coordinates (Intermediate)
- Macros (Advanced)
- Search Files for Text (Basic)
- Text Justification (Basic)
- Mirrored Polygons (Intermediate)
- Managing Drawing Tools (Intermediate)
- Named Views (Basic)
- Symbol Lookup Sheets (Intermediate)
- Symbol Catalog Settings (Advanced)
- Symbol Catalog Filters (Advanced)
- Symbol Control Points (Advanced)
- Define Symbol (Intermediate)
- Curves (Basic)
- Selections (Intermediate)
- Sort Symbols in Map (Basic)
- Extract Properties (Basic)
- Convert File (Basic)
- Get Extents (Advanced)
- Quick Move (Basic)
- Menu Editing (Advanced)
- Trace (Basic)
- Array Copy (Intermediate)
- Explode (Basic)
- Clipboard Copy (Basic)
- Rename & Reorder (Intermediate)
- Drawtools Edit (Basic)
- Trims (Basic)
- Symbol Attributes (Intermediate)
- Fill Style Selection Mask (Basic)
- Browse Files (Basic)
- Node Editing (Intermediate)
- Automatic Sheet Selection (Basic)
- Scale (Basic)
- Text along a Curve (Basic)
- Shaded Polygons (Intermediate)
- Fill with Symbols (Intermediate)
- Global Sun (Basic)
- Symbols in Area (Intermediate)
This series is called the command of the week, but it could also explain a feature. The explanations will tend to explain the technical parts of the command, and is intended to highlight the basics (and complexities) of the command, and information about how to use it, but won't be a detailed tutorial. It is up to you to use it creatively in your maps.
Week 46 - Automatic Sheets for Symbols and Drawing Tools
One very useful feature of CC3+, but also sometimes confusing to newcomers, and sometimes also frustrating is the way CC3+ automatically places certain entities on the specific sheets. This feature means that in most cases, everything will end up on the sheet it is supposed to be on, even if this sheet is not the currently selected one. However, this also means that if you want to place entities on other sheets than the automatically assigned one, you must understand this behavior, and know how to handle it in the most efficient manner. I know some people have just disabled this feature all together, possibly because they felt CC3+ always placing everything on the wrong sheet in relation to where they wanted it to go, but I strongly recommend learning to use this feature properly instead, and work with it instead of against it, because it greatly simplifies the mapping process.The automatic assignment to sheet happens for symbols and drawing tools. Everything else will simply use the current sheet.
Where to find it?
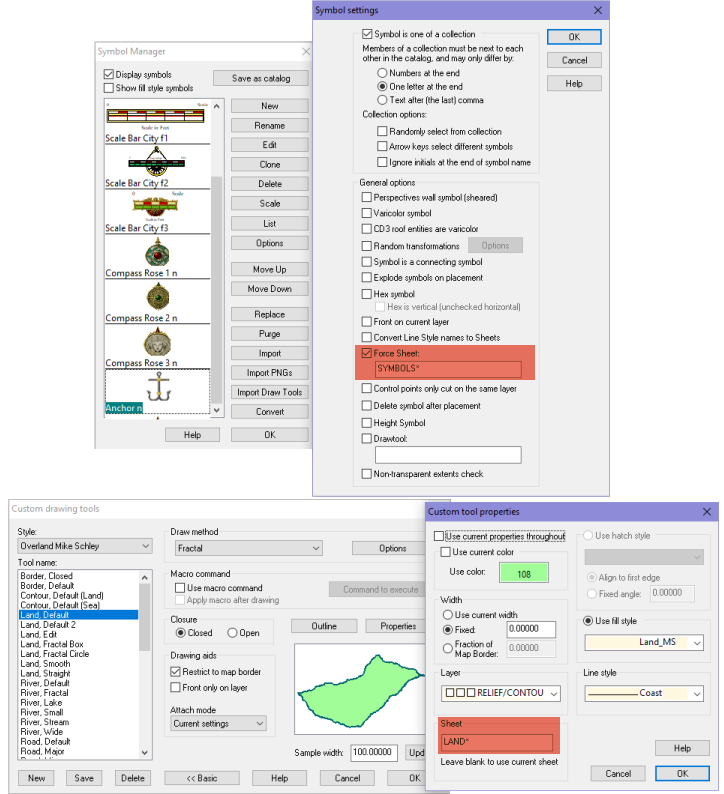
For symbols, you can check this setting for any individual symbol by opening the symbol manager (from the symbols menu), select a symbol, then hit Options. There will be an option called 'Force Sheet' which is enabled for most symbols, and most symbols will have the setting "SYMBOLS*'"here, although some types of symbols have other values.For drawing tools, click the All Drawing tools button, then hit the Advanced button, select any tool from the list, and hit Properties. There is a text field (usually) containing a sheet name here, such as "LAND*". If the drawing tool consists of two entities, the extra entity may also have this setting (The "Outline" button).
How to use it?
While symbols and drawing tools are two very different things, the automatic sheet selection behaves the same way with either feature.The most basic premise of this feature is that no matter what your current sheet is, when using a symbol or tool, CC3+ will place the entity on the sheet defined for that symbol or tool, and ignore your current sheet. Note that your current sheet will be temporarily changed while placing the entity, but it will revert back to your previously selected sheet immediately after you are done. This is extremely helpful, because it make sure that entities end up on the correct sheet automatically, without you having to manually manage this. For most maps, the defaults used make sense, and helps the mapping go faster and smoother, by both saving you from switching sheets back and forth, and also by preventing many simple mistakes.
However, notice that asterisk at the end of my sheet names from the examples ("SYMBOLS*" and "LAND*"). While this is present the behavior is a bit more flexible. Let us see what happens in various cases.
No asterisk at the end
Without an asterisk at the end, the sheet name is absolute and unconditional. If the sheet option is set to SYMBOLS, the entity will always end up on the SYMBOLS sheet, no matter what. If the SYMBOLS sheet doesn't exist, it is created (at the bottom of the sheet list). In the case of the sheet being created, that would also lead to our newly placed entity being on top of everything else (since the sheet will be drawn on top), but otherwise the entity placed would end up on the correct place int he drawing order according to the sheet (As usual, you may need to issue the Redraw command before new entities are arranged properly).An asterisk at the end
Once you have an asterisk at the end, the behavior will differ depending on the name of your current sheet. For this, let us assume that the option was set to "SYMBOLS*".- If you current sheet is SYMBOLS, the entity will be placed there
- If your current sheet starts with SYMBOLS (Like "SYMBOLS LOW", "SYMBOLS TERRAIN" and so on), it will use the current sheet instead.
- If your current sheet do not start with SYMBOLS, then it will always go to the sheet names exactly SYMBOLS (And not any sheet that simply starts with SYMBOLS)
- If your current sheet does not start with SYMBOLS and there are no sheet named exactly SYMBOLS in your drawing, a new sheet named SYMBOLS will be created (at the bottom of the sheet list) and the entity will be placed there, even if there were already sheets starting with SYMBOLS
How to use it efficiently?
The correct way to use this feature is to keep naming of additional sheets in mind. For example, if you have a map that covers two different floors in one map, and you wish the symbols from one floor to be on one sheet, and the symbols from the other floor to be on a different sheet, then name the sheets SYMBOLS FLOOR 1 and SYMBOLS FLOOR 2. This means that you can simply set SYMBOLS FLOOR 1 as the current sheet, and each time you place a symbol that goes to SYMBOLS*, it will go to the current sheet. If you had named the sheet FLOOR 1 SYMBOLS instead, you would find that CC3+ wouldn't place the symbols on that sheet, but rather on SYMBOLS instead, and you would need to turn off the automatic sheet feature to let symbols pick their own sheet, which quickly leads to symbols being placed on the wrong sheet later because the setting wasn't turned back on. Just remember that while most symbols are set to go to SYMBOLS* by default, not all are, for example in a dungeon, doors go to SYMBOLS WALLS*, so to continue with the example above, you might also need SYMBOLS WALLS FLOOR 1 and SYMBOLS WALLS FLOOR 2 in your drawing, and so on for other types of symbols that use different sheets by default. Drawing Tools are generally more diverse than symbols when it comes to which sheets they use, so it is important to understand the nature of each tool and symbol you use when planning sheets.Do note however that as long as the current sheet matches the sheet setting, the entities will go to that sheet, so you must make sure to change sheets manually when working within the set of sheets with matching naming.
Also, to take the most advantage of this feature, it is important that if you make your own tools or symbol catalog, that you remember to set the sheet settings for them. And likewise, it is very important that you use the actual symbol catalogs provided when inserting symbols and not browse to the source image files on disk. While the latter can be used just as easily as symbols, you miss out on all the properties set in the symbol catalog, of which the sheet option is but one.
How to turn off this feature?
While I do not recommend that you normally turn off this feature, because it is more helpful to learn to use it properly rather than just disable it, there are still times when you may need to turn it off temporarily. Just remember to turn it back on.For Symbols: Click the Options button above the symbol catalog and uncheck 'Symbols choose their own sheet'.
For Drawing Tools: Check the 'Insert on Current Sheet' checkbox near the top of the 'Select drawing tool' dialog.
Comments
To make additional tools like this, simply copy the existing ones and change the scaling in the second line of the macro. The font used will always be the currently set font in the text properties dialog.