Command of the Week - Clipboard Copy (Week 38)
 Monsen
Administrator 🖼️ 82 images Cartographer
Index
- List (Basic)
- Symbols Along (Intermediate)
- Fractalise (Intermediate)
- Edit Text (Basic)
- Link with Map/File (Intermediate)
- Offset (Intermediate)
- Measuring Tools (Basic)
- Change like draw tool (Basic)
- Modifiers (Intermediate)
- File Paths (Intermediate)
- Complex Shapes [Combine Path] (Intermediate)
- Complex Shapes [Multipoly] (Intermediate)
- Break (Intermediate)
- Map Notes (Basic)
- Coordinates (Intermediate)
- Macros (Advanced)
- Search Files for Text (Basic)
- Text Justification (Basic)
- Mirrored Polygons (Intermediate)
- Managing Drawing Tools (Intermediate)
- Named Views (Basic)
- Symbol Lookup Sheets (Intermediate)
- Symbol Catalog Settings (Advanced)
- Symbol Catalog Filters (Advanced)
- Symbol Control Points (Advanced)
- Define Symbol (Intermediate)
- Curves (Basic)
- Selections (Intermediate)
- Sort Symbols in Map (Basic)
- Extract Properties (Basic)
- Convert File (Basic)
- Get Extents (Advanced)
- Quick Move (Basic)
- Menu Editing (Advanced)
- Trace (Basic)
- Array Copy (Intermediate)
- Explode (Basic)
- Clipboard Copy (Basic)
- Rename & Reorder (Intermediate)
- Drawtools Edit (Basic)
- Trims (Basic)
- Symbol Attributes (Intermediate)
- Fill Style Selection Mask (Basic)
- Browse Files (Basic)
- Node Editing (Intermediate)
- Automatic Sheet Selection (Basic)
- Scale (Basic)
- Text along a Curve (Basic)
- Shaded Polygons (Intermediate)
- Fill with Symbols (Intermediate)
- Global Sun (Basic)
- Symbols in Area (Intermediate)
This series is called the command of the week, but it could also explain a feature. The explanations will tend to explain the technical parts of the command, and is intended to highlight the basics (and complexities) of the command, and information about how to use it, but won't be a detailed tutorial. It is up to you to use it creatively in your maps.
Week 38 - Clipboard Copy
Using the clipboard to make copies of things are the most common way of doing this in most programs. CC3+ however have multiple copy commands better suited to the task when we need to duplicate an entity in the same drawing, such as Copy in Drawing (Copy) [COP], Copy to Sheet [COPYSHT] and Copy to Visible Sheets [COPYVIS]. Similar commands also exists if you wish to move the entity instead of making a copy. These commands means we don't usually use the clipboard much in CC3+ (or if you are, you may want to rethink your approach), but there are a couple of situations where a clipboard copy is highly useful, such as when copying from one map to another, or copying to other programs.Be aware that even if CC3+ has the normal shortcut keys for cut/copy/paste (Ctrl+X, Ctrl+C, Ctrl+V), the command themselves still behaves the same way as other CC3+ commands, so make sure to keep an eye on the command line to complete the command properly. The most common mistake with this command is failing to complete all the steps. Watch the command line!
Where to Find it?
Menu: Edit -> Cut, Edit -> Copy, Edit -> PasteCommand Line: CLIPCUT, CLIPCOPY, CLIPINS
Shortcut Keys: Ctrl+X, Ctrl+C, Ctrl+V
How to use it?
There are two main scenarios when you wish to use the clipboard in CC3+; Copying to another drawing or copying to another program. I'll keep talking about copying here, but using cut is valid as well, and should provide the expected result, but the steps are identical to copy.Copying between maps
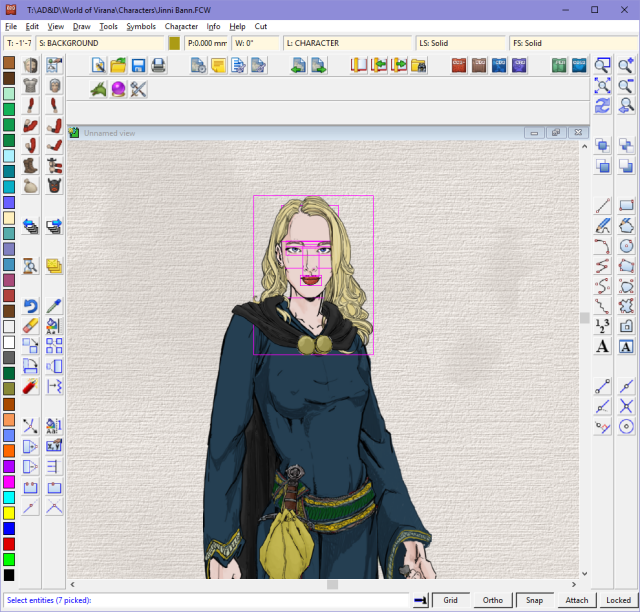
When you copy between maps, I recommend starting two instances of CC3+, and load up the two maps in question. You don't have to do this, the clipboard contents survive loading a new map in CC3+, but it can sometimes be an advantage to be able to see the source map while pasting to the destination map. For that reason, I usually involve two of my monitors in this, with one CC3+ window on each.When you start the copy command, CC3+ will ask you to select entities as usual, and end the selection with Do It. Note that just as with any other CC3+ command, you are selecting entities here, not an area of the screen. Even if you do a selection window rectangle, it will select the entities in the rectangle, not the exact rectangle itself, just as with any selection in CC3+.
After hitting Do It, the command line will read 'Clipboard Origin:'. What this prompts ask you to do is to define the origin point in your copy. Very often, this is irrelevant, but if you are going to do precise placement in the destination drawing, this is highly important. For example, if it needs to be in the exact same spot in the destination drawing as in the source, and the maps themselves are the same size (Say you are copying the walls of a house to a new drawing to detail the next floor), it is very helpful to set the clipboard origin to 0,0 (Use tools like snap, or the modifiers, or just type the numbers to get perfect precision), and then paste it to 0,0 in the destination. The result is that the entities you copied end up in the exact same place in the destination map. This is a trick I use often when I write tutorials, because I usually complete the map first, then I need to recreate it step by step for use in screenshots in the tutoraial, which I usually do by copying entities over from the finished map, and exact positioning is extremely important then if I want my screenshots to match the finished map. If you don't need exact positioning, just click somewhere in the middle of the area to get an origin in the approximate center. The entities will "hang" from the cursor at this point when pasting, so if you are not doing precision placement, approximate center is usually good.
Note that the reason many people have problems with the clipboard copy command is that they forget/ignore the clipboard origin step. Until you have done this, the command isn't complete, and nothing will be on the clipboard.
After selecting the origin, have some patience, CC3+ can take up to a couple of seconds before the entities have been copied to the clipboard. You'll notice that it's done when the selection disappears.
In the destination map, simply execute the paste command. This should put an outline of the copied entities on your cursor. You can simply click to place it, or if you need precision placement, type in the coordinates (such as 0,0 from my example above) or use assists like snap or modifiers. Note that you can place the entities multiple times, simply hit Esc when done. If you look at the command line, you'll notice that you can also use the Shift and Control keys to scale and rotate the entities before placing them. Because Ctrl is the scale key, which is also the shortcut modifier (in Ctrl +V), be very carefull that you do not move your mouse while you hit Ctrl+V (if you use the keyboard shortcut), as it is easy to inadvertently scale the entities while pasting.
I have experienced a couple of times that when you use the command that it doesn't insert anything, and the command line just reads Command [CLIPINS]. Usually, just try hitting paste again, but also make sure that you finished the copy command properly, as detailed above. If you get a message about the clipboard being empty, or you paste something old from the clipboard, you definitively didn't complete the copy command properly.
Note that copying entities will bring over the fill style definitions from the source map, which is required to display the copied entities properly.
Copying to external Programs
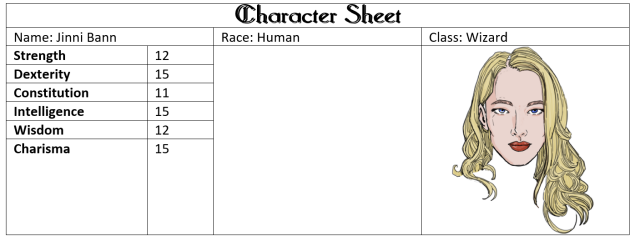
A less used feature of CC3+ is that you can actually copy entities to the clipboard, and then paste them into another program and the entities keep their visual looks. This is a very quick way to get part of your map into a text document or similar, without having to go through the process of exporting the map to a file, then inserting this file. It also has the advantage of only including the entities you selected, and not the entire map, while still keeping the look, including fill styles. The downside of this approach is that the quality is lower compared with what you can do with an export, and also that effects won't transfer over. Also, remember that entities are copied in their entirety. So, if you wish a nice rectangle cutout from the completed map, a rectangular export is better, but if you wish to copy a selection of entities, then clipboard copy can be nice.The copy procedure is exactly the same as outlined above, but the clipboard origin has no meaning when used this way. Do note that you still need to complete that step in the copy process though, but the point you chose won't mean anything.
[Image_9384]
[Image_9385]


Comments
Good stuff here Monsen.