
Raiko
Raiko
About
- Username
- Raiko
- Joined
- Visits
- 2,173
- Last Active
- Roles
- Member
- Points
- 535
- Birthday
- April 20, 1971
- Location
- Lancashire, UK
- Real Name
- Gary
- Rank
- Surveyor
- Badges
- 5
Latest Images

Reactions
-
Handling irregular shaped or "round" dungeons
Unfortunately, if you have unusual walls, you'll need to place the door and windows manually.
You can use the grid snap or the "on" modifier to help you position them exactly.
The cutting symbols won't work on curves either, so the best way to handle that is to add a color key effect to your WALL sheet - keep the default setting (which is magneta "colour 6" and 0% transparency), and move the color key effect to the top of the list on the WALL sheet.
Then draw a solid fill colour 6 rectangle on the WALLS sheet the same size as the door / window, this needs to be above the wall, not below.
The rectangle will act as a mask on the WALLS sheet, it won't appear itself and the wall beneath will vanish.
Then you can copy the door and the color key rectangle around the map. This gives the appearance of being a cutting symbol, without actually chopping up the walls, which is so much better that I never use the cutting versions of wall symbols anymore.
It the above doesn't make any sense, then I'll try to add some step by step screenshots, but I'm not on my PC at the moment.
-
CC3+ in Windows 11
My laptop that I use for mapping has been on Windows 11 for quite a while, as I was on a pre-beta Microsoft insider path (I can't remember what they call it).
It switched to Windows 11 without letting me know at first, as I'd not followed their dev blog! Lol
I've switched down to beta now, because they said a few weeks ago that there'd be some high-risk releases.
Anyway, I've not had any problems running CC3 on Windows 11 as far as I know, I've had occasional crashes, nearly always when doing something with colour key. I don't think that it would have been any more stable in Windows 10.


-
How would you create a fantasy port/harbour rpg battlemap?
Your jetties look good.
I've done some very battered wooden walkways and jetties recently in these maps (I need to post some finished maps in that thread!): https://forum.profantasy.com/discussion/10363/curse-of-the-crimson-crown-pathfinder-adventure-path
I did those by drawing lots of small rectangles aligned in the correct direction. Quick and it worked out better than I expected. I'm not sure how to link to a particular comment, so scroll down.")

-
WIP Commission, Ancient Tombs
@jmabbott, if you check the fill styles in the Ancient Tombs annual, there is a WALL_H fill and a WALL_V fill that allow you to create walls with aligned bricks without using the wall symbols. I did most of the walls for my Tomb of Akhentepi map using those fill styles - I'd already used the symbols for some of them, but as you say, its a little finicky manipulating them.
So just use those two fill styles and draw 1-foot wide rectangles for walls - they're indistinguishable from the wall symbols.
You can also use them for diagonal walls by using shaded polygons and the values from JdR's excellent shaded polygon guide:
https://jdr68.jimdofree.com/tutoriels-tutorials/cartographie-mapping/shaded-polygons-roofs-and-more/
I can't find a thread for that particular tutorial on the forum, so linked directly to Joachim's website.
-
WIP Commission, Ancient Tombs
Textures in CC3 always start to tile from an origin that is the top-left corner of the largest rectangle that could contain the entire entity - so for example a circle's texture origin is the top-left of a square the same size as the circle's diameter.jmabbott said:Where the semi-circular alcoves are I made 2 circles (inner & outer walls) with the circle tool , modified the default wall tool to be a polygon rather than rectangle and traced the circles. Then I just made 1 circle with the floor bitmap of appropriate size , placed and copied it. You can tell if you have a really good look. This will therefore be an area that gets some pretty floor patterns...?
If you want to tidy up misaligned or mismatched textures, the easiest way is using multipolies.
Creating a single multipoly that includes both curves and paths / lines is one of the most painful things you can do in CC3 as the direction of paths / arcs is critical, and unlike combining selections in PS / GIMP overlaps create voids.
So the easy way to do it is to draw a small square right in the top left hand corner of your map and multipoly that square with the straight edged parts of your dungeon.
Then draw a second identical square in exactly the same place, and multipoly that square with all the curved parts of the dungeon. Use "select prior" to easily select the second square, or click both and then deselect the first multipoly by unselecting the straight edged area.
Both multipolies will then tile from the same origin and the textures will exactly align.
You can place this square outside your main mapping area, underneath the border or concealed by a mask sheet to stop it being visible. Or you can use a "point" rather than a square. Either way it just needs to be in the top left of the map and aligned with the grid if you want your texture to be grid aligned (eg if using a tiled floor as a dungeon grid.
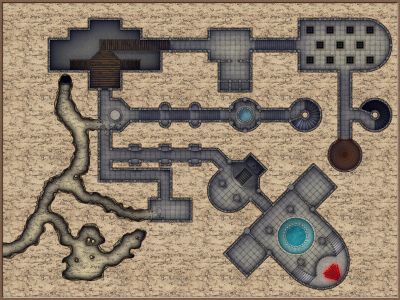
In the image below, there are two square tiles in the top corner. One is part of a multipoly with the upper rectangle, the other is multipolied with two circles. The textures are therefore aligned, and so the overlap is invisible.
Note that the bottom rectangle is not part of either multipoly and the texture of its top left corner is identical to the square in the corner, as the origin of that particular texture is the corner of the rectangle
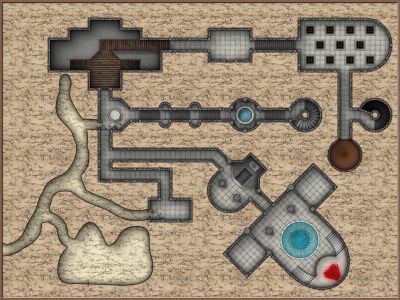
Here is the same 'map' without using multipolies, note that the overlapping circles are now visible and that both rectangles now have identical top left corners.