Loopysue
Loopysue
About
- Username
- Loopysue
- Joined
- Visits
- 10,415
- Last Active
- Roles
- Member, ProFantasy
- Points
- 10,161
- Birthday
- June 29, 1966
- Location
- Dorset, England, UK
- Real Name
- Sue Daniel (aka 'Mouse')
- Rank
- Cartographer
- Badges
- 27
Latest Images


-
A couple maps
Well... maybe, on the font size.
It's bit hard to tell when the map is so small in all that white.
If you want to get rid of it and get the maximum map for the minimum MB, try using the "JPEG Bitmap file" save as type, and making your settings a bit like this:
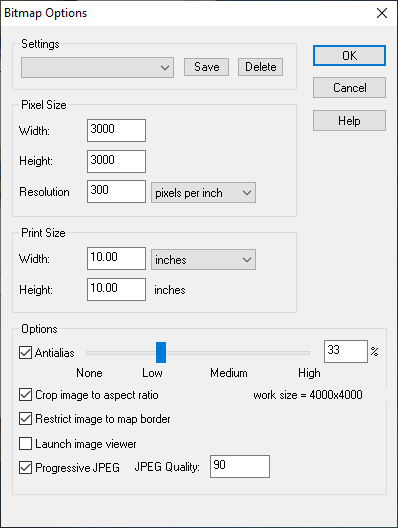
The area of the map is then automatically rendered within the map border, and trimmed on the short side so that the long side is 3000 px.

-
WIP: Egyptian Floral Motif Column
The stone I've made isn't great, but I've done a wood texture I'm pretty pleased with, and which I can use to make things like wrecks (eventually). This is the best one I've done - combining things from 3 separate tuts by different people. They all think they have the best way of making wood, but it depends really on the scale and the application. Don't let this frighten you! It's not as complicated as it looks. I just had to squish all the nodes together so you could see what was there and the settings.
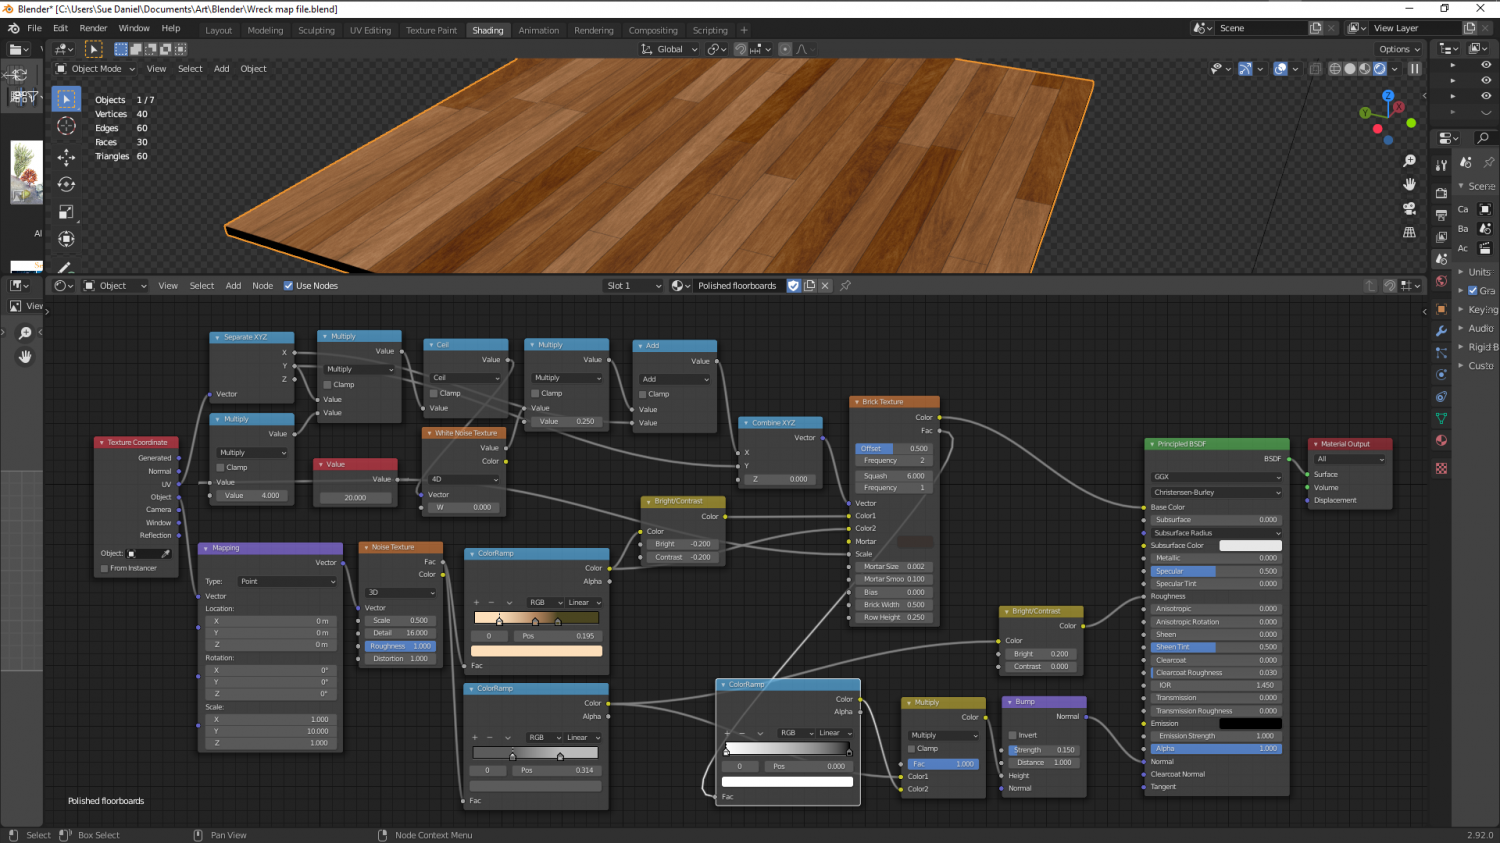
Most 'procedural' stone isn't procedural at all, but uses bitmap textures applied procedurally. Stone is a lot more simple than wood, which requires planks and a direction, and random variation of tone.
Still working on a true procedural stone...


-
Winter Village style development (March 2022 CA issue)
I've changed the dormers for you, Wyvern :)
These appear only on the larger houses in the set - the richer merchant style houses. I'm just testing them on the only tiled house I've made so far, which is the smallest one.


-
Scaling when Import new Bitmap
Hi Brandor :)
Nearly all fills are scaled, so importing them without a scale will cause a lot of hard work because if you don't scale them on import you will end up having to scale them individually by hand using the Fill Style Properties dialog.
This tile (below) is designed to cover 20 square feet, so it has a scale of 20 in this imperial map.
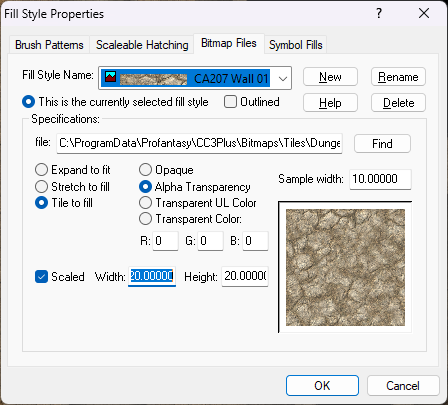
It's probably best to scale them all on import to the scale that most of the tiles will require, and then adjust the scale of any fills that need to be a different scale to the rest.
As I indicated above with my example fill, what scale to give your tiles will depend on how much area you think each tile should cover. For example, if you are importing a tile into a metric map that you know should cover 3 square metres then give it a scale of 3. If you are importing the very same fill into an imperial map give it the equivalent scale in feet.


-
New Mouse
Wouldn't it be interesting to have a 'click counter' app for the mouse so we could see how many were actually involved in making a map.

-
Live Mapping: Mercator Historical
Hi Everyone :)
In this week's Live Mapping session Ralf will be creating a map in the Mercator Historical style, which was the very first issue of the very first Cartographer's Annual 15 years ago now.
Come along and join in the fun! :)

![[Deleted User]](https://secure.gravatar.com/avatar/c75d9a245b74d9c59be0999ea81ca541/?default=https%3A%2F%2Fvanillicon.com%2F92add7f8c954488718110edc4896ad39_200.png&rating=g&size=200)
-
I don't see the Mike Schley elven symbols in my downloads.
@Quenten - First, download the content from the files that come up when you log into your user account and click the Downloads tab. They are under your CC3+ registration.
When you install them and allow CC3 to start up at the end of the process you will see that they have been incorporated into the Structures catalogue for the style, which means they will have been added to the Structures folder (if you are looking for the actual png location). You don't need to do anything or modify the catalogues. All that is done for you.
-
The Creepy Crypt project
Thanks all! :D
Some useful ideas there.
Here is the rapidly growing poll list from the FB Group page so you can see all the other suggestions too.
-
Live Mapping: Using FT3+ continents in CC3+
Hi everyone! :D
Following from some ideas in last week's live mapping session, Ralf will be looking at using Fractal Terrains-generated material in CC3+ overland styles in tomorrow's live mapping session.
Come along and join in the chat here:
https://www.youtube.com/watch?v=iqW-kQ7cC60
Or watch it here if you prefer, though there's no live chat on the forum.


-
Creating greater depth
I think you are doing well with the contouring. It does take some time and patience to get it right. Roads are a tricky one. I did a city a long time ago and cheated a little bit by using 6 or 7 tiers a bit like a disorganised wedding cake. That way each tier cast a shadow where necessary over the roads and houses on the tiers below.