


Wyvern
Wyvern
About
- Username
- Wyvern
- Joined
- Visits
- 3,266
- Last Active
- Roles
- Member
- Points
- 5,584
- Rank
- Cartographer
- Badges
- 24
Latest Images
-
Community Atlas: Errynor Map 01 - The Cliff
With the new undersea symbols ready, finally I could begin constructing the first map. Logically, this was to be my original Map 1, at the top left corner of the Errynor map:
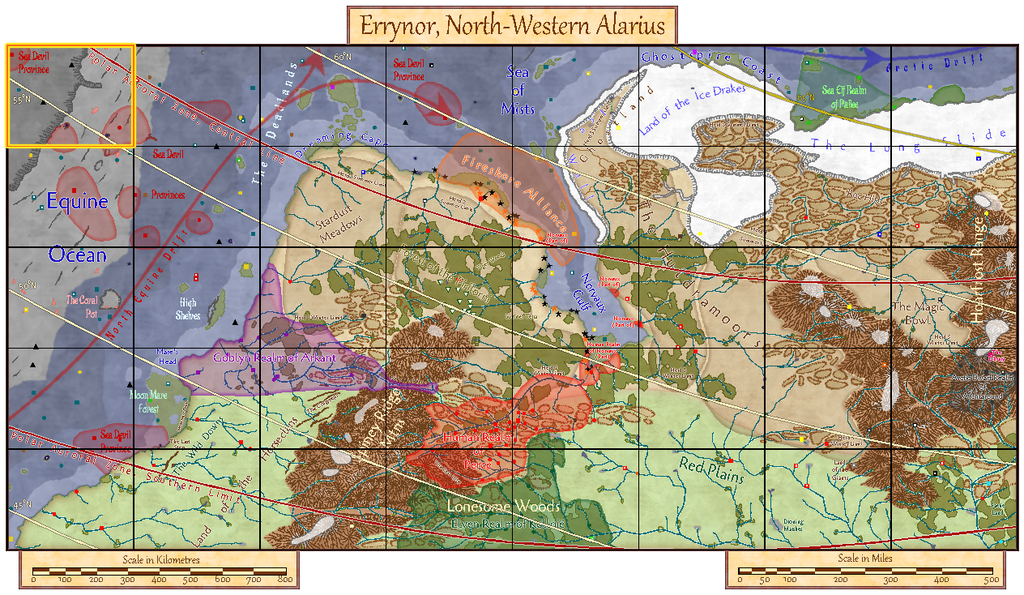
Clearly, the seabed was going to be the primary aspect here, with just two tiny islands above sea level, so that's where I began:
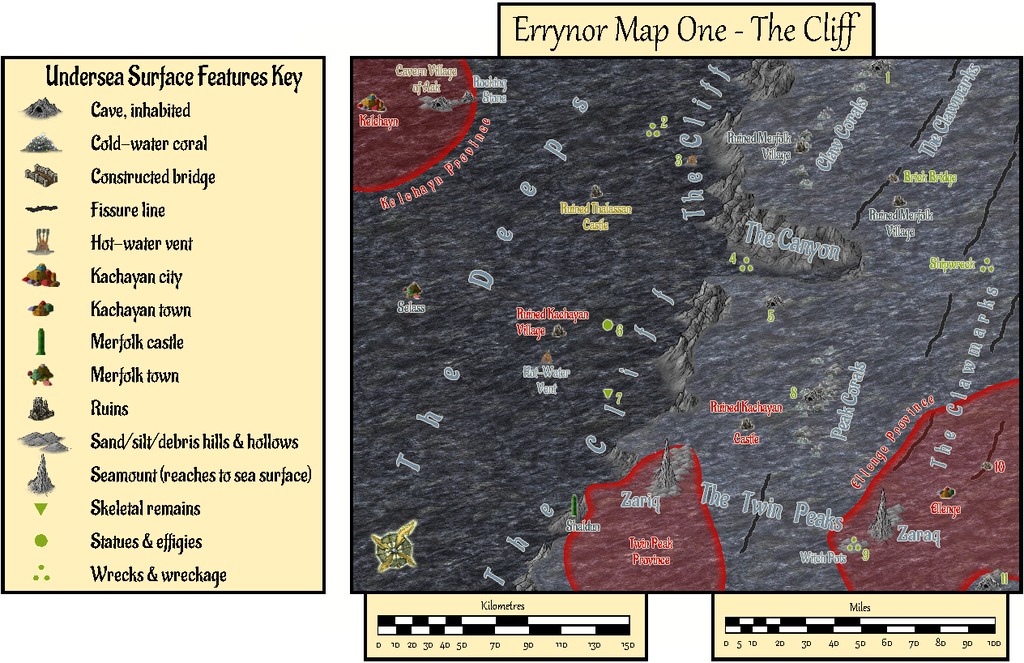
The tremendous cliff at the continental shelf edge is so dominant here, that had to become the map's name, while the relative sparsity of other undersea surface features had been a deliberate choice from the initial planning of the main Errynor map. What items are shown, are thus those more easily found by new travellers to the area, or those whose presence is more influential for whatever reason. This also reflects the apparent nature, as far as can be established, of Earth's own ocean floors. The shallowest seabed mapped here, towards the lower right corner, lies below some 300 m (nearly 1,000 ft) of seawater, for instance. It further fits with the idea of the relative smallness of the undersea intelligent populations in the region, compared with the vastness of Nibirum's oceans, as I'd envisaged them. There is the further advantage that plenty of space is available for GMs to add extra points of interest, should they wish.
The red-limned regions are Kachaya/Sea Devil provinces, incidentally.
I added a SOLAR/GEOMAGNETICS Layer overlay to show lines of latitude for each 1°, and the midline for Nibirum's polar auroral zone. This option should be available by a toggle for the Atlas version.
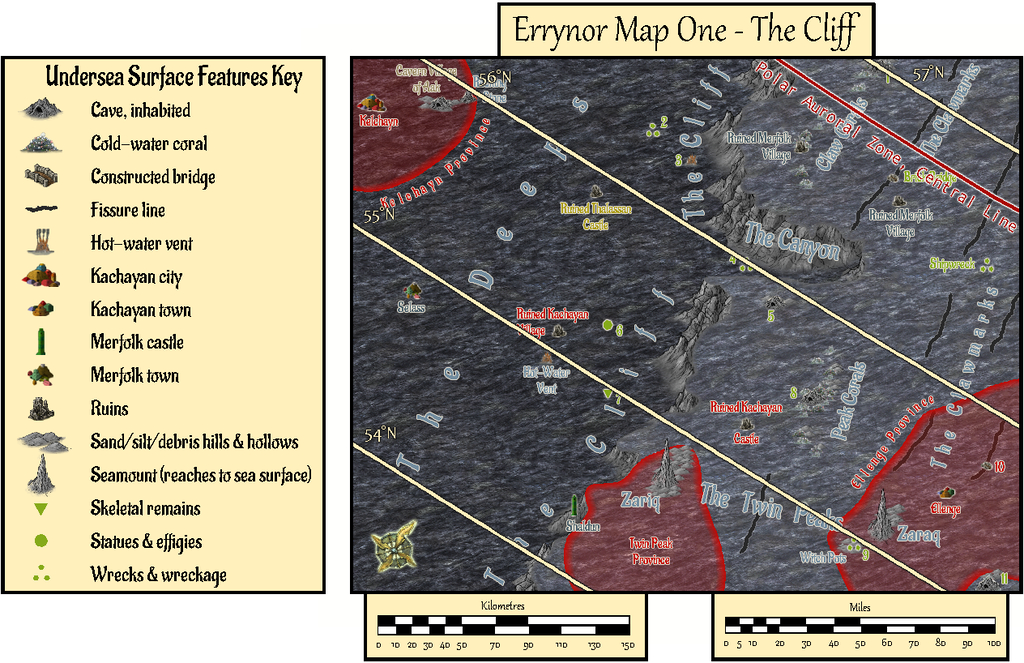
These 250 x 200 mile maps are small enough for the north direction to be fairly consistent across most of the area covered, so I'd been able to add a compass rose as well, which hadn't been possible for the main Errynor map.
When designing the hand-drawn paper maps at the start of this project, a selection of larger/more interesting/more dangerous creatures (and things, for the solid surface) that could be encountered had been randomly included. Many of the undersea types were free-swimming. For RPG use, it's naturally important to know where these are not merely for the sea and undersea land surfaces, but in the water column between too. Hence another map toggle, activating the UNDERSEA WATER COLUMN Layer, is intended to shift the view to that water column (it's best to turn off the TEXT, SURFACE UNDERSEA Sheet for clarity first):
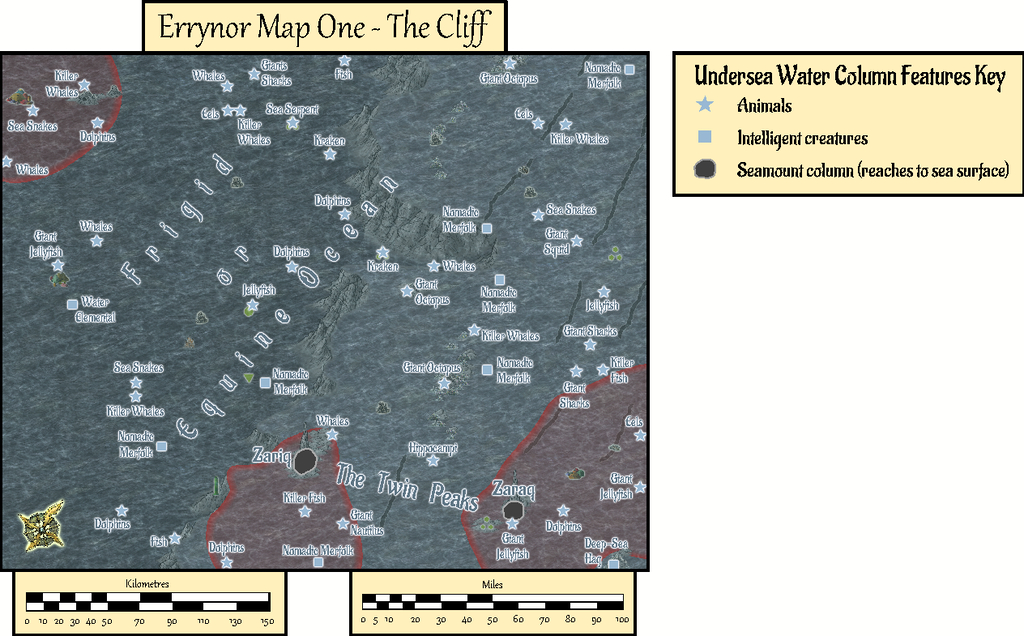
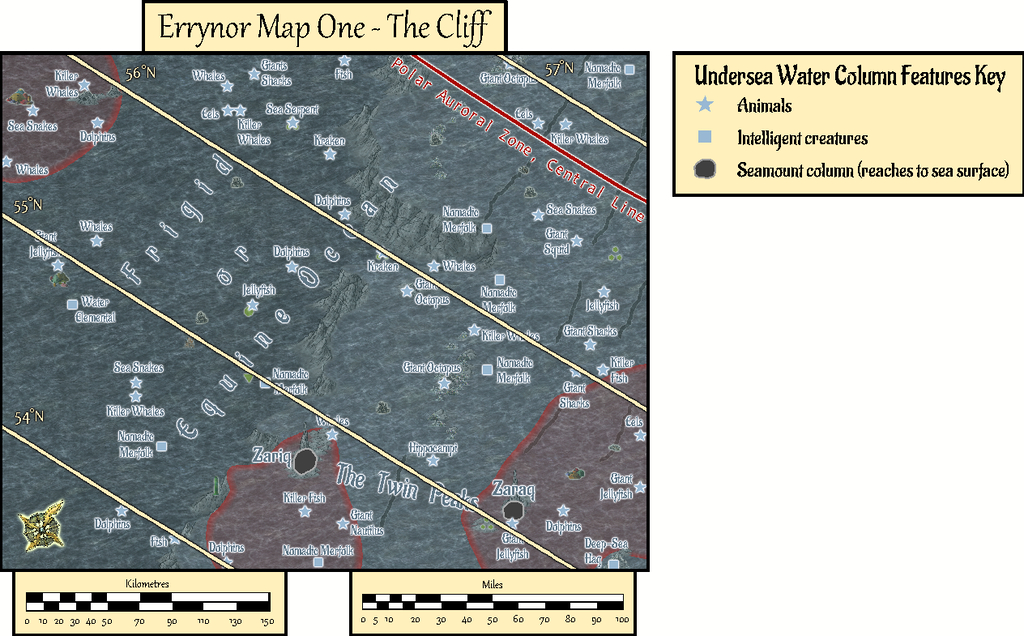
This view isn't at a fixed depth below the sea surface, simply to illustrate in general what can be found somewhere in the water column. Thus although the great seamount rock columns of Zariq and Zaraq have been given physical dimensions here, those are representative only. An 11-page PDF of the map's accompanying text-file notes explains this, together with detailing various of the other more noteworthy features shown.
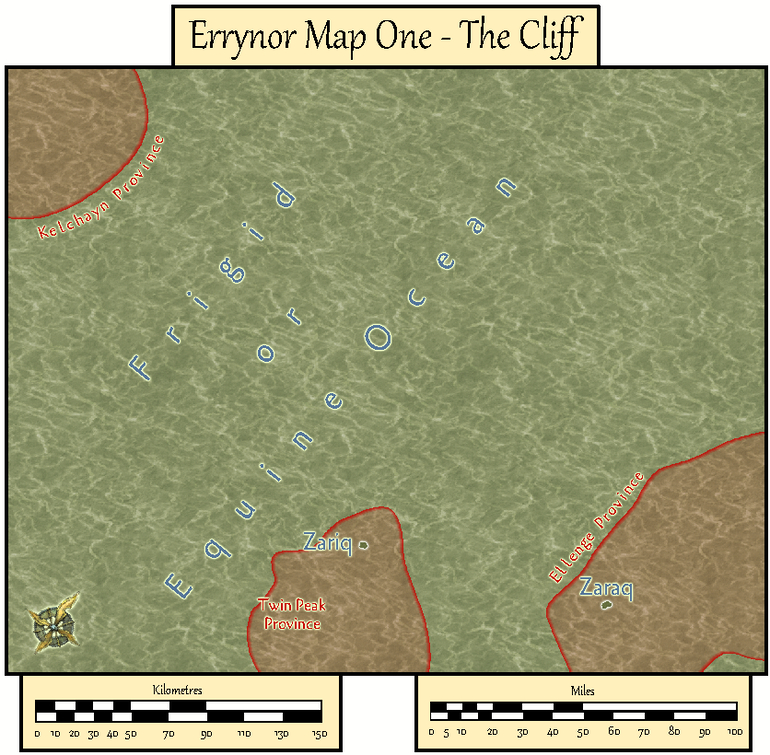
A third toggled view, turning on the COAST/SEA Layer, shifts us to the sea's surface, where the seamounts have become small islands, and the midwater denizens have been joined by several ghost ships and an area where floating wreckage collects from time to time:

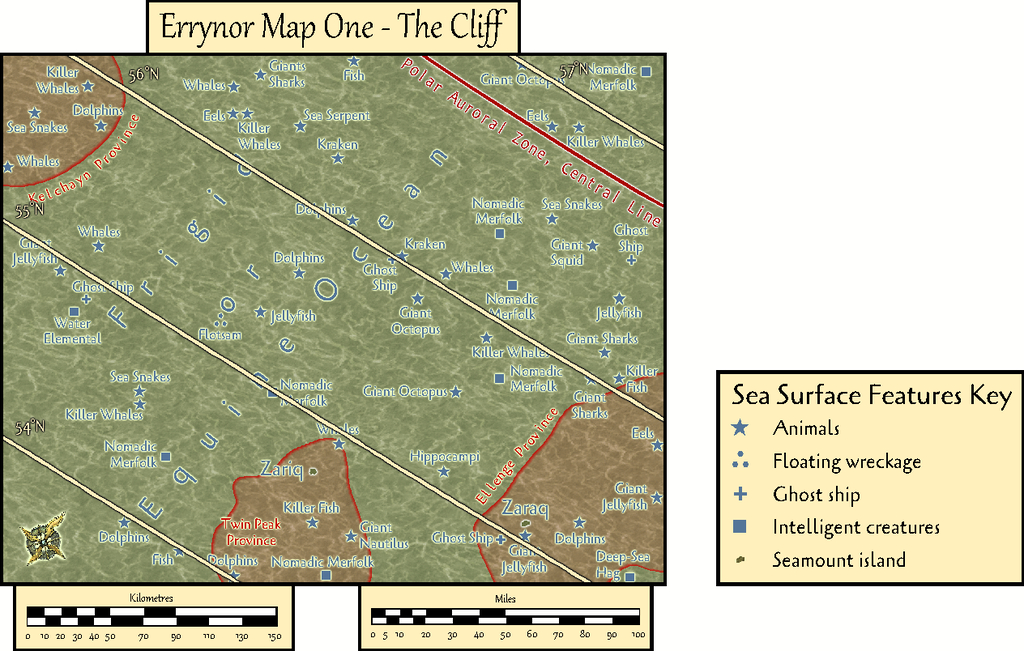
By turning off the SYMBOLS, SEA SURFACE Sheet, the paucity of sea surface features is very clearly seen!
GMs here may be unsurprised to learn I became distracted by some of possibilities of this map while drawing it into CC3+, as I've hinted in some of my more recent Forum posts here. Consequently, instead of progressing immediately to the next Errynor sub-map, I embarked on a group of feature maps from this one first. Plus, it also seemed unhelpful to not provide some guidance regarding the nature of the undersea features, especially the sea-bed settlements, for future mapping, as this is something scarcely touched-upon by published RPG settings and adventures. Thus this one map has become merely the first in a package of around twenty from this one area, which explains much of the delay in getting them ready for the Atlas, given I felt the whole group needed to be finished before any were submitted, in case changes were needed to those prepared earlier in the sequence - and that has happened along the way.
In fact the maps were prepared relatively quickly in each instance with CC3+. The most time-consuming aspect has been preparing and checking the detailed write-ups for them, as these are what has particularly allowed me to explore and expand upon ideas regarding fantasy undersea environments that I've been mulling over in part for decades.
Rather than drop the entire set on Monsen at once, my intention is for a gradual "release programme" with a new map or map-group only every few weeks. Maybe this will give me time too to complete more of the "Errynor 40" maps along the way, hopefully not taking quite so long each...


-
How long have you been using Campaign Cartographer?
Monsen asked: Do you remember why you went for the DOS version at that time?
To paraphrase from "The Simpsons" TV show, obviously...
"C:/DOS
"C:/DOS/RUN
"RUN/DOS/RUN"
😁


-
Community Atlas: Embra - Wooded Places
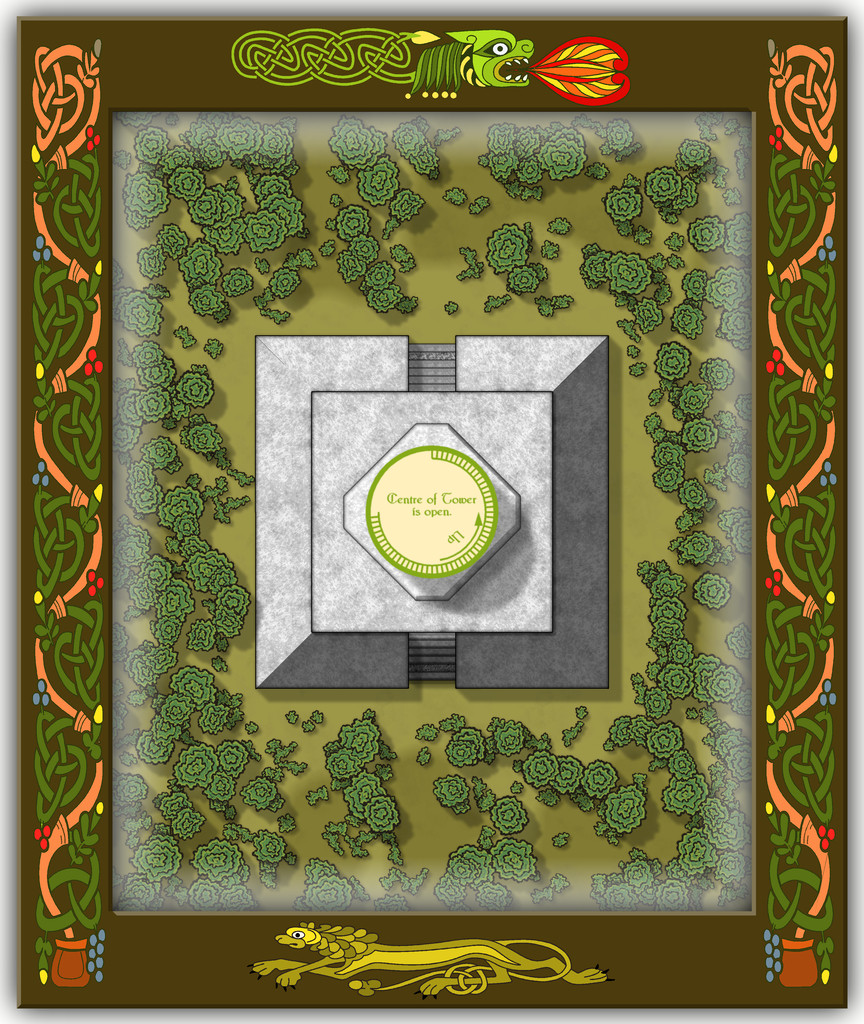
The opening map in the group, for the Painted Light Monument, was based on a design from the old Judges Guild "Temples I" book. As noted previously, these maps are smaller in scale than those in any of the other JG books being used as bases for the Embra Places maps, so this too needed a smaller CC3+ layout:
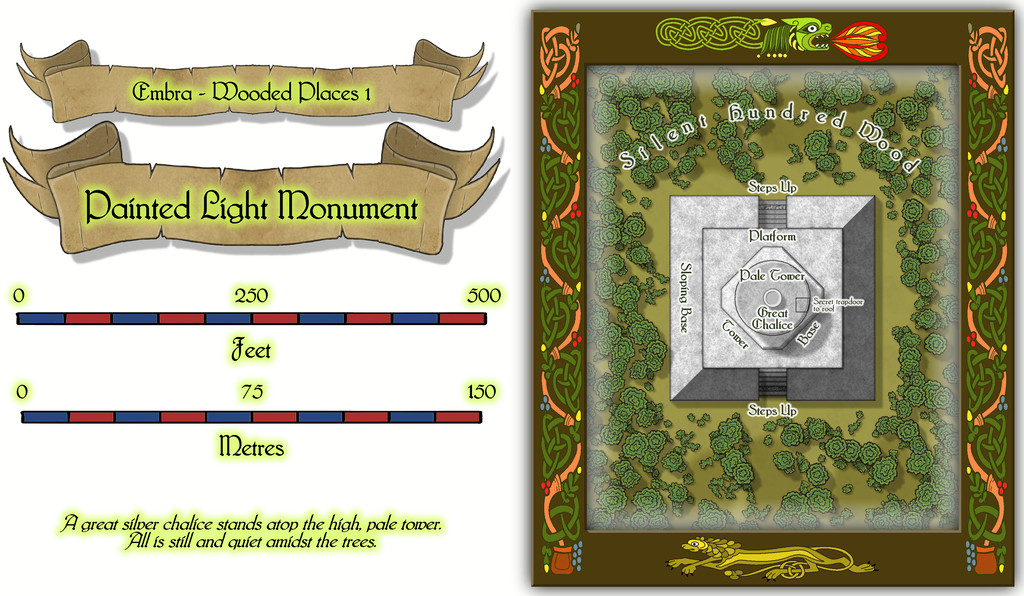
Which of course also reveals the dragon and lion motifs used to further decorate these map frames.
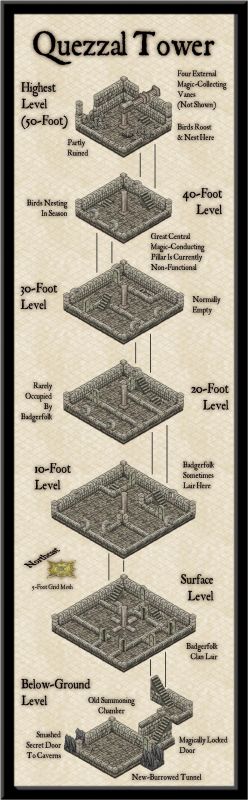
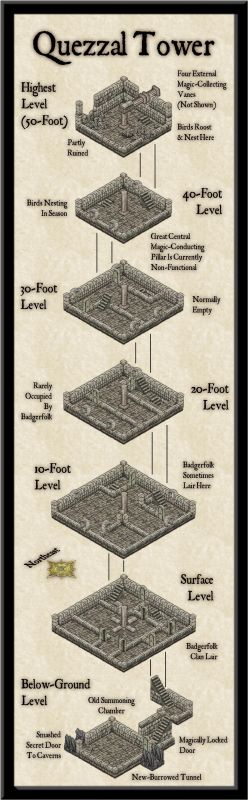
While a deceptively simple map with just a few shapes on it, apart from the omnipresent vegetation (Wooded Places, after all), as the central round tower is almost 90 feet tall (27 metres), there's clearly more to this than meets the eye, which the toggleable (FCW file) interior views should help demonstrate. First the lower level of the Tower Base (the map labels have to be turned-off for clarity when showing the interior):
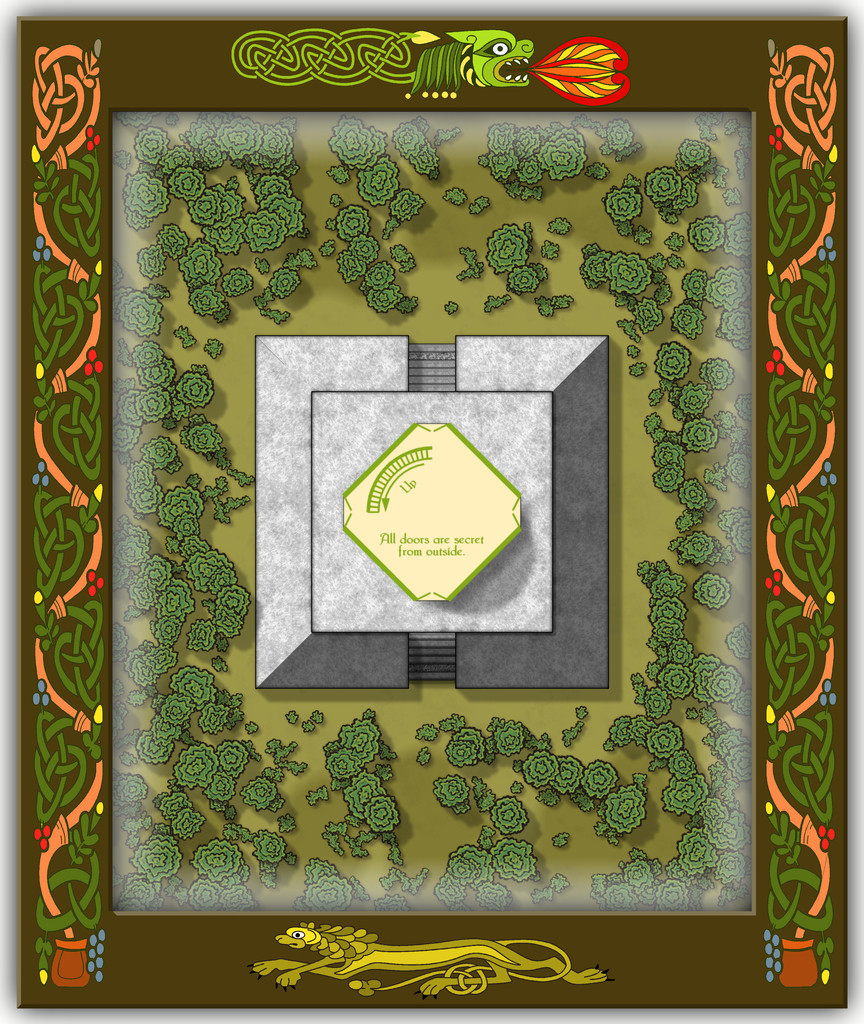
Then a schematic mid-Pale Tower view:
Followed by one more for the highest interior view, just inside the roof:

I decided to add a few basic notes to each of the interior views as well, to help clarify exactly what was being shown. And yes, the number of steps IS accurate for the height of the tower, as the accompanying PDF and text files for the Atlas will reveal!
Speaking of steps, I had quite a few problems with the Effects on those little steps leading up the gentle angle of the outer part of the solid Sloping Base, as regardless of what I tried, there was - and indeed still is - a degree of interference between the stacked Sheets comprising them. This final version was the better compromise I decided was liveable with, where unless you're paying especial attention, the markings could be simply a bit of wear across one of the pale step stones.

![[Deleted User]](https://secure.gravatar.com/avatar/c75d9a245b74d9c59be0999ea81ca541/?default=https%3A%2F%2Fvanillicon.com%2F92add7f8c954488718110edc4896ad39_200.png&rating=g&size=200)

-
Community Atlas: Dendorlig Hall - A Sort-Of D23 Dungeon for Nibirum
Having at last managed to map the exterior region beyond the Hall to its south, Dendorlig Vale, and having just discussed it on the Forum, it seemed a good idea to update the state-of-play with the Hall itself today as well. My handwritten notes currently have reached area 201, while the type-up of these has reached area 160, all of which is easier to tell now, as I'm past the point where some areas were being written and typed-up out of sequence. The map continues to be amended in minor ways, notably in the placement of the area number-labels, after these, as noted previously, were enlarged some time ago.
Today's notes cover what was partly shown in the lower right corner of the previous sample map-segment here, the places formerly occupied by The Pegasus Club and the areas adjoining it (not all of which were directly related to the Club in their previous use). This is the map segment covering the areas involved:

And these are the extracted PDF notes to go with the same areas (only):
As usual, both map and notes are subject to further amendment subsequently, as the text hasn't been fully checked still, while the project remains ongoing. Indeed part of the earlier notes posted here, which mentioned Dendorlig Vale, have been altered slightly too following the mapping of that external region, to reflect how the map actually turned out, rather than how it seemed it might earlier!
Further updates should follow, if all goes to plan.
[EDIT: And if only I'd realised this would have had the Forum-added note "28 Days Later", I might have made some post-apocalyptic comment as well 😉. Too late now though...]

-
Live Mapping: Starship Deckplans
Should be no tribble to do so...


-
[WIP] Community Atlas: Snakeden Swamp, Lizard Isle, Alarius - Dedicated to JimP
The surface map for Snakeden Hollow presented an unusual challenge, as there is no equivalent to the old CC2 style for city-type maps available with CC3+. Source Maps Cities - City Map is perhaps the closest we get, although the symbol options for that alone are rather limited, and don't have options to easily show, or create, ruins, which I'd need for what this map's to illustrate. Instead, I opted for the CD3 Vector Shaded style, using the Vector Classic symbols. These provide a very large range of options in a clean, simple, drawn look; in fact if anything, it's difficult to hold in mind exactly what's where among the series of extensive symbol catalogues in this style. There are five different sets of options just for trees, for example, each in a separate catalogue (there is a sixth, but I think that's a duplicate). As this wasn't a style I've done anything with before, I spent some time - the equivalent of a full mapping session - simply exploring the range of symbols available, and also the drawing tools, to get a better feel for what was available.
In the meantime, I'd also sketched out a general layout for the ruined settlement. The Inkwell dice design was to form one tiny segment of that whole, as I was influenced by the symbol from the Lizard Isle map that showed there to be a substantial ruin here. You can get an impression of the Inkwell design's appearance and original size from the Seer's Hall Village map in Ezrute (as this is the intact version of the Snakeden ruin die-face), discussed on the Forum here earlier. However, during the planning process for this map, I decided it might be better to double its size in this case, partly to stop it from being lost here, partly to make the surviving buildings a bit larger and more imposing. The Inkwell dice designs aren't specifically scaled, although there is a basic assumption that the subterranean ones will be scaled to around 100 feet per side.
That settlement sketch-plan was determined initially using the standard Shadowdark RPG's system for randomly generating settlements, as far as its layout and some additional major structures were concerned, with more additions from the old Judges Guild ruins system, presented almost 50 years ago now (groan...) in their first "Wilderlands" products, all tweaked appropriately. This led to the sketch-map becoming so cluttered and confused that even I'm not sure what all the scribbles mean now, thus I've avoided showing it on any of the following WIP images! I have though left the little Ruins dice sketch design on the first two screenshots, to help give a degree of orientation and scaling.
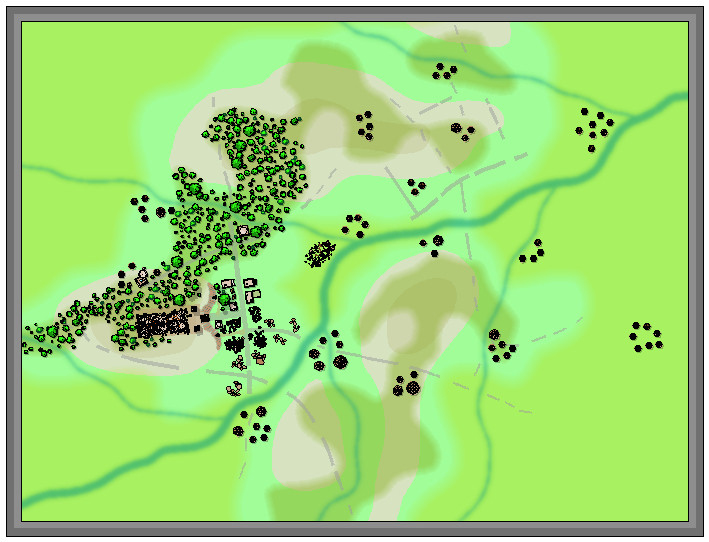
As with the area map, on creating the new CC3+ file, I found there were several sheets with effects already on them, so again this was going to be a more relatively sophisticated map than I'd earlier anticipated. The shots that follow are also of a reduced size, as previously, as they're really little more than impressions of progress at this stage. This one's with the base terrain colours and main streams sketched-in:
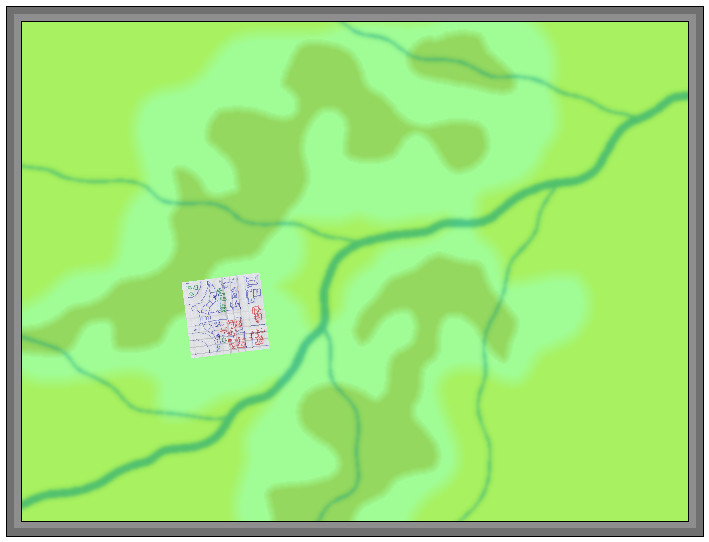
For a bit better clarity, I've turned off the transparency effect on the bitmap sheet with the dice-design sketch. The yellow-green towards the edges is the general swamp terrain, the darker green where the jungle-woods are going, and the "other" green is the basic background.
Next came the road-lines:
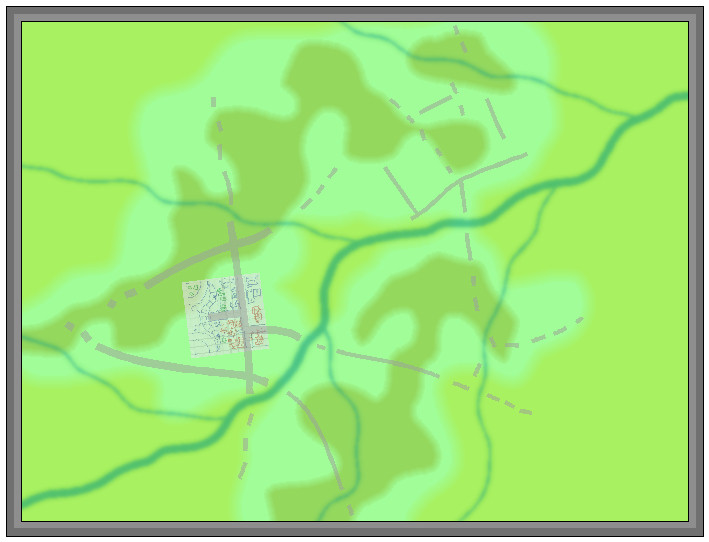
Again, these are simply to indicate the general layout at this point, and their relative widths. These were soon to be altered, as the widths were simplified here to get the lines drawn quickly.
Next, some contours were added to help suggest the "Hollow" aspect from the place-name - hence why those swampy patches were drawn as they were too - and the first elements from the Inkwell dice-face were added as well:

There are no suitable escarpment symbols available to fit what was needed here for the cliff-face, so I simply dropped one into the map at an appropriate scale size nearby, and drew a set of suitably-spaced and sized lines for the cliff-face as sketched, and then discarded the symbol.
Moving on, the rest of that small square segment was completed, a process that included finding and testing various of the rubble, ruins and similar options spread among several symbol catalogues. The perceptive may notice too an experiment in adding a second height contour to some of the hills. Ultimately, that was dropped as showing nothing useful, once more symbols and elements were filled-in elsewhere. It does feature on the next couple of images before that decision was made though.
There is a reason too why the ruins are chiefly on the southern side of that little square area, which will only be revealed later!
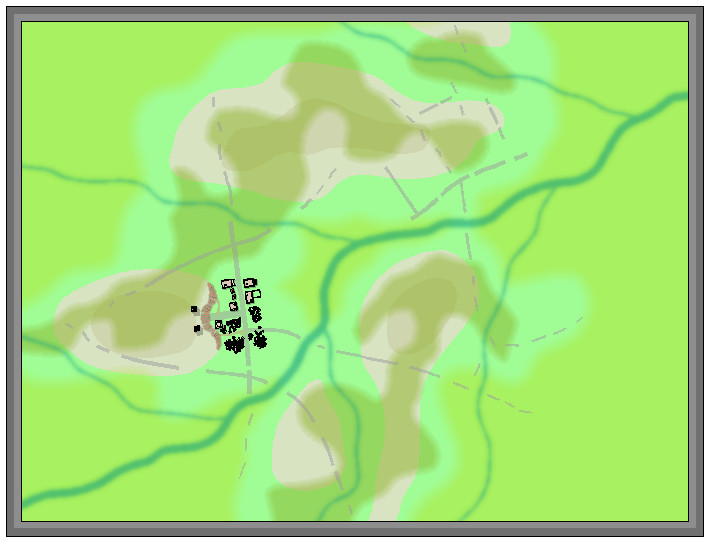
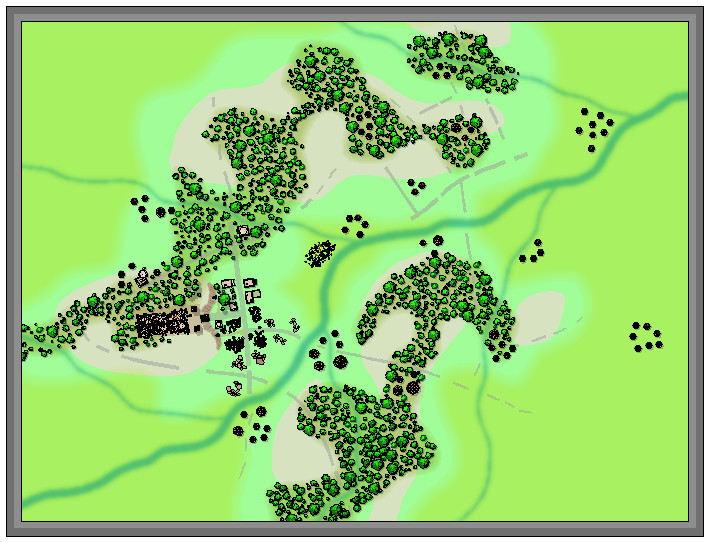
Various fresh symbol elements were added at this stage, including where the main Lizardfolk groups are situated across the settlement (hut clusters), a few more ruins and still-standing buildings, some of which were from the main new features randomly added during preparation, and the start of the vegetation symbols.
Of course, at this point, nothing is too firmly-fixed, but I was liking how the trees worked with the whole. Wasn't so sure about leaving the base vegetation colouring behind the trees at this point, although this was the stage I realised the higher contour colours just weren't working with the tree cover.
So this is where I'm up to currently, with all the trees set-up across the woody areas (there will be more elsewhere in time, though less densely), the higher contours gone, and decisions to be made next as to how best to show the swamp vegetation. More to follow...


-
[WIP] The Dancing Princess (Community Atlas, Artemisia, Spiros Isle, Helinesa)
Looking at the base drawings you're working from, and dependent on how close a copy you're trying to make of them, it's worth studying things in some detail before going further, and thinking-through exactly what's being shown.
For instance, it looks to me as if the full width of the vessel at the waterline hasn't been included in the top-down plan drawing. There should be a sliver of the broadest part of the vessel's sides visible below the cannon barrels, which obviously isn't shown on the plan view.
As a perhaps more significant element, the masts are not all vertical, but at a slight angle (hence why they're not illustrated as circles on the original plan view), they're not all of the same dimensions, and you seem to have missed the bowsprit entirely (or rather, you have a broad linear piece of wood texture at the angle and placement as shown in the drawing, but drawn as if it were merely a flat piece of the deck). The latter will be especially problematic, as the original drawing doesn't seem to indicate its full length (it should extend well beyond the bows, for instance). There's the further complication that it should have at least one yard suspended below it, partway along, to carry the spritsail. You may have to busk this from the 3D model images in Remy's posting, I suspect - much as with the features of the upper parts of the masts, i.e. any crow's nests (which should probably be shown as the ship's highest "level" in an FRPG drawing). If you're intending a vertical cross-section for the ship too, you'll need to think-through where the yards are on the main masts.
There are other features that would benefit from further consideration (beyond what Sue and Remy already noted) - e.g. the hatch covers - but this is already running longer than I'd intended, and I haven't time for more currently!

-
Community Atlas: Monseignor District in Kentoria
Thanks very much Remy!
Since I've had a couple of queries about the Inkwell dice sets outside the Forum, and to clarify for those interested here, the simplest solution is to visit the DungeonMorphs page of the Inkwell site. As you'll discover there, the designs are available also as cards and fonts, and there are books with descriptions and ideas for the more recent sets as well.
In addition, and because I think he actually started the whole concept of geomorphs with this ten-space design (that's ten spaces per side on the design), it's worth looking at the past postings on Dyson Logos' blog, as he's provided illustrations showing many - now maybe all - the designs he's produced over the years, including those he's done for Inkwell. There's a "Geomorphs" tab under the "Navigation" sidebar on his blog, but that only covers the 100 designs he did for a personal challenge in 2009-2010, all collected for easy download in one place. Using the "Post Categories" search box, the Geomorph Mapping Challenge has 217 blog entries, which goes WAY beyond those he's been commissioned to do for Inkwell and those 100 earlier maps!

-
[WIP] Community Atlas August Mapping Contest: Cloven House
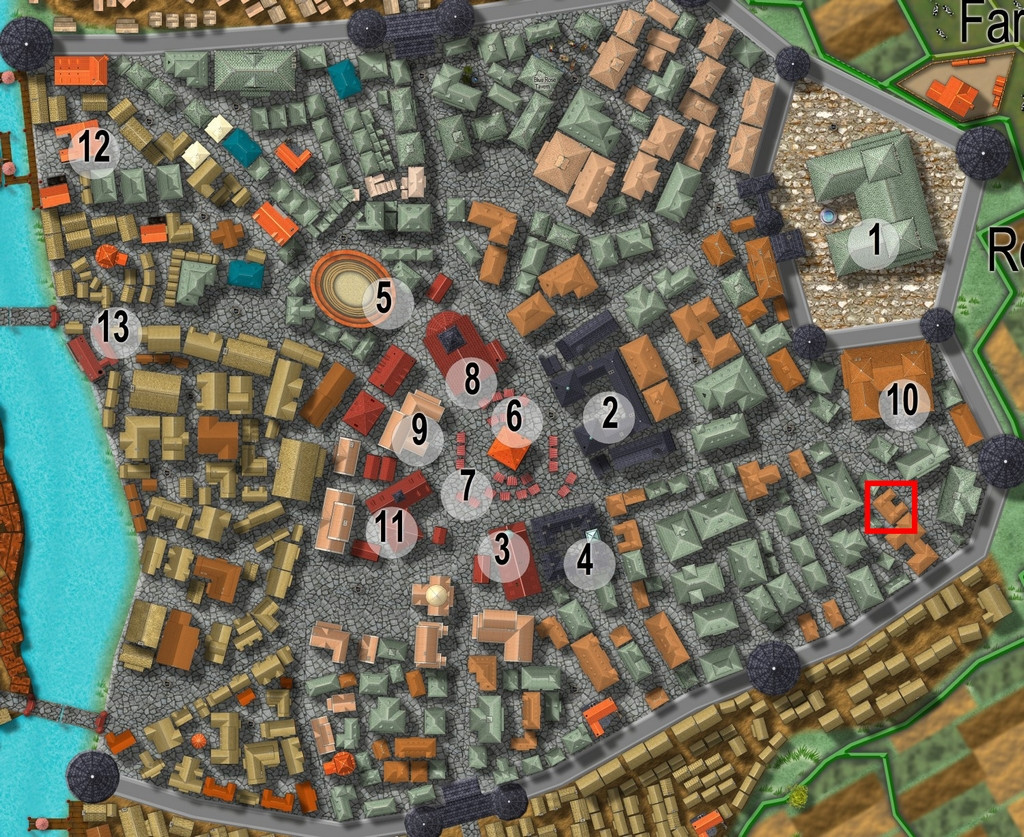
By the time I'd chosen a property to map the floorplans for from Vertshusen for this contest, I already had some ideas as to what it was going to be, and what mapping style I'd be going with. The chosen property is that marked by the red square in the SE corner of the walled area:
My initial thoughts had revolved around a haunted house theme, and because I've already done quite a bit of mapping for the Community Atlas using some of the more realistic floorplan styles, quickly decided I wanted to do something different. For me, part of the point in participating in the Atlas is to experiment with new ideas and different mapping styles.
Three possible styles were uppermost in mind, all very similar tech-drawing styles, the 1930s Travel Guide Floorplans from the April 2011 Cartographer's Annual, the 1800s Floorplans from April 2016, and the one I finally selected, the Dracula Dossier style from September 2015. Haunted house, after all!
However, I also took a look through the PDF of "Hobbs' Architecture", which was a recommended freely-available download from the Internet Archive site, mentioned in the mapping guide and webpage for the 1800s Floorplan style, to get a feel for what house layouts should look like and contain in this general type of map appearance.
The working title for the map was "The House That Wasn't There", as I had vague early ideas of creating a building that wasn't always there. Indeed, one initial concept had been to pick a completely empty space in the city, and map the house into that, only I couldn't find a space large enough!
Which building was chosen was partly down to something that looked interesting, that was also a little out of the way, and the final choice was swayed after I was drawn to one of the smaller buildings in "Hobbs'":
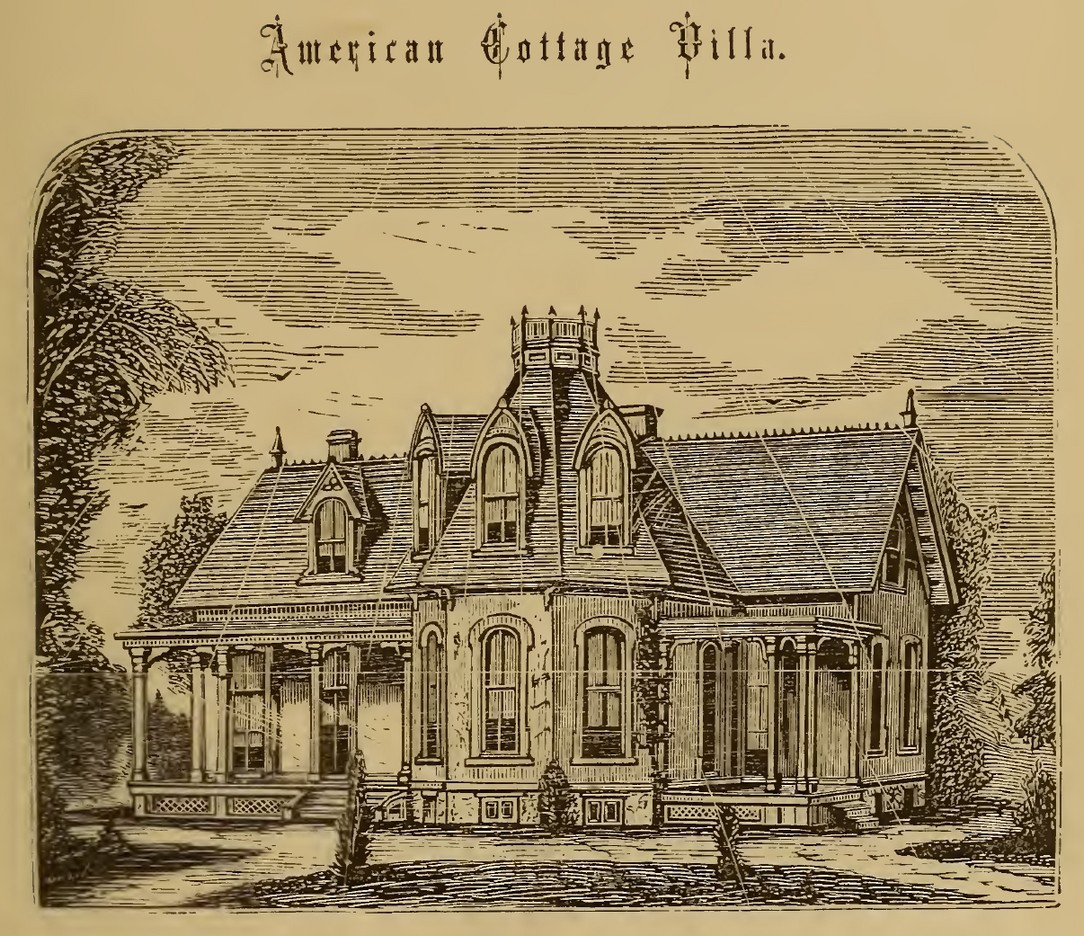
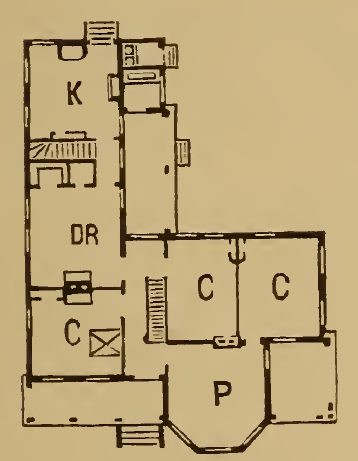
which just looked interesting, and had some features not dissimilar to the building in Vertshusen. The size and scaling weren't the same of course, as the Vertshusen buildings are uniformly tiny by contrast to the structures in "Hobbs'". It was a starting point though.
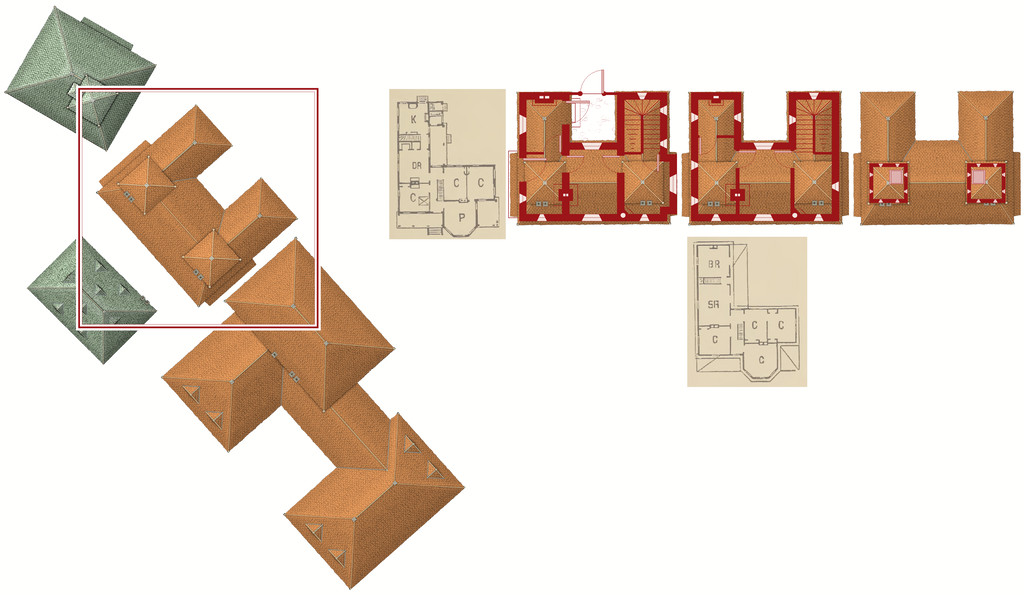
Having measured the house size on the Vertshusen FCW, I set up a suitable template in the Dracula Dossier style, and then directly imported (copy & pasted) the "Wasn't" House and its neighbouring properties, setting "my" house down in the centre of the map border area.
Of course, it's angled as originally drawn, and as others have commented in topics for this mapping contest already, that's not the friendliest layout for drawing rectilinear structures. So I copied the house again, and rotated it to better suit, and then copied that twice more (as my initial idea was for a ground floor plan, an upper floor plan, and a further plan for the two taller roof towers. I also imported copied scans from the Hobbs' book as reminders for the overall look of the plans, setting them up on their own Sheet with a Transparency Effect, so I could position them over the CD3 house roof and get a better idea of what might go where. And then started drawing. This illustrates where I'd got to with the drawings when I ran out of time yesterday:

-
Community Atlas: Selenos, Statrippe, Artemisia
Next to be mapped was the Castle Peris area, various locations in which had a scattering of weird and wonderful items added to them thanks to the random card draws.
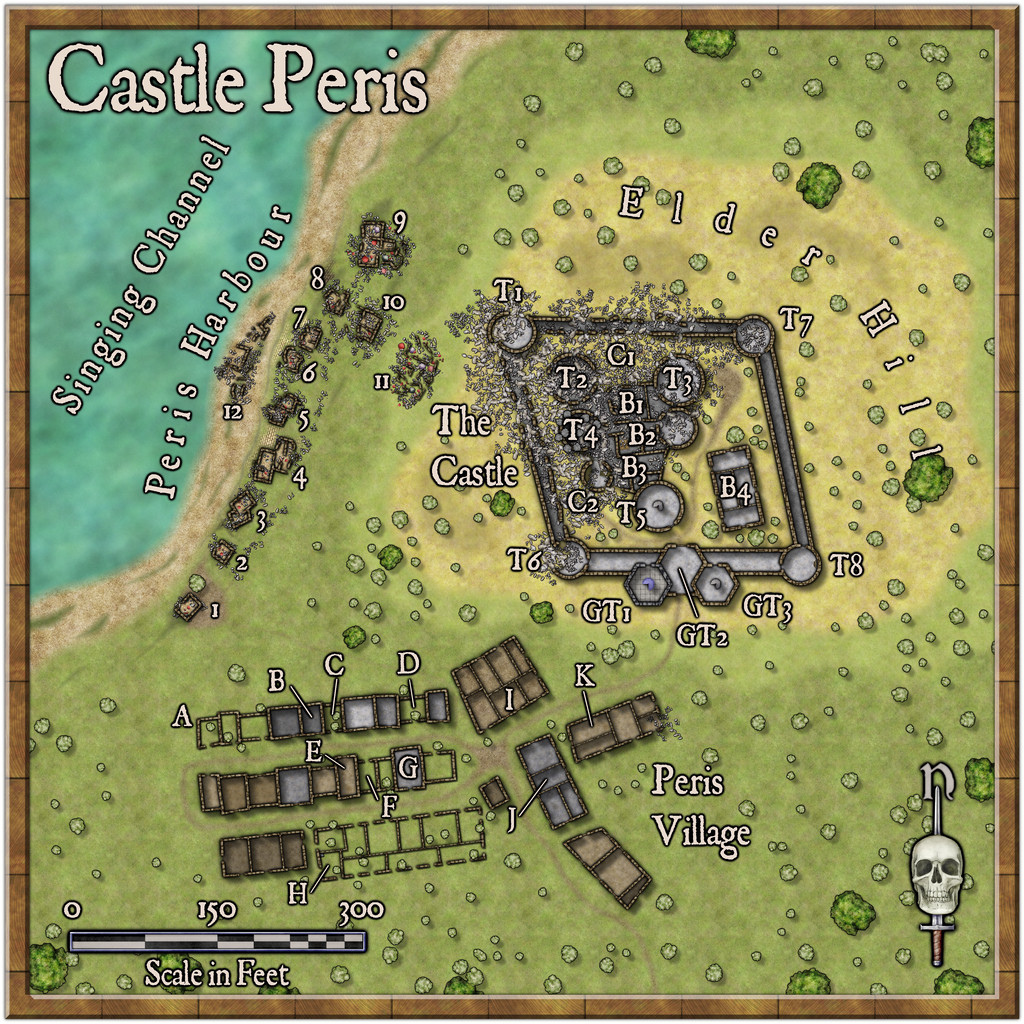
There are three main parts to the map, the Harbour (most of which has fallen into the sea), the Village (much of which has only had building foundations laid, and may never have been inhabited - or not for long, at least) and the eponymous Castle itself. Living here much of the time is that now-amended, card-derived "Chieftain", who has become Hypatos, the isle's sole permanent humanoid inhabitant, a self-exiled, hermit-like Human, and former chief sage, who successfully predicted a major eclipse and planetary alignment in the past, but being imaginative and forgetful, he then failed to warn of an abdication crisis he believed these celestial events portended, somewhere on the mainland (he is quite vague as to when and where all this took place). He still wishes to right the wrongs he thinks followed that crisis. He is convinced there is something on the isle that will help him resolve those perceived wrongs, although he does not know what (possibly that Talisman at the Watchtower of the Sea). He is also the sole priest, of sorts, for The Twisted Torchbearer, and is apparently under her protection. He is very knowledgeable about the isle, and seems to have been here for a very long time, although his appearance suggests no great age, merely late middle-age...
Further notes will be in the final Atlas version.
The drawing itself was done using the Jon Roberts Dungeon style from Annual 54, since it allows the easy draughting of surface areas like this as readily as underground ones. If it had building roof options, I might have been tempted to add those too, but the cross-sectional, ground-floor-only plan views are in-keeping with the original "Castles" book maps, at least!
Next time, the little dungeon map proper.


