


Wyvern
Wyvern
About
- Username
- Wyvern
- Joined
- Visits
- 3,302
- Last Active
- Roles
- Member
- Points
- 5,647
- Rank
- Cartographer
- Badges
- 24
Latest Images

-
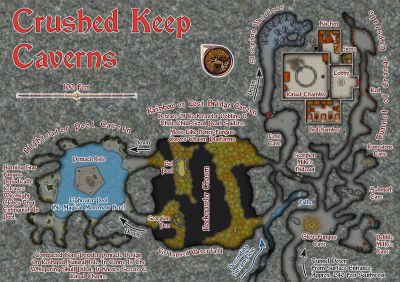
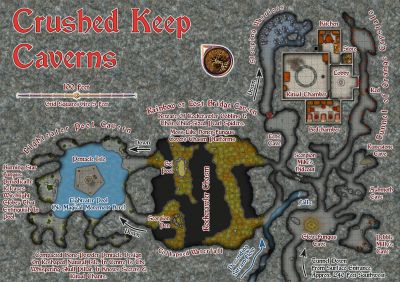
Community Atlas: The Crushed Keep Environs of Silent Forest, Fisher Island, Forlorn Archipelago
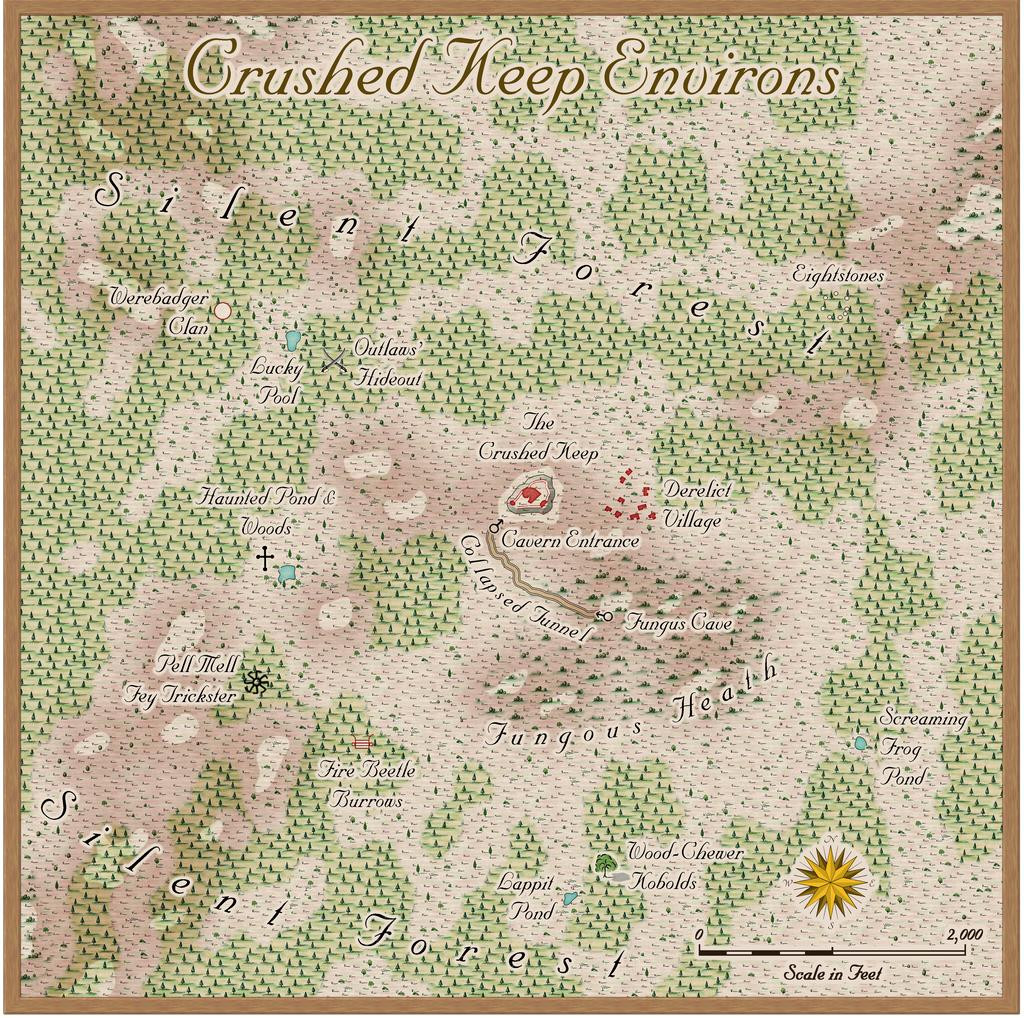
With the little area map completed, it was time to draw the subterranean one, based on the Inkwell Ideas Dungeonmorph Dice designs from the Lairs set established earlier. Ideas for the contents were inspired by, compiled and adapted from the Inkwell Ideas book that accompanies these Dice, “Dungeonmorph Delves & Descriptions: Crypts, Lairs, & Sewers Edition”, in conjunction with relevant items already identified for the area map. As noted last time, quite a few fungal features had occurred already, with more here too, and for the names this time, I picked some randomly from the fungal items on cards in the Downcrawl Encounter Deck, part of the Downcrawl 2nd Edition RPG set by Aaron A Reed.
I wanted to use one of Sue's mapping styles for the underground layout, and as none closely match her Ferraris overland style, decided instead on the Creepy Crypts one (CA186) with some elements from the matching Forest Trails (CA191), plus some symbols from DD3 where required. Gridless, then gridded versions:
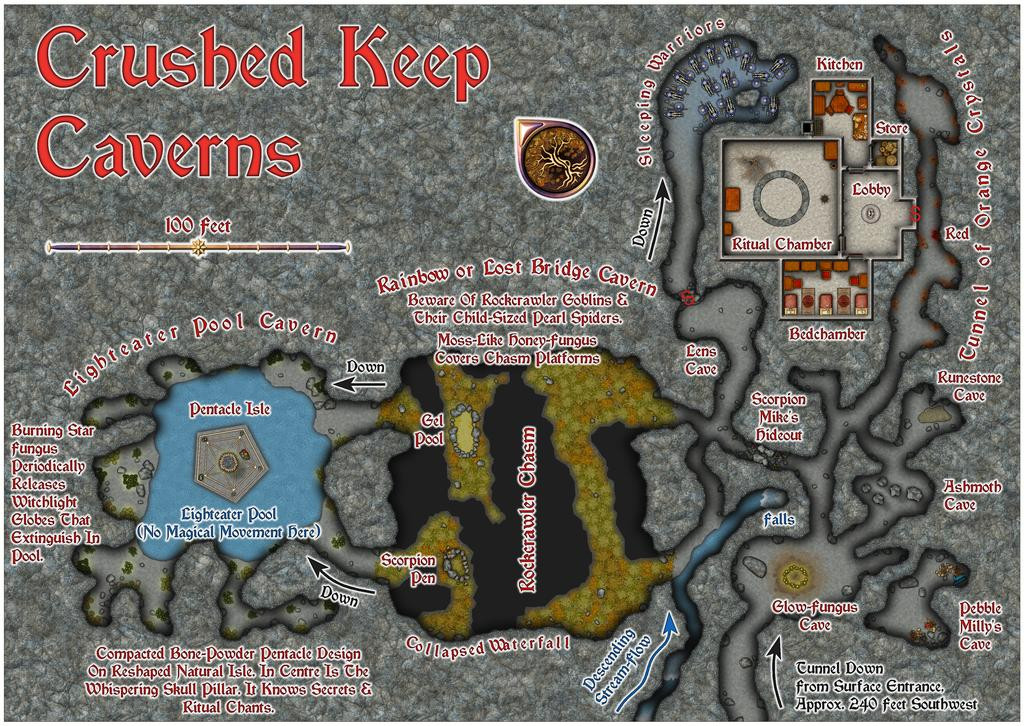
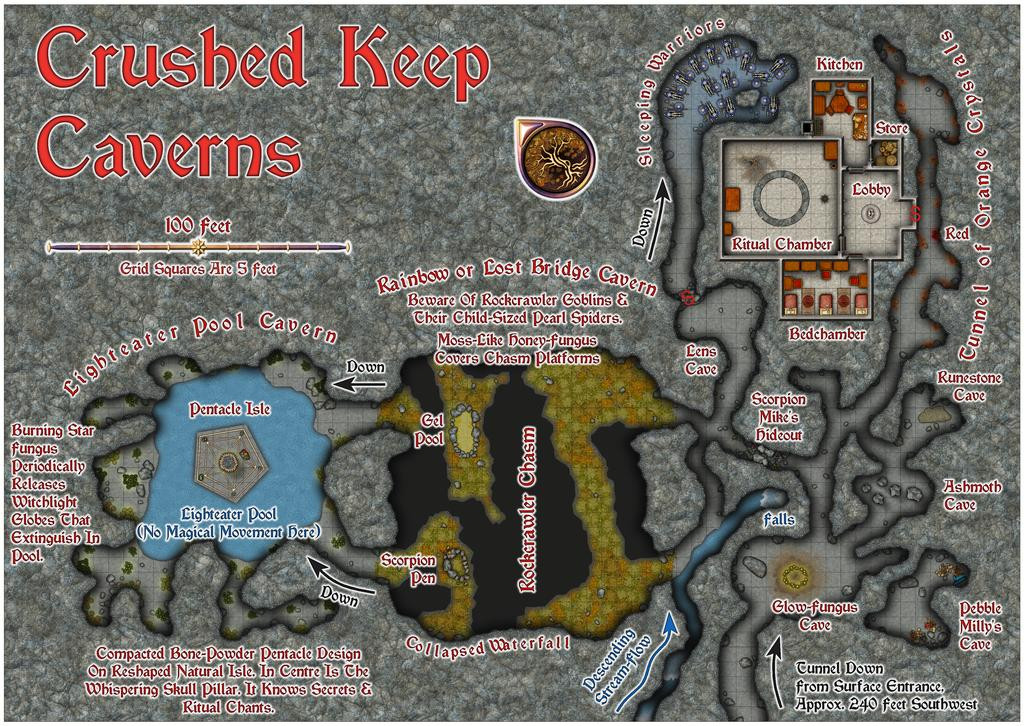
For those who've not used the Creepy Crypts style previously, it takes a little getting used to, compared with the more commonly encountered dungeon mapping styles. It works especially well for caverns, even if the sheet order may not be quite as straightforward as usual at times. The regular rooms towards the top right had to be drawn in a different way on higher sheets in the stack, which meant the grid for those had to be redrawn in separate segments, and even the odd separate line, because the normal grid sheet is buried a long way down in the stack by comparison to where these marble floors are!
There are a lot of oddities here, which the Atlas map notes will expand upon. That "Red" label, for instance, highlights the one redder crystal clump in its tunnel, which is the one that opens the secret door to the suite of marble rooms. Unfortunately, all the other doors in there are magically sealed, but players do love a challenge!
Following which, it'll next be time for a revisit to the massive continent of Doriant, somewhere in the Dungroth region...


-
Hex Maps & Hexcrawls
@Mike Patterson noted: I struggle making hex maps in the style we're likely discussing here - one symbol per hex.
Actually Mike, if you take a look at some of the example maps just of mine, there are both the one symbol per hex types, and area maps with a hex-grid superimposed, so I wouldn't like to deter you from commenting on those grounds! There's definitely more than one way to use hex maps, that's quite certain - and as with maps in general, they're useful tools, rather than constraints (or that's how I've long seen them).

-
Hex Maps & Hexcrawls
Ralf posted about hexcrawling on the ProFantasy Blog earlier today, following his fascinating live hex-mapping video stream yesterday. In the blog notes he asked: "Have you used and created hex maps yourself? Do you like creating them, or is their layout too abstract for your liking. I’d love to hear your thoughts."
So I thought starting a fresh topic to discuss this very matter would be appropriate!
To get things rolling, I'm no stranger to hex maps myself, given that even before I discovered RPGs 50 years ago, I'd been using them for counter-and-map board wargames for five or six years before that. That they quickly started to feature in RPGs from very early on was scarcely surprising, as RPGs developed during the early 1970s from tabletop figure wargaming, and drew on various standard mechanics from those.
In more recent times, I've done a few Community Atlas hex maps, including for the Whispering Wastes in Peredur, the Seer's Hall in Ezrute, and the Barrows of the Ferine Magi in Alarius. All of those have a few notes on constructing hex maps in CC3+, but the discussion I began about a year before the first of those, Hexcrawling starter maps, perhaps says more about hex-mapping for hexcrawls than those other topics.
There are, of course, many more topics on hex-mapping elsewhere on the Forum - a quick search for "Hex maps" brings up around nine pages of options to explore alone!
So, hex maps - do you draw/use/love/hate them? Discuss!

-
Community Atlas: The Crushed Keep Environs of Silent Forest, Fisher Island, Forlorn Archipelago
I hope you won't be too crushed at having to wait for it 😉!
The font is MarriageScript (from the 2007 Cartographer's Annual). The Ferraris Annual sample maps use a font called Tangerine, which is fairly similar, but as it isn't listed in the allowable fonts list for the Atlas, I had to source something else that was, and as you say, this one does fit the bill rather nicely.
I really got to like the style while mapping for this, and I'd like to do more with it at some stage. The downside is, it really works best for small areas, and for the Atlas, I seem usually to have to map at least a 20-mile square area most times, or indeed larger. That's fine, of course, but trying to use Ferraris for that kind of area would take forever!
-
Community Atlas: The Crushed Keep Environs of Silent Forest, Fisher Island, Forlorn Archipelago
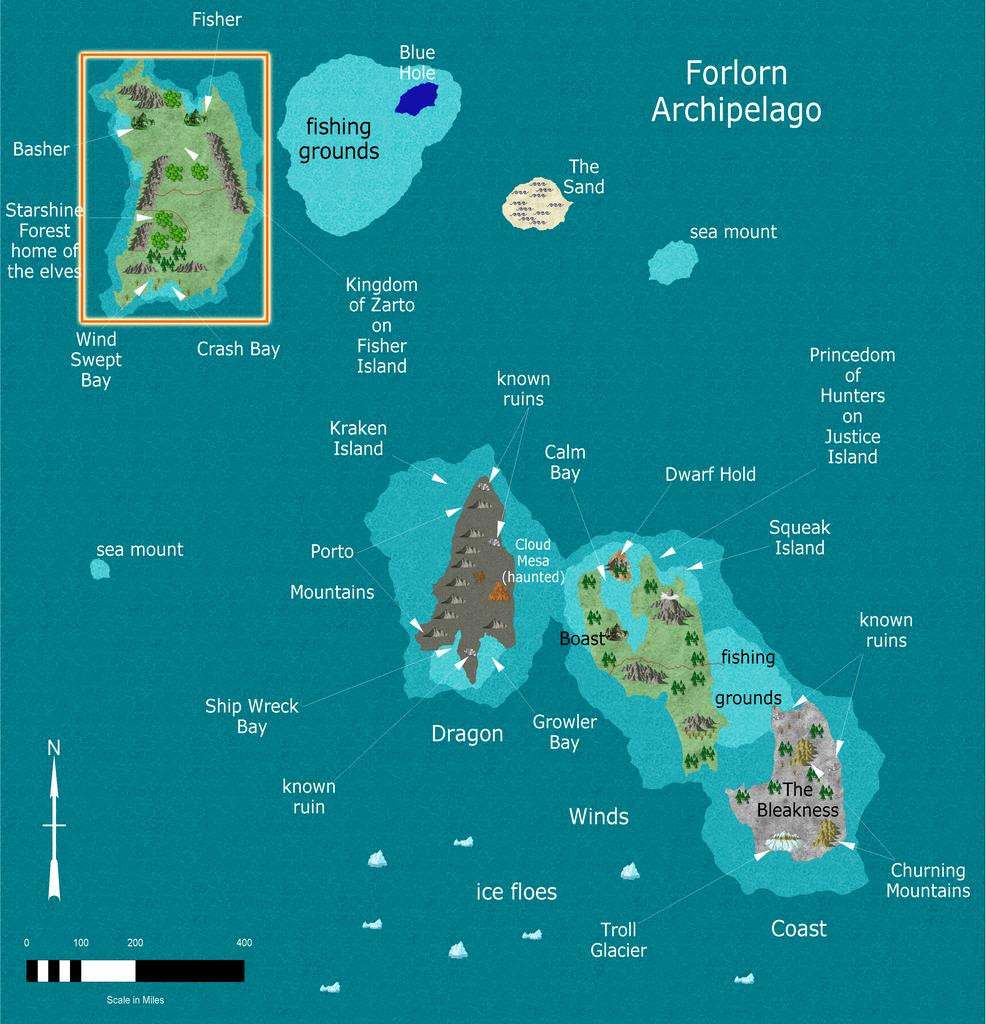
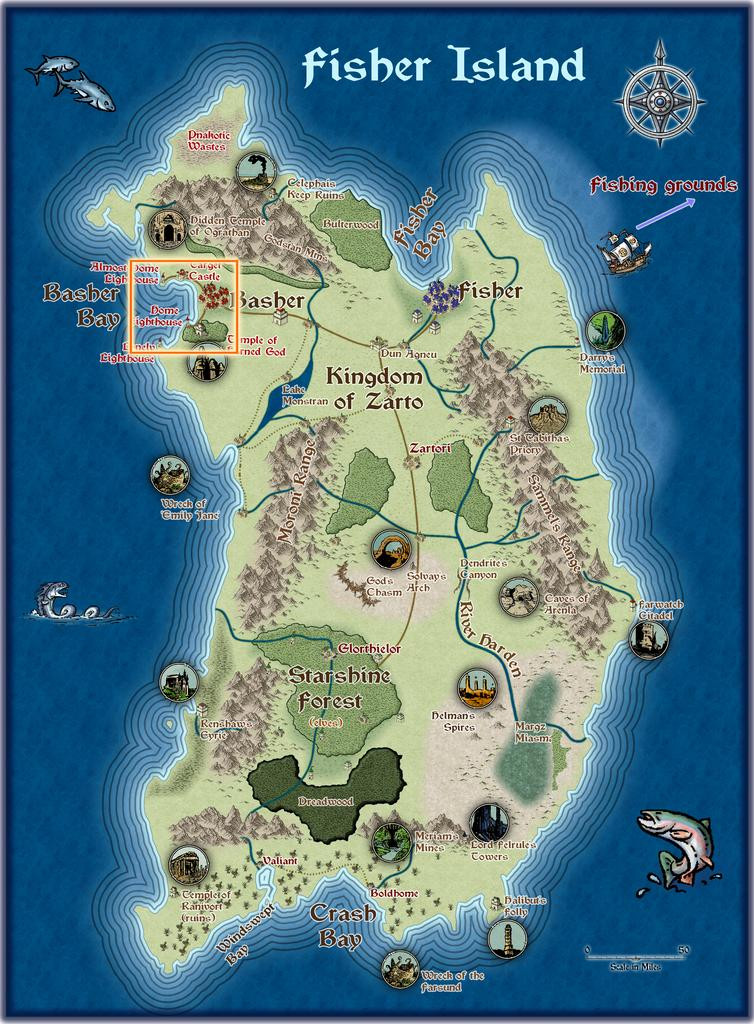
As noted in my closing descriptive post for the recent Oracle Mountains Atlas maps in Peredur, these next maps were to bring a return visit to the Forlorn Archipelago, not this time to the central Kraken Island, but the northernmost Fisher Island:
However, this was originally unintended. Over a year ago, while checking through the list of what was still to do in this project, I realised (despite previous double-checking) there was a duplicate location set for this map to one already completed. Luckily, I'd kept a list of "possibles" that hadn't made the final cut for sites to place maps, hence this one's choice.
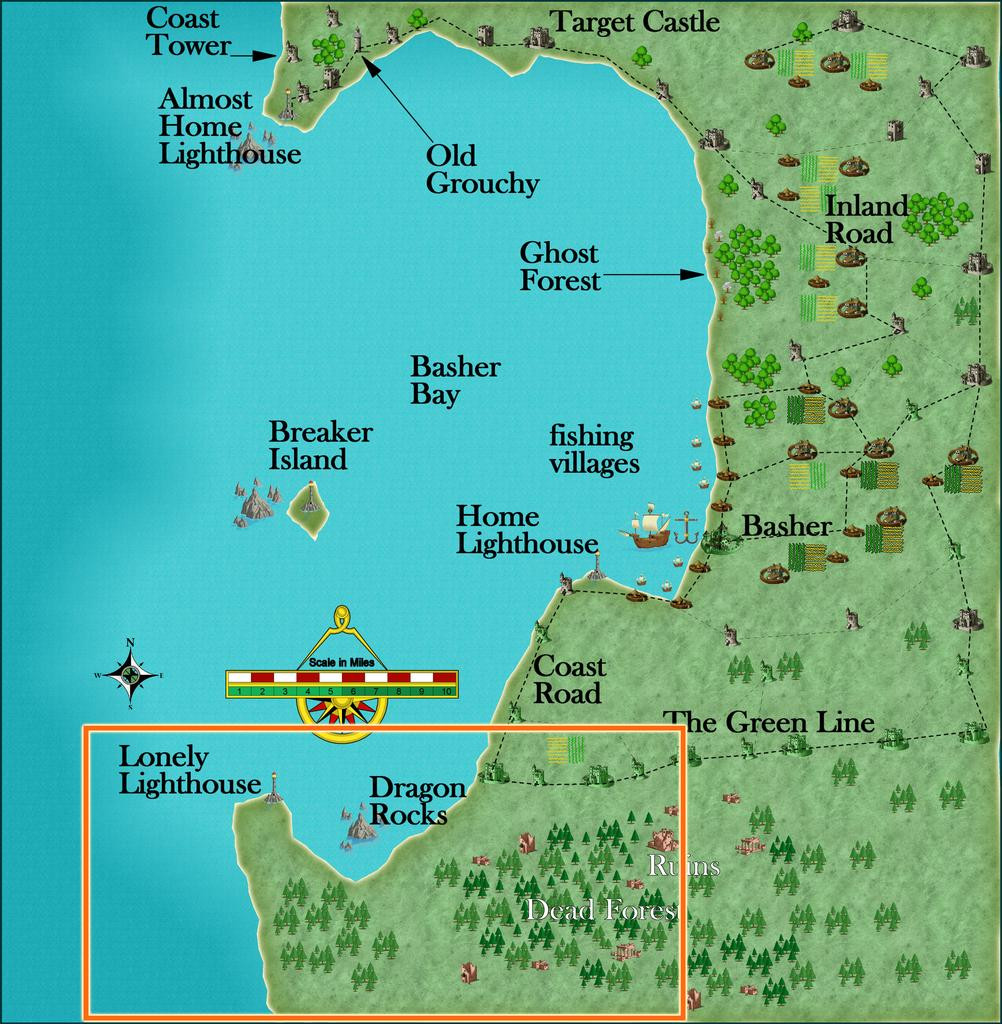
This proved especially interesting, as drilling-down through the extant Atlas maps for Fisher Island, it became practical to zero-in on an unusually small area. So, the Island itself led to Basher Bay:
Which led to South Basher Bay:
And finally to the Silent Forest:
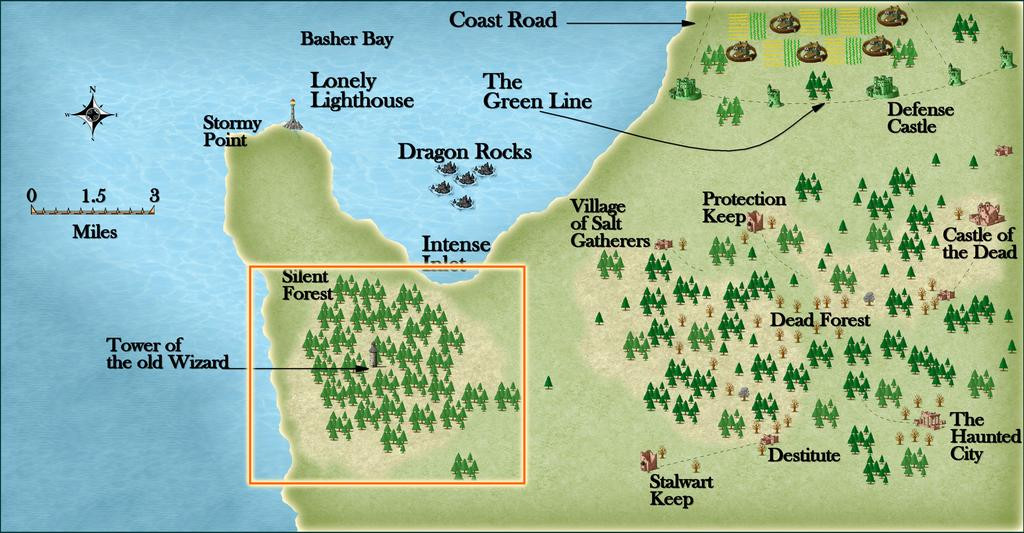
From where I opted to zoom-in to an identified, but unmapped, spot, The Crushed Keep:
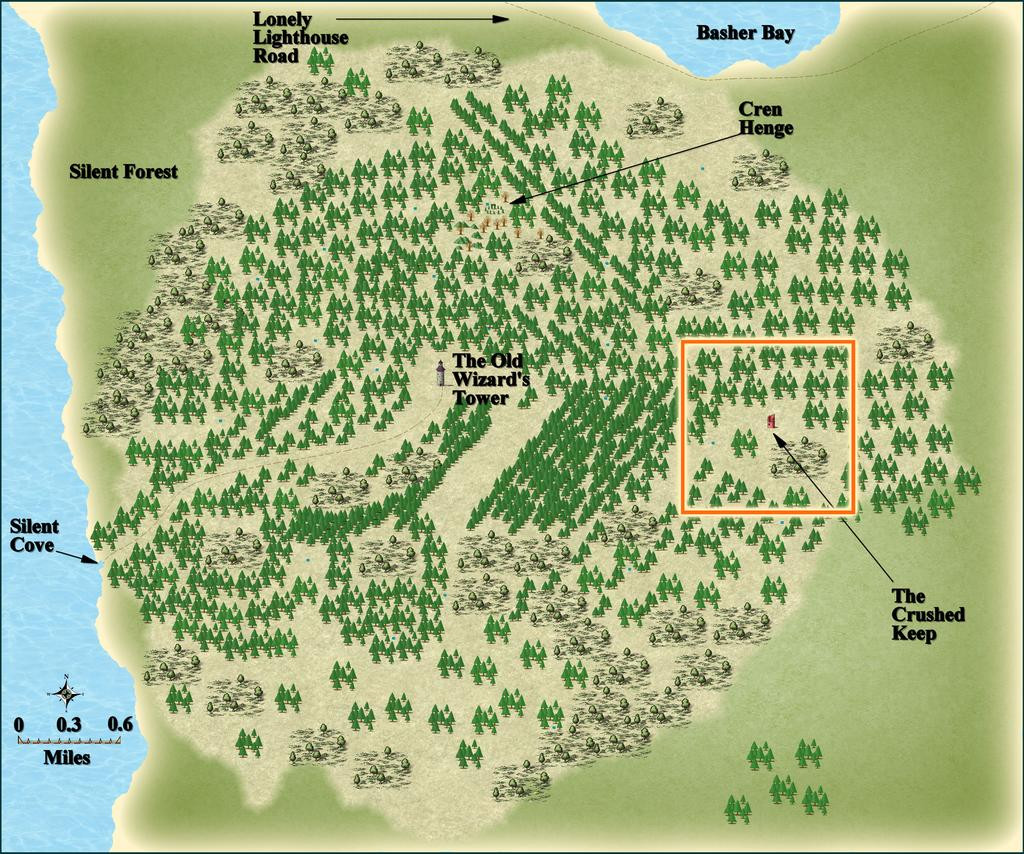
The final three maps shown above here, from Basher Bay to the Silent Forest, were all constructed by JimP, who also provided some interesting notes for them, including that the Silent Forest was so-named as the Old Wizard there dislikes noise, so there are no animal or bird calls hereabouts, that other towers, now ruined, had been built close to that central Tower (which nearby area Jim had also mapped) to keep watch on the Wizard's activities, and that further away, nobody was really sure if the Old Wizard still lived or not, hinting that his Tower too might well be ruined by now. This though was mistaken! Jim's notes for Crushed Keep mentioned for all it was a ruin, there was no debris or mislaid items there, as might be expected ordinarily, and it looked as if it might never have been inhabited, so there was enough mystery here to play around with.
That orange square outline on the last map above was to be my one-mile area map, and such an unusually small region provided the opportunity for a different mapping style to the normal overland ones I often force into smaller spaces than they're used to, which was to be Sue's Ferraris Style from Cartographer's Annual 158. After gridding the area, and randomly choosing places to add a few extra features (not many, as this is meant to be a largely uninhabited wilderness), I sought inspiration from cards drawn randomly from three of Inkwell Ideas' Hexploration Decks, "Into the Wilderness", "Settled Lands" and "Beyond the Pale", with a couple more from two of the Creature Decks, "Fey, Constructs, & Wildlife" and "Animals & Vermin". These ideas were then adapted to fit the overall pattern from JimP's notes, with a few extra thoughts of my own.
Thus the area map:

Of course, the Ferraris Style is really intended more for settled places than areas mostly devoid of habitation, but it seemed to work nicely here anyway, with a few repurposed symbols, and a road line that really represents a collapsed subterranean tunnel.
I decided from the start that I wanted to respect Jim's use of broken, almost spiralling, patterns in the way the woodlands are laid out, while appreciating they were drawn within the constraints of the symbols in his preferred mapping style. I did though add some minor topography, to help mix-up the colours and look a little more. The tiny ponds were from Jim's original map, and I added a couple more of my own. Jim's notes on them give leeway for such additions: "A number of small ponds. Unknown depths. Anything falls in, the leaves close back up. No signs of anything nor anyone had come by there." So ones that have closed must also periodically reopen, where nothing had been mapped earlier!
There are other oddities here as well, and the card ideas included several connected with fungi, which seemed an interesting concept, perhaps further helping to deaden sounds in the region. The map's notes for the final Atlas version will, as ever, say more.
Mapping in the Ferraris style took a degree of getting used to, mostly because there are a lot of options for how things can be drawn, the different fill styles, effects and so forth. I kept both the sample maps that come with the style's package open while I was drawing this to help keep me right. Despite that, the map went together really quickly, after some brief experimentation, so this isn't a detailed WIP topic for once!
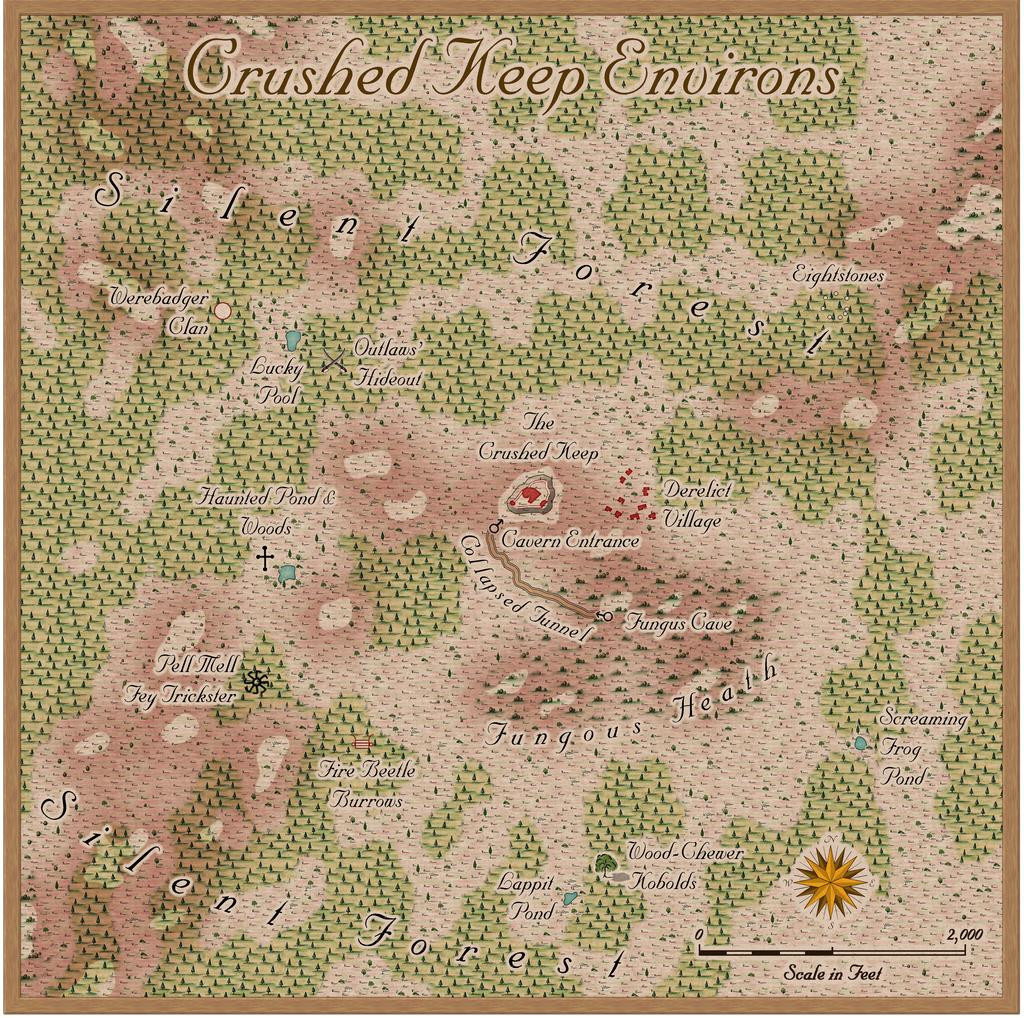
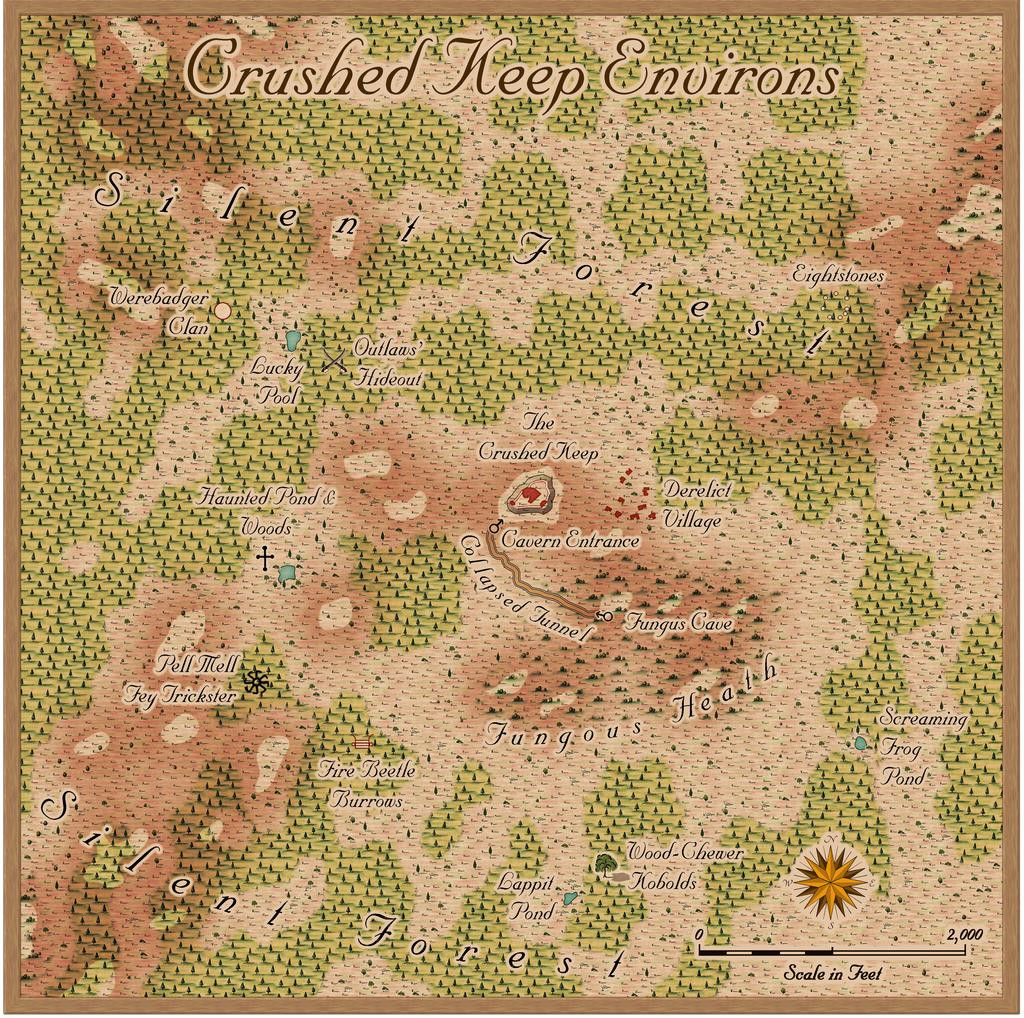
One thing I did test out at the end though were the options for different final looks to the map, by selecting three hidden Layers the style has built-in. While I was happy with the "vanilla" map, as above here, I also rather liked these three alternatives too, so hopefully, each can be toggled in the final Atlas FCW file as well. Thus we have a faded look:
A worn and dirty look:
And a yellowed with age look:
Next time, we'll delve beneath Crushed Keep's small hill...


