


roflo1
roflo1
About
- Username
- roflo1
- Joined
- Visits
- 2,874
- Last Active
- Roles
- Member
- Points
- 576
- Rank
- Surveyor
- Badges
- 8
Latest Images

Reactions
-
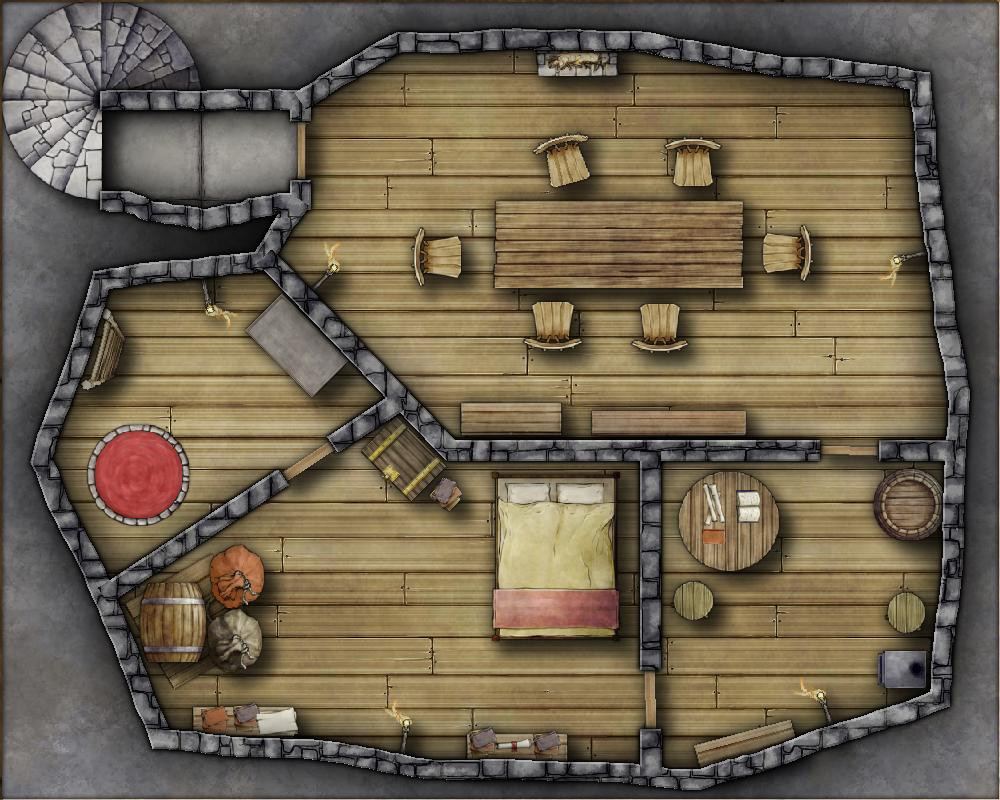
Sangalor's Home
A couple of weeks ago, I had to come up with a battle map for use in my VTT of choice... and I didn't have much time.
I didn't actually time myself, but judging by the files' timestamps, this took me about an hour to complete from scratch. Maybe one day I'll be able to match Ralf and Remy and come up with something more elaborate in just one hour, but I'm pretty happy with the result.

![[Deleted User]](https://secure.gravatar.com/avatar/c75d9a245b74d9c59be0999ea81ca541/?default=https%3A%2F%2Fvanillicon.com%2F92add7f8c954488718110edc4896ad39_200.png&rating=g&size=200)


 and 7 others.
 -
Trying out a Planescape style
Next up was Bedlam (the original image can be seen in this link):
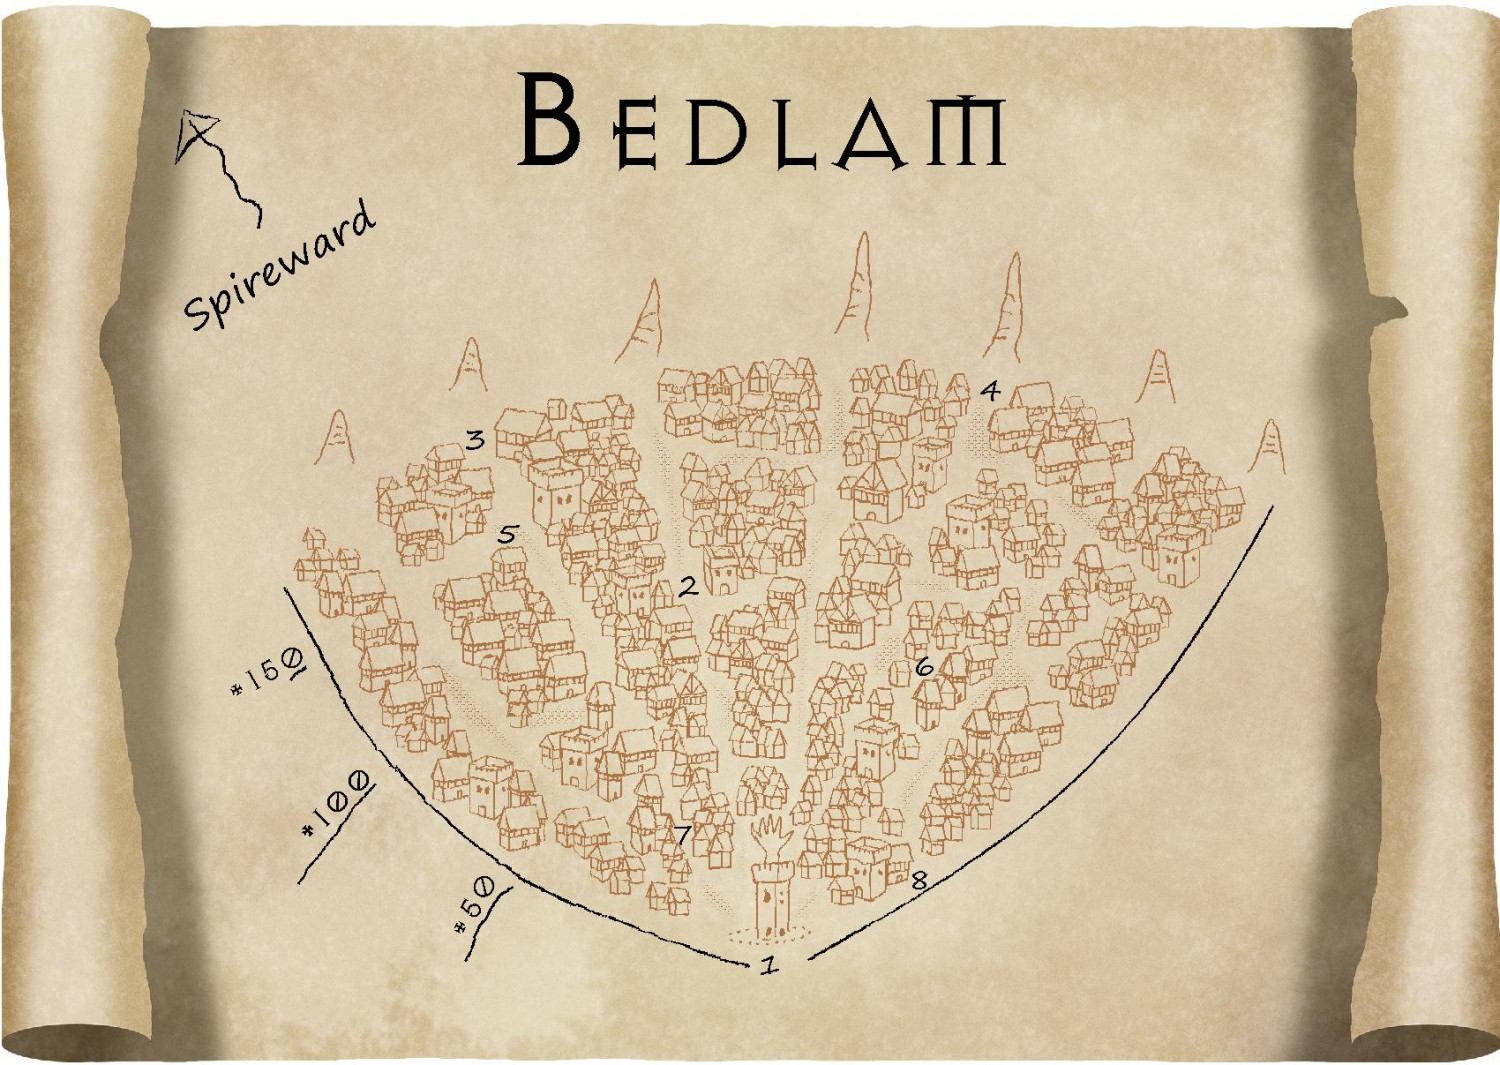
Learned quite some things for this one (the most notable being the one where I used the color key effect, as detailed above).
The one thing I'd like to improve later is the way I did the "roads" (the texture thing, lightly visible on the more transited streets). I tried creating a connecting symbol but it was taking too much time and I wasn't convinced with the progress. I want to use vector-based entities as much as I can, so I discarded the possibility of creating a raster texture.
A fill style based on a Symbol Fill sounds promising.. I did experiment a bit with the Palladiana Symbol Fill, but I'd have to create my own symbol collection and make something similar but filled. Perhaps later.
I'd initially discarded the Brush patterns since they all end up with white backgrounds... but then I remembered the Multiply Blend Mode (thanks again Sue!) and I liked it enough to call it a day.

 and 1 other.
 -
Deepzoom images for web display
While reading the World Builder's Compendium, I opened the beautiful Earlsdale map by Grimur Fjeldsted (http://earlsdale.grimur.de) and realized I actually know a more efficient way to serve a very large image in the web for everyone to view.
Why is this an issue?
Well you see, when you open the webpage above, the server sends you a single, 12MB, 7300 x 5902 image. And then a script allows you to zoom and pan. And while 12MB is not that much by today's standards, what if you want to serve a 73000 x 59000 image? Well, you'd have a 1.2GB image, for starters, and it's time to look for other options.
Enter OpenSeadragon. And deepzoom images.
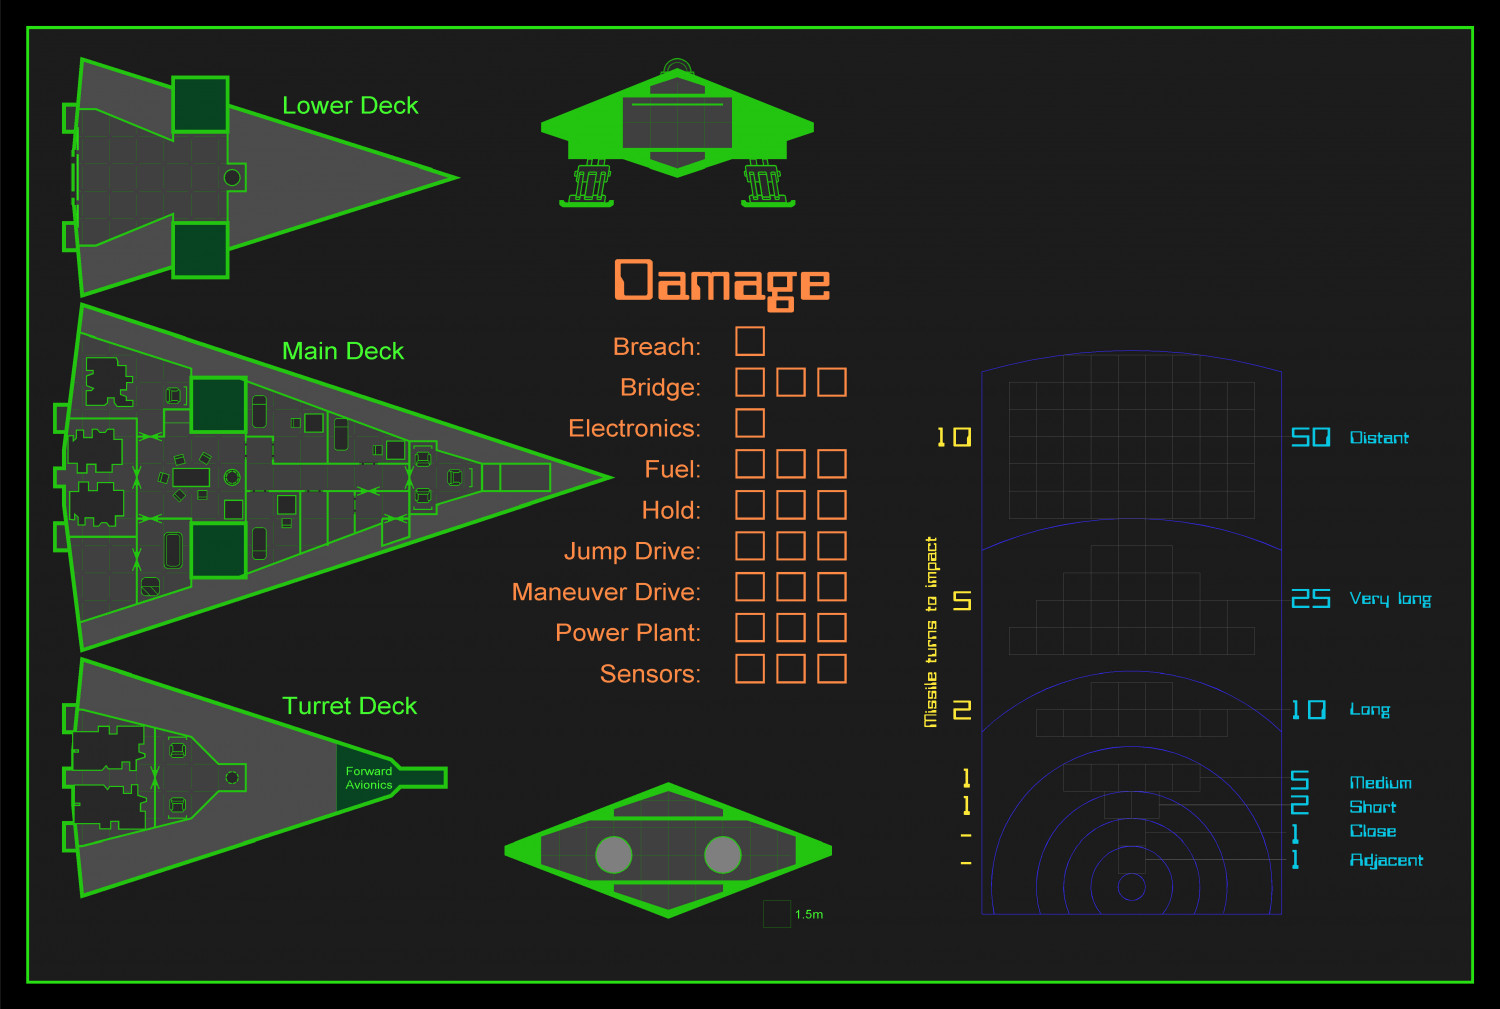
There are many formats equivalent to Deepzoom (or DZI), but I'll only talk about DZI (sometimes also called a "pyramid image"). Take the following screenshot of this folder as an example:

In this example, I split a 15000 x 12000 image in smaller tiles, each 256 x 256 pixels; and they're inside a folder named "14" where 14 is the deepest zoom level available. In other words, these tiles have the maximum resolution I have available for this map.
At a zoom level of 10, these are the files in the corresponding folder:
They're still 256 x 256 pixels (except at the edges), but they are downscaled. And this is where the beauty of a script like OpenSeadragon comes in.
If you zoom out the window, the server will send you the downscaled images, because that's what you really need to be displayed in your window. And if you zoom in, only a few high-resolution tiles will be sent to you (a link to the working example is at the end).
If you've ever used Google Maps, you've already used something similar.
How to do it?
To create all the "tiles" in one go, I discovered this tool called vips. It's a programming library and much more, but it does come with a single command-line tool (vips.exe) that offers most -if not all- the functionality.
To create a deepzoom image, you should type something like this:
vips.exe dzsave "MyBigImage.jpg" MyResultingDZIBut do mind the paths and quotes (quotes are mandatory if any folder or file name has a space in them):
"C:\Path\To\vips.exe" dzsave "C:\Path\To\MyBigImage.jpg" MyResultingDZIThis will create, in your current folder, the following:
- A text file named
MyResultingDZI.dzi - A folder named
MyResultingDZI_files(this folder contains the "zoom level" subfolders with the tiles)
In order to upload this to your webpage, you need to create an HTML webpage and upload the OpenSeadragon scripts (which you can download from here).
A bare-bones HTML file looks like this:
<html>
<head>
<title>OSR Dungeon</title>
<script src="./openseadragon-bin-2.4.2/openseadragon.min.js"></script>
</head>
<body>
<div id="openseadragon1" style="width: calc(100% - 20px); height: calc(100% - 20px);"></div>
<script type="text/javascript">
var viewer = OpenSeadragon({
id: "openseadragon1",
prefixUrl: "./images/",
tileSources: "./OSRblue.dzi"
});
</script>
</body>
</html>
Note that the id "openseadragon1" is used in both the
divand when creating the instance in thescript.You'd need to place this HTML file in a public folder in your webpage, and place the other resources (bolded above) in the specified location. In this case, the
.dzifile is in the same folder as my HTML file, the OpenSeadragon script (openseadragon.min.js) is in a subfolder namedopenseadragon-bin-2.4.2, and the generated pyramid files also next to the HTML file.And this is the resulting web page: https://rpg20.com/vips/osr.html
Bonus:
If you already have multiple tiled images, and want to "glue" them and create the DZ in one step, you can still use vips like this:
vips.exe arrayjoin "File1.jpg File2.jpg File3.jpg File4.jpg" mypyr.dz --across 2(of course, assuming 4 files, arranged 2 images across)

- A text file named
-
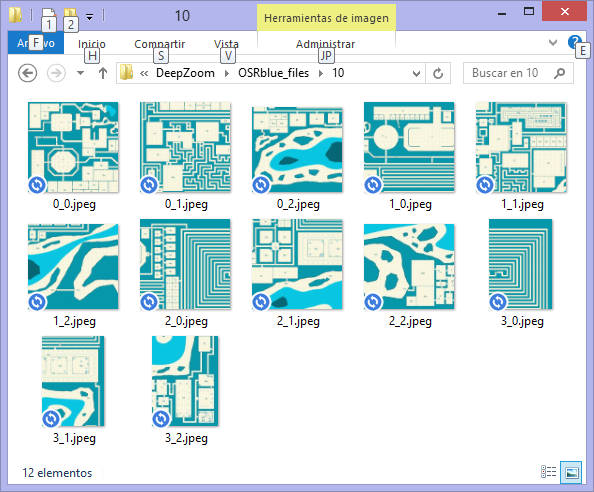
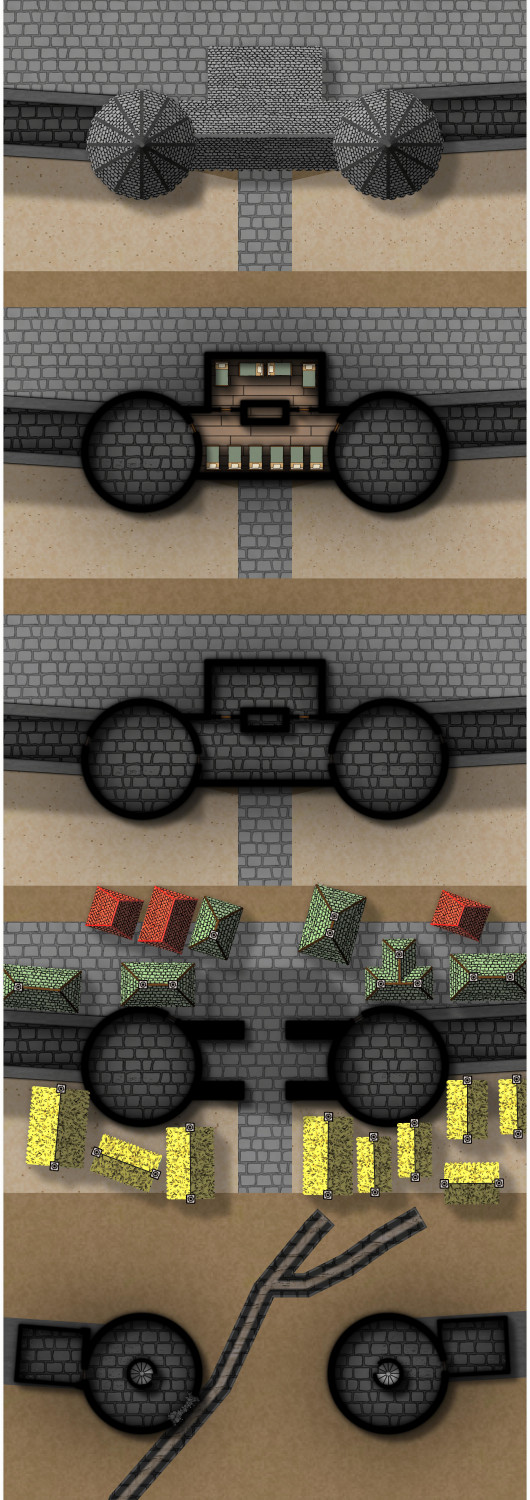
WIP: Relay station
Here's another neon-coloured map I decided to try out. This time, I did take note of the map I wanted to mimic (link), but I feel like I'm waay behind.
Don't get me wrong, I still like the way it's turning out. But it took a form of its own, and it's not really what I sought out to emulate anymore.
Anyway, here's what I have so far. Suggestions are, as always, welcome.


-
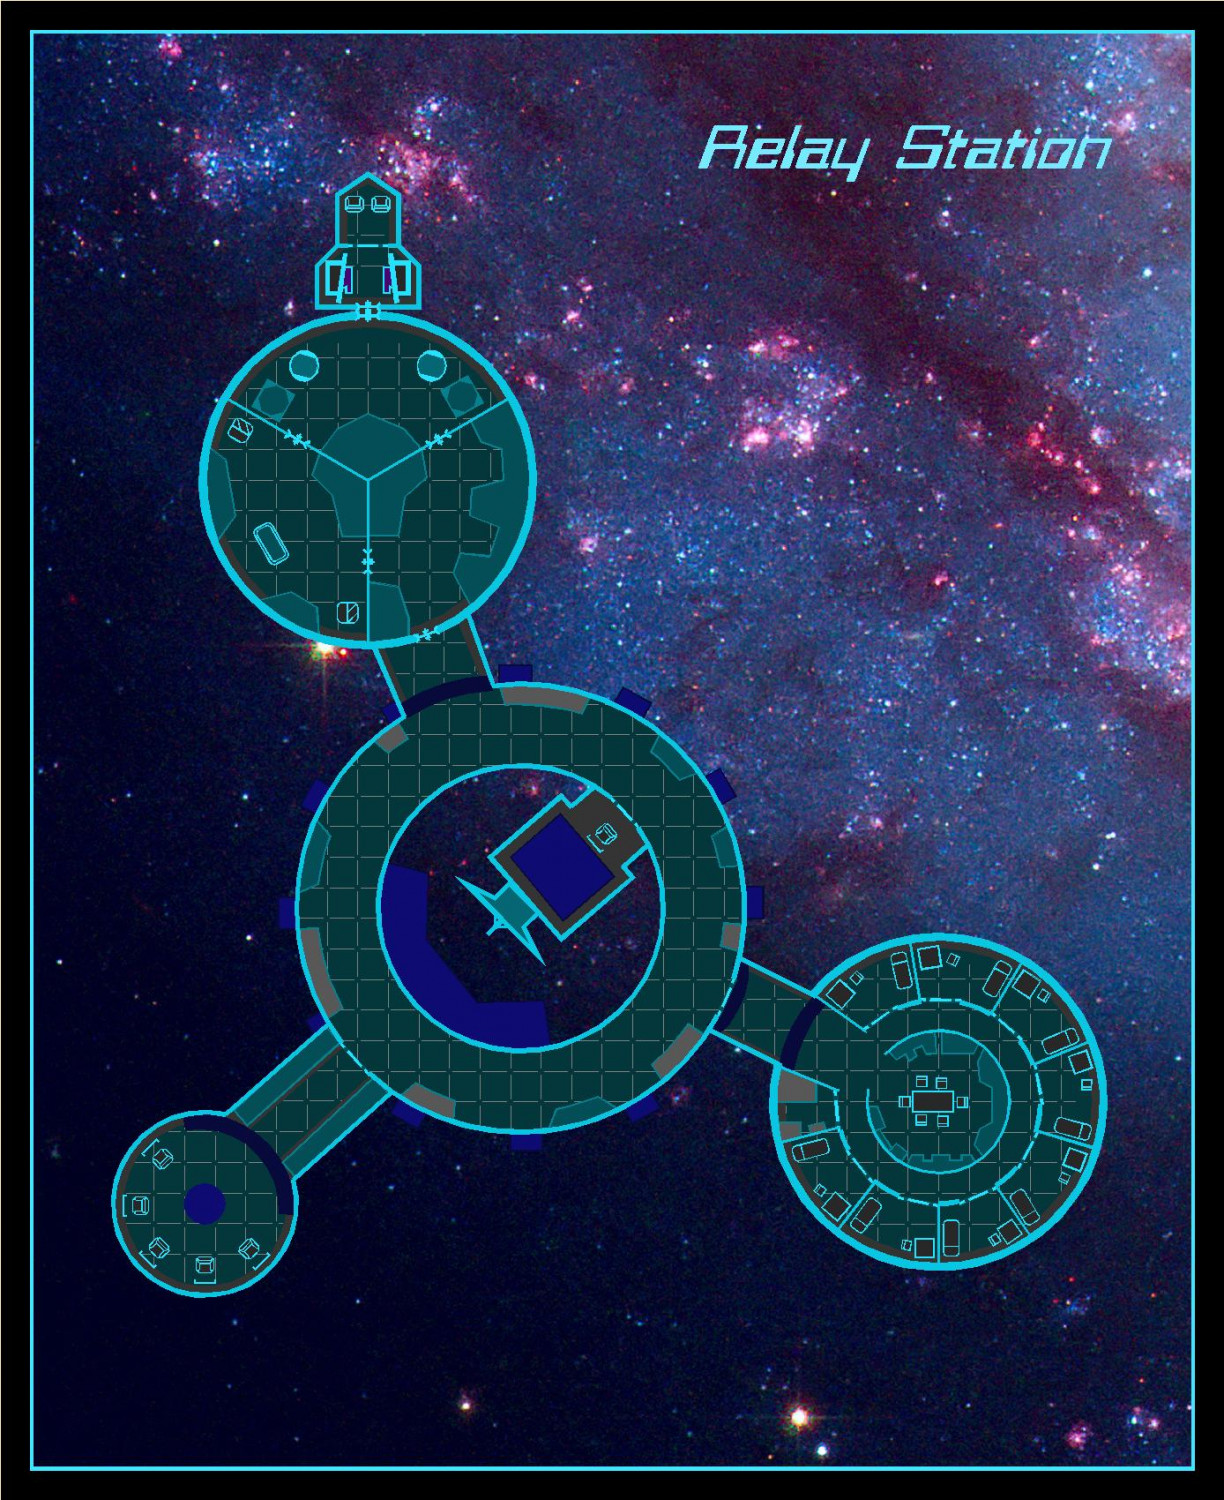
WIP: Cepheus Engine / Traveller tactical battlemap
About a month ago I stumbled into a "tactical battlemap" for Traveller (can't remember where), and I liked the concept enough to give it a try myself.
I don't know if I'll use it since my I'm playing my Traveller/Cepheus game in person. But, we make maps because we like to make them, right?
Anyway, this is what I have so far:
I did try to upload it to my preferred VTT, but I edited the image to have a transparent background (in case I want to later add something else as a background or something else).
I wanted to see if I can get some feedback on things to change, tweak, improve, or just what to put in the upper-right corner. Or how to choose better colors. I'm not the best at choosing colors.
Thanks!


 and 1 other.
 -
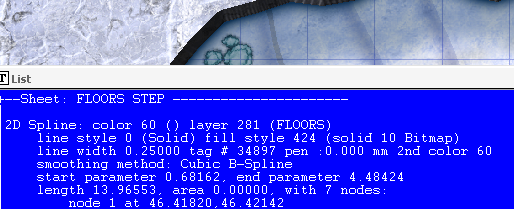
An alternate way to draw elevation changes
I just bought the 2022 annual and decided to try an Ice Cavern.
When I got to the point where I wanted to draw elevation changes, I went back to watch Ralf's live mapping session. But... I'd added a few effects that were conflicting with Ralf's technique in other places, and I must say I'm not a fan of creating tons of sheets.
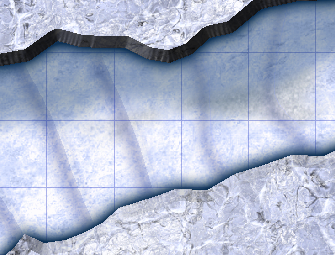
But some creative spark ignited and I came up with an alternative. The result is very subtle (because the lack of bevel makes each "step" less pronounced) but I like it a lot. And I can add many many steps without having as many sheets:
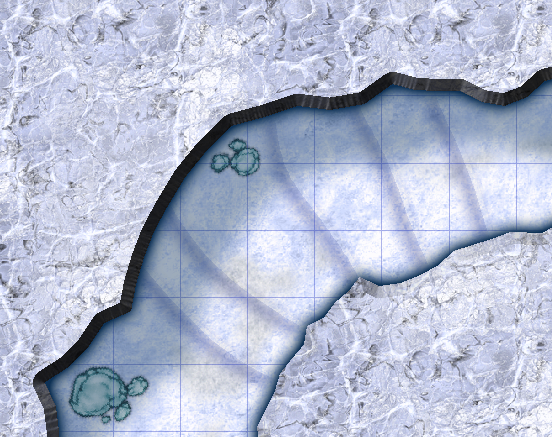
I created a single FLOORS STEP sheet and drew lines with a solid 10 Bitmap (if you hadn't caught it, you might look at the image above and realize it's there... just a faint shade in the top part of each step).
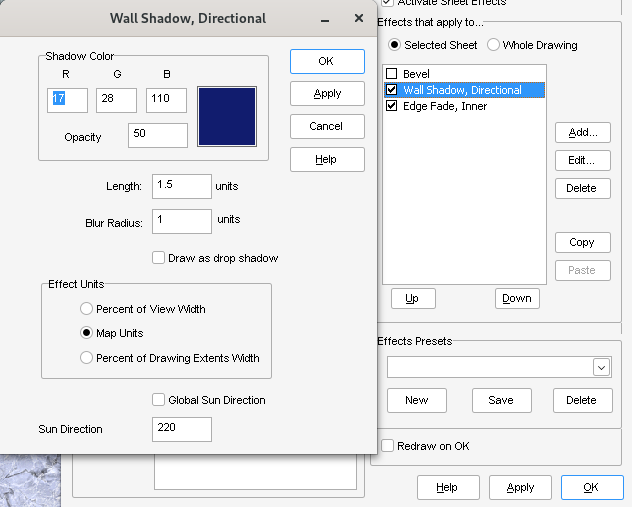
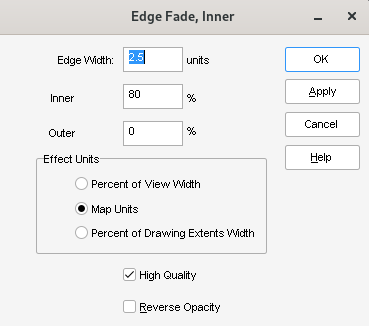
And then just a Wall Shadow, Directional effect, and an Edge Fade, Inner afterwards..
Just for completeness, I tried setting the line to 0-width (the two rightmost in the following image), but the result is even less noticeable (though it might be what you're aiming for):
Of course, given the Sun Direction in my directional wall shadow, these steps only seem logical if going downwards or leftwards, but you can create a new sheet. Two is still a small number. :)
One final note: I had to snap the steps to the nearest point in the cave wall, otherwise I'd get transparency acne (not an issue on the 0-width line).


-
Trying a (few) 2-minute-tabletop style(s)
Before trying my Planescape style (and after trying an old-school style of my own) I tried creating a style using assets by 2-Minute Tabletop (note that I'm only using the free assets... so far). And since I wanted to create a template for each type of map, I ended up making quite a few "sampler" maps (to include as a thumbnail).
These are a few of these maps I ended up creating.
If you've read some of my previous posts, you might have noticed that there's almost always something I don't like about my own creations. But I don't beat myself up, I take it as a lesson, or just something to revisit for later (do throw in comments and suggestions of your own if you wish). And in this case, since they're meant to be thumbnails, they try to showcase what can be accomplished with that template.
Roadside camp

Love the blending of the floor textures (very easy to do with CC3+, it would take me a bit more to accomplish the same with a raster image editing program).
Not convinced about the shadows (too strong, I think).
Ross has a ton of assets suited for this type of maps (I couldn't possibly include half of them in this sample).
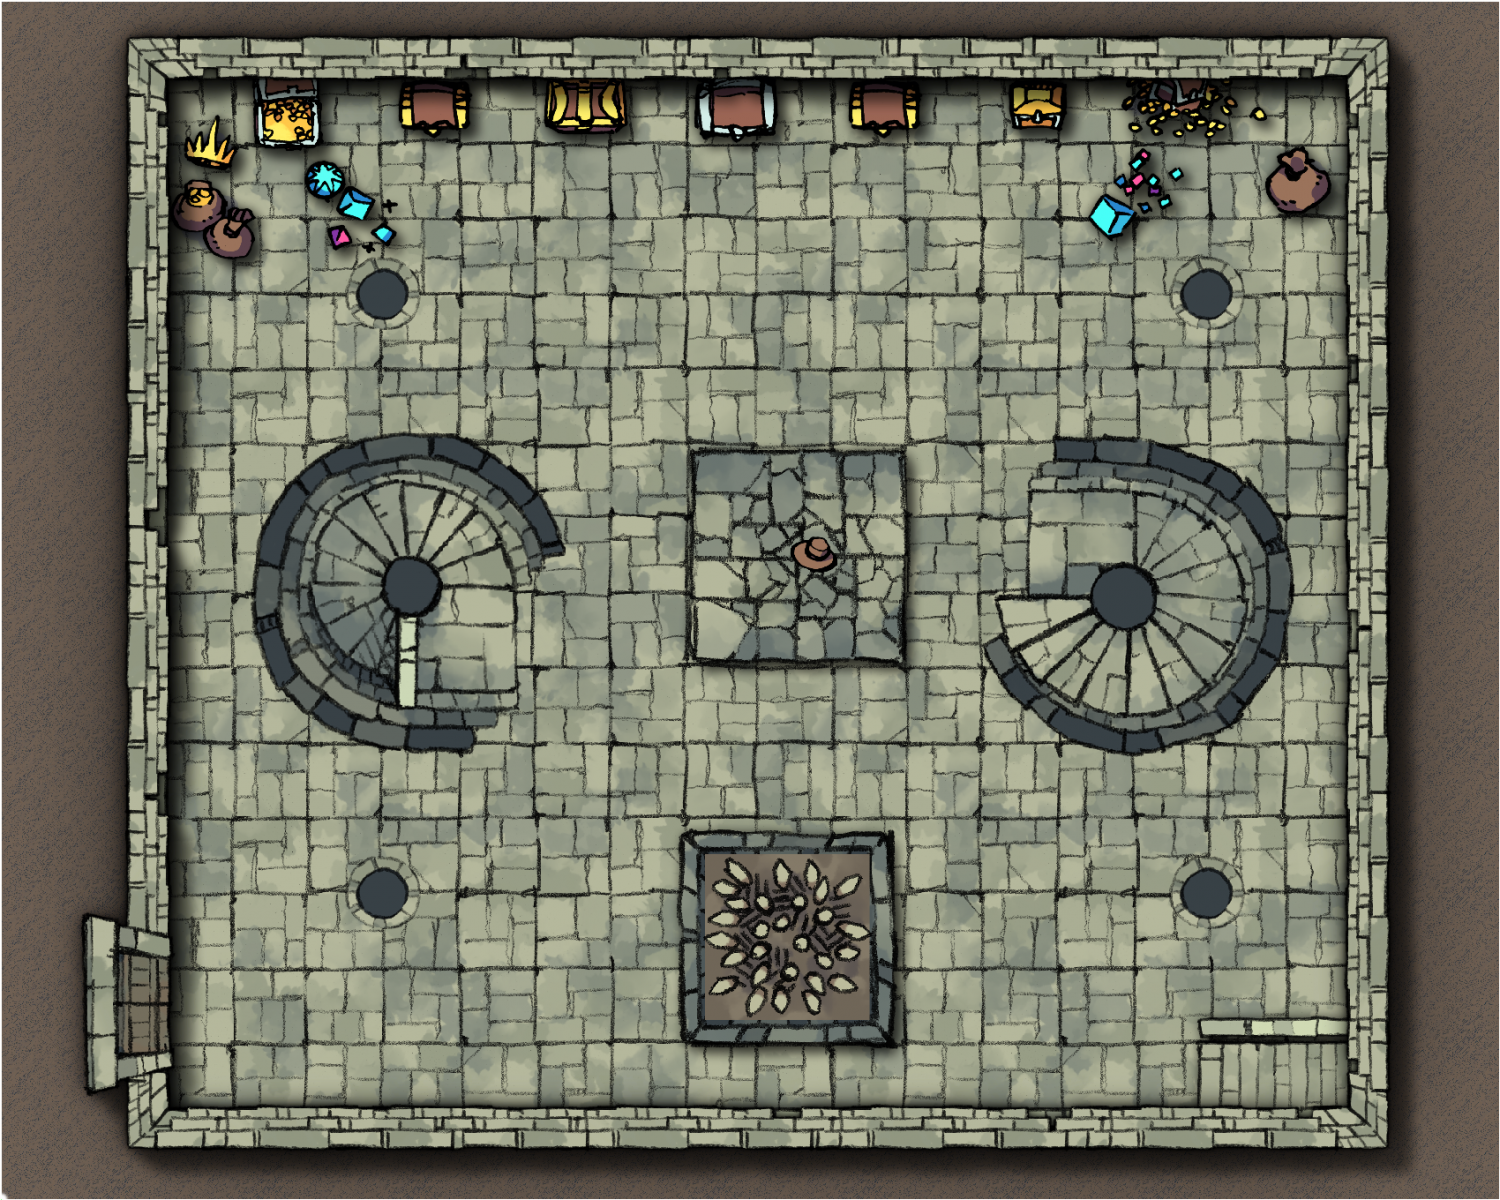
Sewer
There's only a handful of geomorphs for the actual tunnels, and then some symbols for decorating everything.
Yes, I know I messed up the seams in a couple of the geomorphs, something to revisit later.
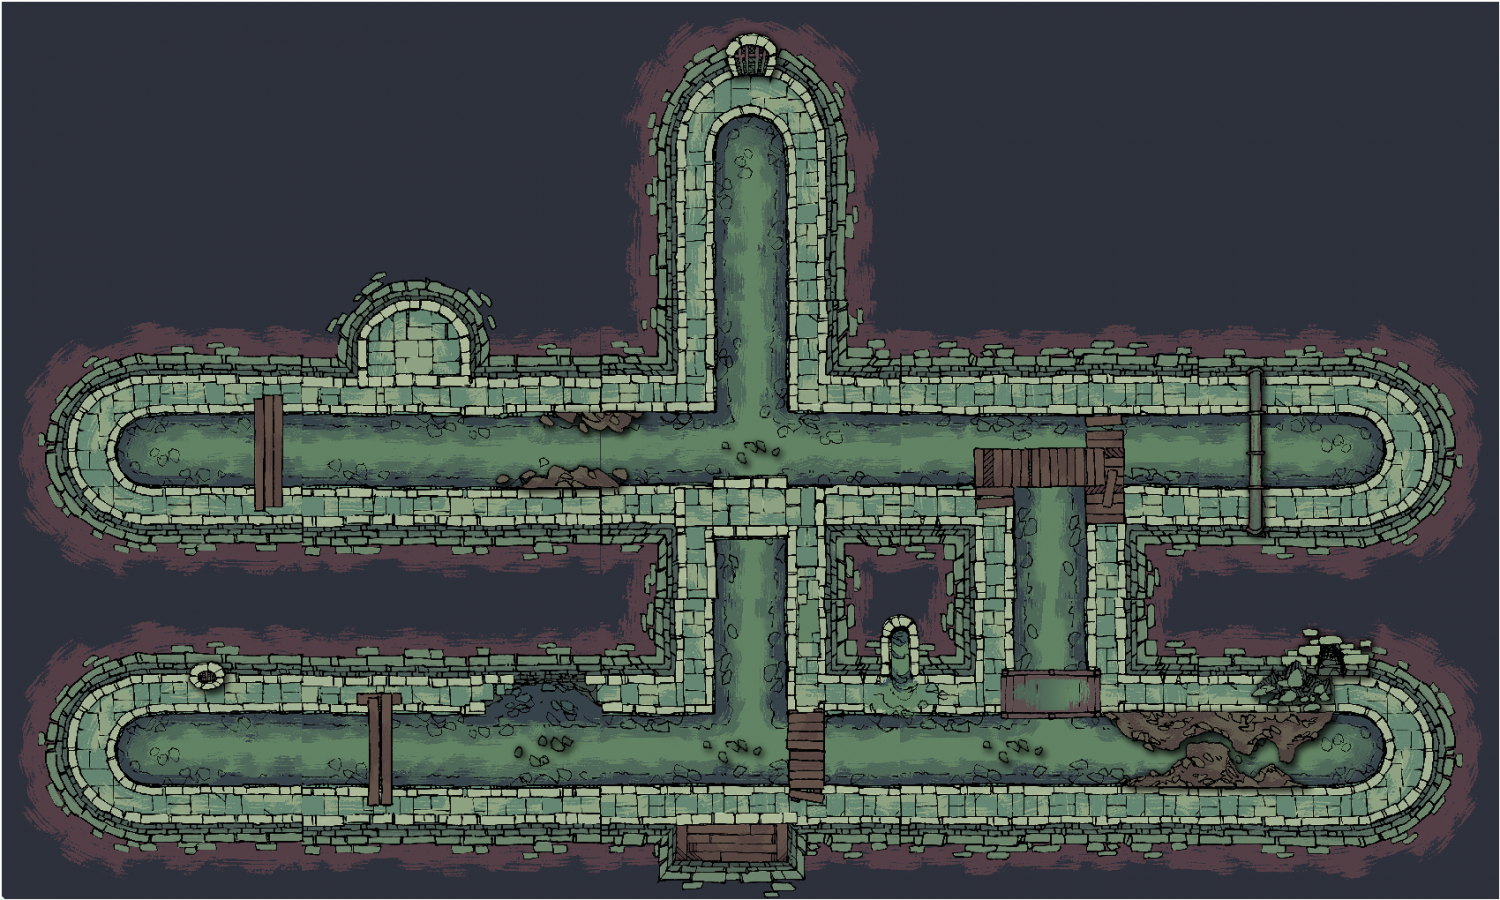
Dungeon
My least favourite accomplishment (the sample I created, not the art by Ross). Basically, I gave up early, created a very bland layout, and called it a day. Also, this was one of the first samples I tried, and I still had some stuff to learn.
Why did I give up?
Well, Ross usually publishes his assets with a generous transparent margin on all sides, so I had a hard time creating properly alingning (snap to grid) symbols for floors and walls.
I do want to revisit the symbols for the walls, and ideally, I'd love to make it a connecting symbol. I might also try to creating a proper texture for the floor instead of tiling symbols at some point in the future.
Desert
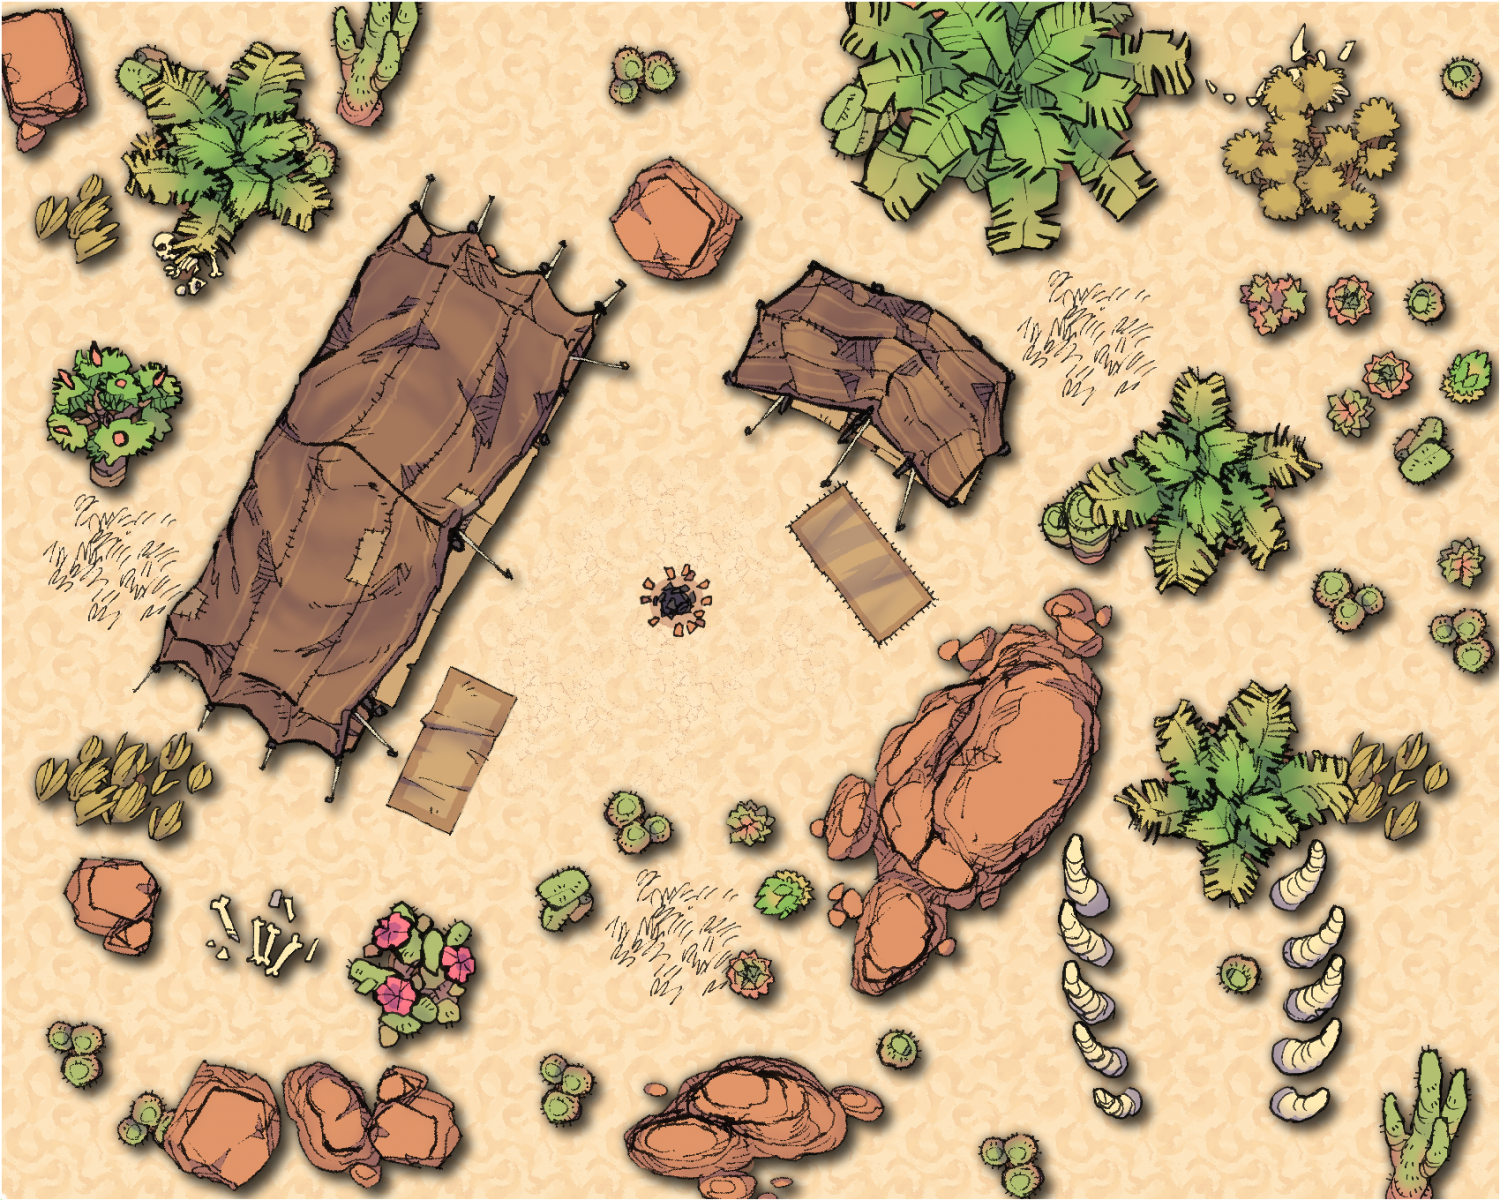
There's not too many symbols for this type of map... but I feel like you don't need too many.
Shadows could be improved (again). Not everything make sense, but in my defense, this is meant to be a sampler.
Ocean
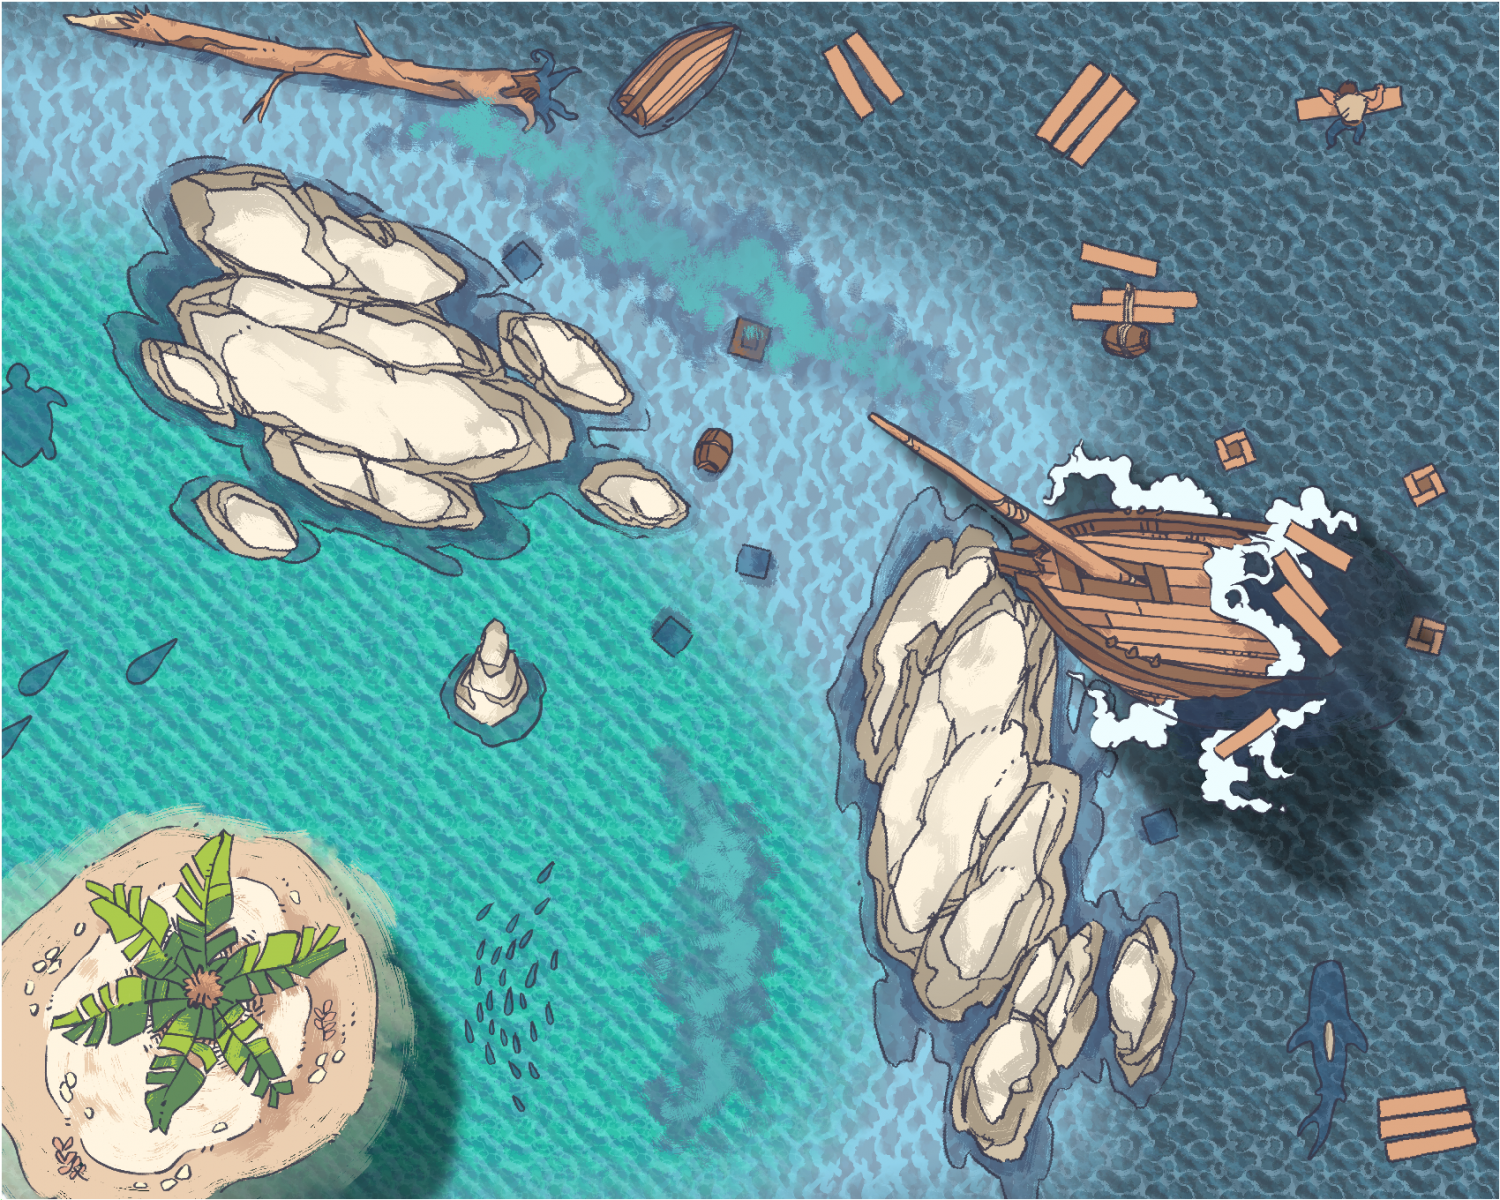
There's not too many assets for this "type" of map, but they seem to be enough for me. Ross did a great job with these packs.
I like the blending of the different depths, I like the shadows.
Snowy winter
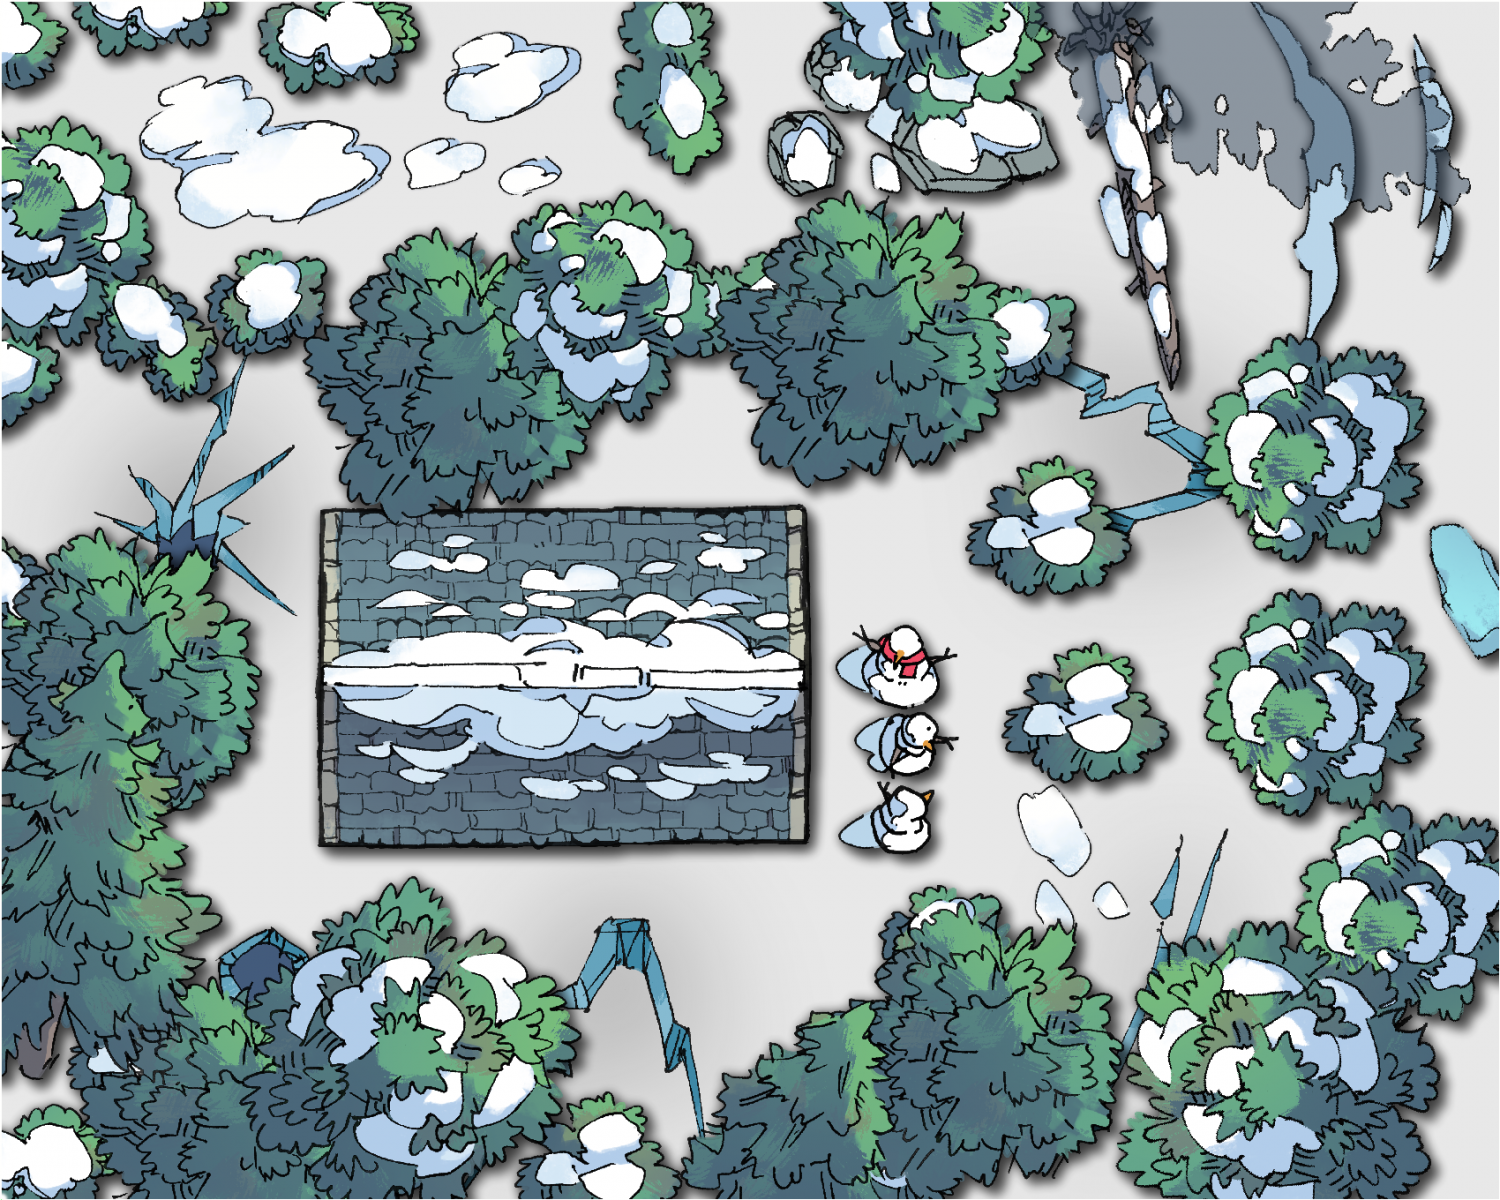
IIRC, there's one asset pack for this "type". But I liked the result very much. There wasn't a floor texture available, but solid fills did the trick IMO.
World
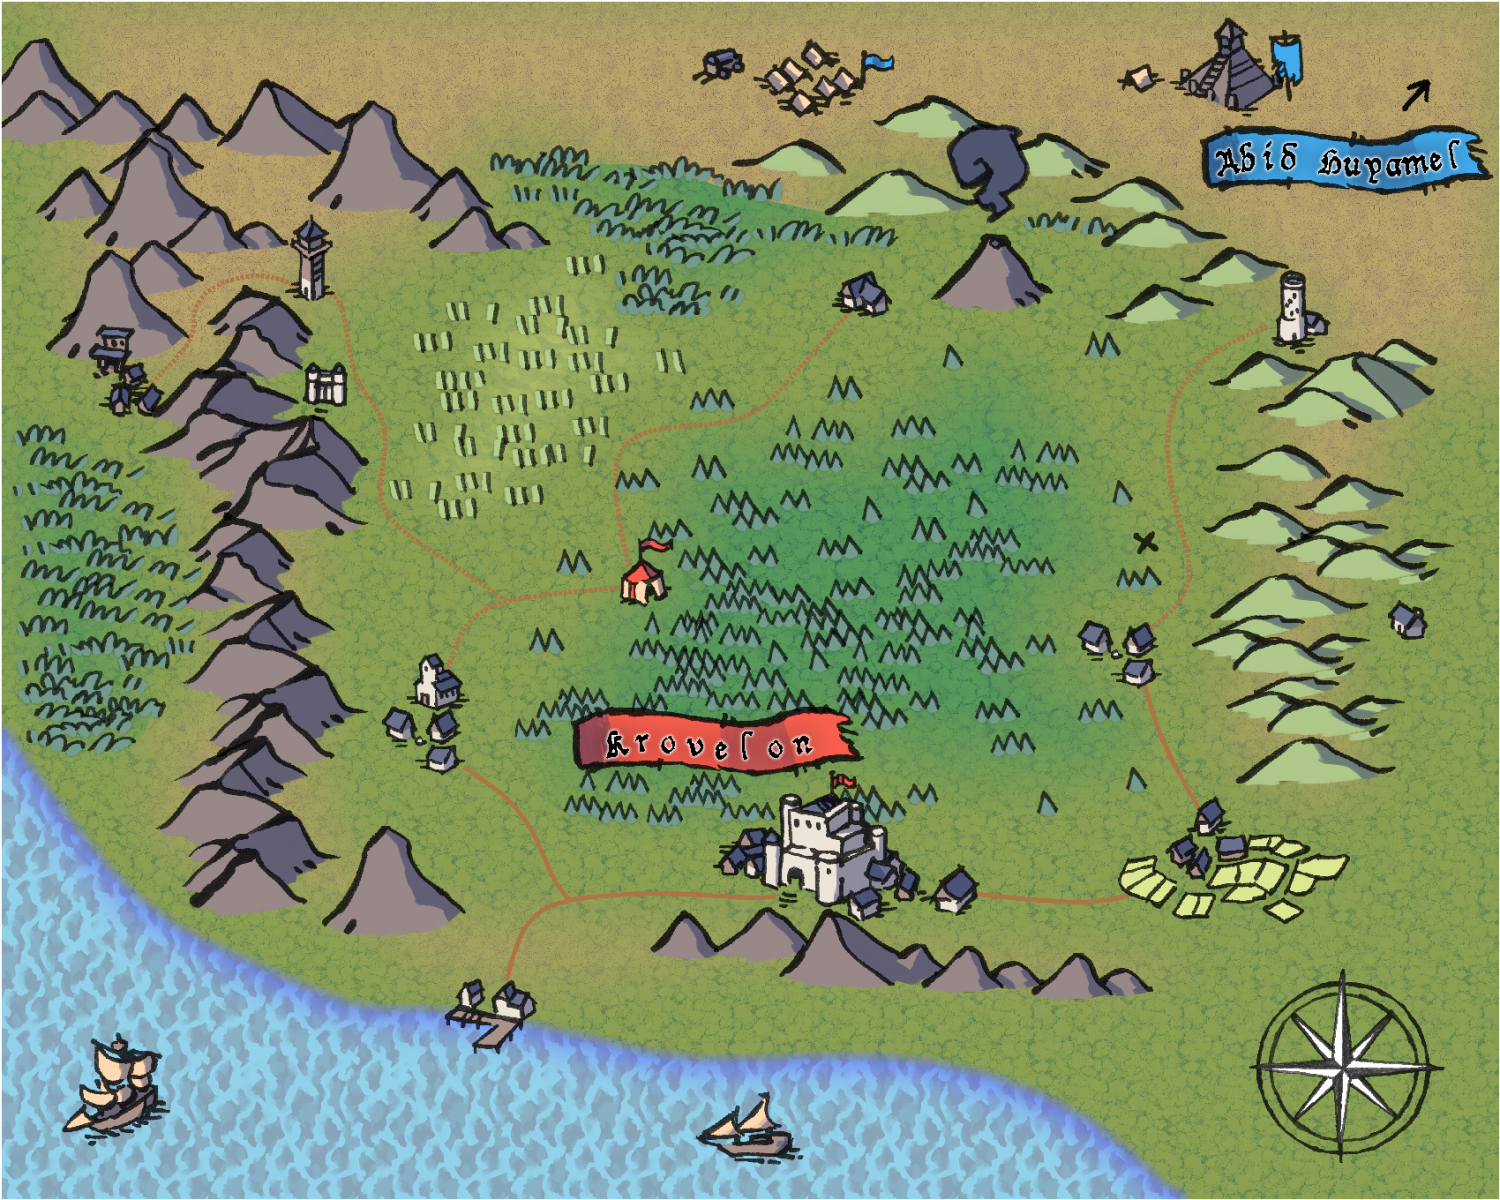
Ross created this pack with Wonderdraft in mind, but they can be used in CC3+ with no problems.
I need to work on those shorelines.
Cyberpunk
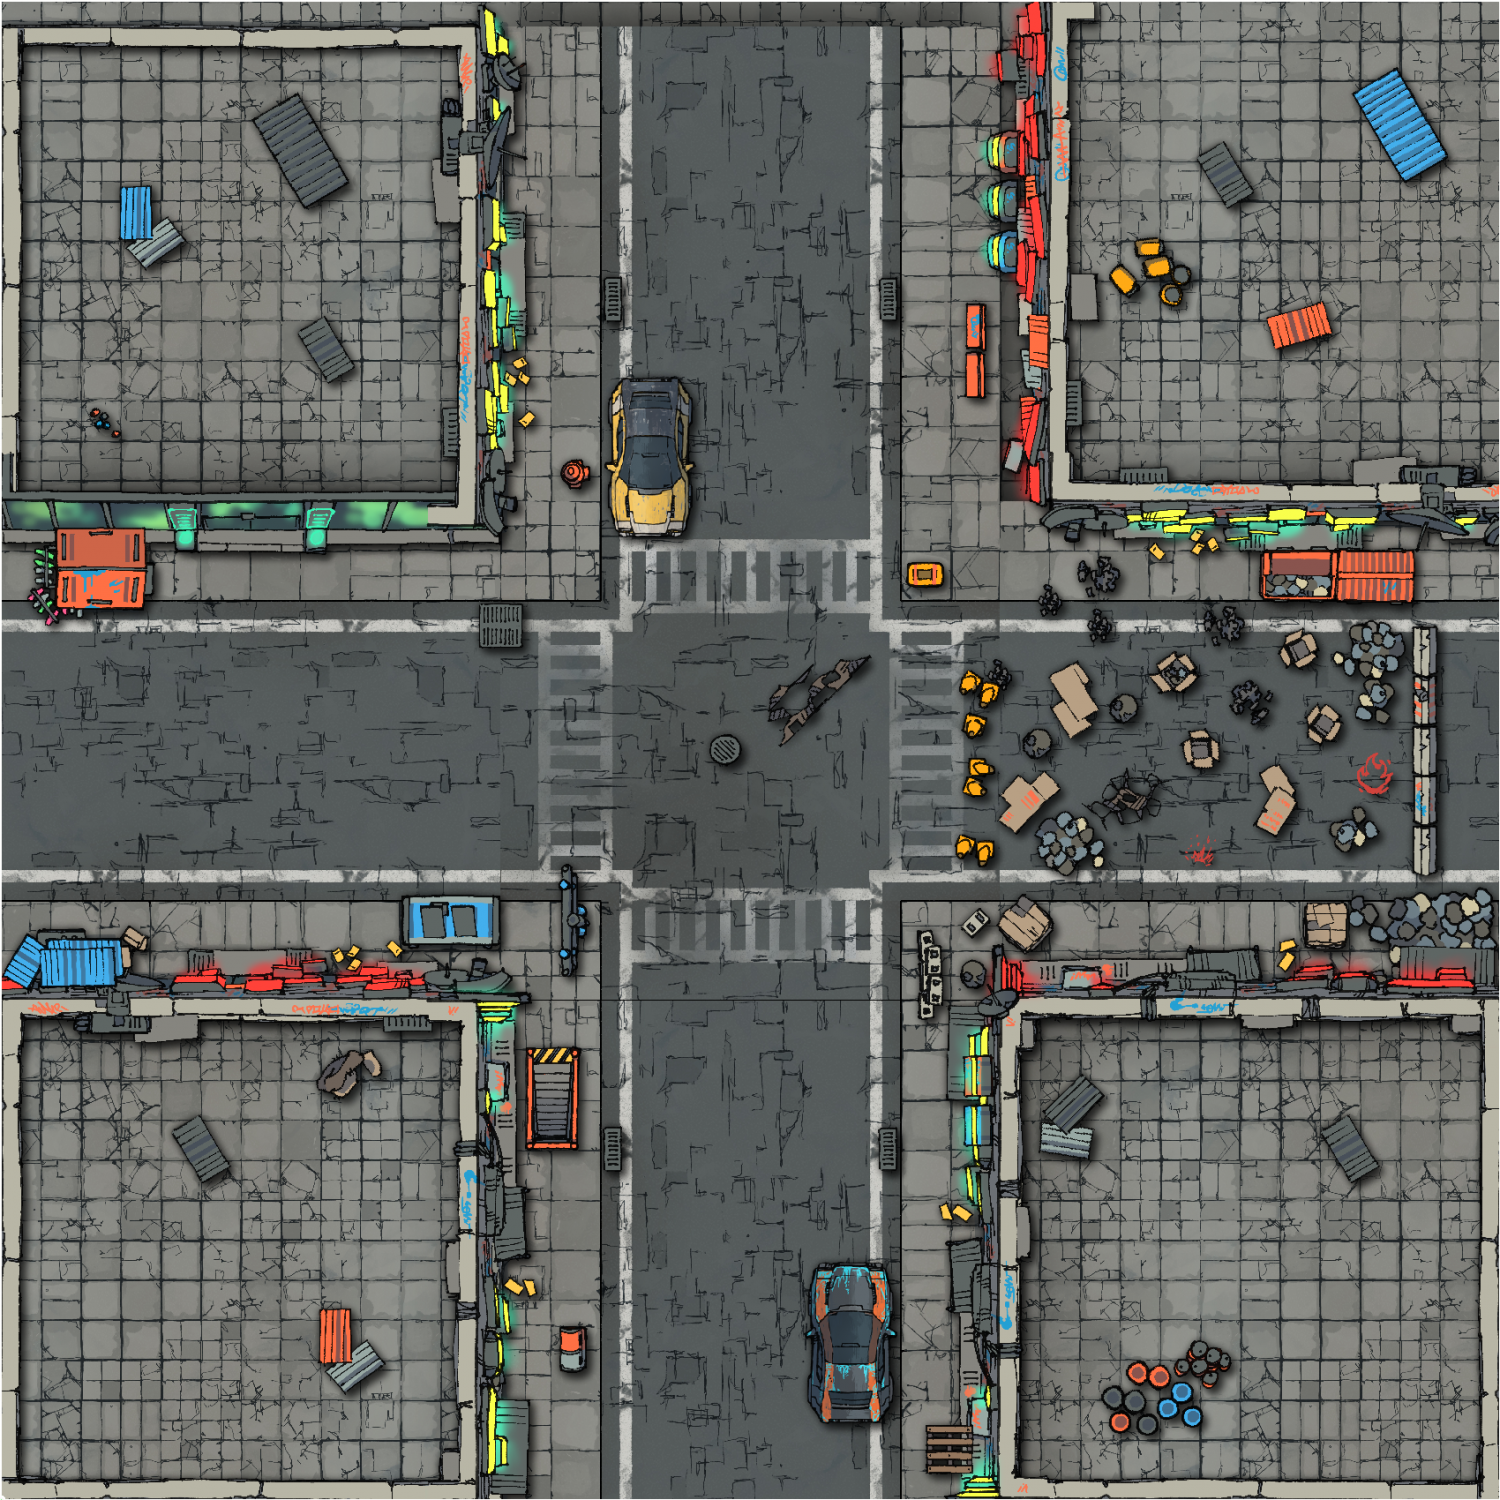
I used 3 packs for this sample. Pretty good results (the paid pack should add a lot of possibilities).
As I type this, I realize I could improve the shadows (yet again). Did I mention these were intended for a thumbnail only? ;)
And finally...
Cave
Now, I should start by saying... I consider this a Beta (or even alpha) sample. More on this after I present to you the image in its current state:

The walls.
You see, Ross has these beautiful hand-drawn textured walls that I like very much. He does offer a cave room builder set, but unless I manage to create a connecting symbol for the cave walls... I'm not sure I'd do it justice.
Or maybe there's something to be accomplished with the Symbols Along Path functionality?
I have to mull it over.
Anyway. This is part of my journey. And it's been fascinating so far.

-
Trying out a Planescape style
The next town is Ecstasy (original map here):
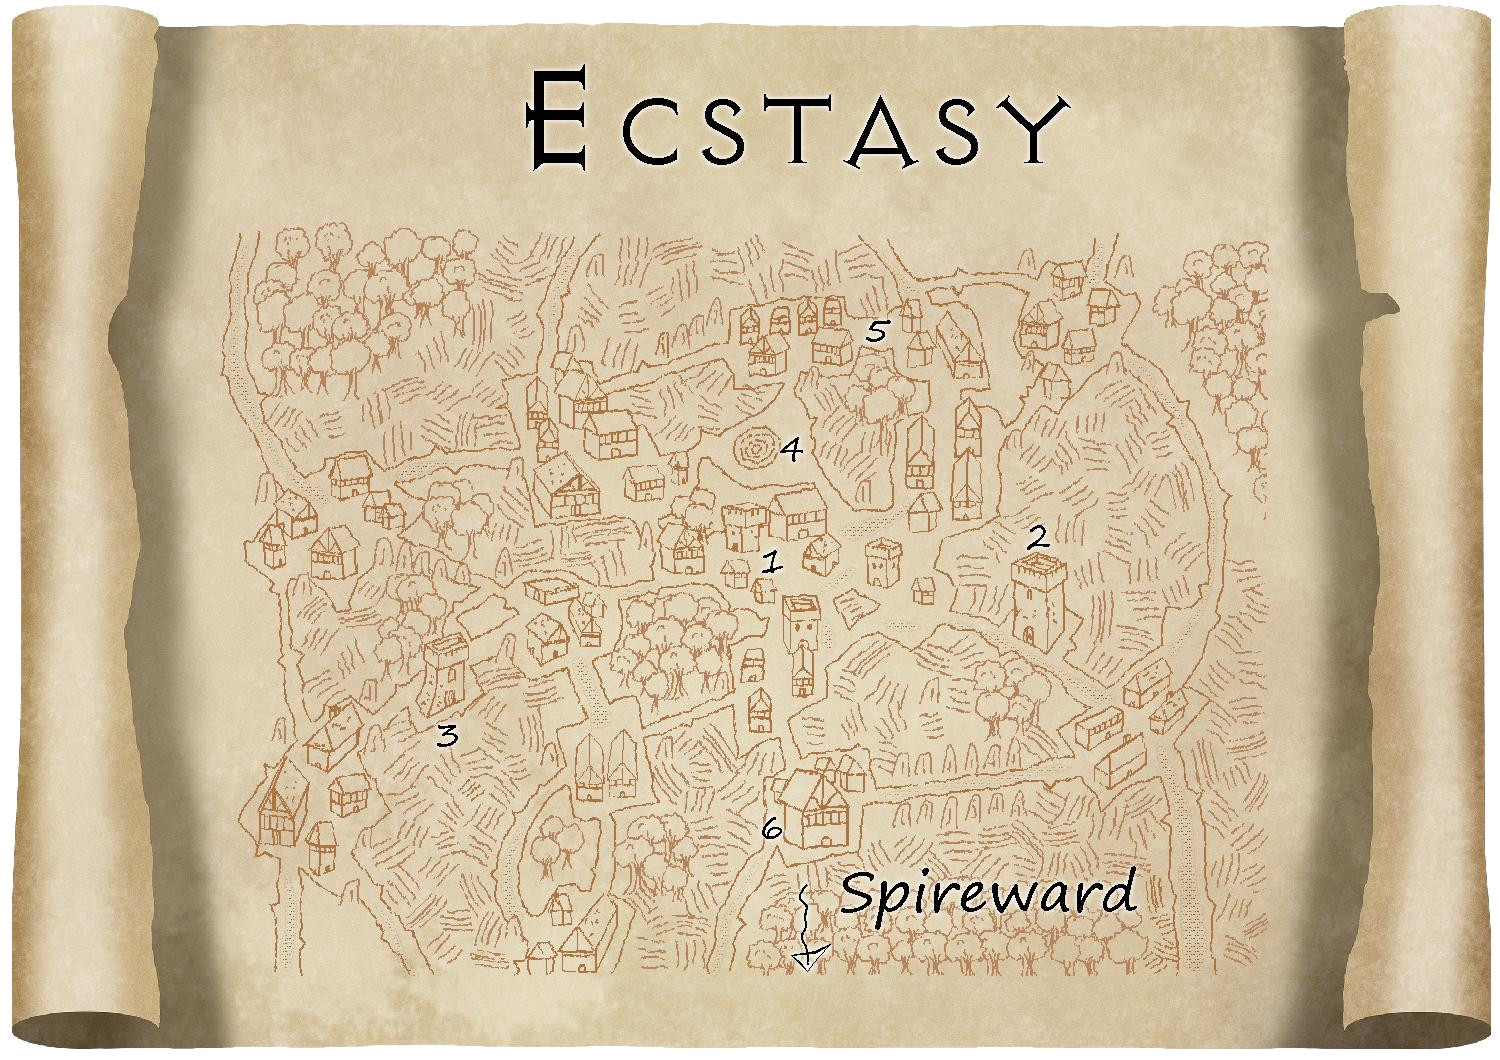
This one took a lot of work. I had to create one too many symbols, and in that process, I discovered I need to find a better way of naming/grouping the building and house symbols. The thing is: you can't rotate isometric symbols. A house drawn at 45º can't be rotated to match a 30º road.
On one hand, you want to be able to switch between different angles/orientations (ie: pressing tab on a collection to "rotate") and on the other hand, you want to choose a single orientation and have the symbol catalog randomly choose a symbol so they all look different. But I was already getting tired of drawing symbols, so I took some creative liberties.
Roads were the easiest part. I just created a drawing tool and traced the road edges instead of the full roads. Unlike previous maps, I added a noticeable glow to the text in this one (I like it. I might add it later to the previous maps). Finally, I'm not convinced about the farms. I drew them with the pencil tool, but when I added the displace effect it was a bit too much. I could have also rotated each one of them manually, but I was getting tired so I just adjusted the worst offenders.
I still want to redo something about all the previous maps, so we can also call this: version 1.0.
-
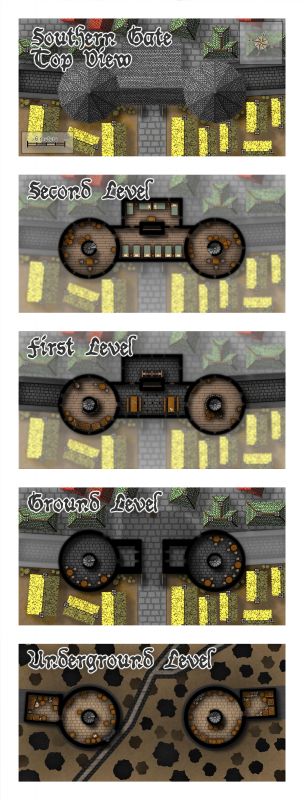
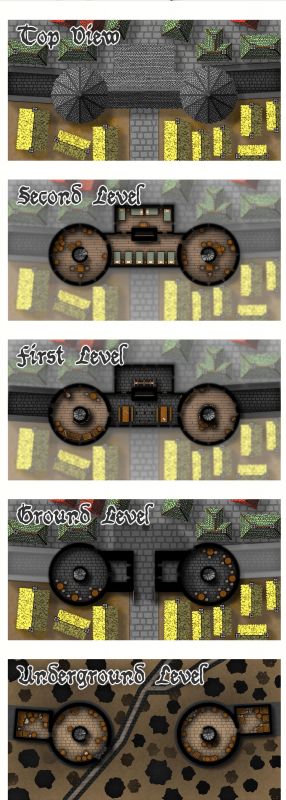
[WIP] August Competition - The Southern Gatehouse
Starting to take shape...


-
Trying out a Planescape style
I wanted to follow up with an "Eureka" moment I had while creating my style. Perhaps it's nothing new to all the experienced mappers here, but might be useful to novices such as myself.
My problem was that while creating my vector symbols, they behave as wireframes... allowing visibility of other symbols behind:
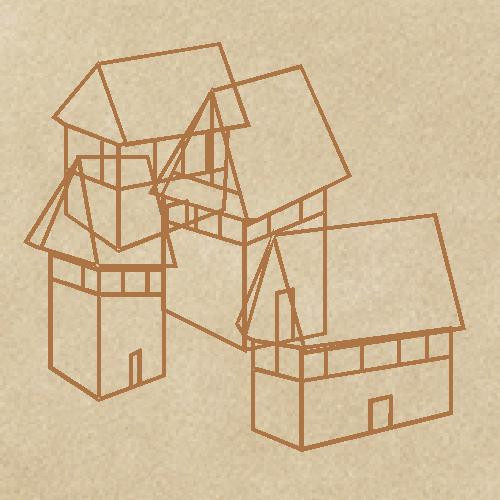
I thought this would be the time to add a fill and test the "Line style names to Sheets" options, but no. That doesn't work because all the wireframes from all symbols would still be in the same sheet (and still overlap each other).
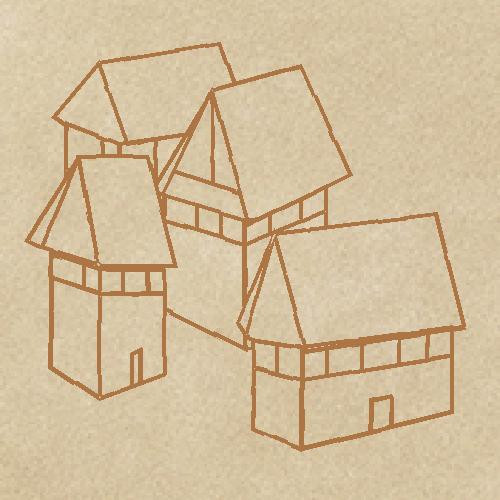
I still tried to add a fill that somewhat fits nicely with the parchment background, and ended up with this:
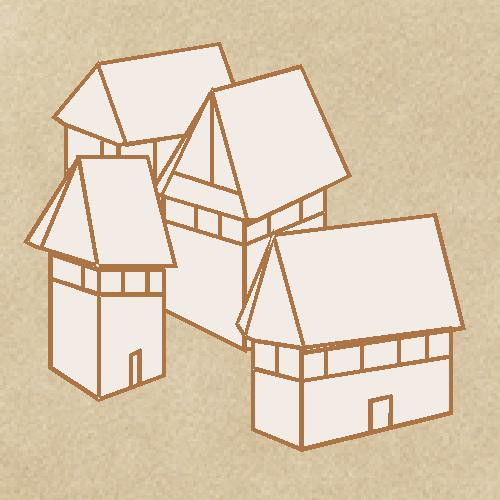
Better, but I wasn't convinced. Then it hit me: I can use the Color Key effect! And that did the trick:
Since all symbols are on the same sheet, the color-keye'd fills will be ordered correctly. And I can no longer see through buildings.


