


Loopysue
Loopysue
About
- Username
- Loopysue
- Joined
- Visits
- 10,358
- Last Active
- Roles
- Member, ProFantasy
- Points
- 10,110
- Birthday
- June 29, 1966
- Location
- Dorset, England, UK
- Real Name
- Sue Daniel (aka 'Mouse')
- Rank
- Cartographer
- Badges
- 27
Latest Images


-
Filling unneded space
Remy wrote an article on how to show and hide secrets here:
You can edit the sheet effects to taste. Open the Sheets and Effects dialog again, pick the sheet with the effect you want to modify, and then pick the effect itself in the right hand pane. Then click the Edit button and a dialog will appear with all the settings you can adjust. Click Apply when you want to see how your changes affect the map.
Playing with sheet effects can take a while, but time spent playing will pay off in the end when you will be able to tell exactly how you want something to look and know how to make it look that way in the future.


-
CA style development - "Darklands City" (issues for September and December 2021)
Well that's easy, Quenten. Since turkeys are too small to be more than a dot at city scale, all you need to do is draw a dot in turkey colour, and then put flames coming out of it :)
Need for a bull noted, Wyvern! LOL!

![[Deleted User]](https://secure.gravatar.com/avatar/c75d9a245b74d9c59be0999ea81ca541/?default=https%3A%2F%2Fvanillicon.com%2F92add7f8c954488718110edc4896ad39_200.png&rating=g&size=200)

-
Making a Mountain
That is transparency acne.
The rendering engine gets confused if the pixels on two sheets are the same colour and decides that there must be a hole in the polygon on the uppermost sheet. The hole isn't really there, but that's how the rendering engine interprets the fact that the pixel hasn't changed colour between the two sheets.
This doesn't happen too often, but when you use polygons of the same texture on two adjacent sheets, and then apply a bevel, or an edge fade inner to the topmost of those two sheets, that sheet effect is applied to all the edges - including to the tiny square edge that exists around each of the pixel 'holes' interpreted by the rendering engine.
You can stop it doing that by adding another sheet between those two (we tend to call it a separation sheet), and copying the topmost polygons onto it. Then use the Change Properties tool to change the new polygons on the new sheet so that they are a solid colour that isn't likely to be in the texture (227 is a good one), and maybe a add an edge fade inner to make sure it doesn't show around the edges. The point of that is to make sure the rendering engine sees the difference between the underlying rock and the overlying rock.

-
Placement of trees
The answer to that one is practice.
I assume you are hand placing the trees, rather than using any of the Symbol fills or Symbols in Area command.
Hand placed trees always look more natural, as long as you don't think about it too much and just do it. The more you think about it and the more care you take the more it looks like a forestry plantation with everything in regimental rows.
Having said that, try overlapping the trees to hide the trunks in a thick forest, and try not to leave spaces that are too regular in other places. Trees often grow in groups or small copses, so try grouping 3 or 5 together in little patches, but in a semi-haphazard way. Do the dense forest first, and then the woodlands around them, so that there is a gradual gradation from thick forest to savannah.


-
Exporting Issues...all of a sudden
The span of the sheet effect is greater than the span of the rendering pass, so when the pass just misses the polygon it doesn't recognise the sheet effect and doesn't render it.
There is an overlap between passes designed to reduce this problem, but it isn't always large enough. The best way to get rid of most of it is to increase the span of the rendering pass.
Type EXPORTSETMPPP and hit enter. The command line will show you a number. If you haven't ever changed the setting before it will be 4000000 (four million). Type 40000000 (40 million) and hit enter, then try again.
-
Ayreon
It looks like an artefact that can happen sometimes if there are 2 nodes very close together. It will probably appear and disappear as you zoom in and out.
The solution is to use the SIMPLIFY command to remove these problematic nodes.
Type SIMPLIFY on your keyboard and hit Enter. Look at the command prompt and see the distance set by default. You can enter a new value, or just hit Return again to use that one. Then use the tool to simplify the coastline of the island the line is coming from.
If you lose too much detail just hit the undo (CTRL+Z) and reduce the factor and try again.


-
are there one on one mentors
We're all generally available to everyone :)


-
Fantasy B&W Map
Here's a checklist:
- Check that the sheet with the parchment on it is on top of everything else (bottom of the sheet list).
- Make sure you have a Blend Mode sheet effect on that sheet, and set it to Multiply and 100%
- Type the command DELAYDRAWSYM and set it to 1
That should work, but if it doesn't shout again.


-
How do you make your own terrain fills?
Most fills used in CC3 are seamless. That means the image can be tiled side by side or top and bottom without the join showing. Like this. (I've moved them apart a bit here to show what is meant).
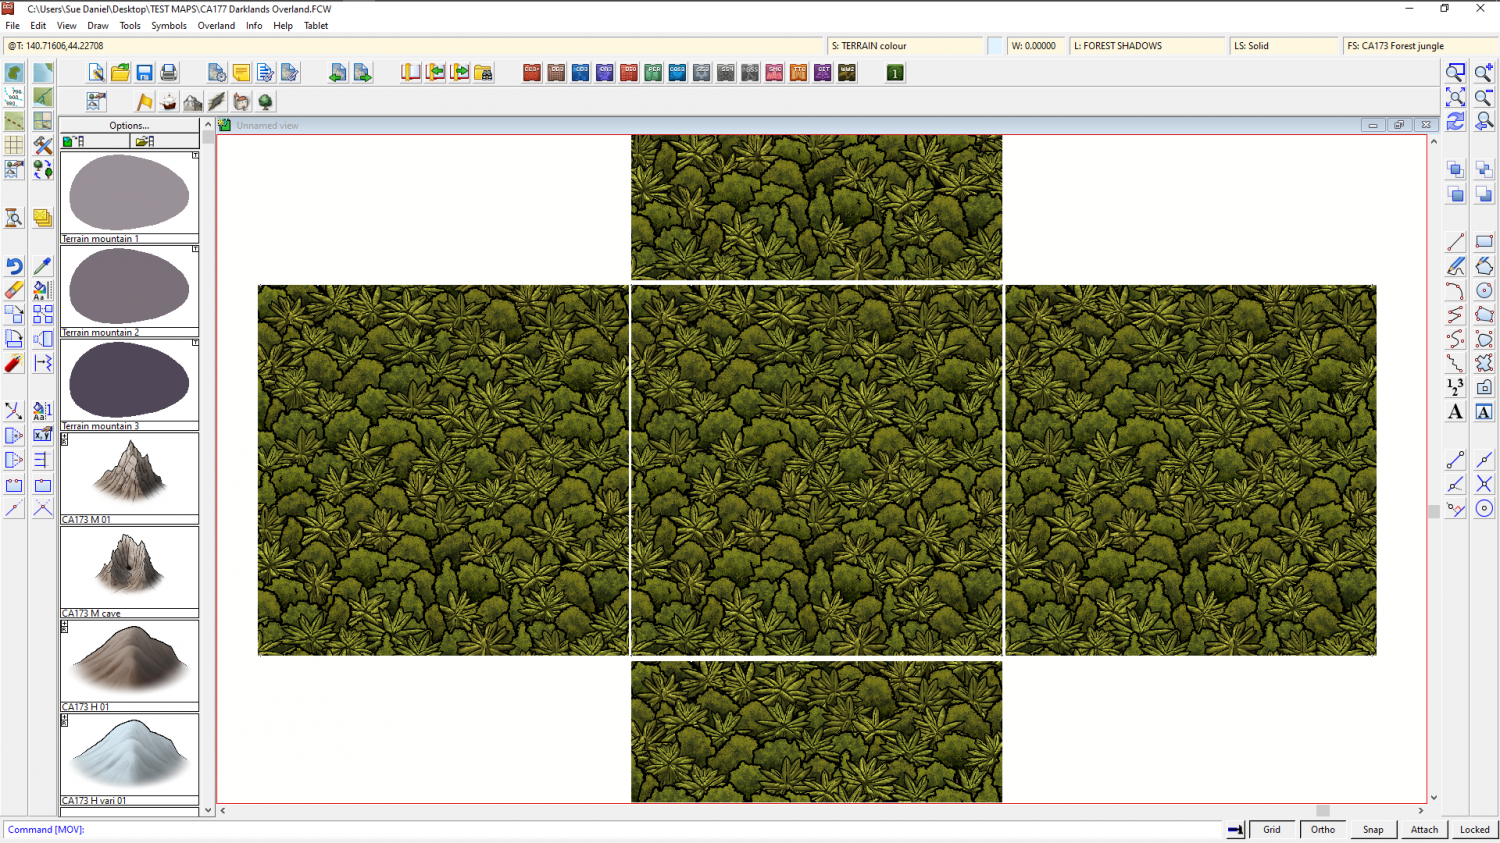
Most fills aren't that big - about 1000 px square, though some I've made are 1500, 2000, 3000 px square. It depends on how much variability you intend to put into it. If you have whole hills in a fill that can be really repetitive if you don't have a bit enough patch to put them in. Consider that if you import a fill that is 2000 px square, to match the resolution with the symbols you have in the map it should really be scaled to about 100 map units, or 100 miles/kilometres (overland symbols are usually 20 px per map unit).
To make a new drawing tool for your fill you could start with one of the two bitmap fill tools already available in the style, select it, then hit the New button and set it up to put your fill on a sheet of its own with its own edge fade, etc.
If you were making a fill of trees like the one above, I've written a short blog about how you can do that in CC3, but I doubt that will be relevant to a dirt fill. https://rpgmaps.profantasy.com/generating-seamless-tiles-part-1-making-seamless-tiles-in-campaign-cartographer/


-
Battle map question
1" = 5 feet = 1 grid square.


