


Loopysue
Loopysue
About
- Username
- Loopysue
- Joined
- Visits
- 10,415
- Last Active
- Roles
- Member, ProFantasy
- Points
- 10,161
- Birthday
- June 29, 1966
- Location
- Dorset, England, UK
- Real Name
- Sue Daniel (aka 'Mouse')
- Rank
- Cartographer
- Badges
- 27
Latest Images


-
Map of a real region
It's coming on really well, though I think you may have misunderstood me when I suggested the paper texture in the symbols. The idea was to multiply the texture over the top of the entire symbol so that the paper texture is effectively mixed with the colours of the symbol rather than just a background, so that in the editor you are using to create your symbols you get this:
- Paper texture layer, set to multiply mode
- All the layers the symbol is drawn on
For the frames, maybe just a simple line at zero width around each one, and a blend mode that is set to overlay with opacity reduced to such an extent as to make them nearly invisible. Be careful, also to leave at least a small space all the way around the inside of each frame so that the text doesn't touch the sides. Probably better to reduce the size of the text a bit so the symbols don't start to look small and lost.


-
WIP - Bend Road Crossing
That's a good map.
I'm pleased to hear you are enjoying the style :)
As a side note here - that transparency acne in the south west corner can be remedied by redownloading the updated installer and using it in repair mode. The textures have been repaired to prevent it in most cases since the original publication.

-
Tool control background fill color
You're welcome :)
Now click the :CC2PRESETS: button and then click the Attach to Drawing button in the dialog that appears and save the file.
We might never know how that happened, but if you get into making your own palettes in the future those top 2 rows must always be left as they are because they affect the colours of the interface.
In answer to your question - the default palette is used in the vast majority of templates, though there are a few styles that have their own variation of the palette, like the one I just showed you.


-
Marine Dungeon - further developments
Hi Everyone! :)
During the Live Mapping session yesterday, where Ralf demonstrated the new Marine Dungeon style published as the July issue of this year's Cartographer's Annual, he mentioned that we had already discussed the possibility of there being a few additional symbols in the same style at some point in the future. So now I am trying to make a list of what everyone would like.
Just as a reminder, this is the example map from that style.
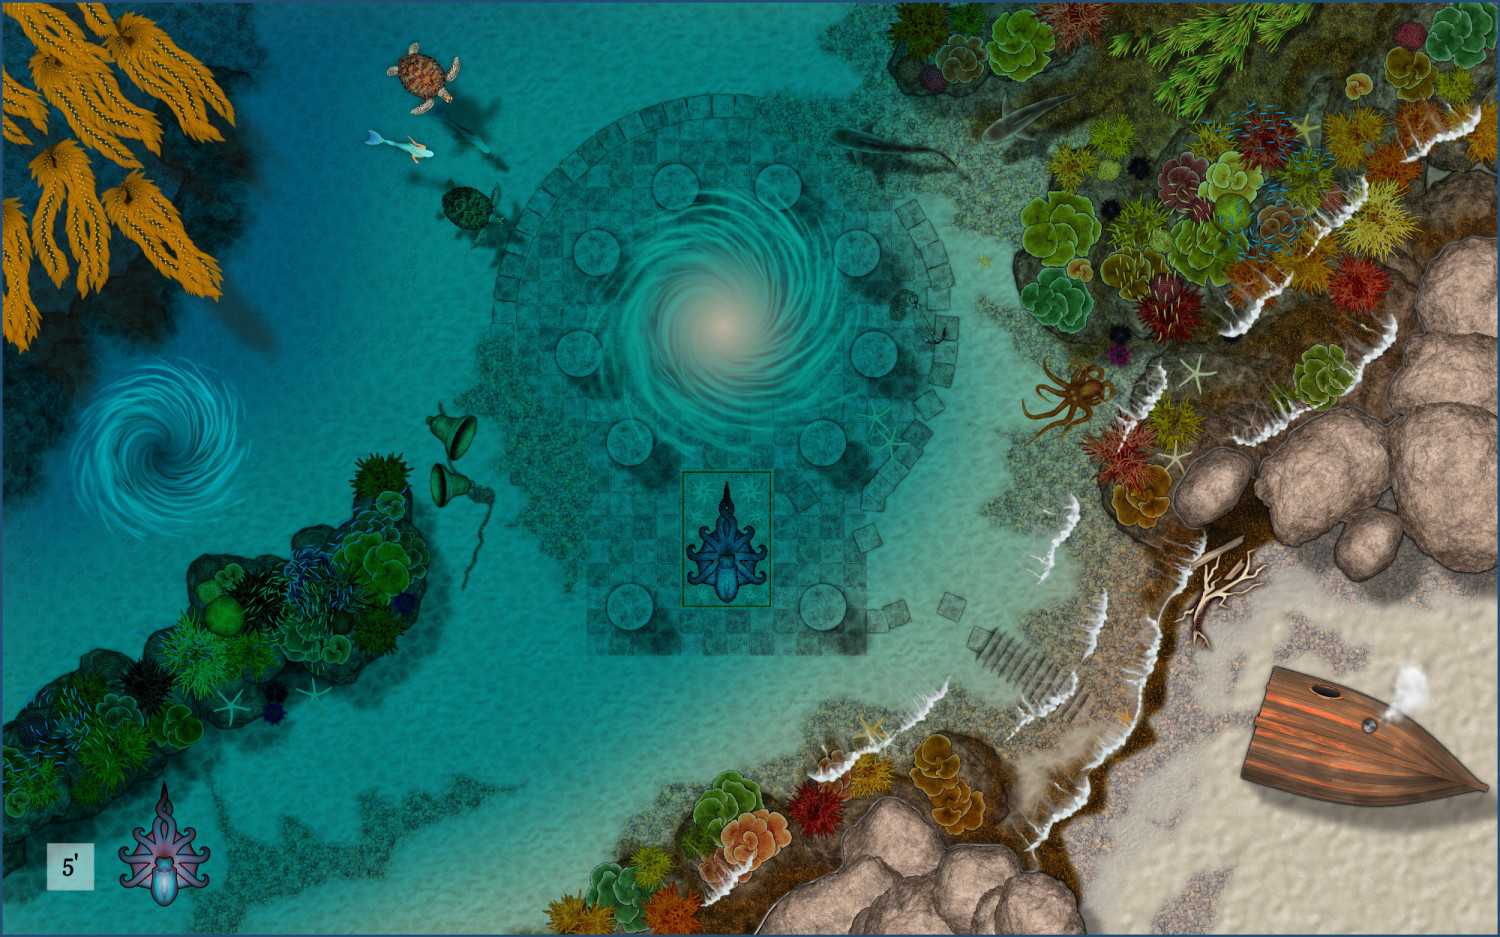
Remember that you can use symbols from other dungeon styles in conjunction with Marine Dungeon, so you don't need to ask for things that we already have in other similar styles that work ok with this one.
Other than that, all requests considered.
Thank you.

-
Pen & wash question
A real pen and ink wash almost completely ignores the lines. Well, they do when I paint that way. The way ink and wash was explained to me at art school was that the ink lines were the structure and detail, while the wash was an impression of the colours and shadows. So my interpretation of that is the ink is like a slightly scruffy technical drawing, and the ink wash is like a translucent dabby impressionist sketch.
So naturally - I prefer it that way. Sticking to the lines is for formal paintings that take weeks to complete and include every eyelash.

-
How to remove white line on smooth polygon river; Herwin Wielink Style
CTRL+F
It toggles the frames on and off. These are to make editing smooth lines easier.
That's a really nice looking map, apowers :)


-
Top down trees & vegetation for Dungeon Designer?
You may have seen trees from SS4 - Dungeons of Schley?

-
Suggestions for Variable River Size
There are only 3 ways of doing it at present, and which one you use depends on the scale of your map. In a city map you can draw the river as a smooth polygon and vary it as much as you like, and in an overland map you can draw the river as one line then chop it into sections that you can then give progressively narrower line widths as you go into the mountains, using Change Properties on each line section.
The third way is a macro written by Joachim de Ravenbel, but I've only heard about that one and not tried it. I think it does the same job as cutting the river into sections and making them gradually narrower.

-
Trying out a Planescape style
Looks like you're really getting on well.
Another way to do it is to keep the plain white fill and put the parchment over the top of everything else and use a Blend Mode sheet effect set to Multipy 100% on that sheet. It's how I add parchment texture to other black and white styles.
-
Pen & wash question
I agree! I can't see much difference, but I also prefer A. It's thinner, isn't it?

