


Loopysue
Loopysue
About
- Username
- Loopysue
- Joined
- Visits
- 10,415
- Last Active
- Roles
- Member, ProFantasy
- Points
- 10,161
- Birthday
- June 29, 1966
- Location
- Dorset, England, UK
- Real Name
- Sue Daniel (aka 'Mouse')
- Rank
- Cartographer
- Badges
- 27
Latest Images


-
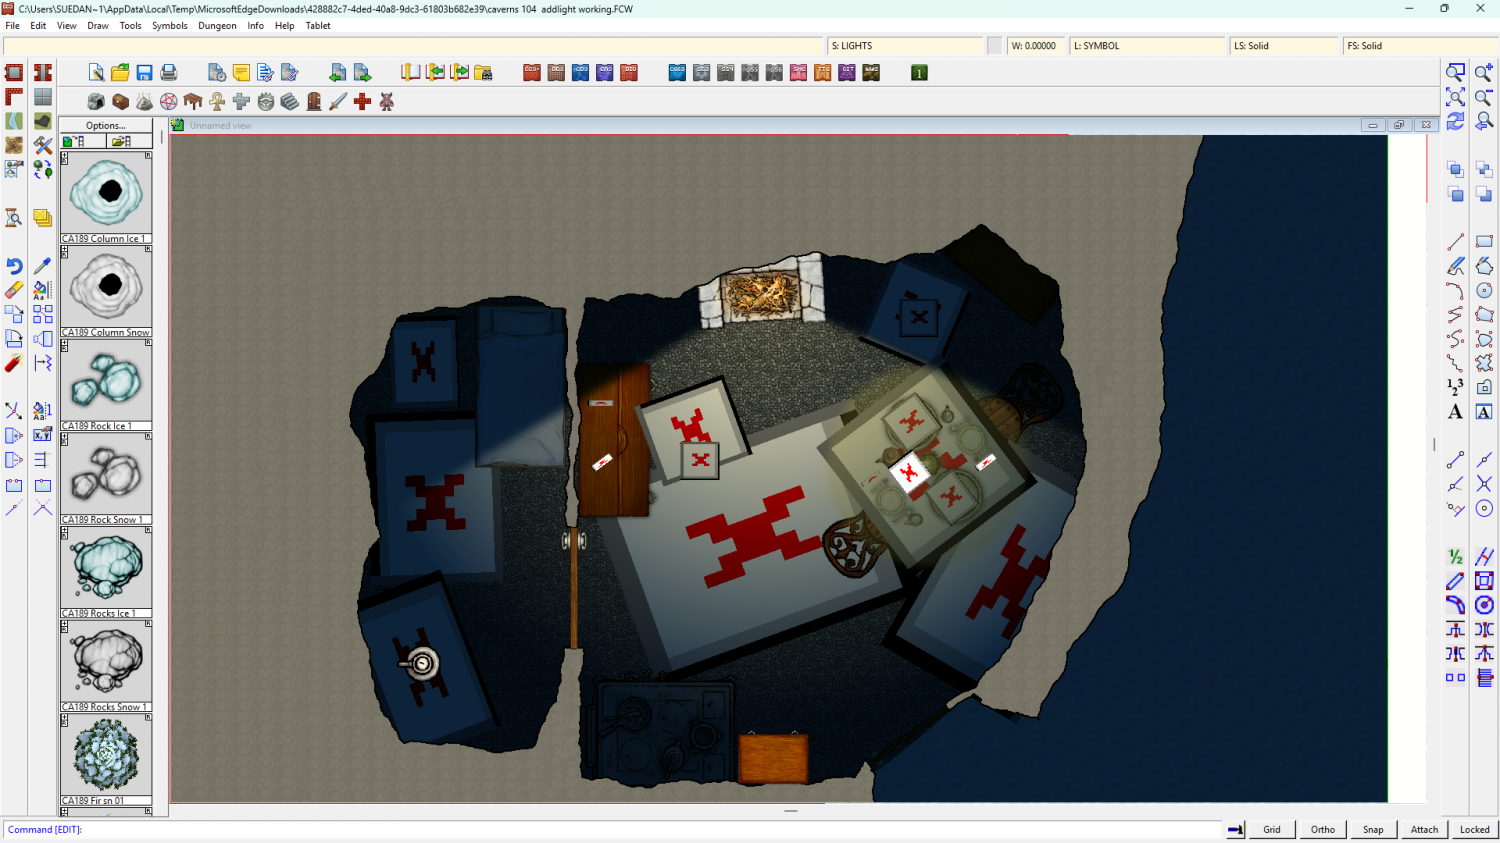
shadows in a top-down cave
The first thing I did was hide everything except the sheet with the current Wall Shadow, Point Light Finalize, and the only Wall Shadow, Point Light Setup effects on it (I will call this effects Finalize and Setup from here respectively) - the symbols fireplace sheet. I also moved the light itself to a new sheet called LIGHTS
I saw that you had set the ambient light in the Finalize effect to a pale yellow, so the darkest shadow you could ever get was pale yellow - and so, your entire map was yellow.
Here I have turned the Shadow Color to the very darkest blue. Now you can see the light properly.
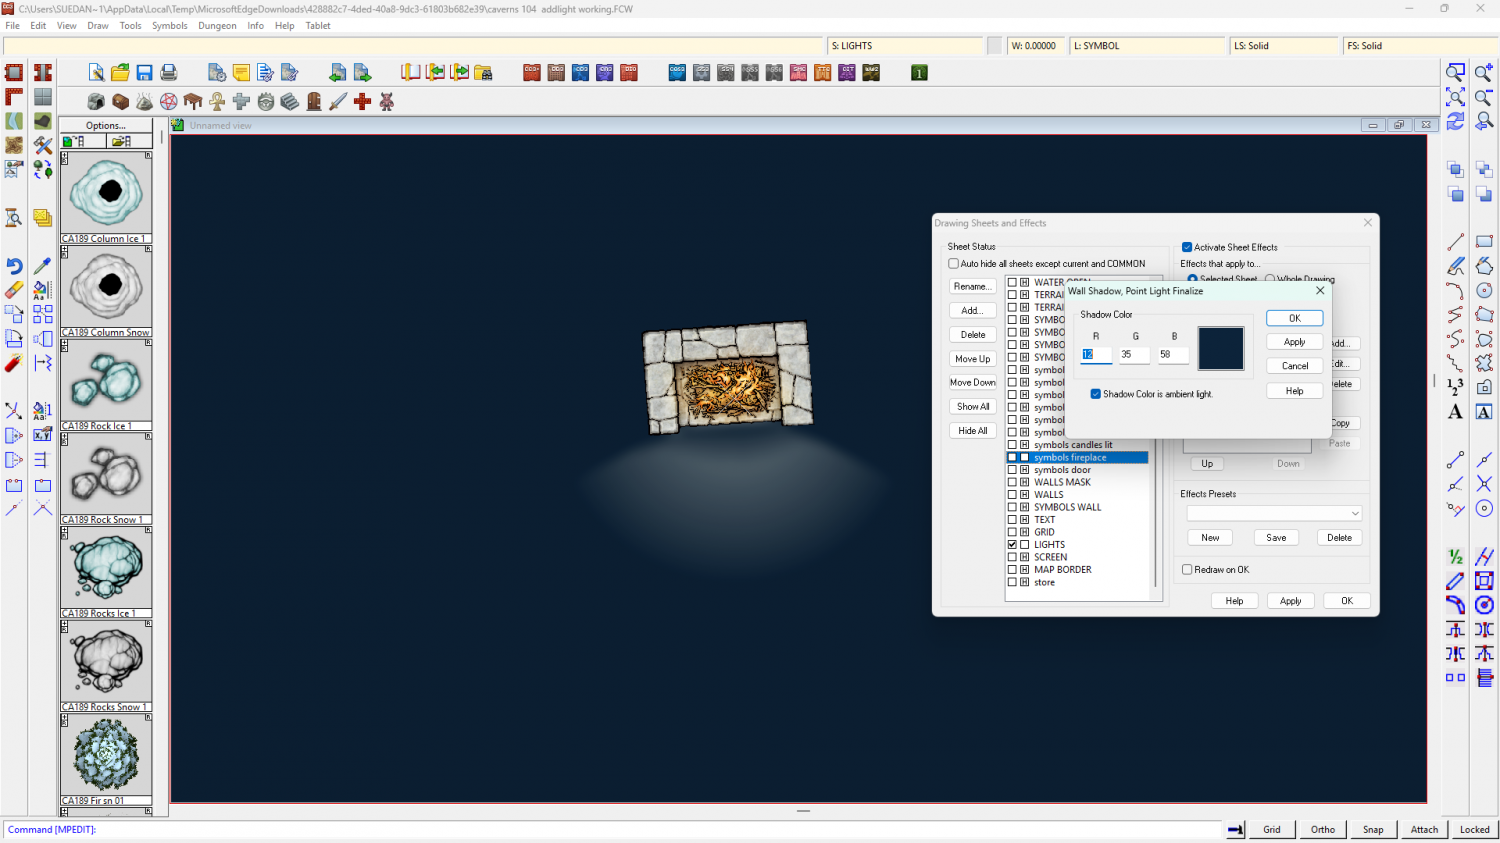
There's still a problem, though. A strange dark halo around the fireplace itself is being caused by the fact that you have a Setup sheet effect on that same sheet. You are (or were before I deactivated it) putting shadows on the same sheet the light was on.
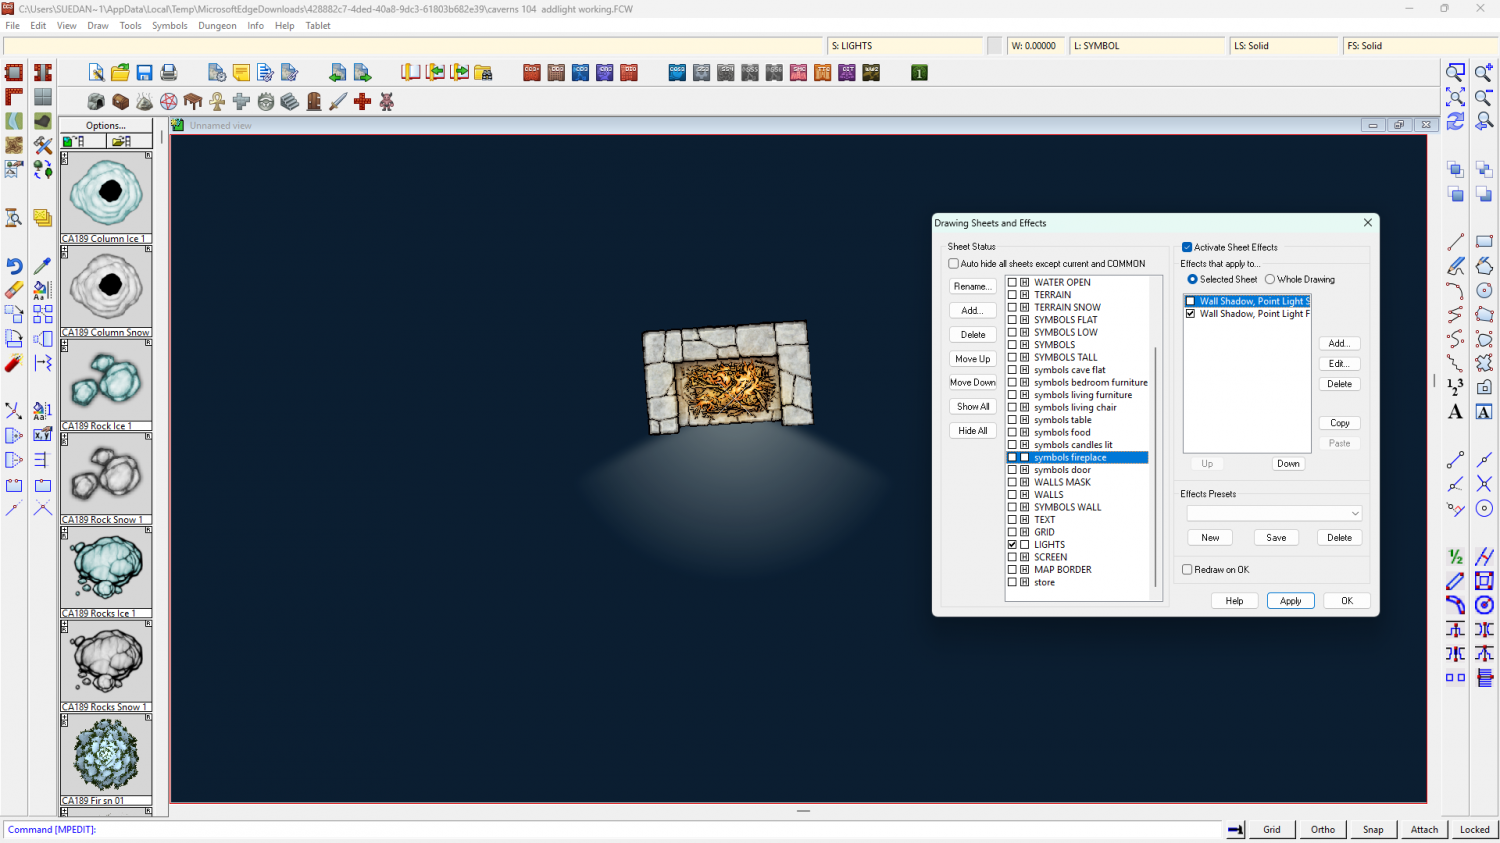
I unhid the rest of the sheets, and discovered that sort of misty grey blurring all over the place was coming from the Wall Shadow, Directional on the WALLS sheet.
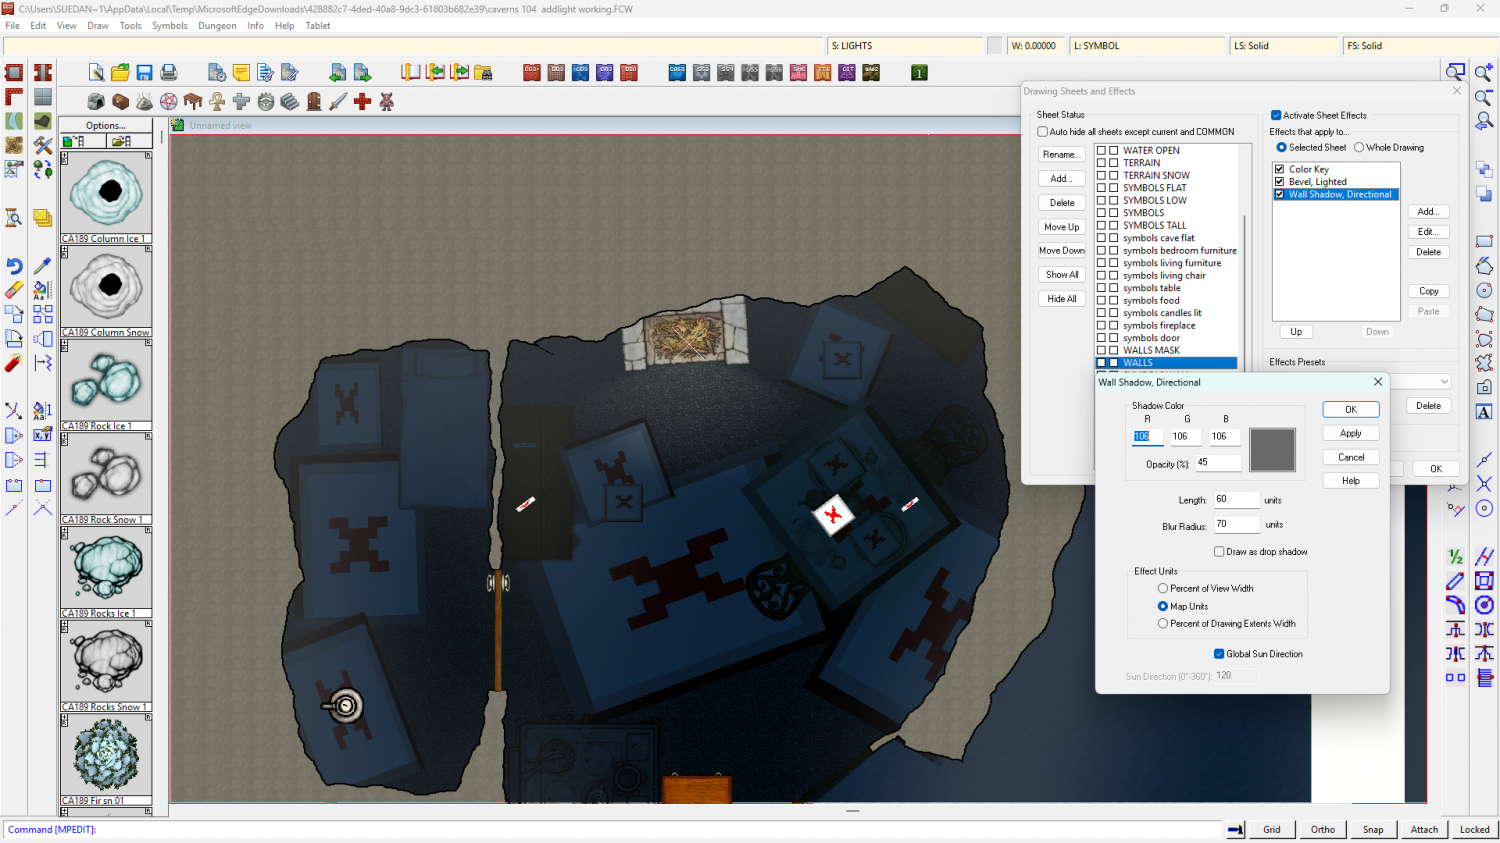
I deactivated that too.
As you can see, the current light in the fireplace area isnt' large enough to cross into the adjoining room, but if you make it large enough (I took the liberty of doing so using numeric edit) you can see there's nothing there to stop it.
What is needed now is something that is a perfect match for the walls moved further up the list of sheets to be above the Finalize effect on the symbols fireplace sheet, and for there to be a Setup effect on that sheet with the size set to 0 (zero means an infinite shadow that no light can pass).
You could just use the WALLS sheet, but that would cause the wall itself to become dark blue like the rest of the shaded parts of the map. I didn't think you wanted that, so instead I copied the walls to a new sheet I called LIGHT STOPPER, added the required Setup effect, and moved it into position just above the symbols fireplace sheet.
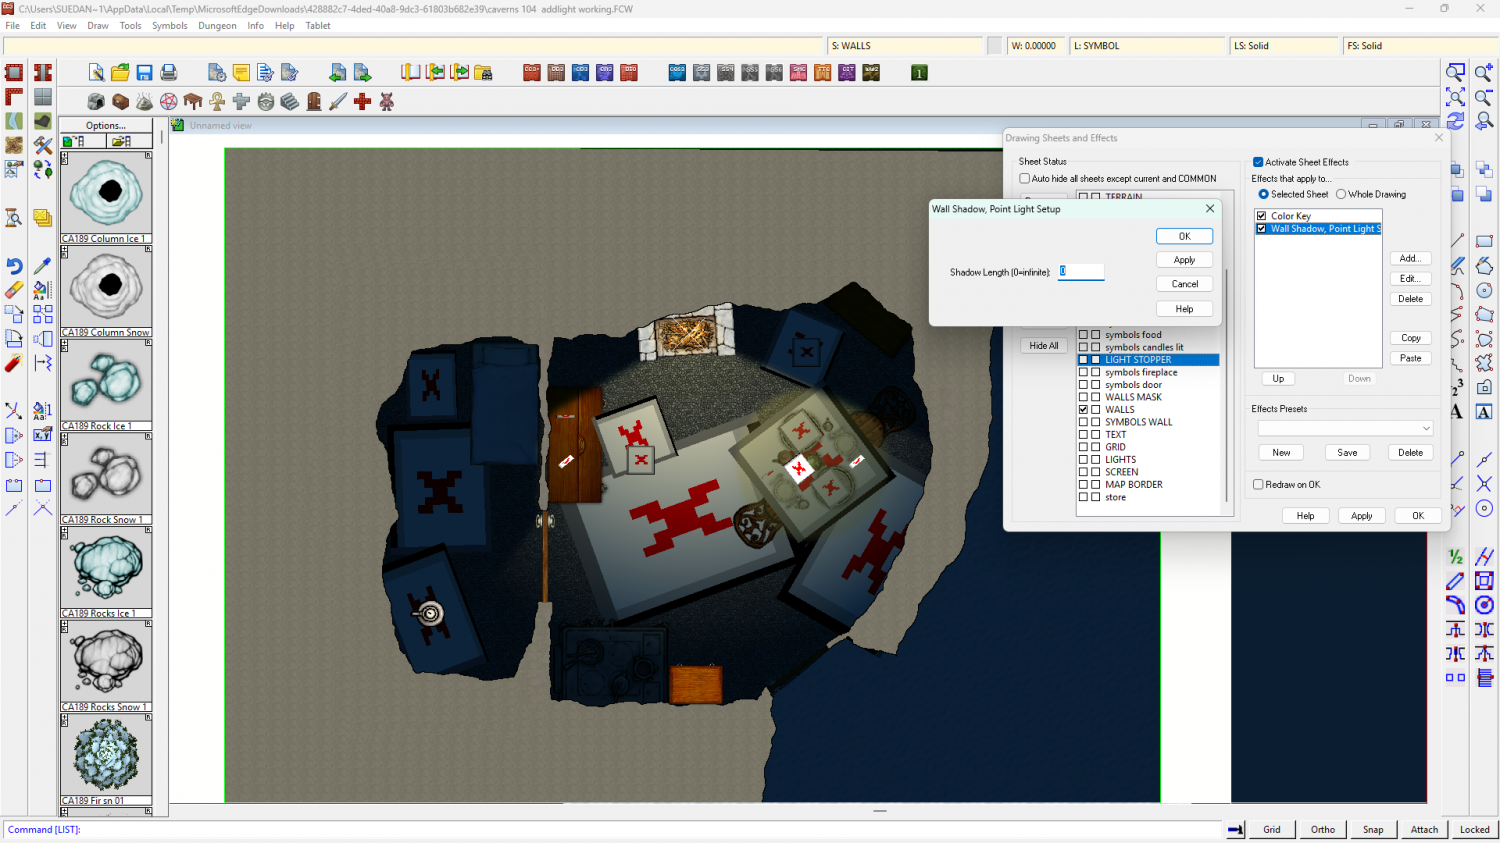
Then I copied the door between the two rooms (which is on the store sheet) to the LIGHT STOPPER sheet to prevent the light getting through underneath it.
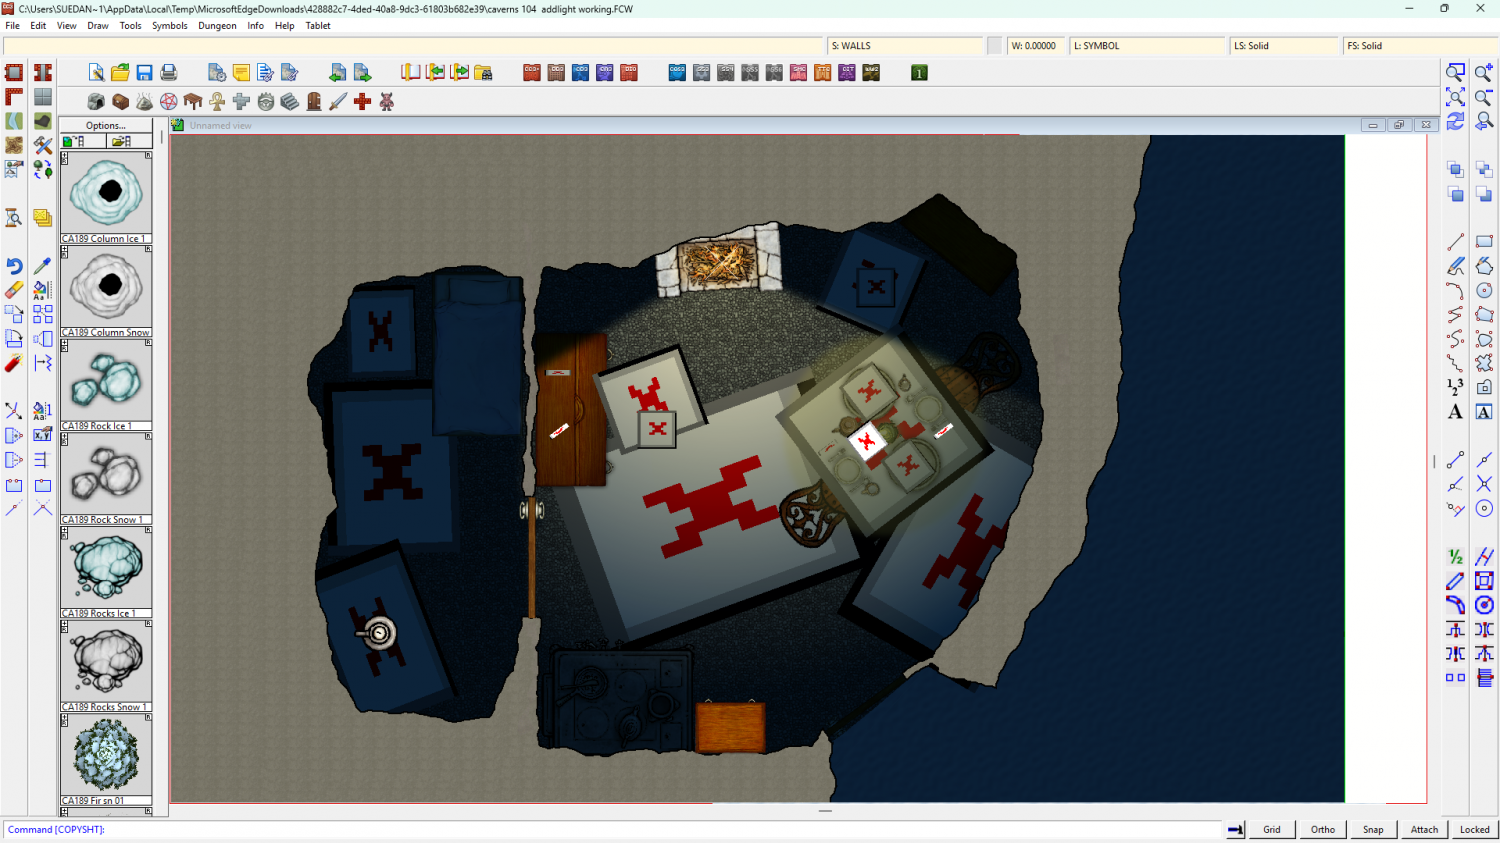
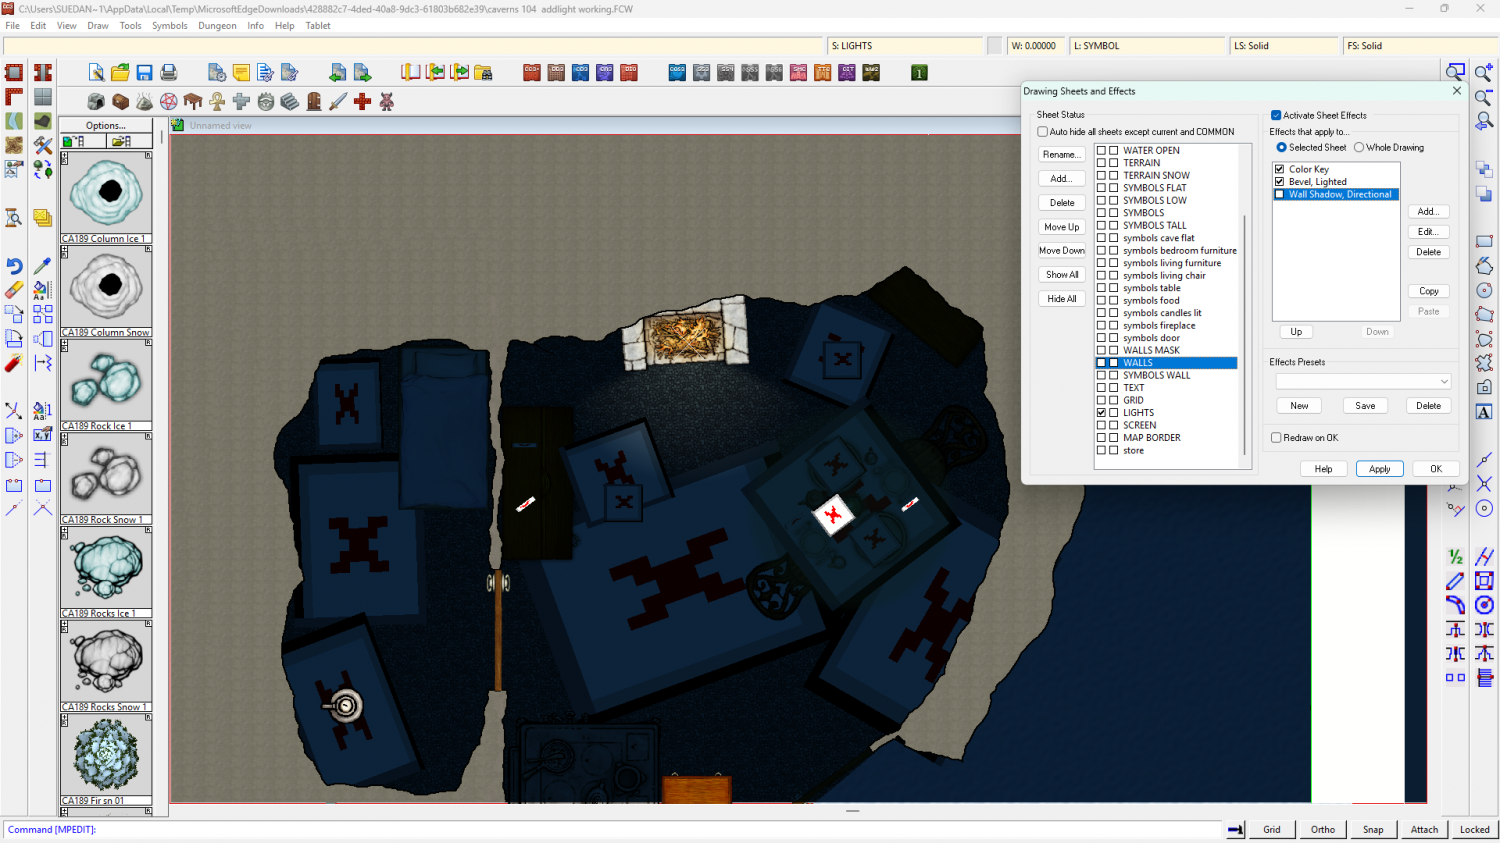
I think this is what you wanted?
I recommend getting rid of the bitmap glow. They don't work well with the lighting.
If you want other sheets to cast shadows according to the light you will need to make sure they are above the symbol fireplace sheet in the sheet list and add a Setup sheet effect to each of them in turn. Deactivate any regular non-lighting shadow effects you happen to have on them. You can control the shadow length by making the Shadow Length variable in each Setup effect greater than the default zero.
If you want to change the colour of the shadow, edit the colour in the Finalize effect on the symbols fireplace sheet.
There's one major drawback here. If you edit the WALLS you will have to delete everything from the SHADOW STOPPER sheet and copy everything from the modified WALLS sheet back onto the SHADOW STOPPER sheet - all of it, including the majenta shapes.

-
Community Atlas competition: Kristol Caverns
And now I am wondering if a longer bevel would be better.
I'm also thinking about adding something to that southern end. It looks a bit bland.

Long bevel, or short bevel - what do you think?


-
How to move stubborn symbols to the back?
Color key doesn't generally work on symbols because of the way symbols are drawn twice by the rendering engine.
The only exception to this rule are 'mapped' city symbols (building roofs that shade themselves according to the position of the global sun), which are only drawn once to preserve the roof shading.
You can copy the png file for the symbol and delete the parts you don't want in the new copy in a bitmap editor, then use your modified copies instead, but be careful to remember they are modified symbols and shouldn't be gifted to anyone else. Using them in your own maps for all the usual purposes, including commercial sale of the map, is fine.
There is really only one big drawback when making your own versions of the public set, and that is if you share your FCW file with others they will only see red X's where they don't have the necessary artwork.


-
Community Atlas 500th Map Voting Thread - Please vote
Sorry! I give you a thumbs up for thanking Remy, but when I reconsidered I realised it might have looked like I was agreeing that your work was rubbish. It's NOT rubbish. So I took back my thumbs up.


-
CA style development - "Darklands City" (issues for September and December 2021)
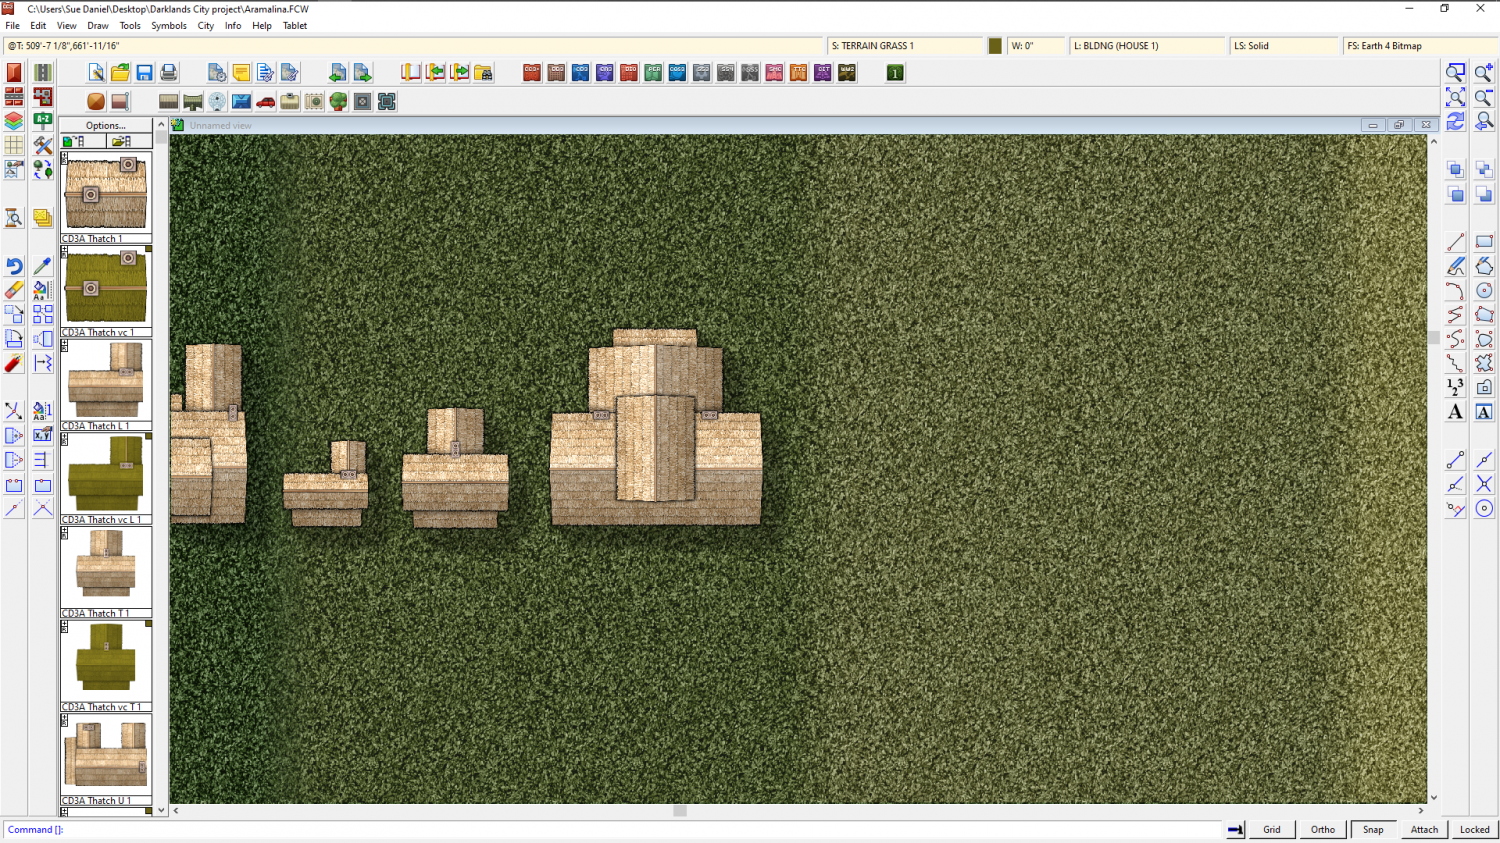
I've always found that the way to start a new style is to get the textures right. With this style the colours are more or less already dictated by the fact that they must be similar to the overland style. That just leaves me with the task of getting the actual texture correct.
Here is a first shot at the 4 grass textures. Those are Bitmap A buildings for a sense of scale. The Darklands ones will be nowhere near as clean and well maintained. The grass is probably long grass, but then - who is going to mow the grass in a Darklands City?
![[Deleted User]](https://secure.gravatar.com/avatar/c75d9a245b74d9c59be0999ea81ca541/?default=https%3A%2F%2Fvanillicon.com%2F92add7f8c954488718110edc4896ad39_200.png&rating=g&size=200)


-
Room for improvement?
They look good to me :)
I am a little concerned about the way the grey tone one will turn out in print. This style isn't designed specifically for BW reproduction and may look a little flat unless the printing quality and the paper are both pretty good. Try printing it out on paper of similar quality first. If it looks bad, try increasing the contrast a little, or even using a tone curve on it in a bitmap editor.

-
And like a bad penny, I keep showing back up!
When you install the update you will probably get a message that tells you you have a newer version installed. If you do, just ignore it and carry on installing the update.

-
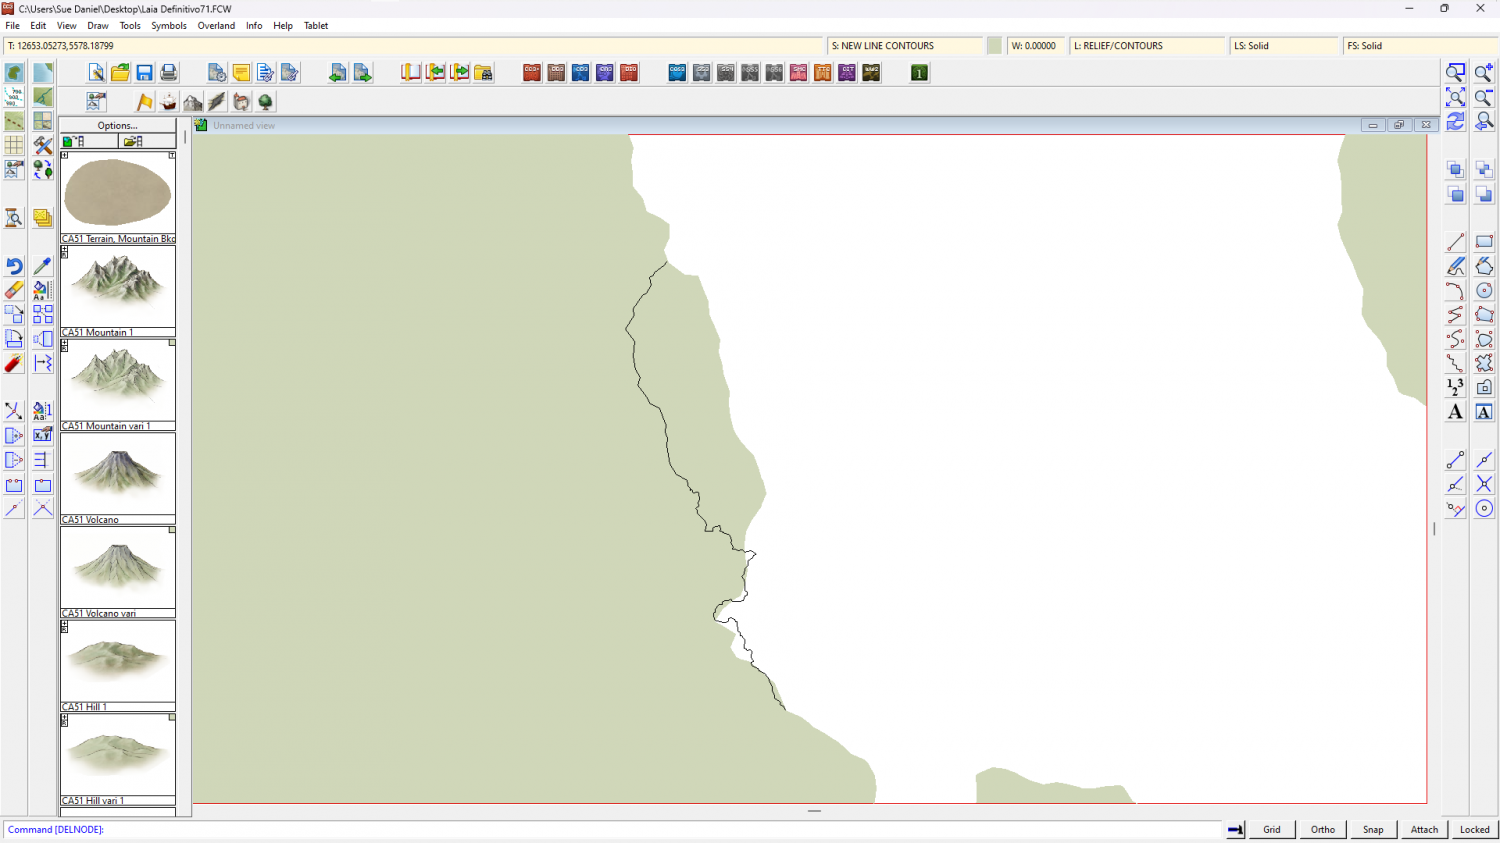
Change the contour of a landmass to a predefined path on another sheet
Stage 1
I exploded the land polygon because as an export from FT3 it was automatically a 'multipoly', which means you can't edit it or trace it. Then I hid the land and trimmed that black line down to just the wiggly side so I could see what I was doing.
As a side note to that simplified instruction - although I had picked the properties of the land before I exploded it, so that the exploded polygons would have the same properties as the original multipoly, they had a line width greater than zero, so became outlines rather than solid polygons. I put that matter right using Change Properties on all the bits of land to reset the line width to zero.
Stage 2
Next (and because I'm not great at using the editing facility of drawing tools) I decided to use the Land, Default drawing tool to trace the original landmass, breaking off the tracing at either end of that wiggly black line and tracing that instead of the original coastline in that area to close the polygon. The default land drawing tool uses a different fill colour to your original land mass, which is coincidentally convenient to show the result.
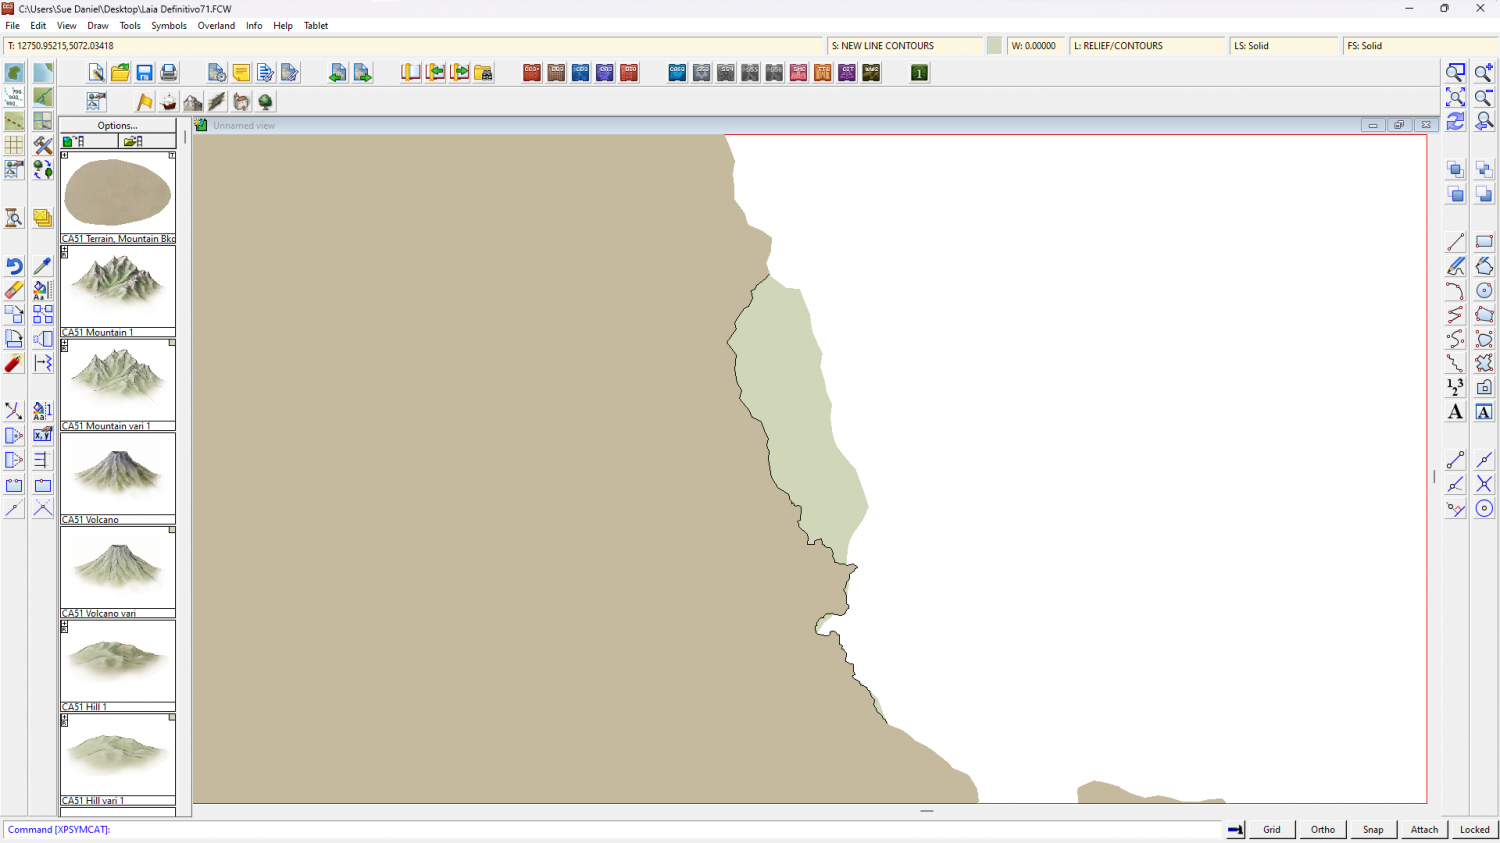
I then deleted the original landmass, hid the black line, changed the colour of the newly traced landmass to match the rest, and picked out the lakes in solid magenta (colour 6).
Another side note here. FT exports are notoriously full of far too many nodes, which makes the drawing sluggish. Since this map has only just begun I used the SIMPLIFY keyboard command at a distance of 5 units (you are prompted for the setting in the command line), which greatly improved the responsiveness of the drawing.
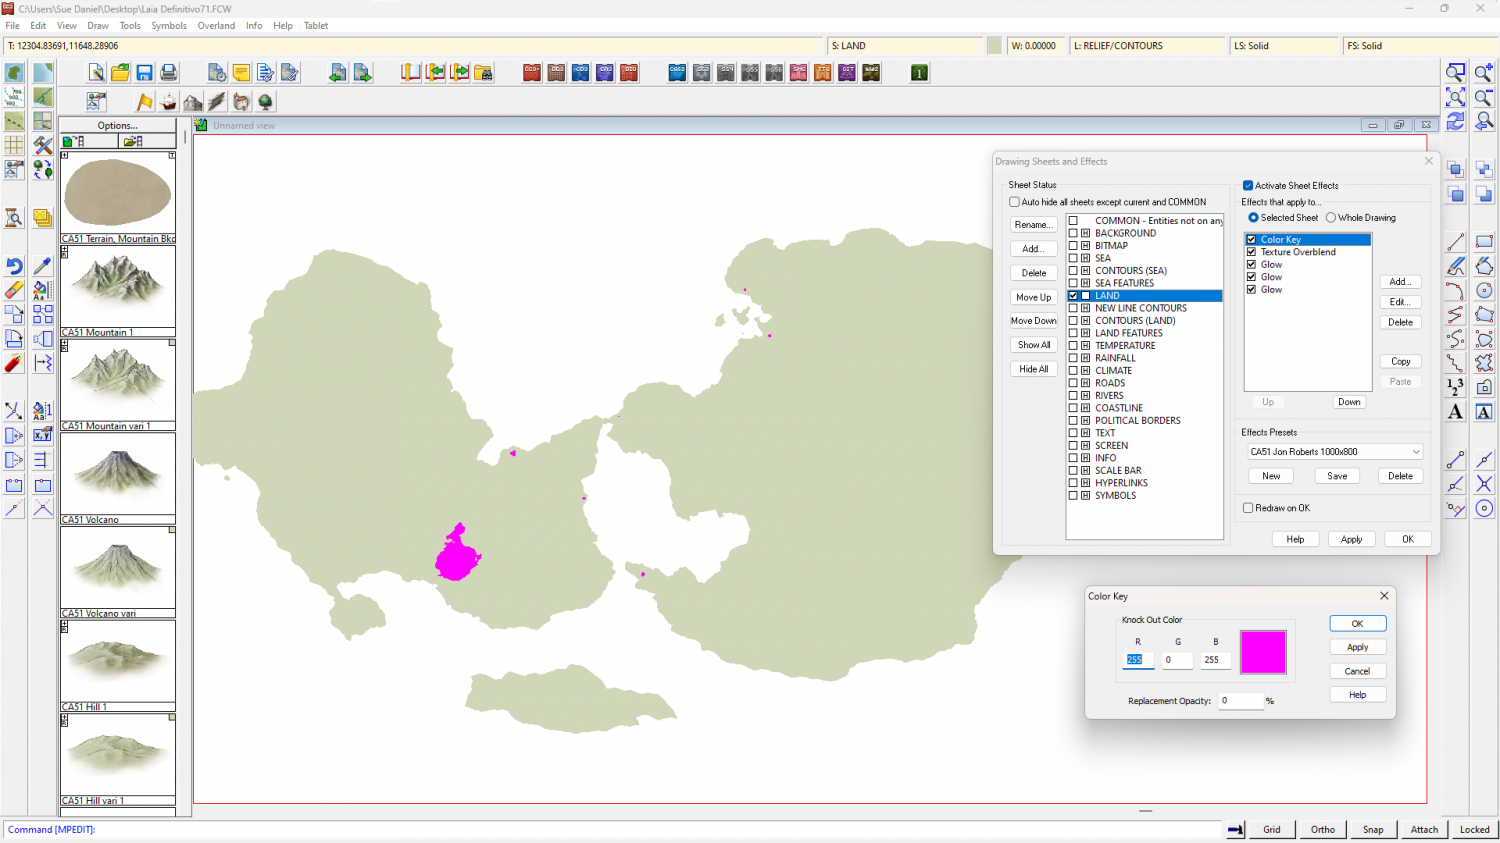
The reason for turning the lakes magenta is to use an alternative method for drawing them so that you don't have to re-multipoly the land. If you look I have added a new sheet effect to the land sheet called a Color Key. The Color Key knockout colour is magenta, so where the lakes are magenta they will become holes in the land when the sheet effects are turned on, like this.
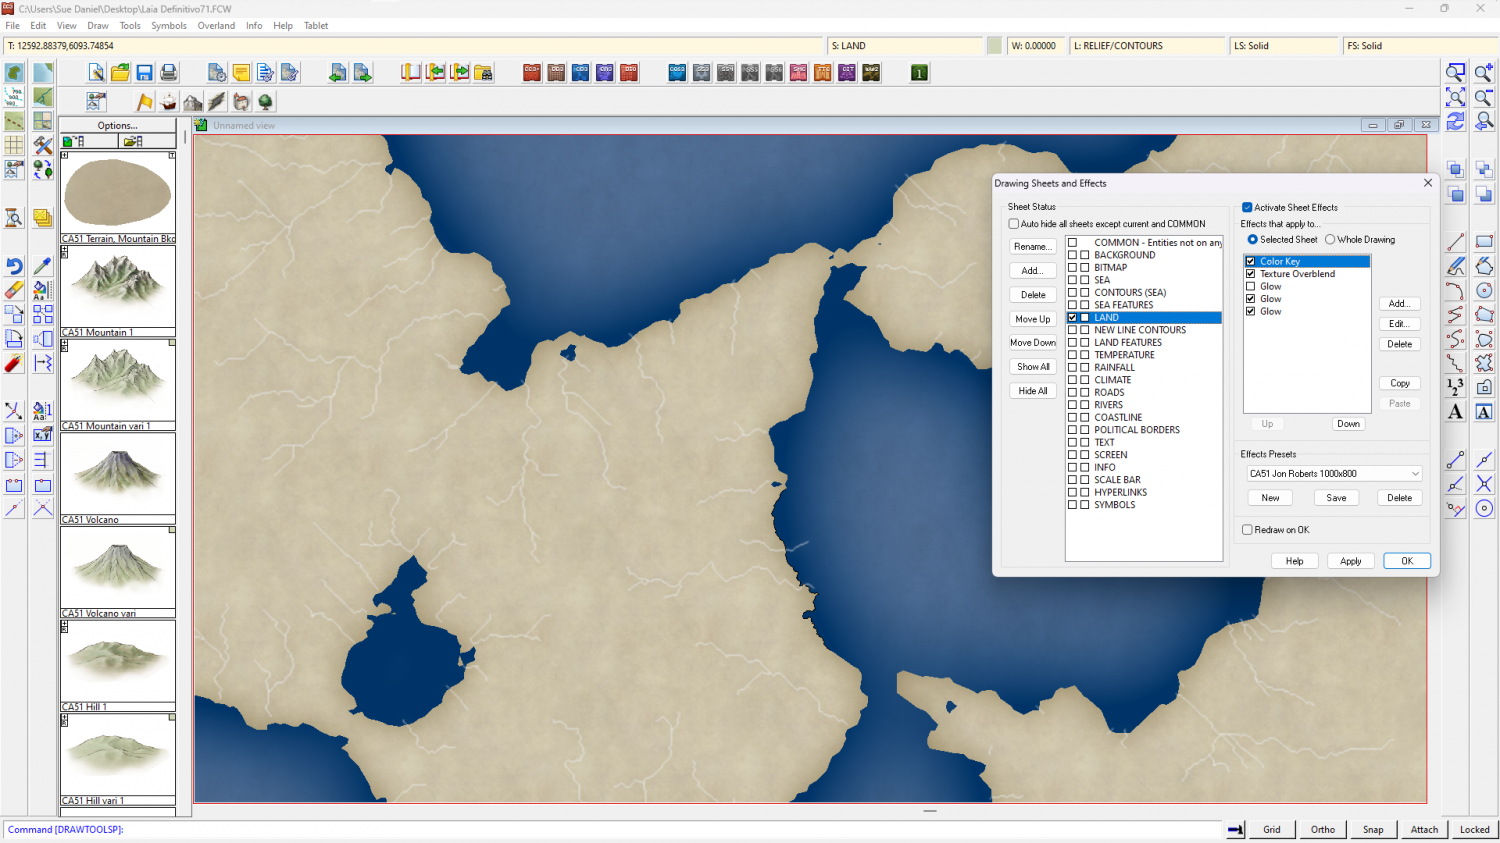
Other adjustments I made to speed up the drawing just a bit were to change the units of the LAND sheet effects to 'map units' and switch off one of the glow effects. You may find it faster to work with effects off in this very large map unless you really need them on to see what you are doing.
The full process was quite involved, so I've uploaded the end result if you want it here.

-
Middan'ord: The Realmdom of Thwendar
It is amazingly detailed :)
Those mountains are good. Where did you get them?


-
Live Mapping: Hand-drawn Fantasy
In this week's live mapping session (Thursday 8 May) Ralf will be demonstrating the most recent Annual issue; Hand Drawn Fantasy, by Ralf Schemmann, and taking the time to show us how to convert our own hand-drawn images into CC3+ symbols.
Come along and join in the chat live on YouTube here;
https://www.youtube.com/watch?v=u_igjMH_1lc
Or watch it later either on YouTube or here on the forum:*
*This thread isn't monitored during the live show, but you can put any questions you may have after watching it on this thread (or even the ones you think about before the event if you wish).


