


Loopysue
Loopysue
About
- Username
- Loopysue
- Joined
- Visits
- 10,417
- Last Active
- Roles
- Member, ProFantasy
- Points
- 10,163
- Birthday
- June 29, 1966
- Location
- Dorset, England, UK
- Real Name
- Sue Daniel (aka 'Mouse')
- Rank
- Cartographer
- Badges
- 27
Latest Images


-
Issue with outlines after copy/pasting landmasses into larger map size
Yes.
Just make sure you hide all the other sheets first so you don't move anything you didn't want to move. Then pick the :CC2MOVE: tool, and select all the bits that you want to move and press D on your keyboard for do it.
Watch the command line. It will ask you for an origin point to start the move from. You need to click somewhere first to give it a 'move from point'. That gets a lot of people ;) While you are in the process of moving things the command line gives you useful hints about keyboard controls that will allow you to simultaneously rotate and scale the things you are moving. If you don't want to do any of that just keep your other hand off the keyboard. I've lost count of the number of times I've accidentally scaled and/or rotated something while moving it.

-
Issue with outlines after copy/pasting landmasses into larger map size
You're welcome :)
I can't say what caused that for certain, but on some overland templates some drawing tools line widths are controlled as a percentage of the width of the map. This is the first thing that would seem to be the likely cause.
-
Issue with outlines after copy/pasting landmasses into larger map size
If you use the Draw Like tool in the Draw menu you can pick up the exact width of the line on the entity you prefer, and then modify the drawing tool. Here I have done this with the coastline, which is the only part of the entity that has a line width to be other than zero (the land automatically has to have a line width of zero to be filled). Then I have opened the drawing tool dialog and clicked Advanced. I've picked the Land, Default drawing tool, which draws both land and coastline, and then edited the Outline, which is the coastline entity of the two things this tool draws.
The properties of this Outline show how it is a "Fraction of the Map Border".
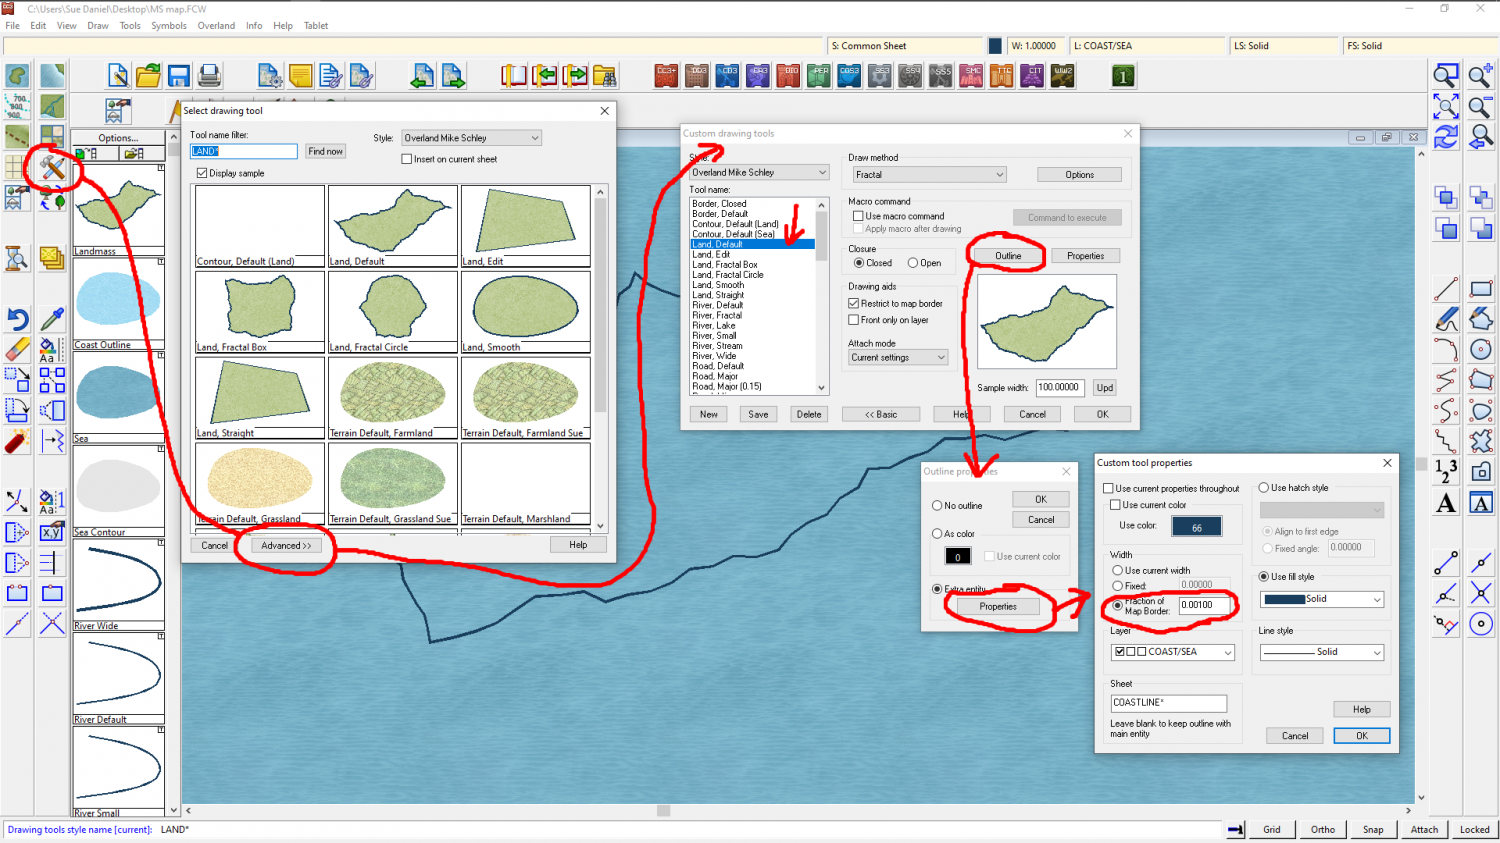
All I have to do to fix it at a certain width is to pick the option above that one. I set it to fixed and to the value of 1, which is the line width I previously picked up from the Draw Like command.
You don't need to save this change, but use the tool immediately.
If you want to save the tool it is better to go back two steps to the advanced dialog and click the new button - to make your own copy of it. This is because you are playing with the drawing tools that are part of the template, and any changes you save into the originals will be there until such a time as you change them again, or reinstall the software.
-
Issue with outlines after copy/pasting landmasses into larger map size
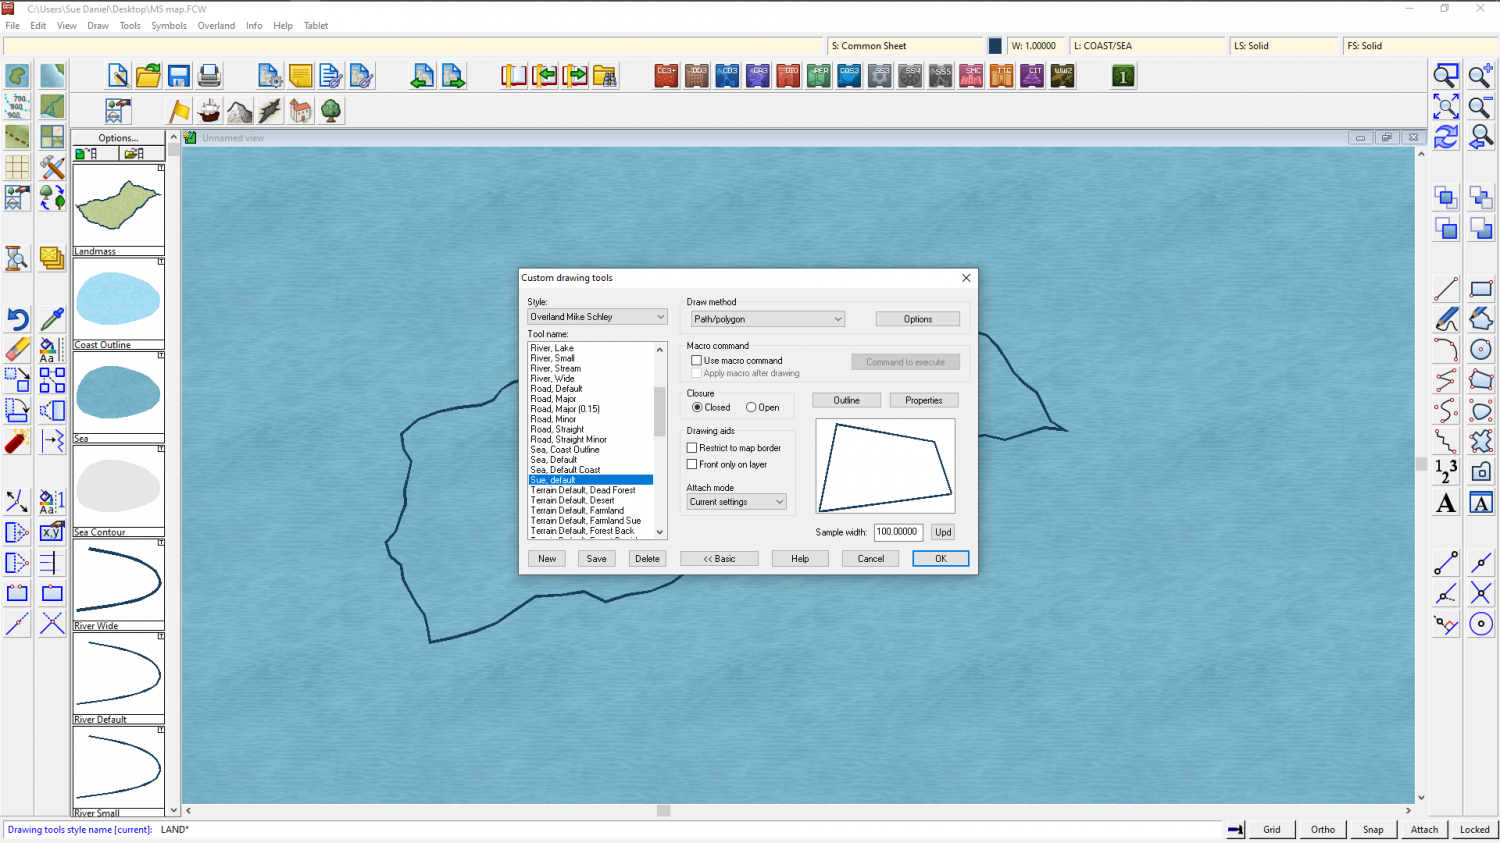
Here is a drawing tool I made for myself that uses all the current properties - layer, sheet, colour, fill, line width etc. It's just handy for the way I work, which is different for everyone. As you can see from the preview it's shown just like the coastline - the properties of which I picked with the Draw Like command.
This one isn't suitable for what you want to do because it only draws one polygon. I just wanted to show you that if you make a new tool and save it, that new tool will show up every time you use that template to make a new map in that style. It's a bit blurry for some reason, but the tool is called Sue, default. Only I have this tool because it is one I made for myself.
-
world map made using trace technique
I quite like both maps :)

-
world map made using trace technique
Maybe some major roads between the major settlements.
A scale bar, and a title?
-
Help with Snow/Ice Terrain CC3+
If you choose to make your own drawing tool, Ookakiba, this is the easiest way to do it.
First, with your Mike Schley map open, click the crossed hammer and pencil button ringed in red on the left. It will open the 'Select drawing tool' dialog, which shows all the drawing tools available for this style.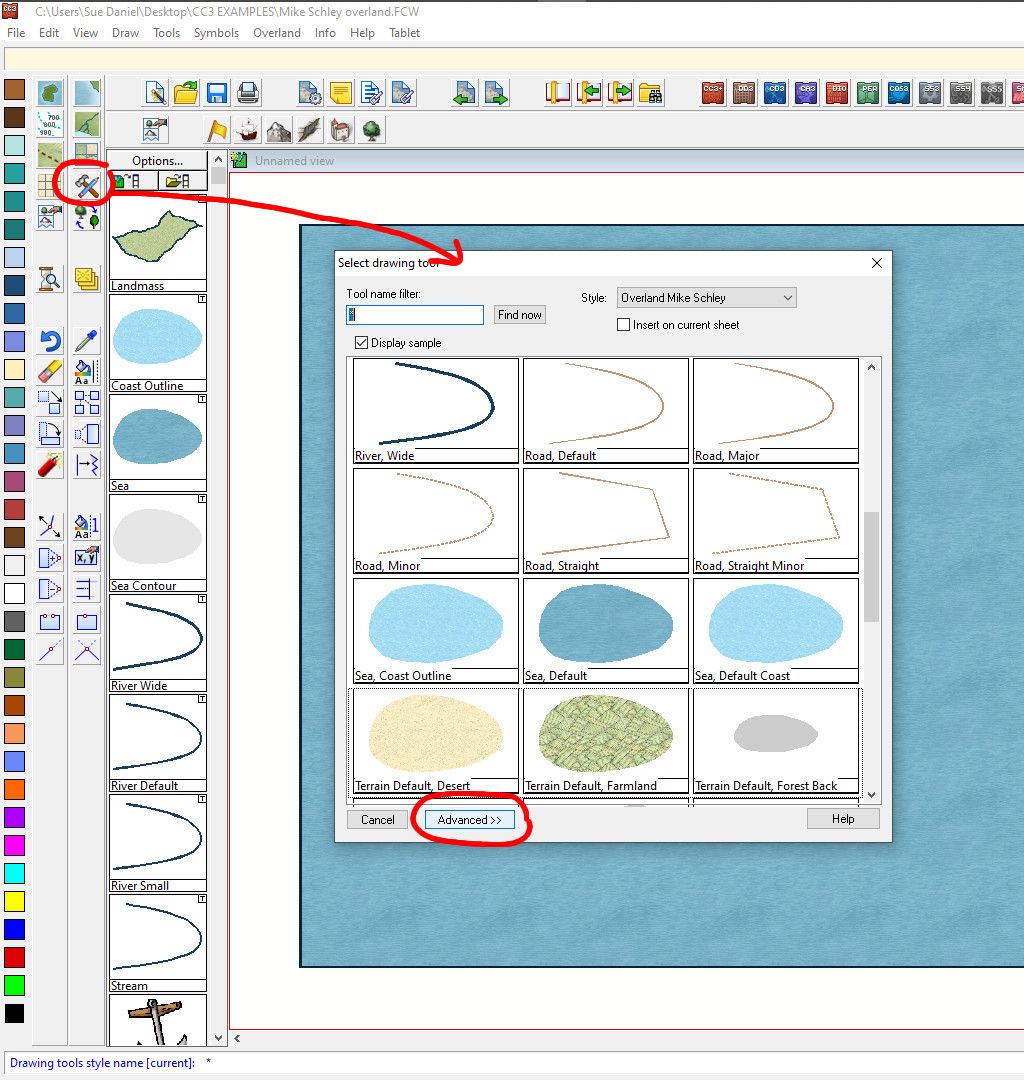
Click the Advanced button at the bottom, and from the list of tools in the left panel select a tool that is closest in behaviour to what you want from your new Ice tool. Here I have picked the 'Terrain Default, Desert' tool. Then click New.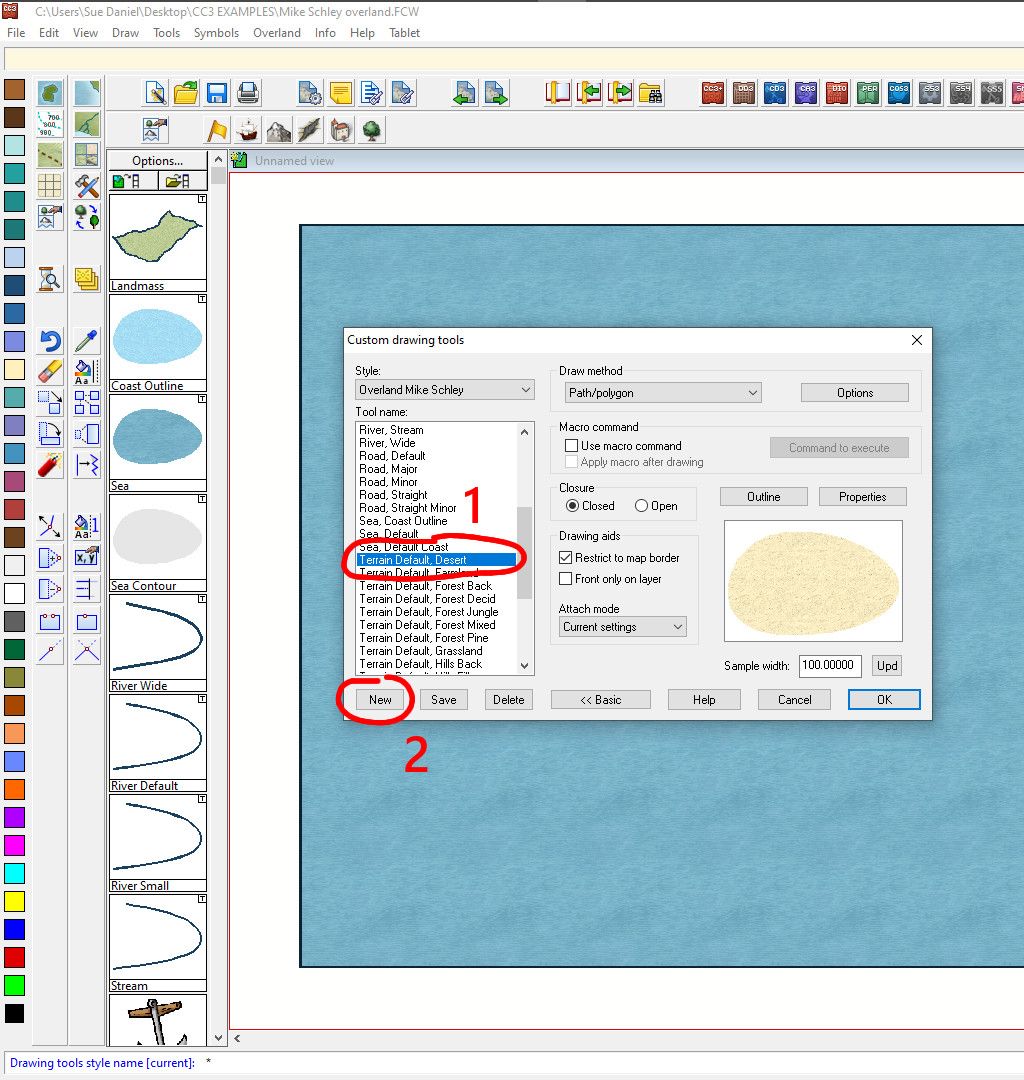
A smaller dialog will open allowing you to name your new tool. I generally stick with the defaults and just change the name at the end (as shown) so that the new tool will appear in the same place as the rest of the terrain tools. Click OK.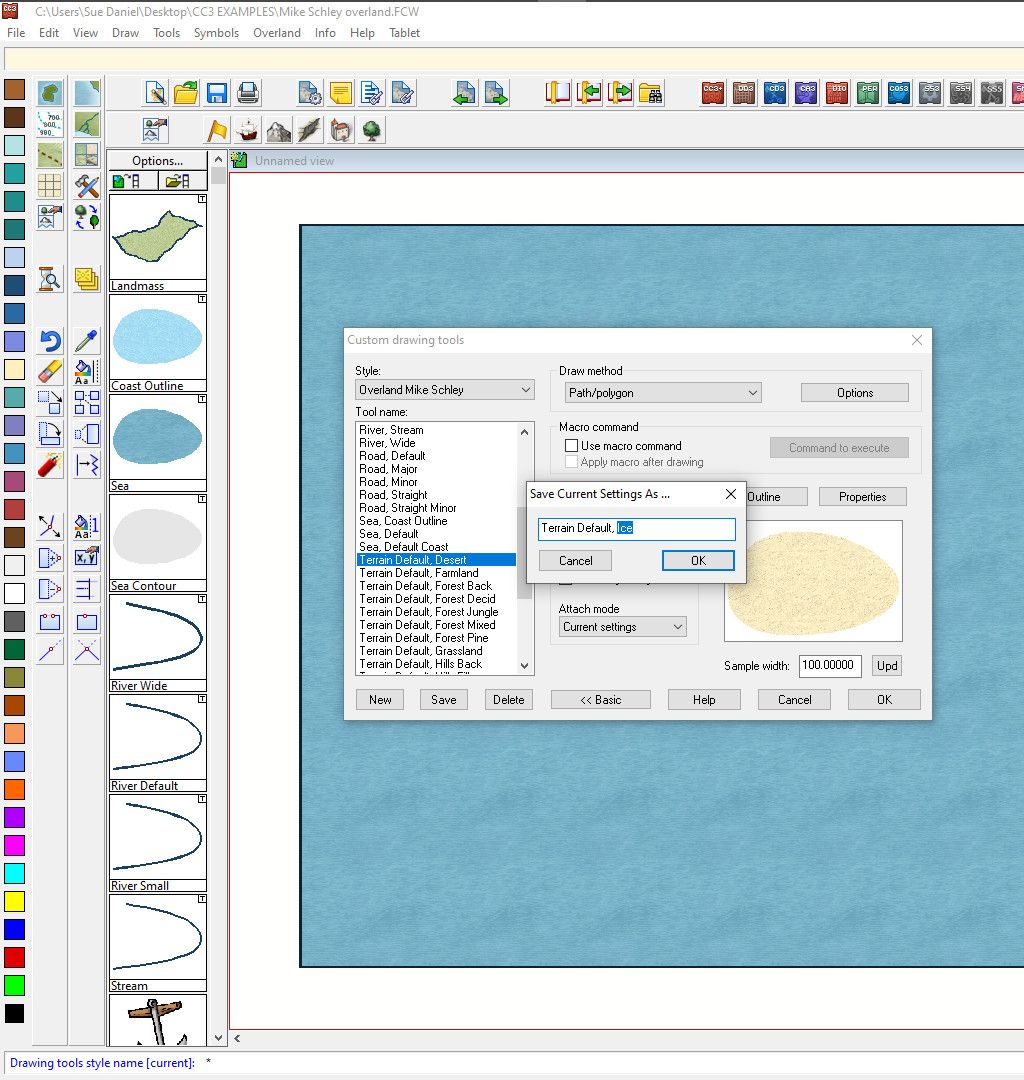
So you have a new drawing tool for your Ice, but it's still showing desert fill (or the fill of the tool you chose to use as a pattern for the new one). Click Properties on the right above the image (1), and change the fill to be used to Ice_MS (2). Then OK the properties dialog (3) and Save your new tool with its changed properties (4)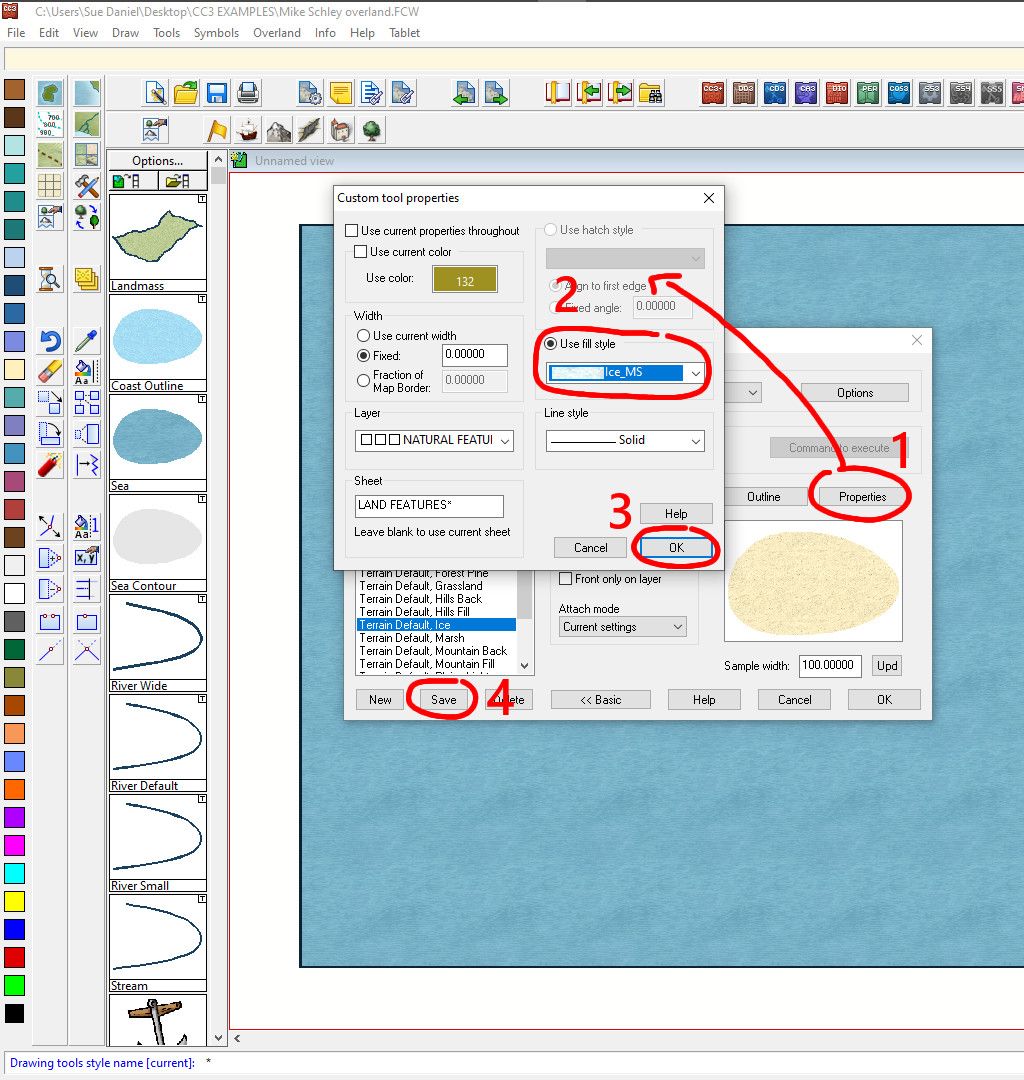
Then you should be able to use your new Ice drawing tool just like you use any other drawing tool, though you will have to locate it each time by clicking the Hammer and pencil button.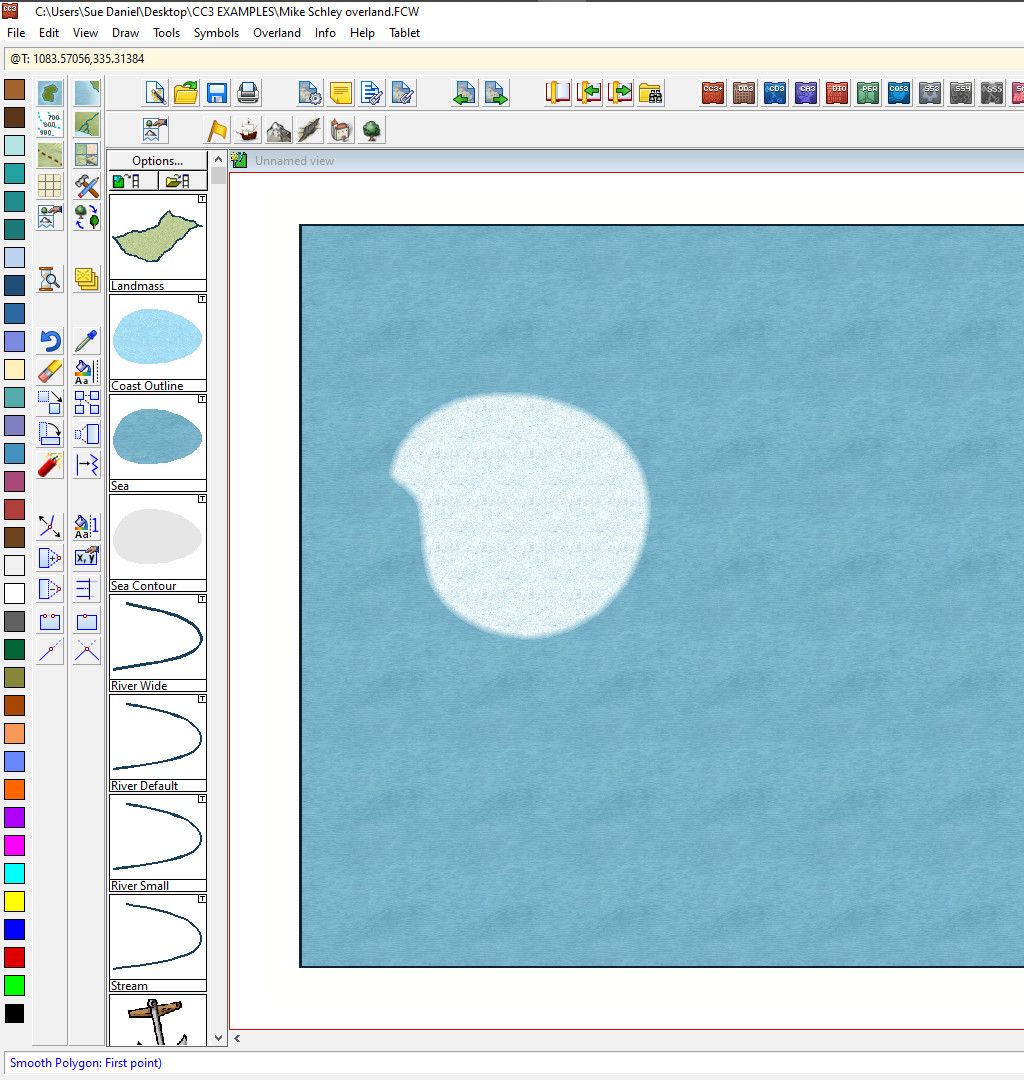

-
Fantastic castle illustrations for reference
No wonder it took him 50 years!


-
Is there a way to scale hatch fills?
If you open the Fill Style Properties dialog and pick the Scaleable Hatching tab, then the rice terrain, you can scale the parts of the fill one at a time using the 'Spacing:' box on the sets. As an example this .25 crosshatch has 2 parts, or two sets of lines that make up the pattern.
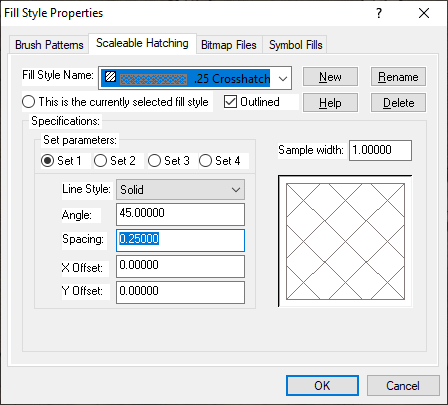
Here I have rescaled Set 1 to be .5 instead of .25, and you can see that one set of lines has been rescaled.

Pick Set 2 and do the same to that one, and you have a rescaled crosshatch fill.
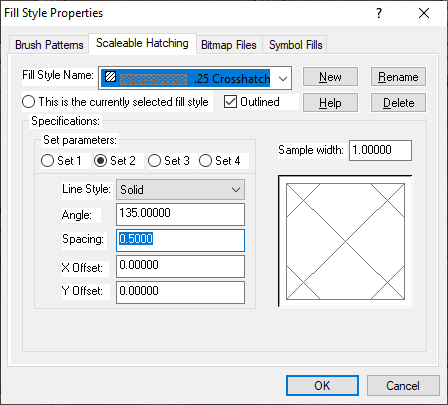
I haven't used hatch fills in any of my maps, so I couldn't tell you if these changes affect the template, but maybe it would be wiser to hit the New button and create a .5 Crosshatch, instead of modifying the existing .25 Crosshatch.


-
My mountains are dissapearing
Hello Anthonys :)
You are probably right. It is quite likely that the sheet order is to blame for your vanishing mountains.
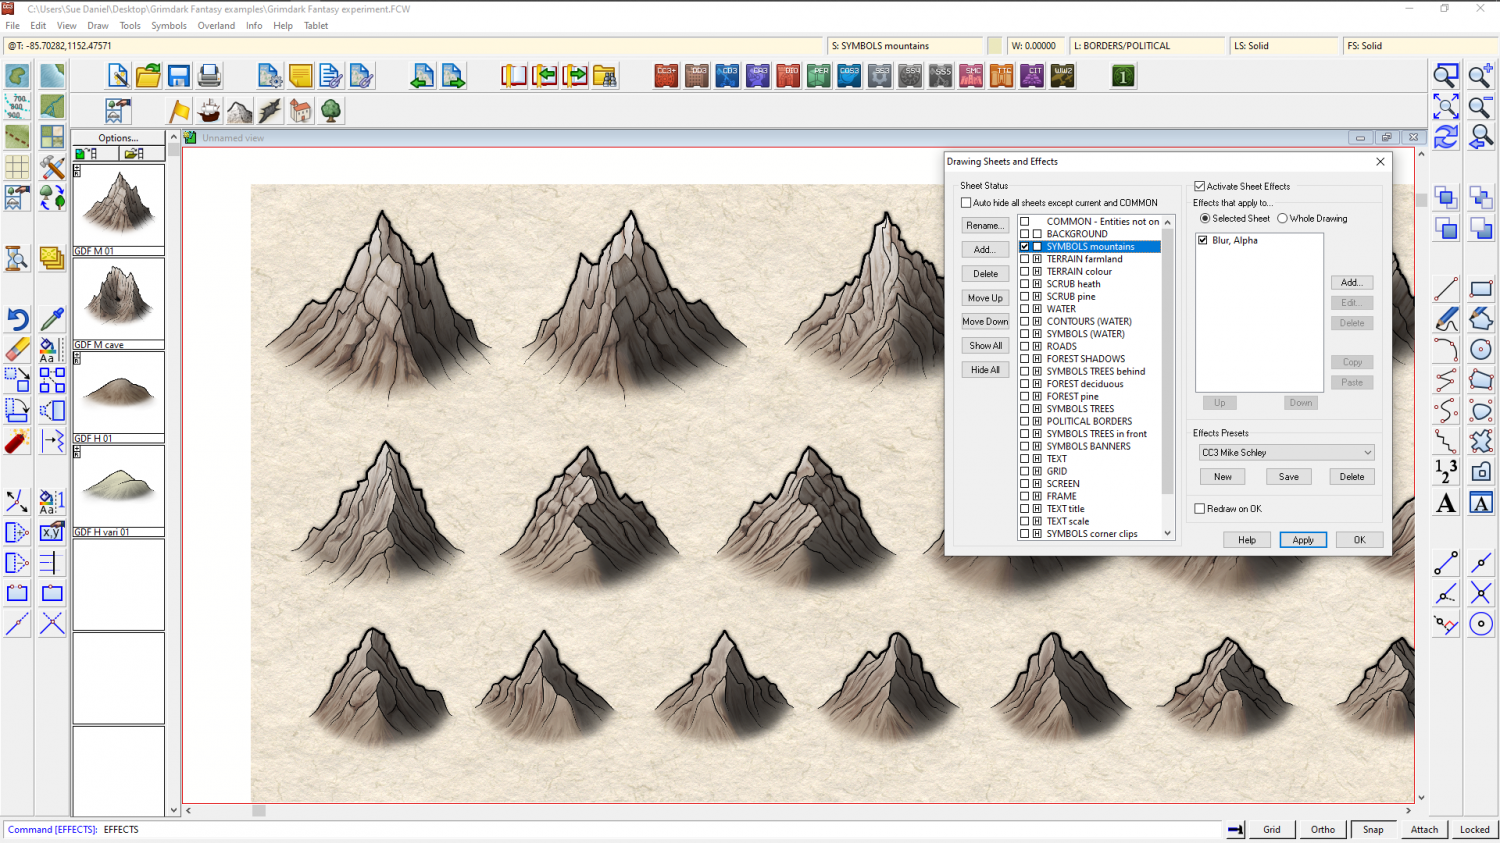
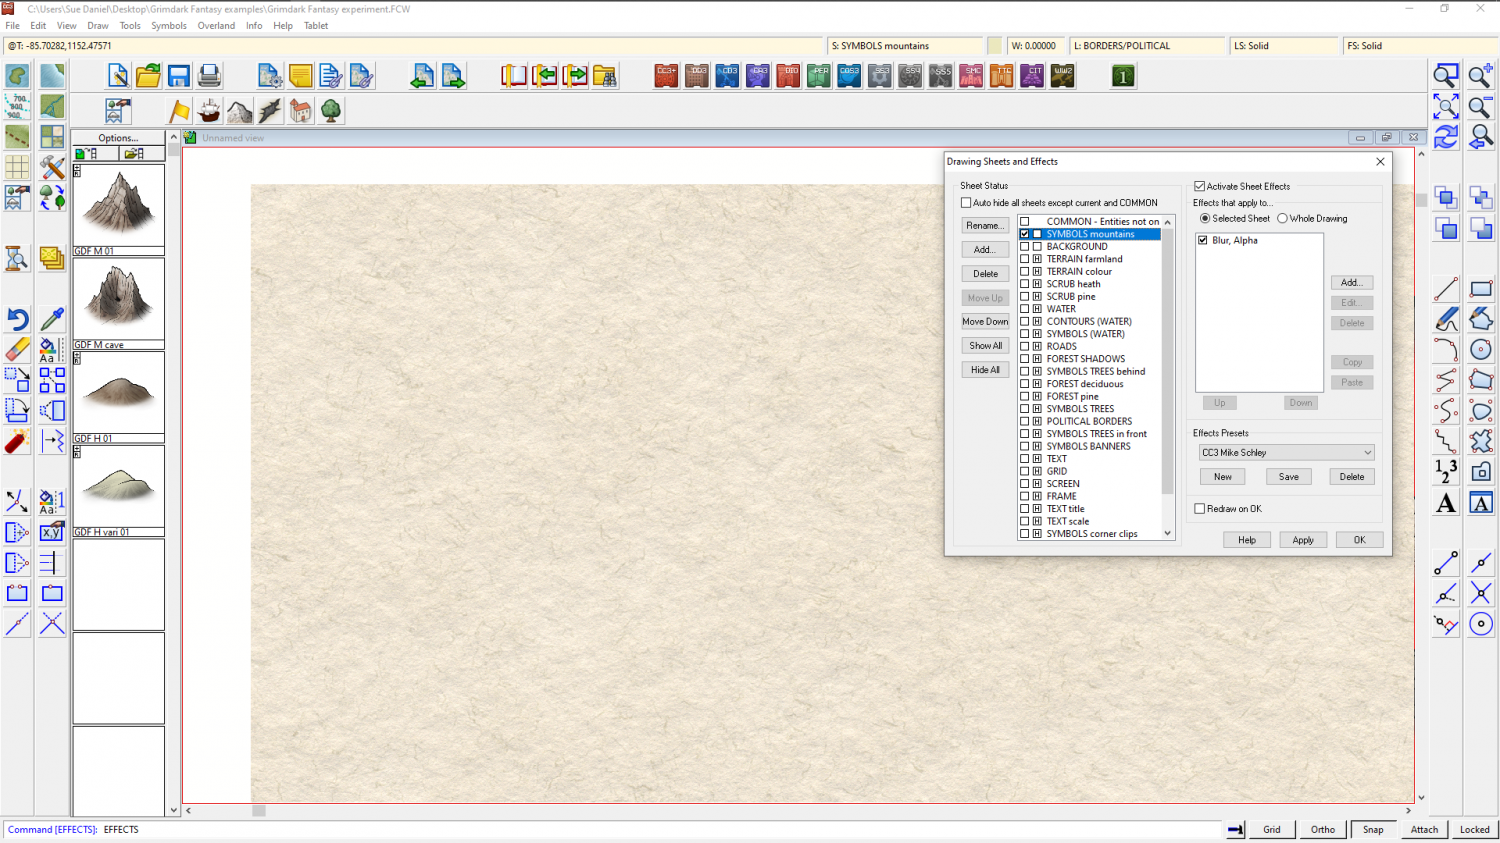
Most symbols are set to paste themselves onto named sheets. You will see these sheets listed if you click the Sheets and Effects button |CC2SHEETS|. Your mountains are probably on a sheet called SYMBOLS MOUNTAINS, or one of the other SYMBOLS sheets, depending on the style you are using. The order of the sheets is upside down as it is shown in the list. In other words the BACKGROUND sheet is right at the bottom of the stack of sheets as they are rendered. Here is a quick example.
This screen shot shows the SYMBOLS MOUNTAINS sheet just below the BACKGROUND sheet, where the parchment background is visible.
(I have hidden all the other sheets to keep this simple)
In this shot I have moved the SYMBOLS MOUNTAINS sheet above the BACKGROUND sheet, and the mountains are now hidden behind the background parchment.
If you are unsure which of the SYMBOLS sheets your mountains are on, use the List option in the Info menu to find out.

