


Wyvern
Wyvern
About
- Username
- Wyvern
- Joined
- Visits
- 3,266
- Last Active
- Roles
- Member
- Points
- 5,584
- Rank
- Cartographer
- Badges
- 24
Latest Images
-
[WIP] Community Atlas, 1,000 Maps Contest: Villages in The Whispering Wastes of Haddmark, Peredur
Hex 1307, Rularn: Instead of simply presenting the seventh map in this series briefly, as previously, it occurred to me in time to actually make some preparations for it, that this would also be a suitable point to illustrate how the maps in this set have been prepared. This is meant as a sort-of WIP topic, after all. And yes, this is a bit late to remember it!
As those who've followed some of my previous attempts at WIP topics here will know, I tend to work from hand-drawn sketches, scanned in and used as a base template for my CC3+ maps for the Atlas. These small settlement maps this time though have been done in a slightly different way, without a scanned-in bitmap to trace or adapt from.
That's in large part because of how the layouts for these villages and hamlets were arrived at, using the Shadowdark RPG random mapping systems. By rolling a few dice, and seeing where some lie in relation to one another on the tabletop once thrown, a basic settlement layout can be generated. I varied that system slightly, by drawing on other random tables in those rules to further detail some elements, and for the hamlet-sized places - such as Rularn - I reduced the options for how many features there could be in them.
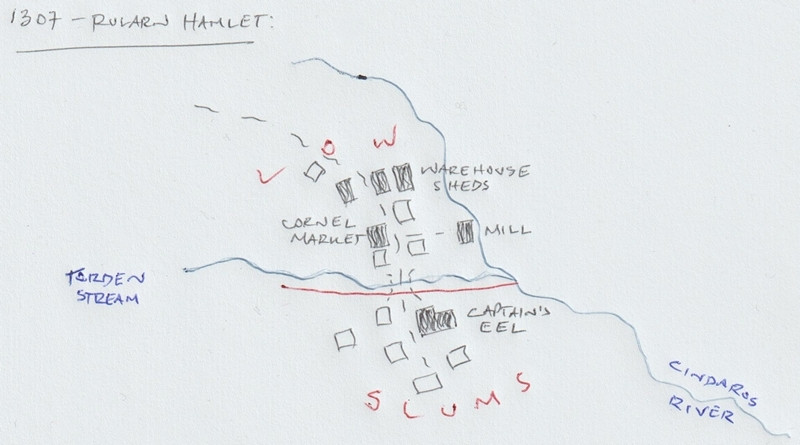
This first stage generated the following information, including a sketch-idea for the map:
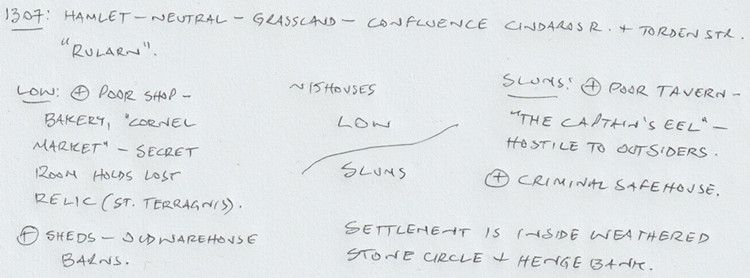
So there are two districts, on the north and south sides of the hamlet, with the keyword names "Low" and "Slums" having specific references in the rules for what tables to use to decide on the features in each. From these can be derived a number of points of interest, sometimes for the settlement as a whole. I've added notes based on the location already decided for Rularn from the Whispering Wastes overland map, and, based on the number of items in the settlement, a rough tally of houses for the whole place, generated using the old Judges Guild "Village 1" book, as noted back in the post about Ljungby Village above.
From this base, another rough sketch was prepared, using the Whispering Wastes drawing for the specific hex involved, to get an idea of how the various component parts might fit together:
Rather than using this as a template, it's really just a loose idea at this stage. The reason the stone circle and henge bank haven't been added yet is because I need to see what the layout looks like in the CC3+ map first, and can then determine where exactly those will lie. The Mill, a specific addition here beyond what the random rolls have identified, might not survive at all, or might be moved, or converted to a windmill instead, say, to comply better with the stone circle feature. The line of the Cindaros River in the sketch is likely too close to the main settlement for everything to fit inside a particularly circular surround presently.
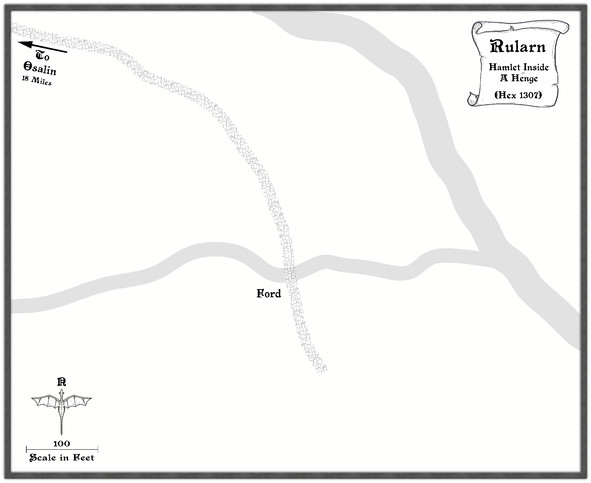
Moving next to the CC3+ mapping, I decided from the beginning that all these small settlements were going to be placed on identically-sized maps, 800 by 650 feet in size, determined using the sizes the various settlement-sized maps were for the Faerie City of Embra, referred to in the Bruga's Hold post earlier in this topic. The settlement itself would always be the main focal-point for the drawing, which would leave parts of the outlying areas available for a variety of additions or enhancements, including notes and elements such as the title, scalebar and compass pointer.
The first things to do included adding a title, dropping in the river lines, and the main road that connects elsewhere, with a label for that too. I put these basic names in so early to remind myself which map I'm doing, aside from other things! This also means I remember to check things like river and road widths from any map intended to connect, however distantly, with the current one. Sometimes these might not be the same - rivers tend to widen downstream, for instance, and roads don't need to stay identically-sized along their lengths either. However, this sets things up, which can always be changed later. These WIP map illustrations are deliberately under-sized compared to Forum norms, to clarify they're really only indicators of what was going on, rather than cluttering the topic up with images larger than is really needed for that.
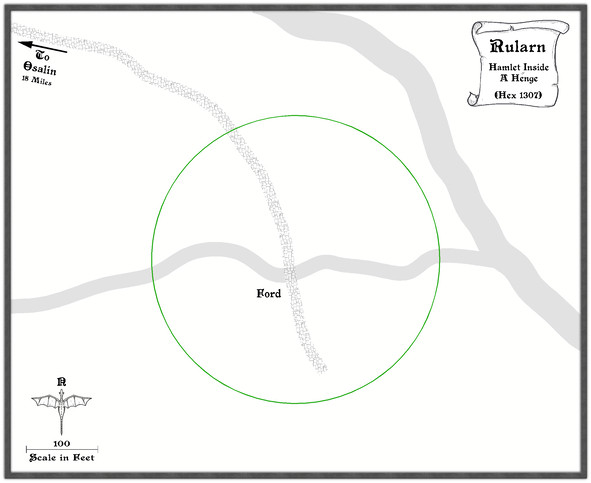
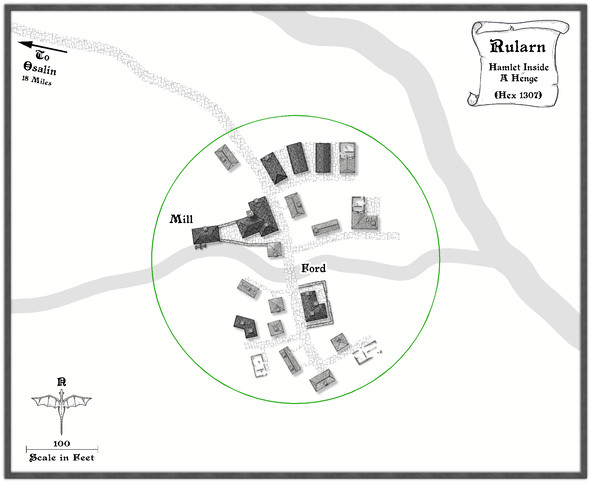
Ordinarily, I'd next add the highlighted buildings for shops, etc., as these are typically the larger properties, or the ones that better-define the settlement's overall layout, and other notable features such as any market place. Here though, everything has to be constrained by an outer henge bank and ring of standing stones, so I set up a new TEMPORARY Sheet and Layer, and drew in a template circle on those to show where it was meant to be (and after a bit of trial and error, it must be said):
With that prepared, the identified properties can be added:
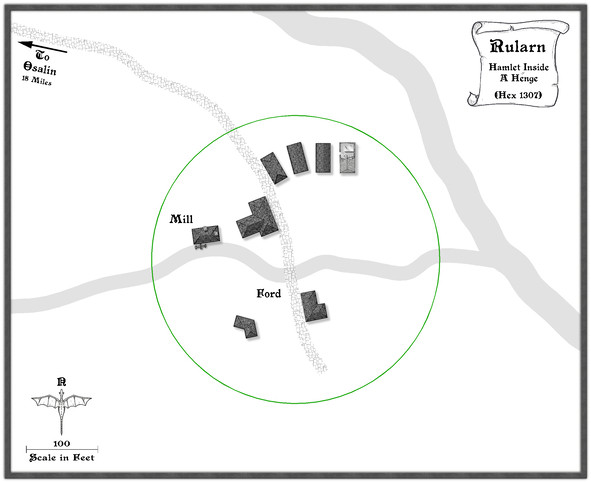
Since this settlement is at the end of the road, and had already been suggested as rather run-down, that seemed the ideal chance to make use of a few of the ruined buildings in this style, one of which - as used - had the form suitable for a rectangular warehouse-like barn/shed. Thus that shape and size became the template for the drawn properties alongside it, apparently in a better state of repair. I've also brought in a copy of the water mill already featured elsewhere in this series, although as we can see, it's now on the lesser of the two rivers here, to keep it within the henge-ring.
Adding the rest of the houses, with a few ruined ones, fleshes-out the settlement, after which more smaller roads and paths to the doors can be added, together with some larger expanses of paved yards, by the mill and baker's, the inn and the warehouse sheds, including a few walls:
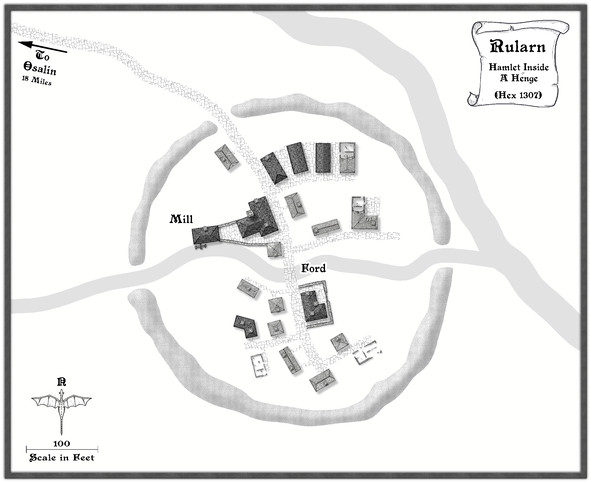
It may not be that obvious at this smaller resolution, but I've also added chimneys to various of the properties. After which, the henge can be added, and the temporary green circle hidden (not deleted for now, just in case!). Having already experimented with the Solid 10 bitmap fill and some lighted bevel effects for the barrow mounds in the Osalin map previously, I simply reused that again here, copying the effect over to a new HENGE sheet. Somewhat to my surprise, it looked fine without further tweaking, although the colouring overall was too close to the rivers, so I decided to add something by copying the henge polygons onto the LAND FEATURES sheet and then changing their fill style first to use the CA100 Grass texture (which was OK, but not ideal), and then to what had been problematical earlier in the sequence of villages, the Road Dirt fill, which this time gave enough texturing "under" the semi-transparent henge polygons to help the henge segments stand out as NOT rivers (or ribbon lakes)!
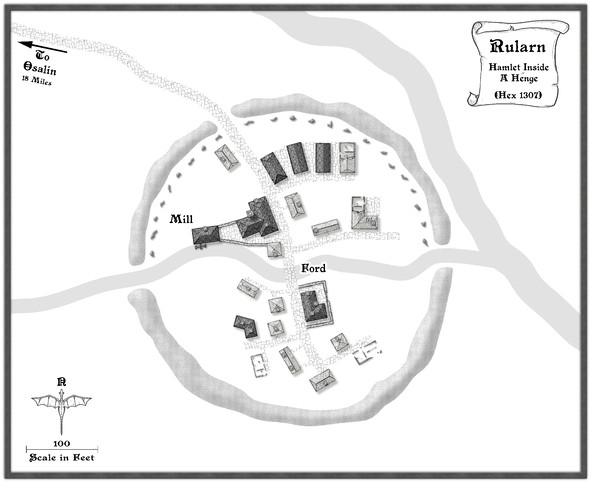
With the henge in place, now just the standing stones were needed, and a similar technique could be applied to create those, a simple polygon with a suitable lighted bevel effect, although I did also darken up the shadows to help them stand out more, as at this scale they needed to be small. I opted for the bitmap Solid 30 fill style for them, again to give them better definition. Although at this reduced size, they appear as little more than dots, this view shows the northern half of the ring completed:
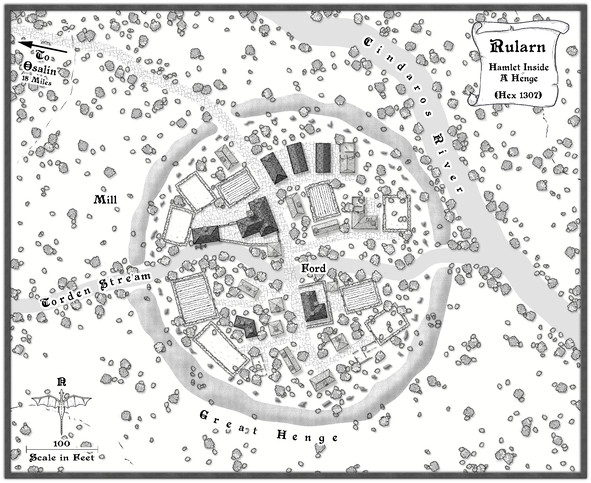
After which things started to move on apace, completing the standing stones' ring, then adding some labels, and starting to fill-in the gaps, with a few more changes. This shows a typical partway-through shot of the process. The Mill label has been moved to add some small fields and other vegetation as well.
From here, things tend to progress more organically, as fresh ideas surface along the way for how to make the place feel more "alive".
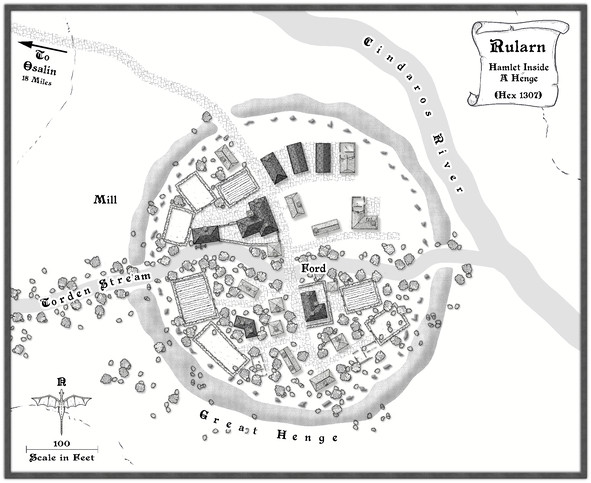
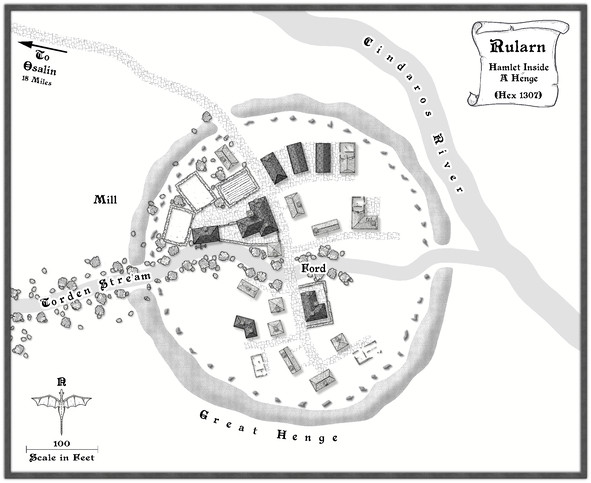
Followed by the rest of the labels, as the final map (now at its full Forum resolution):
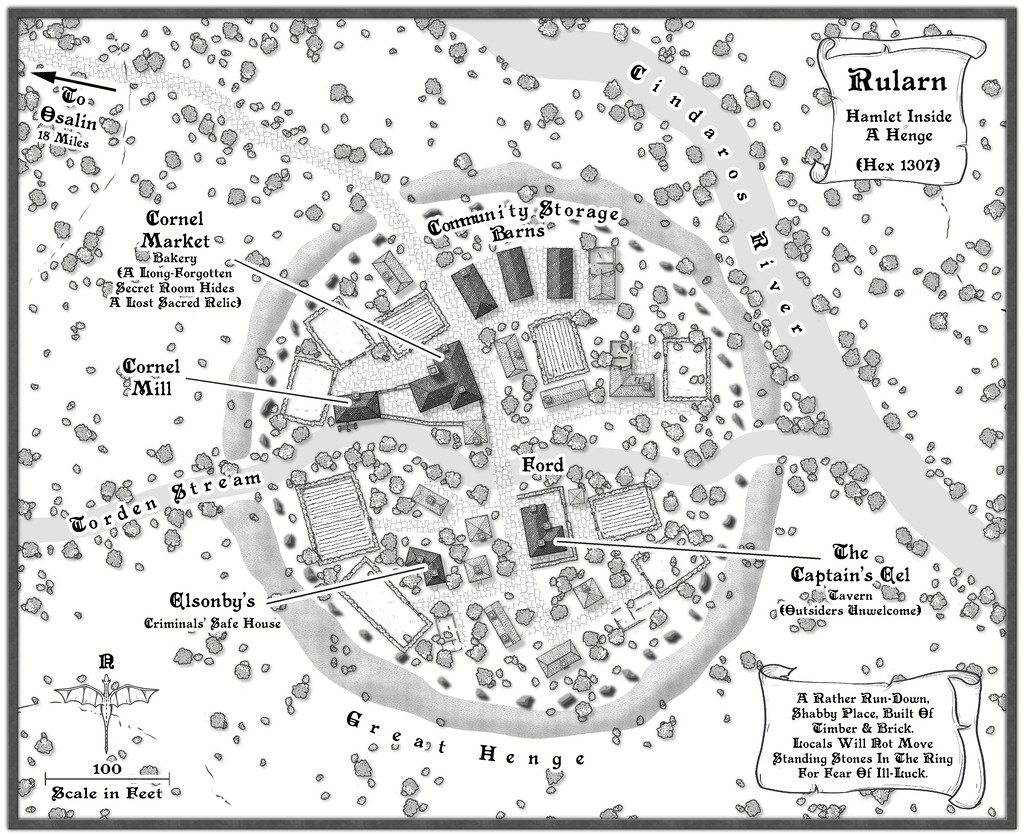
One further minor tweak was made to the shadows on the standing stones, to darken them up more, and help them stand out better against the vegetation, with a new scroll and a further note or two on the nature of the settlement.
And suddenly, there are only three more settlements to go!


-
Community Atlas: Ruins of Shadow Keep, Malhavania, NW Doriant
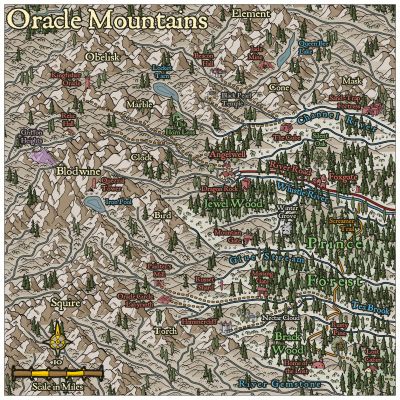
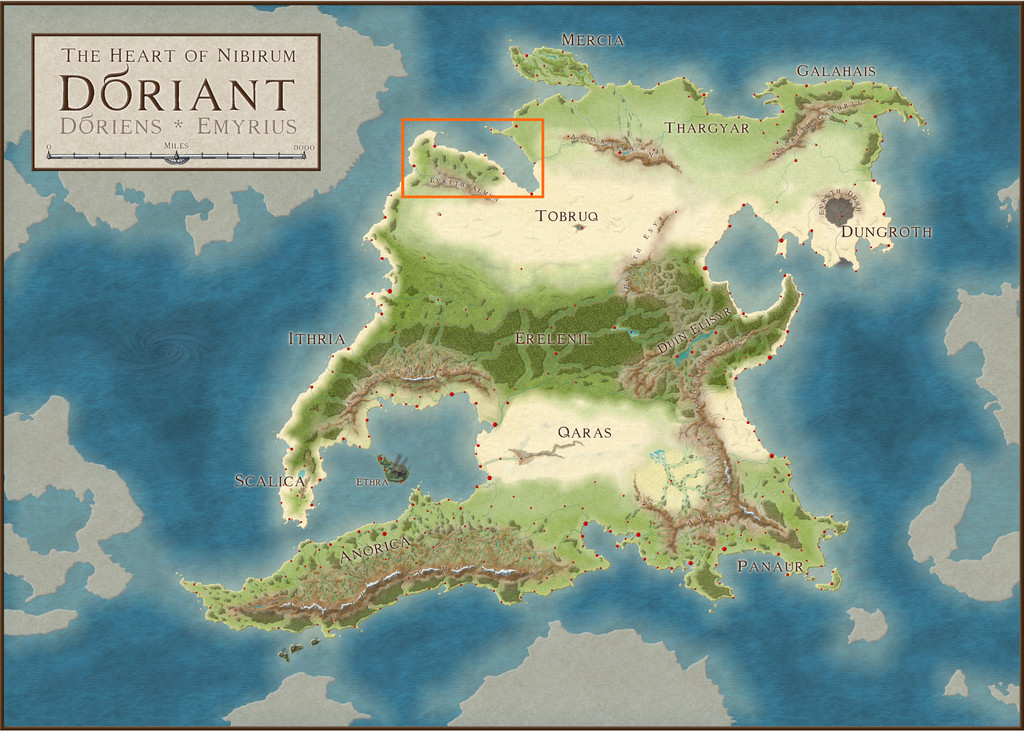
As mentioned last time, the next map in this sequence was heading for somewhere in the NW Doriant map, a huge part of that largest continent:
However, when I investigated further, it turned out the Malhavania peninsula there had already been mapped previously. While itself no small region, that did start to look a little more hopeful:
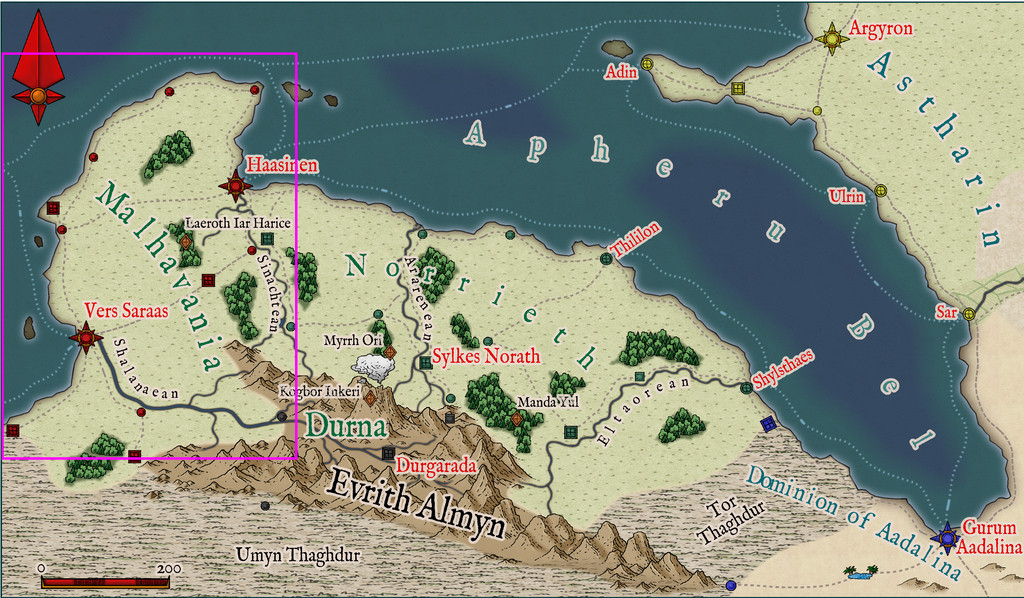

Checking the smallest pre-mapped part of the Malhavania one, around Loksa, clinched things, with its convenient selection of interesting potential sites available to slip-in a small, new, dungeon map:
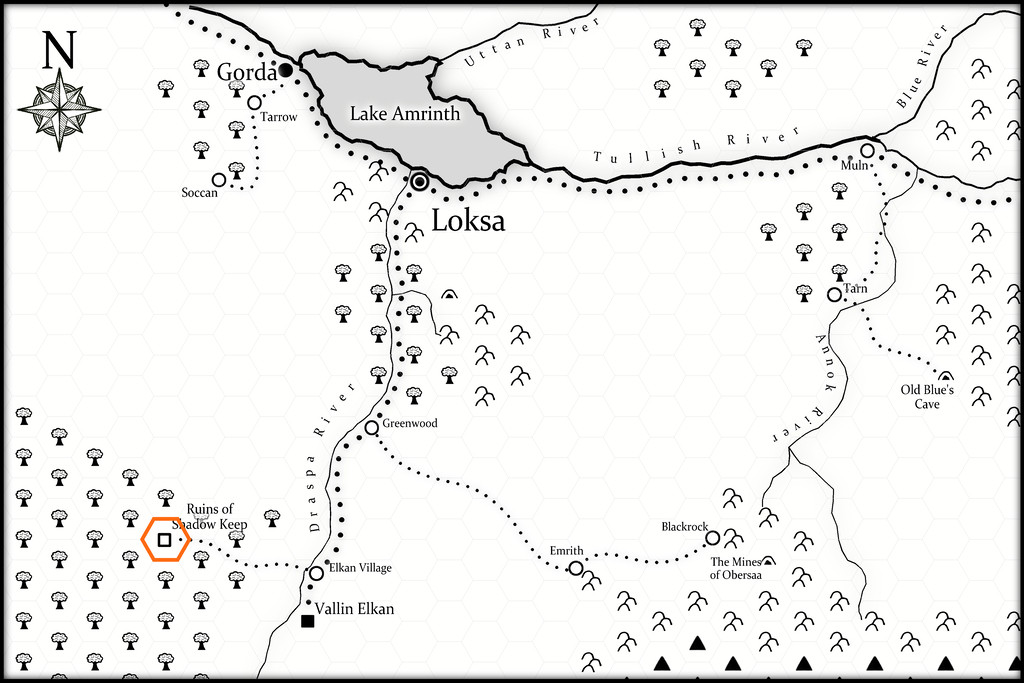
As this final map indicates, I chose the Ruins of Shadow Keep for this site. It's probably not too obvious at this resolution, but the black-and-white area is covered by a hex-map (drawn for the Atlas by Kathorus), with six-mile hexes. I did consider mapping the whole hex, but decided against it finally, mostly because the previous map-group I'd prepared had already been so long delayed in being completed.
The dungeon design was derived this time from randomly-rolled layouts using the Inkwell Ideas Trailblazer Set of Dungeonmorph Dice, the first of the four designs prepared from this set, though I did make a few minor changes to fit better with how things developed for what the contents and purpose of this structure might be/have been ("Ruins", after all). Much of those contents were determined using random tables from the revised edition of "The Tome of Adventure Design" published by Mythmere Games. I only realised after doing so that the Trailblazer dice set actually does have accompanying notes in a separate Inkwell Ideas book! Still, there are three more designs from that set after this one, though I did take a few ideas from that book as well, notably that the original inhabitants of Shadow Keep had been Dwarves, that part of the complex had been a temple, and that another part had been kennels.
One thing the "Tome" came up with were some very weird creatures, which rapidly became the focus for why the Keep had been abandoned and ruined, the Elemental Wasps. From the notes prepared to go into the Atlas: Elemental Wasps. Horse-sized, hairy, spider-form, colonial, egg-laying outer horrors, with three spherical body parts - a small head, medium body and larger abdomen - the body segment with 8 or 10 pincer-tipped legs. Normally invisible, except during and after feeding on blood, when their forms appear pink and sharply-ridged. Attracted to small, shiny objects that they collect as nests. May become ghostly and intangible at will. They have three forms, Queen, Forager and Warrior, of which the Forager and Warrior may cocoon to transform into any other type, as the Queen requires. Cocoons and eggs are always visible.
I also provided the creatures with relevant game stats based on the "Shadowdark RPG", published by The Arcane Library, for GM's guidance. To give an idea of what these (all non-flying) Wasps get up to, these are the notes for the Queen: Elemental Wasp Queen. An almost immobile form, with a huge, egg-laying abdomen and eight tiny legs. AC 12, HP 42, ATK 1 mental burst and 1 lightning cloud or 1 blood suck (near) +3 (1d10 + blood drain), MV close, S +3, D -4, C +2, I +0, W +1, Ch -4, AL C, LV 9. Blood Drain. Extensible head proboscis can hit one target in near. Once attached, may auto-hit each round as the Queen's only attack. Queen regains 1d6 HP per successful attack round. Target may DC 12 STR to break attachment on their turn. Lightning Cloud. Fills a double-near-sized cube extending from the Queen. DC 15 DEX or all within the area take 4d8 damage (DISADV on check if wearing metal armour). Mental Burst. Fills a near-sized cube around the Queen. DC 15 CON or paralyzed 1d4 rounds. Impervious. Electricity immune. Incorporeal. In place of attacks, become corporeal or incorporeal. Invisible. Naturally invisible. After using Blood Suck attack successfully, becomes partly visible. All who can see this, DC 12 CHA or paralyzed 1d4 rounds.
The other forms all have variant powers based on these, with physical pincer attacks as well, and they're a lot more mobile, able to climb vertical surfaces and so forth. There are grubs too, but they're unable to defend themselves, and need looking after by the other mobile types till they become adults.
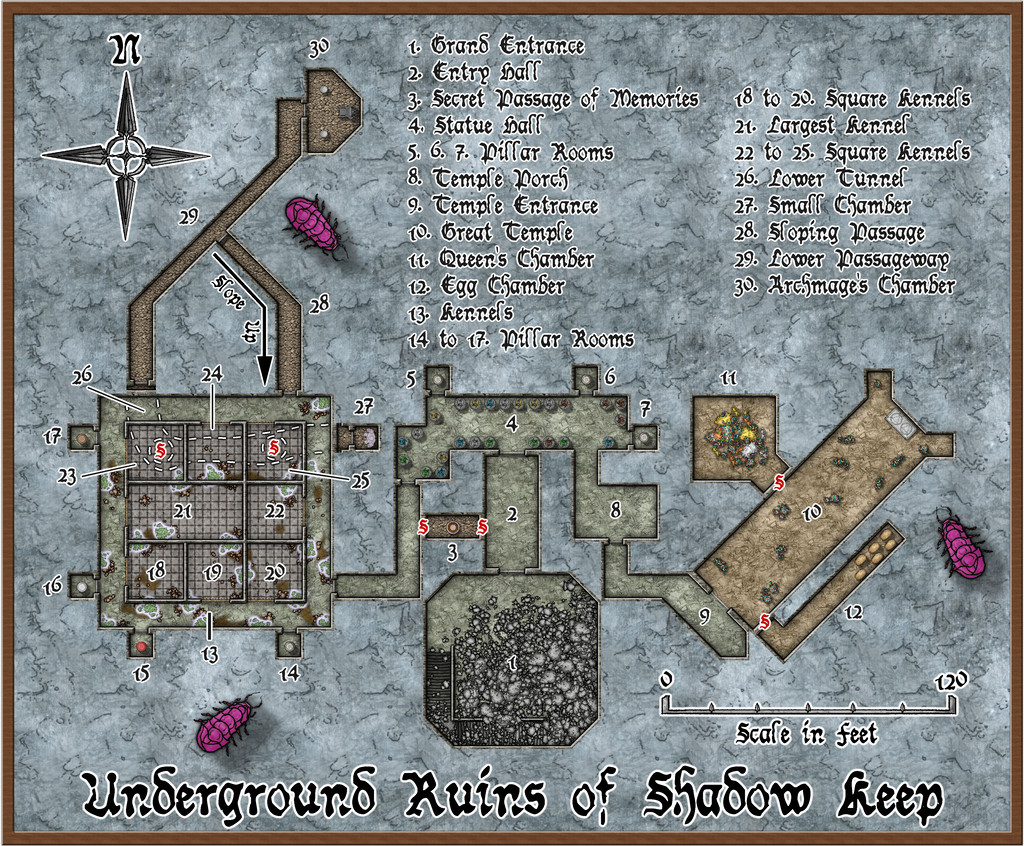
All of which preamble brings us to the new map:
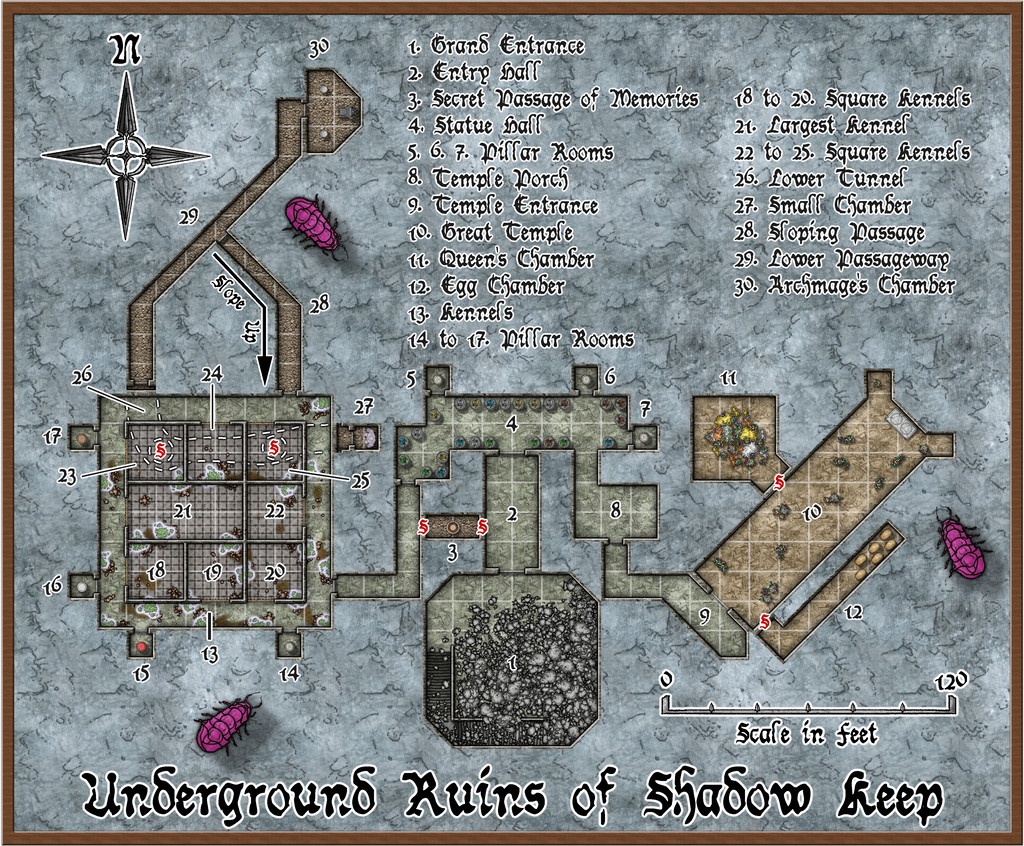
This also has a gridded version, although the angled areas work somewhat less well with that, of course:
The mapping style here started out as the CA94 Dwarven Dungeons one, given the initial inhabitants were, after all, Dwarves. However, it soon became clear that I needed other elements as well. SS4 Dungeons of Schley and the free monthly "Schley" symbols are already intended to work with Dwarven Dungeons, so that was fine. However, I also ended-up adding items from CA209 Stairs & Steps, Sue's Creepy Crypts (CA186 + CA188) and DD3! So using the Worn Manuscript font from Perspectives 3 wasn't much of a step further...
Of course, when you start a new map with Dwarven Dungeons, the first symbol catalogue that shows up has the cave bugs in it, so while they're not very close to how I envisioned the Elemental Wasps (except maybe the maggot-grubs), I thought they'd do to hint at Things To Come for explorers here 😉.
There is much other weirdness as well. The "Tome" provides opportunities to go to town when designing features such as statues, and having had it come up with a Statue Hall (4), all the statues in it now have individual descriptions in the Atlas map notes, based on those random options, as do the individual pillars in those seven Pillar Rooms (because you can also randomly design pillars using it!). Even the glowing hanging moss across the Kennels area (13 to 25) originated in tables there. The ceiling crevices from which it has grown down from the overlying jungle (the site is at about 25°N latitude on Nibirum) were though my own thought to explain how it got to be here at all, at least. Oh, and there are poisonous little spiders in it that keep away other predators...
One more weird item discovered late in the process concerns the Dwarven Dungeons scalebar. If you peer closely at the gridded version of the map, you may be able to tell the 10-foot grid squares do not match perfectly with the 20-foot marks on the scalebar. Ordinarily, when adding a scalebar symbol, I always check it against the grid, to make sure the size is what it's supposed to be and that I haven't messed it up. Commonly, I also place the centre of the scalebar using the snap grid, as a further test. Doing that showed this scalebar didn't fit to the grid, even after testing with adjusted symbol scaling, including trying the varicolor and metric scalebar versions, in case one worked. All proved identical, however. So then I measured the separation of the marks on the bar at scale-size "1", and found the separation between individual marks came out variably between about 15 and 17 feet, with no consistency, which of course explained things. I did think of swapping-in an alternative bar, but I wanted to try to stick as much as possible with the Dwarven Dungeons style here, so have just left it, given it'll still be sufficiently correct for most uses. Something to be aware of when mapping with this style though, perhaps.
Meanwhile back at the broader-scale map, features such as those ceiling crevices in the Kennels, started me considering it probably needed a surface map as well. We'll come to that next time...


-
Community Atlas: Embra - Villages
Next in the sequence is the northeastern Village, Embra - Summerise:
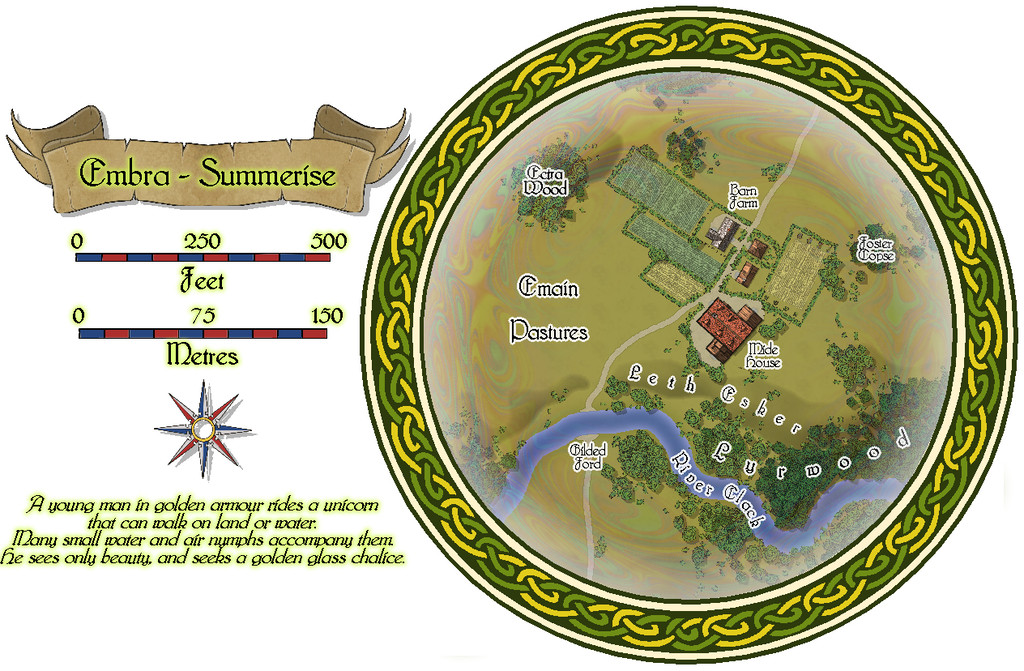
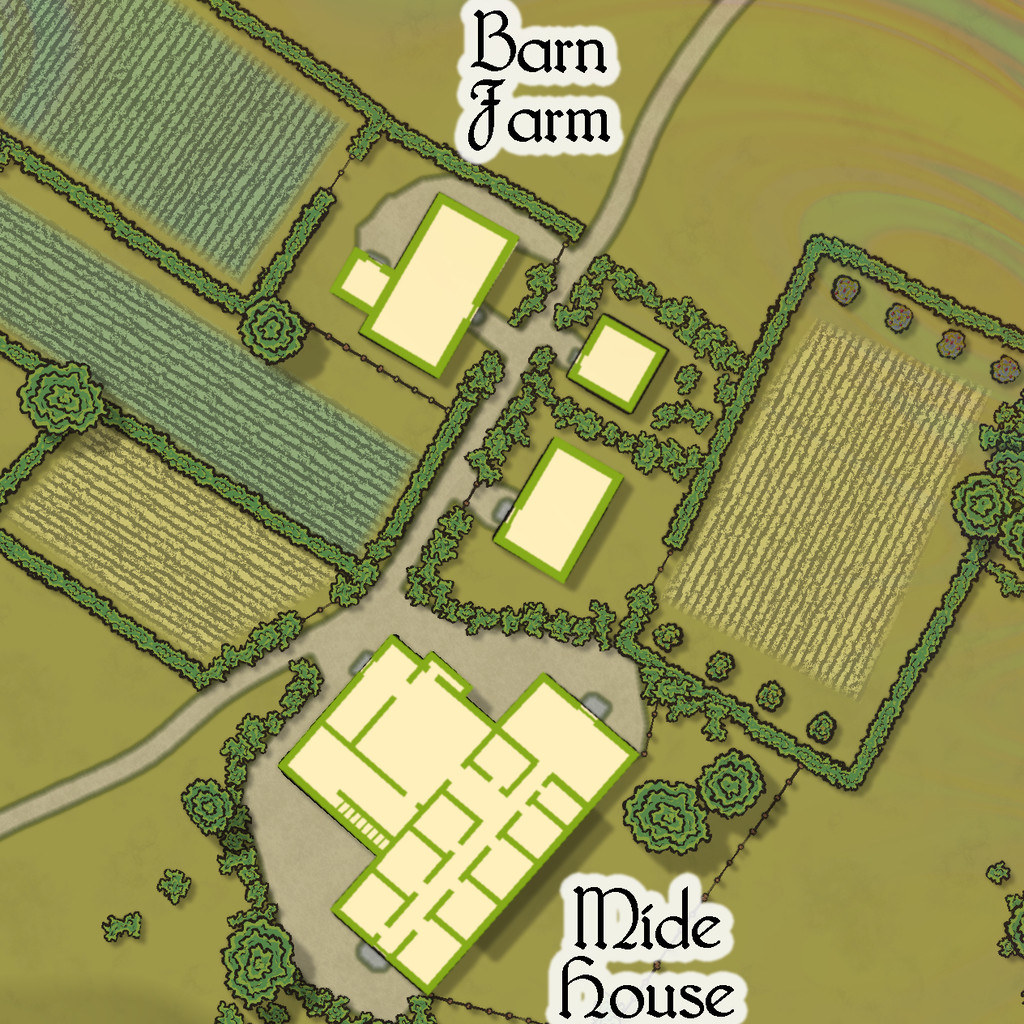
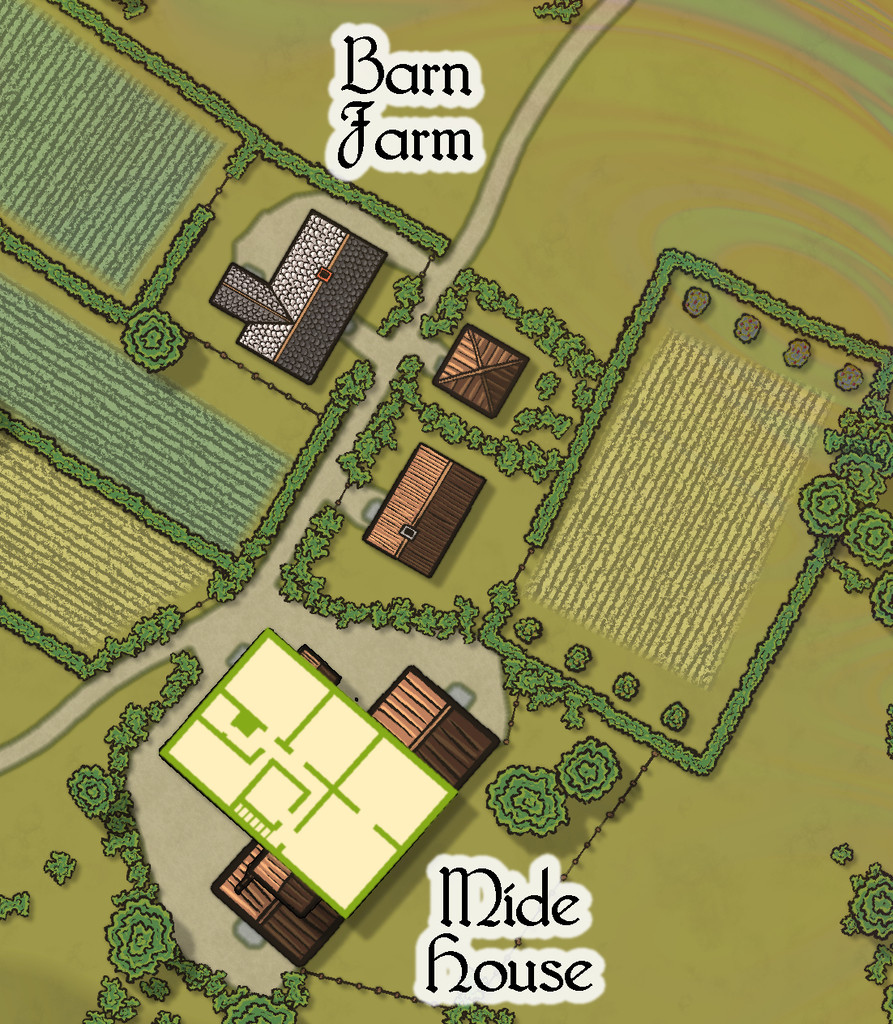
Here, we have a broader River Clack, if still one with a ford. There are fewer buildings this time, although a couple are larger properties, particularly Mide House, treated as an inn in the accompanying map notes. In addition, there are two "interior" toggle options, one for the surface level:
And a second one for the upper floor of the inn:


![[Deleted User]](https://secure.gravatar.com/avatar/c75d9a245b74d9c59be0999ea81ca541/?default=https%3A%2F%2Fvanillicon.com%2F92add7f8c954488718110edc4896ad39_200.png&rating=g&size=200)
-
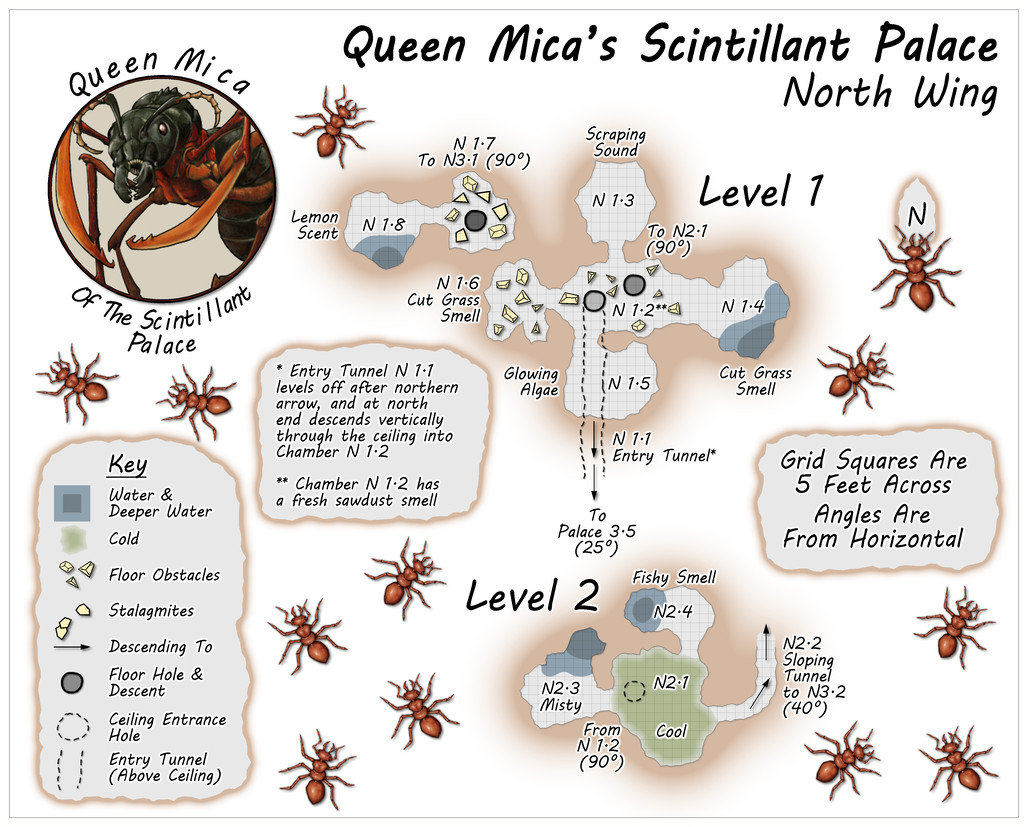
Community Atlas: Queen Mica's Scintillant Palace
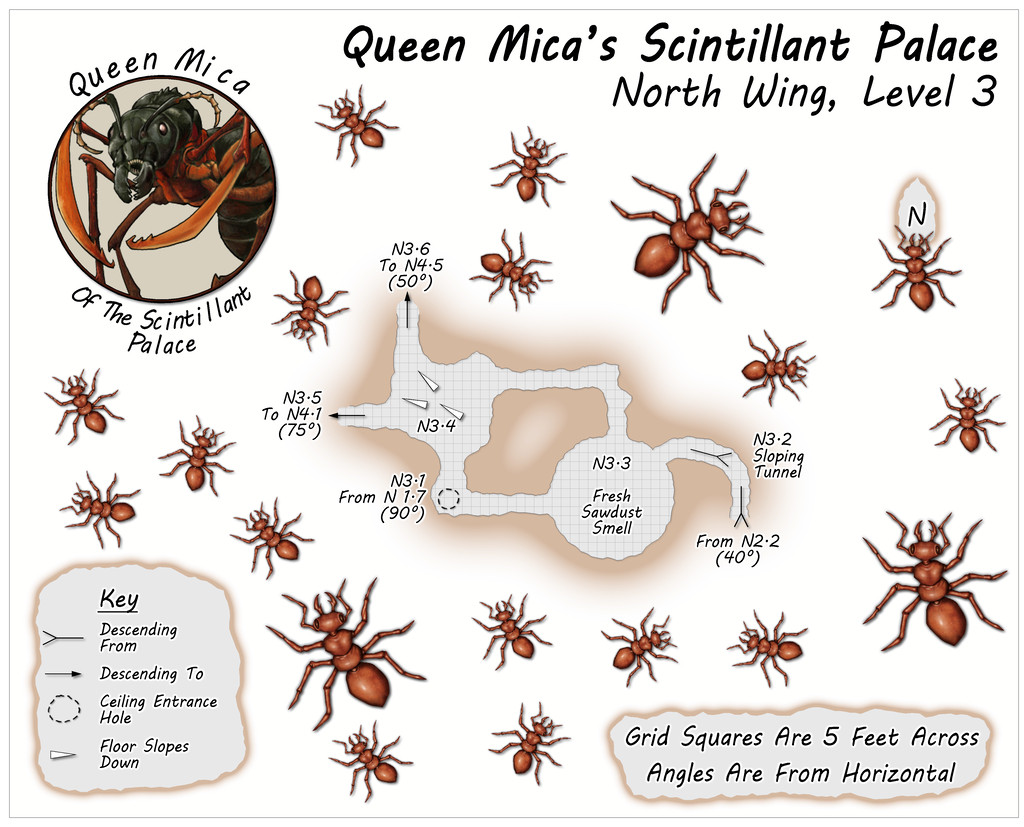
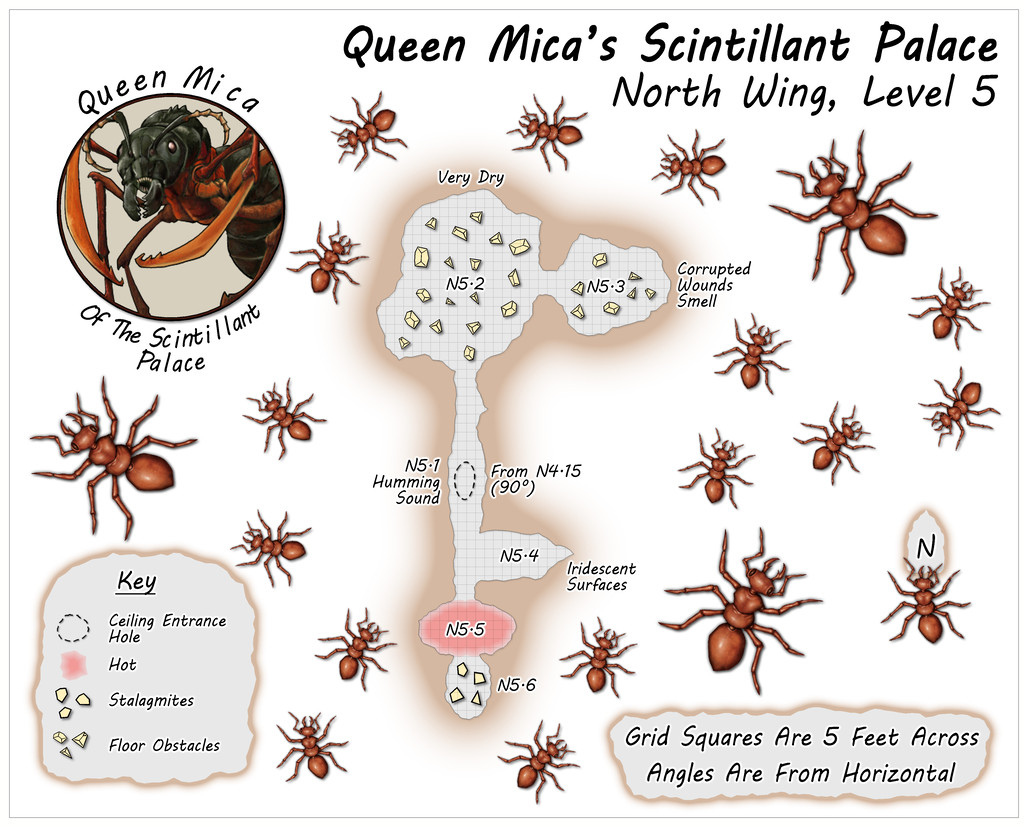
Circling clockwise from the West Wing, the North Wing is the most vertically-extensive of all the Wings, with five separate Levels, just like the central main Palace structure. The layouts here derived from a mixture of images on the Dwarven Forge Discord, and one of the official weekly "On The Anvil" livestreams on Twitch from January 2021 that featured another extensive Burrows build (go to 2h15m or so to see the final design). This combination led to an interestingly complex grouping of tunnels and chambers that, because of the way maps can be linked in the Community Atlas, meant both the small first two Levels were placed on the same map, as Level 1 here connects with both Levels 2 and 3, while Level 2 links back to 1 and on to 3 as well. This also resulted in a means of linking into Level 1 from the Palace by a tunnel that passes above the ceiling of two chambers on that Level, before dropping vertically into one of them. Thus, the North Wing:
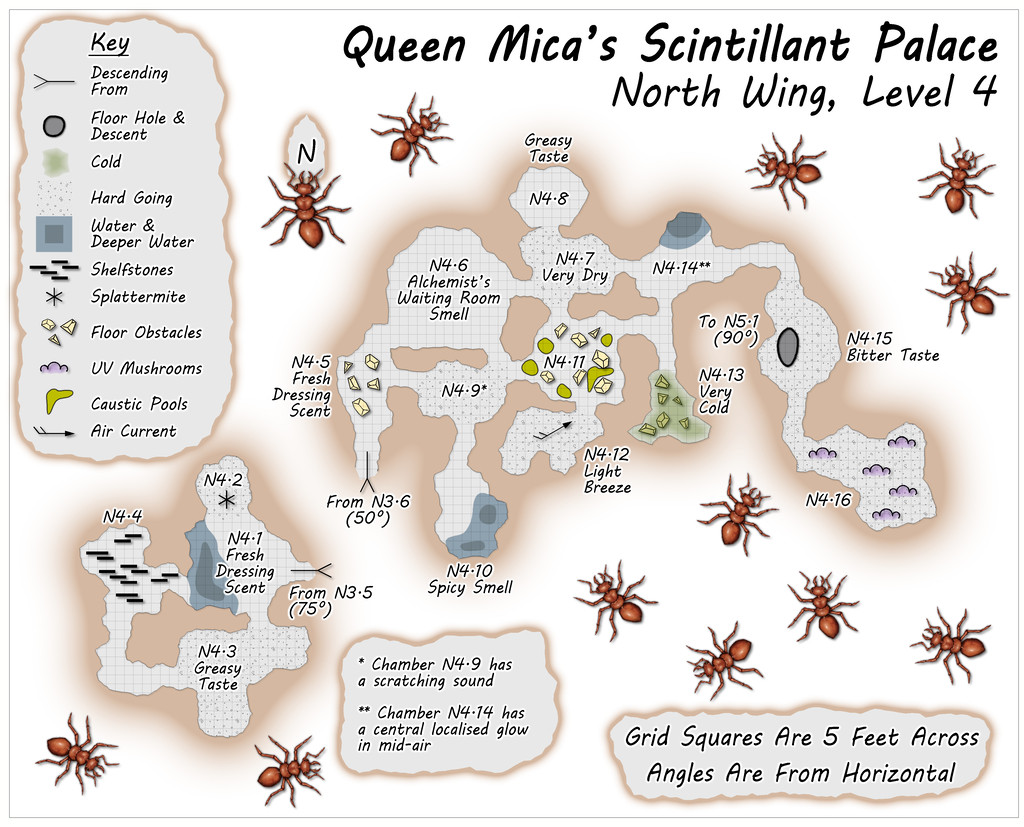
Some particularly unusual random items were rolled-up for Level 4, adding extra interest to this part of the colony beyond its verticality.

-
Desert map for a commission
@Vir: There are a number of problems involved in understanding climate and how it would behave in circumstances for another planet than Earth with its current layout of continental landmasses, sizes and depths of ocean.
One is we don't really understand how Earth's climate works. There are a lot of theories and models, but many of them fall apart if we try to use them to explain the current Earth in any detail, and/or if we try to use them to explain what we understand about the geological past (this latter is a particularly major problem).
Another is that because we don't properly understand how our own planet's climate operates, when we try to use these theories and models to explain another planet's (and this has happened repeatedly in our own Solar System), they don't really work either.
So the further we get away from the current physical situation for Earth, the more guesswork is involved, essentially. (And there's a lot of guesswork involved in explaining the current situation already!)
Ocean depths different to Earth's create particular uncertainties, as it's clear there are things happening in Earth's deeper oceans that have huge effects planet-wide, but we don't really know why they happen. So when trying to look at a planet like this one, where great areas of the ocean are much deeper over far larger areas than Earth's, it gets to the point of either giving up, or just going with whatever you fancy!
Ocean currents, for example, can flow in completely different directions at different depths - a warm current might be flowing over or under a cold current behaving in this way too. Similar things happen in the atmosphere as well, so while that shouldn't be a surprise, it doesn't mean we really know why things are as they are.
If you need a south to north wind (maybe only seasonally), my advice would be simply invent what seems to you a good reason for why it happens, and if that involves something relating to Earth's climate/weather patterns, possibly only vaguely, just invoke that. If anybody's daft enough to question it, then obviously it's because it's also influenced by the planet's magical field!
If you need ideas based on what happens for Earth, I'd suggest taking a look at places online such as already suggested above here for the geological situation for Earth that's similar to your own planet, with things like the estimates for broad-scale current flows. If you can find a good-quality physical atlas showing similar things for either the past or present (which is a useful definition for "good quality"), that will be just as suitable, dependent on what you prefer.


-
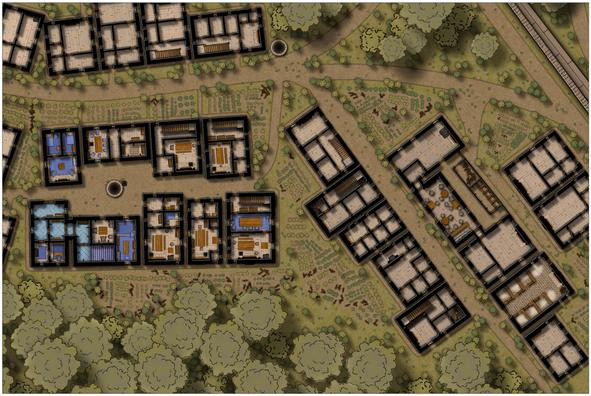
Community Atlas: Temple of Nidag, Stormwatch, Emerald Crown Forest, Alarius
First task on resuming mapping was to complete the structural building interiors and gardens:

However, while I was "digging" the gardens, it became clear the vague not-path from the road to the back of the inn wasn't clear enough. At first, I tried adding patches to cover the hard-line road edges, and tweaking the effects that created those lines too, but it didn't improve, so ultimately, I redrew the connecting area as a full stretch of the road-style dirt pathway, while retaining its funnel-like appearance as seen from above. Doing this though also made me think further about these roadways, so I also added some more of those little "weed clumps" along all the roads, notably at the junctions, in the places where wheels, hoofs and feet would be less likely to pass frequently, all to make the roads look a bit less maintained. They are beyond the main settlement's boundary wall, after all.
Plus we can see how that mid-property fireplace worked out in the end - a fireplace on one side, a cooking range in the narrow, galley-like kitchen on the other.
With this completed, it was time to begin detailing the internal contents of the central properties, those belonging to the temple and its ancillary elements. Temple access hall and priests' quarters first:
Followed by the dwellings of the lesser clergy and higher-ranked followers:
After which came the rest of the inn:

There were a few other changes made here as well. I wanted some water troughs for the stable block, which were simply drawn using fill polygons, as there aren't any suitable symbols in this style (although I did repurpose some stretched versions of the unlit braziers for the wall-mounted hay baskets in the separate stalls - likely too small to see at this res). It then occurred to me that other troughs could be positioned elsewhere, so I put a couple more in by the main crossroads, not far from the well there, and added a few cauldrons resized as buckets nearby, as already done elsewhere.
In addition, I changed the sheets for some of the larger furnishings, to give them a bit more shadow, and thus presence, when viewing the whole map, as I discovered I'd already done that for the bar furniture at the inn earlier. Not sure now if that was by accident or design though!
Finally, the last row of properties could have their interiors completed:

I did think of furnishing all the buildings, but felt that would draw attention too much away from the more central properties linked to the subterranean map. This does also leave open the possibility to install player-characters in one or other of these should they wish to spy on the temple and its congregation at some point. Plus it was common practice in many of the earliest D&D maps to show no roofs, just walls, stairs, doorways and windows, for surface buildings.
That just left the labelling, for which I chose the default font that comes with the Naomi Van Doren mapping style, the awkwardly-named IM FELL DW Pica PRO. Names for most of the items were predetermined using tables in Mythmere Games' "Nomicon", as noted in the first post above here, and allocated where appropriate. Thus we reach this completed first map, or at least its surface view, now at full Forum res, no less:
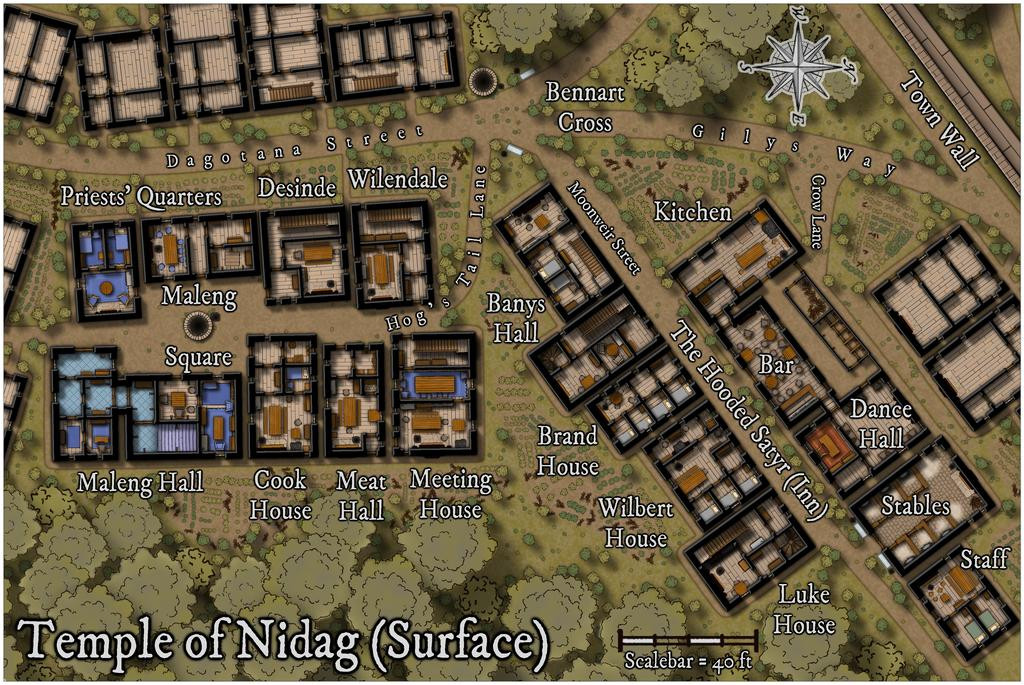
I'll spare you details of how much effort went into tweaking the effects, sizing, colouring and placement of the labels, compass rose and scalebar; suffice to say, it was almost a session in itself.
Next will be designing the upper floors of the properties here that have stairs, which may explain how that Banys Hall label applies to what are apparently two separate buildings at present...

-
CA style development - "Darklands City" (issues for September and December 2021)
They're lovely trees Sue, but I think we're hitting the same issue as with the Darklands overland style, in that they're just too nice!
Maybe think about something less symmetrical, and with some dead branches, or just branches without leaves, and maybe even some very battered trees too?
-
Community Atlas: The Hall of the Seer, Glaciär Kristol, Ezrute
Third map in this group, for the Hall of the Seer, was actually drafted first, using the same style and look as established for all four underground maps in this "Explorer" dice batch, using the two dice designs involved for the layouts of the above-ground and subterranean segments, as mentioned last time. It was really this map though that led to establishing the "gritty" look of the stone-edged roads and paths outside, largely to help give a better contrast between the outside and inside of this little complex. Originally, I did think of just using gravel-filled polygons for the roads, but that appeared confusing with the similar dot-shading to represent the solid interior of the hill lying adjacent to the entrances. Ultimately, I did use the polygon drawing tool for both, altered by the stone edging outside, which with the trees, buildings and blank ground surface seemed to provide sufficient contrast.
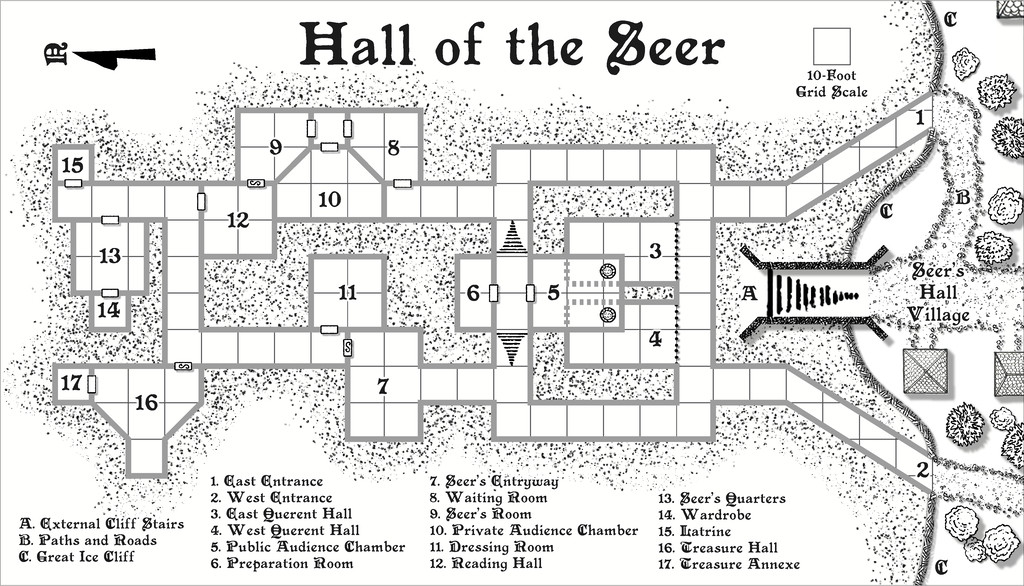
For the internal layout, this was largely what the dice designs provided, omitting the geomorphic connectors in places beyond this layout, and adding one secret door between rooms 9 and 12, as I wanted to provide an inner sanctum as the private domain of the Seer herself. This was chiefly because (and there are hints in the label descriptions) that the Seer had been randomly determined as a Frost Dragon from Shadowdark, modified here to be also an ancient, prophetic creature, able to shapechange to various forms under the local magical influences. There are also three "ordinary" Ice Dwarf Oracles as well (lesser, humanoid seers, in effect), who live in the Village, and provide aid and prophecies here too, when required. I decided to really push the legendary significance, importance and reliability of the Seer - who has the randomly-determined name of Leminsiskiel - to help enhance the significance of this little site overall. After all, there needs to be a serious reason for folks to traipse across the vast, frozen wastes of the surrounding larger region to get here!
As ever, there's more detail in the accompanying notes for the Atlas as to how the set-up here works, as it's not really intended as the traditional kill-the-monsters-and-steal-their-treasure dungeon, more a living place of importance for the lands around - and perhaps even further afield.
Next time, I'm heading off to map somewhere a little more tropical, a site in the Demosthenes Swamp of central-southern Artemisia, according to the random rolls...

-
Issues with Inked Ruins Style: Hatching "Texture" Size and Water Rendering
The water lines problem looks to be one of the classic issues with too many nodes too close together, in this case because the water drawing tool is set to not extend beyond the map border, and as a smooth drawing tool, it will automatically put a pair of "Corners" at the map border to create the straight line there. A Corner is basically three nodes very close together.
A quick check suggests you should be able to solve this by using the "Advanced" button for the water drawing tool, unchecking the "Restrict to map border" box and then save the tool. Then redraw your river, making sure you draw the ends a little way beyond the top and bottom map edges. DO NOT use the "C" = "Corner" option, just add a few nodes and make the ends of the river outside the map border a bit more rounded, with fewer nodes close together. The screen should hide this once you're done (or if not you can use the COLLAR commands to create a new, larger one - use COLLARDEL first to remove the existing screen, and then COLLARAUTO to add a new one - if I've remembered that right).
Hopefully, that'll cure this point at least. Good luck!

-
[WIP] Community Atlas Competition - Runcibor Dungeon
@Quenten asked:
I will probably change to X-section to show joining passage ways, by bending the red line - can that be done, ie would it be stupid to do it?
It's pretty much standard practice in a lot of real-world cross-sectional mapping to vary the line direction like this, often to follow a specific passageway, or series of linked passages and caves. The purpose of the cross-section is to provide useful detail that's not so easy to identify on the plan-view map, so any line that works best to show that is appropriate.
Indeed, if you take a look at the PDF mapping guide for CA7, Caves and Caverns, this is exactly what Ralf (I think?) did in drawing the sample cross-section for that cave using the modern cave mapping style.
Sometimes, it may even be helpful to use more than one such cross-section.
Looking at the cross-section on your first map above here, while it's interesting, in pointing out how variable the levels are in different parts of the cave system, it's not all that helpful, since it implies other parts of the caves may be at similarly variant levels, without indicating what those may be.
In some cases this may be of merely academic interest, where caves aren't directly linked to one another and are some considerable horizontal distance apart, for example. However, where the passages and adjoining caves are at different vertical levels, it can be much more important - i.e. if a passage enters in the ceiling of the next cave, say.
It may also be useful to add some cross-sections of individual passage segments next to the area on the main plan view too. For instance, there are a couple of clear choke-points towards the SE end of the narrow, SE passageway. This suggests they're more or less impassable, yet there's a mapped cave beyond them, so there must be a way through, if perhaps only a crawl-space. A cross-section of just the choke-points on that passage next to the narrowest parts would help clarify that.
