


Raiko
Raiko
About
- Username
- Raiko
- Joined
- Visits
- 2,185
- Last Active
- Roles
- Member
- Points
- 535
- Birthday
- April 20, 1971
- Location
- Lancashire, UK
- Real Name
- Gary
- Rank
- Surveyor
- Badges
- 5
Latest Images

Reactions
-
Paladine's Bell
That is a really great little map. It really makes you want to adventure there!

-
[WIP] Castle Ravenloft.
Like this?
I don't own the 3.5 "Expedition to Castle Ravenloft" version, mostly because I'd just run Ravenloft for 3rd Edition anyway, but I couldn't resist Curse of Strahd for nostalgia.
I'm not in a hurry to get the maps done, so I'll do every level, but just flat versions, to go with all the other maps Mike did for CoS.

-
Changing Background Colors
It's normally easiest to work using the sheets and not worry about the layers too much.
Having said that, first of all open your LAYERS list and make sure that the TEMPLATE layer is frozen (I'll explain why).
Then open the SHEETS list, select BACKGROUND and then Hide All.
Now you should just have the BACKGROUND sheet visible, which normally contains two rectangles overlaid. One is your actual background, the other is a hollow green rectangle on the TEMPLATE layer - which CC3 uses to figure out where the edge of the map is (I think). That's why you need the TEMPLATE layer frozen before proceeding.
Click on either Change Properties or Edit Properties (I prefer the change version as selection is easier) and you'll get this (actual contents will match your current choices):
You can just change the fill style to a bitmap fill - or change the colour, but changing the colour won't have an effect once a bitmap fill is used.
Note that if you do the above steps without having the template layer frozen, then you normally end up editing the template rectangle by mistake if you use the Edit Properties button, as it only selects a single entity and will select the hollow green rectangle every time (I guess because it has a lower entity ID number).
EDIT: After reading @Monsen's reply to you in another thread, I think that I meant the MAP BORDER layer needs to be frozen, rather than the TEMPLATE layer (they're normally both frozen). You probably figured that out for yourself, but just editing in case someone else follows my advice. 
-
[WIP] Community Atlas - Artemisia - Lakiope
That's another great map @Quenten ?
![[Deleted User]](https://secure.gravatar.com/avatar/c75d9a245b74d9c59be0999ea81ca541/?default=https%3A%2F%2Fvanillicon.com%2F92add7f8c954488718110edc4896ad39_200.png&rating=g&size=200)
-
Physical Manual and Essentials Guides
Although it's not as good as having it as a printed book, the Tome of Ultimate Mapping - which I think was included in the bundle - is well worth looking though. Each subsection has it's own set of tutorials, for example the CC3+ section starts with a "Basic Overland Map" tutorial, and then has extra tutorials for many CC3+ functions. The DD3 section starts with a "Basic Dungeon Map" tutorial and then expands from there, and so on for CD3, Perspectives 3, etc.
The blog section of this website has loads of amazing tutorials, often linked to a YouTube video or an example map. https://rpgmaps.profantasy.com/tag/tutorial/
Ralf's blog entry from the start of the year is a great one to start with:
Sue's tutorials are always brilliant, as well explaining advanced features she includes a link to a copy of the example map from the article, so you can always download the FCW file and see for yourself how the magic worked:
And Remy has very insightful articles about various functions of CC3, many of which long-term users had never even seen before he pointed them out - like his Command of the Week series from these forums:
Many of the tutorials are very concise - much more than my rambling here - and colourful, and so they are a pleasant read electronically, and have the advantage of displaying on-screen exactly what you'll see in the software.

-
October challenge: Drummond Street WIP
The spots are spaced out enough on the city map that I don't think that anyone would object however each person decides to map their patch.

-
Castellfollit de la Roca - remixed
That is brilliant @Lillhans - is that all done in CC3?

-
WIP - Rise of the Runelords: The Rusty Dragon.
It's an inn as well as a tavern. I think that the landlady/owner Amiko would be offended at The Rusty Dragon being referred to as a "common tavern."

It's the second best inn/tavern in Sandpoint (of four I think) and serves the best food, with the best inn being too posh for the average adventurer or local. Story-wise I'd say it's the most well know occupied building on the "Lost Coast" (the region of Varisia in which Sandpoint is the largest settlement).
The bunkroom is a common-room/dormitory for guests who don't want to pay for private room, or cannot afford one. The private guest rooms are upstairs.
The parlours are snugs, most large old pubs in England have them (ie the ones that used to be coaching inns), and Aragorn takes the Hobbits into one at the Prancing Pony. I've left them in the same place as they appear in the official map - though that had three rather than two.
There are only two permanent staff at the Rusty Dragon (regardless of how realistic that may be), Amiko and her cook/maid (a very busy Halfling lady called Bethana).
Bethana, lives in one of the small family bedrooms, which is perfectly fine; it's established in the story that she is more than just staff. The second small family room is unoccupied, or used for private guests of Amiko. This has made me realise that perhaps I should swap-out the furniture in Bethana's room for child/Halfling sized furniture.
Normally such an inn would need more than the two of them though, and it does say that Amiko hires in additional staff during busy times and festivals, so I will at an attic with dusty disused servants rooms. There is no attic detailed in the original plan, but I'd been considering adding one anyway - if only to be able to add the huge metal dragon statue that Amiko's got on her roof!

-
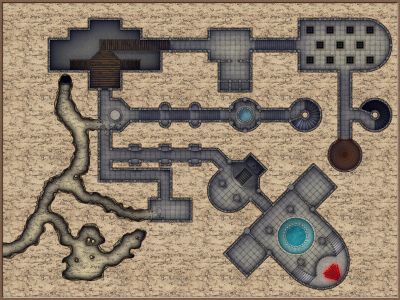
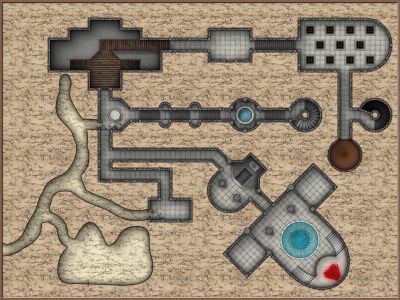
Handling irregular shaped or "round" dungeons
Unfortunately, if you have unusual walls, you'll need to place the door and windows manually.
You can use the grid snap or the "on" modifier to help you position them exactly.
The cutting symbols won't work on curves either, so the best way to handle that is to add a color key effect to your WALL sheet - keep the default setting (which is magneta "colour 6" and 0% transparency), and move the color key effect to the top of the list on the WALL sheet.
Then draw a solid fill colour 6 rectangle on the WALLS sheet the same size as the door / window, this needs to be above the wall, not below.
The rectangle will act as a mask on the WALLS sheet, it won't appear itself and the wall beneath will vanish.
Then you can copy the door and the color key rectangle around the map. This gives the appearance of being a cutting symbol, without actually chopping up the walls, which is so much better that I never use the cutting versions of wall symbols anymore.
It the above doesn't make any sense, then I'll try to add some step by step screenshots, but I'm not on my PC at the moment.
-
Feedback on Decluttering Text/Map Improvements
I'd maybe try to fade the names of countries into the background more, so that for example Fangorn would then be more prominent that Rohan. Especially if you're planning to add more labels, eg a Minith Tirith label would be quite hard to spot.
I've been reading The Hobbit and the Lord of the Rings to one of my children - just finished The Fellowship yesterday - and so I've been showing him a few maps of Middle Earth, and the names of countries aren't always very prominent on the maps, especially when other things are labelled.
Edit: Forgot to add, that's a great map!

