


Wyvern
Wyvern
About
- Username
- Wyvern
- Joined
- Visits
- 3,266
- Last Active
- Roles
- Member
- Points
- 5,584
- Rank
- Cartographer
- Badges
- 24
Latest Images
-
Community Atlas: Wyvern Citadel Defence Zone on Kentoria
I've just sent Remy the final files for this project, after the last descriptive PDF file, for the Tomb of the Wyvern Lords, took rather longer than anticipated to complete. Yep, got a bit carried away with it all yet again... Some extracts:
A rare cycle of tales in Shoenia speaks of a great leader, Murgon, who saved the country from invasion millennia ago by his wit, cunning, magic, leadership, strength and good fortune. His recounted exploits give him demi-god-like status. Said to have been the first person to discover how to bond with wyverns, he became inseparable from "his" golden wyvern (a type of wyvern long believed extinct, if it ever existed at all), Malvernus Thunderchild. When the pair died defending the nation in one final battle, they were buried together in the same tomb. Other tales in the cycle suggest instead that they never really died at all, but went voluntarily into a subterranean chamber with a hundred of Murgon's best rider-warriors and their wyverns, there to sleep until the nation should be in its direst peril, whereupon they would reawaken and emerge to save the day. Murgon's greatest achievement, some say, was his invention of the magical flying chariot that could be towed by a bonded wyvern, and which all his warriors also used. It is thought he took his chariot, the first and greatest, with him to his long sleep - or his tomb, depending on which version of the story is being related. Such chariots, like the golden wyverns, no longer exist, if they were ever more than a figment of a storyteller's imagination. Much of the cycle of tales regarding Murgon the First Wyvern Lord are regarded now as little more than entertaining myth-stories.
The tales, however, are true. Well, not so much the "hundred sleepers" one, but Murgon existed, and he bonded with a golden wyvern, flew in a magical chariot, was a great leader known as "The Wyvern Lord" in his lifetime, and was finally laid to rest with the body of his wyvern in an impressive tomb far below the ridge near where Wyvern Citadel now stands. Only nobody knows this for certain.
Following from this, I set Murgon's lifetime and burial at around 2,500 years ago. The subsequent tombs in the final underground level came about at various later epochs. The two Mummy Tombs, for Amet (or Efnut) the Great and his son Telesthon date to about 1,900-2,000 years ago, then the Scarlet & Angel Tombs, for, respectively, Ndi! the Seeker, also known as "Dragon Lord, Wyvern Rider", and Fhasmet High-Flyer, who ruled for 10-15 years, came in at roughly 1,700-1,800 years ago. ("!" represents a type of tongue-click where the tongue is dragged sharply forwards along the upper palette from the back of the mouth here, incidentally.) The occupied Pillared Hall Tombs then fit between approximately 1,600 to 1,400 years ago, for Dagmet of the Web (circa 1,500 years ago), Xas! (who ruled for 12 years; otherwise unknown and excluded from the preserved Wyvern Lord lists still extant modernly), Khan (who appears not to be buried here, but who is listed as having been Wyvern Lord after Dagmet, and who ruled for 40 years or so, elsewhere), Eshmet Mage-Warrior (said to have reigned for 60-70 years after Khan), Elt (a later Lord who is not buried here either), !ar (ditto), and four other Lords whose names are not preserved modernly, the last of whom died probably around 900 years ago. After this came the Bloodline Lords, until the last of them died out some 400-500 years ago, following which the title fell into disuse.
There are certainly large historical gaps in this sequence, and it's complicated by the fact the records suggest sometimes more than one Wyvern Lord may have been around simultaneously. This may be because the Wyvern Lord position was originally occupied by someone of appropriate capabilities who was chosen by the wider community as a leader in times of strife and emergency. Once the emergency was resolved, the Lordship became more of an honorific title, as ruling power shifted back to the individual settlements and areas making up the community, at least in theory. Some of the early Lords apparently tried to establish bloodline ties to retain the post in their own family, though this seems to have become the established pattern only for the later Lords, none of whom are buried here.
Those familiar with parts of Earthly history/archaeology and folklore/mythology may recognise items
shamelessly ripped-offadapted from elsewhere in all this, which naturally is par for the course in devising RPG settings!I'll see about posting copies of the final maps in my Gallery after adding these notes.
[And so, having created innumerable problems for anyone trying to map in this part of Kentoria subsequently, with one mighty bound he was free to wreak havoc elsewhere!]
![[Deleted User]](https://secure.gravatar.com/avatar/c75d9a245b74d9c59be0999ea81ca541/?default=https%3A%2F%2Fvanillicon.com%2F92add7f8c954488718110edc4896ad39_200.png&rating=g&size=200)

-
Cosmographer Questions
The Cartographer's Annual star charts graticule started life as described in this Forum topic from 2018. There are several links to find similar graticules from that topic if you don't want to draw your own. CA34 from 2009 October has one, for instance, and long-time Forum correspondent @JimP has done work on the subject too, culminating in Bill Roach producing some templates available for free download from Jim's Crest of a Star website - zip file is on this page.

-
Community Atlas: Wyvern Citadel Defence Zone on Kentoria
Keep forgetting I should update this topic.
The maps are all complete now, but may still need further tweaking. Like yesterday, when I found I'd blocked one of the staircase exits with a large cabinet, and forgotten to open the main gateway from being a solid stone wall... I tend to spot things like this only when pulling together the accompanying notes, and that process is still ongoing, however. So, subject to minor (if at all) changes later, the second underground level:
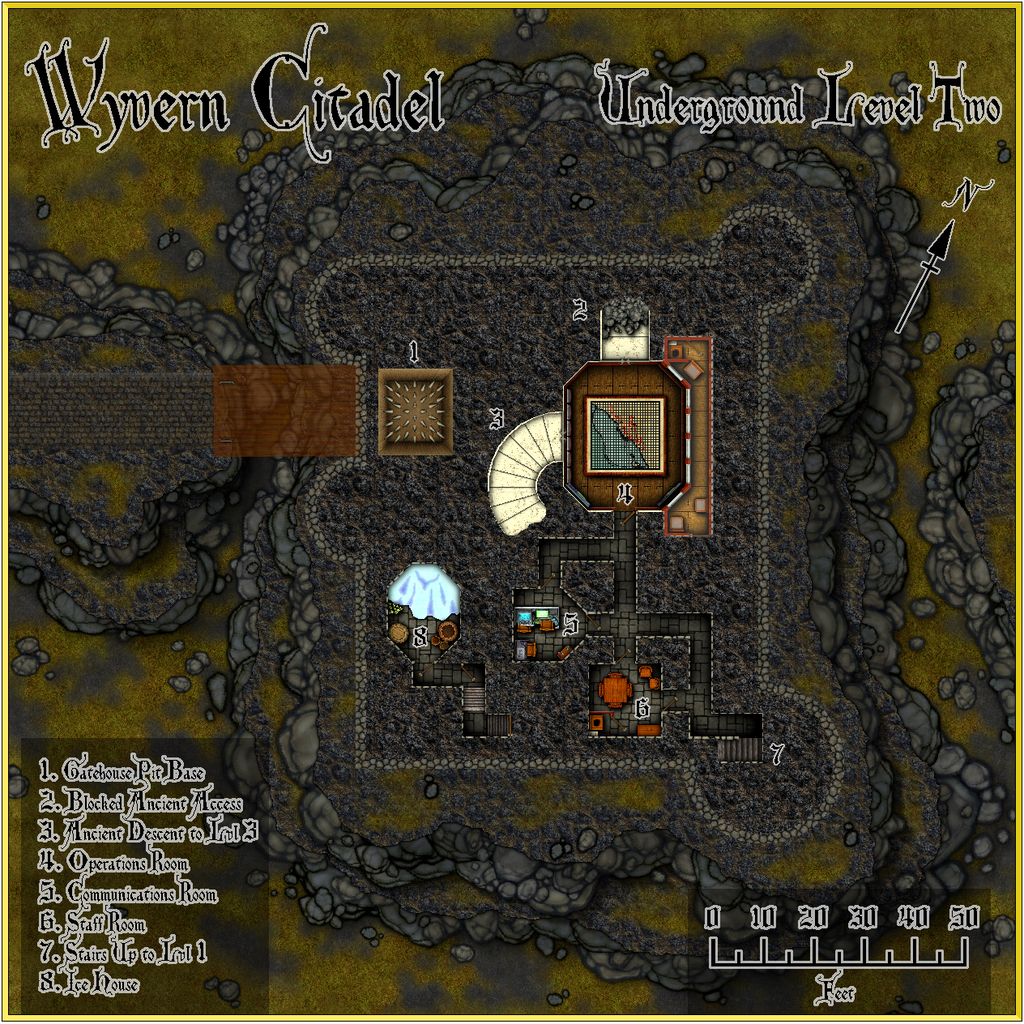
The idea for the Operations Room table is that the Atlas version can have the hotspot link to the full size table map - the table design here is simply a reduced-scale version of that actual FCW, with the Effects ranges tweaked to fit its reduced form. Not many surprises with the other rooms, except possibly those curious white passageways...
My thinking here is that in ages past, long before the castle was built, there was a temple or a shrine on this part of the rocky ridge, created to mark the spot where the descent began to the Tomb of the First Wyvern Lord. The straight passageway is then the surviving part of that initial descent into the octagonal room that's now been adopted as the Operations Room. This was the chamber where the body would be prepared for its final burial - vaguely like some of the Egyptian pyramid tombs and the temples near those - and then carried down the long spiral stairway that area 3 here represents to the tomb itself. The spiral winds around two and a half times, so the tomb is about another 100 feet (30 metres) below the surface.
Over time, the temple/shrine fell into ruins, and whatever traces may have survived were swept away centuries later when the castle was built here. There's no sign on the surface now of where the shrine/temple may have been, so the upper part of the straight white (actually marble-tiled) passage isn't simply blocked, it's been effectively erased beyond this small segment.
The spiral is fully intact though, and goes down to link in with that revised 2005-2014 dungeon layout mentioned earlier. That remained remarkably intact in the final version, though it has had a few tweaks and a couple of amendments. The largest of those was to change the original external link from a cavern and horizontal corridor to this spiral. I decided also to reuse it here partly because I was reminded of it through this topic on long, thin dungeon maps I started late last month. So here it is, the Tomb of the Wyvern Lords:
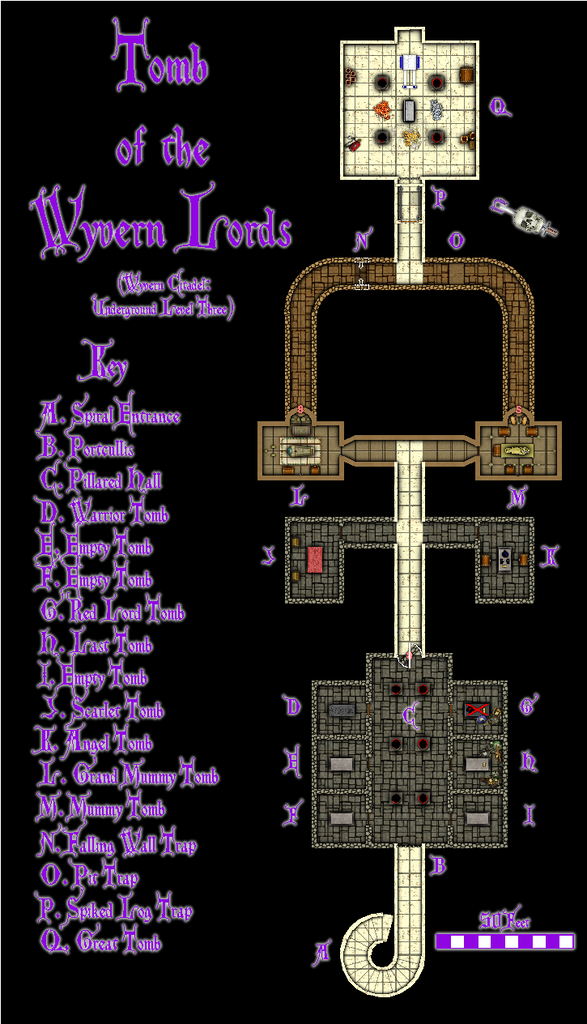
There's obviously something more going on here - the broken segments of the long white corridor leading to the Great Tomb (= First Lord's Tomb), for example - while the perceptive may spot some unusual bodies in Tombs G and H. So by activating the GAME MASTER ONLY Layer suddenly we see still more:
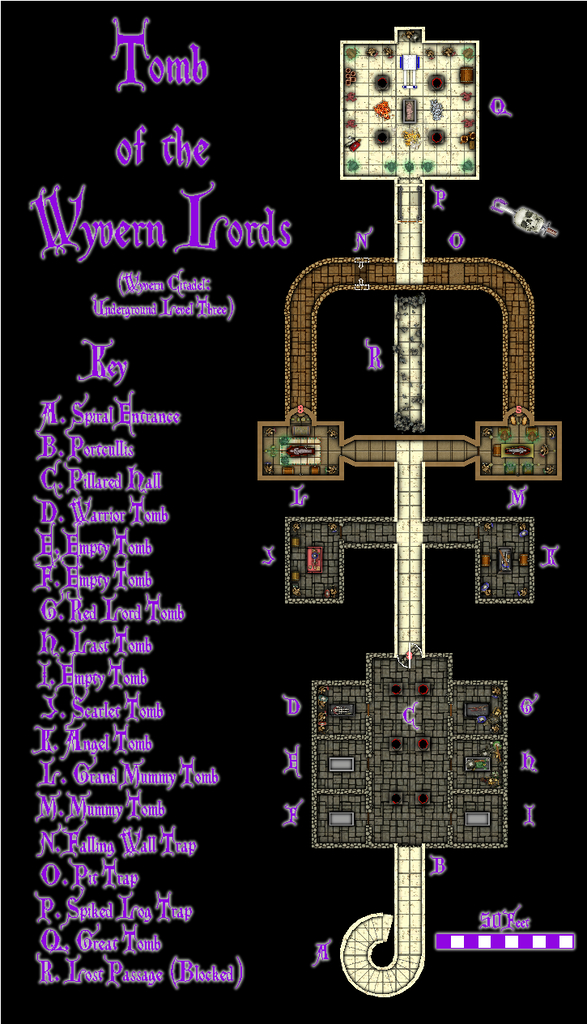
And for anyone struggling to see much at this scale, we can zoom in a little more on the GM's view:
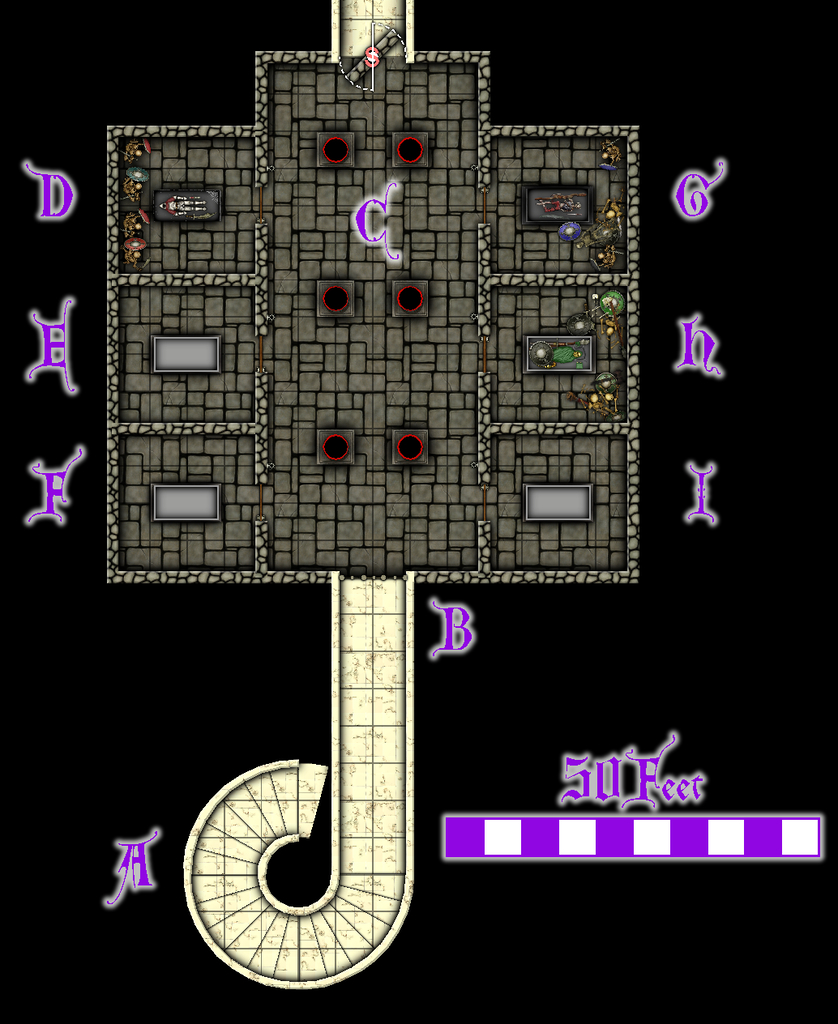
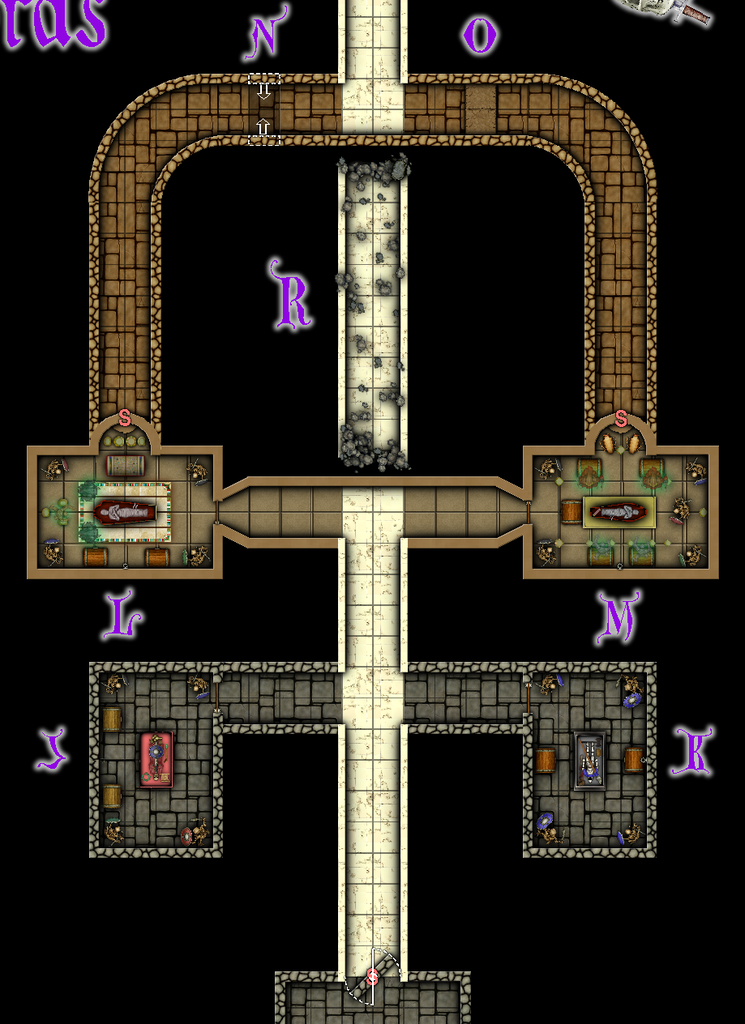
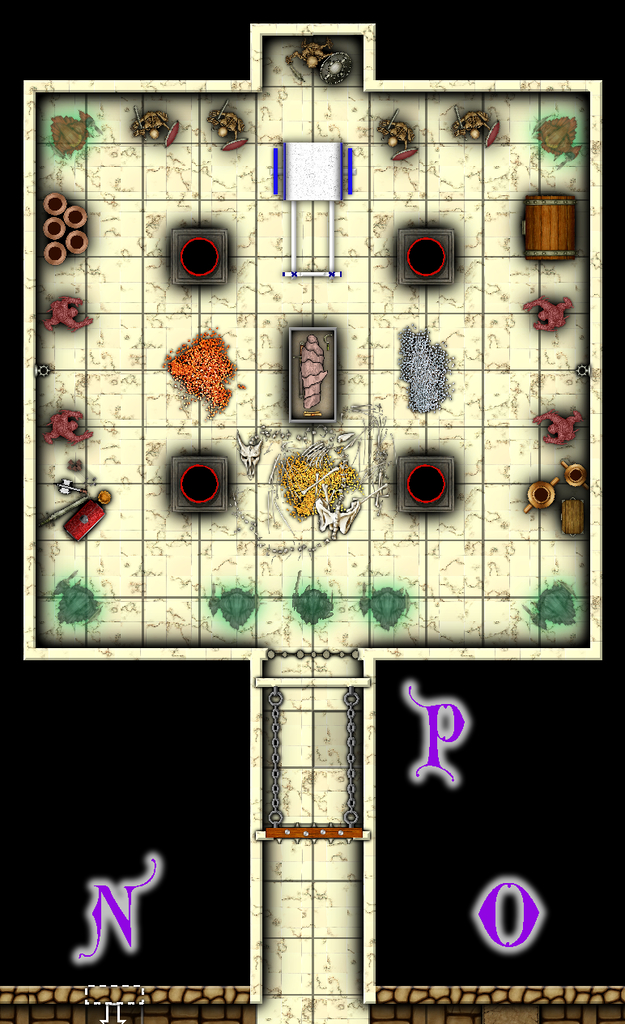
All the room layouts and traps were from the original Dwarven Forge dungeon sets, incidentally, though the wall and floor colouring has been adjusted here because CC3+ let's you do things like that easily! The tombs and most treasure items were also based on resin or metal castings I used in the original layout, though the chariot in the final tomb was actually a standard Celtic-style with a double yoke for two horses. This version has been adjusted to be suitable for a wyvern. Yes, the first Wyvern Lord had a flying wyvern-drawn chariot. And those are the remains of his beloved wyvern.
The critters are a mixture of physical and incorporeal undead types (the latter are transparent, but as that didn't make much impact at full-map size, I also added a green glow to them as well). They only manifest if anything in their tomb is disturbed by something living. While they can be driven off and apparently destroyed, they can't actually be got rid of as long as intruders remain anywhere in the Tomb complex, and will keep coming back for more time after time until then.
Investigations by the current Citadel's occupants didn't progress beyond the first pillared hall. There are tales about this place that have somehow survived, while all memory of where it is has supposedly been lost. So the stone doors were closed, and walled-off, and scarcely anyone now involved beyond the leading commanders is aware such doors exist, let alone what they may lead to. There will be more information on all this when I get round to constructing the text and PDF notes for this level. I hope!
For now, and as some folks here seem to appreciate the flavour notes, a couple of extracts from the current iteration of the places lore from the area map to close with. From the Wyvern Dromes list:
Duck's Ford: Legend holds that this place-name derives from a cunning fellow who once tricked a dangerous bandit (or an ogre, or a demon) into drowning themselves in the river here, by telling them the ducks were just walking across the river bed, not swimming, despite the Jackson's breadth. The river bed is in fact unusually deep in the area, and a ferry runs between both banks regularly by Duck's Ford village on the southern bank, as there is no way to safely cross close-by otherwise. The Duck's Ford squadron base is set on a steep, stepped hill on the northern side of the Jackson, and its wyverns are exclusively blues, because this is the main training base for the big-winged blue wyverns. A key region for breeding blues is in the mountains up the stream that runs through Duck's Ford village, from where new recruits are often brought.
And from the SDF one:
Dunnish: Set on some high dunes by the coast east of the main River Jackson channel's mouth in the midst of the Delta, this is probably the most detested posting of all the SDF locations. Completely surrounded to landward by dense swamp-mangrove forests, this is accessible only by sea for cargo and most personnel movement. However, as the bays near this river channel have clearly long been favoured by raiding barbarians as temporary camp sites - there are remains of numerous such places scattered along the coasts in the vicinity - the base has a higher proportion of military ground and boat-based forces to try to prevent further such incursions. The SDF dome is a very recent addition. Its location affecting the personnel, and the presence of the dense mangrove brakes creating interference at times, means the SDF reports from here are commonly unreliable, and suggestions have been made that it should be moved to the nearby "Jackson Five" island instead. That though would mean having to construct a suitably raised site, as the island is too flat and low-lying towards its north-facing coasts. While the place-name derives from "dune", the personnel sent here darkly say it really originates as the place most likely to be visited by unspeakable horrors, following from one or other folk-story told of a fictional land called either "Ingland" (where a town called Dunnish or Dunwich once fell, or was dragged, into the sea), or "New Ingland" (where a town of similar name was assaulted by an invisible cosmic horror). Two Mark III Lightning Cannons help guard the shoreline, with an experimental ship-borne Mark I Cannon (the oldest, relatively weakest, but more robust type) set on one of the larger craft based here. This has never been tried before, and although tests so far have been satisfactory, it has never been used yet against an enemy raid.
"Jackson Five" island? Yes, the four largest islands and the one large promontory along the outer fringe of the Jackson Delta needed naming, and this seemed the most obvious option to go with...

-
My Ship Obsession: Ship 1 - The Sea Wyvern
If you're wanting help drawing ship plans @Autumn Getty you might try the Sailing Ships style pack in the March 2009 Cartographer's Annual. I was using it myself recently, though it does lack some things, such as chains and anchors, ropes and ship's boats, all of which would have been useful as additional symbols. It does let you draw vertical cross-sections through a ship as well as deck plans, however.
-
Community Atlas: Wyvern Citadel Defence Zone on Kentoria
@Autumn Getty - I'd forgotten your comment about castle maps earlier.
I've rather drawn this one "by-hand" as it were, instead of using some of the shortcut options CC3+ might have provided. The Castle Walls add-on from the Cartographer's Annual for 2010 adds some useful commands for drawing the walls particularly, for instance. I wasn't sure how it might handle some of the variable size crenelations I needed here though, but it would have added fancier doorway and archer-window options than the simple straight cuts I've used, certainly.
If you're intending to draw a lot of castles, you might want to think about the Source Maps: Castles pack too. It is an older system which hasn't been updated for CC3+, and probably won't be now as far as I recall. However, you can use it with the usual DD3, etc., fills and symbols instead of the simpler vector options it comes with (it was designed to the old CC2-Pro standard). Beyond the information in the product pages I've linked to, if you also have the Tome of Ultimate Mapping, there are some additionally helpful discussions and tutorials regarding all the Source Maps products there as well, so you can get a better feel for what it can do for you.
