


mike robel
mike robel
About
- Username
- mike robel
- Joined
- Visits
- 4,196
- Last Active
- Roles
- Member
- Points
- 435
- Rank
- Surveyor
- Badges
- 6
Latest Images
Reactions
-
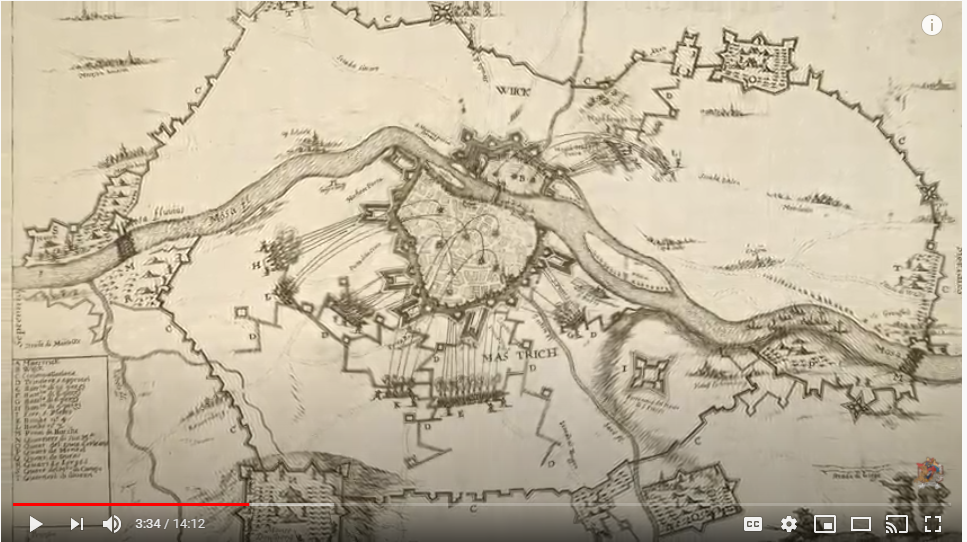
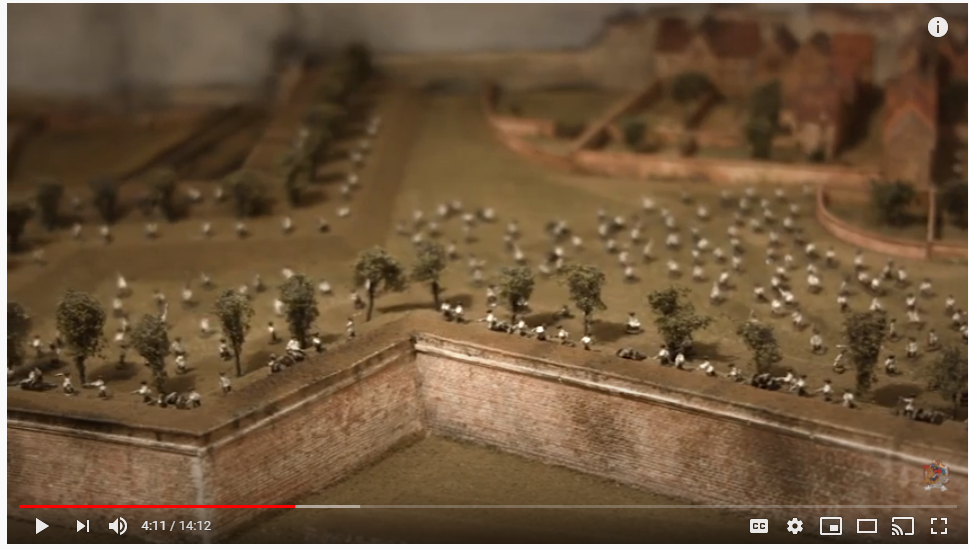
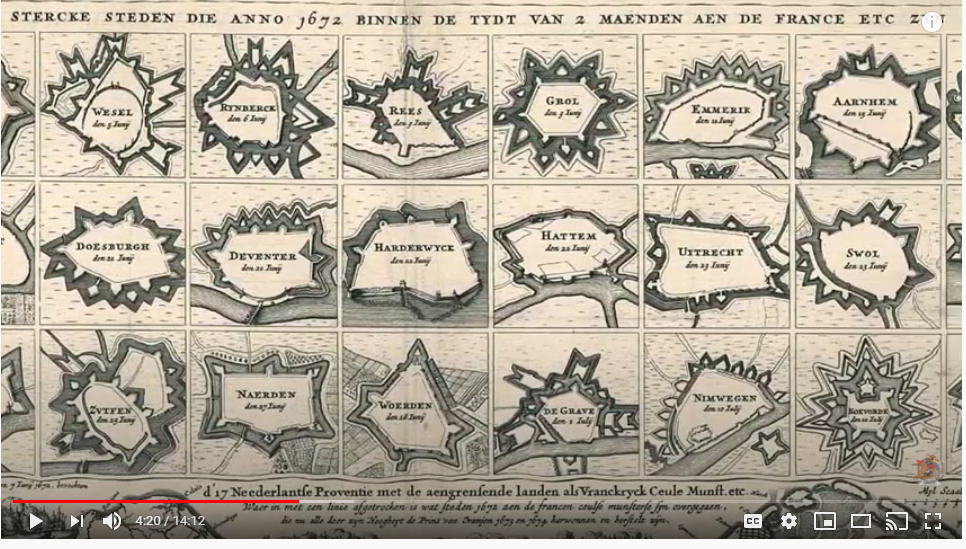
The "Real" Wargame Youtube video
The video at the link has some nice maps and scale models relating to siege warfare. The models, for the most part appear to be period, but some have many figures on them which may result from later updates of the map. The documentary is largely in french, but there are lots of pretty pictures to look at and one can marvel at the craftsmanship of the artificers who created these models to assist in planning and executing the siege.
I think this is the museum website: http://www.museedesplansreliefs.culture.fr/
Some screenshots


![[Deleted User]](https://secure.gravatar.com/avatar/c75d9a245b74d9c59be0999ea81ca541/?default=https%3A%2F%2Fvanillicon.com%2F92add7f8c954488718110edc4896ad39_200.png&rating=g&size=200)


-
Gettysburg
I just finished with all 41 contour levels, ranging from 360 feet to 1180 feet at 20 foot intervals. I like the way this looks, but the contour shades are probably too subtle for me, so I may outline the levels in some brown shade to enable people to see them when printed out. When printed, it will be on a 4 x 4 grid of 11 x 17 (or 12 x 18 or 13 x 19) inch paper with 7/8 inch hexes represent about 300 meters using 5/8 inch counters.
The close up shows the area around the Little and Big Round Top, for those who don't care, where the 20th Maine Regiment stopped the Confederate Army's attack on the Union left, but a lesser known battle on the Union Right went on through the night.
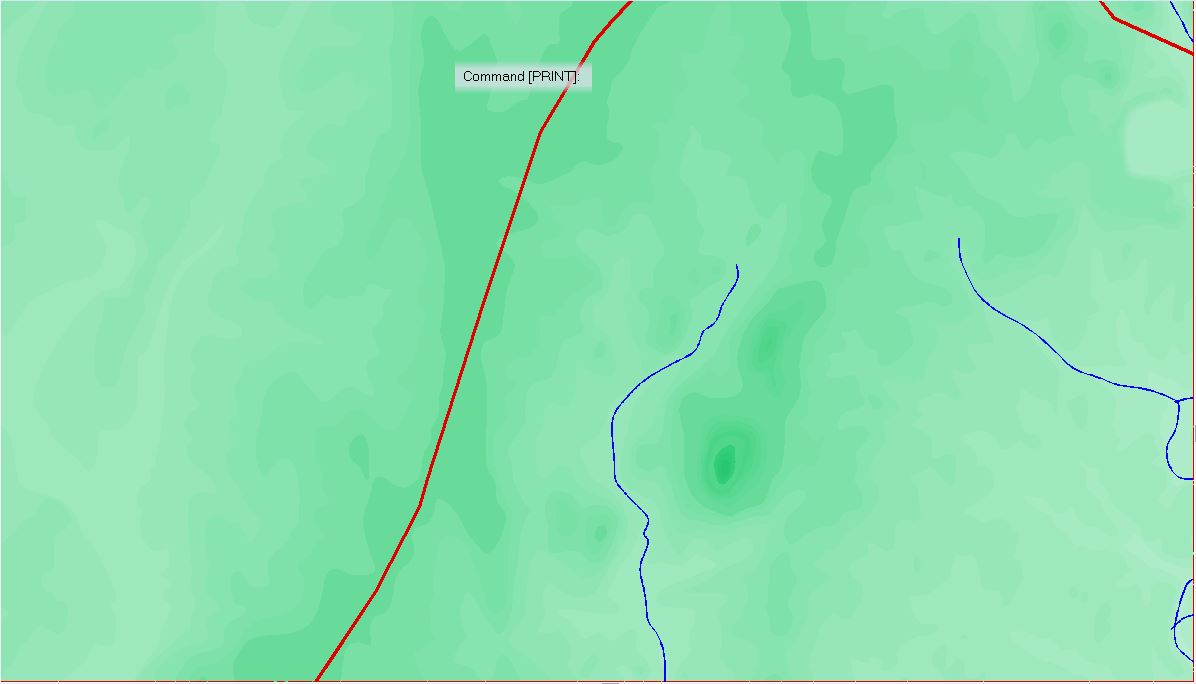
Rivers and Lakes are next. Followed by Roads.
Thanks to @WeathermanSweden for the custom Palettes (again!)


-
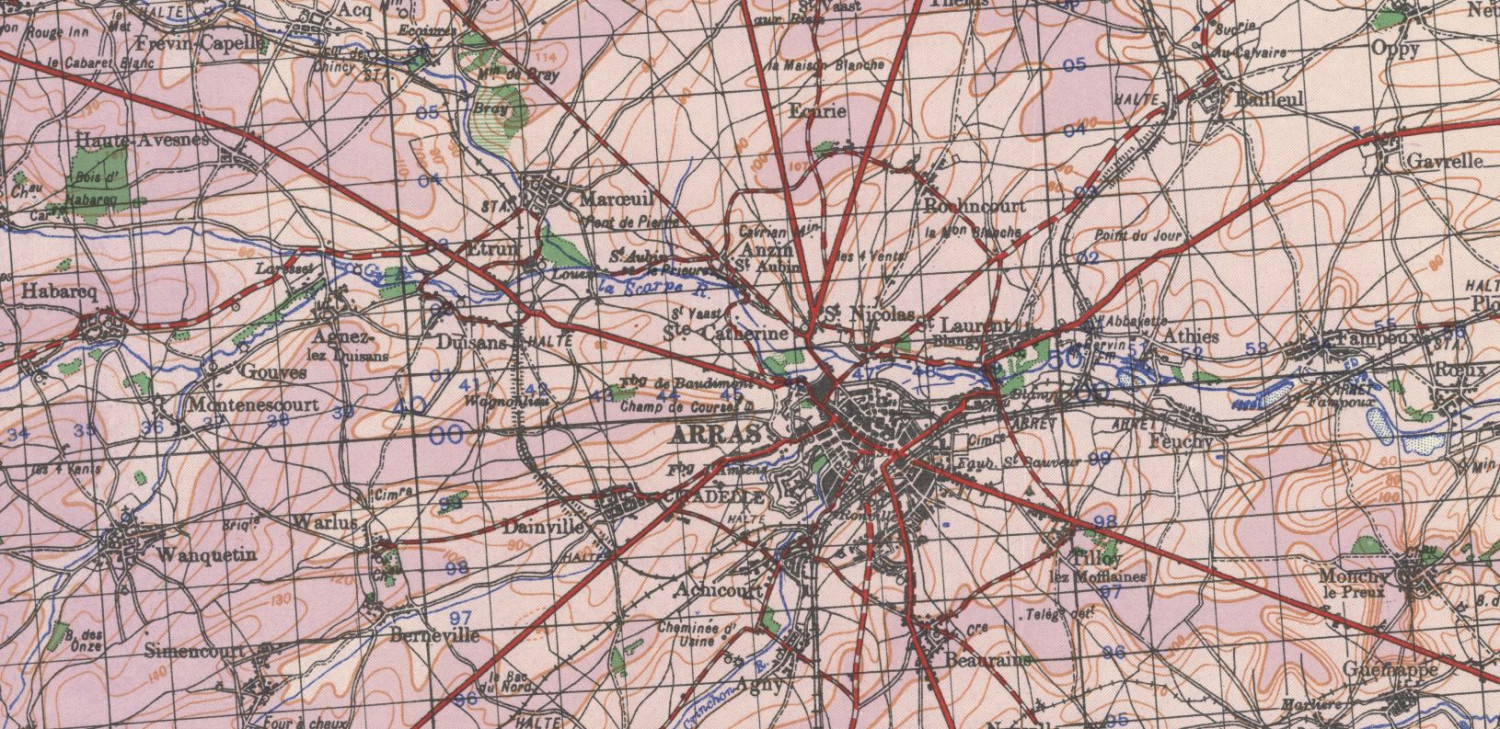
McMaster University Digital Map Collection
As the title says, this Canadian University has an excellent digital map collection from the 18th century (maybe before) until now. Particular interesting is the World War II collection with 1944 era maps for most of Western Europe, but no theater is left untouched. I have not even come close to looking through all of them even briefly.
You can download *.JP2 maps at medium quality or high quality *.tff that are mostly 1GB or larger and they are bloody wonderful, preserving detail to extrement zooming. (The JP2's, not so much.)
I was gratified to find 1:100000 maps covering the Battle of Arras, which was one of my first maps I produced for a game. The British launched a small counterattack with two tank and two infantry battalions, coming in just behind Rommel's 7th Panzer Division's leading tanks and hit his infantry Regiment, causing considerable havoc. Rommel's aide was killed 5 yards away from him; imagine the consequences. There is also some evidence that Rommel panicked, his situation map has the notation "5 Divisions" with a couple big arrows pointing toward his division. The attack contributed to the Panzer Halt which gave the British the time to get to Dunkirk.
I worked from modern maps and snippets of copies of maps from books and online images and it is just wonderful to have such a map.
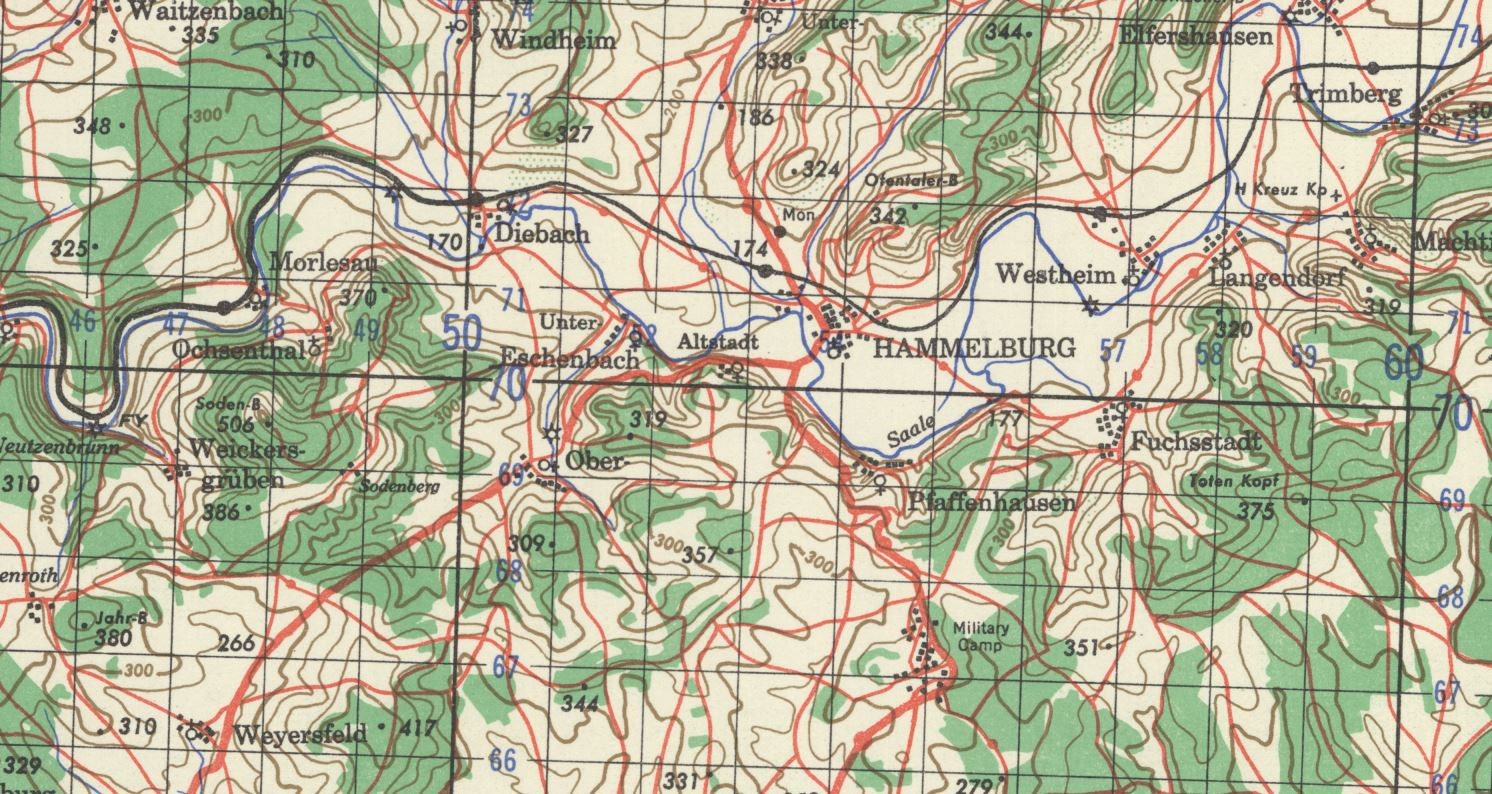
I also got 1:100000 maps covering the path of TF Baum (which included the WW2 company my last command was descended from) Hammelburg, Germany raid . I "walked" and road the raid path several times when I was stationed in Germany, using modern 1:50,000 maps, while while highly detailed, do not show things as they were then. BTW, the raid failed, TF Baum was destroyed and survivors taken prisoner or escaped.
Next is the Battle of Arracourt in France in which the company was destroyed too, and the Break-in to Bastogne, Belgium which the company led (and did not get destroyed).


-
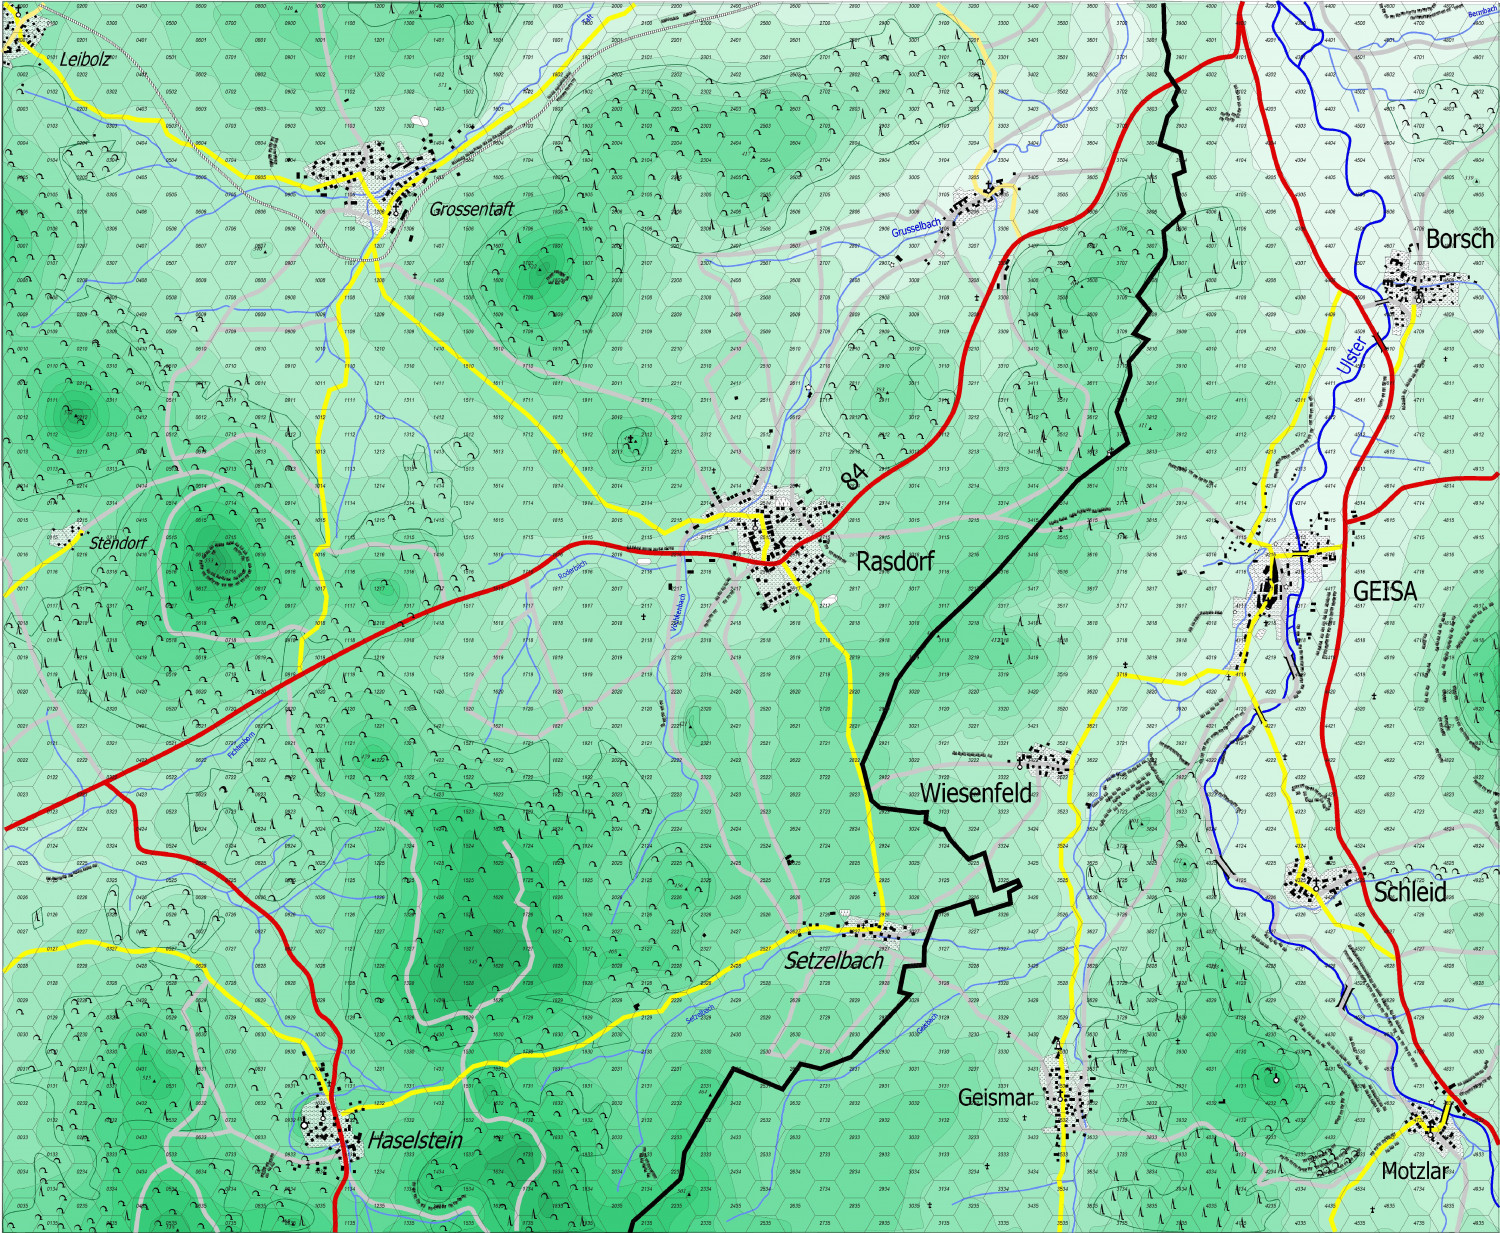
Yet Another Wargame Map set in ...


-
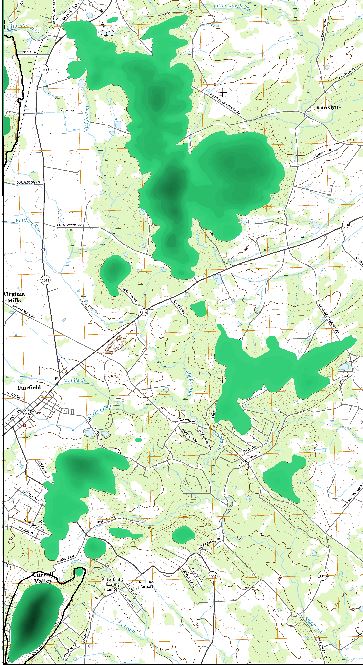
Little Bighorn Battlefield Map
At this point, the map is at a stopping point while I move on to other projects. As one can see by the title, it is the area in which the Battle of the Little Bighorn (aka Custer's Last Stand) was fought. I need to tune the road network, consider if I want to place buildings and other objects on the map, and add place names. I really like the way the shaded contour areas define the terrain and combined with the water courses and the vegetated areas, highlight the ridgelines and draws.
The map will be for a science fiction game based on Hammer's Slammers stories by David Drake (with his permission).
My quandary at this point is the vegetated area. As the map is drawn right now, those areas are solid. The drawback is they block the contours of the map, as can be clear seen in the lower right corner of the top image. The alternative is to fool with the transparency, and the second image shows that. I think it makes the map look like it has small pox or something and the vegetation since it is fairly light, seems to blend in with the terrain. The last image shows a close up of the lower right with transparent terrain.
Alternatives:
1. Just leave it solid and be done with it.
2. Fiddle with the transparency and accept how it looks.
3. Split the vegetation layer into two layers with one area covering top or left side and the other area covering the bottom or right side and have the transparency different. I think this would give the map a very odd look.
4. Go through and convert all the vegetation to Polygons with no fill, leaving only the border, then fill the polygon with symbols, and then convert all the polygon boundaries to no line. This would probably give the best artistic look, but would be tedious. It also would potentially put non-topographic symbols on the map (if I use top down tree symbols) or look kind of weird if I used the available topographic symbols for various types of vegetations, mostly deciduous trees.
5. Convert the contour polygons so they are hollow and then place them over the vegetation symbols. This has the draw back of making it more difficult for some people to visualize the terrain. Many game players don't really know how to read contour lines. (I find it interesting for instance, that Google Maps/Earth don't have them.)
At this point, I am sort of leaning toward option 4. It requires Brute Force and Ignorance to get through, I think, but some say that is what I excel at to get through notty problems. It will take a lot of fiddling to get the fill to look right and at some points, for very small regions, I may just manually plop the symbols down.
I'd appreciate comments and other potential solutions.


-
Yet Another Wargame Map set in ...
@Wyvern You are totally correct placing the features in the way I don't like leads to easier play. I adjust the feature to make it obvious where the feature lies. For roads its not a big deal, but for rivers, you pay the cost when you leave the hex and there is no cost when you move along the river line. Line of Sight issues always occur, and I just have the players resolve the issue if they can't agree with a die roll.
In my younger days, we would play computer assisted simulations in the main Fort Riley gym, on moving map tables with maps blown up to about 1:10000 scale using micro-armor. As the battle shifted, we'd move maps in our out of the play area as the game unfolded. We had to talk about what we could see and do before we filled out the battle form and took it to the computer operators. Several times, late in the game and usually late at night it seemed fist fights might break out as the arguments became heated and ones map reading skill, as well as other qualities and abilities might be called into question.
Regardless, I try to make my map and rules as clear and understandable as possible. Since battle is chancy, if players disagree I tell them the challenger gets to roll a die and if its even he wins and odd the challenged wins. If in the other players turn, they have to roll again to determine if the issue changed.
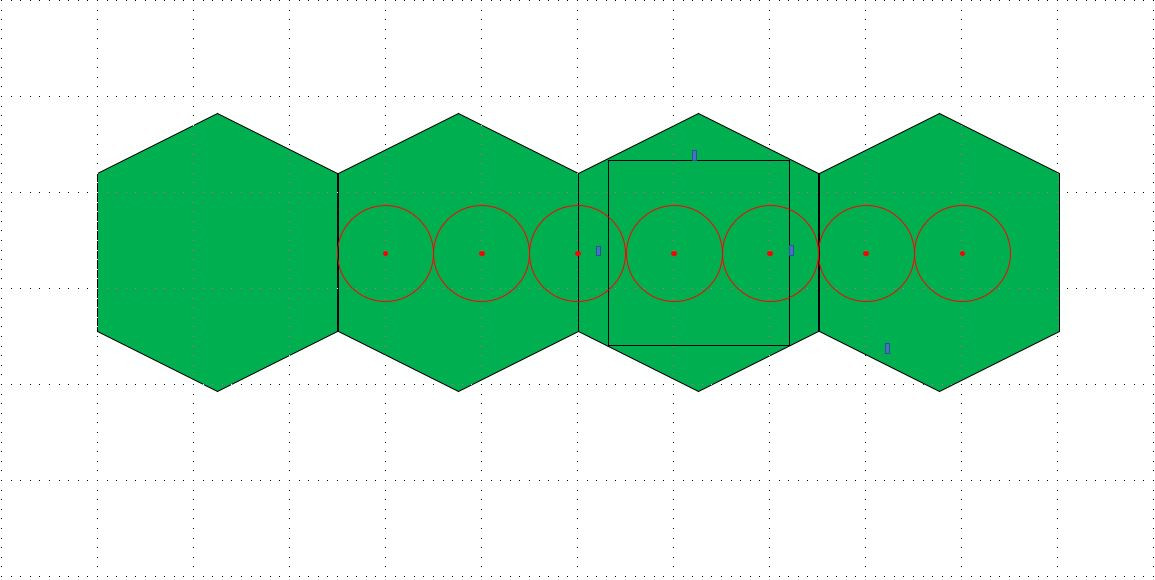
I'm a moron. I didn't scale the drawing properly. The dot's you see in the background are 0.1 inch apart, the hex is 25 dots wide and each dot is 10 meters apart. Therefore I have spaced the tanks 10 meters apart, not 100. The second picture below shows the correct spacing at 100 meters.
The other thing to remember is tanks are tiny and hexes are large. The Hexes below (in the second diagram) represent the typical width of a 1000m battle position I would allocate to a platoon to give them plenty of room to shift position in the defense or to move in the offense. The M1A1 tank is scaled to represent its length and width (9.77m x 3.66m) with the typical 100m spacing between tanks. Seldom would the tanks of my company in the same hex, unless I was in the final assault. They can be anywhere in the hex and you can bet they would look for the most advantageous position for themselves as they could find.
The 6 red dots in the second diagram represent the impact of each round while the circle represents the burst radius and together represent the beaten zone of a volley from a 155mm artillery battery. A single volley would do little, if any, damage to the tanks.
The black square represents the counter size.
Diagram 1: Incorrect. This rendering has the tanks spaced too closely together.
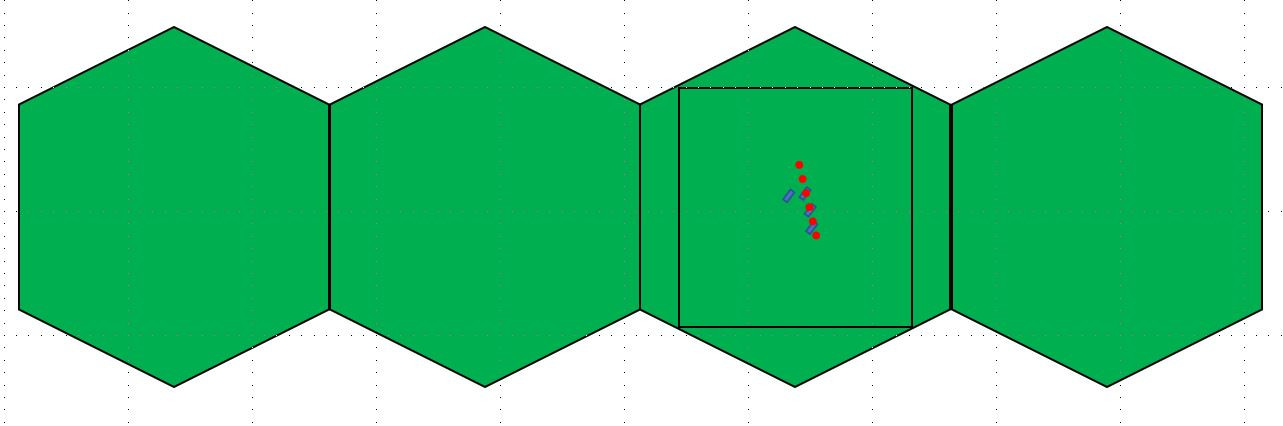
Diagram 2. Corrected. This rendering has the tanks spaced correctly.
You can see the battlefield is empty space and an individual tank or person can be virtually anywhere inside the hex. So measureing from the hex center is an inexact representation of what occurs. But no one wants to get into computing line of sight mathmatically (except maybe in a computer game) so it is good enough. The 100 meter spacing is somewhat elastic. The platoon could get pinched down to a wedge in which the tanks are only 10 meters apart or even into a column, but you do't want to that close together.
As Sherman said, "Men are not blocks of wood," but neither are blocks of wood (or cardboard) men or tanks.
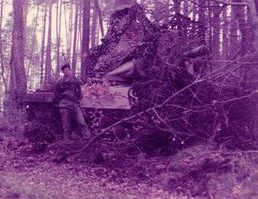
Here is a shot of me in front of my first tank. The woods are moderately dense, but LOS in blocked pretty well if you are trying to see in, but is pretty open when looking out. Until you shoot and the muzzle flash gives you away. Then you need to move, which is why I gave all that space to me tanks. Today with thermal sights, hiding is much harder. Better to dig in and not turn on your heater in the cold.
A Boy and His Tank.
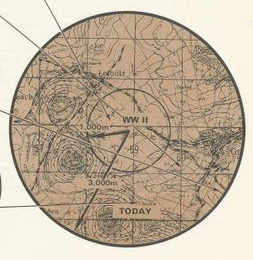
Lastly, this last shot shows the difference in range from WWII (an M4A3E8 76mm Sherman tank) versus about 1980 (An M60A1 Main Battle Tank) overlayed on a section of a 1:5000 map near where my map is. A glance easily shows several places where LOS is blocked and areas where tank would have a difficult (slow) time trying to move through.
WWII Range vs 1980s Range
More than anyone here probably wants to know. :)

-
1876 Centennial Campaign Map
This is a fairly simple map that shows the movements of the three US Army Columns and the Sioux Village movement from April 1876 - June 26. Obviously, I am only showing the rivers. I will be adding a legend and the north arrow.
There were three columns involved. The Gibbon/Montana Column (Light Blue) leaving from Montana and moving East. The Crook Column (Orange) moving North out of Wyoming, fighting a battle on 17 June, then giving up the field and going back to Wyoming until July. The Terry Column (Black), with Custer commanding the 7th Cavalry (Yellow) moving West from Dakota and Reno's reconnaissance with one 6 Companies of the 7th (Green).
Reno was about 50 miles from the Battle of the Rosebud (the lower 3 black dots) on the 17th, having discovered the Sioux Trail and then turning back due to lack of supplies. He disobeyed orders, but had he not done so, they would not have known where the Indians were.
Terry moved West along the Yellowstone with Gibbon's column aiming to move up at least as far as the Big Horn/Little Bighorn river junction while Custer was supposed to move North along the Little Bighorn, hoping to pin the Sioux between the two forces.
Custer then took the whole Regiment moved down the Rosebud until he picked up the Sioux trail, then disobeyed his orders to attack the Sioux village. Had he followed orders, he would most likely have come across the Rosebud battlefield, but they likely would have lost the Indians again.
The map is very busy. What I am going to do next is show where units are on specific dates so one can see the progress of the various groups on a day by day display so I can display the maps in PowerPoint to show the progress of campaign.
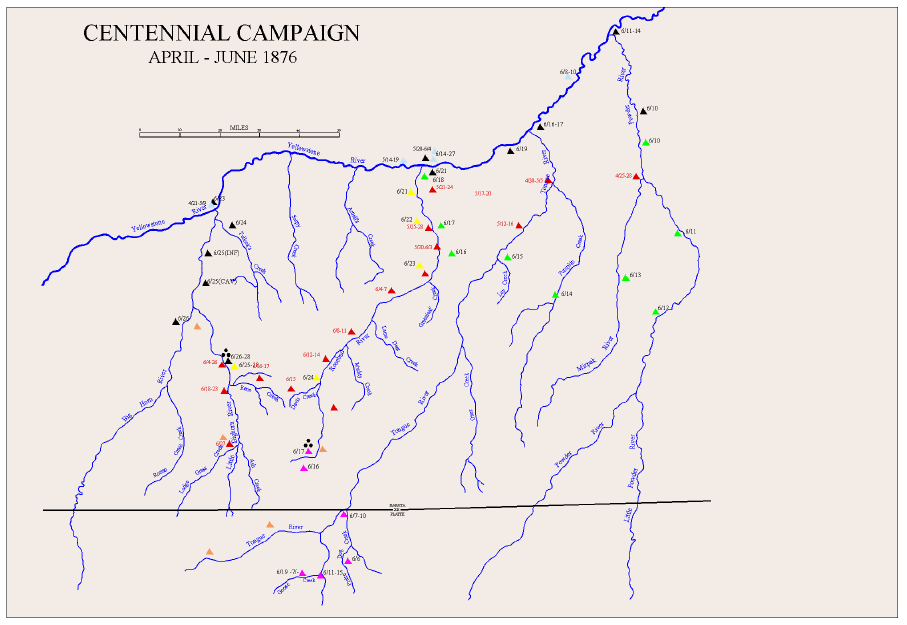
I am not likely to try and put any indications of terrain into the map because I think it will be too busy and I have been without success in trying to do maps with the hashmarks they used at the time to indicate hills..


-
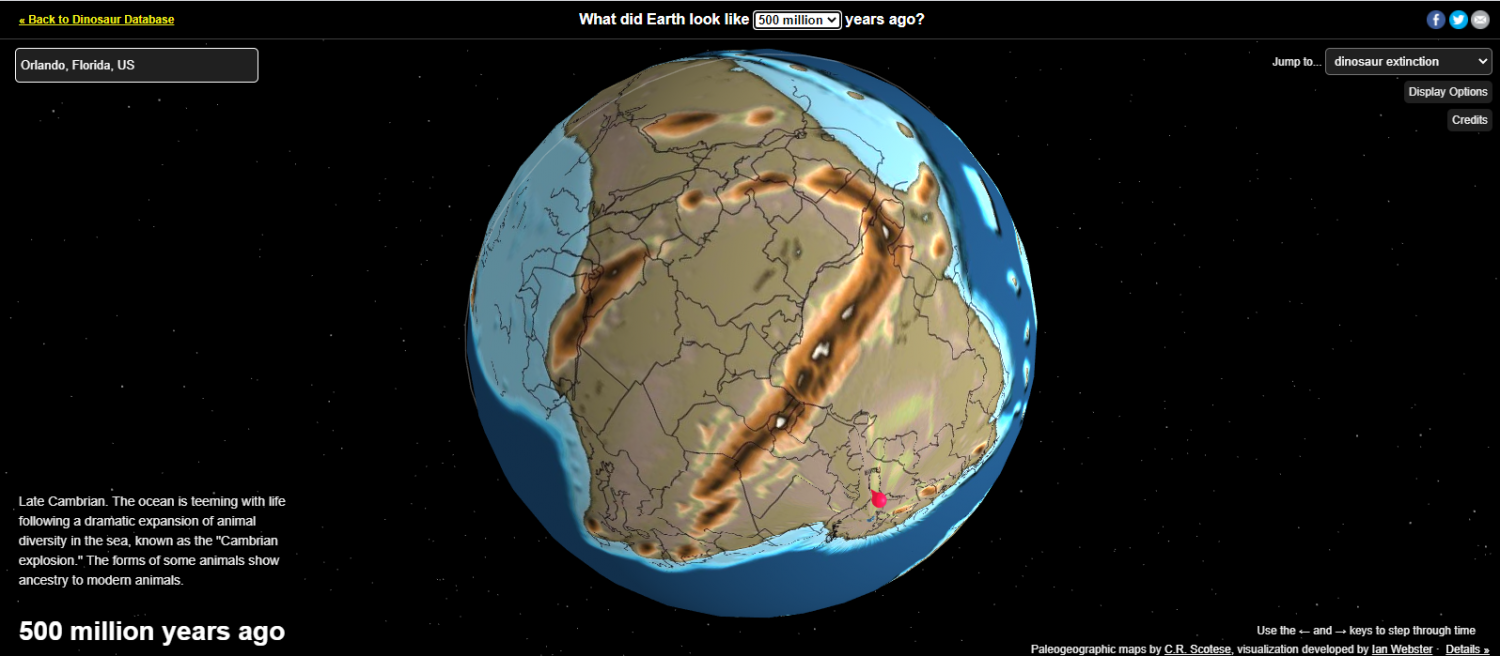
Global Map takes you from present to 750 million years ago
This site allows you to visualize the earth at various stages up to 750 million years and you can input a town near you to see how things change over time. An interesting perspective and it rotates, you can switch views, stop it. etc.
Those of you who like lighter colors higher will be pleased.
-
Gettysburg
I am in a pause of sorts on my Covering Force Game plus Andre made some awesome palettes of 32 and 48 brown/green colors as well as two that start brown and transition to green or start green and transition to brown that I am itching to try.
After Covering Force will be a game based on Hammer's Slammers (If I ever finish CF. While I was hoping for a (2020) Christmas release, I will now just say a Christmas release and you all can guess which one, if you care to.) and I want to set it in places of historical interest (even though it occurs in the 23rd or 24th Century on different planets). One will be at the Little Bighorn and I decide another would be Gettysburg.
This is a much smaller map, only 2 1:24000 map sheets versus the 12 or so for the Little Bighorn (cause I cover the approaches) or the 9 or so 1:50000 sheets for Covering Force.
The challenge here is the 20 foot contour interval (which is why I needed the large green/brown palettes), my hand-eye coordination, and my color blindness which makes distinguishing fine color graduations difficult. Some of the contours are extremely close together. Unlike German maps, the US maps of the area do not have spot elevations and they follow the normal practice of only listing the height every fifth contour, so following intermediate contours off the map is very challenging. Therefore, instead of building the map from lower to higher, I am going the the other way, which is slower.
Anyway, here is the untouched Gettysburg map (made in 2016). They map is going to be 44 inches x 64 inches in size (yes, I size the map to the physical map I wish to produce), so there is a lack of detail. The grid squares are 1000m on each side.

And this is the map thus far. I started at the 1160 elevation on the left, then worked down to 700. Before I move to far to the 600 level, I want to complete the contours on the left side of the map, which is the next step. The Black line marks the boundary of the 700 line and I need to finish filling in to the left side of the map and the bottom left hill.

Next shows a little closer view of the left side of the map. I really like the color interplay, but it is probably too fine for easy wargaming. It may be just too bad. Hahahaha.
and then close ups of the interesting terrain features thus far.


-
Project Spectrum - Part 2
Nice. I think you should include Joshua Trees.


