


Wyvern
Wyvern
About
- Username
- Wyvern
- Joined
- Visits
- 3,303
- Last Active
- Roles
- Member
- Points
- 5,647
- Rank
- Cartographer
- Badges
- 24
Latest Images

-
Live Mapping: Random City
Just time to generate a quick sample random city map before the stream (it may not take anything like that long, depending how long you take adjusting the parameters first)!

-
Sword & Sorcery Cities
It's perhaps worth saying too that rooftops are rooftops, and haven't changed a tremendous amount over time, within a fairly limited range of forms (flat, sloping, domes/spires). In the basic City Designer 3 package you already have the option to draw your own rooftop (= house) shapes, using a variety of textures, so you can add exotic shaped pieces/materials to any ordinary roof to make them look weirder. If you'd prefer ready-made domes in a variety of colours and textures, try the bonus issue of the 2018 Cartographer's Annual, City Domes.
Don't forget too to explore the house symbols style options in CD3 anyway - Classic (loosely ancient Greek-Roman), Mideast, Thatch in the Bitmap A collection; Classic, Fantasy, Hovel and Thatch in the Bitmap B set; some of the Gothic items in both could provide some especially weird structures as well; many of the Vector symbols could be used in this regard too.

-
Add On File Size Question?
Only sometimes 😉?
When I tried checking the size of programs on my computer after reading this topic yesterday, I found that most of them have no file size given using the usual Win Settings options, so I'd assumed, also from the weirdly suspicious similarity in these CC3+ file sizes, that Windows can't actually tell the size of such things properly. Nice to have a proper explanation for that now though!

-
current situation with Image Magick and CC3+
It looks like this is something that only needs to be done once, as if changing a setting within CC3+ itself so that ALL exports (on any map I open) will use the 40 million value now that I've made this change (at least, until/unless I were to manually change it back). As opposed to needing to enter this command + number for each map or for each export ... Do I have that right?
Yes, you do have it correct. The only time you might need to do it again is if CC3+ has a serious crash and resets its defaults back to their originals, or if you need to reinstall the program again. Thus it's worth keeping a record of what the command is that lets you reset it just in case (because it may be months to years before you'll need it again, with luck!).
Can't help you with your ImageMagick query though, sorry.

-
How to Mark/Illustrate relative depth in Dungeon Maps?
There are various other options you might try, beyond what's been suggested already. Perhaps the most comprehensive guide to mapping cave systems for CC3+ is in the very early Annual Caves & Caverns modern style, as the mapping guide for it demonstrates how to use a top-down drawing to create a workable cross-section as well. That mapping guide also has a link to the UIS Working Group's website, which has a PDF of various real-world caving symbols, including for illustrating heights, that can be used that way, and a further website that has detailed example maps as further inspiration.
For more "art-style" dungeon drawings, where there's overlap between features on different levels, the classic method is to use a dashed line to indicate the underlying part - as I've done recently for the Nidag Temple map, for instance.
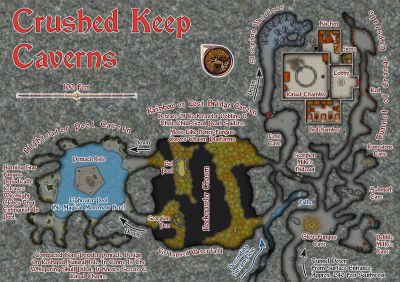
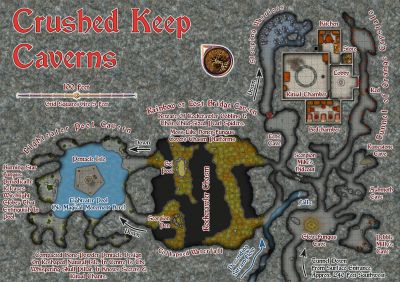
I used these, with a mixture of other tricks (shaded stairways, shadow from an angled ledge, different floor fill styles/colours) on the Rosebud Caverns map from the Atlas last year as well, which may give you a few more ideas.
Even with a "flat" dungeon level, it need not be the same level everywhere; early versions of D&D encouraged use of sloping passageways and similar features for example, based on real-world caves and artificial underground places, although that often simply made for player headaches in trying to map things during games, so tended to disappear from practical gaming use very often.
Don't forget too that something as simple as an arrowed line can help show where a gradual slope is, drawn on or beside an affected area, and different styles of arrow can be used to show different degrees of steepness.

-
Dungeon Level Symbols - Celtic Revival Room by Room
...but am also finishing up a few maps for the atlas that have been sitting in my works-in-progress folder for ages.
Sadly, a very familiar concept here too... Just keep plugging away as and when time allows, much like myself, Shessar 😁!

-
Community Atlas: Temple of Nidag, Stormwatch, Emerald Crown Forest, Alarius
@Don Anderson Jr. asked: How did I miss the entirety of this thread?
Honestly, I do this all the time on the Forum. I come back a few days later and find there's something among showing as unread way down the list, when I'm sure I'd clicked to check all the new topics here. Probably just get distracted with too many other things at the same time. At least you found it now! Thanks too for your very positive comments!
And particular thanks, as ever, to Remy for fitting these into the Atlas now!
-
A Hand-Drawn Fantasy Map of Jack Vance's Dying Earth
Thanks very much, Sue! It's the style that does it really though - and that's down to Ralf!
-
Live Mapping: Gritty SciFi Blueprints Prt 2
Probably just as well I didn't see this before the stream Sue, or I could have wrecked it by doing so - and it went well, clearly, and with good sound in the end, of course!

-
Live Mapping: Gritty SciFi Blueprints Prt 2
Sue: I've just checked myself, and posted something on this here.

