


Wyvern
Wyvern
About
- Username
- Wyvern
- Joined
- Visits
- 3,303
- Last Active
- Roles
- Member
- Points
- 5,647
- Rank
- Cartographer
- Badges
- 24
Latest Images

-
[WIP] The Griffon's Eyrie Redux: Spectrum Overland
Yep, the sea looks better this way now!
The Moon is always tricky, because it should affect the lighting on the whole map, and if it doesn't, it can look odd. Technically, for the almost last quarter phase you have currently, it'd be unlikely the unlit side of the Moon would be visible; by that phase, the lit amount is too great for the pale earthlit shine to remain visible. Appreciating this is more artist's view than photo-realism, however!

-
Castle Perilous
Why not use this style? It's a perfectly fine, and rather underused one, especially in the Atlas.
Though I do have a fondness for black-and-white styles in general, so am probably biased 😉!
-
Border Templates
Not sure about just a paper edge for something vaguely science-fiction future. The whole sheet probably should have its own look/texture - like parchment or vellum did in previous centuries (albeit still in use for high-quality or special items today).
Perhaps something like a metal scroll would be used for futuristic mapping, with the design etched into the surface, if we're thinking of similarly long-lasting, quality materials to vellum, say.
For modern paper, we have the recent Sticky Note Dungeon Annual options, of course, and further back in time, the Annual issue covering Investigation Props might be worth a look too. Note that the latter option has a ready-made computer readout background option!

-
[Atlas Submission] - Doriant - Gold Coast - Eknapata Desert - Kukaar
And for @Royal Scribe: I remember seeing this map quite a while back; most impressive still, even though I assumed it had gone into the Atlas back then as well!
Mind you, I'm forever finding maps by others I don't recognise when hunting for places to fit my latest Dungeon24/25/26... maps to. I suspect some probably were never posted about on the Forum, though it's at least as likely I've simply forgotten about them in the intervening years.
-
Live Mapping: OSR Dungeons
Impressed you managed to create anything at all while also trying to watch what Ralf was doing @Don Anderson Jr., and keep an eye on the livechat! And it looks good, too!
As Sue said, this is such an early style, it's one that the effects aren't automatically preloaded when you open the file; that's easily amended, but it can be annoying sometimes if you don't realise and wonder what's happened to the map (from frequent personal experience 😏).
-
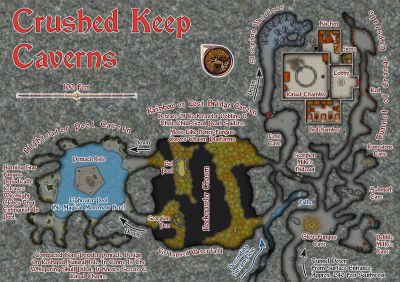
OSR Dungeons - The Goblin Outpost and the Lost Tomb
Fragmented walls are - as shown - for surface ruins, although you could use them for a partially collapsed underground area too. The symbols in this OSR style can be as versatile as you make them, mostly because they're not always obvious as to what they're meant to be (name-labels notwithstanding!).
-
Hex Crawl Test
Looks nice!
Maybe a bit more contrast for the river and road lines in places, so they pop better on the greyscale?

-
Live Mapping: OSR Dungeons
@Loopysue said: At the last count I think there were already more than 200 of them.
I'm sure we're all shocked to learn you don't remember every one, and all the time-codes for every single item discussed in them, Sue 😉!
-
Printing maps from PDF?
I haven't done a lot of printing to true scale like this. However, when doing test prints of any map, I simply save it as a rectangular section .JPG, then transfer that image to MS Publisher (albeit not for much longer, as MS is to withdraw support and cease the program shortly...), because there, I can set the image up exactly where I want it, at exactly the size I need, on whatever paper size I want. That can then be printed directly, or printed to a PDF, or saved whatever other way seems best.
The main reason I do this is because I've had horrendous problems trying to print directly from CC3 and CC3+ in the past, with fills printing weirdly, or with odd colours, etc.
If you want to try this, save the entire map as a .JPG at the exact size you need the full map to be when printed out, and leave the cutting-up into pages till you have it in a program where you can do that more easily - or the GM can, if that may be better (in case their printer doesn't like the PDFs you've prepared). As Don said, bleeping printers!
-
WIP - Wayward Village and Inn
Hey, as someone who used to DM with bits of cut-up graph paper, and with friends who DM'd using hand-drawn lines on clear-plastic-covered hex paper, this looks amazing! Mind you, that was close-to 50 years ago, so we had some excuse (that and there wasn't any other option back then!).

