


Wyvern
Wyvern
About
- Username
- Wyvern
- Joined
- Visits
- 3,266
- Last Active
- Roles
- Member
- Points
- 5,584
- Rank
- Cartographer
- Badges
- 24
Latest Images
-
Floor Question
This style follows the original Hobbs's Architecture book from 1876 (a free PDF of which comes with this Annual issue), and that indeed just leaves gaps for the doorways, which the style mimics.
For advice on using this issue, or indeed any Annual issues, see the accompanying PDF Mapping Guide. You can find this Guide, and any sample maps, images or other associated information files, wherever you've told the program to install the Annuals. On a standard default Windows installation, this will be in the C:\ProgramData\Profantasy\CC3Plus\Annual folder, after which you need just look for either the number or the name (the first year's Annuals only have a number) to find the correct sub-folder with all those details.
If you can't find, or remember, the issue you're after, check Sue's image wall of all the Annuals elsewhere on the Forum here, which covers up to the middle of 2o24 currently.


-
Community Atlas: Selenos, Statrippe, Artemisia
And so lastly, we have the dungeon, linked by a rubble-hidden trapdoor from area B2 in the Castle, Crabwell Delve:

Jon Roberts Dungeon again, with a hint of Token Treasury 2! A nice, simple layout, and while it would have been pleasant to have more symbol options, a top-view statue of a Platinum Basilisk was always going to be unlikely, together with a gigantic Crowned Crab statue to fit over the top of, and around, the well. Hints of magic, fun and weirdness to be found in this long-abandoned, indeed long-lost, piece of subterranea, however, courtesy of those Story Engine card decks!
Next time, I'm apparently staying in the tropics, if a bit further south, to visit somewhere on the large island of Ethra in southwestern Doriant...


-
Community Atlas: Selenos, Statrippe, Artemisia
Heading back to Artemisia from Lizard Isle in Alarius, this time I was aiming for somewhere in Statrippe, the southernmost sliver of the continent:
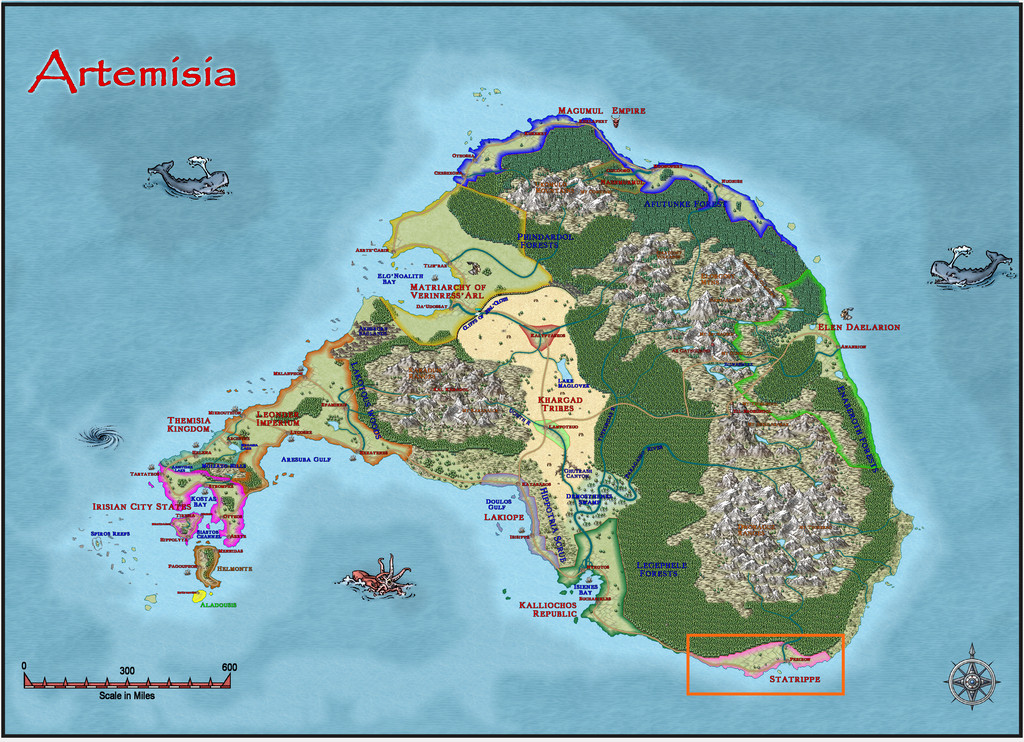
When I started a closer examination of this area for a suitable site for this latest map, there was an immediate complication, because the northern half of this area has been mapped twice in the Atlas, once on the Statrippe map, and once as part of a much larger map to its north covering the Dworaguz Ranges. To avoid the problem that a map can be linked to only one parent map in the Atlas, and as Statrippe was the map already identified here, this did rather restrict the options somewhat to a site in the southernmost sliver of the sliver that is Statrippe!
Luckily, there was an intriguing small island off the south coast, labelled as "Castle Peris (Ruins)", item 13 on the map here:
With no additional information about the isle available, its size, about 14 miles by 8 (22 km by 13), felt like a convenient area to map complete, and then drill-down to add the dungeon layout. Castle Peris was thus already suggesting scope for how to proceed 😉.
My initial thought for the isle's castle ruins was to reuse an ancient map of my own, a castle wrecked in a figure wargame 46 years ago for the specific purpose of creating an RPG setting. Of course, I then couldn't find the original hand-drawn map... Instead, I thought to source an alternative from one of the two - roughly as old - Judges Guild "Castle" books. I have though used quite a few of those layouts previously, and after a few duplicated random rolls, chanced-upon a handily-ruined castle with a neighbouring settlement, also partly ruined, in the second of those volumes.
The map layout for the dungeon was already decided from the Inkwell Dungeonmorph Dice designs, which just left the isle itself, a base image for which was quickly generated from the Statrippe map, with a grid to place random features set over it.
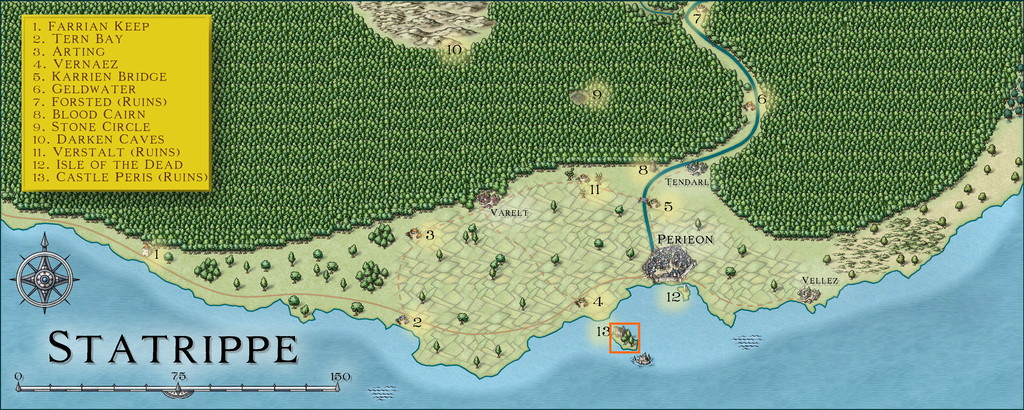
Rather than use random tables to fill-out the various points of interest, this time I'd decided well in advance to go with the latest set of card prompts produced by The Story Engine, their Loremaster's Deck and its Loremastery Expansion, cards designed especially to help create RPG settings. These have only just been published this year. The concept is pretty straightforward, in that you draw random cards from various sub-sets within the main deck, and choose suitable prompts, called "cues", from what's on each one. There are instructions to assist, but of course, you're free to adapt as you see fit, given their purpose is to help spark-off your own creativity - maybe in directions you might not otherwise have gone.
To give an idea of what this all means in practice, this is the spread I generated for the isle's general features:
As you can see, there are cues on all four edges of each card, and each is also double-sided, but with more descriptive concepts on the white-coloured reverse. You simply pick which one (or ones) you prefer, and run from there. I chose the Location card with "Isle" on, because obviously, it's an island I'm designing, but the rest were all randomly drawn.
So now we have a name for it, "Isle of the Full Moon". It's filled with the sounds of songbirds. It has extensive subterranean features, and requires guides to get to, as well as being the hiding place for a chieftain of some kind.
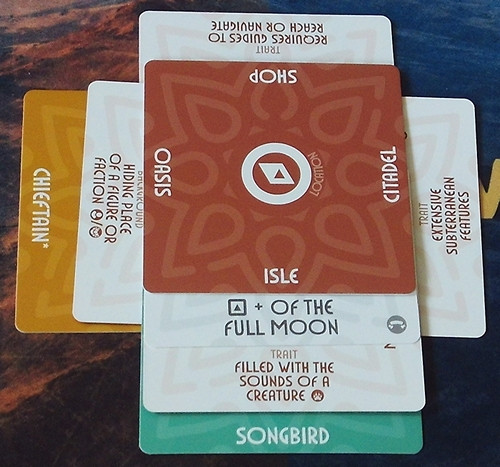
To find out more, I delved into what the songbirds might be:
Here, I've fitted the Songbird Creature card with a Focus Sleeve, to help remind me what it is I'm examining further. The birds are gleaming, they use echolocation or specialised vision, they're not simple physical animals, and there's a notable subspecies at a Watchtower. So now we have a new island feature with this watchtower (which might be part of the ruined castle still at this stage), as well as more details on these magical birds. Intrigued, what of the Watchtower?
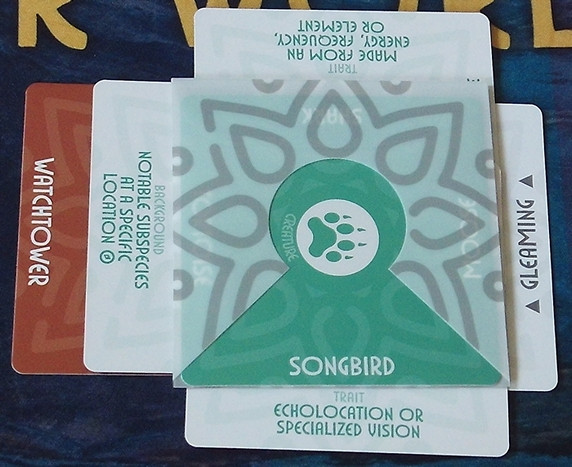
That little yellow 3D wooden arrow comes with the card deck, and helps identify what's from where, when creating complex card webs, incidentally. Now we know this is the Watchtower of the Sea. It has a spiralling form, has been overtaken by plants or fungi of some kind, is located in a cave or grotto, and there's a hidden Talisman in it somewhere. On down the rabbit-hole...
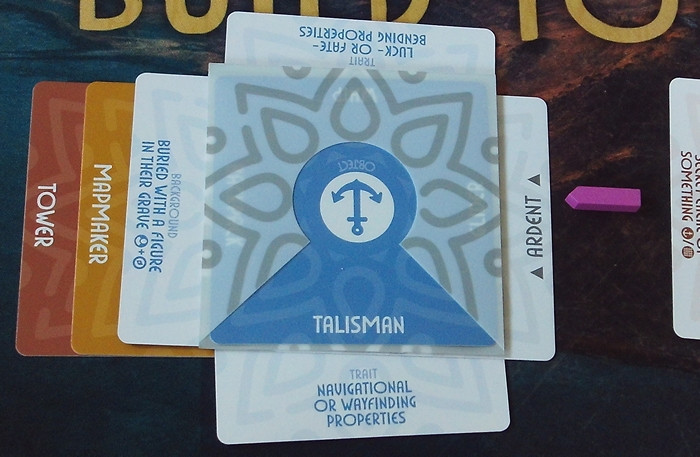
Those little wooden arrows come in different colours as well! So we've now an ardent Talisman with navigational powers, that can also bend luck or fate, and which is buried with a mapmaker in - where else? - the tower. And that's where I stopped for this card-chase, because by this point, my own ideas had begun to spiral like the Watchtower. But I still needed to check what the Chieftain was:
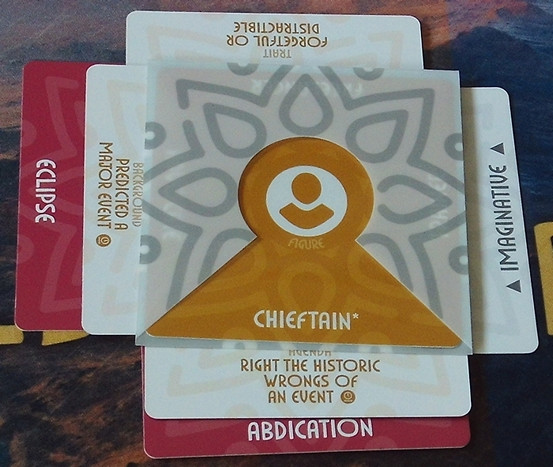
I doubt I need to walk you through how to read the card spreads by now, but this character was starting to feel less like a "classic" chieftain, and more like the leader of a group of sages or scholars, who'd made a mistake in the past, and exiled himself to the isle to try to find a solution ("he" was just randomly rolled for).
There was a lot more of this card-design process subsequently, for all the features of the isle, with developments, adaptations and changes in what was already done as things went along, and further ideas were sparked. It was a particularly rich process using the cards, rather more so than can be the case with only random tables sometimes. Without going into too many details, as there will be a full set of notes in the final Atlas version, these are some of the more important elements.
The isle became formally called Selenos, which is a loose ancient Greek-ish version of "Isle of the Full Moon", in-keeping with the main cultures of Artemisia. Despite being in the tropics (it's at about 16°N), I decided it could be oddly temperate at times, opting for it being where a cold current from the Frigid Ocean to the north sweeps down the east coast of Artemisia, then turns west, meeting a warm current from the Doriant Ocean to the southwest, helping to create frequent mists and fogs, hiding the isle, and making the extensive offshore reefs, shoals and sandbanks severe hazards for navigators. Thus only expert local sailors stand any chance of sighting the isle, let alone landing on it safely, as many wrecks in the waters nearby confirm.
The isle has alternative names, including The Hidden Isle, and The Isle of the Lost and Broken. The latter comes from it being the home and rebirth-place of the goddess Eunike Lysistratedoros, aka Gaiane, or more commonly The Twisted Torchbearer, whose domain is misplaced, broken and imperfect things. She may have created Selenos as her home. Tales hold the isle can be found only on nights when the White Moon is full, with the waxing and waning Moon reflecting the goddess' cyclical nature, periodically dying and being reborn here.
Fairly naturally, the songbirds became Moon Birds, which fill the air with strange, haunting music all across the island and the seas around, and which look like flamboyant, colourful Birds of Paradise. Plus they're magical creatures made from solidified moonlight, able to see equally well by day or night, and see the invisible too. Some say the isle is home to Sirens, because of the birdsong.
Aside from the Greekier personal names being derived randomly from tables in the Hyperborea RPG, everything else came from, or was inspired by, the cards.
And so, finally, to the map! I wanted to try to use a connected style-group again, as with the Snakeden Swamp maps on Lizard Isle, and chose the Jon Roberts Overland style here (and the Dungeon one for the later maps).
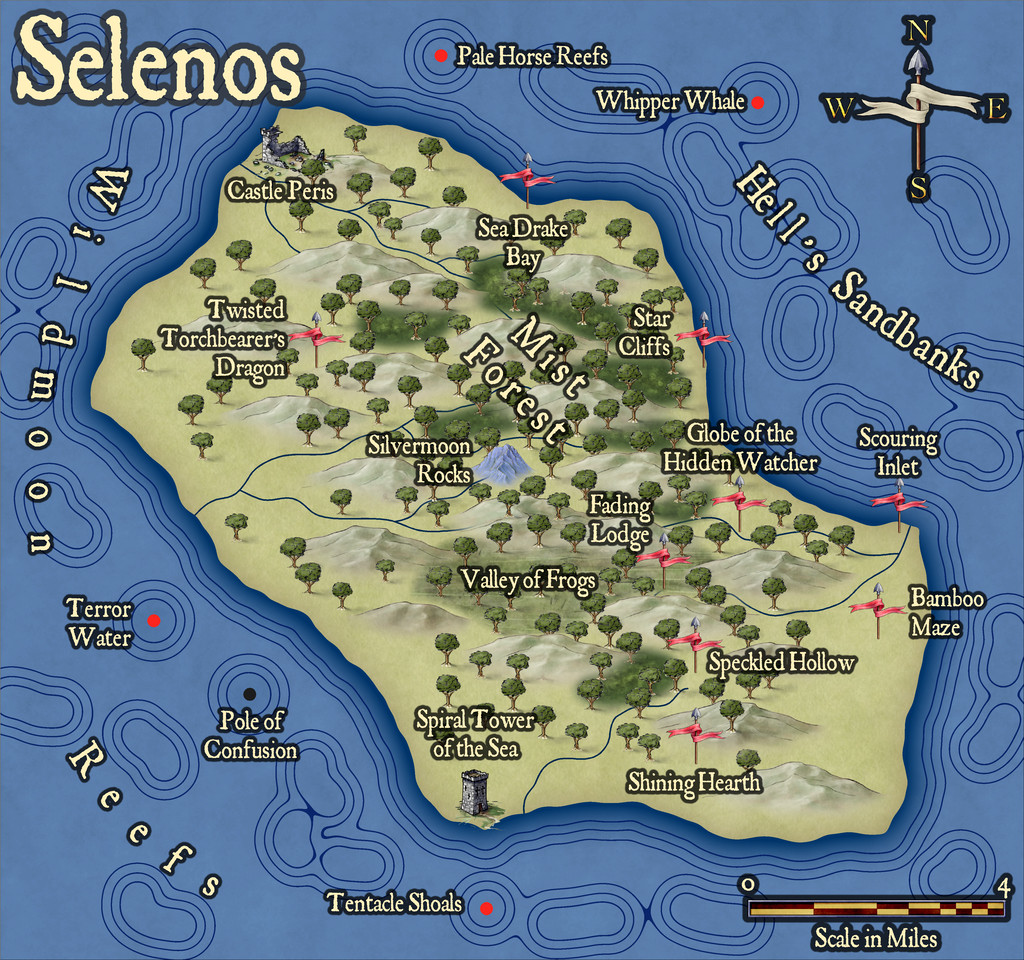
Ordinarily for a map of this size and scale, I might have tried to make the coastline more varied. However, as the isle's so little-known and under-explored, I'd already decided to keep it fairly close to the lines of the original from the Statrippe map. Plus as I wanted to use the edge striping coastal effects option available in this style - for the shoals, reefs, etc., offshore - a more complex coastline can sometimes make those look a bit too messy, so the cleaner lines overall looked better to my eye. As you might expect by this point, the names don't always mean quite what you might think!
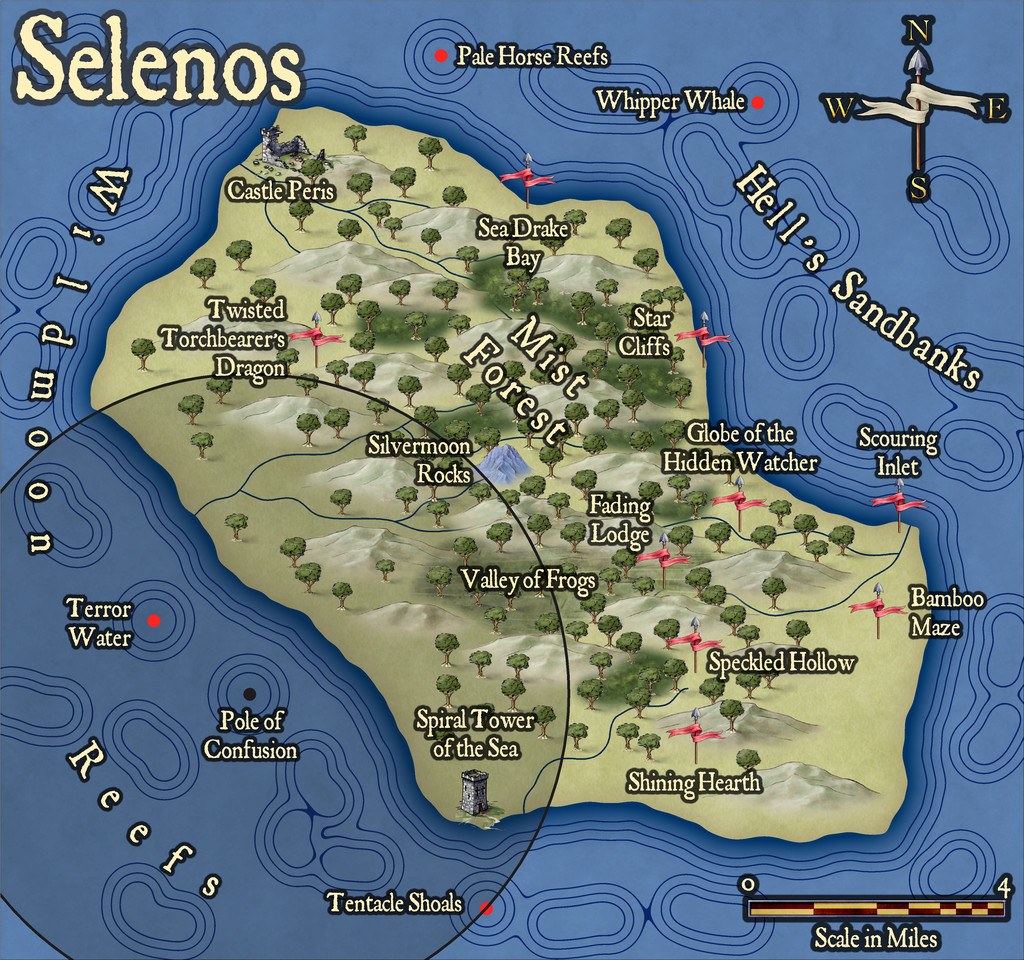
There is also an alternative version of the map, with an eventual Atlas toggle, because there's a curious magnetic effect centred on the offshore - actually undersea - Pole of Confusion, which deflects lodestones and compass needles within about five miles (8 km), as shown on this view:
More to follow!


-
Your favourite settings? (worlds)
Which is fair enough!
I think at the time I was bought the original D&D boxed booklets, and even when the City State arrived, there were two UK importers for the whole country here, so it was never easy - or cheap - getting hold of any of the US-published items. Made it all a bit more special though!
-
Mythic Carpathia map by Free League Games
There's a good reason for that. It is!

