


Wyvern
Wyvern
About
- Username
- Wyvern
- Joined
- Visits
- 3,267
- Last Active
- Roles
- Member
- Points
- 5,585
- Rank
- Cartographer
- Badges
- 24
Latest Images
-
Hotspot not working
Glad we got that sorted at least! I did know about the hotspot disabling, but wasn't online after you replied yesterday. Thankfully, we always have Monsen 😁!


-
Darklands City walls questions
I suspect you'll need to post the FCW file here to get some definitive answer to why these symbols are showing as green and with a green edge, as there are too many variables to try to guess at something useful without that information.
The wall and tower symbols in Darklands City go on to one or other of the SYMBOLS Sheets. There is a dedicated SYMBOLS 2 (walls) Sheet, and another SYMBOLS 3 (towers) Sheet, although you would need to have selected either of those Sheets to have the walls (or towers) go on to one of them as you place the symbols. Otherwise, if you have no other SYMBOLS Sheet selected, they will default onto the normal SYMBOLS sheet only.

-
Live Mapping: Landform Overland Maps
I ran into the same issue that Ralf identified during the livestream when preparing my recent Monseignor District map for the Community Atlas, regarding the unscalable hatch styles, when trying to map the swamp areas there. My problem was greater though, because the area I was mapping was a lot smaller, at 10 x 15 miles.
The way I got around it was by accessing the hatch style's FCW file, and simply copying over all the constituent vector polygons, and rescaling the lot together. I then just copied and pasted those rescaled elements to where I needed them for the swamp texture, and in the forms required. This had one advantage, as I also wanted some grassland texture to represent the farmlands, and the swamp texture's polygons include those horizontal linear polygons too. Just a few more copy & paste operations.
It would be practical to use the hatch style's FCW file to set up individual symbols for use when mapping this way, so the individual pieces would be scalable like any normal symbol. Plus that would have the advantage you could also make use of techniques such as "Symbols in Area", "Fill with Symbols", etc. If you're going to be making frequent use of one of these early Annual styles, that would definitely be worth doing.
-
Looking for ships wheel png
You could simply draw your own, using polygons of the wooden bitmap fills in the Sailing Ship Annual (CA27). There are some odd symbol omissions from that Annual issue in general, which could perhaps be remedied by a future updated version (pretty please!) 😊.


-
Community Atlas: Embra - Enclosed Places
Enclosed Place of Interest 3 is the Floating Dale Park:
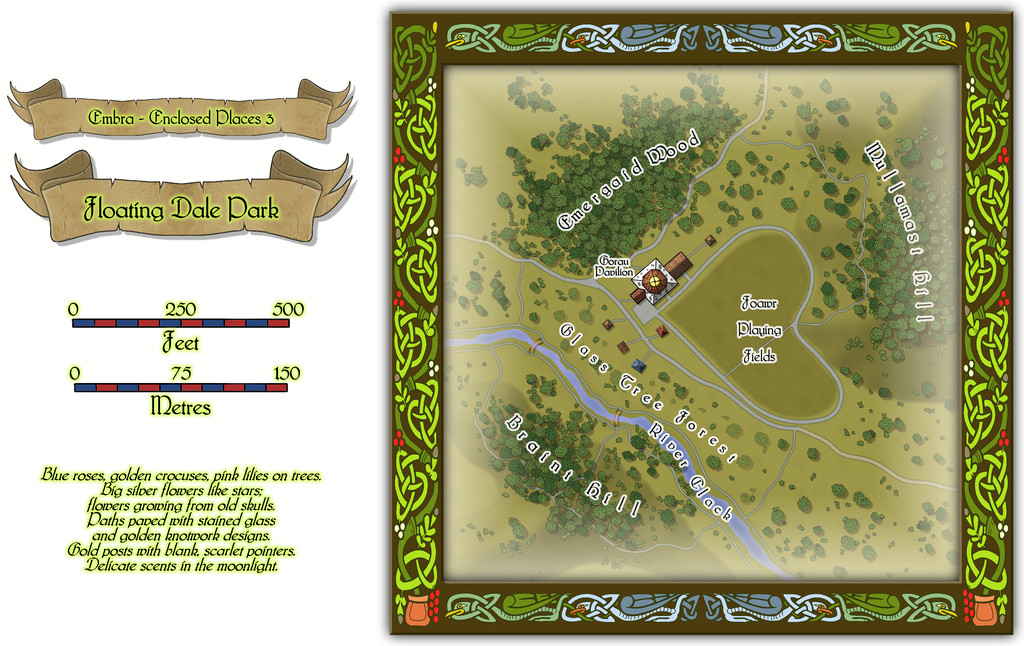
This can be used as a typical real-world park, with opportunities to wander around, or play outdoor games on the central Playing Fields, whose unusual shape may call to mind that Faerie outdoor games and sports may not be quite those familiar from the Mortal Realm.
There are a handful of surface-level buildings scattered around the map's centre, as one of the map toggles will reveal:

These include the Pavilion, where equipment for playing sports and games is available, as well as a restaurant in the central octagon beneath the building's dome. And yes, some of the vegetation is actually intended to be of living glass in Glass Tree Forest. And again yes, those ARE bridges made from rainbows over the River Clack. As ever, the text and PDF files will explain a little more about both facets, and others, from this map. In case this seems not very "Enclosed", there ARE boundaries to the Park which are deliberately less obvious than some.
![[Deleted User]](https://secure.gravatar.com/avatar/c75d9a245b74d9c59be0999ea81ca541/?default=https%3A%2F%2Fvanillicon.com%2F92add7f8c954488718110edc4896ad39_200.png&rating=g&size=200)
-
Live Mapping: Random City
Thinking further about this option since the livestream, it's a powerful tool no matter what kind of settlement you're wanting to map, even if it's to fit in a pre-drawn setting, as anything unwanted the random option generates can be readily moved or removed to fit terrain features (e.g. coastlines, rivers, cliffs).
Different areas of a larger city could be created randomly in different ways (medieval and modern could be mixed, drawn from different random maps, for instance), and then fitted together in a suitable CC3+ master file, simply by copying over the relevant parts of the separate randomly-created settlements.
Naturally, this would need quite a degree of restructuring and amending after the fact to make everything fit together correctly, although a lot of the base work would be done from the random creations.
It would also be possible to "super-detail" parts of a settlement drawn in a quite different style, such as a Watabou-type settlement, leaving the "blank" areas for segments that weren't necessary for such detailing. Again, unwanted parts of the random design would need removing, but this would be something to consider if of interest.
-
Community Atlas: Embra - Hilly Places
Thanks very much Sue!
I wanted the cliffs here to look different to yours, which I'd already decided to use for the red sandstone types at Embra, as the Palace Heights ones are meant to be a harder, volcanic type of rock. Actually, a Faerie type of volcanic rock, which has different properties and abilities to "ordinary" volcanic rock, so I also wanted the forms here to act as a reminder that something a little different to normal was involved. I also used a similar style of cliff drawing in one of the Crossing Places Streets - the Rocky Vale under Seafield Road there, again because the Vale is a weird place that can't be reached, another reminder of something odd happening there.
-
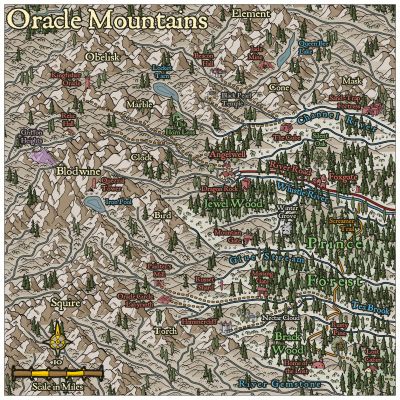
[WIP] Community Atlas: Oracle Mountains Area, Ruma Helrevy, Peredur
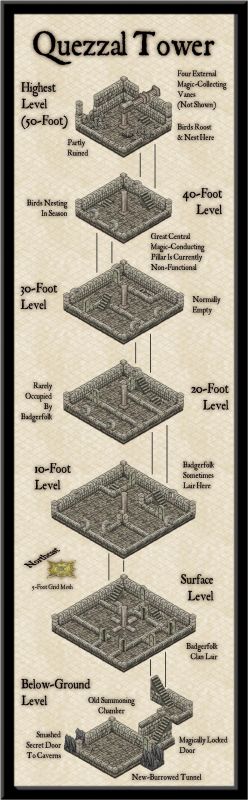
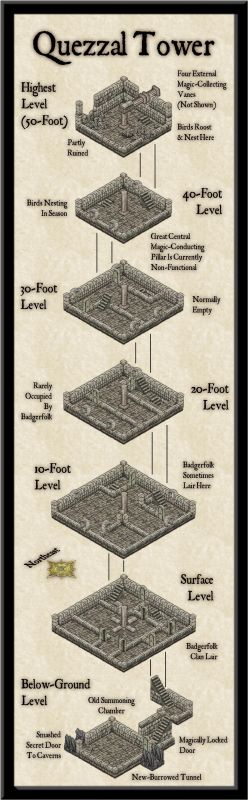
Having performed the usual New Dungeon Map Ritual, in consultation with the CC3+ Wizard of the New Drawings, and imported the hand-sketch for the map to a fresh Bitmap Sheet and Layer, as normal, the first section of the subterranean level could be prepared, essentially amplifying the Below-Ground Level of the Quezzal Tower map:

As we see, I'm using Ralf's Hand-Drawn Dungeon style again here, and it's likely also obvious to those more familiar with the style, that there are a couple of cavern walls missing here. These are where the next areas connect to this one, connections which are somewhat complicated by the fact the link-areas are actually cliff-lines in the cave, indicating steep rises and falls in the level. This part of the drawing already shows what happens when floors are all drawn on the one Floors Sheet, which has a nice inner glow effect on it, that the walls increase with their own glows. All the floors flow straight into one another, without any such shading effects. That's great if all the floors are on the same level, but cliff-lines mean they aren't. Thus, enter some new Floors Sheets:

Only it's not quite that simple, because to fool the eye properly, the floor level above the drop-line needs to be lighter up to its edge than the one below. Thus the floor level apparently above the drop line has to be drawn a little longer there, on a Sheet BELOW that on the other side of the drop-line. So the way I had the floor edges on the initial snapshot image here was only correct for the broader of the two connection points. The narrower passage one had to be edited after the fact to extend under the next upper, though actually lower in Sheet order, floor. And as the second shot above indicates, there were sometimes going to be multiple levels on the same passageway...
This wasn't actually quite so bad as it may sound, because I'd already discovered how to get round the problem when drawing the map for the Tomb of General Chengdai previously. Although I didn't draw attention to it there, nearly all the adjacent floor areas of that dungeon map are on different Floors Sheets as well, and the sliding walls have had an additional external glow effect added to their Sheet to help maintain a similar darkening close to them too.
Even so, it needed a couple more sessions to get the whole layout drawn, and I had to add an extra Sheet at one point because, for entirely unfathomable reasons, one of the new Floors Sheets started causing transparency acne problems with the next Floors Sheet in the stack (but none of the others did so, despite all being identical, and having minor overlaps in places, nor did the problematic Sheet with others that weren't adjacent in the stack...):

The freestanding rock stacks were drawn using the Cave, Cut-out drawing tool, that makes use of the Color Key effect to punch through the grey stone floors to show the brown stone background, and make it seem like they're upstanding features within the caverns. Occasional tweaks were needed to get rid of a few too-sharp fractal points along the edges, taken-out individually rather than using the "Simplify" command, which I find sometimes takes away a bit too much on this kind of smaller map.
One element that slowed things a little more was adding the cave walls after various segments of floor were completed. "Trace" does help hugely in this, although the individual floor patches meant constant chopping and changing as to which part was being traced at times. So this didn't leave a lot of time to start adding the first interior details:

Just some debris and the floor circle in the Old Summoning Chamber, the pool in the next main cave along (yes, that's going to need its own pool-edge drop-line at some stage!), a large central-cavern chasm, and, ooh, glowing spiderwebs! What can those mean? More next time...

-
Community Atlas - Forlorn Archipelago - Poncegraf Village - Church
For the Church, the pillar shadows could use some adjustment, as right now, they're passing over and through the walls, which is confusing.
On the upper floor (which might benefit from labelling as such), the stained-glass window patterns thrown on the floor need adjusting, so they cover only where the wooden flooring is - where they shine into the air beyond, there should be nothing.
Additionally, not all the windows should be showing these at all on either floor, only where the light will be shining directly through them, and that should match with where the floor shadows lie as well.
It might be helpful to add dashed or transparent lines on the lower floor image to indicate where the upper balconies are on the lower map view.
-
Map of Narnia
Helen, you can find that map, and many other illustrations, on the Pauline Baynes website. She was an amazing lady who did a huge number of illustrations, including the only ones of Middle Earth not drawn by Tolkien himself during his lifetime which he authorised.
This map, and that for Middle Earth, were available as posters at one time, as I used to have both. They are true works of art!
Plus, she also did all the maps and illustrations for all of Lewis's "Narnia" books. There is, or was, a single volume hardcover at one stage which had all the texts, maps and illustrations in, all in colour, if I recall correctly.

