


Wyvern
Wyvern
About
- Username
- Wyvern
- Joined
- Visits
- 3,266
- Last Active
- Roles
- Member
- Points
- 5,584
- Rank
- Cartographer
- Badges
- 24
Latest Images
-
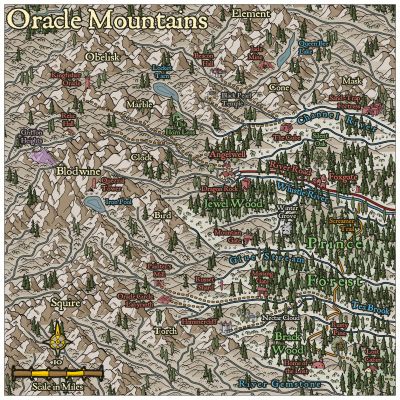
Community Atlas: Queen Mica's Scintillant Palace
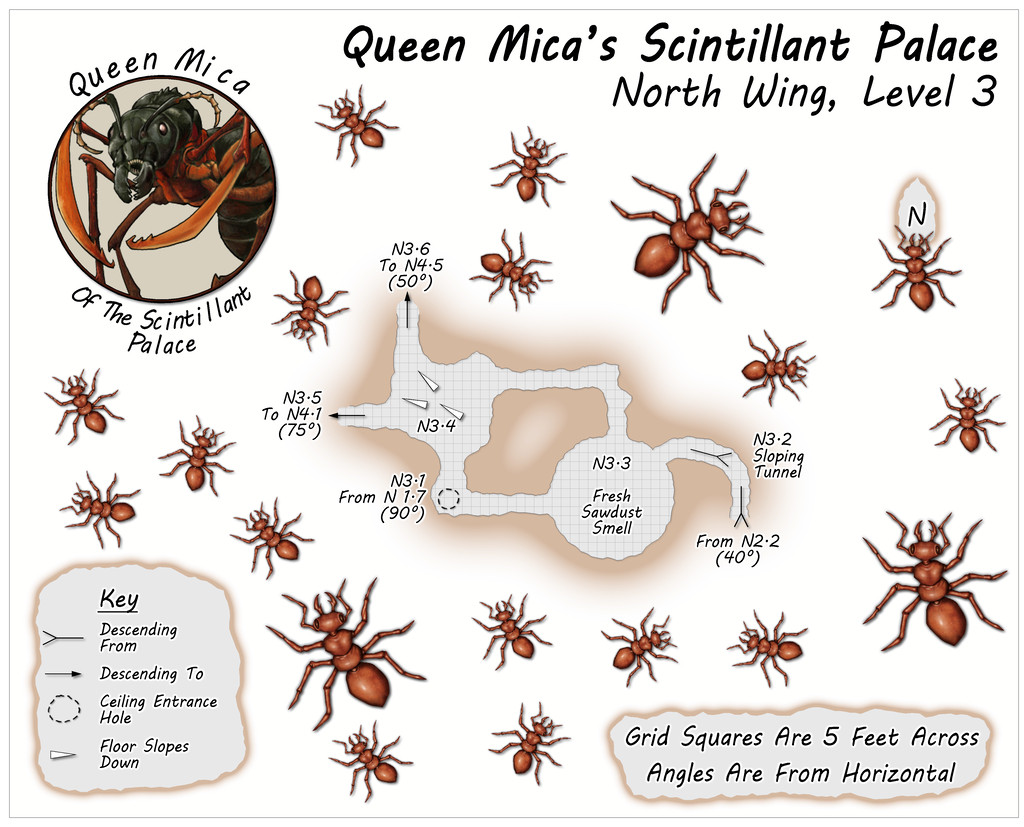
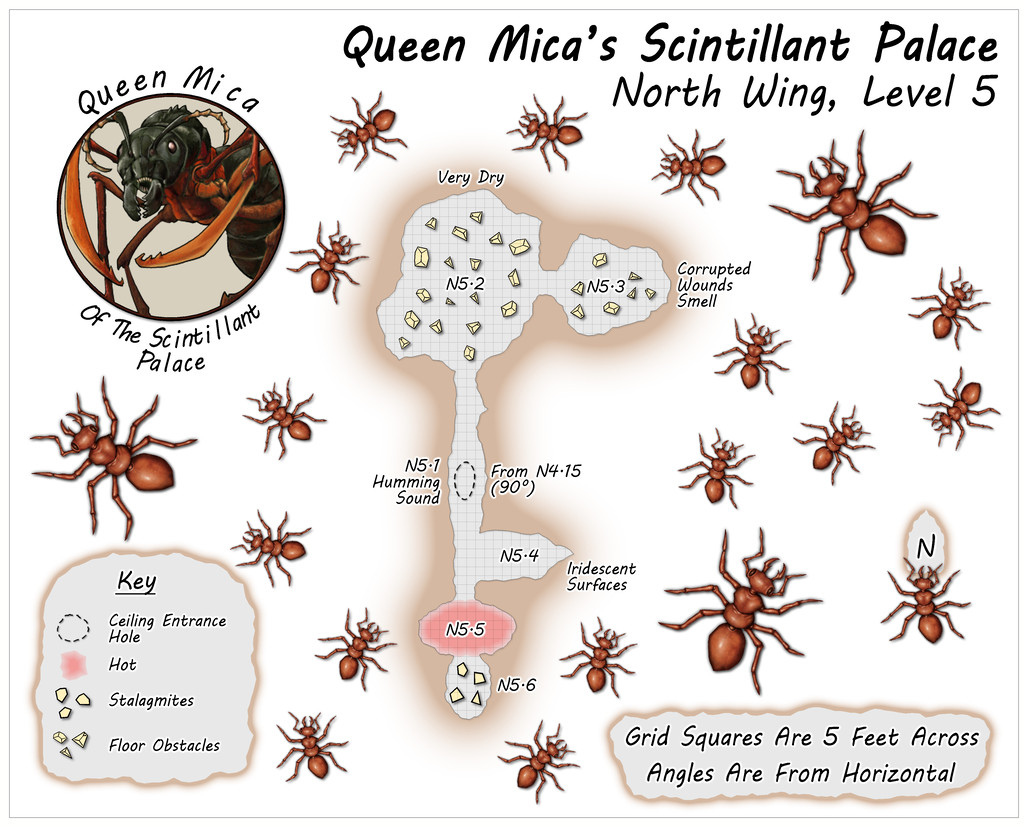
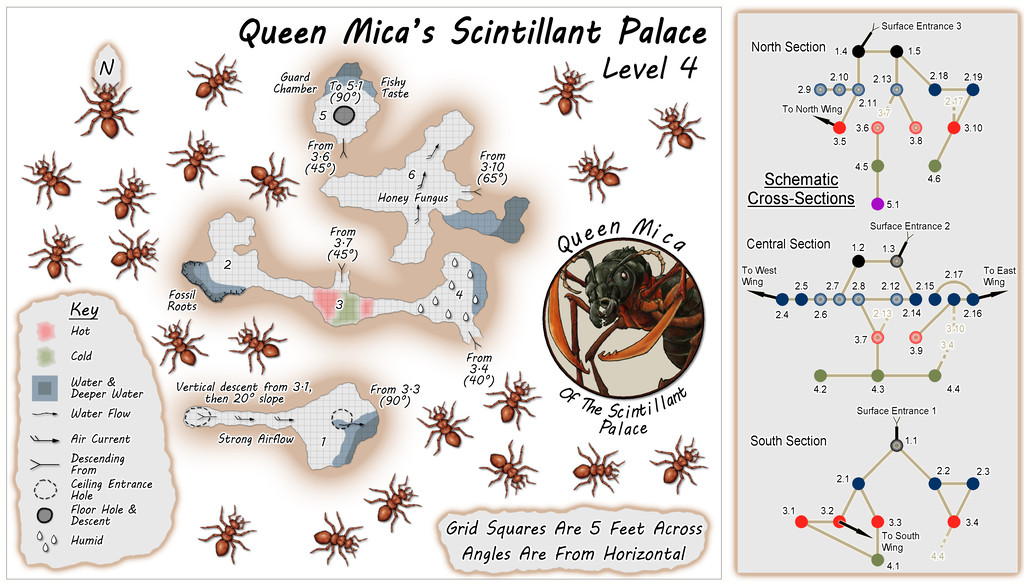
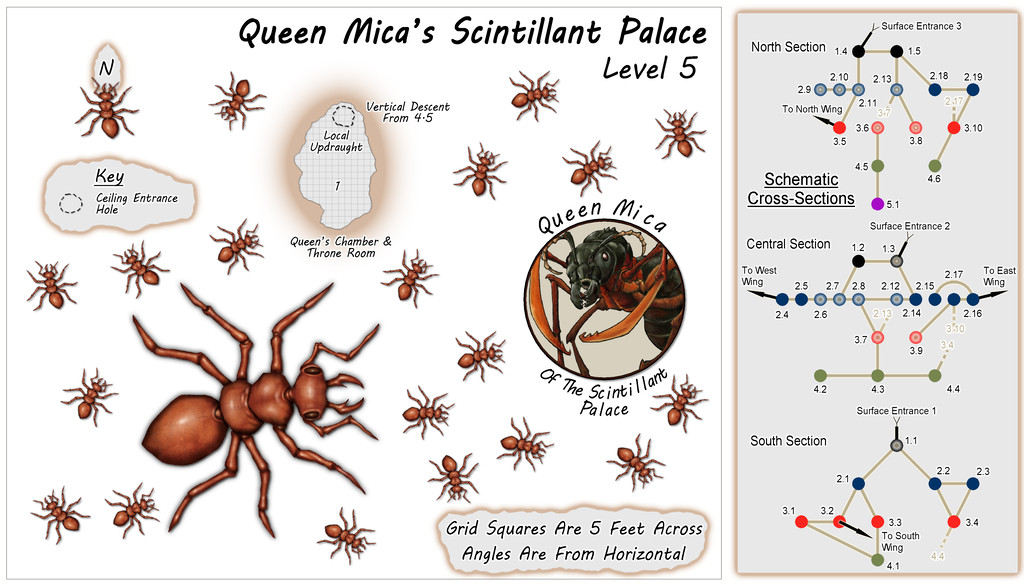
Circling clockwise from the West Wing, the North Wing is the most vertically-extensive of all the Wings, with five separate Levels, just like the central main Palace structure. The layouts here derived from a mixture of images on the Dwarven Forge Discord, and one of the official weekly "On The Anvil" livestreams on Twitch from January 2021 that featured another extensive Burrows build (go to 2h15m or so to see the final design). This combination led to an interestingly complex grouping of tunnels and chambers that, because of the way maps can be linked in the Community Atlas, meant both the small first two Levels were placed on the same map, as Level 1 here connects with both Levels 2 and 3, while Level 2 links back to 1 and on to 3 as well. This also resulted in a means of linking into Level 1 from the Palace by a tunnel that passes above the ceiling of two chambers on that Level, before dropping vertically into one of them. Thus, the North Wing:
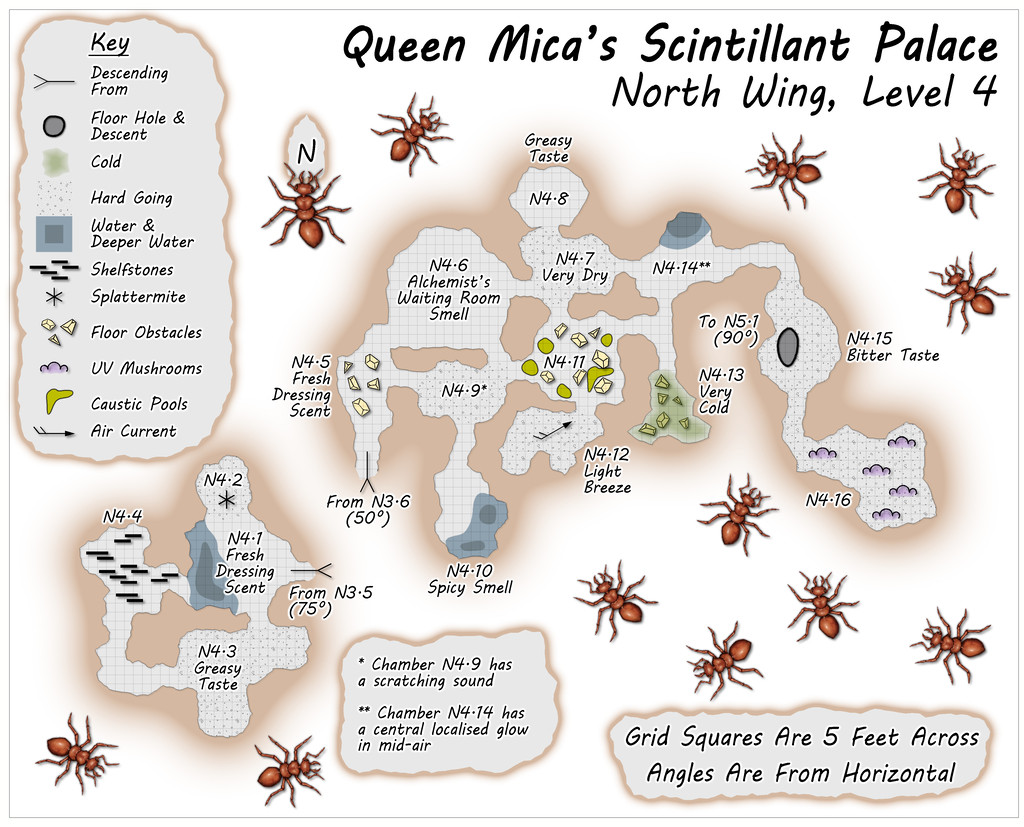
Some particularly unusual random items were rolled-up for Level 4, adding extra interest to this part of the colony beyond its verticality.
![[Deleted User]](https://secure.gravatar.com/avatar/c75d9a245b74d9c59be0999ea81ca541/?default=https%3A%2F%2Fvanillicon.com%2F92add7f8c954488718110edc4896ad39_200.png&rating=g&size=200)


-
Community Atlas: Queen Mica's Scintillant Palace
The central, main, part of the Palace complex, consists of the Level 1 map(s) above, and the other four earlier "Hive" maps, with suitable amendments:

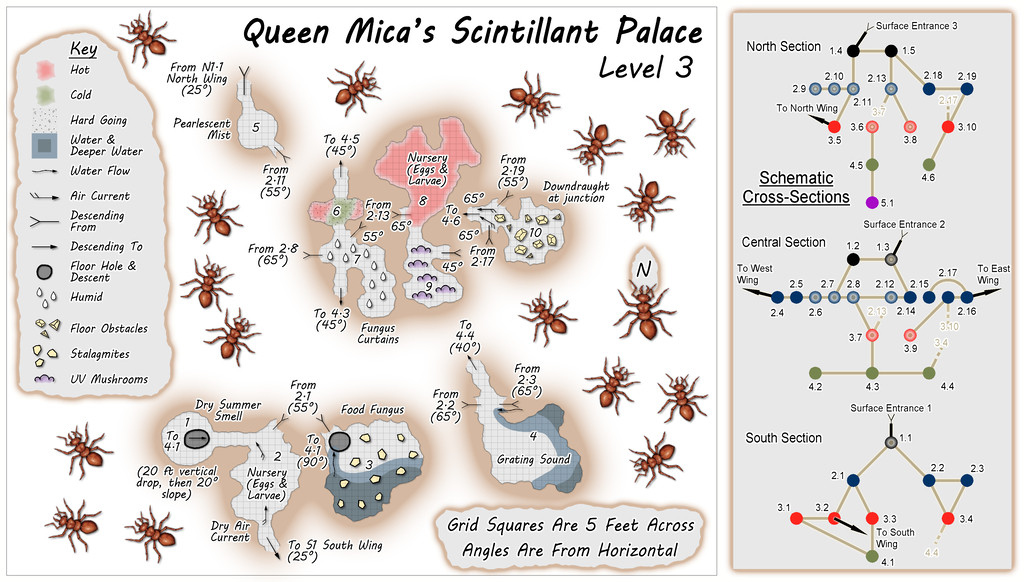
One major change was the original "Hive" was a single map, with each of the five levels set-up on a separate Layer in that FCW file. Here, each Level is in its own separate FCW file, as that seemed easier to try to keep things properly organised for presenting in the Atlas (although the Level 1 map still works that way, for its variant "Reality" and "Illusion" versions).
As the accompanying descriptive files suggest, the illusory nature of the Palace might be continued for some visitors, as GMs could prefer, throughout an entire visit here. Although no further illusory versions of the maps are provided, the idea is the level maps would be simply inverted, so as to seem that deeper levels below ground were actually higher buildings and towers, with suitable illusory views across the surrounding countryside and neighbouring parts of the Palace. Naturally, none of the locals are deceived by any of this, and now tend to give the place a wide berth, though less because it's really a giant ant colony than because the Queen, while respected as a powerful Faerie creature, isn't the greatest company over any length of time. Plus honey fungus for a meal or two is fine, but not on its own as a regular diet. Unless you're a giant ant, that is.

-
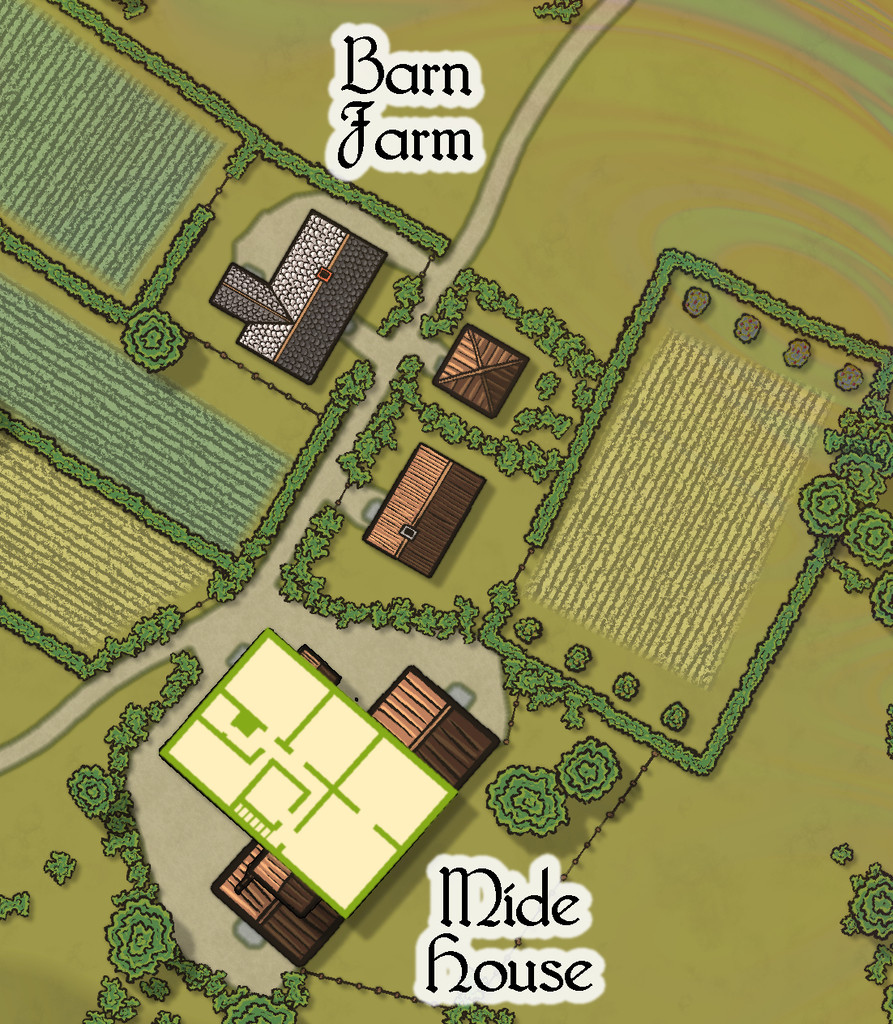
Community Atlas: Embra - Villages
Next in the sequence is the northeastern Village, Embra - Summerise:
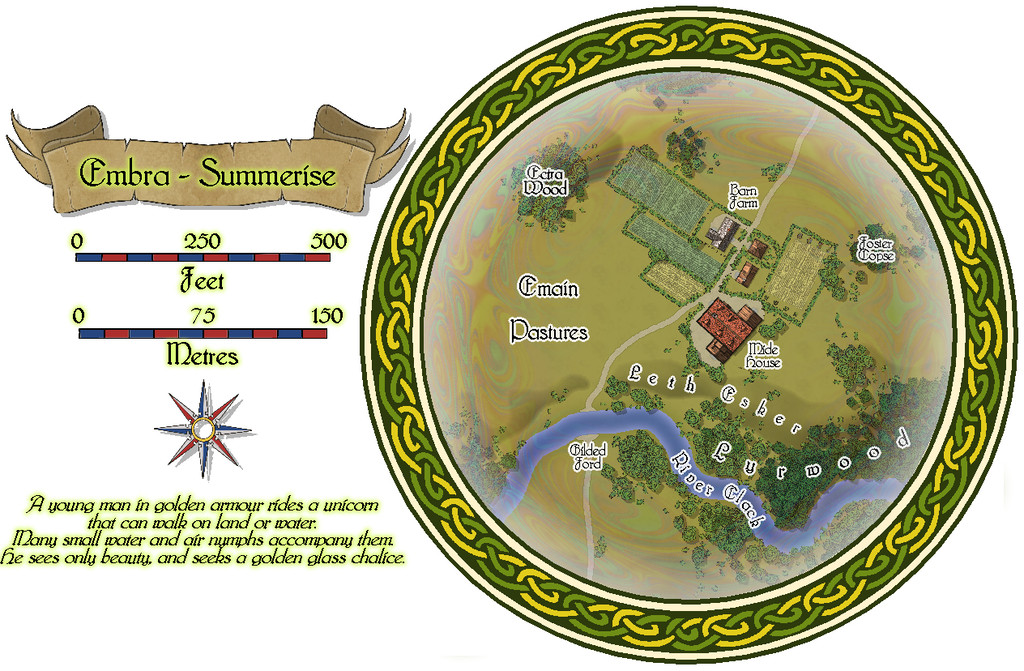
Here, we have a broader River Clack, if still one with a ford. There are fewer buildings this time, although a couple are larger properties, particularly Mide House, treated as an inn in the accompanying map notes. In addition, there are two "interior" toggle options, one for the surface level:
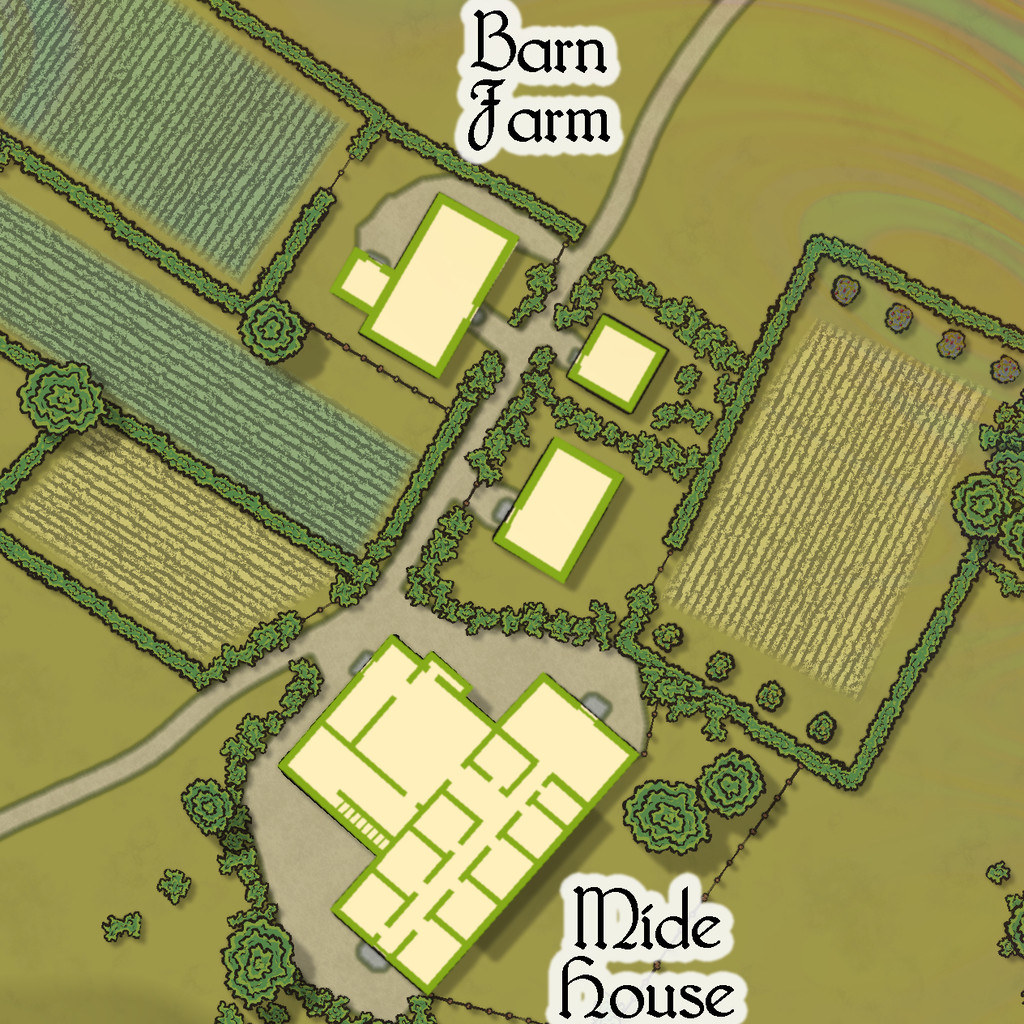
And a second one for the upper floor of the inn:


-
Community Atlas: Errynor - Meteorite Coral Cavern
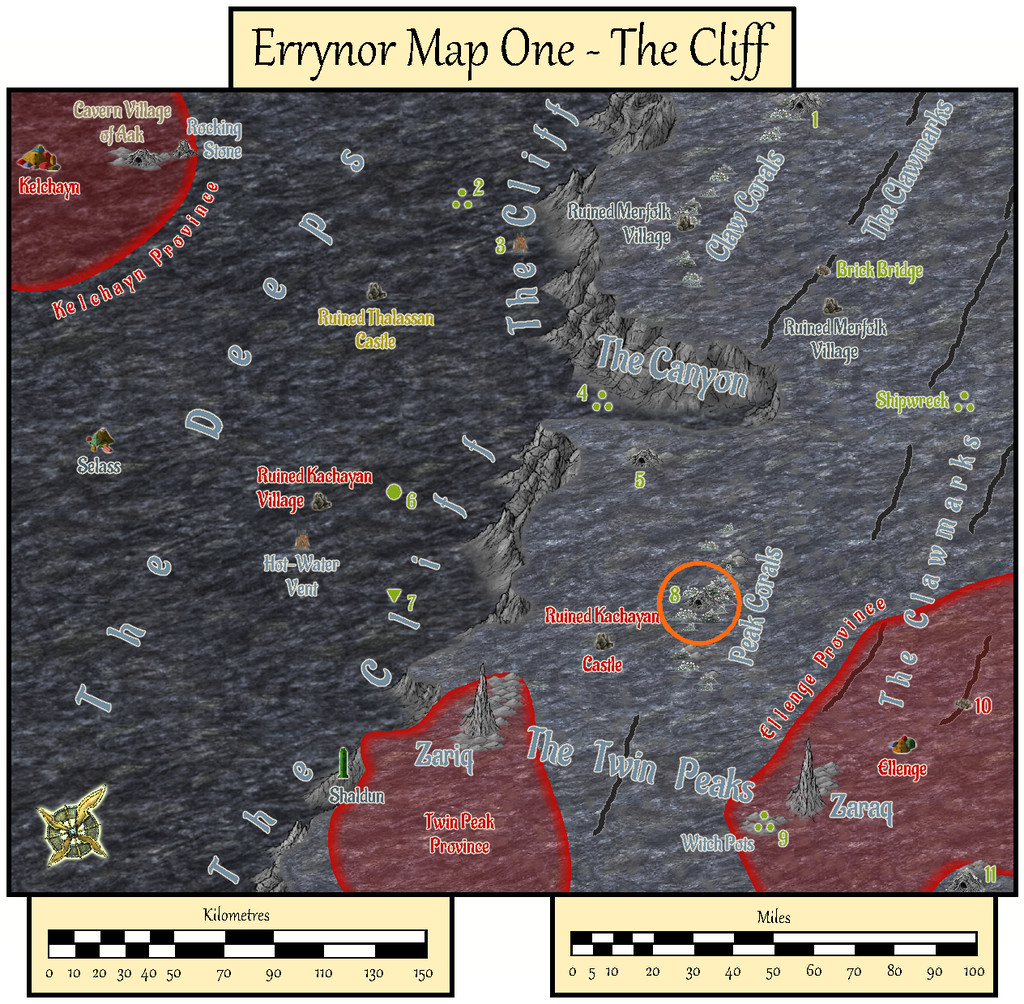
Having spent much of 2020 preparing detailed maps and descriptions that often took weeks at a time to complete for the Community Atlas, it seemed worthwhile to tackle a less involved map at this stage, for one of the smaller projects I'd long had in mind as part of Errynor Map 01. There, it had the prosaic label of merely "Cave 8", the lair for a giant octopus set among the Peak Corals:
However, for some time, I'd intended to make it a little more than simply an animal lair. Indeed my earlier planning for the maps to add detail to this Map 01 area had included others of the cave lairs elsewhere on it too. As time passed, I'd discarded that prospect as liable to become too similar, either because I'd end up frequently drawing small cave maps, or because I'd be struggling to make each one somehow unique. So this map ended up with a concentration of elements from some of those "cancelled" maps:
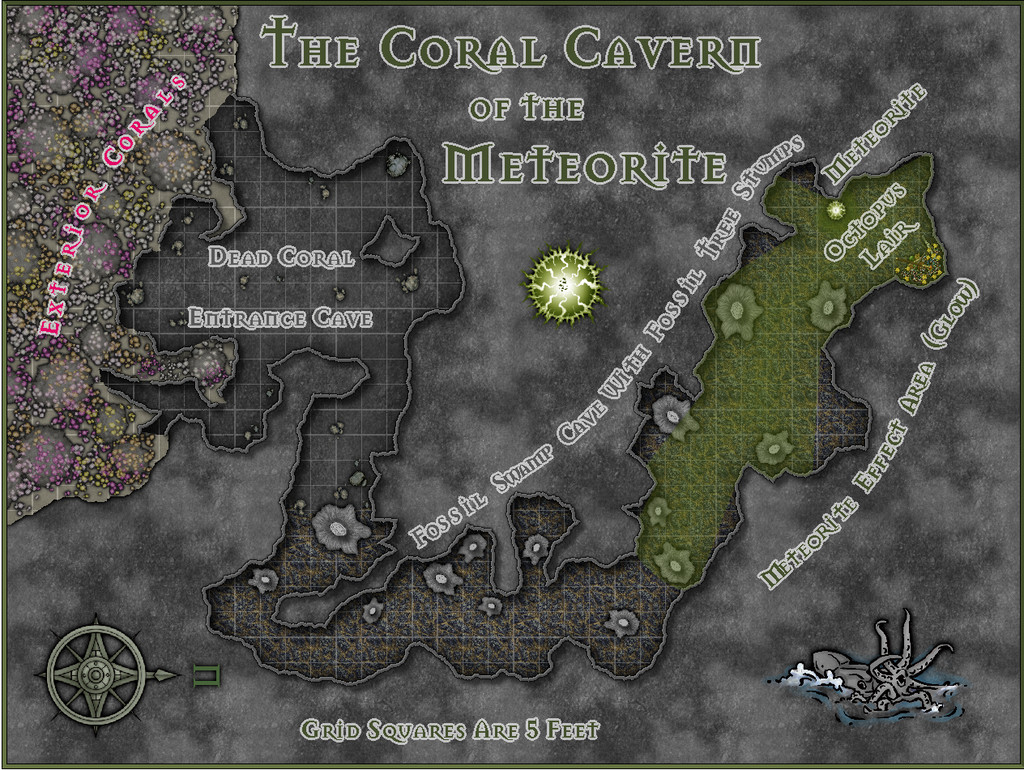
As the lair is set among the Peak Corals, it's not quite a "traditional" cave, as much of its entrance area especially has formed over time from gaps in the build-up of dead coral and other debris which has since solidified, with collapses and modifications by the more mobile creatures living on the reefs and within the cave system, along with the effects of nearby sea-bed gas escapes. Hence I decided not to use a mask to hide the outer edges of the walls here, and just let the shadow Effect from them fall where it might onto the normal Background Sheet, as a reminder the "walls" may not be really so defining as they might seem.
The inner parts of the cavern become increasingly weird. Despite being very far from land, in extremely deep water, and where the usual sea-floor rock is the typical once-molten black basalt, much of the cave floor is that of a very ancient, fossilised, swampy land surface, including numerous substantial fossil tree stumps. Once around the sharp angle, those with normal colour vision will be aware of a green light emanating from further north (north is to the right here for once). The origin of this glow is an even more ancient meteorite, embedded in the fossil swamp from when it was still a living swamp. It shines green, and is Not Entirely A Good Thing, shall we say. Its non-visual effects have led to the giant octopus that lairs here becoming tougher, longer-lived, more intelligent, and - as the substantial treasure hoard might suggest - far more acquisitive than others of its ilk. Much of its time, when not out hunting, is spent gazing contemplatively at the meteorite.
Much of the map was created from normal DD3 assets drawn over a random design from the Curufea's Random Cave Map Generator website, with a few tweaks. I did though add a couple of extras from the Mike Schley overland style - the octopus illustration and the compass rose - and labelled the whole using the Mason Serif Bold font that comes with CC3+. Before starting, I'd intended to use a lighting Effect for the meteorite's glow, but soon realised this would be impractical for the map to be useful as a GM's aid, so elected instead to use a simpler fading-glow look for the affected area, using sightlines drawn from the meteorite to establish where the "shadowed" parts of the inner cavern would be.
I added hand-sketched "tree-ring" lines to the tops of the DD3 stalagmites that were repurposed as fossil tree stumps, having already opted for the cooled lava fill texture to stand for the fossil swamp cave floor. The living coral masses outside the cave on the sea-bed were DD3 fungi and trees, including varicolor options, with added glow and transparency Effects to make them less fungal-floral. The overall look was chosen as deliberately near-greyscale and relatively dark, given the water depth here at over 750 metres (2,500 ft) is far below the depth to which sunlight can penetrate, in-keeping with my deep undersea mapping conventions, while hinting, with the limited use of colour, that things are also a little different here. And yes, naturally, the shadows are anomalous, despite being what the eye expects!


-
Paper Modelling (October 2021 Cartographer's Annual)
Thinking further about this, it occurred to me it might be helpful to provide a list of manufacturers that produce, or have produced, downloadable card and paper models, with website links. I'll not pretend this will be fully comprehensive, but it may give some more precise pointers than simply advising people to go and hunt through the OBS sites and CWF. Where not noted, the scale is generally the "standard" 28 mm-32 mm used for most fantasy and science-fiction gaming (which of course isn't a true scale at all, but what can you do?).
Antohammer the Lonely Wargamer: Mostly 2D standee paper minis, with some 2D, 2.5D and occasionally 3D models as well (of terrain features, smaller structures and a few vehicles), fantasy and historical.
Arid Hills Gaming: A limited range of 2D, 2.5D and 3D fantasy and science-fiction gaming terrain and props (e.g. for dungeons and graveyards). Manufacturer has now though switched to 3D printer files only.
Avalon Game Company: Mostly paper minis (plus a massive collection of written RPG accessories, gaming floor tiles, tabletop print-and-play games and accessories), with a limited range of fantasy 2D and 3D scenery, e.g. for dungeons.
Black-Ronin: A small number of 15mm-18mm scale 3D exterior modern buildings and structures, and 2D floorplan textures, intended for historical wargames.
Crooked Staff Publishing: A VAST and increasing range of Pay What You Want texture packs for creating your own scenery. The guy who is the company, Kristian Richards, also produces regular short YouTube videos (59 so far!) on using these to make 2D, 2.5D and 3D models (attaching the texture to various types of card and foamcore first, very often), and has an enthusiastic Discord channel. Although not specific models as such, the PDF file textures could be easily converted and transplanted for personal use in CC3+ to draw specific models using them in Dioramas 3, for instance. The videos are especially to be recommended for new card model builders, and mappers particularly may care to view the, currently 4, "Tiny Terrain" videos, which are in essence 3D hexmaps!
DarekPages: A small, occasionally growing, range of 3D terrain models, some vehicles and 2D minis, for near-future/science-fiction settings (although some items will work for fantasy too), with comprehensive photographic instructions.
Dave Graffam Models: A huge, still growing, range of 3D, mostly exterior-only, models for fantasy and science-fiction settings, with 2D ground tiles as well. Instructions provided with each kit, many of which make heavy use of the PDF layers facility, so each model can be built in a variety of appearances.
Eddnic: All-free, more-or-less unique 3D paper minis, and some 2.5D and 3D fantasy prop models (HeroQuest-style, after the 1980s fantasy boardgame of that name). Not for beginners, as some can be very difficult to make, there are NO instructions, and searching through to find what might be of interest is a challenge in itself (as it's purely a blog site), but the models are often astonishing and - as mentioned - free + unique!
Epic Wargaming also known as Print and Play Fantasy: Primarily wargame-style 2D fantasy standee minis, but there are a couple of 3D models as well, notably a castle on the Wargame Vault site. A major website failure three years back has meant the ranges are still incomplete on the new site, although new minis are produced from time to time. Many of the minis are free, though some are Patreon-only items now.
Fat Dragon Games: A large range of mostly 3D buildings and terrain (for possibly the greatest number of biomes available anywhere in papercrafting), the later models often making use of the PDF layers feature to extend the options for how the final models can appear. Mostly fantasy structures, with some science-fiction, although the natural landscape terrain has many more uses. The owner has switched to 3D printed models only now, so the existing paper-model range is unlikely to expand further.
Finger and Toe Models: A large range of 3D building, structure and vehicle models for fantasy, historical and science-fiction settings. Mostly exterior-only models, and provided with illustrated instructions.
Haunted Dimensions: A host of horror-themed, free, 3D models, games and some minis. The models are chiefly exterior-only, though they do include the Bates and Amityville houses from their respective movies.
Helion & Company: Their Paper Soldiers range of hardcopy and PDF books each contain complete pairs of historical wargame armies of minis, basic rules and usually some 2.5D or 3D terrain features and miniatures, and come with full instructions. Two sets, "European Buildings" and "Castle Assault", are especially heavy on the 3D buildings side!
Hotz Stuff: A range of 1/300 scale historical naval wargame minis, including 3D ship and building/structure models, plus a range of 30 mm (1/60 scale) Wild West buildings and structures. No new items in more than a decade, however.
Kingsway Models: Mostly hardcopy-only OO-scale (roughly 1/76 scale) historical British railway model structures and buildings, with a few free downloadable PDF items. Some 1/43 scale (O gauge) items also available. Print quality on the hardcopy items is often not as good as you would hope, from personal experience, and this is true also of the PDFs.
Lord ZseZse Works: A range of 3D models (as well as lots of 2D ground-tile flats), primarily for fantasy settings, and including some terrain features as well as structures. Also a few 3D vehicles (historical Russian tanks). Unfortunately, after a very successful Elven Papercraft KickStarter campaign in 2014, the company ran into problems delivering all they'd hoped to from that, and although all their models remain available for purchase, no new models are likely, as the owners split-up in 2017.
Mystic Mountain Productions: A modest range of fantasy 3D buildings, mostly exteriors, though some with internal 2D floor plans as well, with comprehensive photographic instructions. Often makes use of PDF layers to enhance the final appearance options. No new models since 2017, however.
Okumarts Games: A large range of mostly 2D standee paper minis, but also produces some 2D, 2.5D and 3D models (dungeons especially in the latter type), mostly for fantasy and science-fiction settings, also some historical minis. Detailed photographic instructions are provided for the models, and the PDFs nearly always make much use of the PDF layers facility.
One Monk (also known as Mayhem in Paper) : Although One Monk produces chiefly 2D standee fantasy minis and a few 3D vehicles, their main website also hosts a huge repository for many free minis and models created over the years by the papercrafting community, in recent years via the Cardboard Warriors Forum's "Monthly Hoard" system, or produced by individuals outside that.
Papercraft Dungeon also known as Kev's Lounge: A range of mostly 2D paper standee fantasy minis, with a small range of 3D structures, the buildings coming with full external and internal artwork. The build mechanics can be complex for the structures, and although photographic instructions are provided, they work better for those with plenty of paper model-making experience. Tending to concentrate chiefly on standee minis only in recent years, however. In addition, not all the models are available via the OneBookShelf sites (the link above), and the owner's site, Papercraft Dungeon, while allowing easy paid-for and free downloads, will only let you download each item in your account a limited number of times - so make plenty of back-up copies!
Papermau: An extensive, very long-running blog, which serves chiefly to highlight some of the many paper model creations freely available across the Internet down the years. The blog's author also makes new, usually 3D exterior-only, models from time to time as well. Being Brazil-based, a few of the blog posts in the past two years have become rather politicised, which may be something to be aware of.
Paper Realms: A large and growing range of 3D exterior buildings, 2.5D/3D subterranean and ruin models for historical and fantasy settings, with some props sets and ground tiles, and some overground 3D terrain models, including options via PDF layers, and instructions.
Papier Schnitzel: A substantial and growing range of mostly historical 3D model structures and ships (Dark Age Europe and Medieval Asia, primarily), usually with full exteriors and interiors, making extensive use of PDF layers, and provided with detailed, photographic instructions.
PERMES: Chiefly a 2D standee minis producer (vast range; historical, fantasy and science-fiction), some of the sets do come with pieces of 2D or 2.5D terrain as well, and a few packs are chiefly of this sort. Instructions are not always provided, so some experience with paper modelling is necessary to get the most from these models.
Ravensblight: The "Toyshop" section has a substantial range of free horror-themed 3D exterior-only buildings, games and vehicles, including full-sized novelty items. Commonly added-to around Hallowe'en in most years, in some cases with RPG/story notes as well, plus separate PDFs with instructions.
Reviresco Tin-Soldier: A small range of mostly exterior 3D model vehicles, structures and buildings, making use of PDF layers to swap things around at times, and with useful, illustrated instructions.
Scalescenes: A growing range of British model railway structures, buildings and some vehicles, available in OO (1/72) and N (1/148) scales and with different exterior texture options (though only one scale, and one texture option, is provided in each paid-for downloadable model). Illustrated instructions come with each kit. Look out too for the free downloadable PDF scale rulers!
Stoelzel's Structures: A large range of highly detailed 3D models with full interiors and exteriors, often with props, and comprehensive instructions, suitable for near-modern and horror settings particularly, with some fantasy items (such as caves and dungeons). PDF layers are not used, so there are commonly huge numbers of pages per PDF, which can make it difficult to keep track of what to print when there are options available. Also relies on the use of foamcore to retain the correct wall thicknesses, so the walls are simply covers for that.
Tinkering Tom: A small selection of 3D building models, fantasy-historical in nature, complete with illustrated instructions.
Wordsworth Model Railway: A substantial range of British OO scale 3D exterior railway model structures and buildings, all free. Also a YouTube channel with a huge number of construction videos. Video 92 is recommended for beginners by the company, as a 10-minute general introduction to making card buildings.
World Works Games: A large range of 3D fantasy, horror and science-fiction model structures, buildings and some vehicles. Unfortunately, the range is no longer supported, so is unlikely to further expand. In addition, the kits are all available only through the company's own website, and it too is not regularly maintained, so in recent years, it has been frequently, and unpredictably, offline for unexplained reasons. As only a limited number of downloads are available from each purchase, be sure to make plenty of extra back-up copies of anything purchased from the site.


-
Community Atlas competition entry: The Summer Palace of the Winter Queen
As mentioned a couple of days ago, aside from the mapping, I've also been pulling together the notes to accompany this set of maps, so for those who might be interested to know more in advance, here are the general comments from the start of that file, as drafted to date.
No one is quite sure who or what the Winter Queen really is. The rare tales mentioning her suggest she may be a deity or an exceptionally powerful, probably immortal, perhaps Faerie, creature. Few such tales give useful details on her nature, though many cultures in the higher northern and southern latitudes of Nibirum preserve variants or fragments of the stories, where the Queen has numerous alternative, typically apotropaic, local titles. It is clear she is thought to possess great magic, much exceptionally obscure knowledge, and a considerable burden. Humanoid in form, she appears as very tall (around 8 or 9 feet high; 2.4 to 2.7 metres), dressed in a long, hooded robe, with piercing blue eyes, bearing a long white staff or crook taller than she is, and an air of great sadness. Her clothing and physical features are said to alter subtly from one day to the next.
She cannot leave the Palace, and has no control over where it goes, as the Palace moves magically, and instantly, once a day to a new location. It is said to be never in exactly the same place twice, but its location is always in an icy, remote, spot, concealed below the surface. Its solitary entrance, while small and hard to find, has no door (there are no doors throughout the Palace), and can be recognised by the profusion of perfect representations of summer flowers and foliage all around it, made of crystal-quality ice. This summer array of perfect specimens is astonishingly beautiful, all of which objects are very fragile. Damaging any is a swift way to raise the Winter Queen's ire, something the tales strongly warn against.
Wherever the Palace alights and for fifty miles around (eighty kilometres), the weather worsens and turns wintry, if it was not winter when it landed. Sometimes, it settles in the clouds, where it stirs them to winter storms, pouring hail and snow down to the surface beneath in icy gales. Even then, the Palace remains deeply hidden by the clouds, for all it still has its ice-flower-surrounded single entrance.
While some tales allude to it, one reality about the Palace is that the souls of all who have died recently in the frozen places of the world, and all those who have died from cold elsewhere, must pass through it on their way from wherever they were to wherever they may be going. A few may linger in the Palace for a time, and some may become temporary guests or servants of the Winter Queen. The Queen has no control over which may stay or move on immediately, however. She frequently converses with those passing through even so, from which much of her secret knowledge derives. Occasional tales may hint disparagingly that the Queen is merely running a ferry service for the recently deceased.
The Palace changes its form whenever it moves, never the same twice, though always in plan-view having the shape of a gigantic snowflake, with walls, floor and ceiling composed entirely of solid, if at least slightly translucent, crystal-like ice. This is always beautiful, with glittering facets like gems that reflect light on or just within the solid ice surfaces. Somehow, light palely manages to illuminate the whole interior with a soft radiance, no matter how deeply buried the Palace may appear to be. At times, rainbow-coloured beams, arcs and spots may be seen, like haloes in the outdoor sky that are created by refraction of sunlight through tiny hexagonal ice-crystals in thin, high-altitude, clouds. Sometimes such light effects may become dazzlingly bright briefly. The ice walls, floors and ceilings reflect light as well, which in places can take on a mirror-quality surface. Such mirrors can allow glimpses of past or future events and places, memories left by the passing spirits, perhaps. The Winter Queen does have some control over such light, vision, visionary and illusory effects within the Palace.
Queen and Palace are so inseparable because in essence, they are parts of the same thing. Many of the Queen's "servants" are actually living ice-constructs which appear from, and can return into, the inner ice surfaces of the Palace as required, thus too are simply another element of this whole being.

-
Community Atlas competition entry: The Summer Palace of the Winter Queen
Along the way, I let myself get a bit distracted, and decided a CA3 portrait of the Winter Queen might be an interesting addition to the map set, with a hint of the SS2 Bitmap A Snow Frozen Lake fill texture for the border design, which thanks to the standard CA3 bevel effect, looks rather like fine marble now:
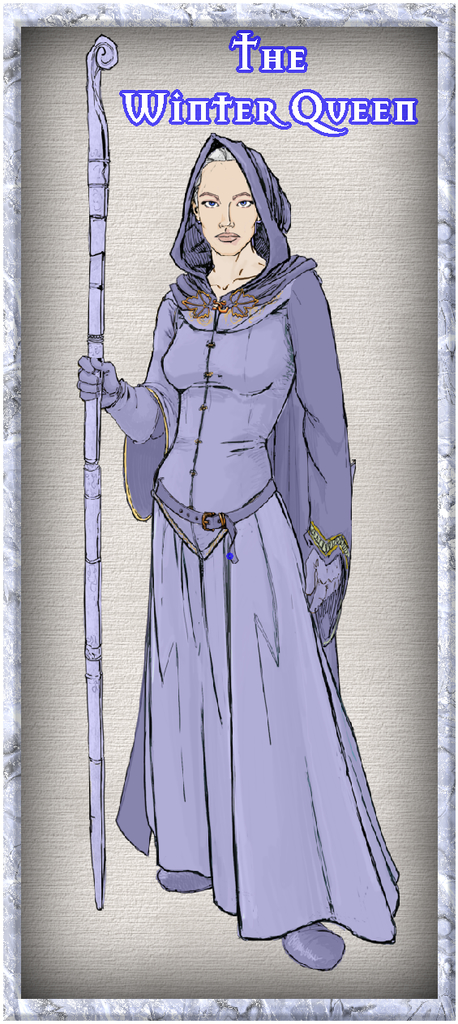
She's intended to be between 8 and 9 feet tall in (imaginary) reality, 2.4-2.7 metres.


-
Community Atlas 1000th map Competition - with Prizes [August/September]
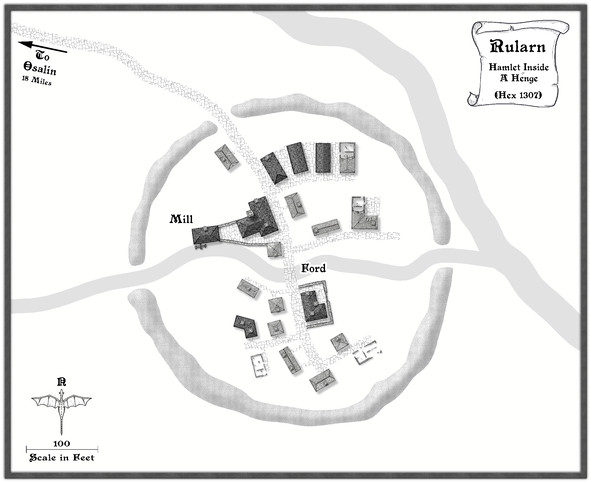
Map seven from my set of ten is for another hamlet, Rularn:

A more extensive set of notes than usual have been added to my WIP topic elsewhere on the Forum (as I remembered to make some screenshot versions as I was constructing this one!), with a higher-res image in my Gallery. The FCW and PDF notes files follow:


-
Community Atlas: The Marshmalika Area of Kumarikandam
As these "ghostly" comments may indicate, I'd had a few ideas of my own as to what else could have been happening in the area, partly also drawing on what I'd established for the Sussara Region earlier. One thing I was pretty sure of is that Marshmalika had been the first place attacked when the invaders arrived, given the Bay of Aqesh is a logical landing area, away from the open sea, where storms are more likely, and the most inland section of that would be as good a place as any to begin. I also thought it would be interesting to explore why their main headquarters wasn't on the coast any more, or indeed at an obvious communications centre with a reliable freshwater supply (it's the orange triangle on the Banjar province map in my first post above). Hence the ghosts, which the rank-and-file are most unhappy about. And there are oddly large numbers of poisonous scorpions and snakes where the ghosts are too, which were never found in such profusion previously, or indeed still at other parts away from the old inhabited locations.
So to the small town of Marshmalika itself, or more correctly, its abandoned ruins:
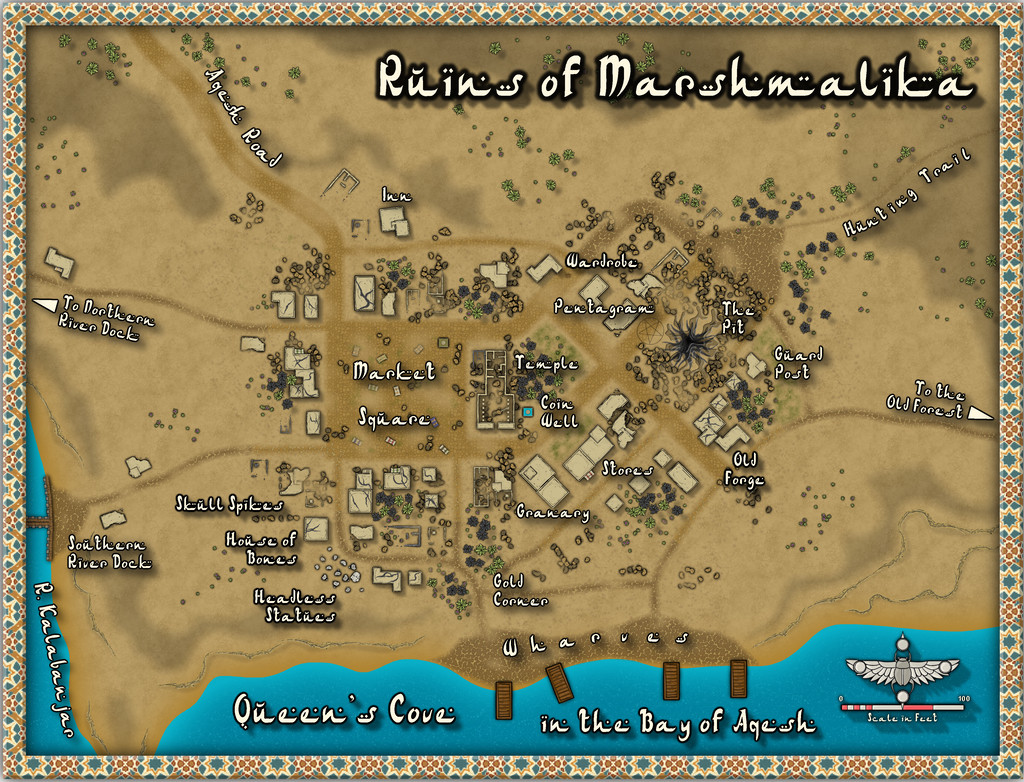
While the style's the same Desert Oasis one as before, other than the sea, I've deliberately muted the choice of other colours here to reflect its ruined status, and had quite a bit of fun creating The Pit and the Pentagram (no, not Pendulum 😉). Hopefully, those will be a little clearer on the higher-res version in my Gallery, and of course, clearer still once in the Atlas. I also chose not to have all the nearby features be on, or fully on, the map, to add to that slightly edgy, uncomfortable feeling, while still keeping it usable as a gaming map. I have to say too, I'm impressed by the versatility of this mapping style, so with just this one Annual issue, it's possible to create a vibrant, living settlement (Sussara Village last time) and an abandoned, ruined one here.
When I started rolling the Inkwell dice sets to generate the base maps for this whole project, I made a few decisions in advance. One was that I wouldn't reuse the same dice-face design twice (I just re-rolled any duplicates), and because I wanted to keep the maps fairly small and manageable, that I'd roll randomly between 2 and 4 dice at a time only. I'd then put together the map based on how the dice fell on the table, once slid together into a whole, naturally. For this "Ruins" set map, I just rolled two dice, and the orange rectangle on this image shows what the dice had set-up:
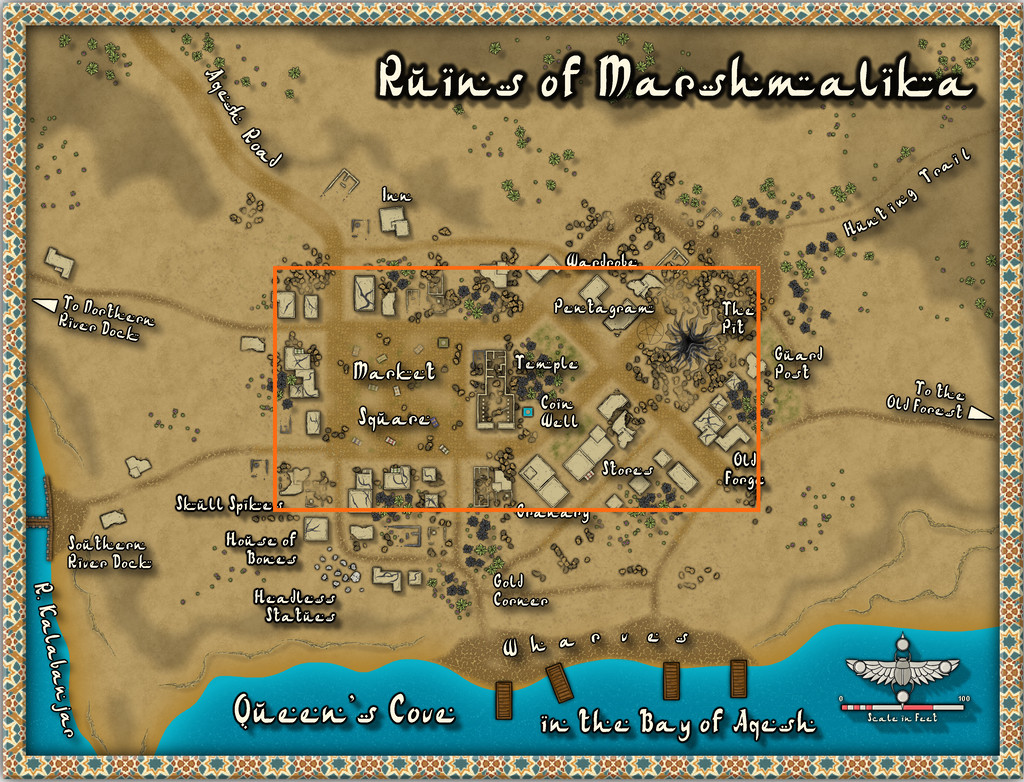
Most of the major features of the settlement, in fact, as that seemed appropriate. The only real change I made here was that the Temple was originally a group of large, partly or wholly ruined buildings, with trees and an open area in the adjoined block to its right. However, the Desert Oasis style comes with its own ruins, including this one, and it seemed a shame not to use it! The expanded areas were a mix of randomly-rolled options, with logical completions and expansions of roads and trails to fit the landscape around the settlement. Other ruined properties further from the centre aren't shown, as already buried by drifting sand, dust and ash, which is explained in the PDF and text files for the final Atlas version, along with what's going on at the various labelled sites. That House of Bones area is an especially unpleasant reminder that the place was invaded by ruthless folk who cared nothing for the local populace, incidentally (so those sensitive to such things should be warned).
I'm not sure if it's been all this thinking about warfare and ghosts, but my next port-of-call is (as randomly decided) to be on Mate Ora, southernmost of the islands in the Nga-Whenuatoto archipelago, a land where the dead walk, apparently. At least it's still in the southern tropics of Nibirum, so decently warm!
EDIT Feb 3: The eagle-eyed among you may have spotted there were missing internal lines in the Pentagram; images have now been corrected!

-
[WIP] Community Atlas, 1,000 Maps Contest: Villages in The Whispering Wastes of Haddmark, Peredur
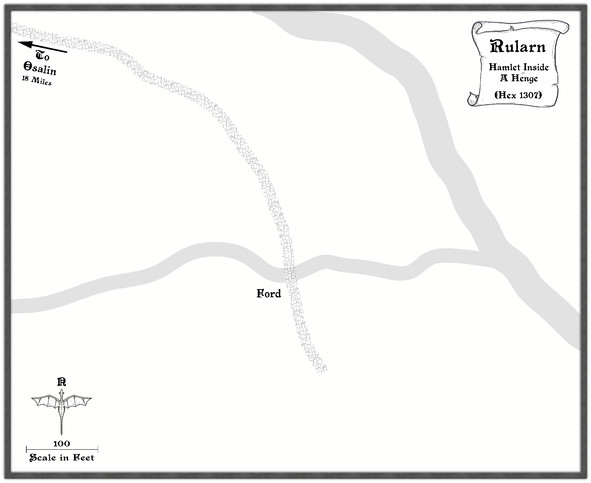
Hex 1307, Rularn: Instead of simply presenting the seventh map in this series briefly, as previously, it occurred to me in time to actually make some preparations for it, that this would also be a suitable point to illustrate how the maps in this set have been prepared. This is meant as a sort-of WIP topic, after all. And yes, this is a bit late to remember it!
As those who've followed some of my previous attempts at WIP topics here will know, I tend to work from hand-drawn sketches, scanned in and used as a base template for my CC3+ maps for the Atlas. These small settlement maps this time though have been done in a slightly different way, without a scanned-in bitmap to trace or adapt from.
That's in large part because of how the layouts for these villages and hamlets were arrived at, using the Shadowdark RPG random mapping systems. By rolling a few dice, and seeing where some lie in relation to one another on the tabletop once thrown, a basic settlement layout can be generated. I varied that system slightly, by drawing on other random tables in those rules to further detail some elements, and for the hamlet-sized places - such as Rularn - I reduced the options for how many features there could be in them.
This first stage generated the following information, including a sketch-idea for the map:
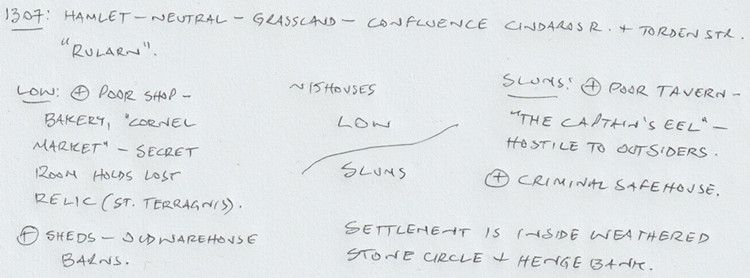
So there are two districts, on the north and south sides of the hamlet, with the keyword names "Low" and "Slums" having specific references in the rules for what tables to use to decide on the features in each. From these can be derived a number of points of interest, sometimes for the settlement as a whole. I've added notes based on the location already decided for Rularn from the Whispering Wastes overland map, and, based on the number of items in the settlement, a rough tally of houses for the whole place, generated using the old Judges Guild "Village 1" book, as noted back in the post about Ljungby Village above.
From this base, another rough sketch was prepared, using the Whispering Wastes drawing for the specific hex involved, to get an idea of how the various component parts might fit together:
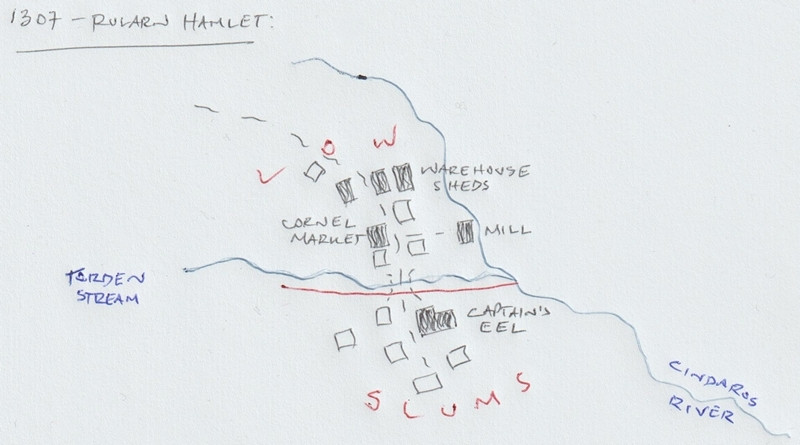
Rather than using this as a template, it's really just a loose idea at this stage. The reason the stone circle and henge bank haven't been added yet is because I need to see what the layout looks like in the CC3+ map first, and can then determine where exactly those will lie. The Mill, a specific addition here beyond what the random rolls have identified, might not survive at all, or might be moved, or converted to a windmill instead, say, to comply better with the stone circle feature. The line of the Cindaros River in the sketch is likely too close to the main settlement for everything to fit inside a particularly circular surround presently.
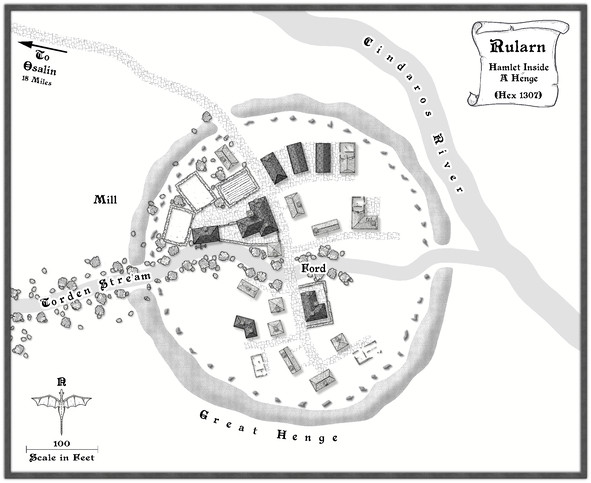
Moving next to the CC3+ mapping, I decided from the beginning that all these small settlements were going to be placed on identically-sized maps, 800 by 650 feet in size, determined using the sizes the various settlement-sized maps were for the Faerie City of Embra, referred to in the Bruga's Hold post earlier in this topic. The settlement itself would always be the main focal-point for the drawing, which would leave parts of the outlying areas available for a variety of additions or enhancements, including notes and elements such as the title, scalebar and compass pointer.
The first things to do included adding a title, dropping in the river lines, and the main road that connects elsewhere, with a label for that too. I put these basic names in so early to remind myself which map I'm doing, aside from other things! This also means I remember to check things like river and road widths from any map intended to connect, however distantly, with the current one. Sometimes these might not be the same - rivers tend to widen downstream, for instance, and roads don't need to stay identically-sized along their lengths either. However, this sets things up, which can always be changed later. These WIP map illustrations are deliberately under-sized compared to Forum norms, to clarify they're really only indicators of what was going on, rather than cluttering the topic up with images larger than is really needed for that.
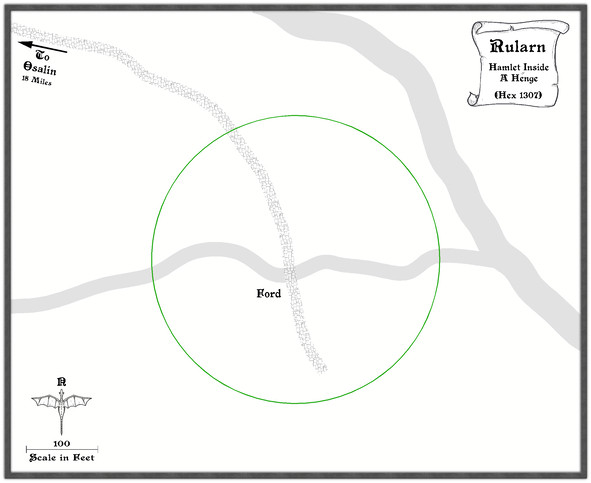
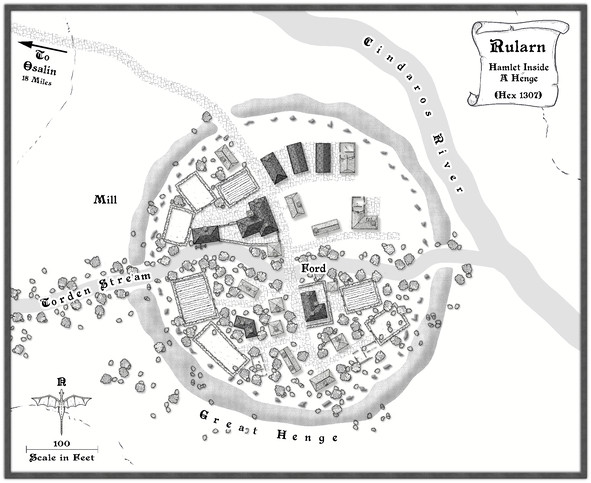
Ordinarily, I'd next add the highlighted buildings for shops, etc., as these are typically the larger properties, or the ones that better-define the settlement's overall layout, and other notable features such as any market place. Here though, everything has to be constrained by an outer henge bank and ring of standing stones, so I set up a new TEMPORARY Sheet and Layer, and drew in a template circle on those to show where it was meant to be (and after a bit of trial and error, it must be said):
With that prepared, the identified properties can be added:
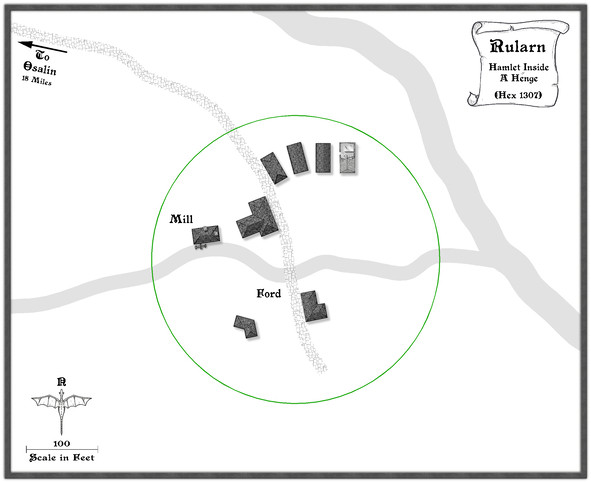
Since this settlement is at the end of the road, and had already been suggested as rather run-down, that seemed the ideal chance to make use of a few of the ruined buildings in this style, one of which - as used - had the form suitable for a rectangular warehouse-like barn/shed. Thus that shape and size became the template for the drawn properties alongside it, apparently in a better state of repair. I've also brought in a copy of the water mill already featured elsewhere in this series, although as we can see, it's now on the lesser of the two rivers here, to keep it within the henge-ring.
Adding the rest of the houses, with a few ruined ones, fleshes-out the settlement, after which more smaller roads and paths to the doors can be added, together with some larger expanses of paved yards, by the mill and baker's, the inn and the warehouse sheds, including a few walls:
It may not be that obvious at this smaller resolution, but I've also added chimneys to various of the properties. After which, the henge can be added, and the temporary green circle hidden (not deleted for now, just in case!). Having already experimented with the Solid 10 bitmap fill and some lighted bevel effects for the barrow mounds in the Osalin map previously, I simply reused that again here, copying the effect over to a new HENGE sheet. Somewhat to my surprise, it looked fine without further tweaking, although the colouring overall was too close to the rivers, so I decided to add something by copying the henge polygons onto the LAND FEATURES sheet and then changing their fill style first to use the CA100 Grass texture (which was OK, but not ideal), and then to what had been problematical earlier in the sequence of villages, the Road Dirt fill, which this time gave enough texturing "under" the semi-transparent henge polygons to help the henge segments stand out as NOT rivers (or ribbon lakes)!
With the henge in place, now just the standing stones were needed, and a similar technique could be applied to create those, a simple polygon with a suitable lighted bevel effect, although I did also darken up the shadows to help them stand out more, as at this scale they needed to be small. I opted for the bitmap Solid 30 fill style for them, again to give them better definition. Although at this reduced size, they appear as little more than dots, this view shows the northern half of the ring completed:
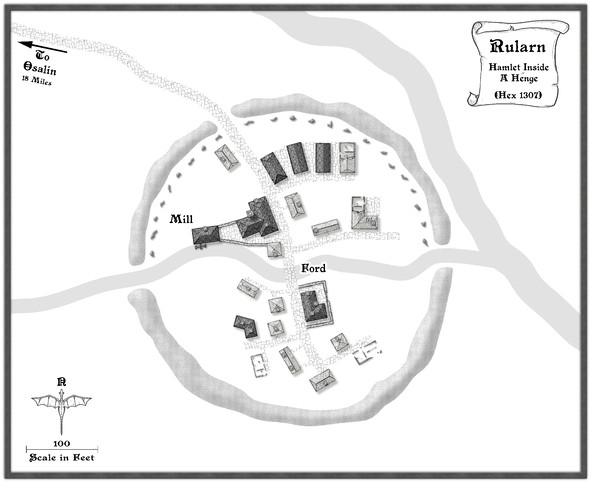
After which things started to move on apace, completing the standing stones' ring, then adding some labels, and starting to fill-in the gaps, with a few more changes. This shows a typical partway-through shot of the process. The Mill label has been moved to add some small fields and other vegetation as well.
From here, things tend to progress more organically, as fresh ideas surface along the way for how to make the place feel more "alive".
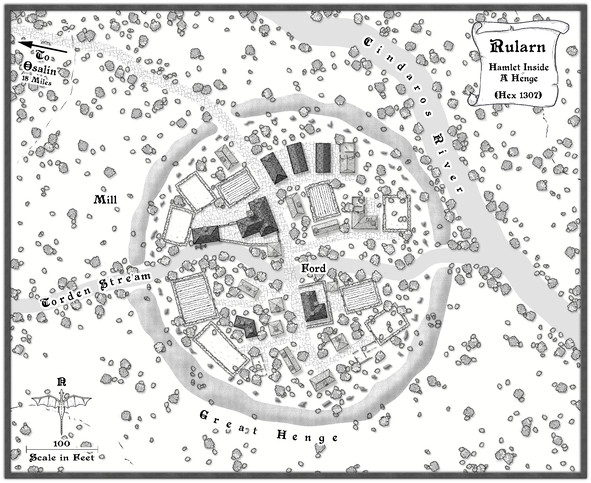
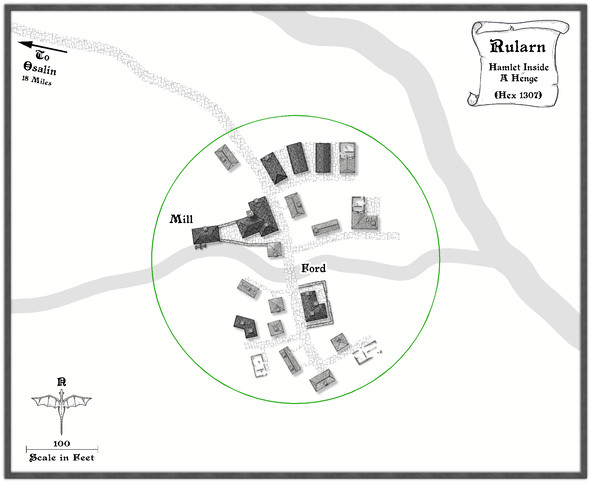
Followed by the rest of the labels, as the final map (now at its full Forum resolution):
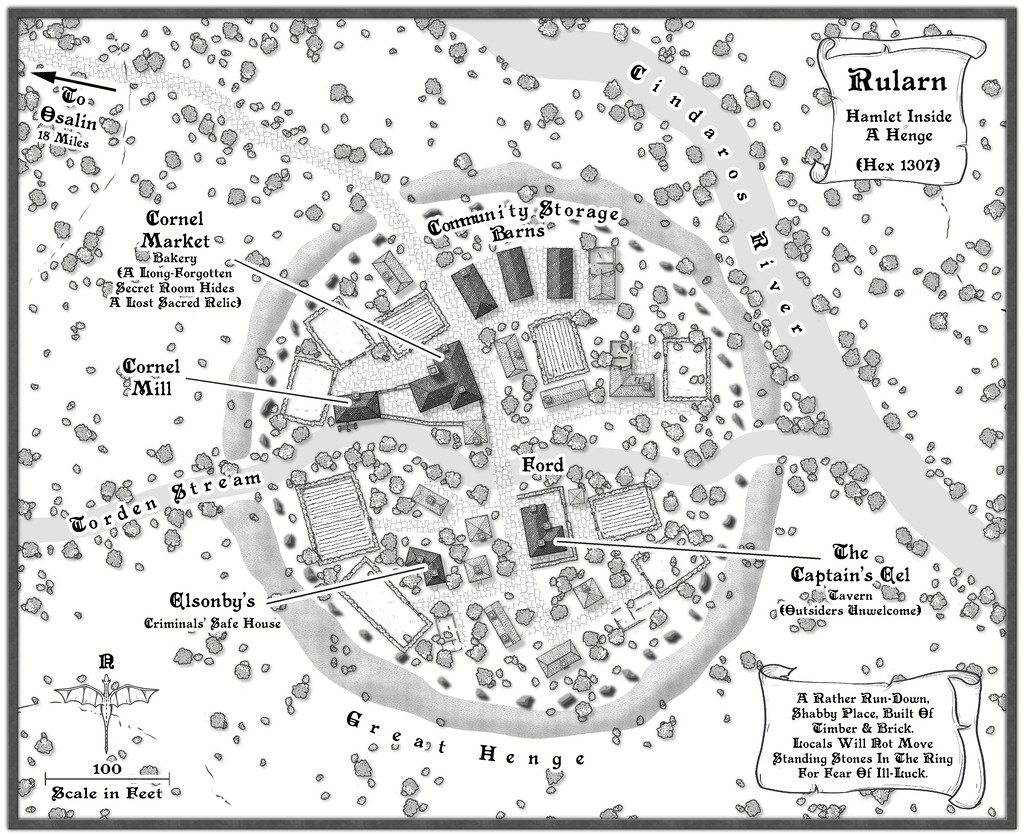
One further minor tweak was made to the shadows on the standing stones, to darken them up more, and help them stand out better against the vegetation, with a new scroll and a further note or two on the nature of the settlement.
And suddenly, there are only three more settlements to go!
