


Wyvern
Wyvern
About
- Username
- Wyvern
- Joined
- Visits
- 3,303
- Last Active
- Roles
- Member
- Points
- 5,647
- Rank
- Cartographer
- Badges
- 24
Latest Images

-
Community Atlas: Petroc Hills area, North Central Alarius
The basis behind the Inkwell Ideas setting that I wanted to reuse here was as a sort-of druidic experimental station, a series of caves magically enhanced to allow the growing of normal surface food crops underground, protected from conditions outside, and defended by a group of willingly-summoned elementals. This seemed very suitable for this area, with its short summers and long winters, and although not illustrated specifically on the map, the notes for the area indicate there are a lot of other small caves across the Petroc Hills, which might also be used in future, if the experiment here works. It's all being done in secret for now though, in case something goes wrong, hence the defences. I tweaked a few items, added one or two more, and decided, partly based on the general layout, that it had originally been one of the old Hill Dwarf mines of the district. It's often amazing how much just seems to come together from a couple of initial thoughts in this way. I even contemplated having it be set-up just for growing grain crops for a different flavour of whisky at one point, but decided against that eventually. If they can grow the food underground, that'll leave more field space for cereal crops to make whisky outdoors, after all!
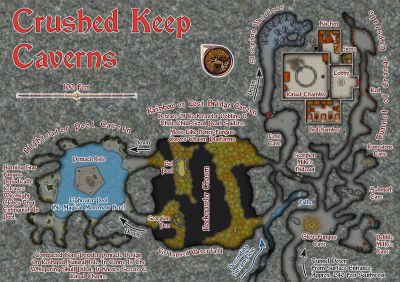
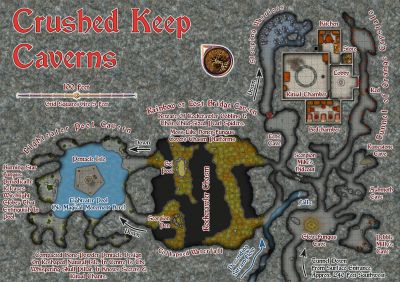
As indicated earlier, I'd be opting for the Jon Roberts Dungeon style from Annual 54 for the mapping of the Caverns, and although I had to make use of a couple of DD3 symbols to round-out what was needed, most of what was required could be found, or repurposed, from that style alone. So to the map:
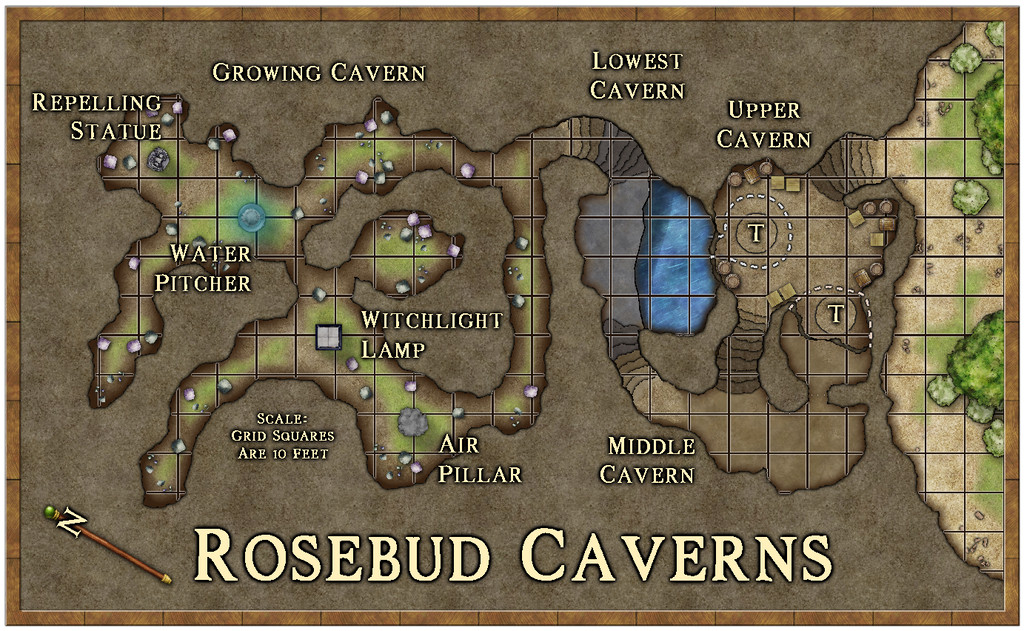
The earthy colouring worked to reinforce the whole "druidic growth" concept, and it's a style that works well in showing what's outside and inside, as having greenery, bushes and trees available. To keep the interior clear enough for GM use though, I decided against adding specific plants there, just some fungi (which are one key aspect of the Growing Cavern area), and also went with a quite strong scaling grid, as distances here can be important. I continued the grid over the water, because half of Lowest Cavern is underwater, and characters could well end up stuck there (the underwater areas including the annexe chamber beneath Upper Cavern - the dashed white lines show bits of the lower caves under Upper Cavern). Those circled "T's" in Upper Cavern are indeed rotating Dwarf-made round trapdoors, dropping down to the barred-cell cave off Middle Cavern, and into the plunge-pool off Lowest Cavern. In Growing Cavern, the four labelled statue-like features are the magical items that keep the place functioning, as explained in the map notes, and which again have vaguely elemental aspects to them.
Probably the biggest mapping challenge was constructing the steps, which did start to feel a little as if they were having to be carved from the native stone by hand for a while! Each has to be on a separate sheet to enable the effects on them to be adjusted to create the illusion of showing which are higher and lower, with the added pain of trying to hide the dark glow at the "back" edge of the top step. They're not perfect, but to my eye at least, they seem perfectly functional to show what they are on the map.
One further troublesome aspect was the abysmally slow redraw times when using the "Trace" command here, because the caves are all drawn as fractal polygons. For reasons I won't pretend to understand, the command insisted on repeatedly following the entire Caverns outline every time it was used, regardless of which way I'd told it to go, or how small an area I was trying to trace. There wasn't any choice though, as aside from needing different floor textures in places, I had to create masks to Color Key cut-out the unneeded segments of the grid, due to the way caves are drawn in this style. Worked in the end, but quick it ain't!
A useful feature of the Inkwell Delver dice set is that one of the six dice is designed to show entrances to the subterranean systems. So for the first time in this mapping project, rather than simply devising a suitable way in to the dungeon or caves separately, the first segment of this map - from the exterior through to that first long, straighter, northeast-southwest passageway in Growing Cavern - came directly from the dice design. We'll get the chance to see another of these entrances in action next time.
As for next time, a new continent beckons, the largest on Nibirum, Doriant, and a location somewhere in the Duin Elisyr region...


-
Community Atlas: Embra - Villages
The western village of Embra - Evenside carries things to an even stranger place, now with a "castle", Caer Sidi, that is really just an elaborate stone fence around an open field! The Clack here isn't a stream, but a series of ponds linked by marshes that have a couple of bridges over the swampier spots. There's also a huge orchard, and a second dry valley with a scatter of marshy ponds along it too:
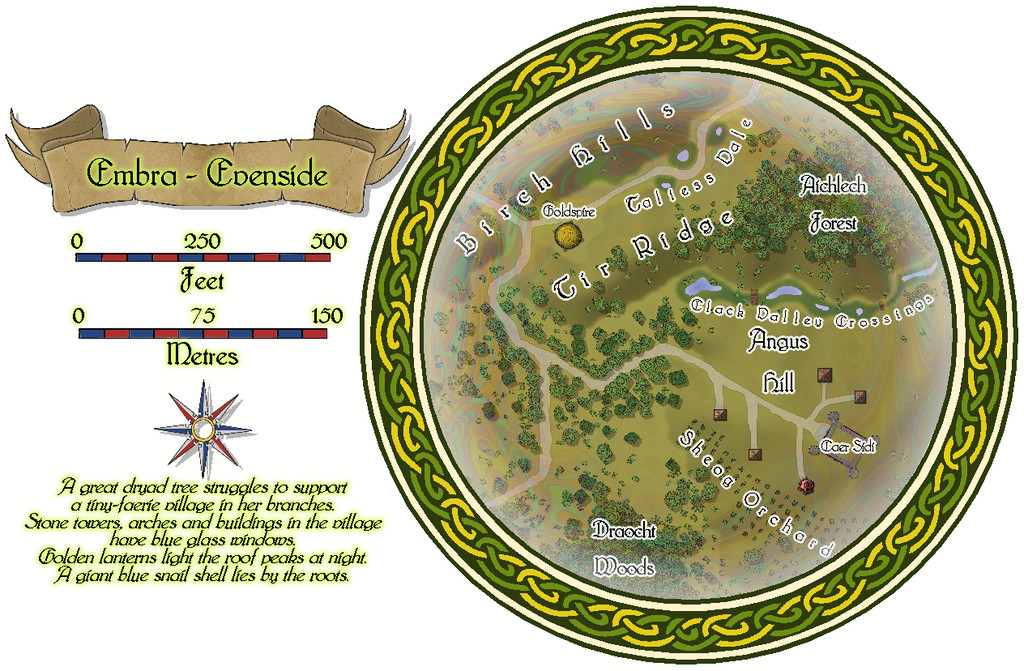
This is one map which I think especially benefits from a means to help identify which mapped items are genuine buildings:


![[Deleted User]](https://secure.gravatar.com/avatar/c75d9a245b74d9c59be0999ea81ca541/?default=https%3A%2F%2Fvanillicon.com%2F92add7f8c954488718110edc4896ad39_200.png&rating=g&size=200)

-
Community Atlas competition entry: The Summer Palace of the Winter Queen
Thanks Quenten! I started trying to analyse what the influences had been on this set, and while some were obvious enough, the more I thought it over, the more came to mind, mostly from folklore, mythology and fantasy fiction (which latter tends to rely heavily on both the former, of course). Plus as I said back when I started mapping "my" bit of Alarius a couple of years back, I've been working on parts of what was to go into that for decades, and the same is true here too, as essentially another part of the same thing.
Meanwhile, back to Palace 8, which is finally completed. This is it:
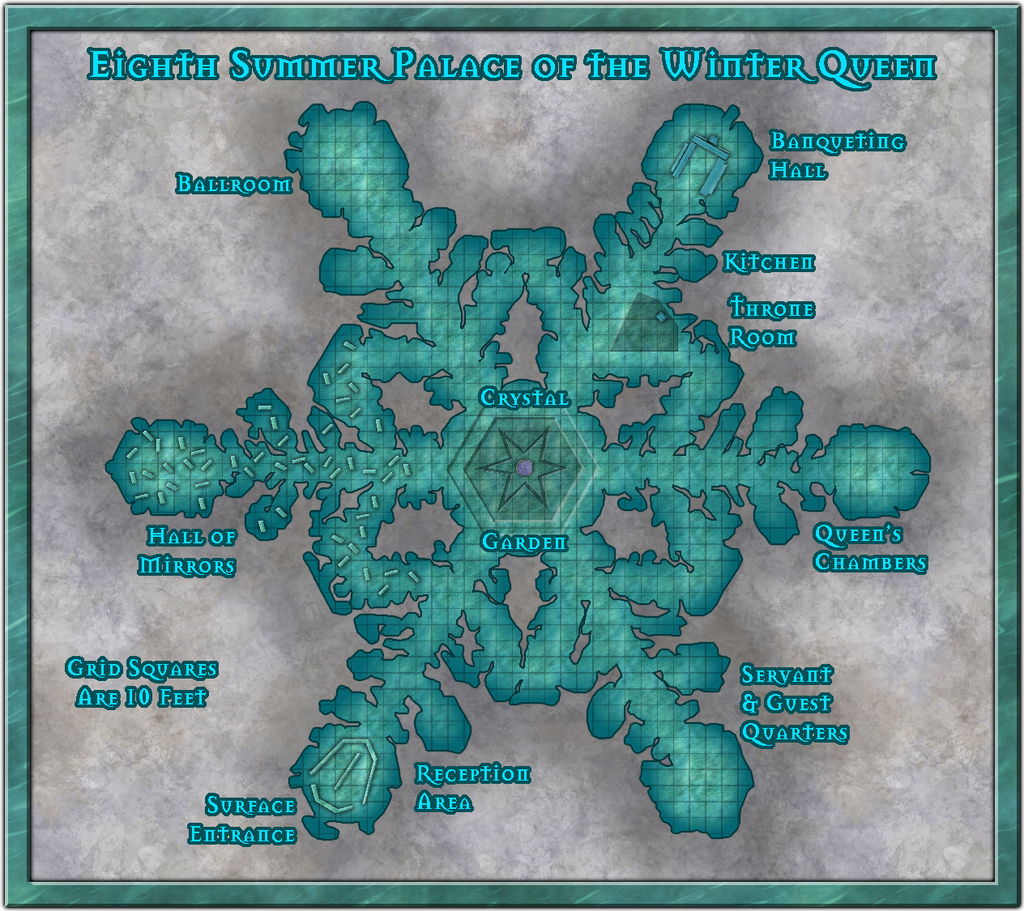
There have been a number of additions and amendments, mostly of a cosmetic nature, beyond the anticipated scattering of symbols and other internal additions, and the labelling, of course. The most substantial change was probably to reduce the overall size of the map somewhat, as the whole felt a little unbalanced at the top and base of the drawing once everything had been added. That was a bit fiddly, because there are always quite a number of entities to amend on the Map Border and Screen Sheets, as well as things like the Background Sheet, whose rectangle was also then too large.
I then had to change the fill for the frame. For all it might be thought a little incongruous as not having a very icy/snowy look, I rather liked the default wood-block pattern on the earlier version, and it looked a serious contender to remain, right up until the point where I adjusted the size of said frame. At which point, the lower border (only) suddenly had a dark horizontal line running right through it, because of the way the fill fits itself into drawings at the scale it had. And that quickly became A Distraction, so sadly it had to go.
The new fill for the frame is Water Green from this CA54 style, scaled-up to prevent it tiling, and holding up remarkably well in doing so, I thought. I was really just experimenting with it, but as soon as it dropped in with the light Bevel Effect, I knew it had to be The One!


-
Ferraris Style MERGE Layer Problem
I discovered when using the Ferraris Style (CA158) over the weekend that clicking any of the symbol catalogue icons, except the Minerals/Mountains one, automatically changes the Layer to MERGE. Clicking to change the symbol catalogue by the manual system (the button between the "Options..." button and the currently-visible symbols) does not force this change however, keeping the Layer as whatever is currently chosen.
For anyone unaware, having any new items added to the MERGE Layer is an extraordinarily bad idea, as this Layer is part of what helps control the map effects. Unfortunately, it's very easy to accidentally do this because of this unexpected defaulting with this style.
Luckily, I spotted it before I'd added more than a few symbols, although it took a while to discover it affected all but one of the catalogue icons, and it was easily remedied, but ths behaviour is something prospective users should be aware of!


-
Community Atlas competition entry: The Summer Palace of the Winter Queen
Thanks folks!
@Fersus - Yes, I wondered about a hexagonal grid. However, over the past year, I've been involved in discussions about the use of movement grids in RPGs more generally elsewhere, and the consensus has been almost exclusively for square grids (or occasionally none at all). They're such a feature of most published dungeon maps, it's hard to break away from that, I suspect. Plus because hexes don't scale equally in all dimensions, a square grid works better for estimating distances for the GM by-eye.
Given the whole point about participating in the Atlas, and contests like this too, is to try different things, at least from time to time, my intention was to try to make each of the ten Palace maps different. So for the second one, I picked the Old School Blue style from CA12 (also known as the Create Your Own Style pack). Blue, ice, seemed apt!

For continuity, I've decided to stick with the Mason Serif Bold font that comes with CC3+, however.


-
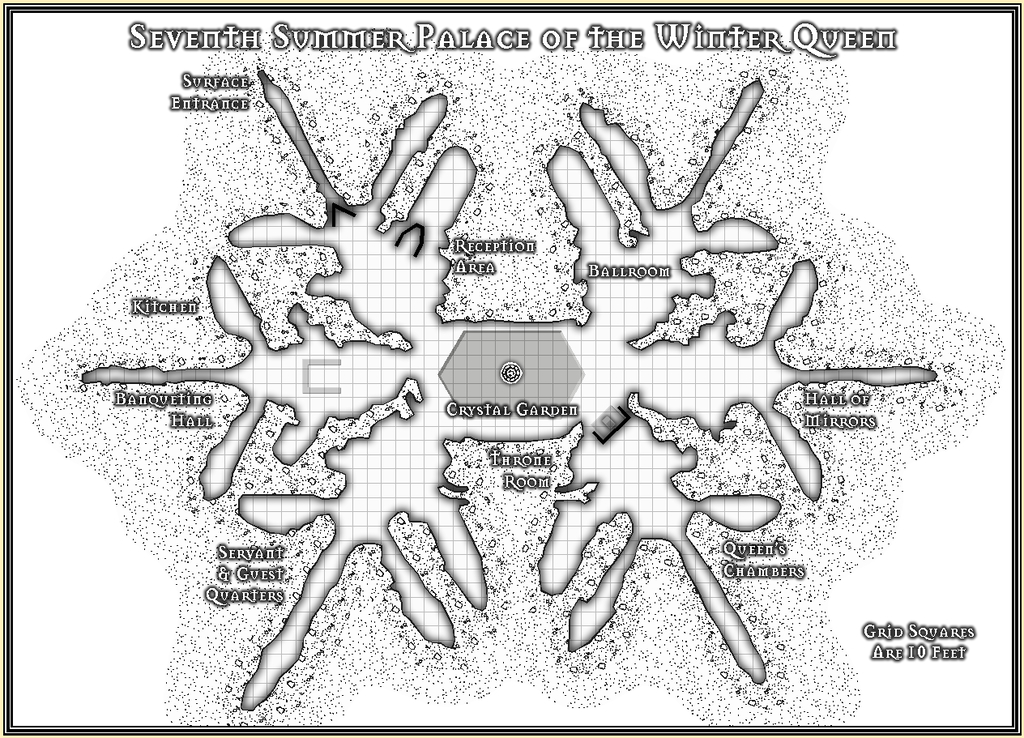
Community Atlas competition entry: The Summer Palace of the Winter Queen
On a roll, so Palace 7 was also done with a black-and-white style package, this time the Inked Dungeons one from CA160 last April, the first time I've used this. I must admit I wasn't too sure about it at first, as it uses a quite "busy" looking fill to mask the outside of the subterranean walls. However, when I selected the various snowflake images for the Palace designs, this flake was probably the most obvious to pick, because it looked so different to many of the others, as elongated on one axis. That in turn set me thinking about larger ice crystals, as the central Crystal Garden area here was a single huge ice crystal on the original image, so far as I could tell. So now this Palace has unusually large ice crystals visible along and buried in its translucent outer walls as well, simply because the style pack set me thinking while I was drawing the map!
In addition, Inked Dungeons comes with relatively few symbols, which isn't so much of a problem with these large-area Palace drawings, since as I've noted above, there can be problems where the symbols have too much interesting surface detail from other style packs. So I used only one, actually designated as a brazier, but repurposed here as its opposite - the fountain in the Crystal Garden - and just drew the few other more obvious features, as has been the case for many of the other Palaces.
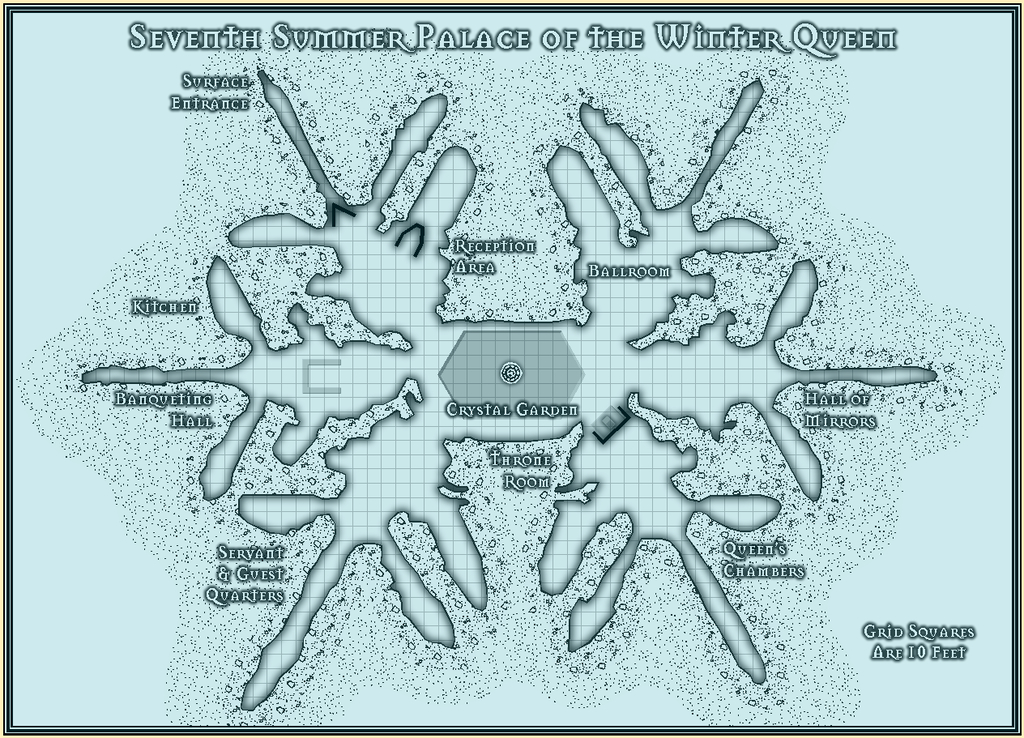
The final step once more was to offer the option of a simple blue cover to colour the whole map, as previously, intended to be a toggle option in the Atlas version, and as with Palace 6, added using a blue rectangle with a strong Transparency Effect. Because it stops me panicking when I open the file and find it's just a blank white emptiness otherwise (see the Palace 5 notes above!).
-
Maps of Anglo-Saxon England
When hunting for maps today to assist a colleague on an ancient history forum, I happened upon this page on Kemble: The Anglo-Saxon Charters Website, which has links to a host of beautiful, sometimes annotated, hand-drawn, black-and white maps of Anglo-Saxon England, all done by the cartographer Reginald Pigott for various books in the early 21st century. They're especially valuable, as some show the established, or best-estimated, extents of features like forests, marshlands, and coastlines, many of which have altered since the 7th to 11th centuries CE. They're free to download for personal use, and are well worth a look.


-
Dead trees. Spectrum overland [Solved]
It looks like there's a problem with the macro that operates with this drawing tool under Terrain Default, Woods Dead. The first line is:
SYMFILLLOAD @system\fillers\CA163 Snow Woods.symfill
If you change the end of the line to read:
CA163 Dead Woods.symfill
instead, that should solve the problem.
To do this, click on the Overland drop-down menu at the top left of your CC3+ screen, and choose All Map Drawing Tools... That will bring up the Select drawing tool pane. Click the Advanced button at the bottom left of that pane.
Scroll down the Tool name list to find the Terrain Default, Woods Dead tool and click on the name. Just in case you make a mistake at this point (easily done!), click the New button and give the tool a recognisable, but different, name, like "Terrain Default, Woods Dead 2". Click OK.
Now, in your "new" tool, click the Command to execute button. This will bring up the macro that runs with this tool in a separate pane. Change the "Snow Woods" of the first line to read "Dead Woods" instead. Don't change anything else! Click OK.
Then click Save, so the change you just made will work with the tool, and then click OK. You can now draw with the corrected Woods Dead tool. I hope ?
I imagine this will be amended when the second part of the Spectrum Overland set is released in the Cartographer's Annual next month.

-
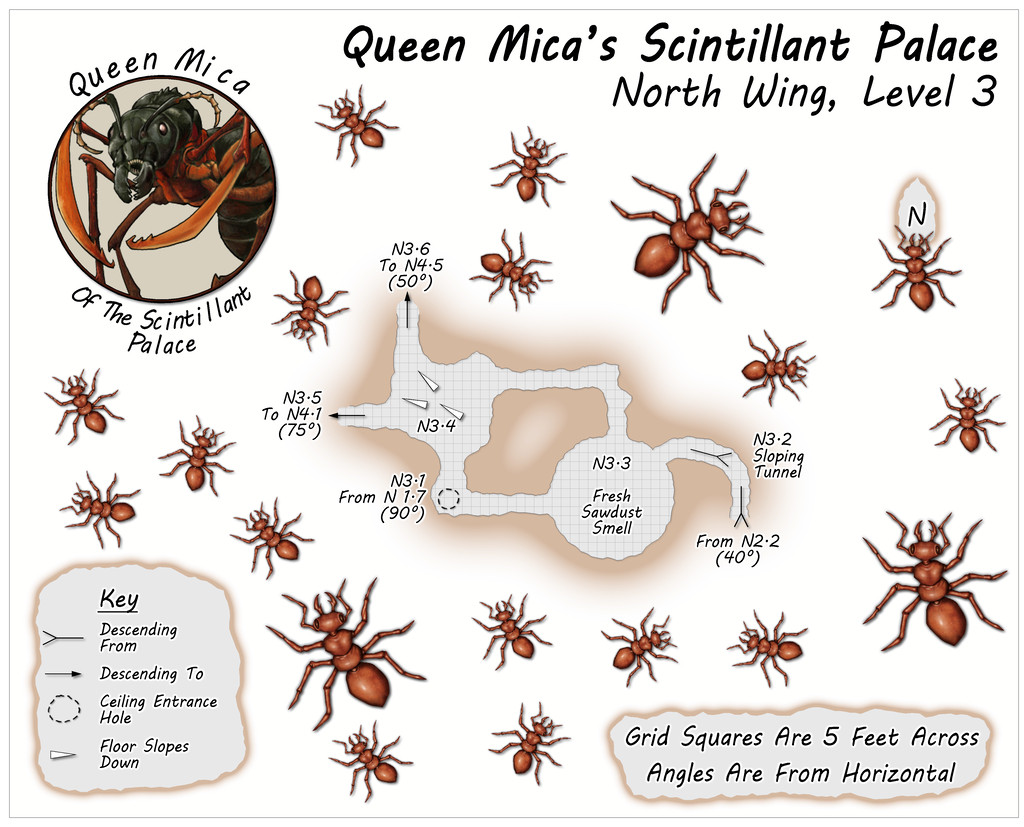
Community Atlas: Queen Mica's Scintillant Palace
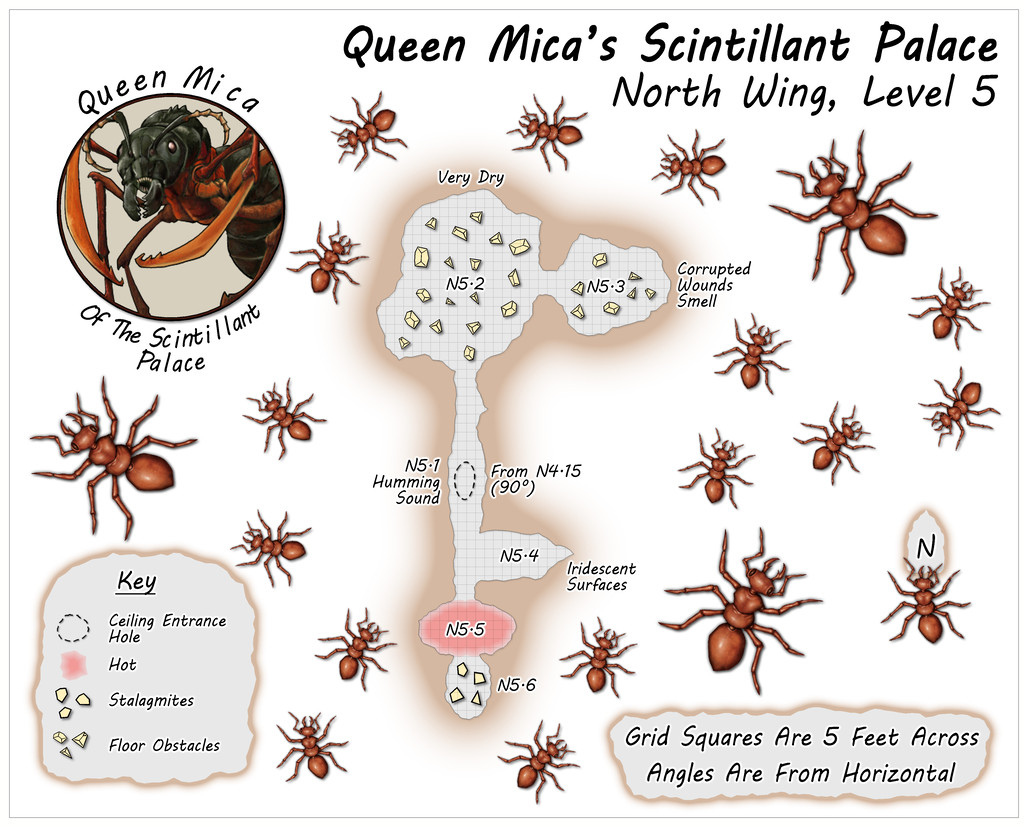
Circling clockwise from the West Wing, the North Wing is the most vertically-extensive of all the Wings, with five separate Levels, just like the central main Palace structure. The layouts here derived from a mixture of images on the Dwarven Forge Discord, and one of the official weekly "On The Anvil" livestreams on Twitch from January 2021 that featured another extensive Burrows build (go to 2h15m or so to see the final design). This combination led to an interestingly complex grouping of tunnels and chambers that, because of the way maps can be linked in the Community Atlas, meant both the small first two Levels were placed on the same map, as Level 1 here connects with both Levels 2 and 3, while Level 2 links back to 1 and on to 3 as well. This also resulted in a means of linking into Level 1 from the Palace by a tunnel that passes above the ceiling of two chambers on that Level, before dropping vertically into one of them. Thus, the North Wing:
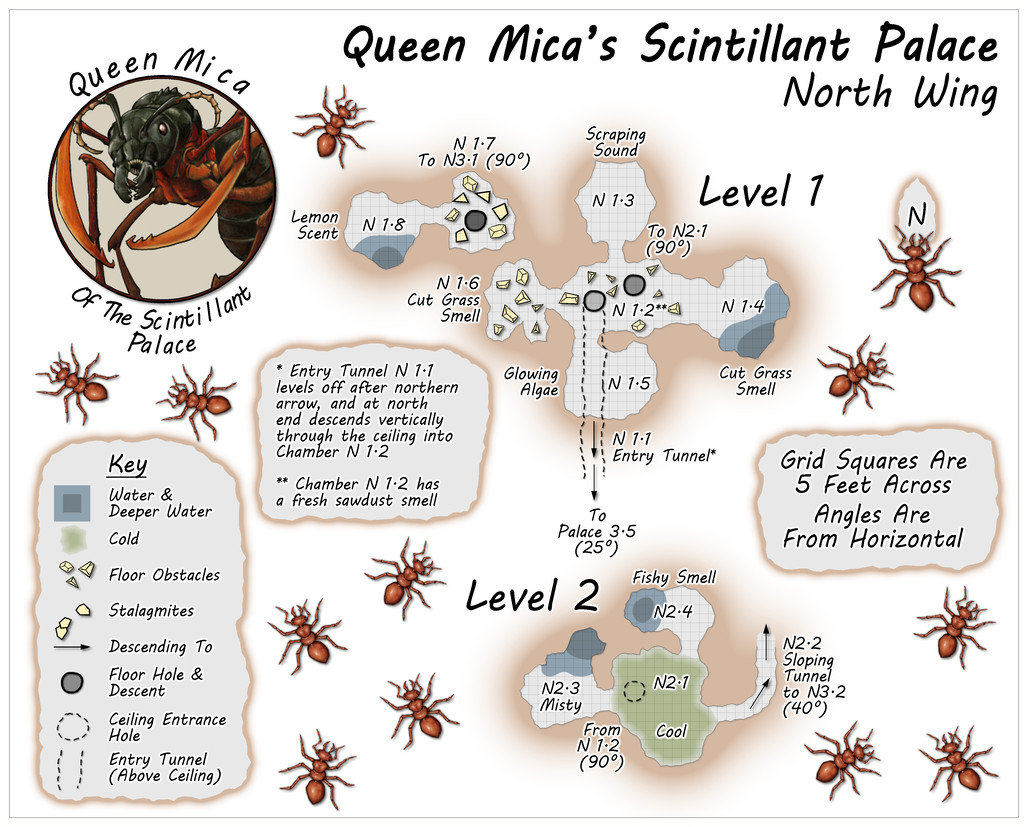
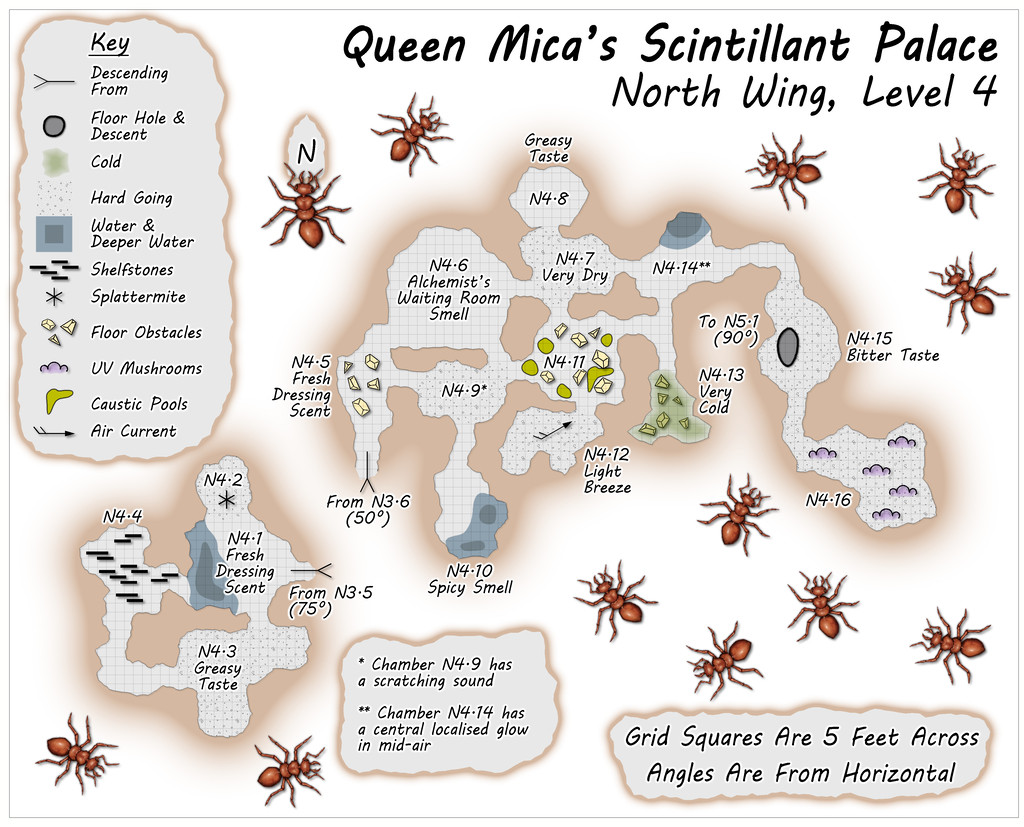
Some particularly unusual random items were rolled-up for Level 4, adding extra interest to this part of the colony beyond its verticality.

-
[WIP] Community Atlas, 1,000 Maps Contest: Villages in The Whispering Wastes of Haddmark, Peredur
Hex 1307, Rularn: Instead of simply presenting the seventh map in this series briefly, as previously, it occurred to me in time to actually make some preparations for it, that this would also be a suitable point to illustrate how the maps in this set have been prepared. This is meant as a sort-of WIP topic, after all. And yes, this is a bit late to remember it!
As those who've followed some of my previous attempts at WIP topics here will know, I tend to work from hand-drawn sketches, scanned in and used as a base template for my CC3+ maps for the Atlas. These small settlement maps this time though have been done in a slightly different way, without a scanned-in bitmap to trace or adapt from.
That's in large part because of how the layouts for these villages and hamlets were arrived at, using the Shadowdark RPG random mapping systems. By rolling a few dice, and seeing where some lie in relation to one another on the tabletop once thrown, a basic settlement layout can be generated. I varied that system slightly, by drawing on other random tables in those rules to further detail some elements, and for the hamlet-sized places - such as Rularn - I reduced the options for how many features there could be in them.
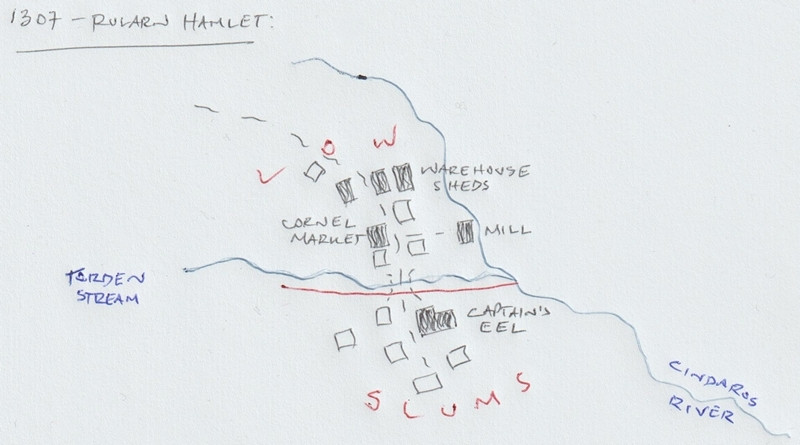
This first stage generated the following information, including a sketch-idea for the map:
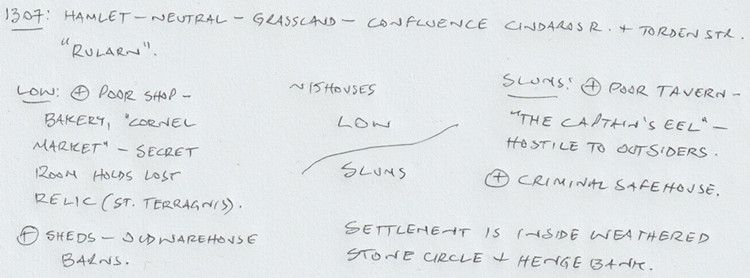
So there are two districts, on the north and south sides of the hamlet, with the keyword names "Low" and "Slums" having specific references in the rules for what tables to use to decide on the features in each. From these can be derived a number of points of interest, sometimes for the settlement as a whole. I've added notes based on the location already decided for Rularn from the Whispering Wastes overland map, and, based on the number of items in the settlement, a rough tally of houses for the whole place, generated using the old Judges Guild "Village 1" book, as noted back in the post about Ljungby Village above.
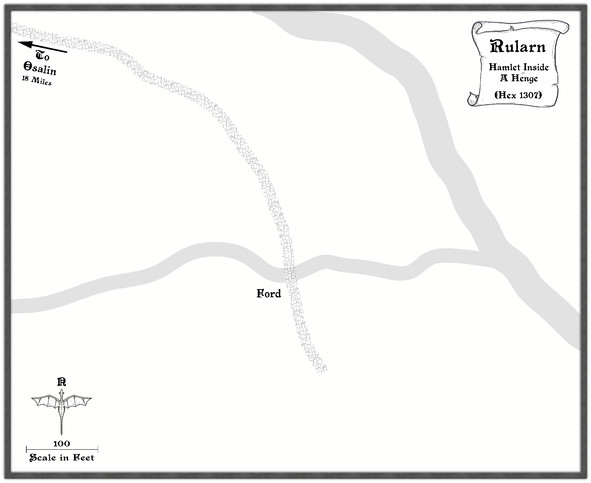
From this base, another rough sketch was prepared, using the Whispering Wastes drawing for the specific hex involved, to get an idea of how the various component parts might fit together:
Rather than using this as a template, it's really just a loose idea at this stage. The reason the stone circle and henge bank haven't been added yet is because I need to see what the layout looks like in the CC3+ map first, and can then determine where exactly those will lie. The Mill, a specific addition here beyond what the random rolls have identified, might not survive at all, or might be moved, or converted to a windmill instead, say, to comply better with the stone circle feature. The line of the Cindaros River in the sketch is likely too close to the main settlement for everything to fit inside a particularly circular surround presently.
Moving next to the CC3+ mapping, I decided from the beginning that all these small settlements were going to be placed on identically-sized maps, 800 by 650 feet in size, determined using the sizes the various settlement-sized maps were for the Faerie City of Embra, referred to in the Bruga's Hold post earlier in this topic. The settlement itself would always be the main focal-point for the drawing, which would leave parts of the outlying areas available for a variety of additions or enhancements, including notes and elements such as the title, scalebar and compass pointer.
The first things to do included adding a title, dropping in the river lines, and the main road that connects elsewhere, with a label for that too. I put these basic names in so early to remind myself which map I'm doing, aside from other things! This also means I remember to check things like river and road widths from any map intended to connect, however distantly, with the current one. Sometimes these might not be the same - rivers tend to widen downstream, for instance, and roads don't need to stay identically-sized along their lengths either. However, this sets things up, which can always be changed later. These WIP map illustrations are deliberately under-sized compared to Forum norms, to clarify they're really only indicators of what was going on, rather than cluttering the topic up with images larger than is really needed for that.
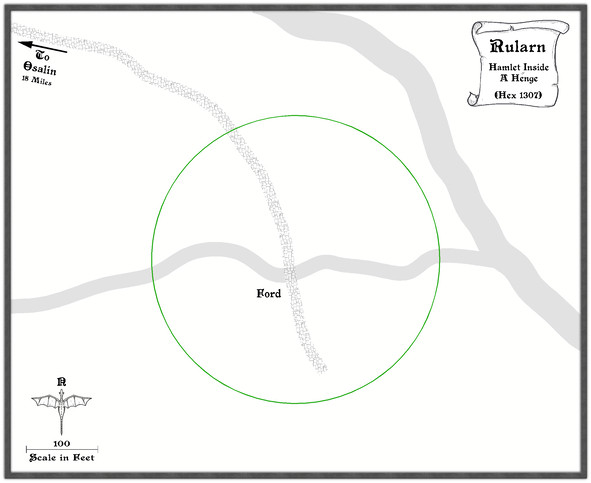
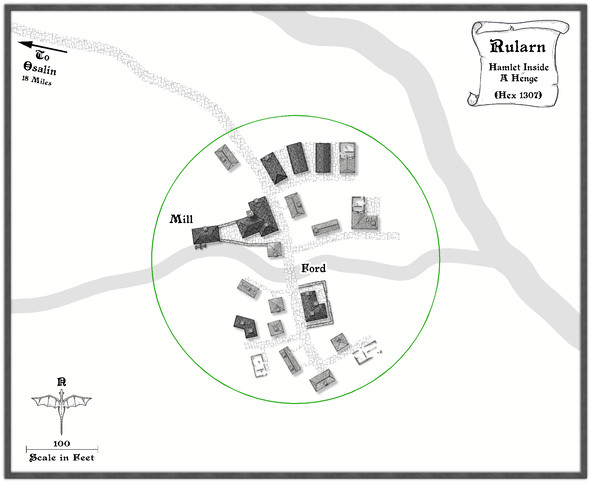
Ordinarily, I'd next add the highlighted buildings for shops, etc., as these are typically the larger properties, or the ones that better-define the settlement's overall layout, and other notable features such as any market place. Here though, everything has to be constrained by an outer henge bank and ring of standing stones, so I set up a new TEMPORARY Sheet and Layer, and drew in a template circle on those to show where it was meant to be (and after a bit of trial and error, it must be said):
With that prepared, the identified properties can be added:
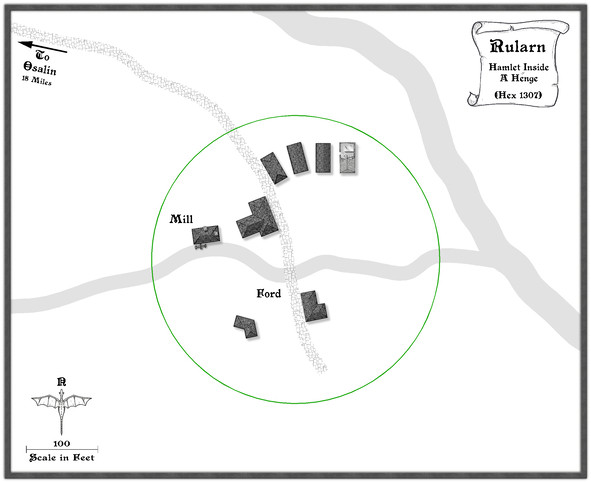
Since this settlement is at the end of the road, and had already been suggested as rather run-down, that seemed the ideal chance to make use of a few of the ruined buildings in this style, one of which - as used - had the form suitable for a rectangular warehouse-like barn/shed. Thus that shape and size became the template for the drawn properties alongside it, apparently in a better state of repair. I've also brought in a copy of the water mill already featured elsewhere in this series, although as we can see, it's now on the lesser of the two rivers here, to keep it within the henge-ring.
Adding the rest of the houses, with a few ruined ones, fleshes-out the settlement, after which more smaller roads and paths to the doors can be added, together with some larger expanses of paved yards, by the mill and baker's, the inn and the warehouse sheds, including a few walls:
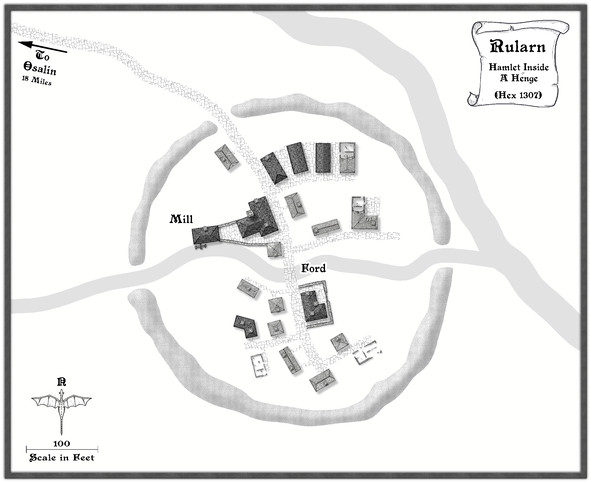
It may not be that obvious at this smaller resolution, but I've also added chimneys to various of the properties. After which, the henge can be added, and the temporary green circle hidden (not deleted for now, just in case!). Having already experimented with the Solid 10 bitmap fill and some lighted bevel effects for the barrow mounds in the Osalin map previously, I simply reused that again here, copying the effect over to a new HENGE sheet. Somewhat to my surprise, it looked fine without further tweaking, although the colouring overall was too close to the rivers, so I decided to add something by copying the henge polygons onto the LAND FEATURES sheet and then changing their fill style first to use the CA100 Grass texture (which was OK, but not ideal), and then to what had been problematical earlier in the sequence of villages, the Road Dirt fill, which this time gave enough texturing "under" the semi-transparent henge polygons to help the henge segments stand out as NOT rivers (or ribbon lakes)!
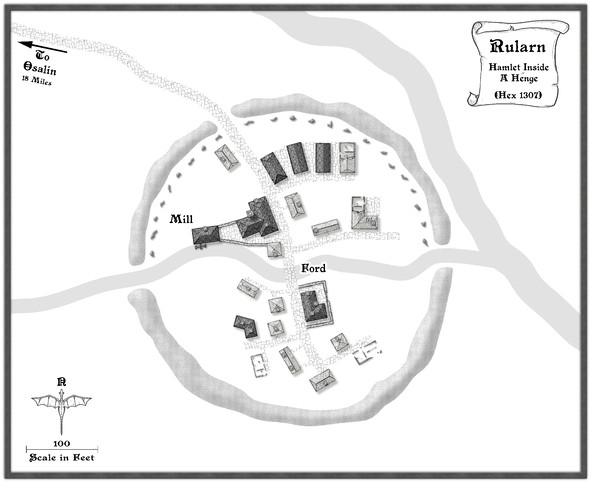
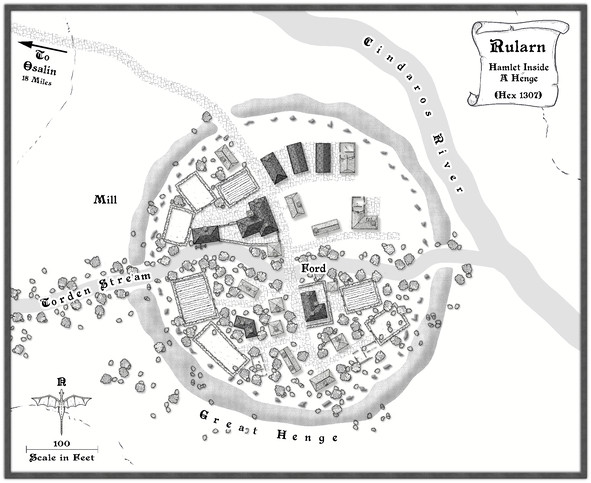
With the henge in place, now just the standing stones were needed, and a similar technique could be applied to create those, a simple polygon with a suitable lighted bevel effect, although I did also darken up the shadows to help them stand out more, as at this scale they needed to be small. I opted for the bitmap Solid 30 fill style for them, again to give them better definition. Although at this reduced size, they appear as little more than dots, this view shows the northern half of the ring completed:
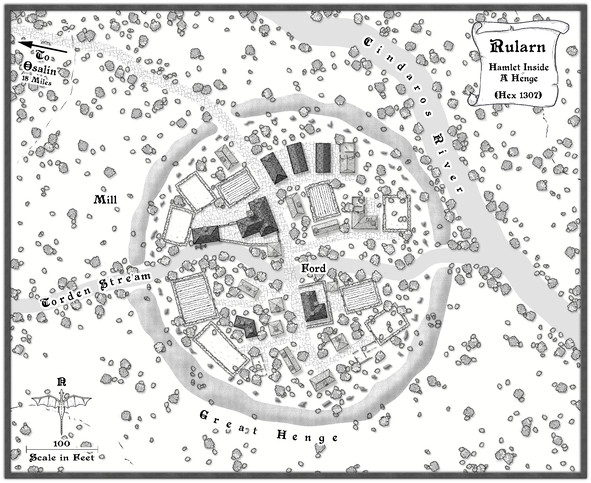
After which things started to move on apace, completing the standing stones' ring, then adding some labels, and starting to fill-in the gaps, with a few more changes. This shows a typical partway-through shot of the process. The Mill label has been moved to add some small fields and other vegetation as well.
From here, things tend to progress more organically, as fresh ideas surface along the way for how to make the place feel more "alive".
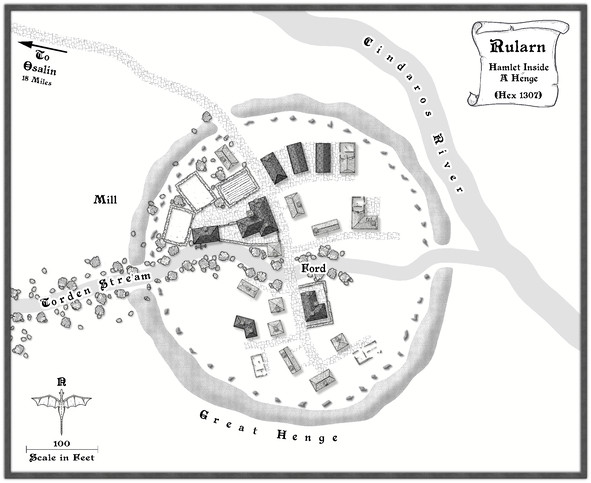
Followed by the rest of the labels, as the final map (now at its full Forum resolution):
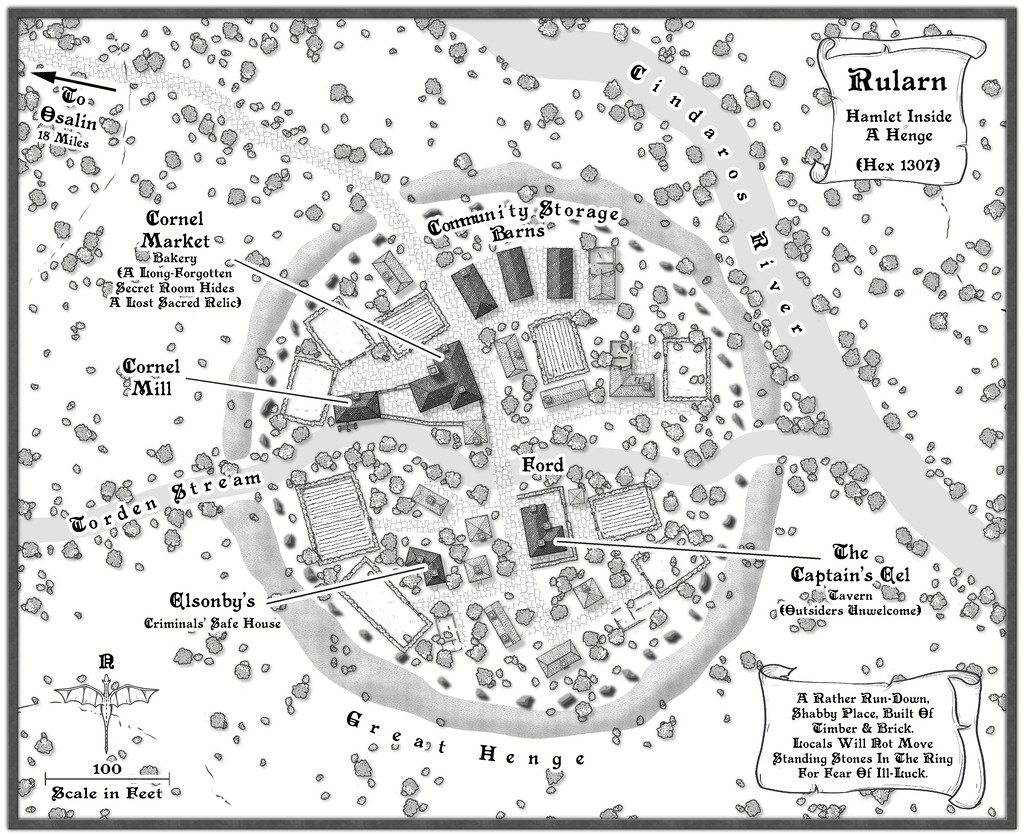
One further minor tweak was made to the shadows on the standing stones, to darken them up more, and help them stand out better against the vegetation, with a new scroll and a further note or two on the nature of the settlement.
And suddenly, there are only three more settlements to go!

