


Wyvern
Wyvern
About
- Username
- Wyvern
- Joined
- Visits
- 3,266
- Last Active
- Roles
- Member
- Points
- 5,584
- Rank
- Cartographer
- Badges
- 24
Latest Images
-
Community Atlas: Embra - Villages
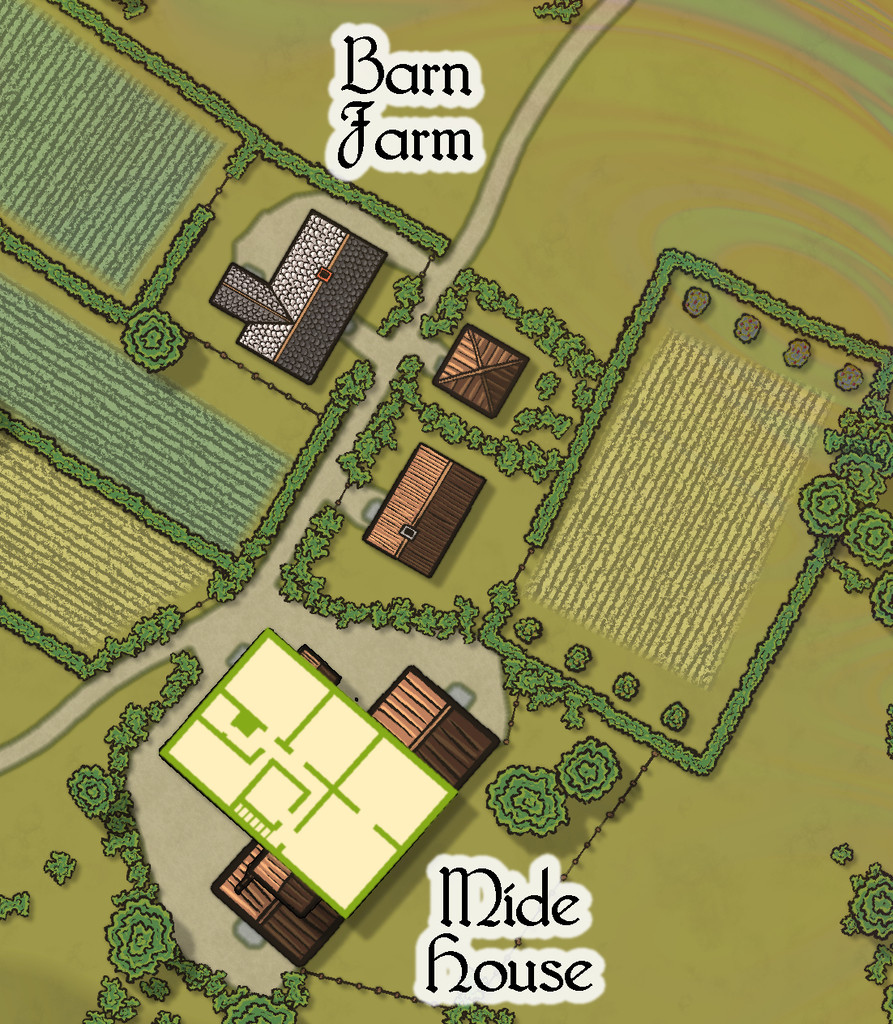
Next in the sequence is the northeastern Village, Embra - Summerise:
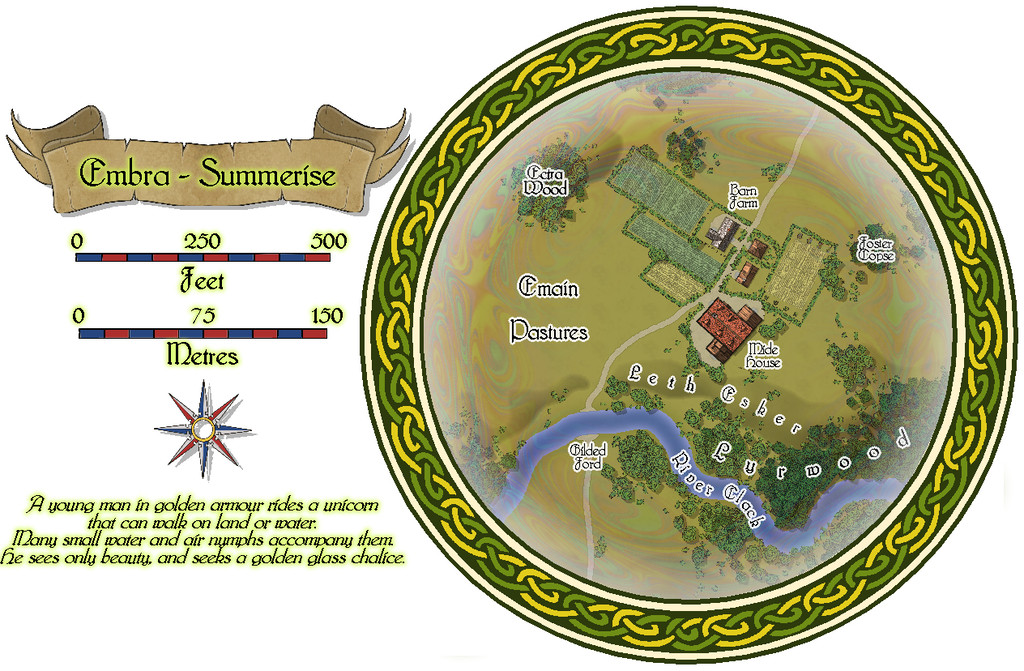
Here, we have a broader River Clack, if still one with a ford. There are fewer buildings this time, although a couple are larger properties, particularly Mide House, treated as an inn in the accompanying map notes. In addition, there are two "interior" toggle options, one for the surface level:
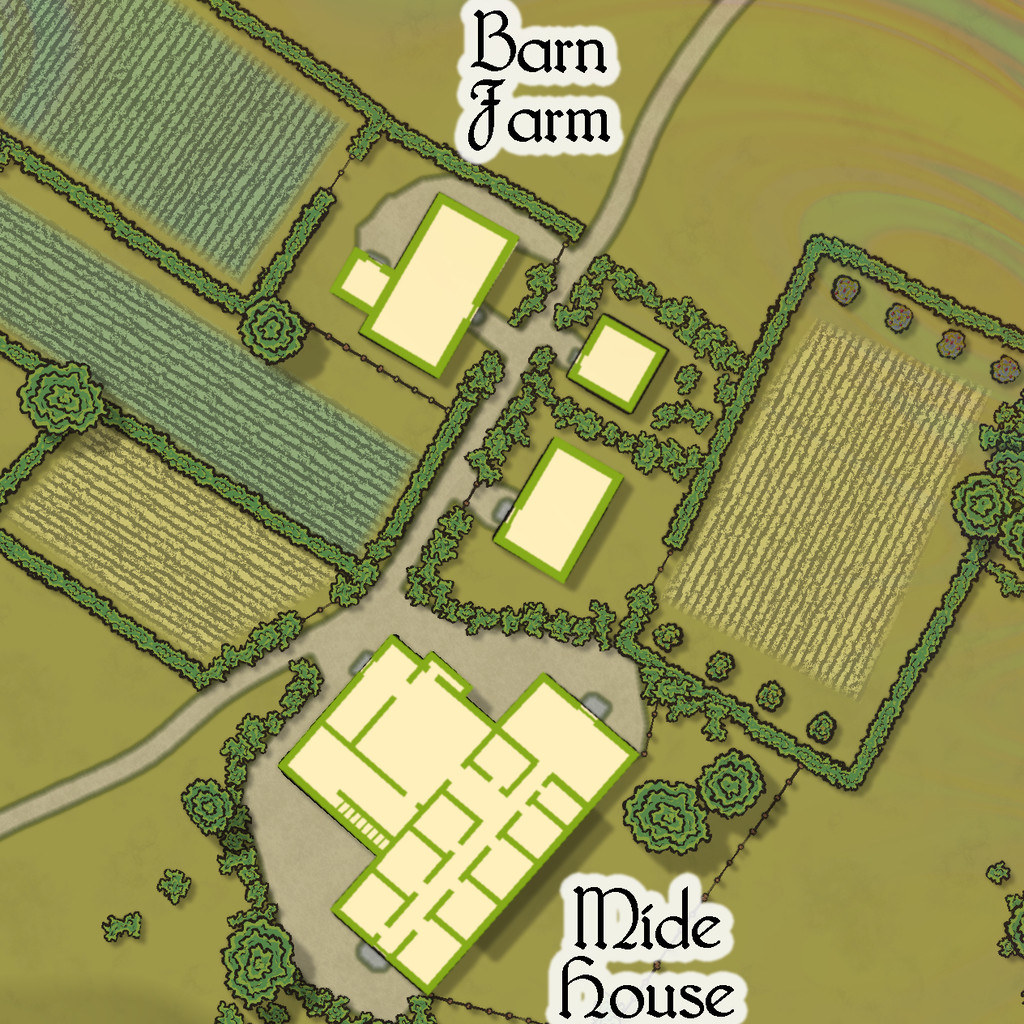
And a second one for the upper floor of the inn:


![[Deleted User]](https://secure.gravatar.com/avatar/c75d9a245b74d9c59be0999ea81ca541/?default=https%3A%2F%2Fvanillicon.com%2F92add7f8c954488718110edc4896ad39_200.png&rating=g&size=200)
-
Community Atlas: Embra - Villages
When approaching, or leaving, the Faerie city of Embra, and as discussed previously on the Forum, the settlement seems to be merely a village, whose appearance can be different depending on the direction involved. Eight such Village maps are provided for the Atlas, one for each of the main compass directions - north, northeast, east, southeast, south, southwest, west and northwest. As also noted earlier, the bases for these eight were randomly-picked maps from the two Judges Guild "Village" RPG map books, published in the late 1970s, reworked and amended in places to fit what was needed here.
Those base maps were all placed within hexagons, though I decided a circle would be more suitable here from very early in the process. Having set that, the overall appearance of the eight Village maps was quickly established, partly thanks to the banner, scalebar and compass-rose assets available in the CA169 Fantasy Town package chosen for the mapping.
A decision had been made too that variant Celtic knotwork borders were going to be key aspects of all the Embra maps. Finding a circular design was fairly straightforward - if unfortunately not using the CA23 Map Border options (as they work only for rectilinear borders). Those CC3+ designs did influence the general look to an extent, however, with the "Village" colours partly chosen following those used in the "Official Guide" map's border:

The final Village knotwork design was based on a couple found online, although one of those, what turned out to be my final choice, was also virtually identical to one in the Dover Clip-Art "Celtic Borders on Layout Grids" hardcopy book, mentioned in the introductory Forum topic as well. This then is the map for the "north" Village, Embra - Midnight:

The nature of these eight Villages, on the border between the Mortal and Faerie Realms, invited adding something to each map to reflect that, hence the pale, misty, oil-iridescence colours towards the edges, fading into the middle. This also gives a suggestion of viewing the map through an old, round window, lens, or in a mirror - Embra Through The Looking Glass, perhaps. That oil-patterning comes courtesy of @Loopysue's transparent City Domes symbols from CA144A.
Although scales and an unlabelled compass-rose are provided, nothing in the Faerie Realm is strongly fixed, so while the map is correctly drawn to the scales, GMs can adjust those distances, sizes and directions to best-suit their own needs. Similarly, the featured text below the compass-rose alongside the map can be used, adapted or ignored as the GM may wish. It was determined by a random tarot-card draw, as described previously, as an interpretation of what the card artwork showed or inspired.
Place-names on the maps were sometimes taken from their obvious nature, the surroundings of Embra as established on the Clack Valley map, my own earlier RPG mapping, or more commonly from a random choice of adapted names in Celtic mythology, primarily drawn from entries in James MacKillop's Dictionary of Celtic Mythology (Oxford University Press, 1998). Some of these are explored a little more in the PDF and text notes accompanying each map. The placement of the labels is necessarily somewhat obstructive at times, so a toggle in the Atlas FCW versions will allow them to be switched off for better clarity.
A second Atlas toggle on this Embra - Midnight map allows simple internal layouts for each building to be shown. The original Judges Guild settlement maps were always drawn like this, showing only cross-sections through the surface level's outer and interior walls and doorways, for almost every building. Indeed, this was established so early as the norm for RPG settlement maps, that I still struggle to make sense of the more recent RPG tendency of settlement plans that DON'T provide this option, but show just a - to me - sometimes confusing series of rooftops. This was part of the reason I decided to add this element for the Village, and many of the Places, maps for Embra, although a lesser aspect was I found it wasn't always easy to tell where the buildings were on some of the more heavily-vegetated maps. Most of the buildings have just a single room inside, while all occupy only the surface level on this map:
One aspect on most, but not all, these Village maps is the River Clack, which, as the Clack Valley map indicated, runs through the city. In Embra - Midnight, it is quite narrow, and crossed by a ford. Elsewhere among the Village maps, it can be broader or narrower, and bridged. In some cases, it becomes almost ditch-like. This variation, while adopted from the Judges Guild base-maps, was a deliberate choice from very early in the planning and construction process, to emphasize that Faerie is not the mundane world outside, where things may not be what they seem, even at such liminal places as these "outer" Villages.
While the Atlas connections favour moving from outside to an entry-village, and then on into parts of the city itself in Faerie (or reversing the process when wishing to leave Embra), there is no reason GMs could not opt to move the party from one Village to another as an extra possibility too, perhaps camping, or taking rooms at an inn, in one Village, only to wake next day in a quite different one - perhaps where the inhabitants are identical, say, for a little further confusion!


-
Community Atlas: Errynor Map 40 - Introducing the Faerie City of Embra
This first map of the 57 is designed to get visitors into the city from the outside world of the Clack Valley. A comparison with my early sketch for this link-map (shown above) indicates there wasn't much change along the way:
Indeed, its general layout was decided long before any of the other maps in the collection were prepared. However, this final form was among the last to be completed, thanks to needing extracts from some of those others. The frame decoration, as noted, is taken from the CA23 Map Border pack.
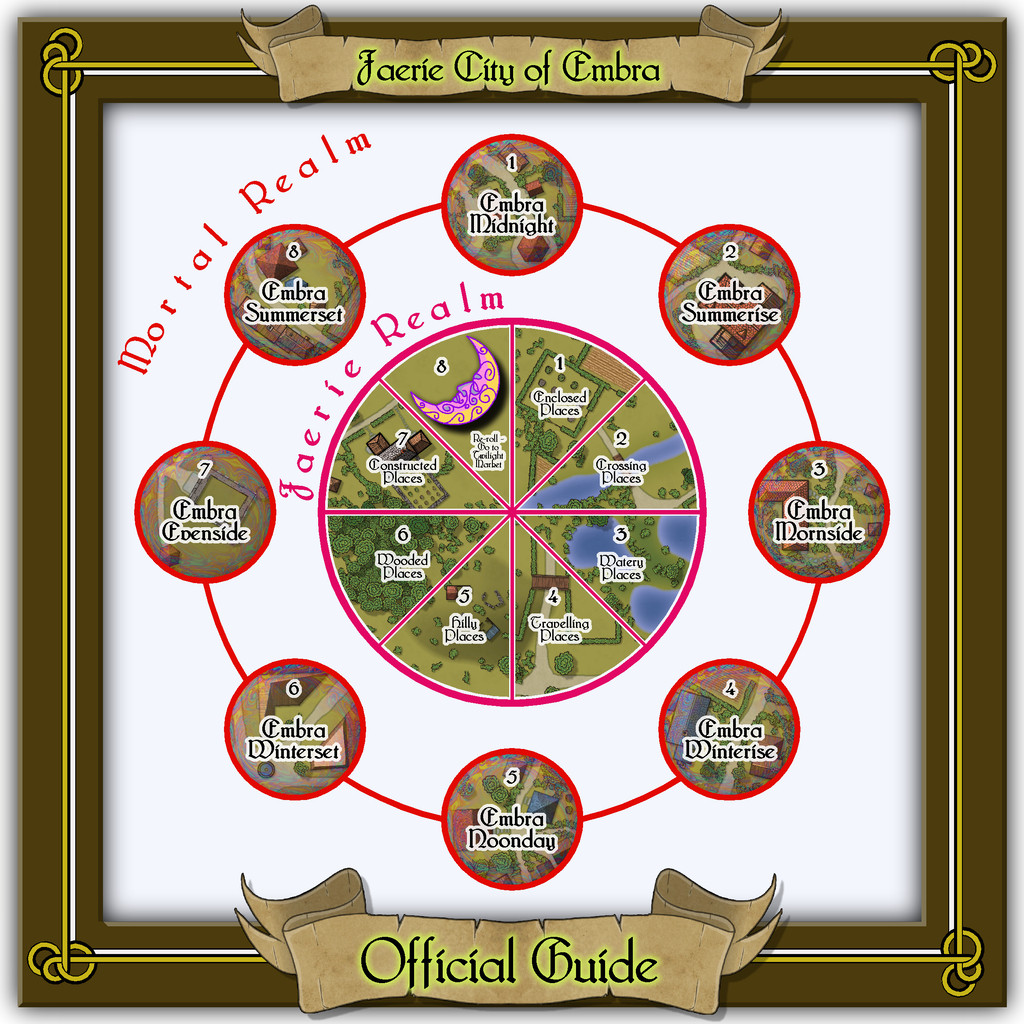
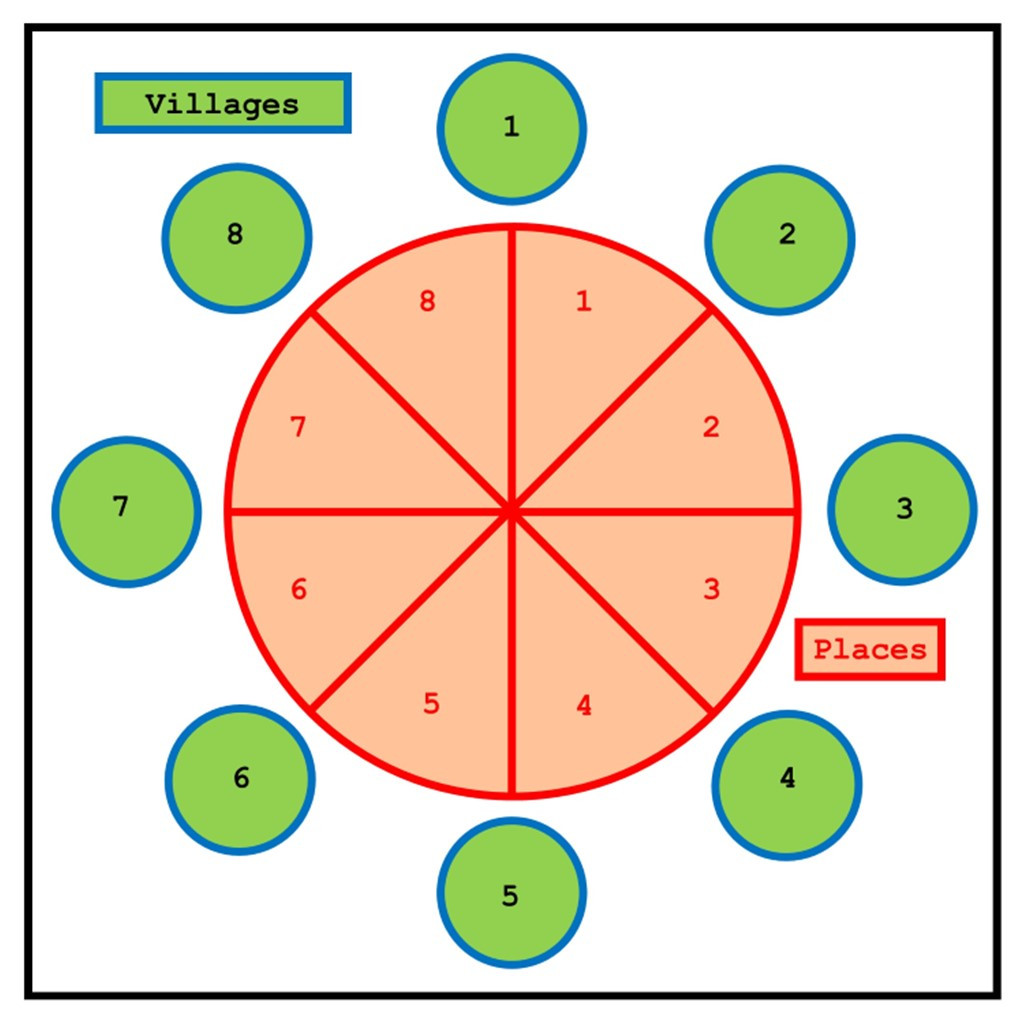
In the Atlas version, each of the numbered circles and central wedge-segments, except wedge 8, will link with their appropriate next maps in the Embra set. The outer ring of circles is the connection between the Mortal and Faerie Realms. Each circle leads to its separate Village map, showing how Embra appears from the outside, an appearance which can be different depending on its approach direction. As the names suggest, this outer ring is a compass-rose, representing in order north, northeast, east, southeast, south, southwest, west and northwest. GMs can opt to roll a D8, use the party's approach direction, or simply choose one of the Villages, to determine this initial connection. Similarly, when leaving Embra, the last place to be encountered will be one of these eight outer-ring Villages.
Segments 1 to 7 of the inner "pie-chart" connect with their respective "Places" schematic in the City itself, from where individual locations and streets within that type of Place can be accessed and explored. Segment 8 allows a random D8 roll to be used at GM's option to decide where a group may go next, as it provides the re-roll possibility mentioned in my earlier posting here, where the party would then be able to go directly to the Twilight Market from whichever set of Places was finally picked. GMs might alternatively decide by preference, or using the magical Law of Similarity, to select the next location instead. For example, if the party opened a gate to enter a field in whichever Village or Place they were in, by Similarity, they could then go to somewhere from the Enclosed Places selection. Had they been crossing a stream, they could have gone to one of the Crossing Places, and so on.
This is not necessarily all obvious from just the Official Guide schematic, and although there are PDF and text notes with the Atlas map, I felt it would be helpful to add some short comments to the map itself. By chance, the February 2022 issue of the Cartographer's Annual was published while this map was being finalised, providing an ideal opportunity to make use of one of its key elements as "The GM's Little Red Book". The full Official Guide map then, looks like this:


-
Community Atlas: Errynor Map 40 - Introducing the Faerie City of Embra
As mentioned before, my Errynor mapping project for the Community Atlas has been an opportunity to bring to life ideas sometimes previously developed, and occasionally even mapped, in earlier decades of fantasy gaming. A Faerie settlement has been a concept under consideration for years, without finalising a mapped setting. When a Faerie city - what became Embra - came-up among the randomly-designed places for Errynor, that seemed the perfect time to progress with the concept finally.
Influenced by literary, artistic, folkloric, musical and fantasy gaming sources, I wanted to give the impression that visiting the city would be like negotiating Maurits Escher's semi-dream-state artwork and that of some of the surrealists. Disorienting, essentially, yet retaining a quality of magical wonder.
That's fine as an idea, but it then must be transposed into the physical reality of one or more maps to fit the limits of the Community Atlas.
Eventually, I settled on having many maps for the city, each showing only a small part, without defining what the city as a whole should look like, or how its pieces might fit together. Thus every visit there will be different, albeit with some familiar places for those returning - if they can find them!
The Atlas connections mean a map can have multiple links from it, but each linked map must use the first map as its only parent. They can't cross-link separately. Thus I opted for a two-fold access structure like two concentric circles, an outer "ring" linking with the Mortal Realm (and the next map "up" in the Errynor maps, that for Clack Valley), while the inner would lead to the Faerie city proper, so entering or leaving the city would be usually via the outer "ring" - inward to Faerie, outward to Mortality.

So as not to be too linear, I decided that when approaching the city from outside, it would look like just a village, so someone wishing to visit the Faerie "inner" city would first need to find a means to do so from there. That might be achievable randomly, by GM's choice, or using something like the magical Law of Similarity - like goes to like - possibly variably. For the latter, entering a field through a gate at the "village" might lead instead into a floral garden or a park in the Faerie city, say, and so forth.
From this, I thought having the "village" be different in form depending on the direction it was approached from would add extra spice, and decided on eight for the eight main compass points - north, south, east, west, northeast, southeast, southwest and northwest. So that's eight maps already, and we're not yet into the city!
This does though provide those three options - a D8 random-roll possibility and the approach-direction "Similarity" mechanic, either of which could be superseded by the GM as preferred.
For the Village maps, I decided to use as a base some from the two Judges Guild "Village" map books from the late 1970s, chosen randomly from their nearly 100 layouts. These are identically-scaled, set within a hexagon 1,056 feet, 0.2 miles, across from flat side to flat side, subdivided into smaller hexagons each about 40 feet across similarly.
Following from the Similarity principle, seven main elements were identified in each settlement: enclosures such as fields, orchards and gardens; crossing-points, like bridges, fords or ferries; damper places - lakes, ponds, streams or marshes; travel routes - roads, tracks, footpaths, etc.; upland areas such as hills, cliffs and broken ground; woodlands - copses, forests, even shrubberies; and structures - the village buildings.
Hence seven themed general areas developed: Enclosed Places, Crossing Places, Watery Places, Travelling Places, Hilly Places, Wooded Places and Constructed Places. These could be connected at GM's choice or by Similarity, leaving only the random option one short of another D8 roll.
In the notes for deep-sea hag Aunty MacKassa (PDF link; Forum discussion for this map is here), I'd mentioned Embra contained the great Twilight Market. That was to be incorporated in seven parts here, one for each of the Place groupings. Instead of impractical cross-links between the Market segments, I devised a Twilight Market identifier, based on various online and hardcopy-book designs, adapted and recoloured (not a CC3+ symbol, simply a piece of artwork):

Rather than a "Return" option, the eighth item became an additional D8 re-roll, ignoring further "8s", after which the GM could continue to the part of the Twilight Market for whichever of the seven places had been determined.
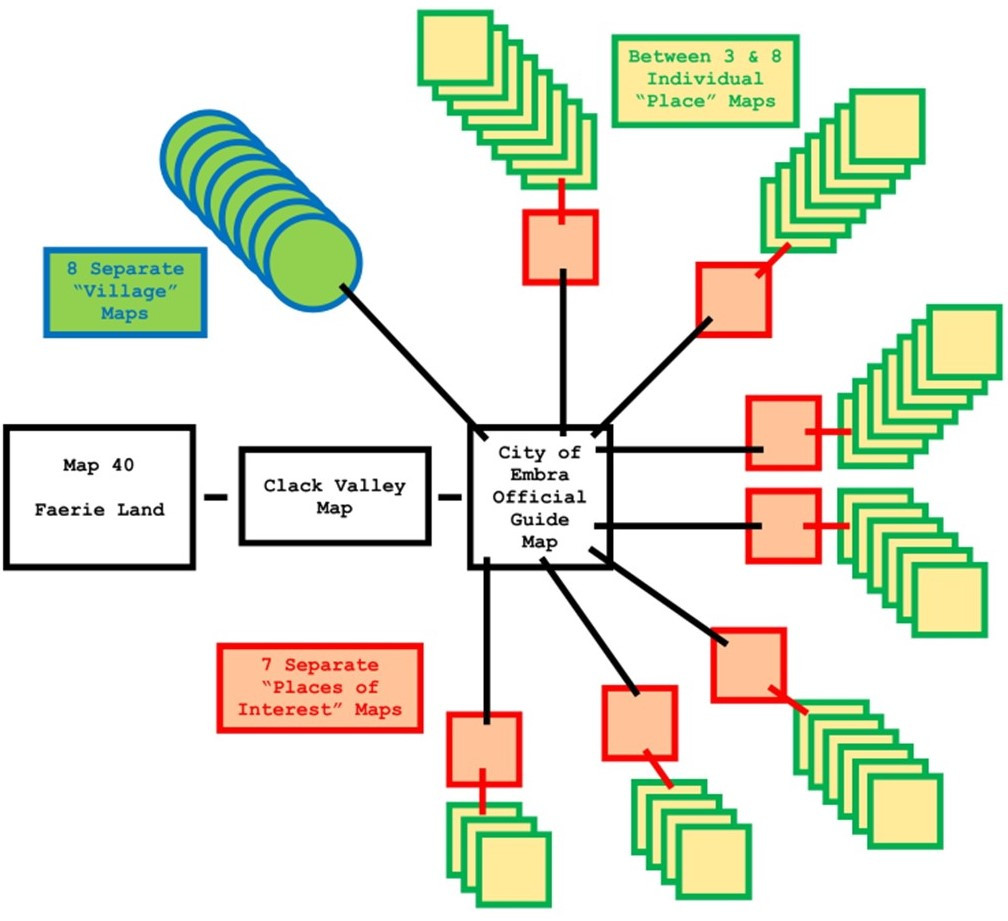
Thus the eight Village entry-points, seven general Places links, and the Twilight Market indicator provided the initial map for the city, accessed from the Clack Valley map in the form of a schematic drawing, given its sole purpose was to link to the other maps of the city. I called it the "Embra Official Guide", similar to how some real-world tourist guides are named. The next image is a cleaned-up (i.e. legible!) version of my final pre-mapping sketch for this schematic:
The eight outer Village maps link from this schematic individually, while the seven general area Places each get their own "landing schematic", as they consist of a group of separate locations. The random element, with other factors of what was both practical and interesting, meant each Places grouping would have ten different components in it, including the Twilight Market map for each Places set.
Ideas for what these Places might be came from a range of sources. Some were old concepts of my own, some drawn or adapted from fictional works, though many derived from real-world placenames. The origin of the city's name, Embra, is the local dialect contraction of "Edinburgh", Scotland's capital city. However, it also sounds like "ember", the glowing remains of a fire, which in turn conjures up the magical twilight glow of somewhere lit only by firelight, a place for stories of mystery and wonder. Thus the real-world City of Edinburgh became a source of inspiration for many of Embra's Places, suitably renamed, amended and altered to better suit a Faerie settlement.
The 70 items included locations in the city and names of streets, since Places need linking in ways more mundane as well as magical, to help keep things interesting. Ultimately, the split between Places and Streets was 34 to 36, as the "Streets" included a railway.
Each Place needed its own map, but the Streets and railway were condensed into a single map for each Places grouping. So the final tally of maps comprising Embra totalled "only" 57. Perhaps I should have named it "Heinz"...
This sketch illustrates the way the maps were to be connected:
Random base maps for the main Places were selected from all the old Judges Guild map books I had available - Villages I & II, Castles I & II, Temples I and Islands I (there never was a "II" in either latter case). Each book contains around 50 maps, though the Temples volume doesn't use the same hexagon style and scaling as the rest. Places were allocated to particular base maps from their appearance and content, although changes were made, so sometimes only the overall form of the base map was used in constructing the CC3+ Atlas version.
I reworked a set of tables for randomly generating caves and mines from another old Judges Guild text to decide on the Street lengths, widths, types and layouts, although that system ultimately was more "me" than "JG"!
A few notes were added in the process, but I wanted more, less predictable, aspects too. I turned to two tarot decks, which each coincidentally consist of 78 cards. One card was randomly drawn for each Village, Place and Street from either deck, and extra comments added to the map. The decks were Tarot of the Secret Forest (although this online review page has a lot more images), illustrated by Lucia Mattioli (Lo Scarabeo, 2005), and Shadowscapes Tarot, illustrated by Stephanie Pui-Min Law (Llewellyn Books, 2010). Both are heavily Faerie-inspired in their designs.
For the mapping style, I chose the Fantasy Town one from the January 2021 Cartographer's Annual, as it was ideal for the relatively small areas I needed. It has an attractive dark-wood-look border frame. I've not done much with frames in my Community Atlas mapping so far, so my initial thought was to discard this, but I had a change of mind, and for most of the maps enlarged it as a distinctive aspect. Partly, this was to help tie together all the Embra maps, after adding a series of Celtic-style knotwork and animal designs to the "wooden" frames.
Some of those designs were inspired by the connecting vector symbol options from the Cartographer's Annual Map Border pack (as recently featured in one of the ProFantasy live videos), one of which was used for the final "Official Guide" map. Others were reworked from the copyright-free drawings in Celtic Borders on Layout Grids by Mallory Pearce (Dover Clip-Art Series, 1990), coupled with more found in various online sources. Each Place group and the Village maps gained its own distinct variant, adapting and redrawing which proved a new challenge in itself!
All the maps have written PDF and text file commentaries, as usual too (preparing which took notably longer than the CC3+ mapping!).
I'll be posting notes about the various Places groups on the Forum over the coming weeks, as well as sending Monsen the Atlas items. Next today though, I'll start with a look at the final Official Guide schematic map.
-
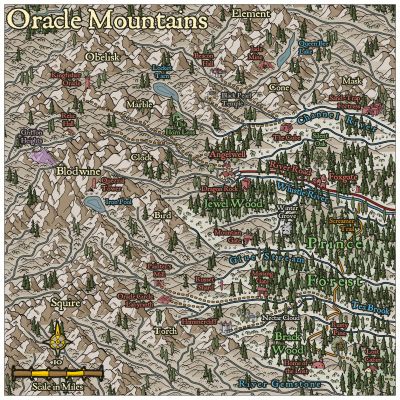
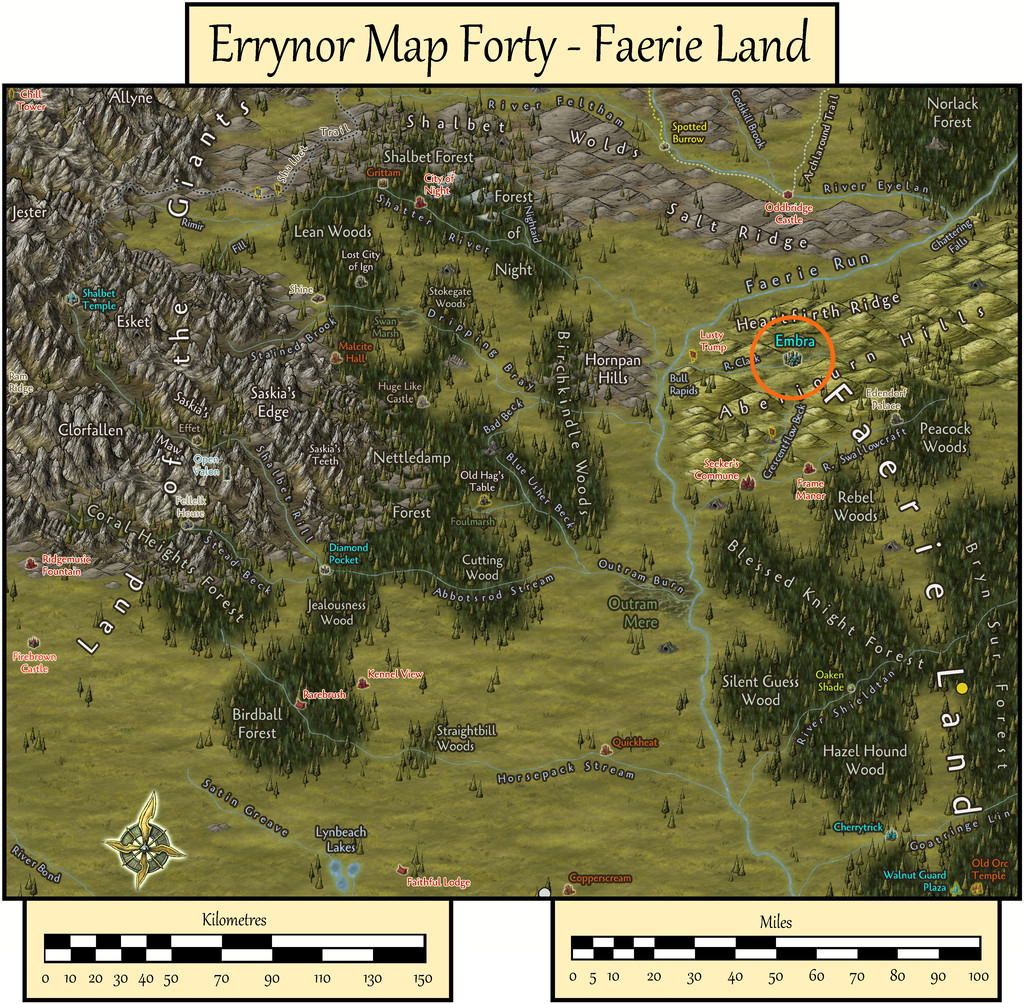
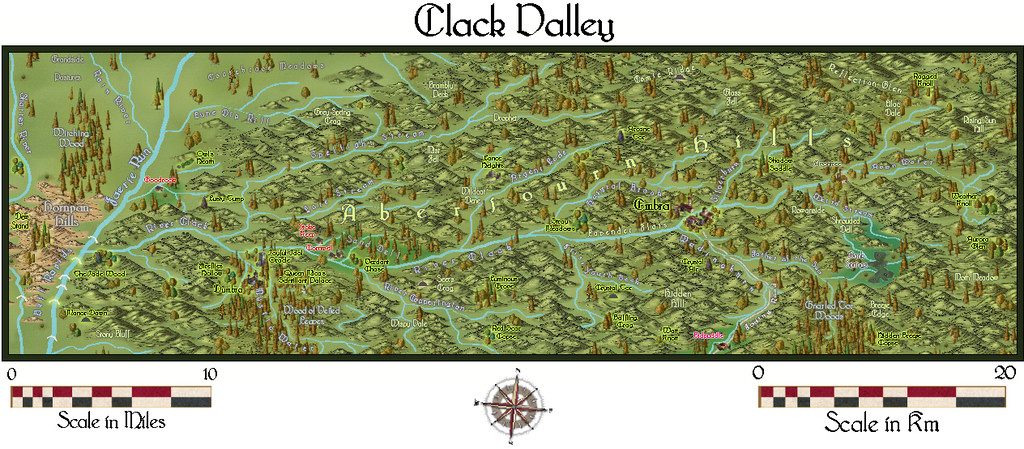
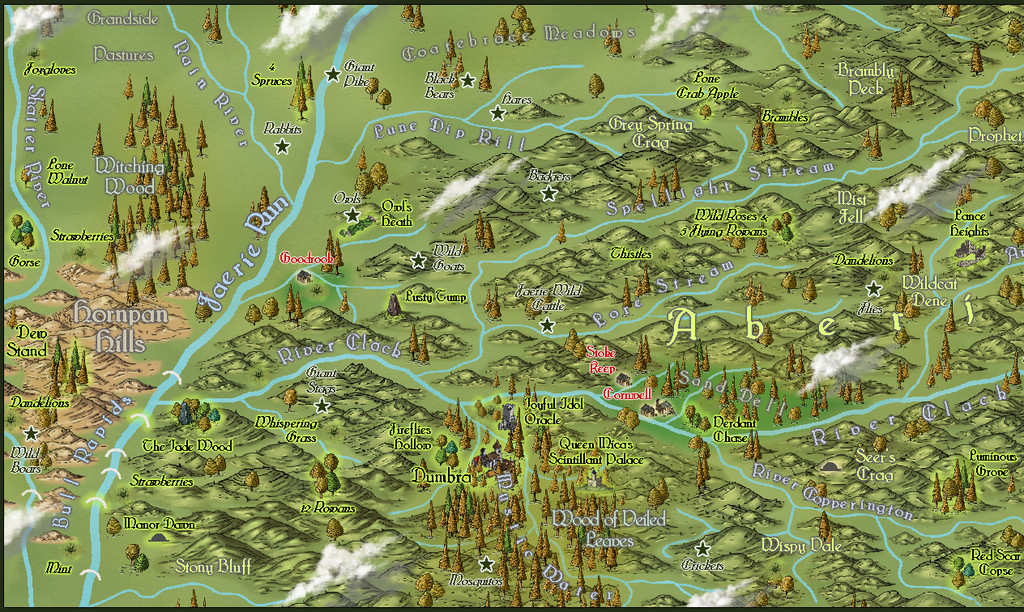
Community Atlas: Errynor Map 40 - Clack Valley
When I started preparing the Faerie Land map for the Atlas, I already knew I was going to add to it a couple of places which would require further mapping. As it turned out, both would be placed relatively near one another in northwestern Faerie Land, in the River Clack valley.
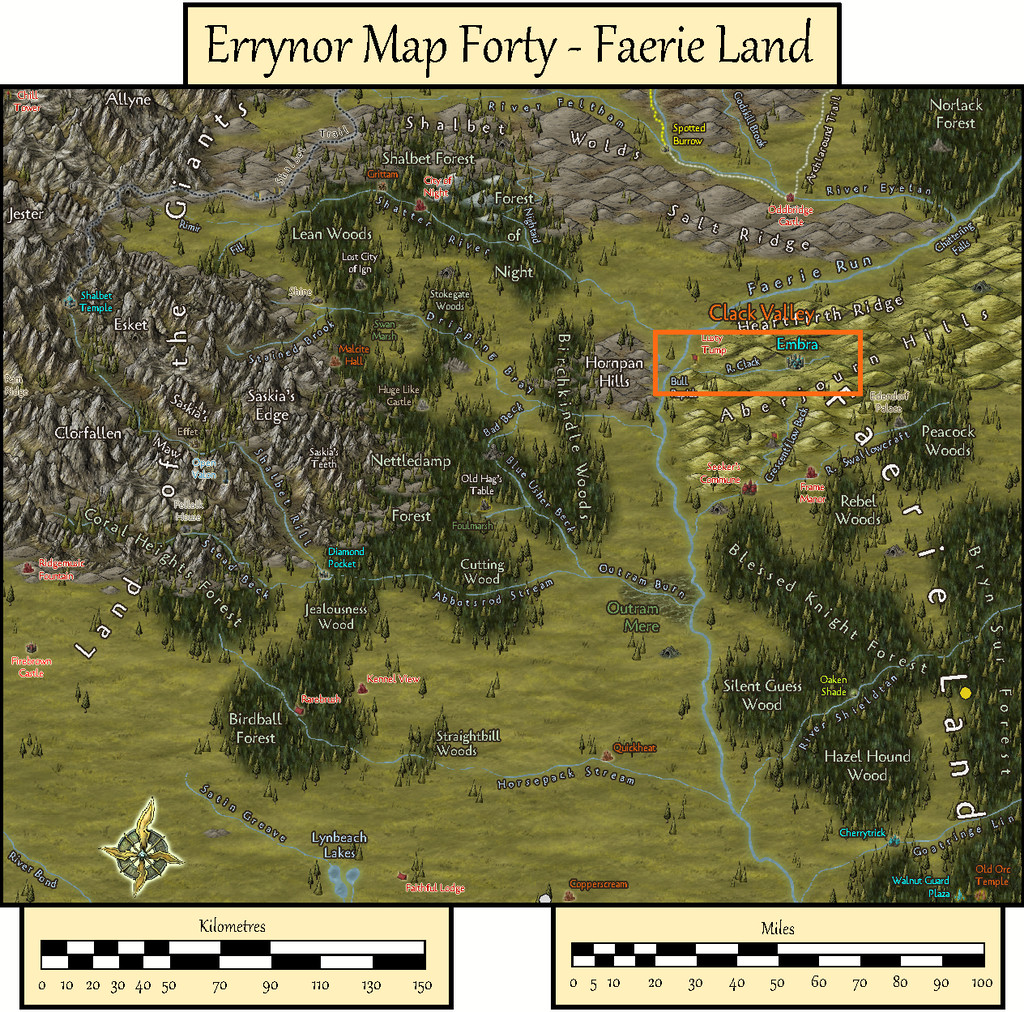
To better locate both though, it was clear a map covering a much smaller area than Map 40 would be helpful first, which is where the Clack Valley map originated. Examining what the valley looked like on the Faerie Land map, it seemed reasonable to cover the entire length of the River. From that, an area some 50 miles long by 15 miles wide (80 by 25 kilometres) would work nicely, as shown here by the orange rectangle:
Making a hand-drawn copy of this area onto squared paper, much as I often do (see the Map 40 construction topic elsewhere on the Forum for the concept), I then drew-up some new and amended random feature tables to add fresh detail, deciding and setting the results into one-mile squares across the whole valley. From those, smaller rivers could be added in places, also drawing on the general tenor of how and where the various hill ranges had been plotted on the larger map previously. Here too, I'd decided to add a variety of random plants as well as creatures, since real-world faerie lore frequently draws attention to such things as having significance. This all helped give further character to the region.
By this stage, there was an increasing need for a host of new names to highlight some of these fresh significant places. Aside from the randomly-generated names left over from the Faerie Land map, which hadn't been used there, I'd also come across a substantial series of random-name tables on The Collaborative Gamer blog a while before, so I used those to roll-up an extra set of names to choose from, to add to what I had already. Some of the name-options on that blog are heavily Tolkien-based, which I decided against employing here, but many of the other tables read almost like a series of thesaurus entries, giving ideas even when they weren't always used in the strictly random form in which they'd been rolled. Then it came down to fitting the names to suitable specific places. After which, the CC3+ mapping could begin!
Looking through the various mapping styles of those I'd not used previously which work particularly well for handling smaller overland areas, led me to the Alyssa Faden Overland style from the 2014 November Cartographer's Annual. This is supplied with the Bridgnorth font, and that too seemed to fit with what I intended for this area.
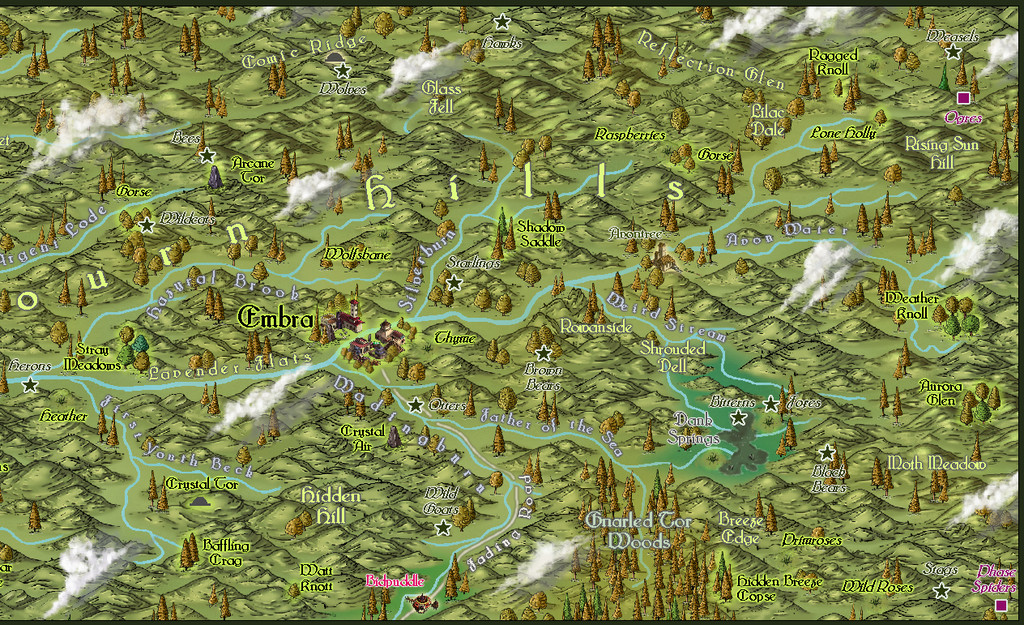
This then is the basic map:
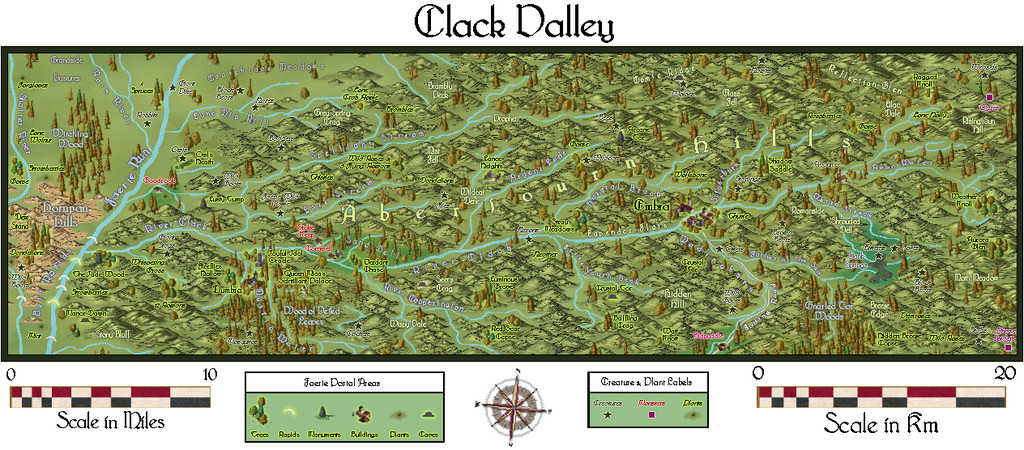
There are two small Keys to accompany it, which can be hidden separately if required, one of which brings in the extra labels and markers for the various creatures and plants added to the map:
Although most of the area illustrated falls within the Faerie Land Core zone, as defined already on Map 40, a small part towards the map's left-hand edge is beyond it, as this overlay view shows, also intended to be toggleable in the final Atlas FCW version:
Part of my reason in picking this mapping style was because it comes with its own selection of cloud symbols, so I had to add some of those too:
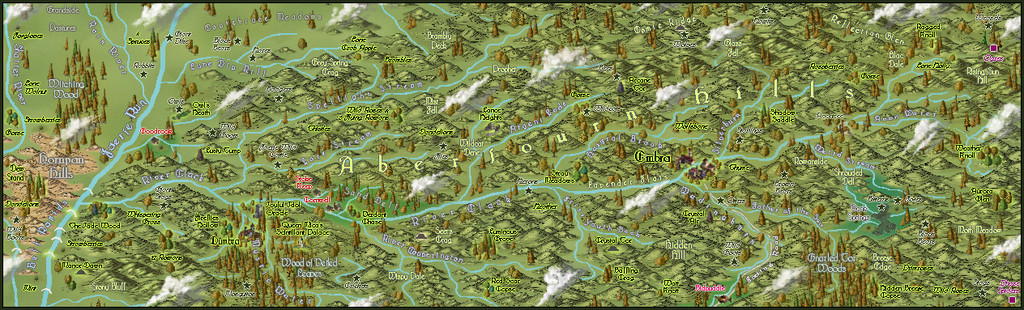
As these are purely decorative, despite being placed so as not to conceal too much of any important labelled sites, they were set-up so they can be toggled on or off separately as well.
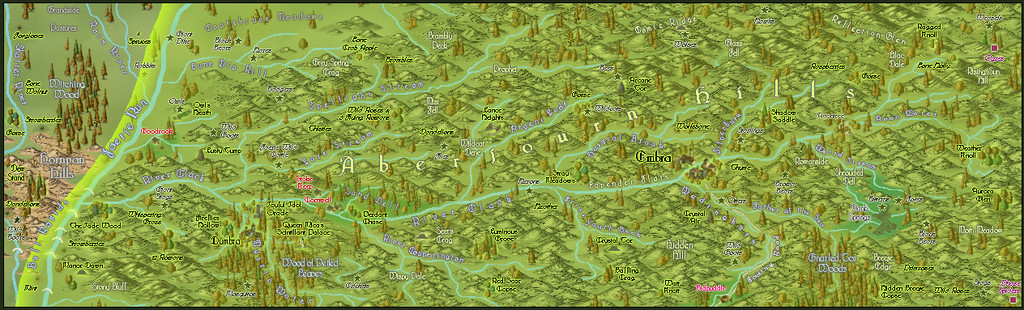
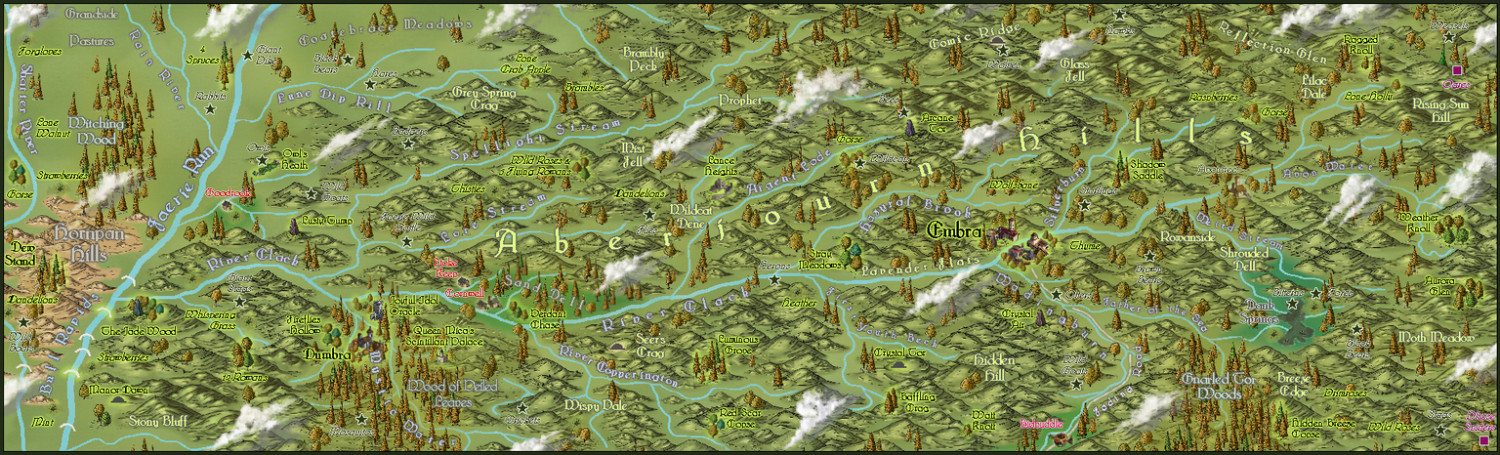
Naturally, the Forum's layout options make horizontally-linear maps particularly difficult to see much detail on, so the images below show the western and eastern halves of the map a little closer:
This last image is larger than the usual Forum preferred size, but it is at least complete!
The Atlas map will also be provided with the usual PDF and text file document of notes explaining more about the map's contents, and which two late medieval Herbals were drawn on especially to add a sprinkle of magic to some of those special plants!

