Monsen
Monsen
About
- Username
- Monsen
- Joined
- Visits
- 717
- Last Active
- Roles
- Administrator
- Points
- 8,999
- Birthday
- May 14, 1976
- Location
- Bergen, Norway
- Website
- https://atlas.monsen.cc
- Real Name
- Remy Monsen
- Rank
- Cartographer
- Badges
- 27
-
CC3+ migration from one PC to another
Yes, you can just copy stuff over from one CC3+ data directory to another, including symbols and drawtools and anything else in there. Just make sure you don't overwrite something you didn't intend to. But unless you have messed up your old data directory somehow, and you are running the latest update, most files should be the same anyway.
The only thing to be aware of when it comes to custom stuff, is the question if you made sure to always use relative paths. Of course, if the locations are exactly the same on the new PC it doesn't matter, but if they aren't, you may end up with some red X's if you have used absolute paths in your symbol catalogs and such.
-
Difference between layers and sheets
Just view Sheets the same as layers in Photoshop. They work basically the same way. The naming confusion is just a result of the fact that when image editors started using what they call layers, they completely ignored that that name was already in use and had a different meaning in the CAD world.
As for layers, I don't recommend ignoring them completely, but for the most part, layers are set automatically and don't influence the outcome, so you can actually do most maps without thinking about them at all.
-
Selecting multiple entities using entity tags
-
HELP - My houses are a single color block, still pretty new
Your buildings have entities on the wrong layer. This is probably caused to how the random building/street command works. The correct layer is set when the symbol catalog is loaded, so if it changes after that, it can cause issues with this command. It can be worth checking that the correct layer is set every so often.
Fortunately, it is easy to fix.
To fix it for future placements, simply change the layer shown in the status bar to one of the city demographics layers; the ones named BLDNG (XXX).
To fix buildings already placed in the map, either simply delete and recreate them, or use the Change House Layer command found in the City menu on them. Note that after selecting the buildings and Do It, the command line will prompt for a layer. the easiest is to right click inside the map to get the layer dialog, then pick the appropriate demographic layer, hit OK, and when back in the map, hit the refresh button to update the display to actually see the change.
-
Macro square root calculation
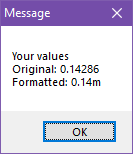
I can't remember if there is a better way off the top of my head, but you can control the number formatting pretty well if you do it manually, like in my simplified and overly verbose example here:
MACRO TTT
GV a 1/7
GN b a*100
GN c a/100
GV d a-c
GN e d*100
GL out Your values
APND out
APND out Original:
APND out a
APND out
APND out Formatted:
APND out c
APND out .
APND out e
APND out m
MSGBOX Message;out;
ENDM


