


Royal Scribe
Royal Scribe
About
- Username
- Royal Scribe
- Joined
- Visits
- 9,940
- Last Active
- Roles
- Member
- Points
- 3,476
- Birthday
- February 5, 1968
- Location
- San Francisco, California
- Website
- https://legacy.drivethrurpg.com/browse/pub/31814/Royal-Scribe-Imaginarium
- Real Name
- Kevin
- Rank
- Mapmaker
- Badges
- 16
Latest Images
Reactions
-
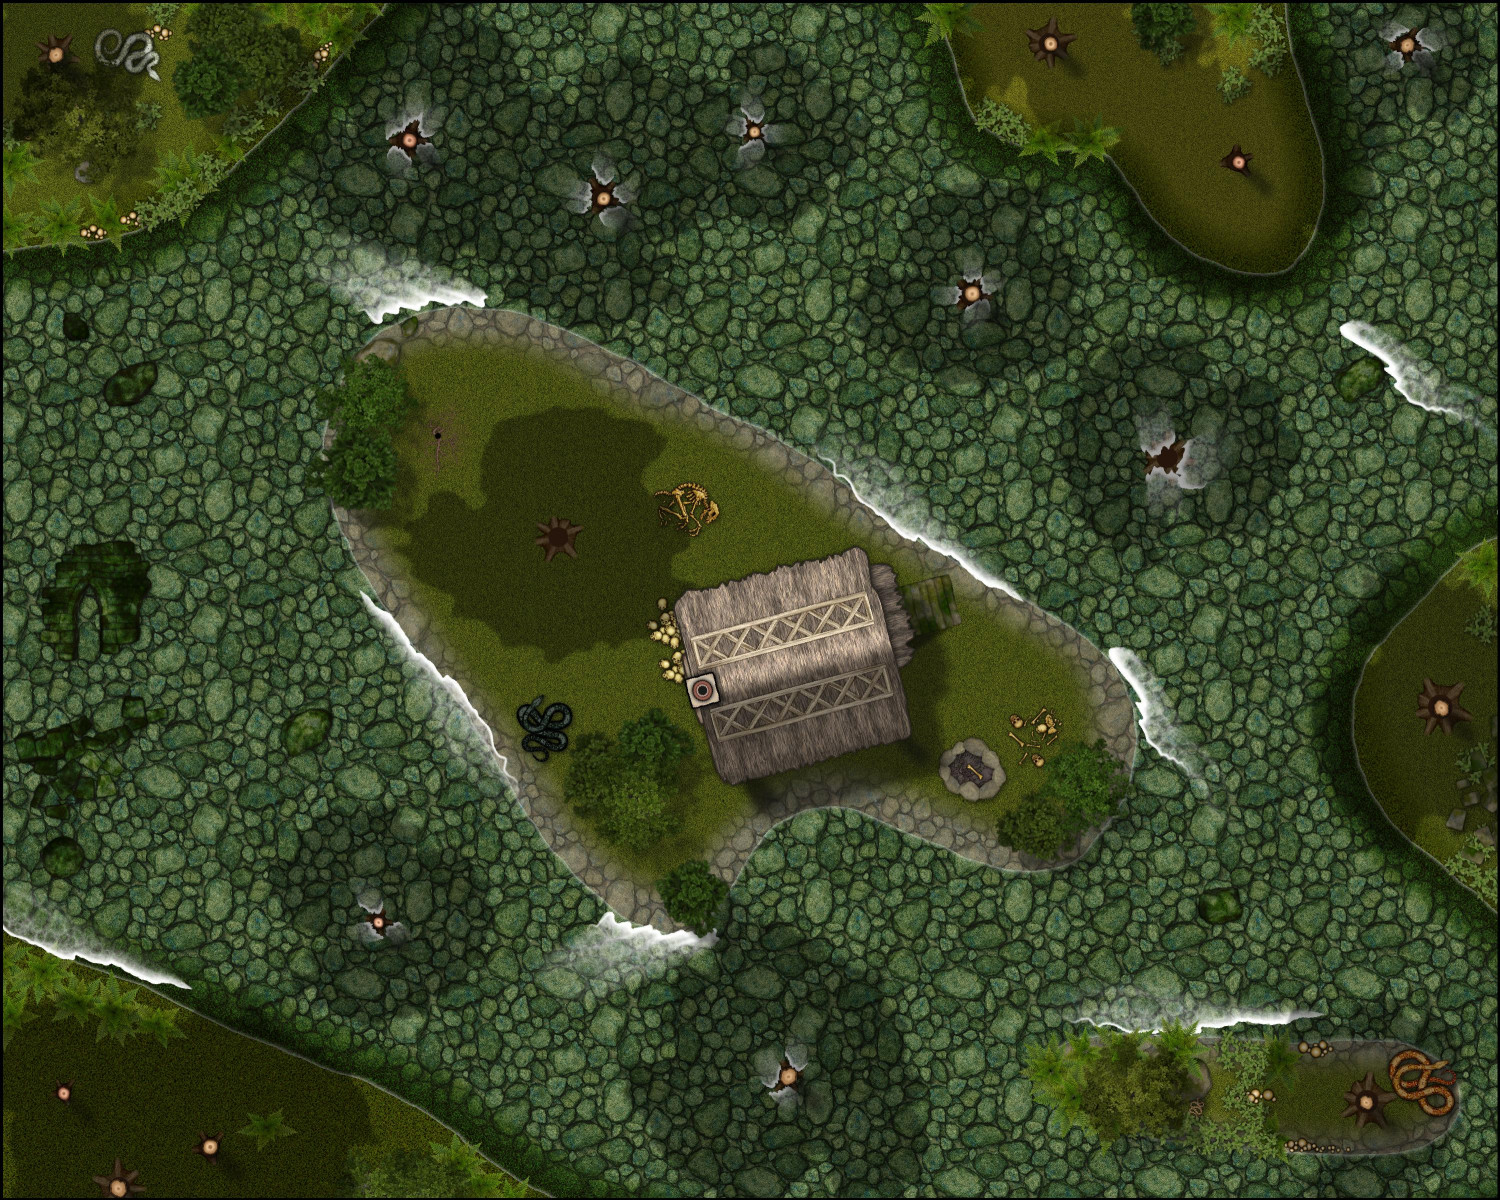
[WIP] Swamp Witch
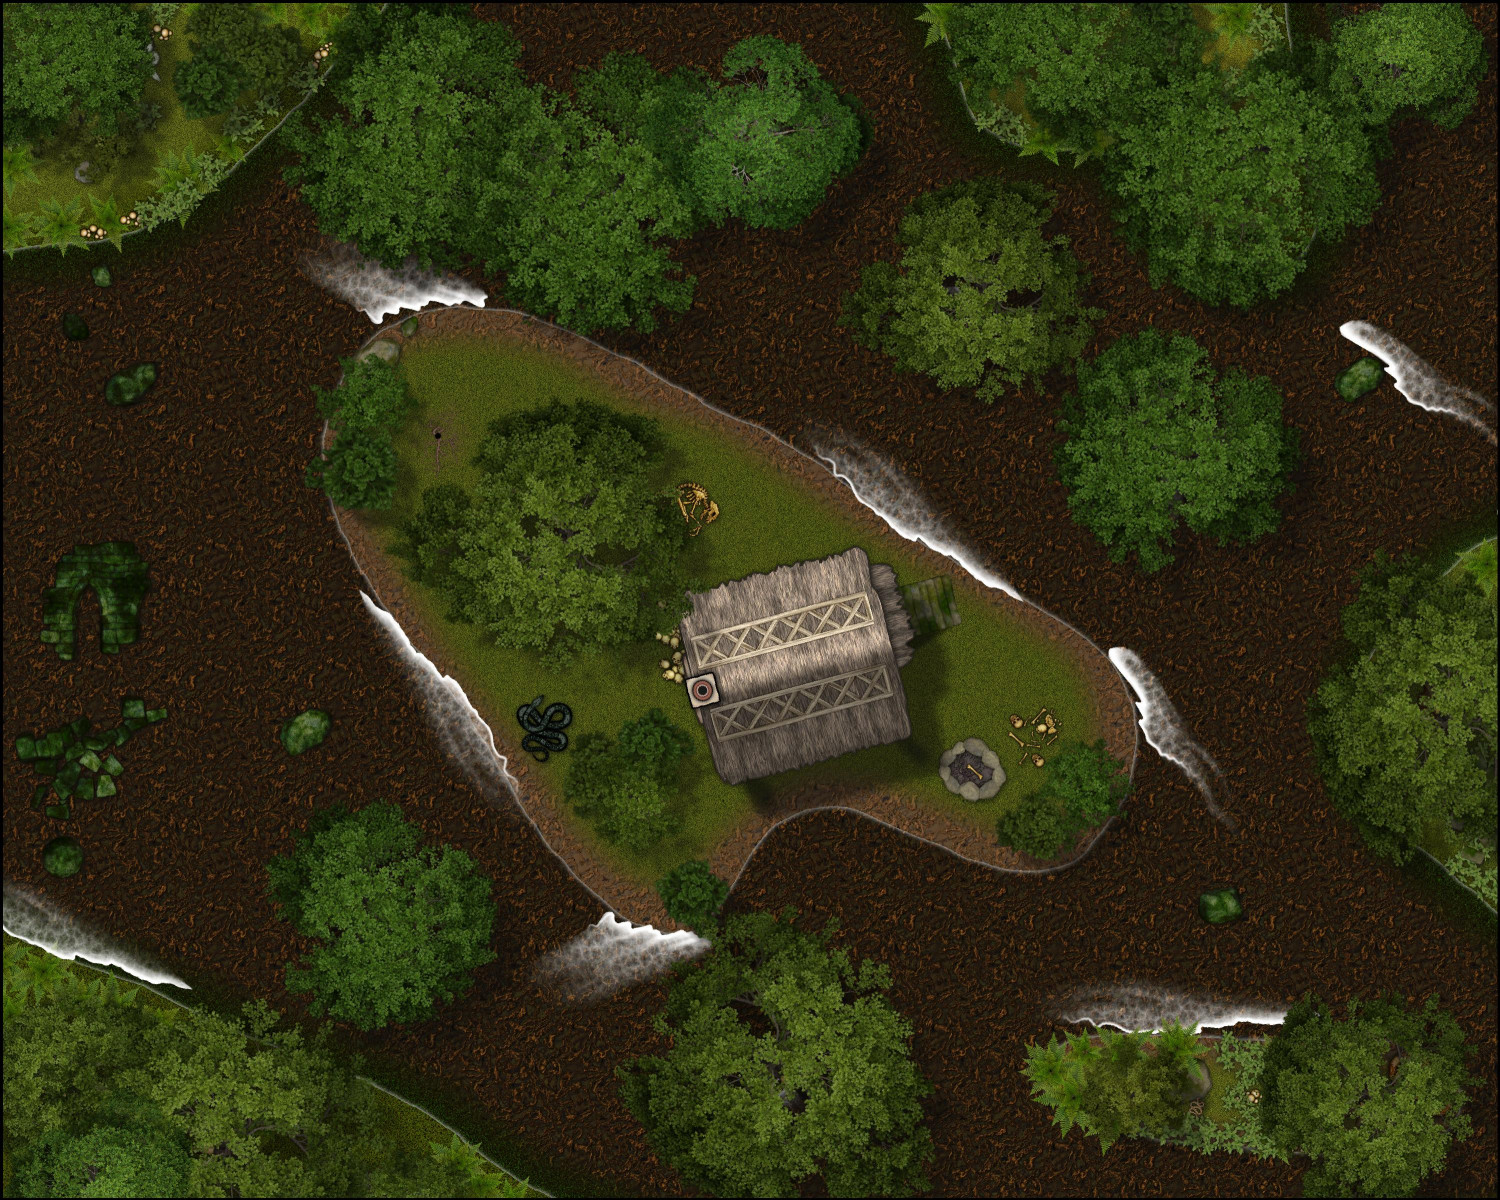
For Forest Trail, I had to bring in the cottage from Darklands City, and the bones/debris from DD3. I struggled with two things: the riverbed and the ripples around trees growing in the water. For the ripples, I used the rapids symbols that come with the annual. For the riverbed, I tried three different versions.
Here are all three together:
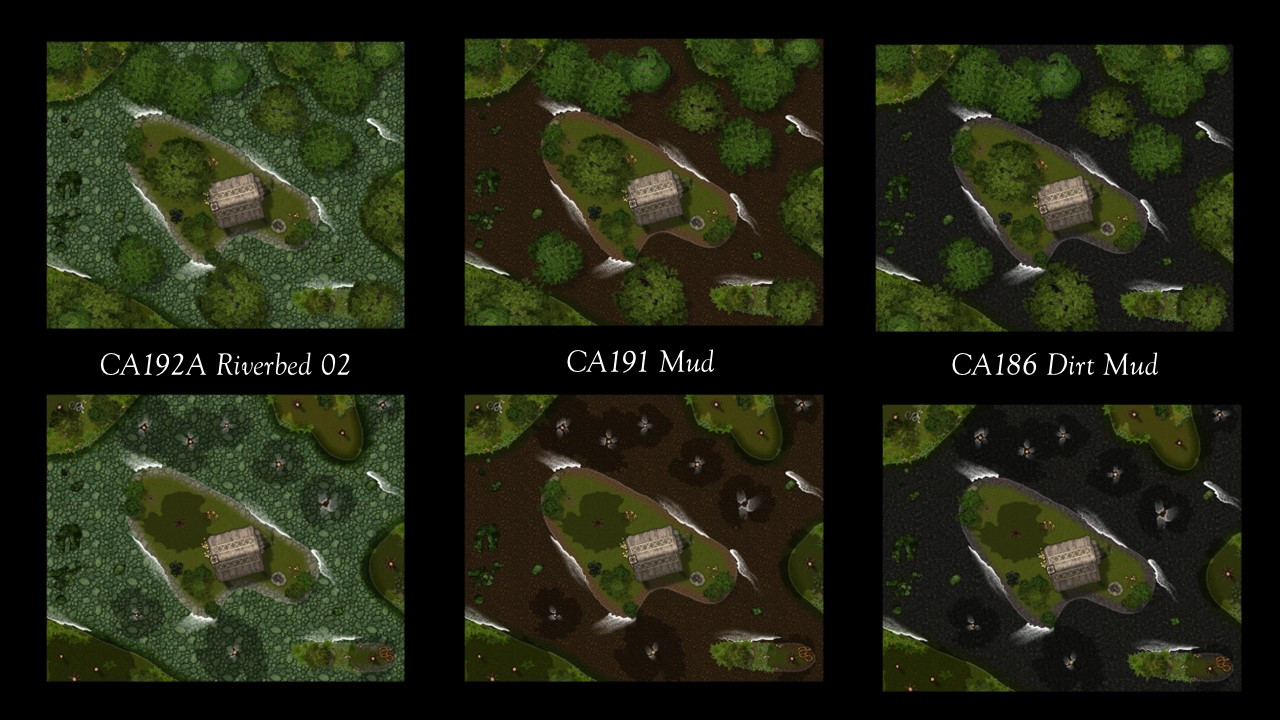
The first version uses the riverbed fill from the annual. It doesn't look particularly swampy to me, though.

The second version uses a mud fill from the Forest Trail annual:
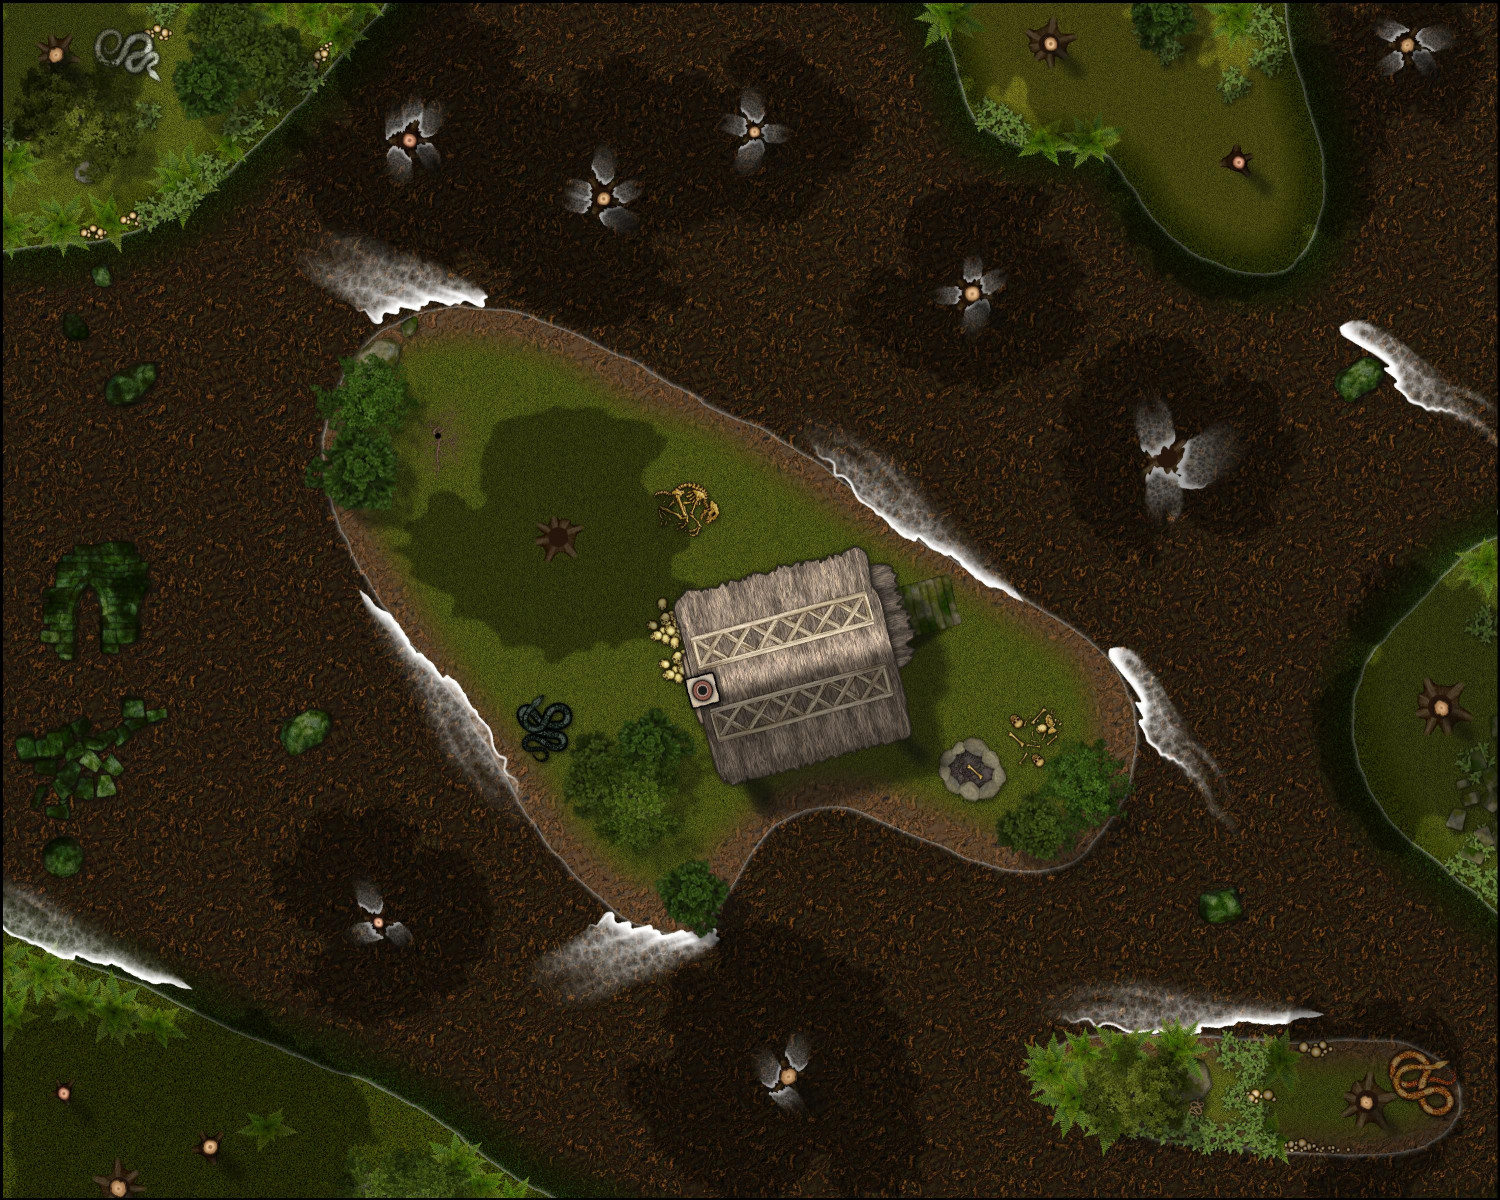
The third version uses a mud from Creepy Crypts:
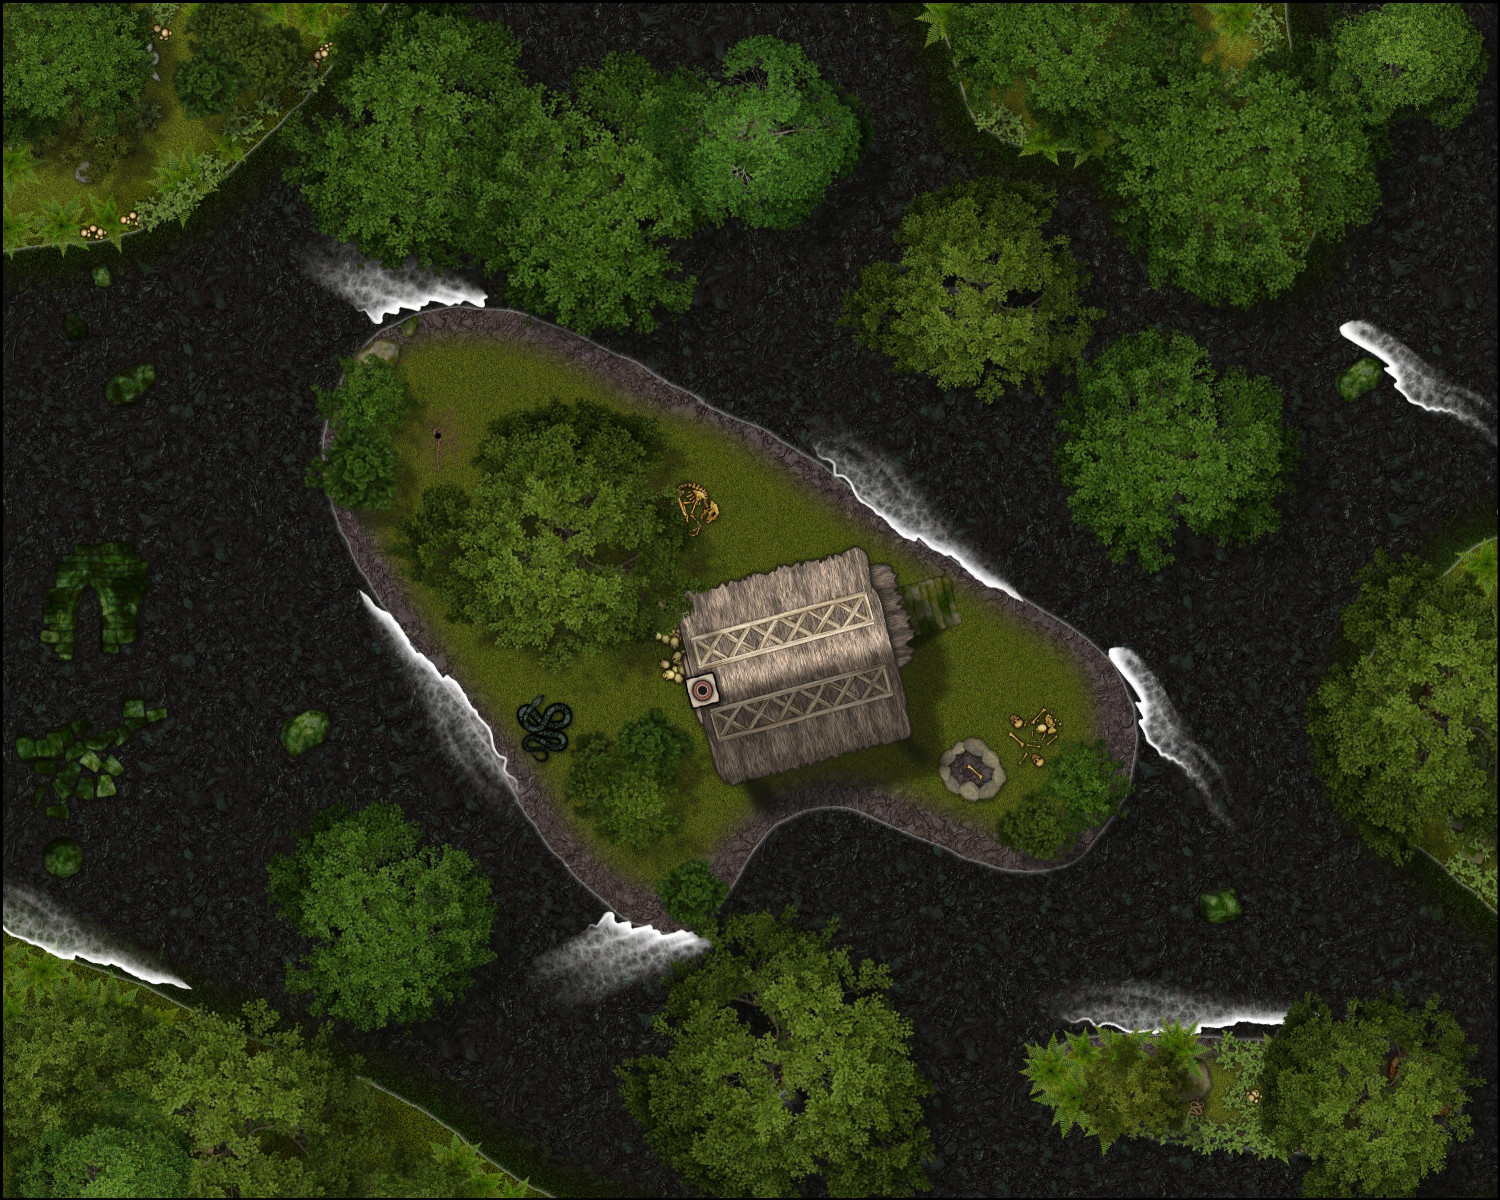
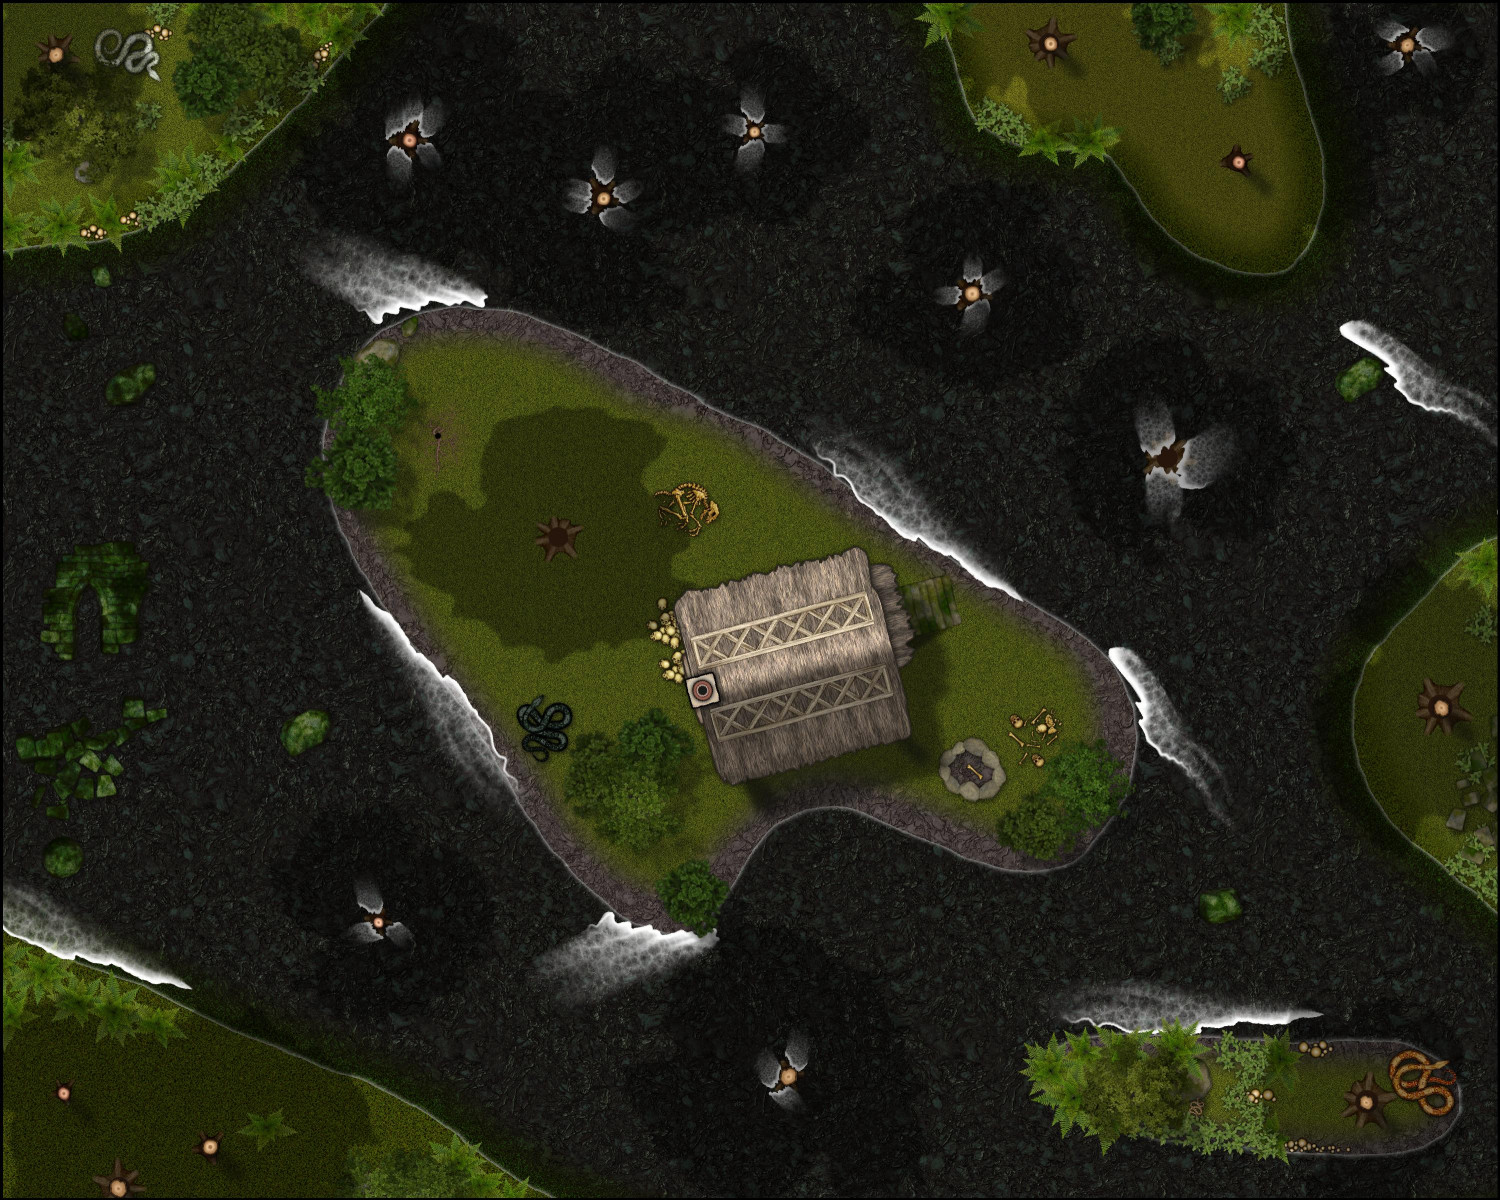
I like the mud from the second two, but I'm not sure it's clear that the trees are growing out of muddy water and not just mud. Maybe if I added more waves, or played with the water effects?


-
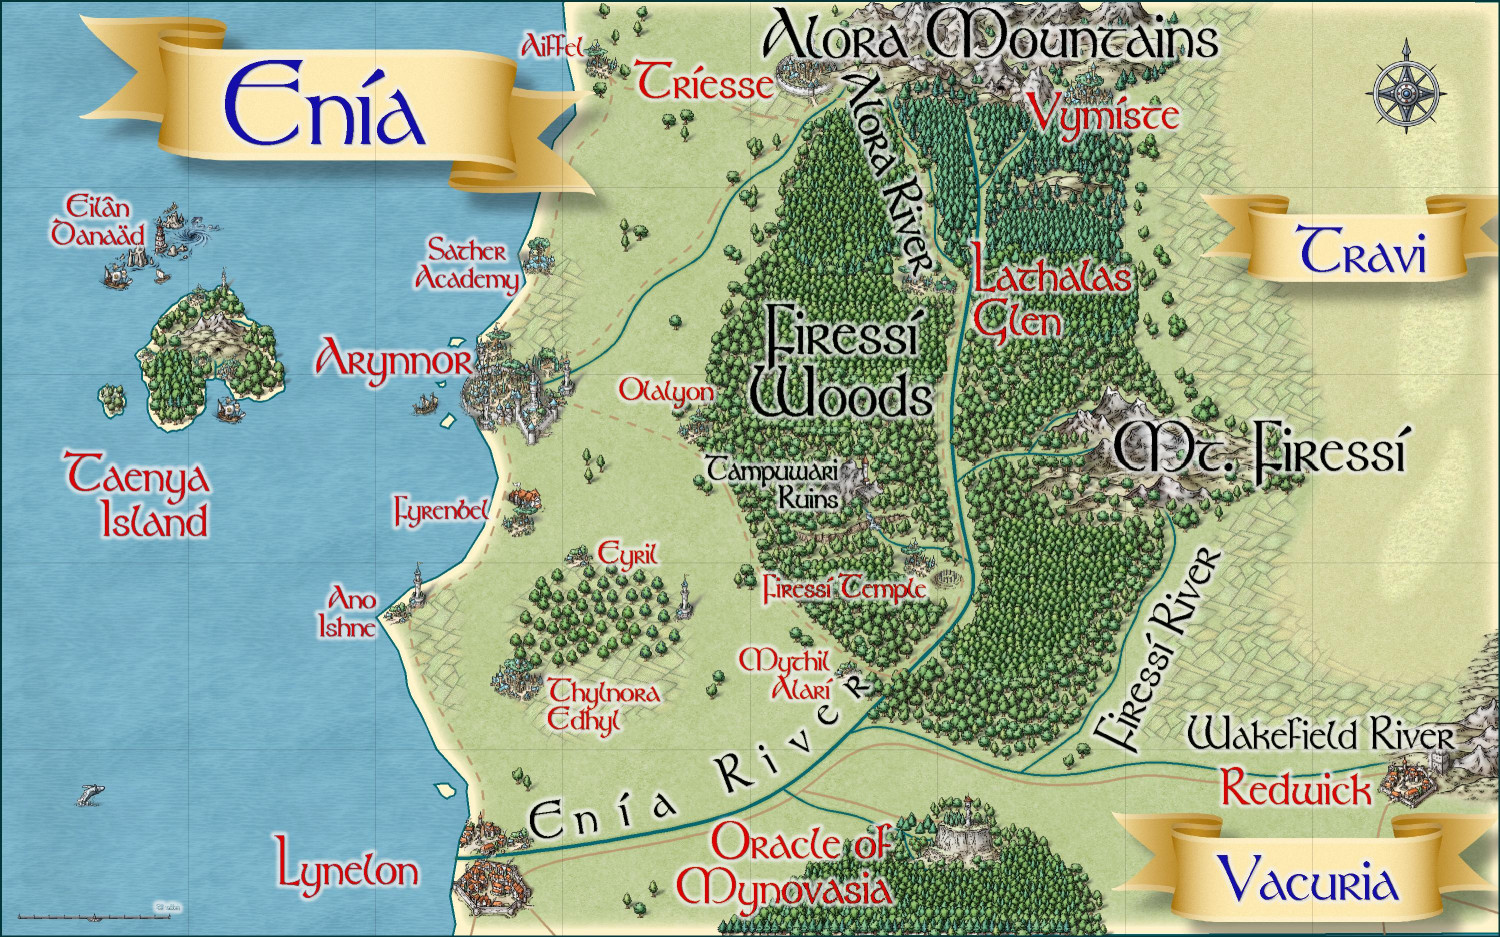
[WIP] Community Atlas - Gold Coast, Doriant
Remy said two things about the 1000th map contest that I have taken to heart:
- We can submit more than one map, but will only be able to win one prize; and
- We can make our own local map anywhere in the world to create a place for a village we want to design (but only the village map is eligible for the contest).
With that in mind, I have been working on this Gold Coast map as well as an area map for the Kingdom of Enia, an elvish kingdom on the northern side of the coast. I have two villages in Enia that I will submit. If this works best for you, @Monsen, I will create a thread for all of the non-contest Atlas submissions once they're finalized, and then the actual villages for the competition will be posted in the competition thread when they're ready to submit.
Gold Coast
Here is the Gold Coast region, first without and then with political borders (which can be toggled). I am writing up the description now.
Without Political Borders
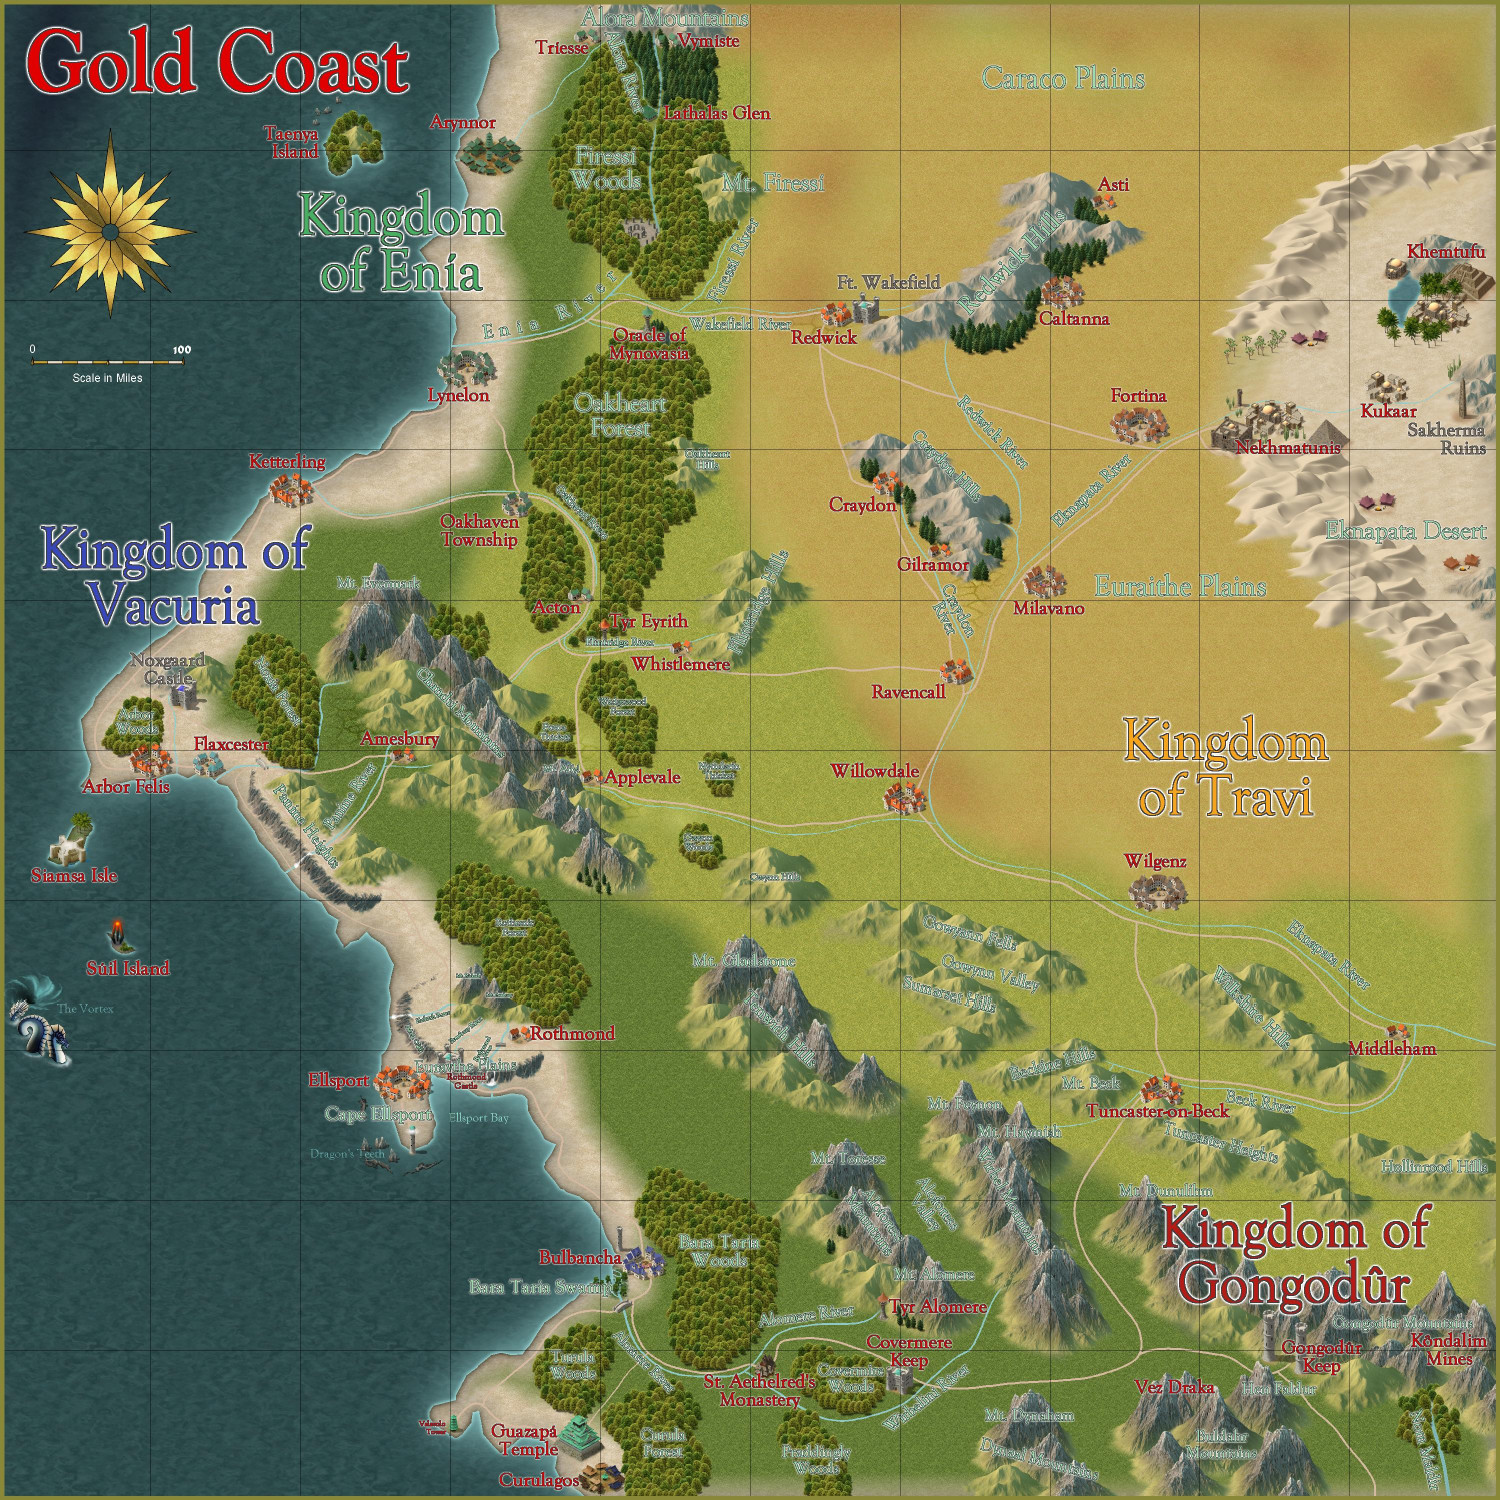
With Political Borders
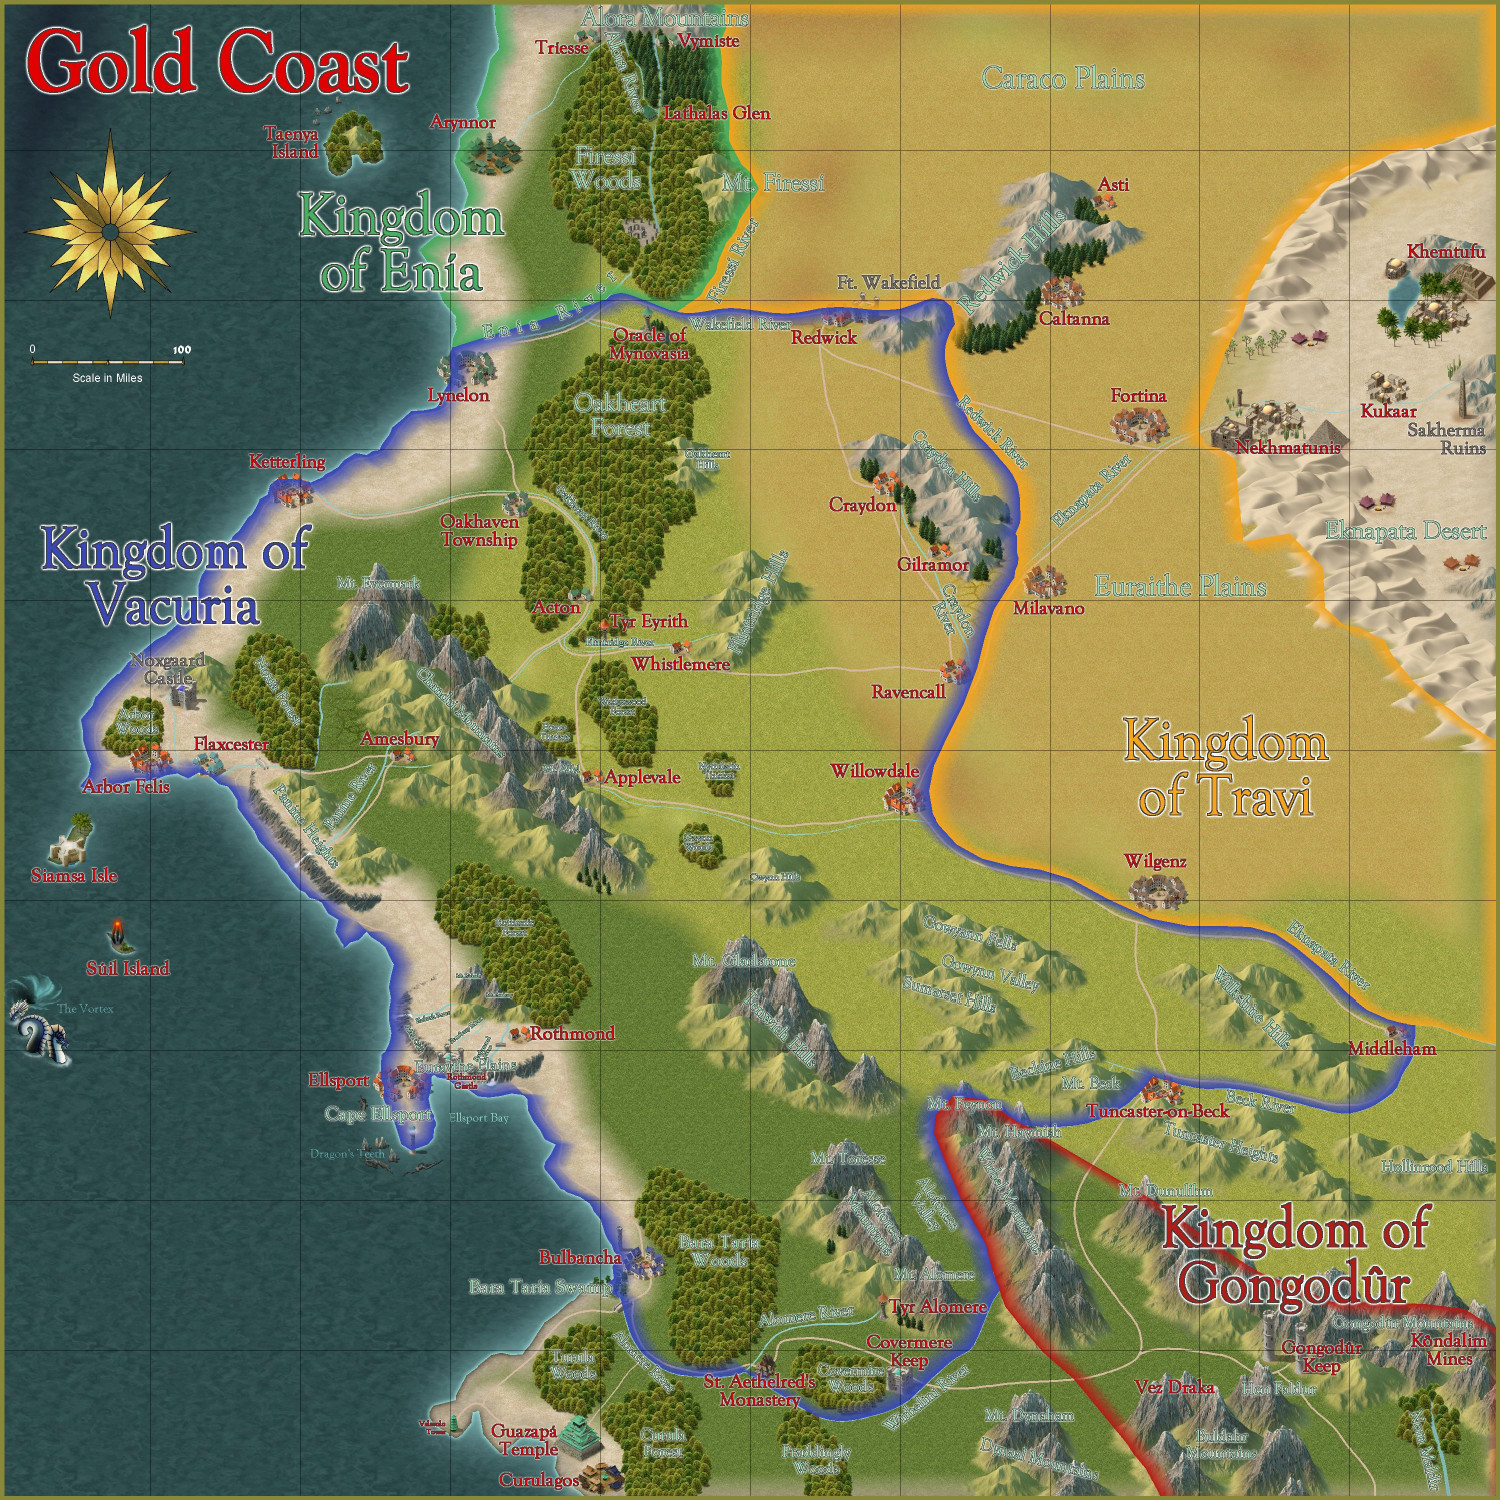
Thoughts?
And then here's a map of the Kingdom of Enia, with more smaller hamlets and other small details added, this time in the Mike Schley style:


-
[WIP] Haunted Mansion
Probably won't have a chance to finish this by the end of Halloween, as I had planned, but that's okay. Here's the second floor. It has a few guest bedrooms and some common space for the family: an office, a library, and a solarium or sun room. The ballroom extends into this level, as it has high ceilings, but it is from this level that the family and VIP guests can make grand entrances into the ballroom from the stairway.
Not really sure why my roads outside now have a visible white line down the center. I tried changing the color to brown, but that didn't work.
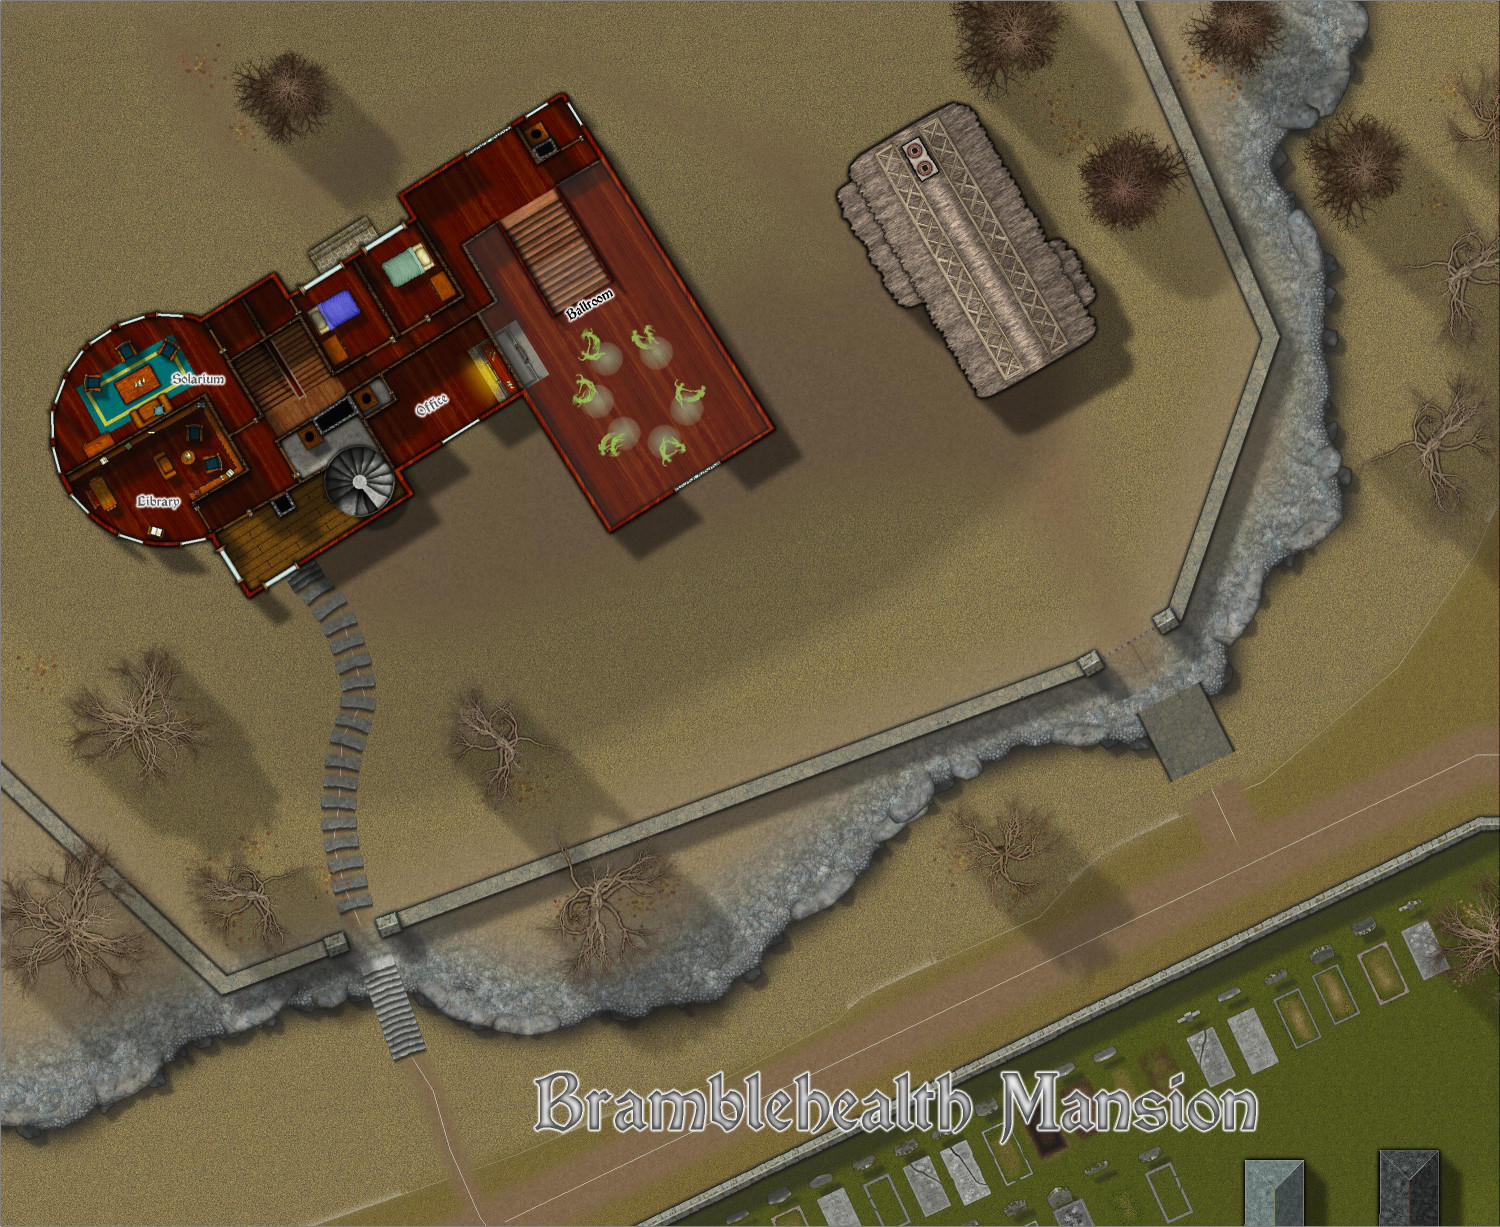
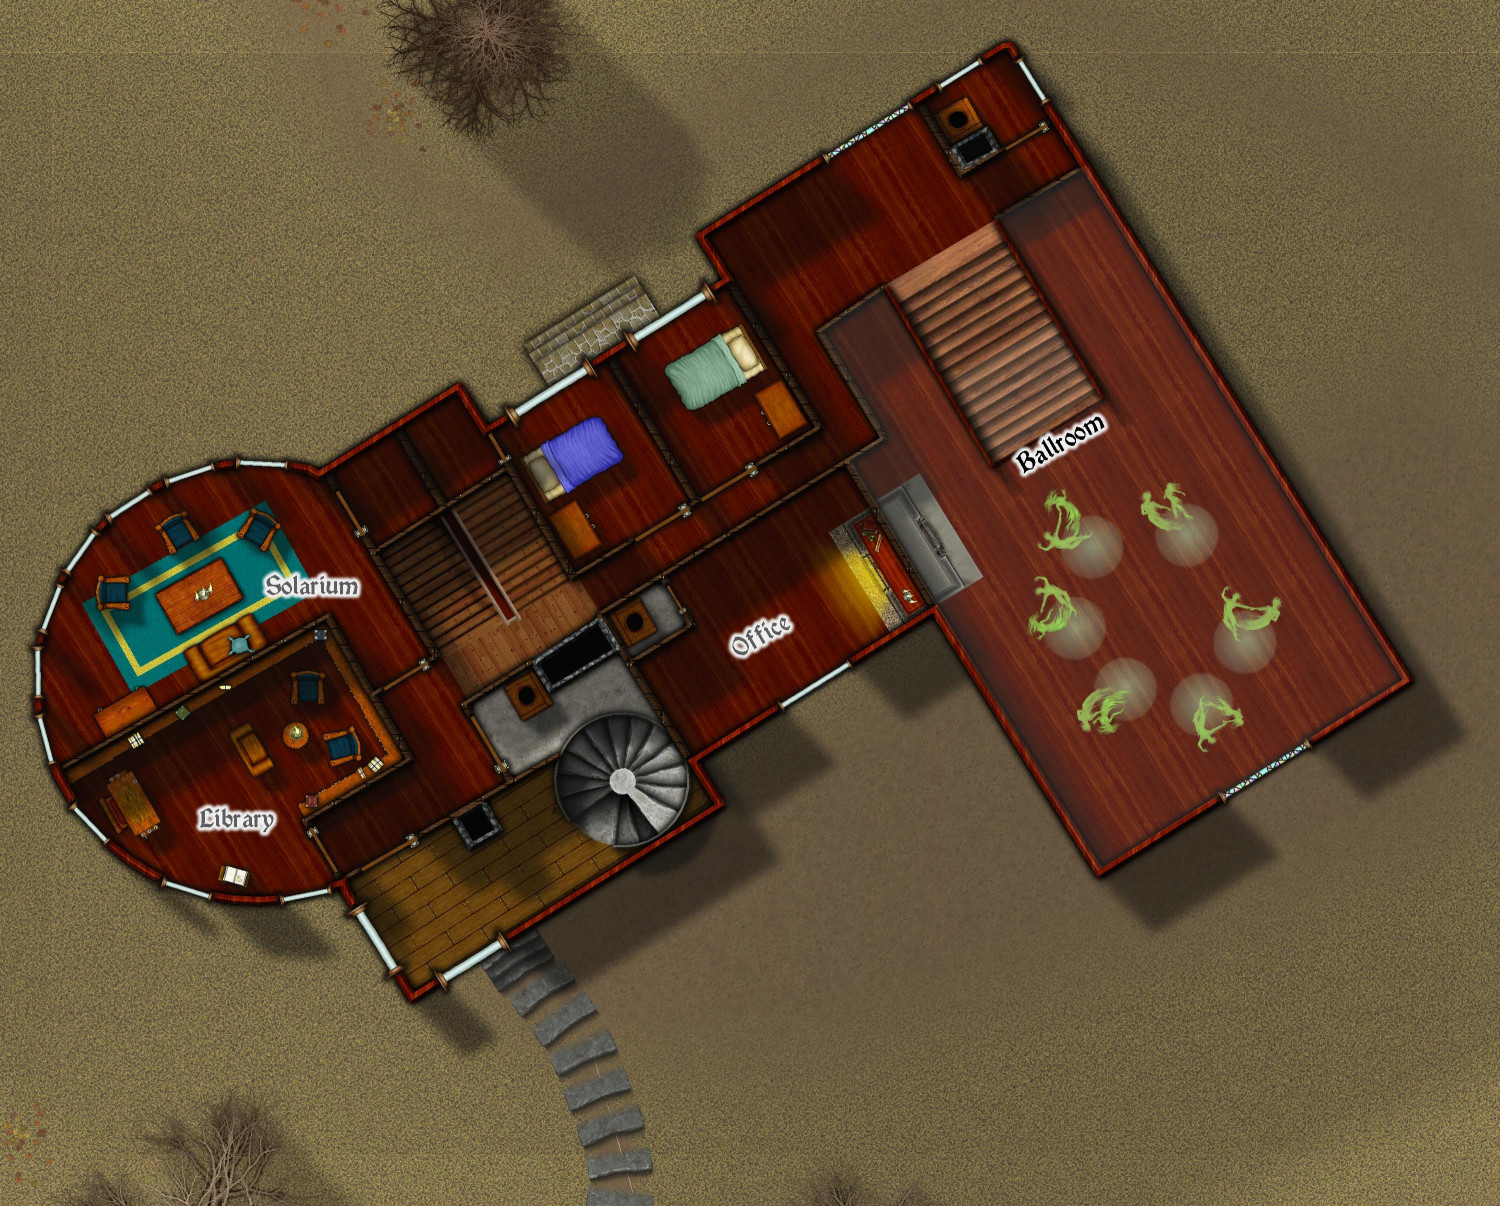
Just noticed that in addition to failing to furnish the office, I also neglected to put in a doorway!
Still to come: floor 3 (bedrooms), the top floor of the tower, Basement 1 (kitchens, wine cellar, staff quarters, etc.), a secret Basement 2, and the sewers that connect everything together.
-
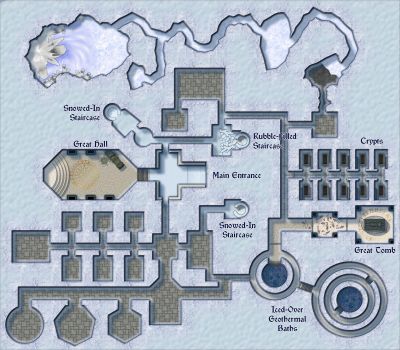
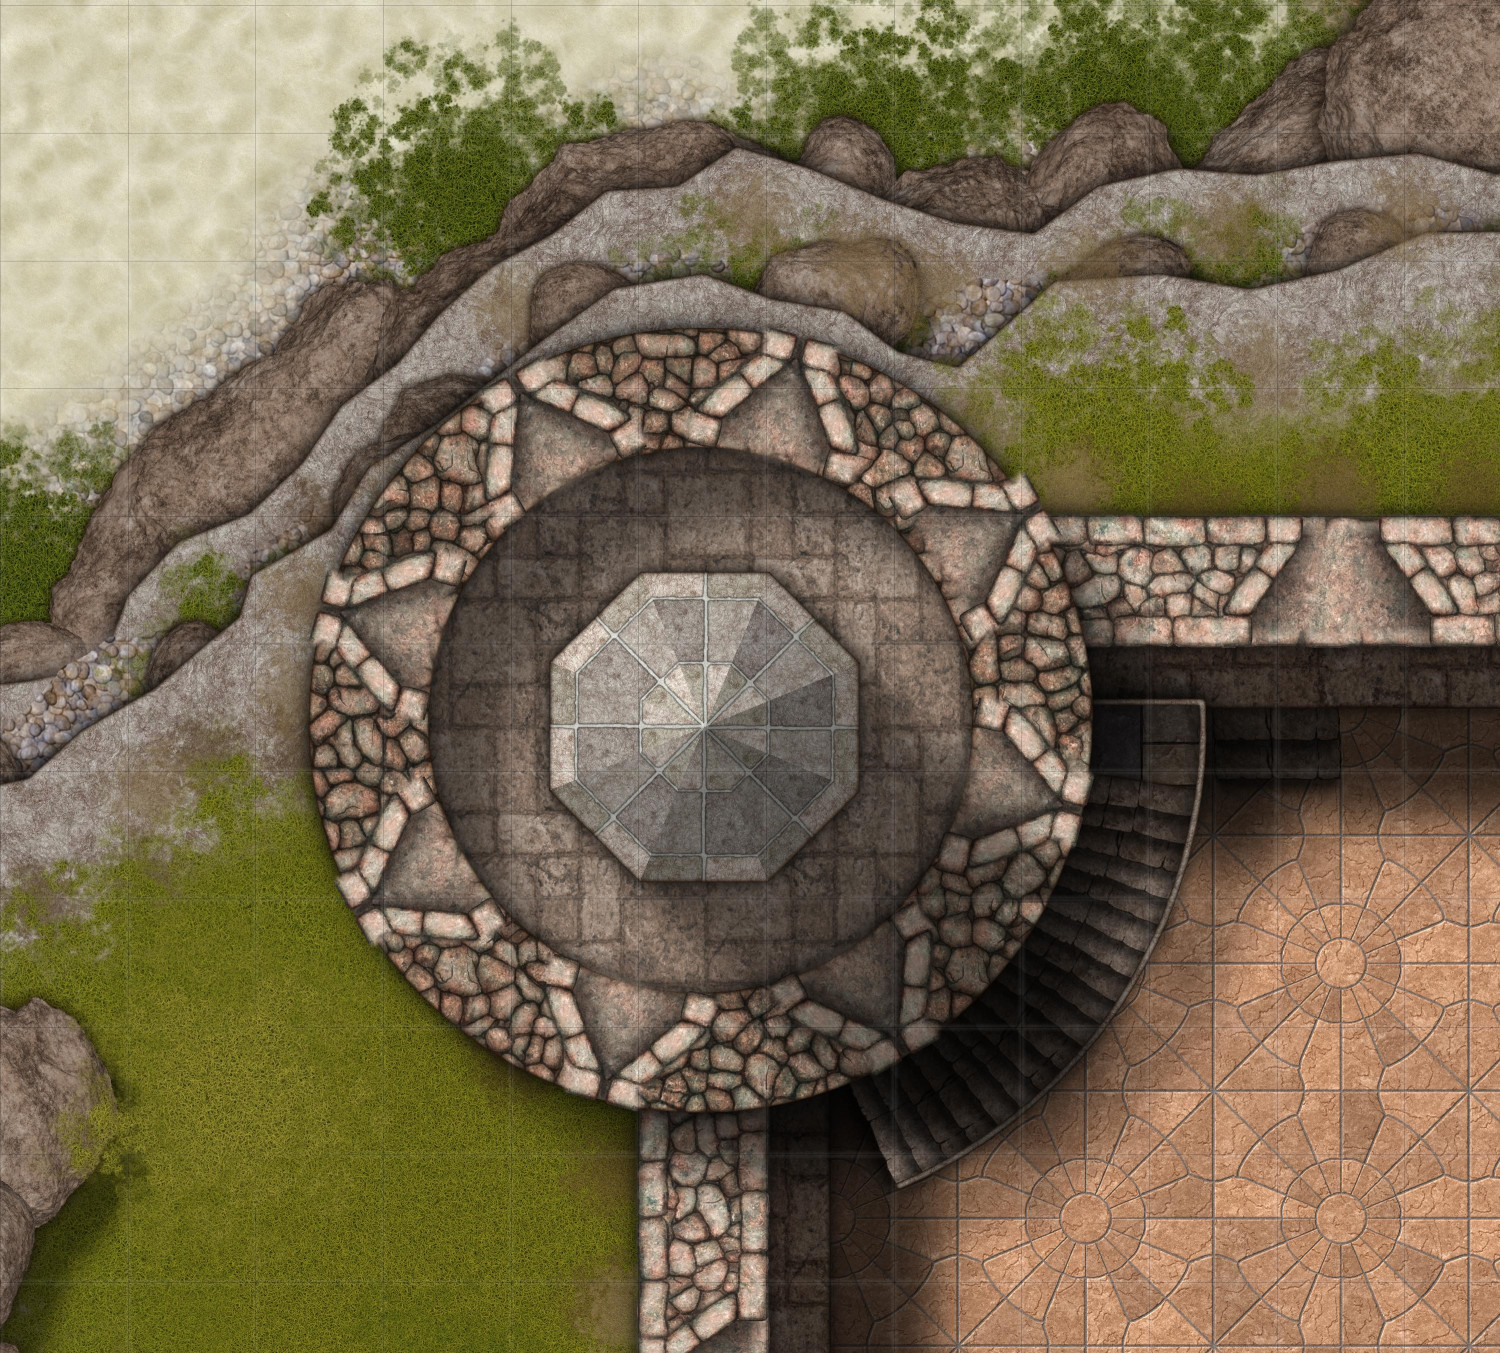
[WIP] Inside the Temple of Fah
Basement 1
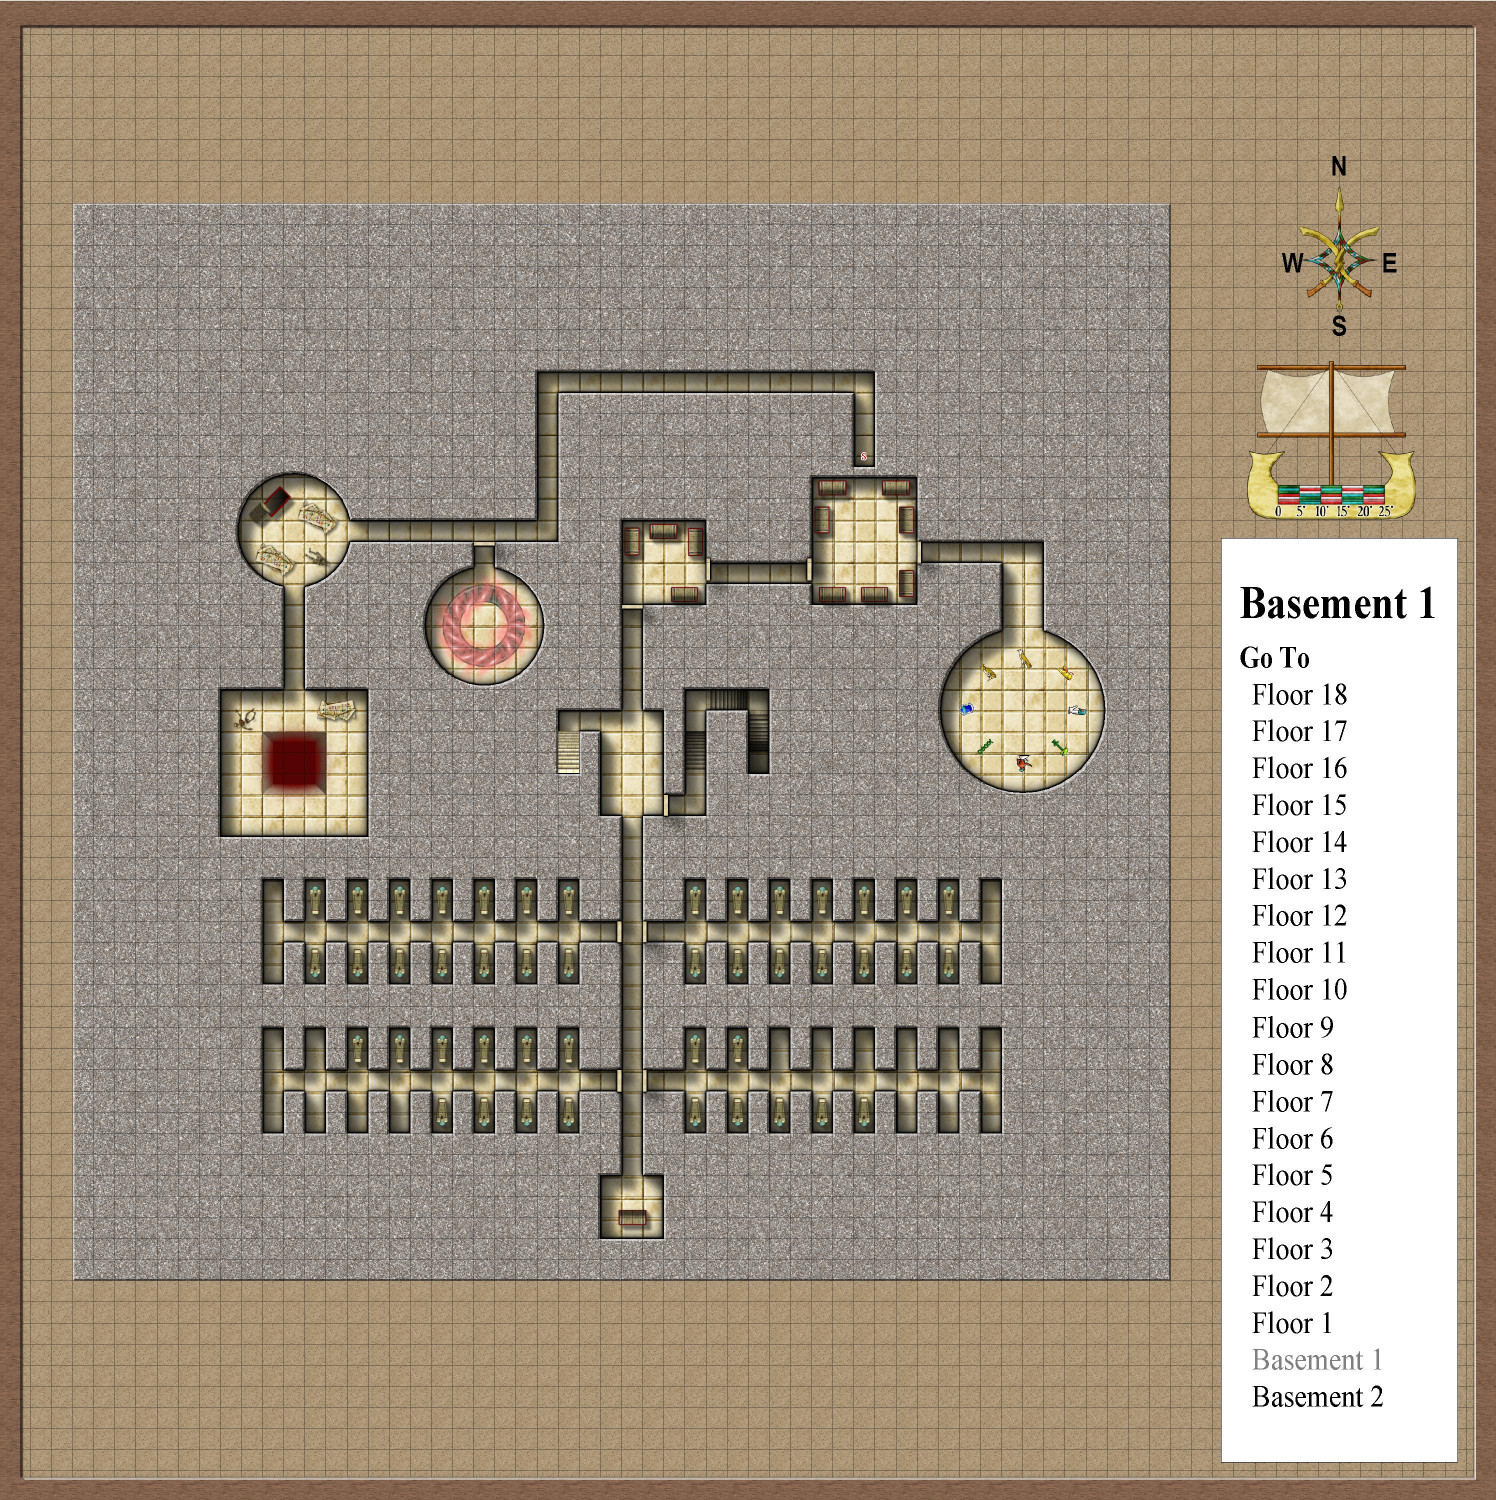
This level contains catacombs with 64 crypts for wealthy individuals who were not entombed with their pharaohs. There are 16 vacant spots.
This level also contains two chambers with the temple’s treasures, which connect to a circular chamber inscribed with eight hieroglyphics. The original purpose of this chamber has been forgotten. (The truth is, this was towards the end of my designing and I realized I hadn't used the hieroglyphs yet, so here are some.)
A secret passage leads to a chamber with a teleportation portal. Another circular chamber has both of its doors destroyed. The chamber beyond has a 15x15 pit. The heat, stench, and red glow suggest that it drops into a bed of lava.
A locked door provides access to a set of stairs that descend 30 feet to Basement 2.
Basement 2
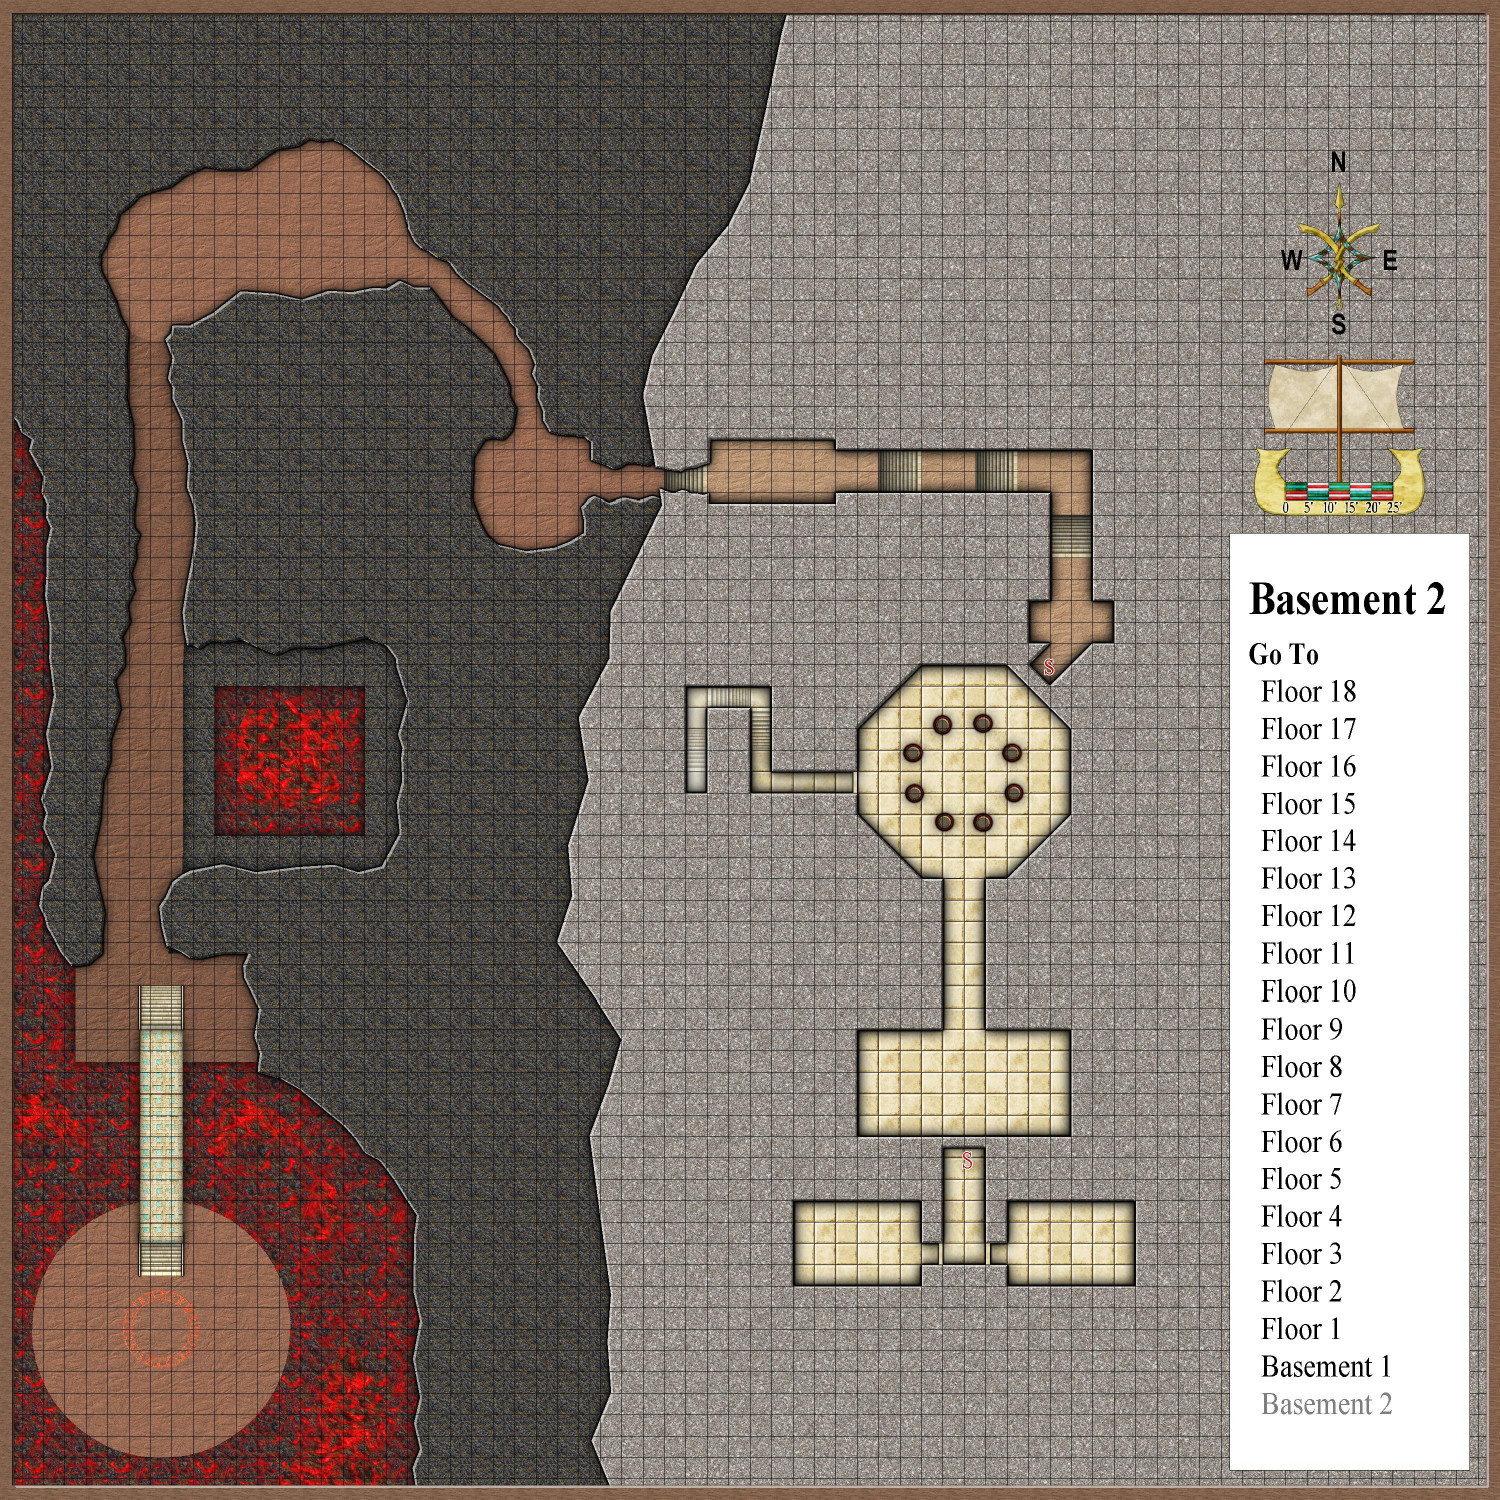
The 30-foot descent brings us to an octagonal chamber that appears to be used for secret religious rites, perhaps by priests who are part of a forbidden sect? This connects to a large meeting room. A secret door provides access to two more chambers.
A secret door on the northeast wall of the octagonal chamber provides access to a wide passageway that descends 30 more feet down a series of staircases to a narrow chamber. There on the west wall, more stairs descend another 10 feet into caverns carved into the bedrock.
Here the pit from Basement 1 does indeed drop into a bed of magma, encircled by a platform of cooled lava rock. A raised bridge provides access to a platform with glowing runes inscribed in a circle.
I’m really pleased with how the lava turned out here. I used two different fills that I think came from Monsen’s Mines. The darker one is on a sheet above the lighter one, and then I used the color key effect to allow brighter parts of the magma show through in spots.

-
Difference between layers and sheets
One thing I use layers for is to simultaneously reveal or hide things that because of different sheet effects need to be on different sheets. I once designed a five-level sewer system with each level of the sewers involving multiple sheets on a single layer for each level. Or a mountaintop covering a dungeon that can be hidden or revealed with a single layer.


-
[WIP] Marine Dungeons Lighthouse (more May Annual Stairs & Steps)
I decided I didn't want to redo the entire tower, so I did some stairs ascending around it from the courtyard as a proof of concept. I do like the idea of stairs winding around a tower. Wonder if I can make it go around multiple times? I have some thoughts on how to do that, but I will save them for another map.
In the meantime, here's how it turned out:
(It's subtle, but beneath the railing there are railing posts, which you can't really see but they cast a subtle shadow.)
Anyway, I'm rushing out the door, but I will make any tweaks when I return and then re-export the maps that show the tower.

-
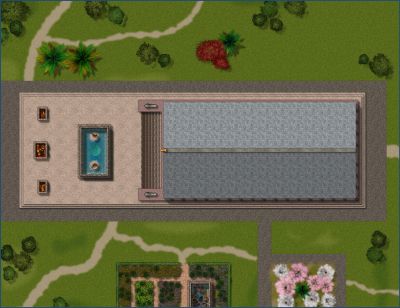
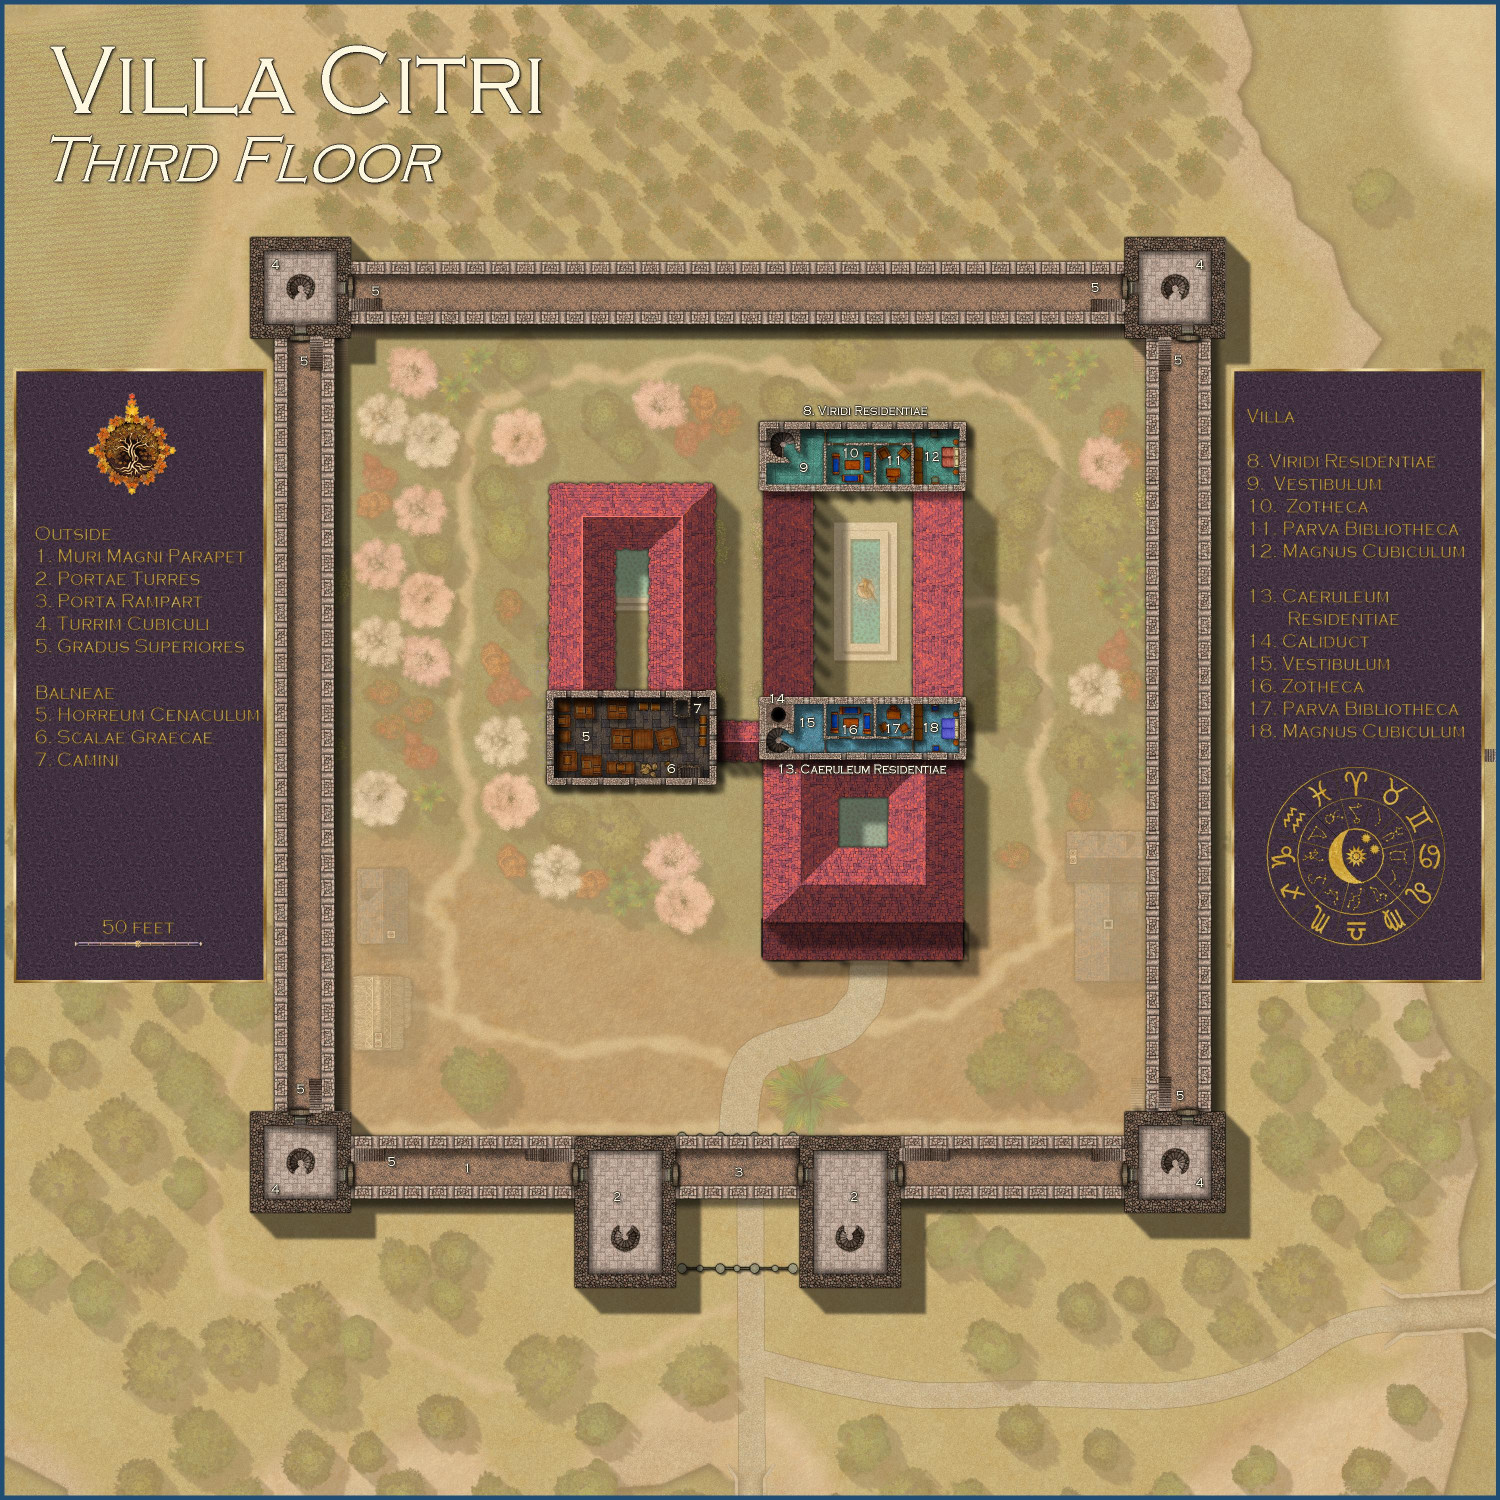
[WIP] Villa Citri (Roman-style villa)
Here's the third floor.
The outer walls here are accessed through the spiral staircases in the gatehouse towers and the corner towers. From there, arched doorways secured with metal doors provide access to the parapets of the outer walls. Stairs on these parapets lead to the top of the towers.
The main villa has two disconnected suites on this floor, nicknamed the Green Apartments and the Blue Apartments because of the color of the tiles. Each is accessed by separate spiral staircases from the second floor. Each has an outer reception room, a private dining/lounge area, an office, and a relatively spacious bedrooms. In previous generations, the Lord and Lady of the manor had separate suites. It is currently occupied by the Dowager Countess of (I forget), who resides in the Caeruleum Residentiae (the blue suite), as it is heated by the hypocaust's flue and the other apartment is not. The other suite is the guest quarters for her son, the current Earl of (I forget) when he visits.
The upper floor is the bathhouse is currently used for storage.

-
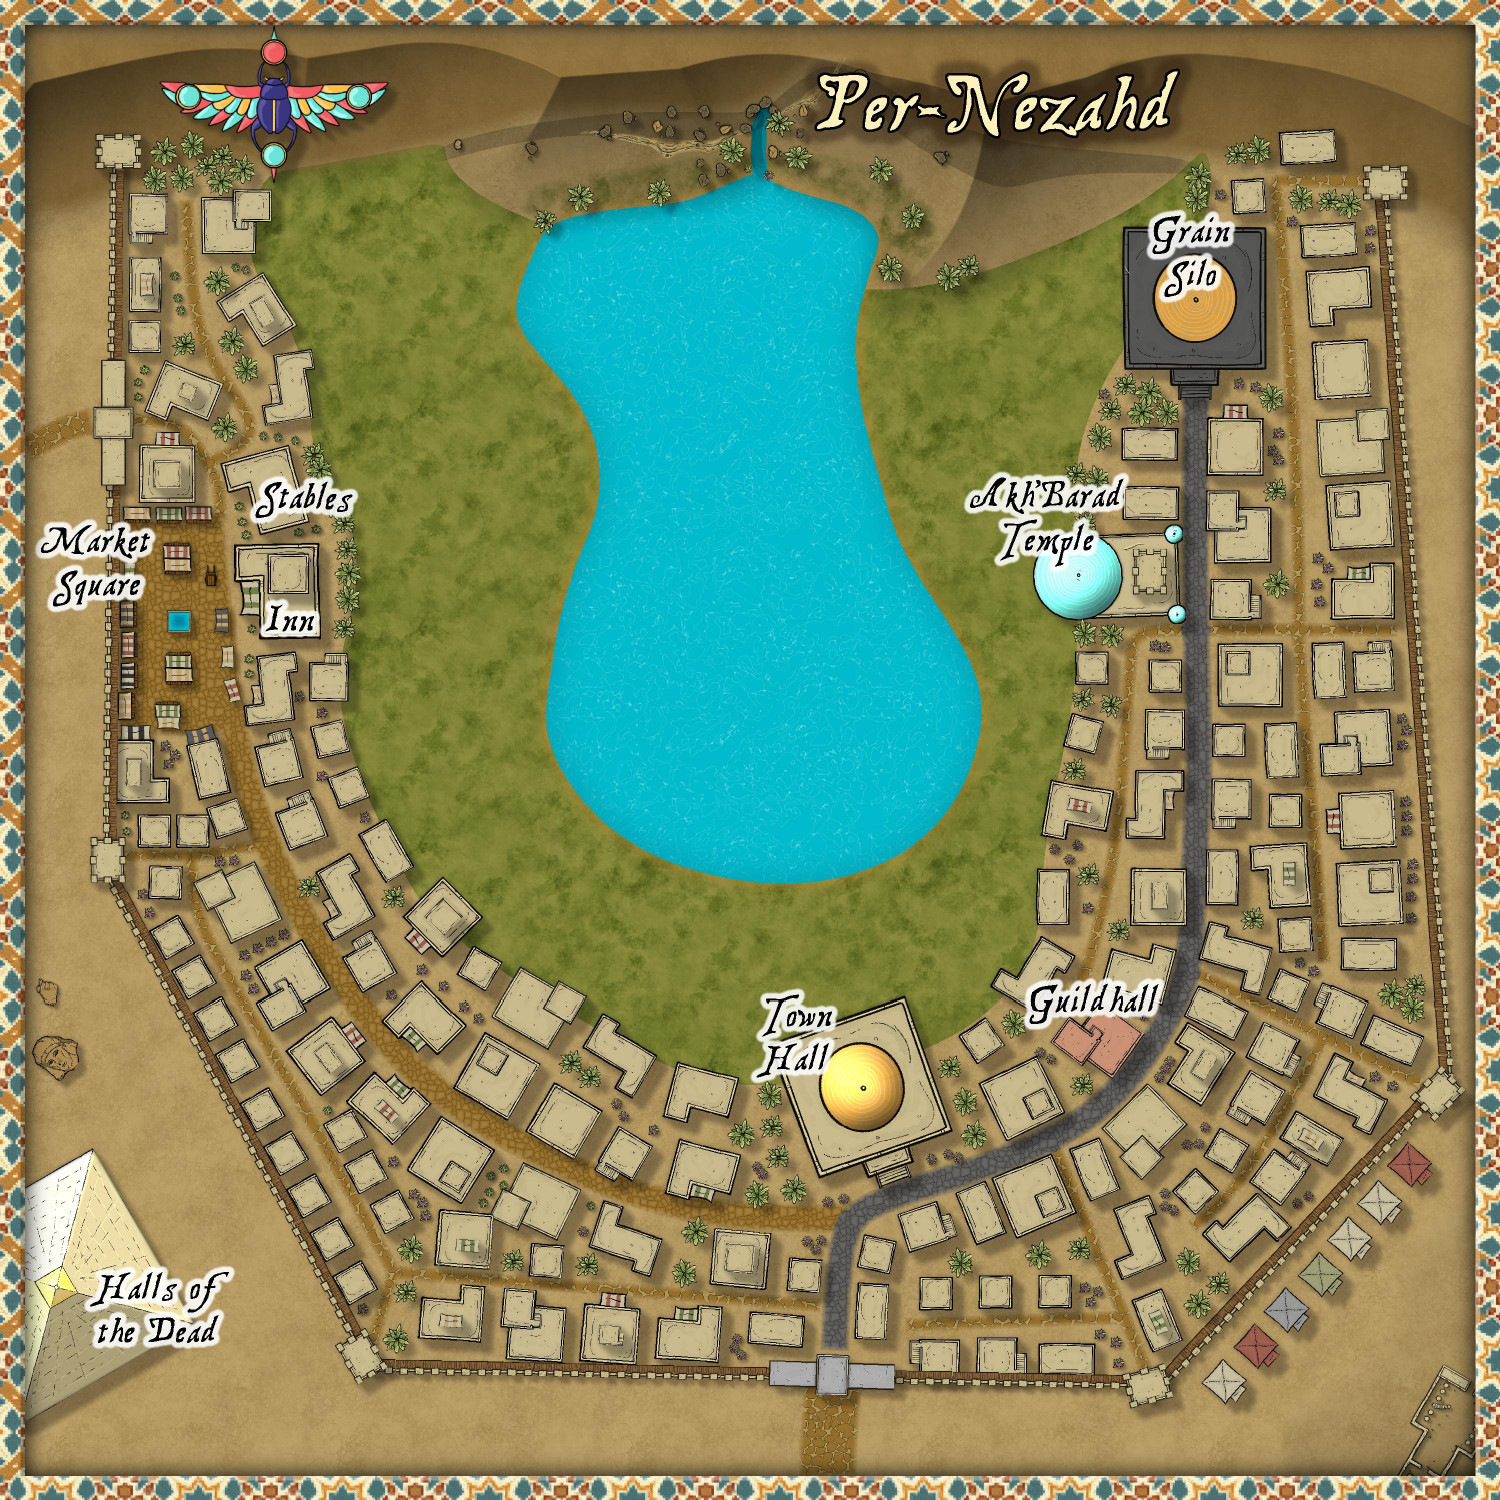
[WIP] Per-Nezahd
Yup, I think it's a town, not a village. But that's okay, I have a home for it (looking at the parent map, it probably should be a town, not a village). But that's okay, it got me thinking and gave me ideas for a smaller village in the same style to design. (Also a little too symmetrical, but I guess it makes sense that everything would radiate out from the only water source for miles around.)


-
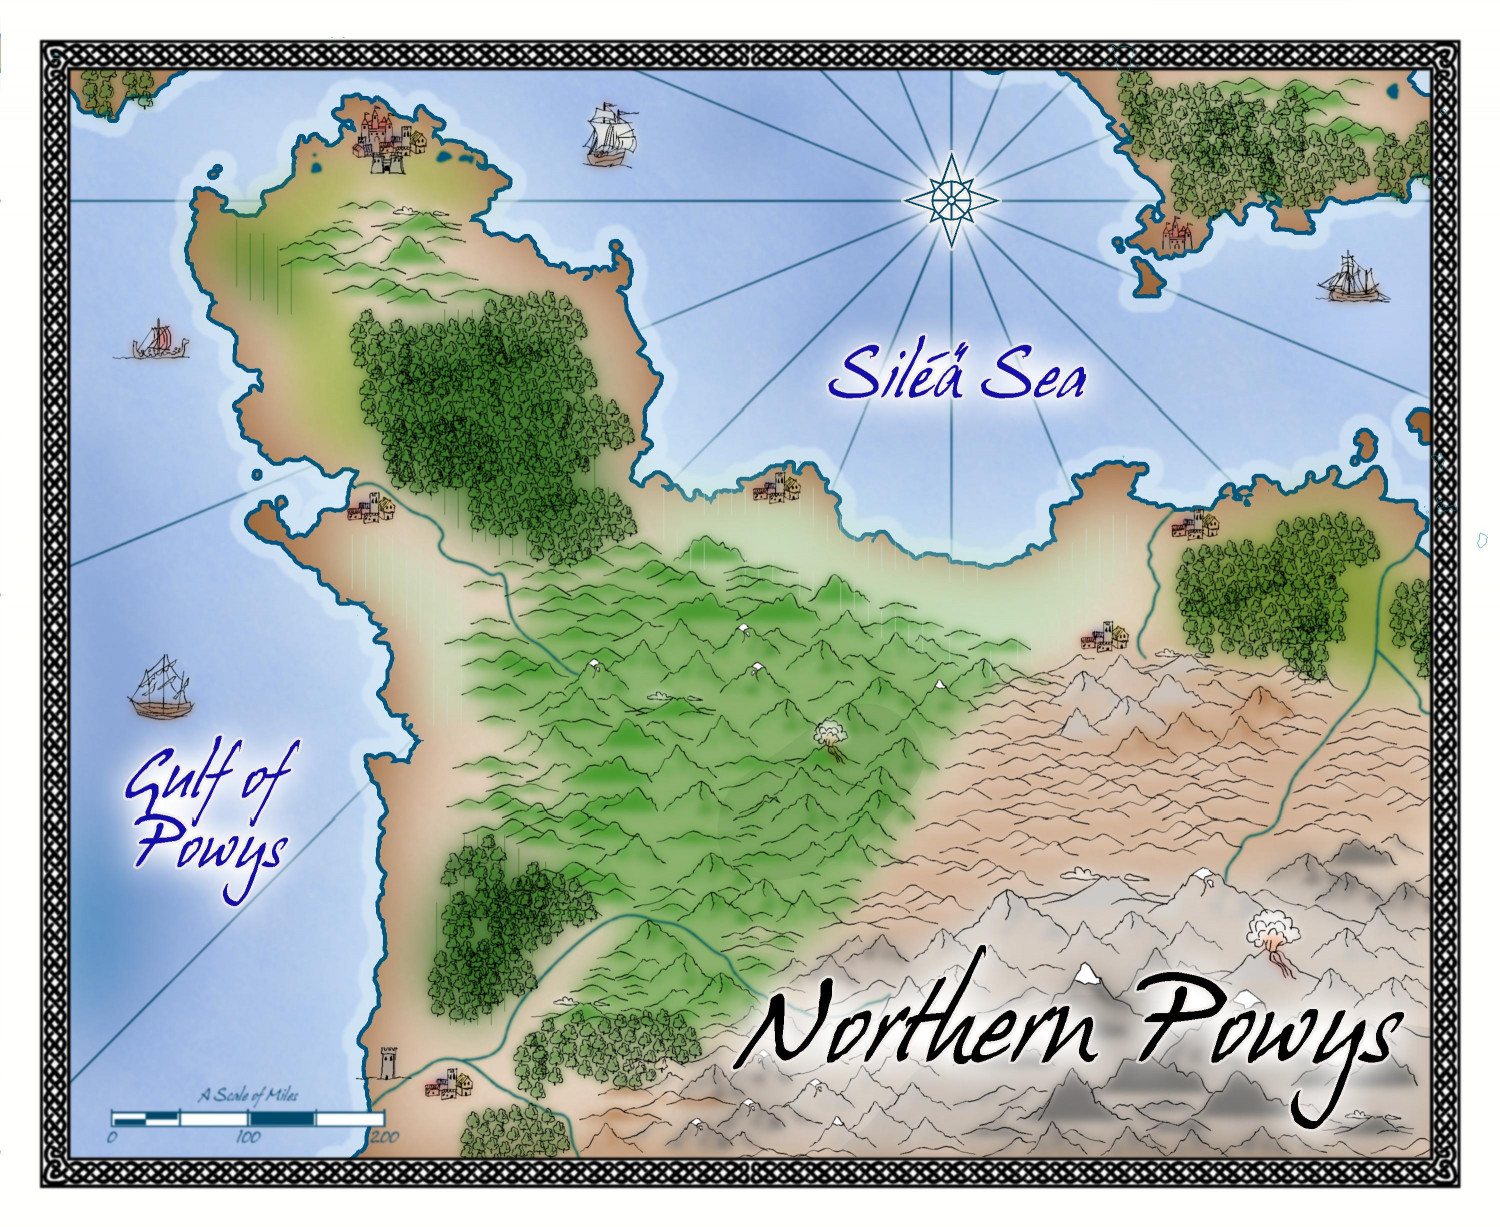
[WIP] Northern Powys (Sarah Wroot Revisited)
Playing around with the newest Sarah Wroot Revisited annual. This is the northern part of the Kingdom of Powys from my campaign world. The coastline was brought in from a Fractal Terrains export, but then the rest was done by eye/memory rather than trying to get the contours exactly right. It's like an impressionist painter's rough representation of the kingdom.


-
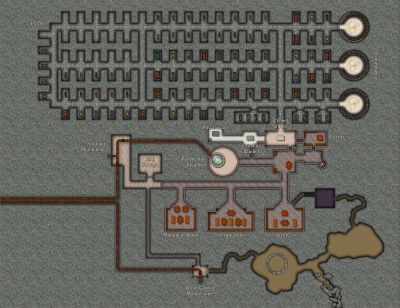
[WIP] The Sewers of Elmsbrook Township
These are the sewers for Elmsbrook, a town in the human kingdom of Powys in my campaign world. They’re intended to be fairly representative on the sewer systems in my kingdom – smaller villages might have a simpler system, but larger cities will have the same basic layout, but with more extensive canals.
I was hoping to get this done the same month that Sinister Sewers was released, and I barely did it. I still have work to do, and advice to collect, but thought I would post where this stands.
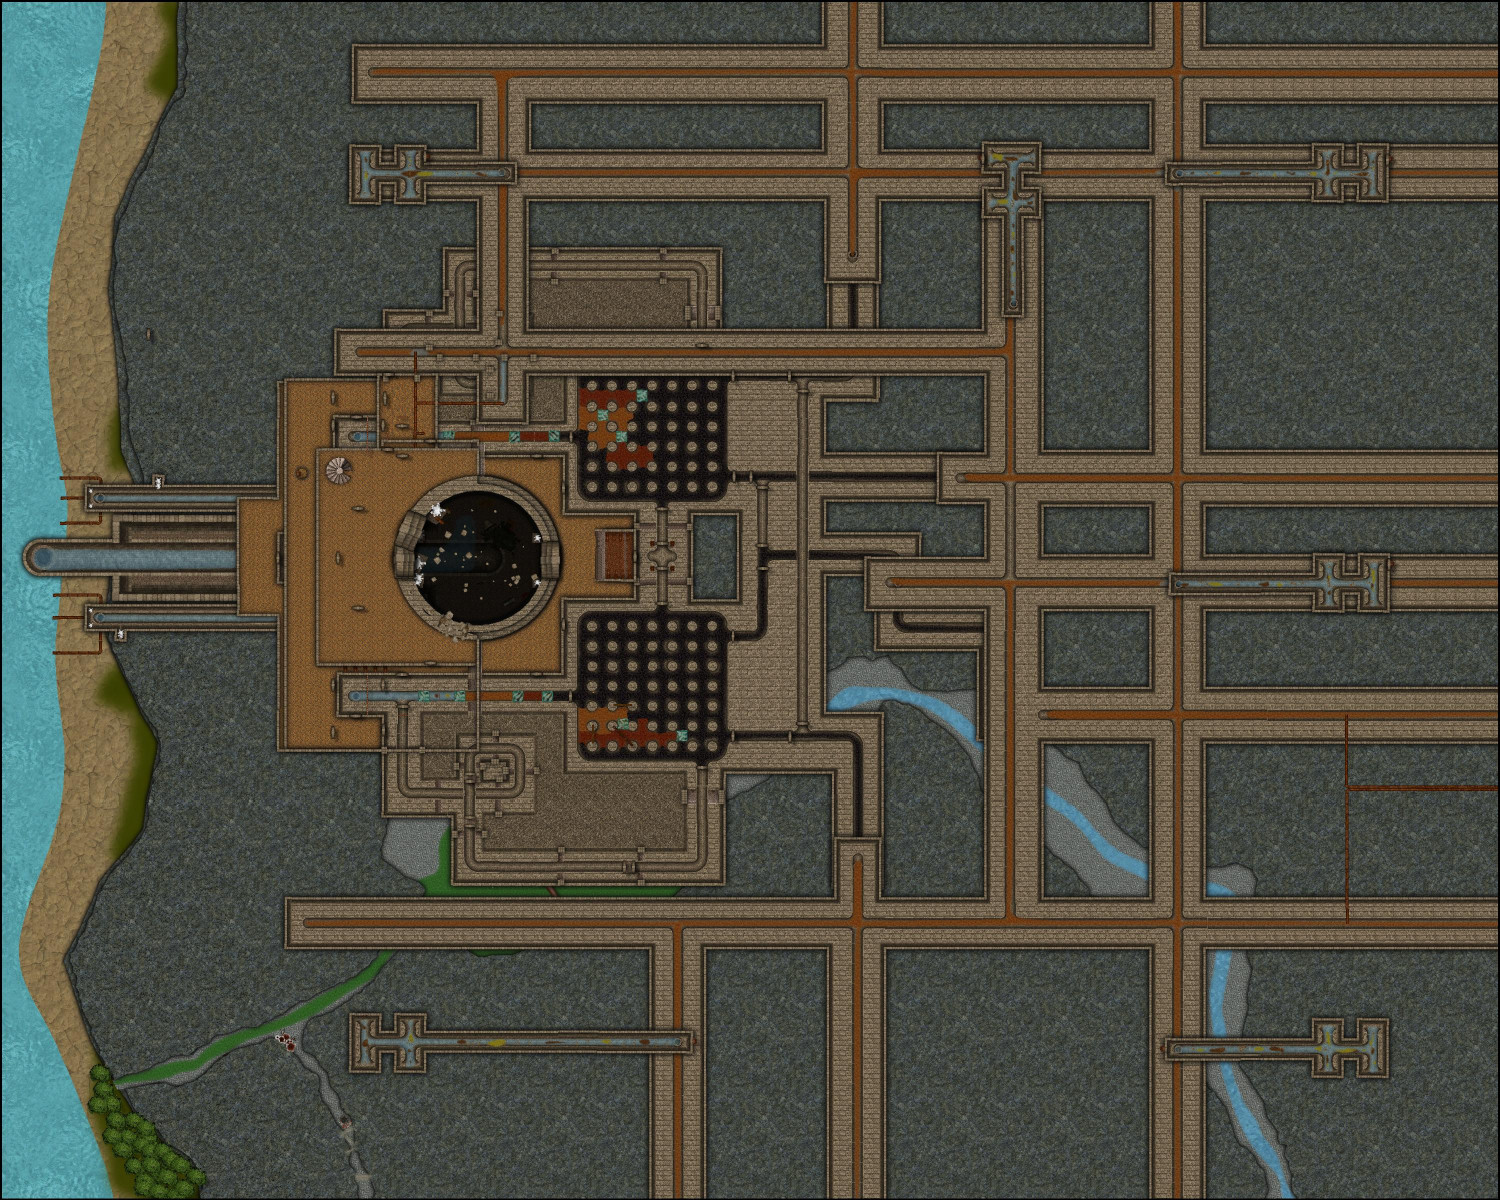
By the way, Sue: it worked putting everything for each level on its own layer, making it easy to display or hide different levels as needed.
In addition to using the symbols and fills from Sinister Sewers, this also uses a few things from Marine Dungeons (particularly the stairs and the bell at the bottom of the pit), and a few things from Forest Trails (leaves, the trees along the beach, and maybe some of the fills) and Creepy Crypts. Also: Sue spent a lot of time helping me come up with a technique to show clear water, but it really worked best close-up. At this scale, it made it look like black water. I ended up using a water fill from Creepy Crypts, but on its own water sheet with a 50% transparency effect added.
In my campaign world, fastidious elves have long understood at a high level the correlation between hygiene, sanitation, and the spread of diseases. (Even if they don’t have the tools to study microbiology and virology, they can study commonalities in infected populations to identify vectors of disease.) Dwarves first developed aqueducts and sewer technology. And it is said that orcs pioneered the use of flesh-eating oozes for waste management.
Oozes are amorphous creatures with an intelligence no greater than an ordinary garden slug, flowing through subterranean lairs to devour any creature or object they can dissolve while shunning things that provoke their flight reflex, like bright lights and extreme temperatures. I have made a few tweaks to oozes in my campaign world to make them better suited for deploying in sewers. I added immunity to poison and diseases. I also added a weakness: sunlight hypersensitivity where, like vampires, they can be damaged by exposure to sunlight. (This is why they avoid bright lights: a bright lantern won’t harm them, but it still triggers their flight reflex.) Sunlight can kill an ooze, causing their acids to neutralize and their bodily remains to collapse into a nutrient-rich goo that farmers often use to fertilize their crops.
Some items of note about specific oozes used in sanitation systems. Gelatinous Cubes can dissolve nonmagical soft tissue and vegetation, leaving behind undissolved bones, metal, glass, stone, and magical items of any sort, along with excess water stripped of anything edible. They cannot climb but can move up slopes with a grade of 25 degrees or less. Moving up a slope with a grade of 10 degrees or more requires the Cube to expel any indigestible materials or excess water. Black Puddings are far more dangerous. In addition to dissolving soft tissue and vegetation, they can also dissolve nonmagical bones, metal, but cannot dissolve glass, stone, or magical items. They can also climb any surface, even upside down. Sanitation workers employ bright lights to keep Black Puddings from escaping (and an ample food supply keeps them from seeking to escape). And finally, I created a new ooze called a Voracious Sullage. It’s a slow-moving, weaker version of the Gelatinous Cube, unable to maintain a cubic shape. It tends to stretch itself across small waterways so that anything edible flows to it (and anything it can’t eat gets expelled on the other side).
Here's a quick summary of how the sanitation system works. More specifics for each level of the sewer system will follow in the comments.
Surface (not shown): Storm drains at the intersections of major streets, with a manhole cover at one of the corners than allows maintenance workers to descend using rungs. There is also a large Waste Management Facility where residents can dispose of large objects that cannot be repaired or repurposed (such as items that cannot be chopped up for kindling). Maintenance workers throw these items into a giant pit nicknamed the Great Maw that is about 140 feet in diameter. The surface of this pit is in a building that is covered at night but open to the sky during the day. Bright luminescent crystals are placed near the mouth of the pit to frighten away the Black Pudding at the bottom of the pit.
Level 1: This level is immediately below the surface. Storm drains at major intersections deposit rainwater (along with other debris) here, where they run off to chutes that bring wastewater to Level 2.
Level 2: Wastewater from Level 1 is deposited here, where it helps push through human waste from outhouses and latrines that are connected to the sewer system. This sewage flows through chutes down to Level 3.
Level 3: Waste brought in from Levels 1 and 2 are treated here in two great chambers called Auditoriums. Numerous Gelatinous Cubes gobble up the waste, leaving behind items they cannot digest, and now-clean water stripped of contaminants. This purified water drops through chutes to Level 4.
Level 4: Primarily a passthrough level, and the lowest level that maintenance workers normally go.
Level 5: A Black Pudding lives at the base on the Great Maw, devouring any waste thrown into the pit. It can eat nonmagical flesh, vegetation, and metal, but cannot digest stone, glass, or magical objects of any sort. Water purified in Level 3 descends to this level, where some passes directly to the sea and the rest is used to flush out anything the Black Pudding cannot digest.
More details for each level in the comments.


