


Wyvern
Wyvern
About
- Username
- Wyvern
- Joined
- Visits
- 3,237
- Last Active
- Roles
- Member
- Points
- 5,515
- Rank
- Cartographer
- Badges
- 24
Latest Images


-
Community Atlas: Aenos Isle North, Demosthenes Swamp, Artemisia
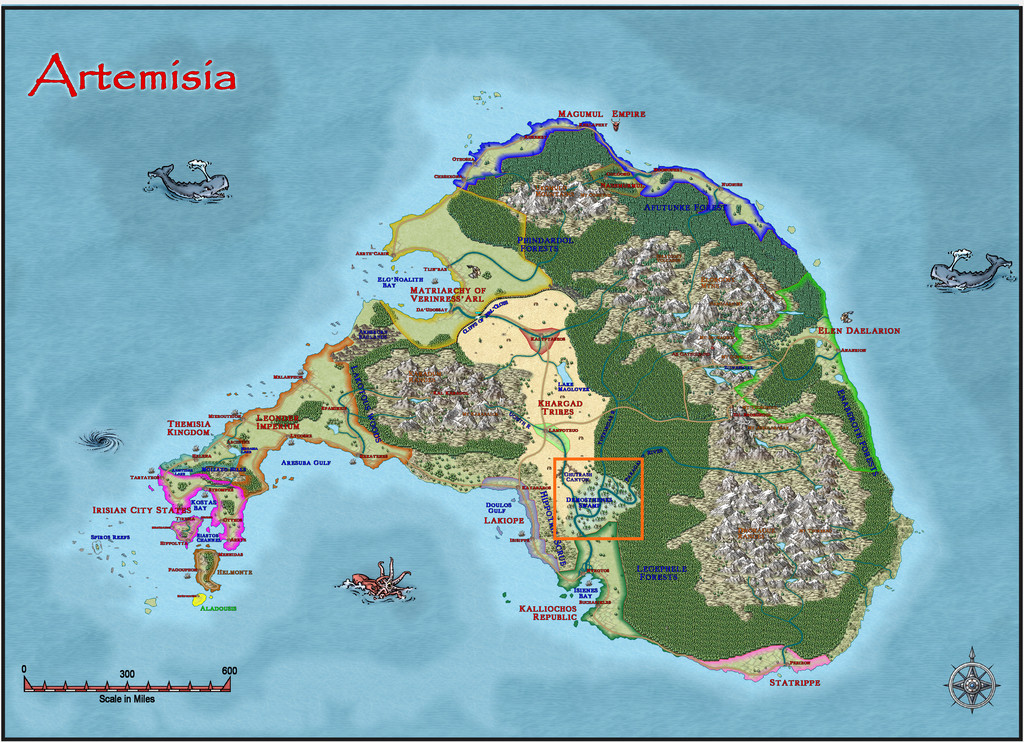
As noted when I was leaving the frozen wastes around Seer's Hall in Ezrute last time, I was heading off to somewhere warmer, in the tropics of Artemisia, in fact, around 25°N latitude, the heart of the Demosthenes Swamp no less:
A further change was that this map was to be based on three of the Inkwell Ideas Dungeonmorph Dice designs from the "Adventurer" set, the first from that set I'd be using in this sort-of Dungeon24 (now of course Dungeon25...) project. I'd decided in advance to swap back to colour mapping from the black-and-white styles I'd been using for some months, and also to try out some different random design systems for determining what was to be where among these new maps. This time, I opted for a couple of weighty tomes by Raging Swan Press, delighting in the titles of "Dread Thingonomicon" and "Dread Laironomicon".
Looking over the map notes for the Demosthenes Swamp region, I found the area to be home to Lizardfolk living in smaller settlements, ruled over by a Queen. Quite quickly, a couple of settlement markers in likely spots towards the middle of the swampy region that would work with what the dice had provided became apparent - a surface settlement leading into two separate underground areas, with some of the surface buildings constructed against a right-angled cliff line. The Lizardfolk here were further noted as being the larval stage of dragons (which immediately, and quite naturally, became Swamp Dragons in my mind), the Folk passing through a chrysalis stage to achieve full dragonhood. With what the dice showed, ideas formed rapidly from this framework of notes, and I decided (for reasons that will eventually become clear) that I needed an additional, deeper subterranean map as well. That was determined from a couple of Inkwell dice in the "Lairs" set that showed interesting cavern options, and which weren't already going to be used for later maps in this series.
The site I chose was the settlement marked as "Aenos" on a small island in the near-central swamps, for which I also realised that, much as normal, I'd need a suitable area map. The orange square on this version of the extant Demosthenes Swamp map shows that area, which is 10 miles square:
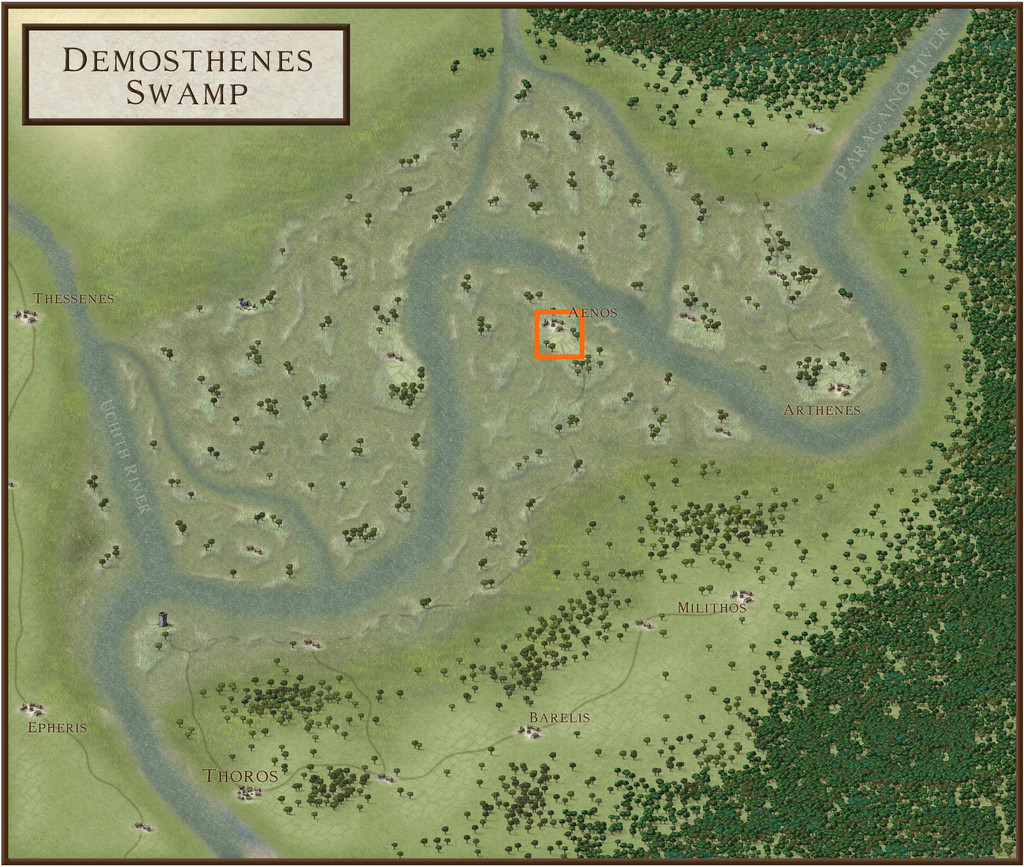
Setting-up a one-mile square grid over this area, random features were allocated, besides what the parent Swamp map already indicated, again much as normal now. I wanted to try to stick with a similar "green" colour palette to the Swamp map, and soon realised that it would be possible to make use of some of Sue Daniel's Annual styles that fitted together to cover everything I'd need in this three-map group. It occurred to me early on too that as the Lizardfolk had a very different civilisation here to many of the other realms on Artemisia, it would be unlikely they'd persist in using the Greek-style names so frequent over the nearby area. So for a couple of major features - including the settlement, which had now become the Lizardfolk capital - I decided to retain the Greek names, and add local ones, while holding with local names for other places, or simpler descriptive names in English for the sake of clarity.
Since the area map was linked to the Demosthenes Swamp map, it seemed reasonable to retain the Greek-like name in its title, thus it became "Aenos Isle North", as covering more or less just the northern half of the Isle the settlement is set on. For the mapping style, I picked Darklands from the May 2021 Annual:
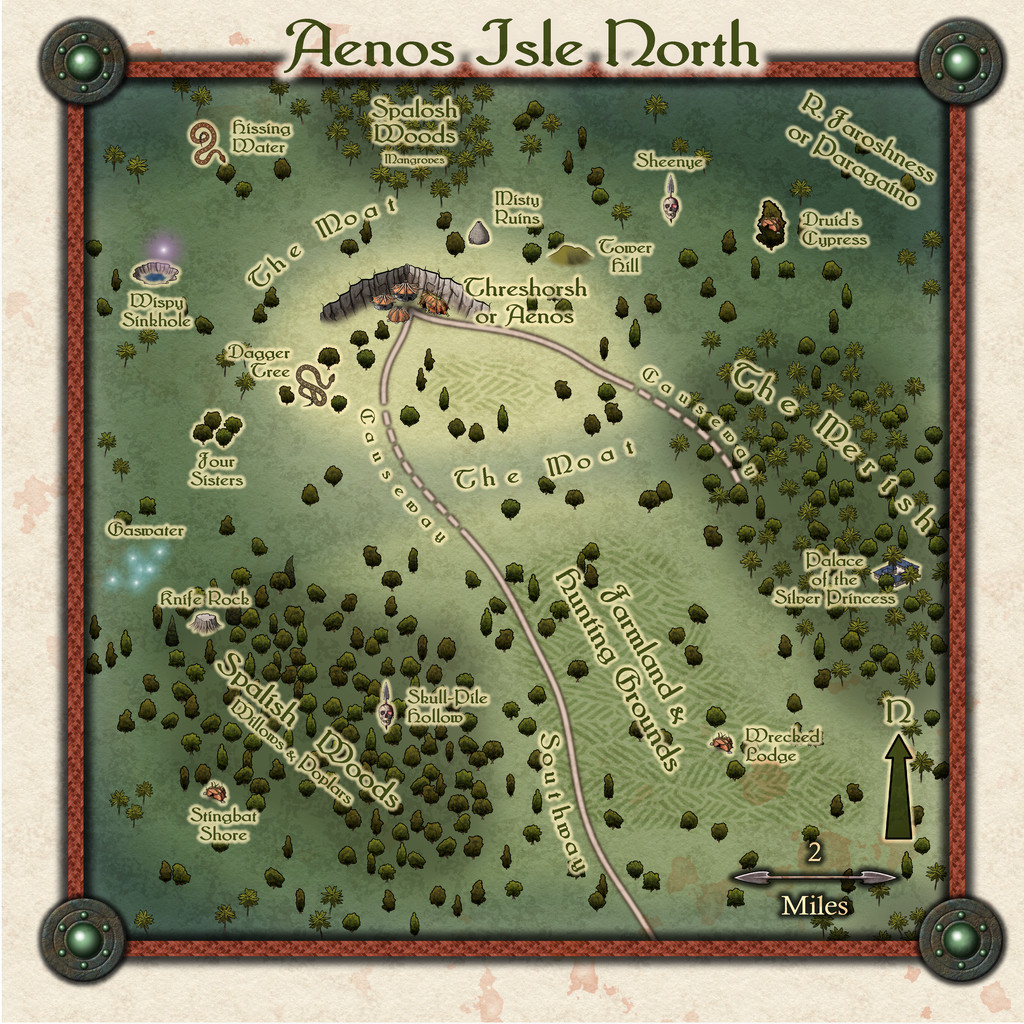
In general, I retained something akin to the colour scheme from the larger Swamp map, as that helped indicate where the higher, drier ground was, as well as the swampier areas, and the deeper swamps together with the great river that wends sluggishly through these. As normal, there are descriptive texts to accompany the Atlas version of this, but some further notes follow here too.
There seemed little point in trying to illustrate the numerous pools, ponds and streams across even this little zone, as in swamps, these rarely stay the same for long anyway. Looking at the larger map, the river channel - the Paragaino there, the Faroshness here - was shown as about five miles wide, although its indistinct edges create much doubt, just as would be the case in an actual vast swampland like this. So I took it there would be both identifiable rivers channels of varying width, interspersed with pools and marshes of varying depth and difficulty to cross, and which soon became the standard concept across most other places not on the Isle itself.
The woods were then allocated tree types based on the relative depth of swamp nearer to them. These were all assumed to be local tropical varieties, retaining more recognisable names again mainly for clarity. While the larger map does show farmland along the spine of the Isle, again that seemed plausibly more an external imposition by the local Greek-style map-makers, than reflecting the reality of what a Lizardfolk civilisation might have. However, some farming for food and building materials (timber, rushes, reeds) made sense, with a lot more of the drier ground left open for hunting. A random option allowed the inclusion in the text of some ant-nest "towers" here too, that outsiders might mistake for ruins...
I also decided against adding more settlement markers, given the capital of Threshorsh (as Aenos became for the locals) is only village-sized anyway. There is an assumption in the notes that there will be huts, farmsteads and hunting lodges scattered over the drier parts in general, which things like the Wrecked Lodge, Misty Ruins and Tower Hill further hint at/act as reminders. Not to mention the shunned Palace of the Silver Princess (a ruin guarded by a living, solid silver statue of a Lizardfolk Princess; and something else...).
The Moat actually isn't one, but a natural ring of shallower swampy ground that surrounds the highest part of the Isle, while the two Causeways over it also really aren't, instead being ramshackle sort-of bridges, made from tangles of living trees, dead logs and waterlogged old planks, suitable for foot traffic only - with difficulty. Southway was luckier, as it was given the randomly-selected option of running along a slightly elevated ridge, so is a more typical trail.
Happily, the style's cliff options allowed me to create the right-angled setting for Threshorsh the dice designs required, making a rather fun little arrowhead too. I almost thought to use this as the north pointer, although the finally-chosen arrow for that had to be ported-in from another of Sue's Annual styles, Creepy Crypts from 2022, largely because I'd repurposed the skull-and-spear north pointer from Darklands as a marker icon for a couple of mapped sites by then, one for the Banshee Sheenye, the other, at Skull-Pile Hollow, as a former Green Hag's lair-marker. Indeed, that latter, with elements from both Knife Rock and Stingbat Shore - all decided randomly don't forget - helped characterise Spalish Woods as somewhere the locals try to avoid. The Hag is dead. Probably...
Next time, we get up close to Threshorsh.


-
Community Atlas: Wyvern Citadel Defence Zone on Kentoria
As suggested when I requested this part of Kentoria a few days ago, this is the WIP thread to try to show something of how this mapping project's been developing, and where I'm up to with it.
It all began in 2020 July, when Quenten suggested a series of potential mapping projects for various Forum "regulars" from an area in western Kentoria he'd just been mapping, called Shoenia. While I had no time then to do any mapping for "my" bit, Wyvern Citadel, I did some basic exploration of the area and made a few notes even then. Not much has been said about Kentoria, but what there is suggested to me a high magic-use continent, now threatened (if presumably only to an extent) by barbarians. I also discovered that this Citadel was the sole structure shown near the western shores of Kentoria on the continent map:
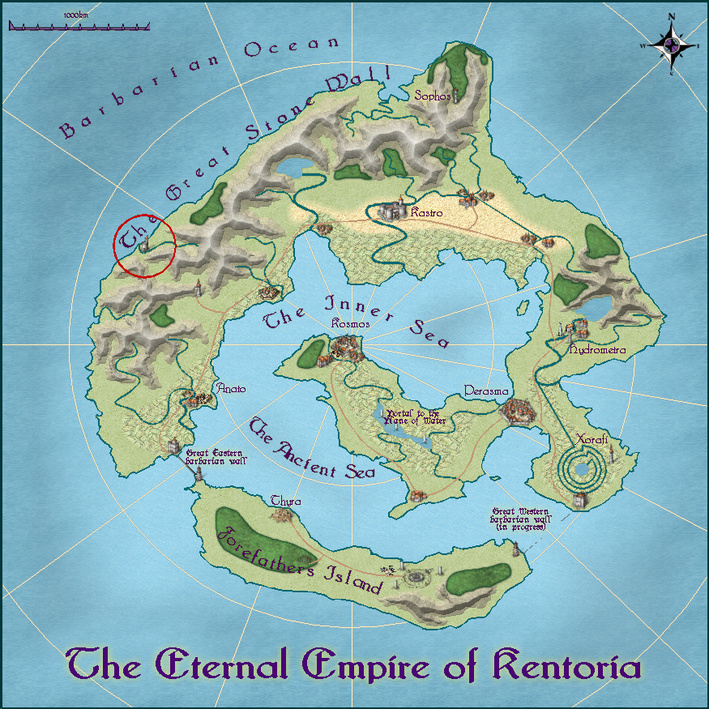
That suggested it was of considerable significance, and being next to the Barbarian Ocean (despite the considerable separation from the nearest land on that side of Kentoria) started suggesting reasons why, particularly seeing that Quenten's Shoenia map had provided a lot of obviously high-yielding agricultural land in the region, stretching for several hundred miles into the surrounding valleys (told by the numbers of settlements, as well as the extent of the farmed lands).
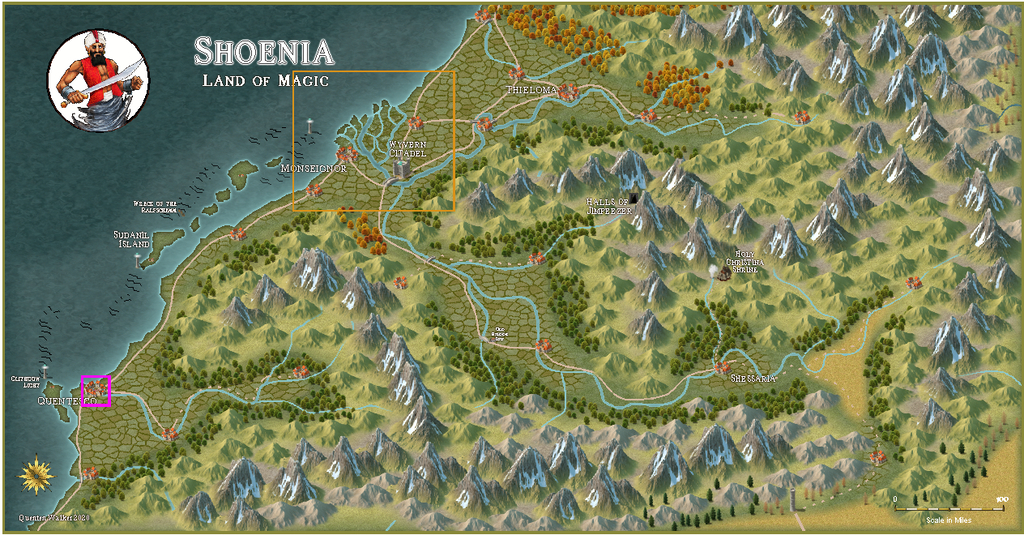
I toyed with a few ideas around all of this at different times, but it's only been this past week or so that ideas have really firmed-up. The orange boxed area on the Shoenia map here shows the area I decided would be useful to map in a little more detail around the Citadel itself, because that large, swampy, river delta seemed a likely place for barbarian sea-raiders to be able to strike unseen, tempted in by the obvious agricultural richness of its surroundings, ones likely equally rich in other resources, like gold, say!
What I've come up with is that the delta vicinity was attacked by barbarians last year, when an unusual sickness in Kentoria laid low much of the population, and prevented the folks hereabouts being as vigilant as normal. The raid also happened in the winter - or as much of winter as Nibirum's southern tropics ever get - during a spell of abnormally severe weather. It was so bad, the snowy remnants can still be seen on the south-facing slopes of many of the mountains hereabouts. It appears the weather was magically augmented by one or more powerful druids/shamans that accompanied the raiders. Some of the raiding ships were driven-off, though one larger fleet especially managed to land in the southernmost estuary of the delta, nearest Monseignor, which city was raided particularly heavily, losing much treasure, and having its Forum destroyed. While the Forum was quickly rebuilt, as the political leaders locally say, "bigger and better than before", the population remains very nervous, and has demanded further action, especially as the sickness seems to be dragging on in places into another year.
The area has been long known for its colourful wyverns. Indeed, some say the smallest kinds outnumber the birds in these parts, and are of comparable sizes. The region is sometimes called the Wyvern Coast elsewhere in Kentoria as a result.
So, wyverns. Wyverns in defence. Wyverns and their riders. Squadrons of wyvern-riders. Thinking here something on the lines of Anne McCaffrey's Pernese dragon-riders, with mentally-bonded wyvern and rider pairs. Aerial defenders made me think of the Battle of Britain in 1940, particularly because of KENToria, Kent being the English county above and near which much of the aerial combats then took place. Thus came about the recently-constructed Wyvern Citadel Defence Zone:
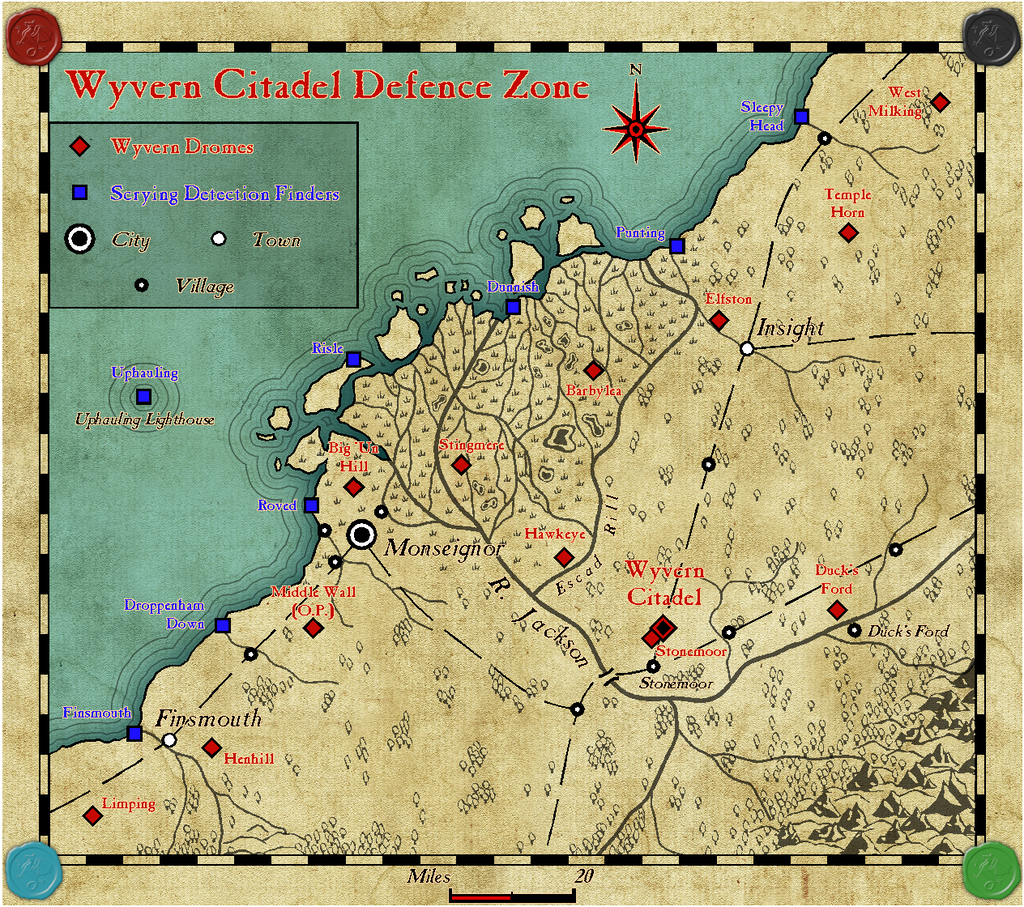
The perceptive may notice a certain - familiarity, shall we say - about some of the new place names. And some are just... well, why not?! I had to name the river and its delta, and The Great Stone Wall mountains conjured up for me the famous American Civil War general "Stonewall" Jackson. There'll be PDF and text-file notes to add more flavour to all this eventually in the Atlas.
There are four main colours of wyvern, as illustrated here by the four wyvern seals from Sue's brilliant new symbols pack with this month's Annual issue. Couldn't resist! Each colour has its own particular powers. The blue wyverns, for example, are extraordinarily powerful flyers, able to fly higher and for far longer than any other type of wyvern hereabouts. They also have the greatest wingspan of any of the wyverns. Or big wings, if you prefer. So, their primary training ground is the drome nearer the mountains where they're often found wild, at Duck's Ford. Obvious, if you know your Battle of Britain history, of course!
As for the Scrying Detection Finders, I'm sure someone will eventually start calling this system "Scrydar"...
The mapping was done using the CA128 Parchment Maps style from 2017 August, including the font, plus Sue's seals, as mentioned.
I'll add a copy of the Defence Zone map to my Gallery shortly, with more to follow on the area later!
![[Deleted User]](https://secure.gravatar.com/avatar/c75d9a245b74d9c59be0999ea81ca541/?default=https%3A%2F%2Fvanillicon.com%2F92add7f8c954488718110edc4896ad39_200.png&rating=g&size=200)


-
Community Atlas competition entry: The Summer Palace of the Winter Queen
So having chosen my ten snowflake templates, it was time to test things out using CC3+. Summer Palace 1 was drawn using DD3, with the snow fill from SS2 Bitmap A as the backdrop:
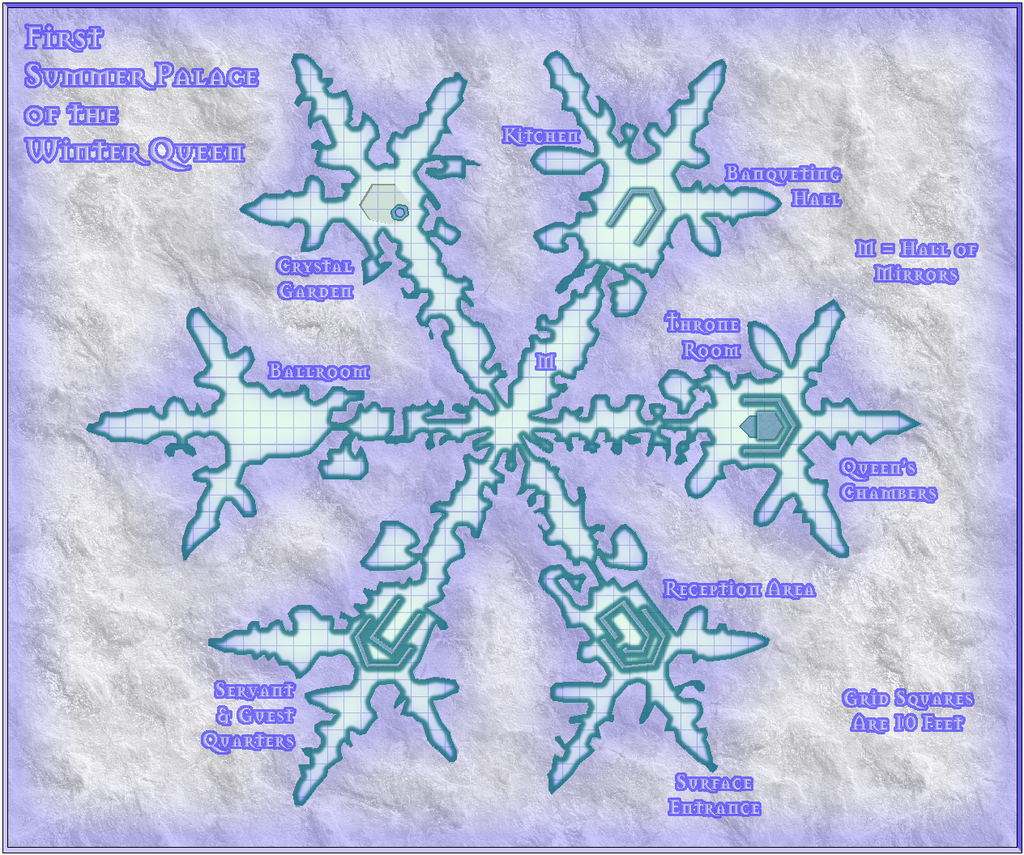
The Palace size doesn't encourage adding too much interior detail, as it starts to look cluttered very quickly, so I settled for showing simply the major, fixed features instead. There'll be text notes and a PDF to accompany all the maps in the final Atlas version, as normal. Each Palace version is intended to have the same seven main areas (Hall of Mirrors is one of the seven, incidentally), though not always in the same order - it is meant to be the same place, just with a different appearance each day, after all.
I was a little concerned about the narrowest passages, for all I'd checked with the grid on as I was drawing it - the narrowest are between four and five feet wide in the connecting passages. I decided early on that it wasn't going to be necessary to ensure access to every nook and cranny that didn't require direct access. It is meant to be a magically-grown, natural creation, and when real snowflakes can be so complex, that seemed an ideal recommendation to follow!
There was a degree of experimentation in this, as I wasn't sure how best to work the complex outlines at first, as you may find when you have access to the FCW file later - such as several overlapping floor segments in places. As I was just using the normal straight polygon drawing tool though, not fractal, I probably shouldn't have been too concerned. That's easy to say after the event though ?


-
A Hand-Drawn Fantasy Map of Jack Vance's Dying Earth
Closing-in on the final stretch now, with only that southeastern quadrant to complete.
And lo! The coastal lines did resume their former appearance (again, no idea why, but I'm not complaining!):

There was also one new addition here, although it may not be all that obvious. It happened when I realised I'd not added the background shading polygons to the huge Fer Aquila to Black Maurenron Mountain ranges, or the Chaim Purpure one. That realisation came about after preparing the notes regarding these very background area fills previously! I went on to add a few more similar patches to the smaller clutches of hills elsewhere in places, helping to soften the landscape a little more (e.g. in Kauchique).
All of which brings us to the final version of the map, as luckily, those last areas needed fewer labels in them, which, as mentioned previously, always seem to take the longest to get right. A higher-res version of this is in my Forum Gallery:

This was all rather fun, and as good an excuse as any to revisit some of the tales, and explore both the Goodman and Pelgrane RPG materials more fully, to pull together the on-map notes for my version, for all it was heavily based on the Goodman Games map.
Naturally, on reflection, there are features here that seem a bit odd, due to how that guide map had been drawn. That "Great Central Steppe", for instance, seems neither very great nor central, but of course compromises have to be made when trying to pin-down on a map things that have been extracted from a literary source, where imprecision in describing such things was to be expected, and sometimes intended (because such details were often given by characters in the stories who may not have known the information anyway, or had deliberately altered it). You'll notice too that those two later sea creatures had to scoot aside as the map's title dropped into place!
No scale or compass rose were added. The scale issue was mentioned before, as not featuring on the Goodman Games map, which also had no compass pointer. Distances in the stories tended to be glossed-over a little vaguely anyway quite often (for instance, the distance between Canspara and Ampridatvir was noted as being a thousand leagues in one tale, although what constitutes a "league" here is anyone's guess, so essentially "a very long way" - rather like the real-world, as a league is a distance measure that's had different definitions at different times and places). I did trial a compass rose briefly, but the only suitable spot was in the lower-right corner, where it looked awkward without shifting the "Songan Sea" labels (so those then looked odd!), or making the rose too small to seem useful.
I'm thinking now of revisiting this in future, perhaps with similar reworkings of the alternative Dying Earth maps from elsewhere, and/or compiling a variant of my own. Though I really should get back to some Atlas mapping again now 😁...


-
Community Atlas: Temple of Nidag, Stormwatch, Emerald Crown Forest, Alarius
For the next map in my ongoing Atlas project, I thought it might be interesting to try another work-in-progress topic, to show some of the developments as they happened along the way. It's been a while since I last tried this, and I do tend to forget to record progress while mapping, but we'll see how it goes! The initial posts below, over the coming days, will outline what's happened to get this map underway during the last couple of months, and only the subsequent notes will start to become rather more immediate.
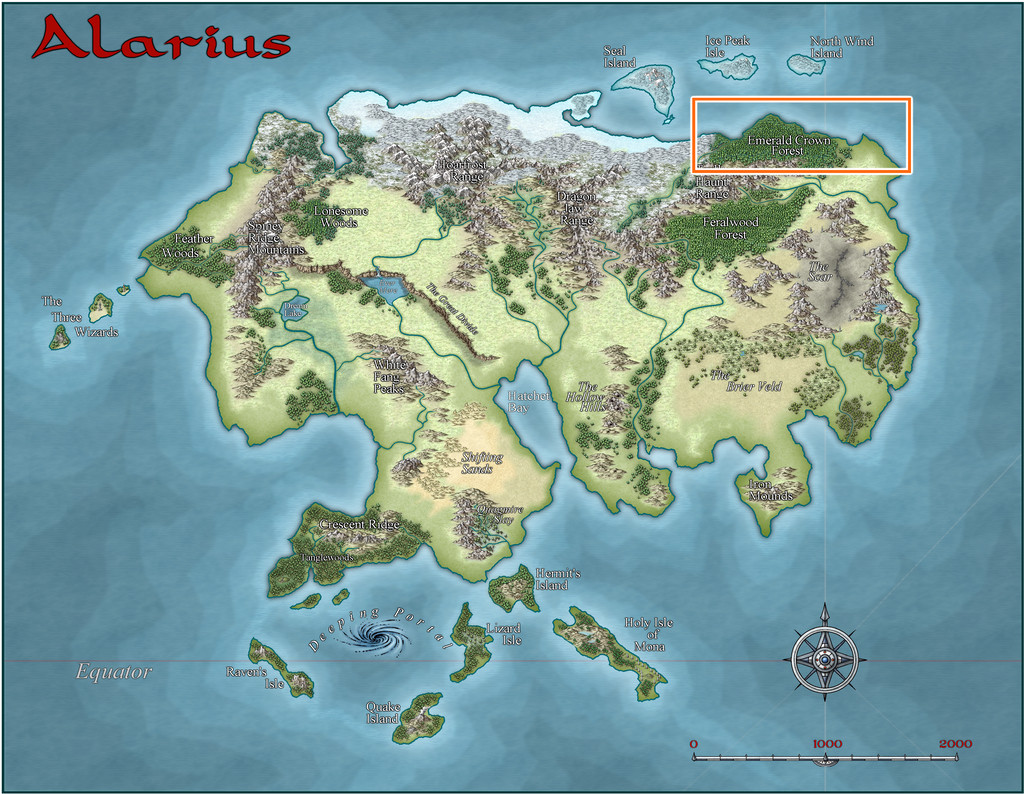
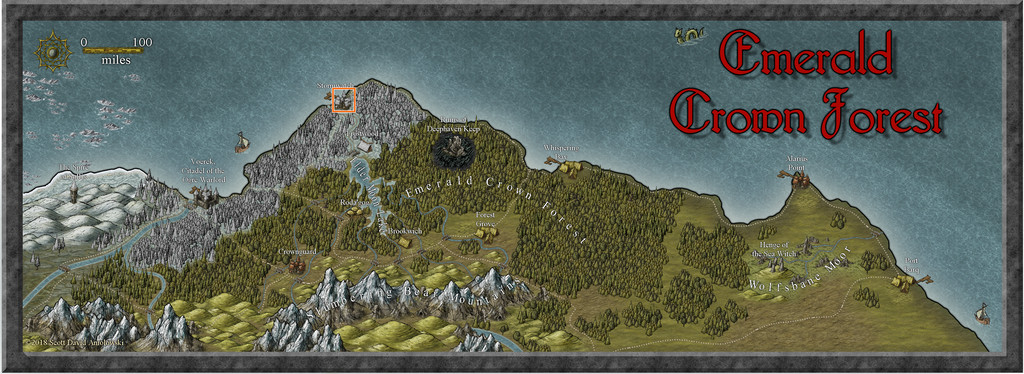
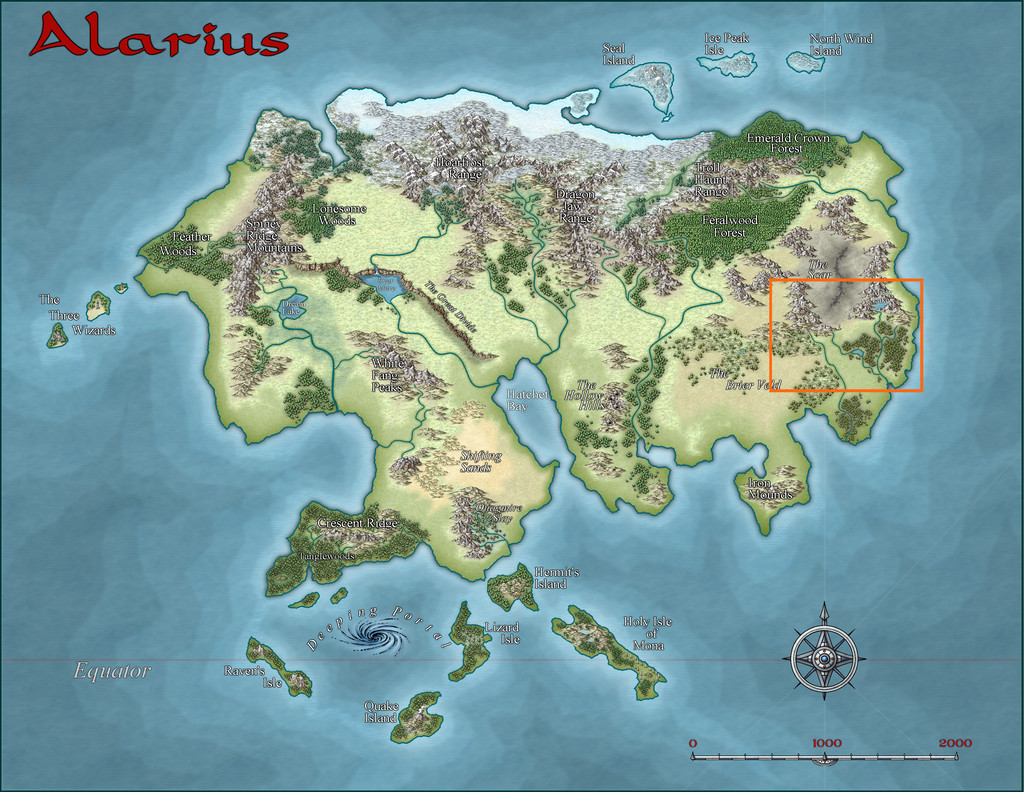
Said map was intended for somewhere in the Emerald Crown Forest region of northeastern Alarius, here:
Zooming-in to the next map already in the Atlas, there were a couple of additional places already mapped (highlighted in pink), along with some equally intriguing unmapped spots:
As usual, the development of each new map in this project is an organic process, in that while thinking about where the map's to go, I'm also looking at the dungeon design, and identifying ideas for what its contents and purpose might be. In this case, the design was from two Inkwell Ideas Dungeonmorph Dice in the Trailblazer set:
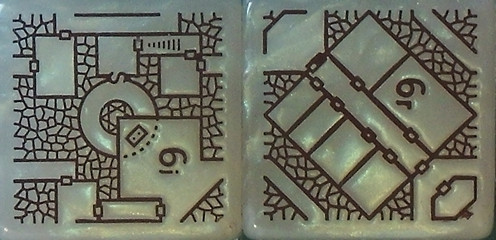
These translated into my hand-scrawled version, with the unconnected/extraneous passages and areas either removed or adapted, thus:
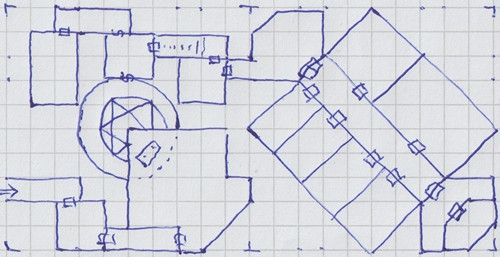
Looking through the Inkwell book that accompanies the dice for this pair of designs, the 6i one is from the Incantations/Magic Areas die, whose main-idea notes suggested this to be a temple masquerading as for a good/neutral deity, but which was actually for another less pleasant one - so that altar above the circular room drops victims down into it, for use in summoning an avatar of the deity, for instance.
The 6r die's main notes (for Rooms/General Areas), proposed it as part of the private quarters for some royalty, with a kitchen, dining room, and guards, while one of the alternative suggestions was for it to be an inn, possibly one with several vertical levels. In combination, these suggested a temple complex (replacing royalty with priests and inner-cabal followers), partly above ground, partly below. That suggested a larger population would be needed to both support and conceal such a place, as well as to provide victims for use in the summoning chamber.
Turning then to a couple of further books for inspiration, the "Tome of Adventure Design", and the very recently-released "Nomicon", both published by Mythmere Games, provided Maleng, Herald of the Seasons as the beneficent nature deity for the temple, with the congregation ostensibly calling themselves The Fellowship of Maleng, although they're really The Fellowship of Nidag, The Blind Slayer (the deity who's not so pleasant).
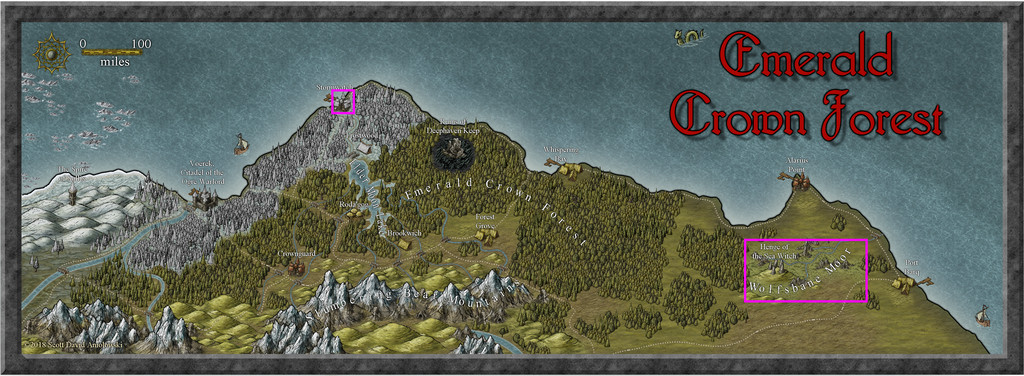
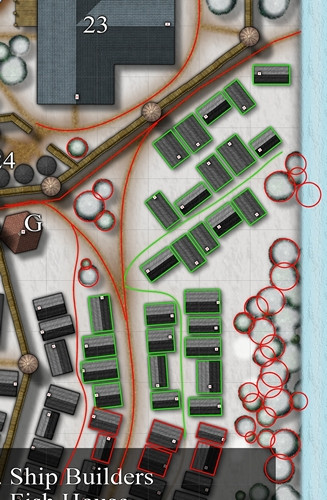
Looking at settlements in the Emerald Crown Forest area after this naturally pushed my thoughts towards the larger towns, and likely towards those on the coast, as probably having sizeable itinerant populations, where people chosen as victims would be less missed. Which eventually brought me to the pre-mapped town of Stormwatch:
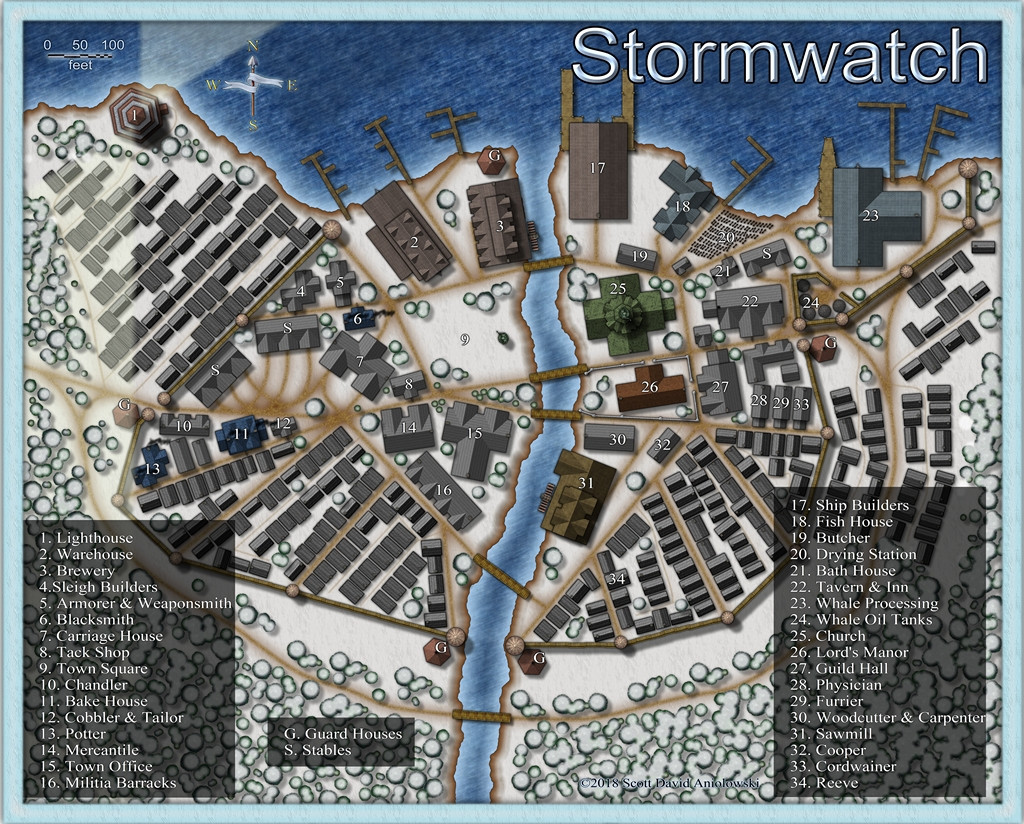
It's probably not hard to see what drew me here - there are lots of anonymous groups of houses of the right size and rough orientation to fit the dungeon dice designs quite well. Finally, I picked a spot on the eastern edge of the map, outside the town walls, here:
At which point we discover I was missing a few small symbols (probably from the free, non-ProFantasy, sets usable in the Atlas) - for the inn signs, chimneys and waterwheels - hence the red Xs in places (the previous shot of Stormwatch was taken from the hi-res Atlas version).
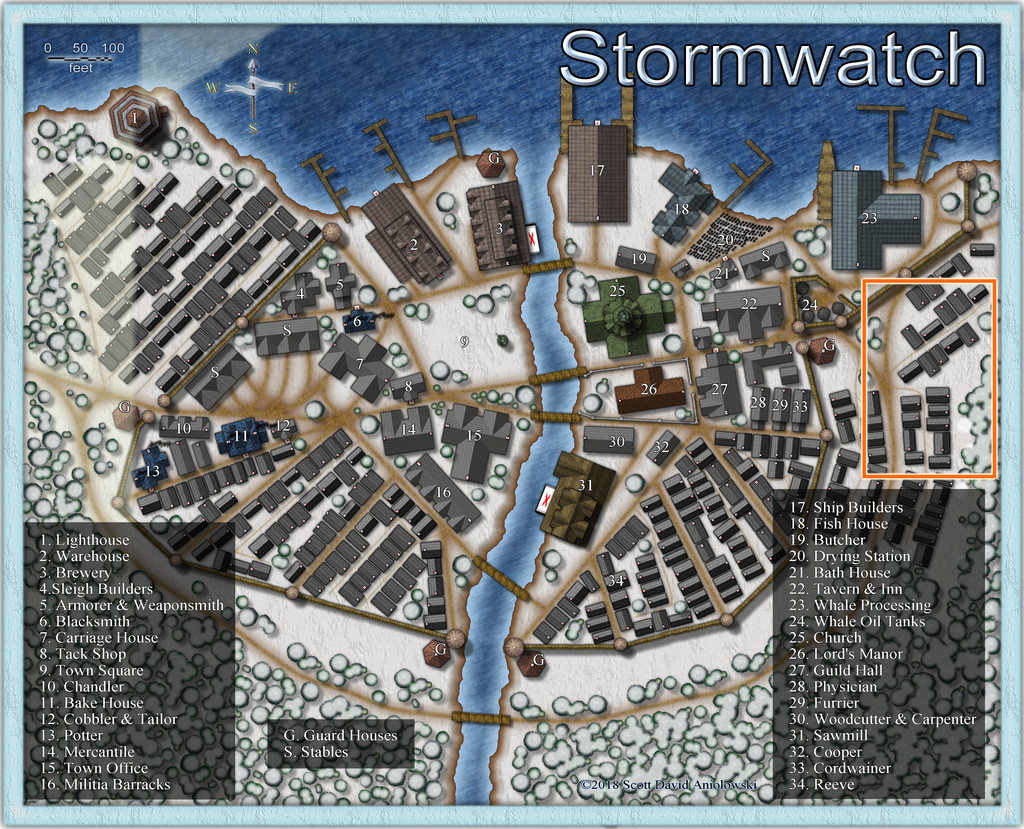
Choosing that area wasn't straightforward, however, because a swift test-trial of my hand-drawn dice design showed the fit wasn't going to be exact, either from the placement and sizes of the various buildings, or the angle between the two main parts of the design. This wasn't unexpected, and after checking several potential alternatives, the orange rectangle on the image just above was picked as the closer fit. Even then, that area wasn't properly defined at this point.
I narrowed the spot down by setting-up a basic line drawing in CC3+, where I could compare the exact shapes, sizes and orientations of the Stormwatch buildings with the dice design draft map. This began by extracting those forms from the Stormwatch map thus:
The building outlines were generated more or less automatically, by simply copying the buildings to a new sheet and layer, and changing their properties (possible only because they were originally created using the CD3 house-drawing tool), while the tree circles and road lines were all hand-drawn. The two colours are because the original test-fitting was done just with the green-outlined buildings, and took several attempts. The red outlining was to make sure all the features in the final rectangular map area would be covered too, once the final "green" selection was made. Next time, pinning-down that rectangle.


-
Community Atlas: Aenos Isle North, Demosthenes Swamp, Artemisia
The final stage of this group was the lower level partly beneath the Great Temple, which both sections of the upper underground complex link into, Thalagos Cavern:
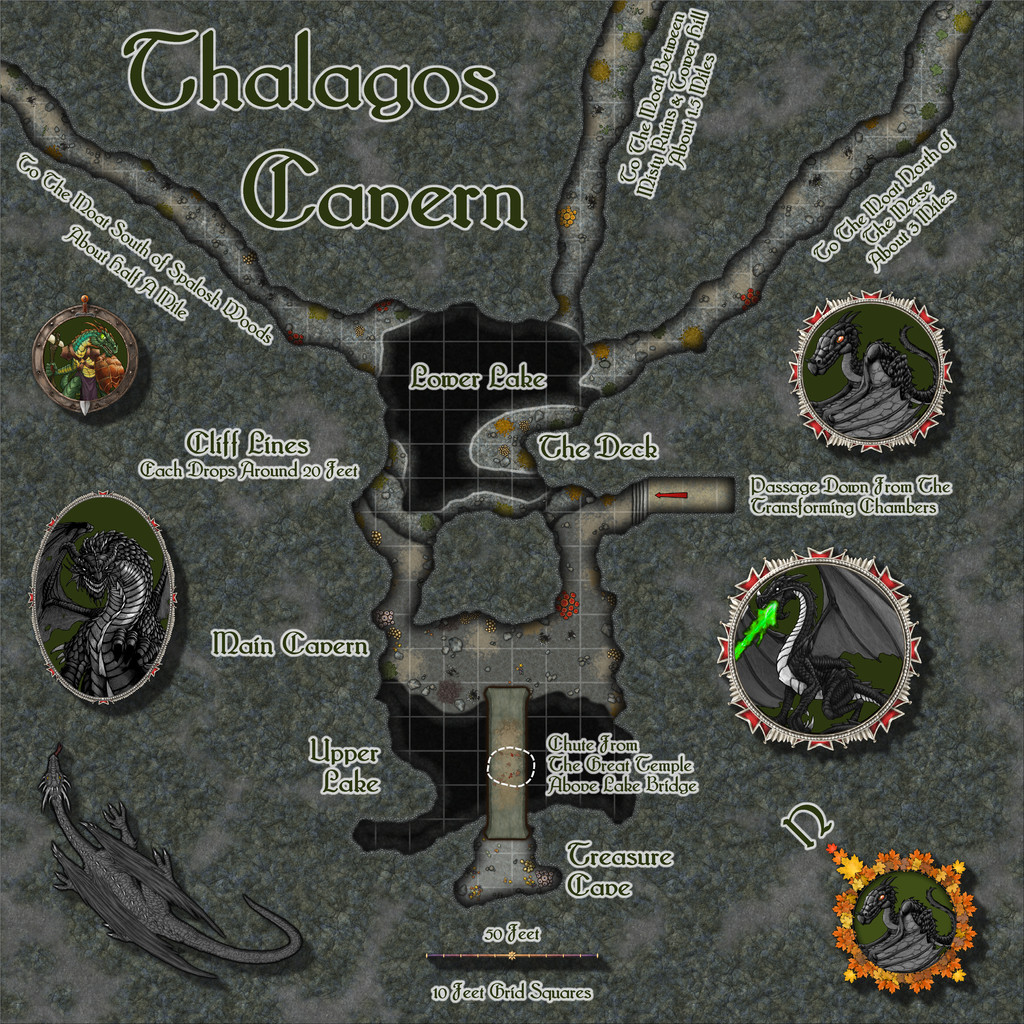
The base layout was from the Inkwell dice, as noted in my first posting above, with a few minor tweaks, notably extending those three straggling exit passages, which lead off-map for some considerable distance to the inner edge of the swampy Moat surrounding the higher area on which Threshorsh is set. The passages are all mentioned as being flooded in their latter stages in the accompanying notes for the Atlas version, and all emerge under the swamp, so there is no easy means to access the Cavern from outside that way.
Since the Inkwell dice designs are set on a geomorphic grid, that does make it quite easy to connect with other such layouts above and to the side like this. Indeed, I simply copied and pasted over the chute from the Great Temple and the floor from the Cavern Access passageway in the Threshorsh map to this one (both of course are drawn to the same standard Dungeon "in-feet" scale), to make sure everything linked properly.
Creepy Crypts was the base style used for the map, giving some interesting additional rocky textures, and while the walling system takes a little getting used to, it had the advantage in this map of allowing me to very easily add those steep-drop Cliff Lines simply by copying the sheet effects to a couple of new "Walls-but-not-really-walls" sheets (I didn't call them that!). Then by tweaking the water effects a little, it became possible to show the shallower sloping shores around Lower Lake too - the pale lines - leaving the shadowy darkness of the cliff-drops to show where those were - including all round Upper Lake.
Fun times were had adding all kinds of patches of mould, assorted splats and stains, and a few small treasure piles, to parts of the floors, along with some significant clumps of fungi. Some of the moulds and fungi are bioluminous too, which were among the randomly-obtained features to add to this map. And yes, sacrifices do occasionally find their way down from the Great Temple to the bridge top above Upper Lake (though not perhaps as often as you might think). The trickiest element was the scaling grid, largely because this never seems to work well in narrower, variable-width cave passages. I did try it as more strongly visible at one stage, and considered a toggle to let it be turned off (as it just looked too strident). Ultimately though, I felt this subtler version worked OK, and should anyone need to brighten the grid, the FCW will always be available in the Atlas.
There was a lot of space around the layout too, so I added some of the DD3 "holey" textures to change it up a trifle, and added a few more, and larger, TT1 options than I'd anticipated at the start - even a varicolor DD3 dragon, if maybe one a bit too robust and "wing-y" for the Swamp Dragons as I'd been thinking of them. I did consider reducing the length of the exit passageways, but I wanted to keep the labels for them on the map, so left things alone finally. Plus I did rather like the vaguely spiky-tentacular look this gave to the whole. Though that's probably just me!
Ordinarily at this point, I'd mention where I'm off to for the next "Adventurer" dice set of designs. However, we're having a short excursus from that, as I've brought forward the mapping for the "Ruins" 6R* dice-face design (which you may recall I mentioned when using the unruined version of this, from the "Cities" dice-face 6R, for the Seer's Hall Village map previously). That will be going onto Lizard Isle, a large island offshore of southern Alarius.
-
Community Atlas: The Witch's Valley Head Area in eastern Alarius
Returning to Alarius, if not to my usual part of it, in my Dungeon24-ish project (this previous topic has more information on that), saw me hunting for a suitable location on the Southern Scar Environs map of eastern Alarius, for where to place the fourth and final "Crypts" Inkwell dice design map.
That's a big area, and one affected by the unpleasantly weird effects from The Scar, the linear volcanic feature surrounded by swathes of greyness in the top centre of the orange rectangle in the above illustration. The dungeon design is, by contrast, tiny, although the nature of The Scar, as sketched in the map notes, coupled with the fact this was to be another burial tomb site, had already suggested something undead and/or necromantic as a theme for the subterranean layout. So that narrowed things down somewhat, and ultimately, the site very nearly chose itself, given that one of the few labelled main locations on the Southern Scar map was "Witch's Valley", which had a circle of standing stones set in its midst. Right at the northwestern, mountain-enclosed, end was a cave symbol, so that was that!
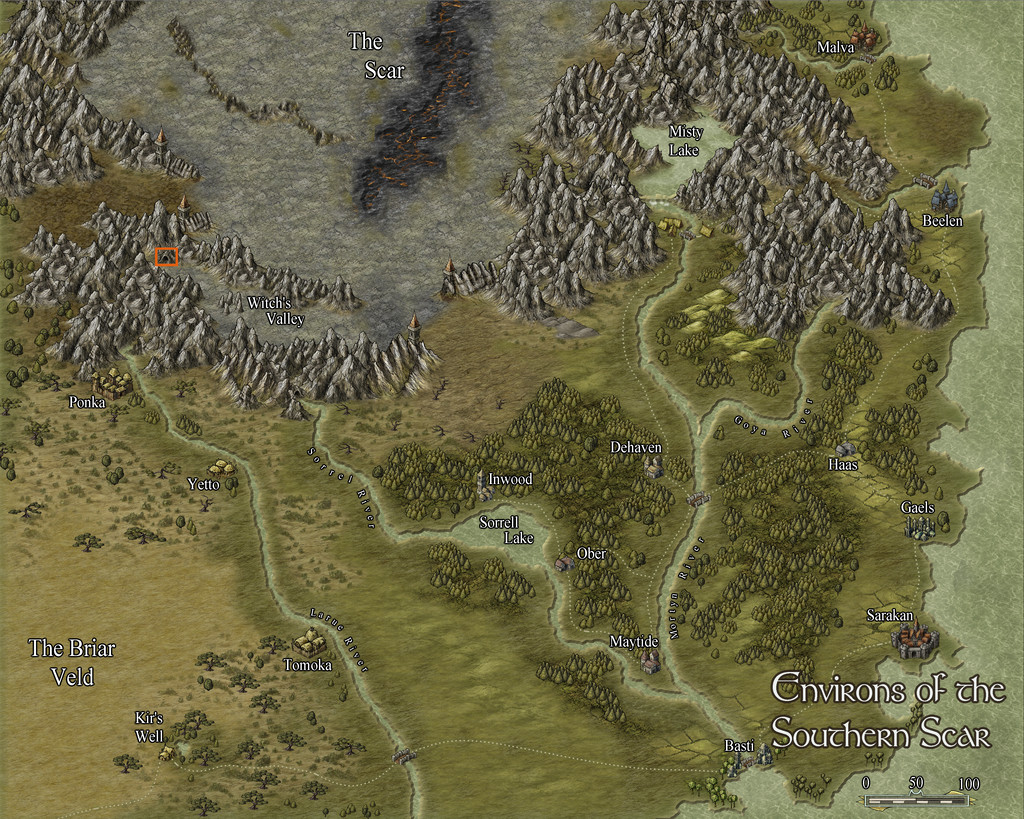
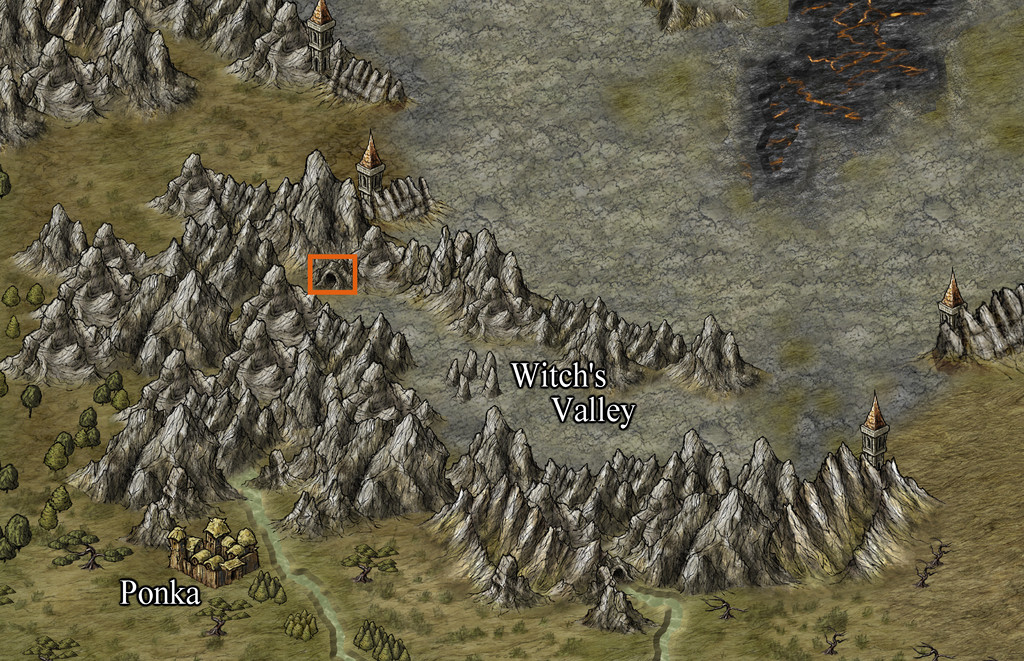
The orange rectangle around the cave is actually 25 miles by 16 in size, so not wanting to simply drop in a little dungeon map there, as has started to become typical for this project, I also needed to devise a suitable area map into which the dungeon design could be fitted. Having sketched the basic features for this onto graph paper, I then added a random selection of additional items from the sources mentioned in my first post last time on Mate Ora, although here, the selections were tweaked to better reflect the negative feeling of this area, so relatively near The Scar - if sometimes with a few hints that things were not always as they now appear here too. Once these feature locations were emplaced, it was possible to draw in a few river and stream lines to fit, since while no major river is shown in Witch's Valley on the Southern Scar map, valleys rarely happen without something of the sort, and the mountainous terrain, plus the near-tropical location (the cave symbol is at roughly 37° N latitude), showed there would be some water channels at least.
Then it was time for the mapping. Several possible overland styles were identified as having a suitably large number of mountain and hill options, of which the DeRust Overland style from Annual 81 seemed a good fit. Thus the Witch's Valley Head map:

The labelling font is the Mason Serif Alt Bold one that comes with CC3+, as that seemed a comfortably "spiky" fit for this map style. As normal, there'll be PDF and text file notes to provide a few more details on the labelled items in the final Atlas version. While the sites for these were chosen purely randomly, it was pleasing to find they'd clustered more towards the western to northwestern part, given those are the directions of the more imposing, larger, mountain symbols on the Southern Scar map beyond this selected area.

-
Community Atlas: Dendorlig Hall - A Sort-Of D23 Dungeon for Nibirum
Slightly later than I'd hoped for the eighth main update on this map, although Day 250 of 2023 seems an apt moment to present it at least, particularly as just this morning, I completed the draft notes for area 360, the final one in this mapping project! Getting those notes typed-up still lags some way behind (at area 310), so the map and notes won't be going into the Atlas right away. The end is in sight, however!
While there may be (hopefully only minor) changes needed to the map after this, during checking of the text, or as other things occur, this is likely to be close to the final version now:
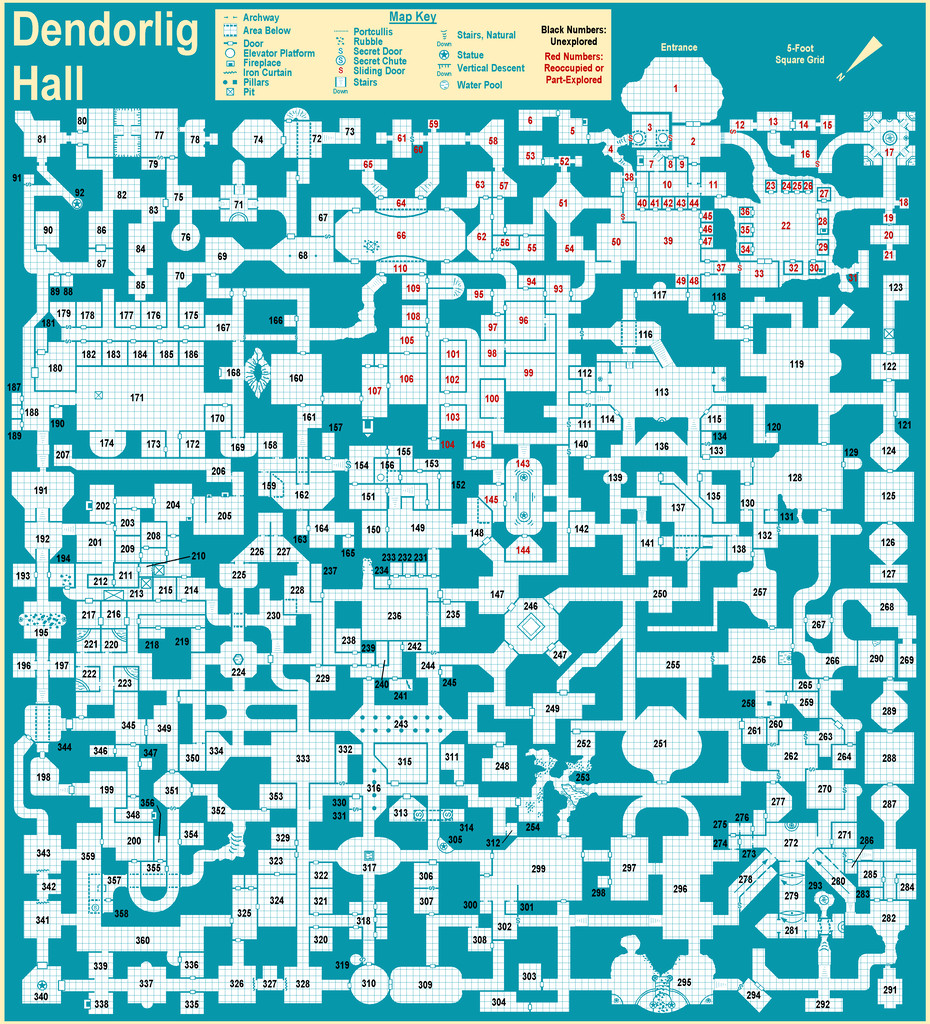
From this, it's clear I finally got round to adding the title and a key for the more recurrent mapped elements, and also moved the North pointer and scaling note off the map entirely. I decided too to make the colouring of the title and header labels a pale cream, the same pale cream this style uses for its drawing window background, and which, in preparing the map for the Forum, I've also used as a thin "map border" of sorts. This header-colouring usage helps draw my eye (at least) into the map, making clear which items are peripheral to the map itself.
I've not prepared any additional close-up map or PDF notes to add here today, since the final version will be ready relatively soon anyway, although I have updated my Gallery image for this map now, to a higher res version of this near-final one.
All being well, the next update should be the Atlas submission one!


-
Community Atlas: Errynor - Aunty MacKassa's Home & Vehicles
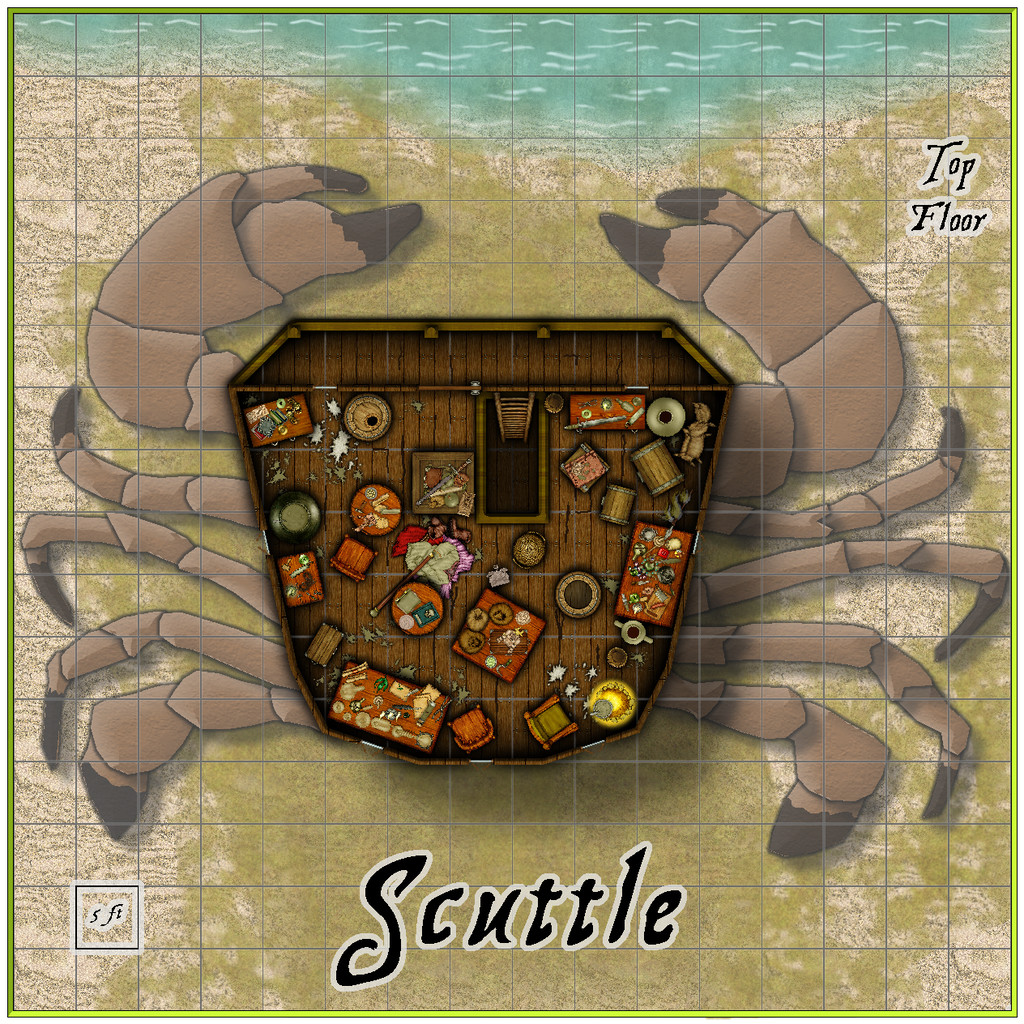
The second of Aunty's vehicles, and the concluding drawing in this whole Errynor Map 01 set, is Scuttle, as promised earlier, a giant-crab-legged, ramshackle, shipwreck hut. This has two floors, accessed by toggling in the Atlas' FCW map, with a further toggle option to add a five-foot grid:
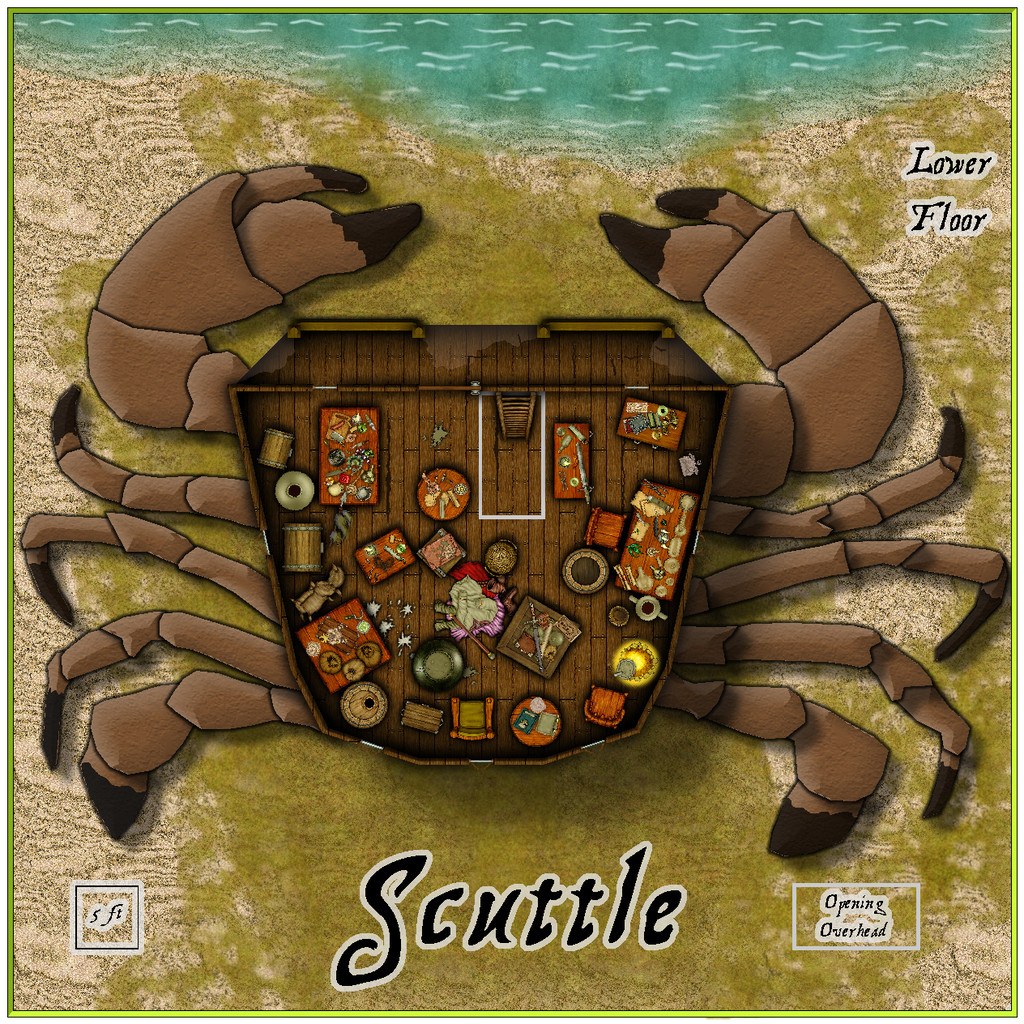
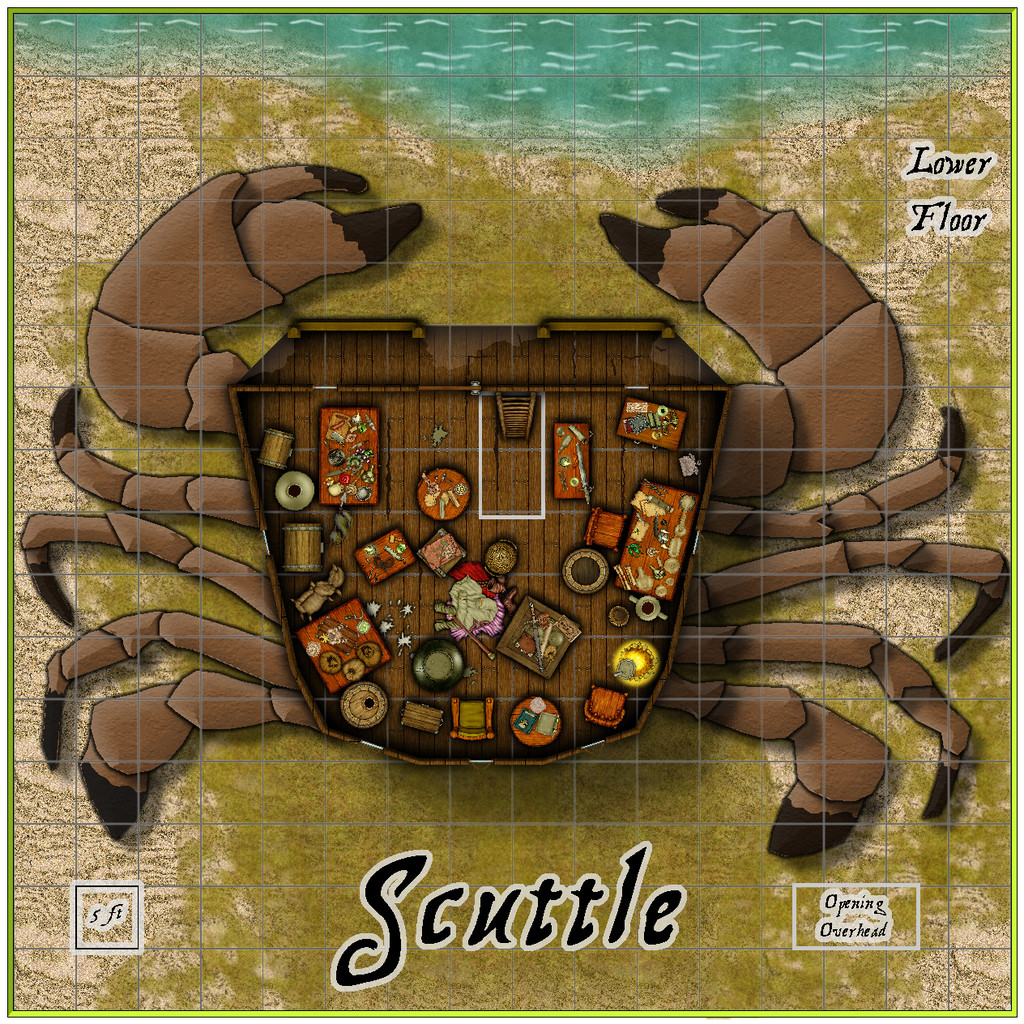
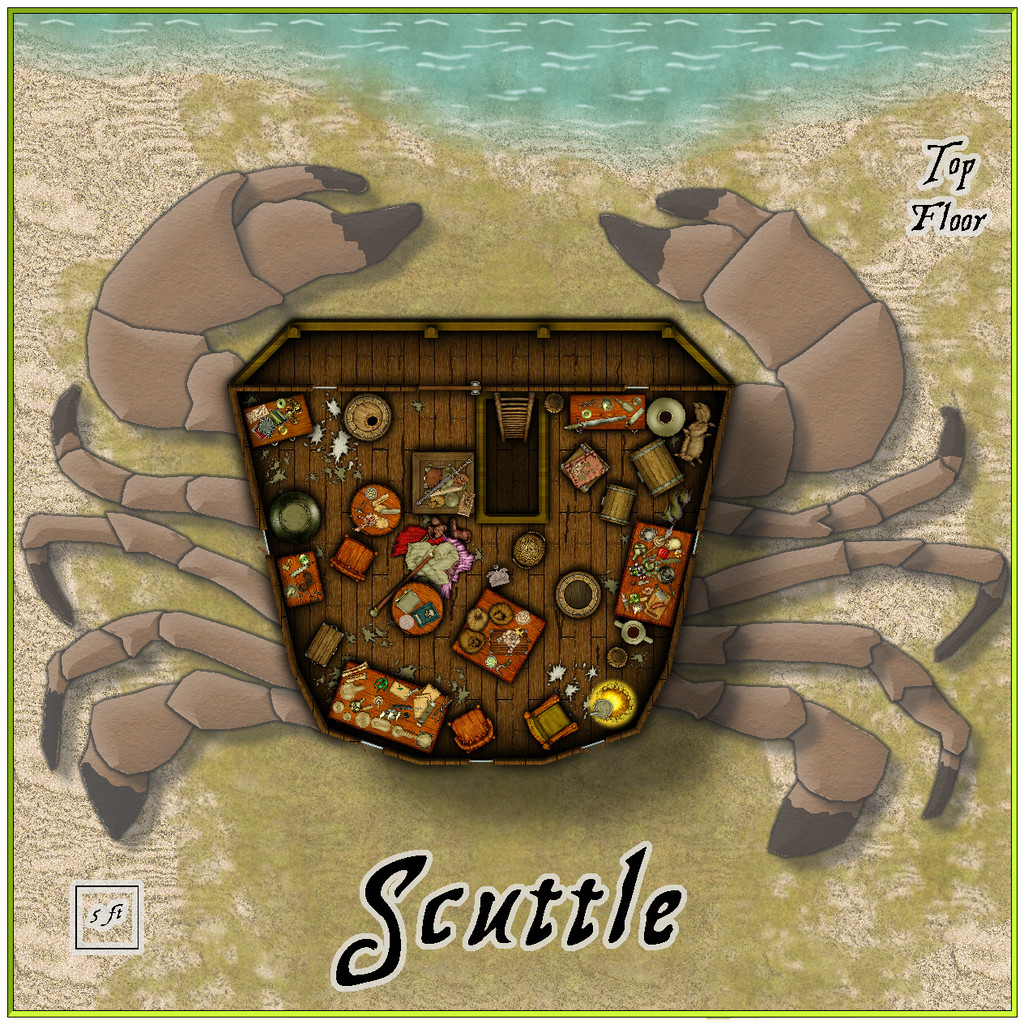
For the crab legs, I tried sourcing top-down crab images online, but couldn't find one that worked well enough for what I wanted for tracing. There are few crab symbols in CC3+ and its add-ons, and although I did find one that looked good among the free Dundjinni Archives collection, it wouldn't scale-up properly without becoming too pixelated. In the end, I used that enlarged symbol as the base, and partly traced, partly redrew, the legs as individual segments on different Sheets, and then fitted them to the base of the hut, as now illustrated.
The bulk of the hut and its contents were copied from The Naughty Lass deck plans, the walls and windows redrawn, and a driftwood balcony added to the front of both lower and upper floors, partly to increase its overall crab-like appearance. By contrast to the ship, these drawings largely flew together quickly. A fresh PDF and text file of notes and - done!
Hopefully, more Errynor maps to follow!

-
Community Atlas: Errynor - Ruined Thalassan Castle
In theory, this ruins map was going to be one of the smaller, thus quicker, maps to draw. I wanted to add it to the set from Errynor Map 01 as it was the only Thalassan (Fish-folk) structure in the area, and it seemed useful to provide at least one sample settlement for each of the represented undersea humanoid folks shown on that map.
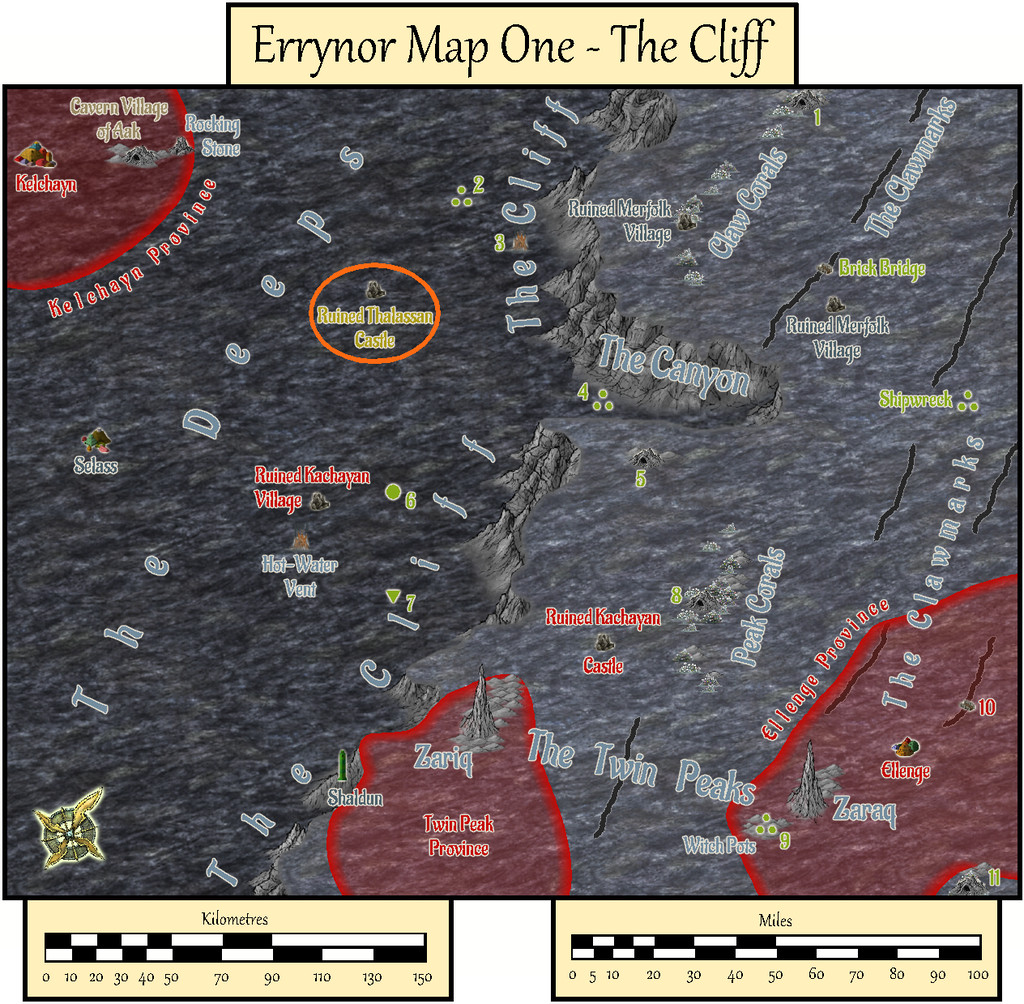
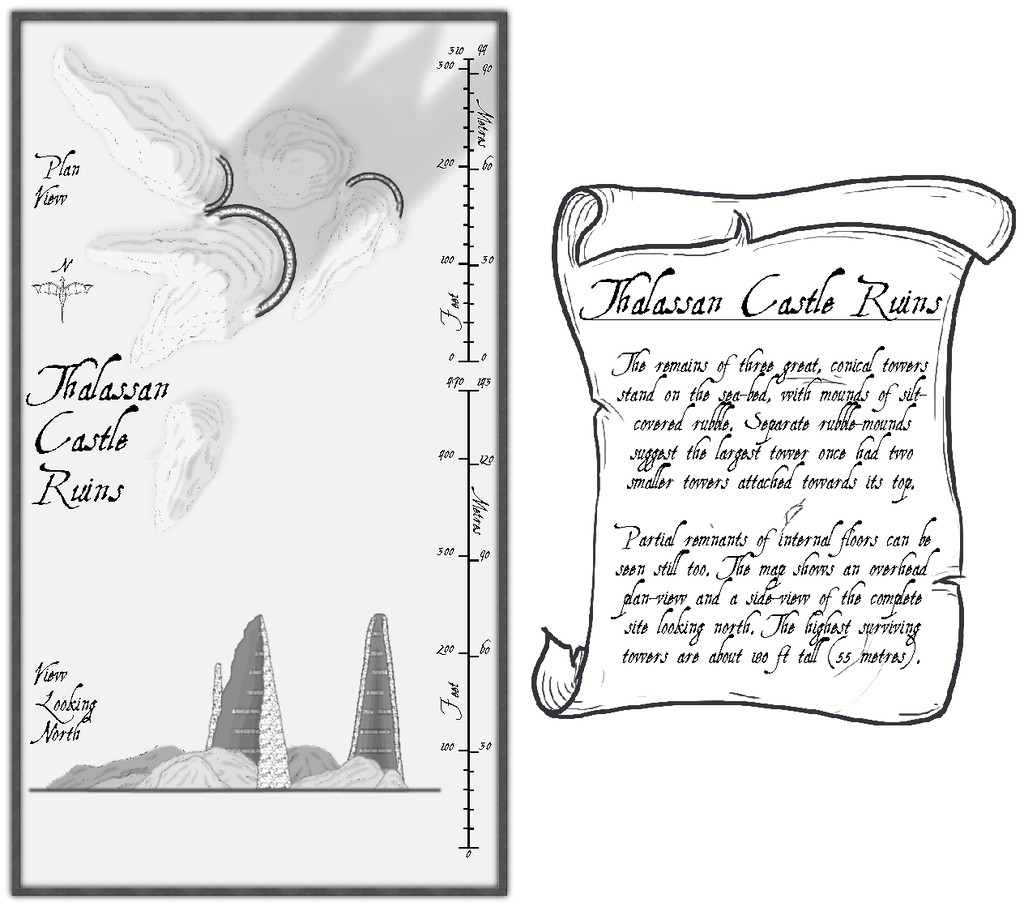
The overall pattern for it was easily established randomly from a few dice rolls, and I had already some ideas for its appearance, with whatever else might be concealed by the ruins. Given the site lies below almost 3,300 metres of ocean (nearly 11,000 feet), I wanted to use a black-and-white mapping style, in-keeping with most of the other deep-water maps in the set. It was though obvious that no style would provide the symbols I'd need for the structures, which would have to be hand-drawn. So I settled upon the Black & White Towns style by Pär Lindström from the 2015 April Cartographer's Annual, mostly because I thought the sketchy contour-line symbols in it might work well for the silt-covered rubble piles I'd envisaged as surrounding this ruin. While these did work out quite nicely, adding shading to give the rubble more definition took a lot more time than expected, particularly in showing the whole site in an elevation drawing as seen from the sea-bed.
The font is AquilineTwo from the 2012 CA, as I originally thought to use the scale-bar symbol as well as the draconic north indicator from this style, and that's the font employed in these.
Clearly, there's a lot of blank space here, and the scale-lines look a little odd too. The reasons for both are explained by activating the Residual Magic toggle in the FCW file:

The explanatory banner text has also been increased here, although for clarity, those notes are repeated and expanded upon in the map's accompanying text-file and PDF notes.
As the magical blue glow extends some distance below the sea-floor surface, it's obvious there's something more happening there too, and activating the Subterranean Tunnels toggle shows what this is:
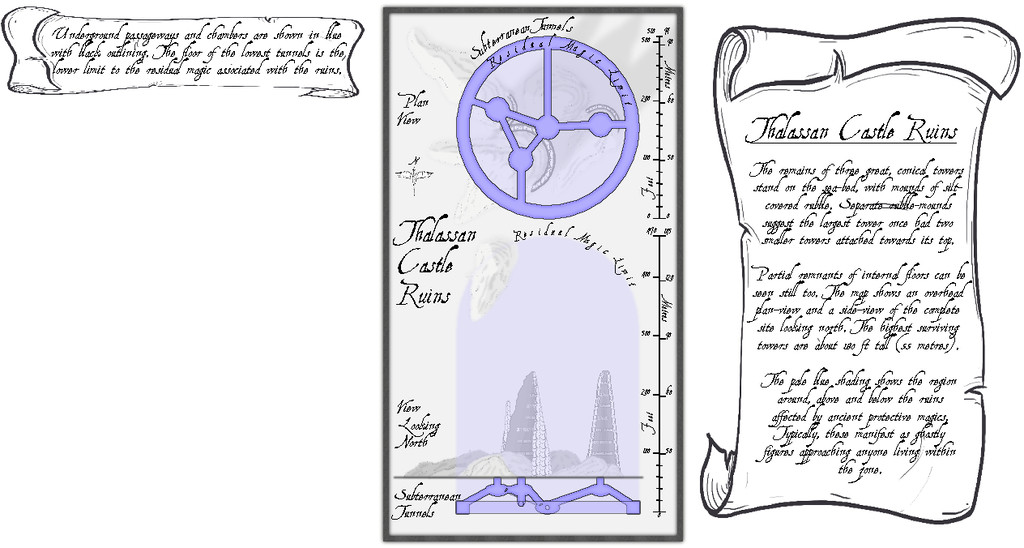
A series of subterranean chambers and tunnels, essentially, with a further banner note of explanation. The latter of course hints at still more to come, given the vast blank space beneath it. So activating the Original Towers toggle reveals...:
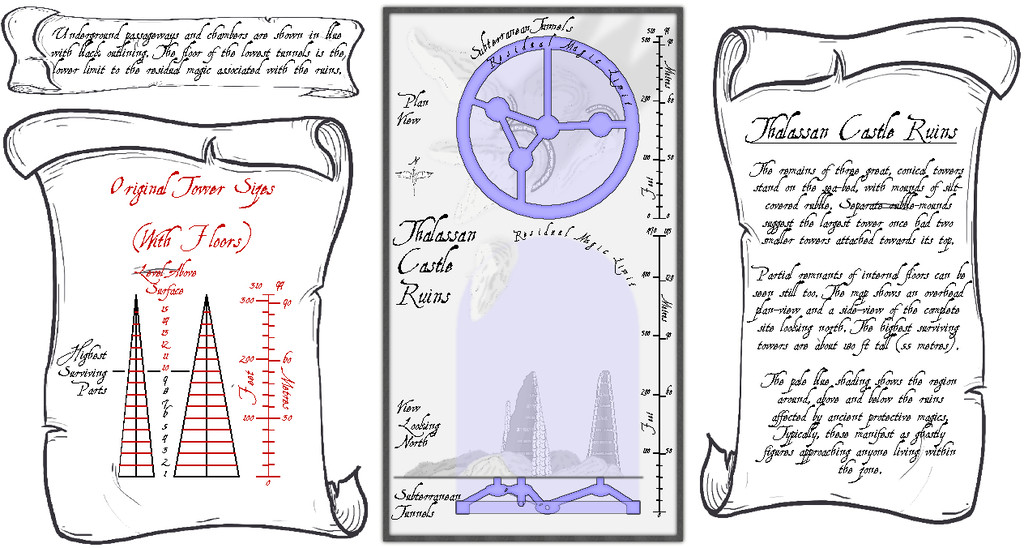
I'd had to draw out in advance what the towers would have looked like before they became ruins, to get the look, sizes and angles right, so it seemed probable this would be something other GMs might find helpful.
For the underground maps, I added a "concealer" Sheet with a Transparency Effect to reduce the strength of the surface features and magical glow for clarity, which is largely why the shadows on the surface views ended up so relatively strong, when the subterranean areas are hidden. Naturally, the shadows are unrealistic anyway, as there'd be ordinarily no light at all at such depth. Without them though, the drawings are much too flat, as some shadows at least are what the eye more or less expects.

