

Community Atlas: The Sussara Region in Kumarikandam
 Wyvern
🖼️ 293 images Cartographer
Wyvern
🖼️ 293 images Cartographer
Part of the reasoning in heading off next to tropical-desert Kumarikandam for my sort-of Dungeon24 project (outlined here earlier), was because by chance, that continent had come up as the next random choice for another dungeon based on more of the Inkwell Dice "Crypts" set designs. A second map had also been randomly allocated to this place later in the process, for one from the (City) "Ruins" set. It seemed sensible to tackle them together, especially because both had also been allocated to the Banjar Region map. That map is pretty large-scale however, so there isn't a lot of detail on it:
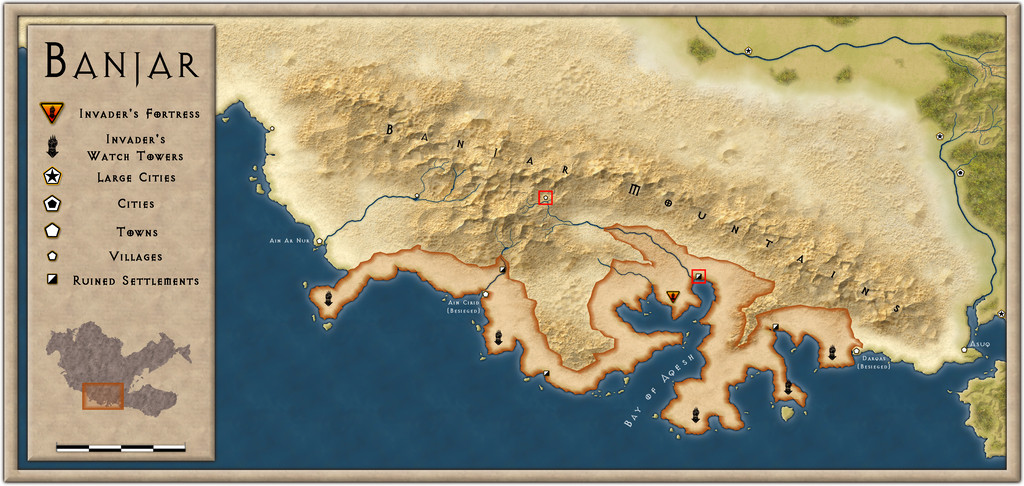
Despite that, picking a couple of suitable spots wasn't too difficult, using notes already provided from this zone for ideas (it's recently been invaded by mysterious assailants, who seem intent on slaughtering the tiny, sparse local populace, hence the ruined settlement markers and that ominous, creeping "conquest" line). It did though mean that my two selected settlements (shown by the tiny red squares on the above illustration) were going to need small area maps to better locate and describe them, aside from the "main" dungeon map. Each of those squares is really 20 miles on a side.
The "Crypts" dice map was to be first, and I opted for the inland site at the intact village in the heart of the Banjar Mountains for it, close to the headwaters of one of the two main rivers there, the one that drains into the Bay of Aqesh (my choice for the subsequent "Ruins" map was the ruined settlement near the mouth of that same river). So I began by mapping the dungeon, as that was already prepared in hand-scrawled form, and progressed outwards to the village, and then to the surrounding 20-mile area. Plus I also got distracted and did portraits for two of the main characters in the dungeon.
Here, we'll go from larger to smaller, starting with the 20-mile area map, called simply "Sussara" (which is also the name of the village):
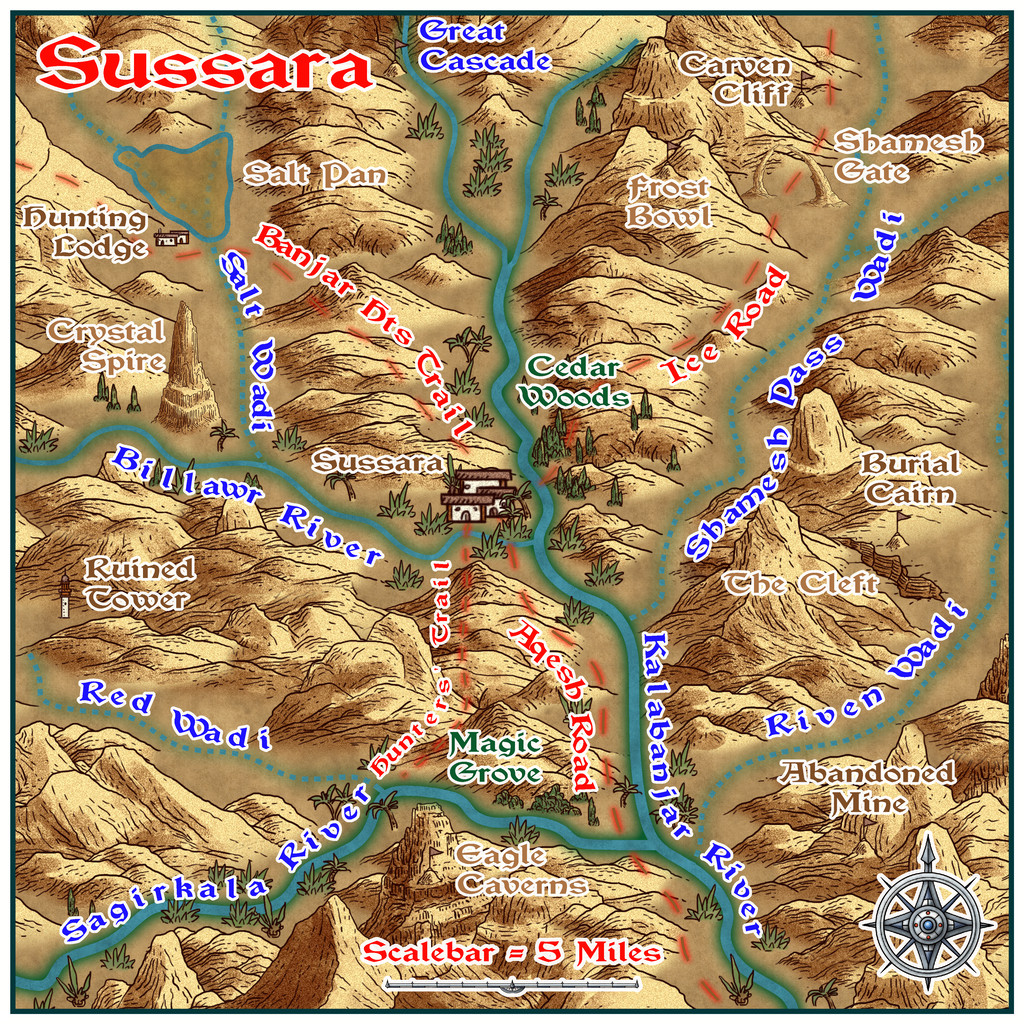
For what perhaps should be fairly obvious reasons, I selected the Scorching Sun Annual style for this map, labelled with the Vinque font from the 2015 CA. Quite a number of features, such as the various trails, and the names of the two nearby rivers, with Cedar Woods, had already been decided when completing the Sussara Village map. The other main river, the Sagirkala, was shown, though unnamed, on the Banjar Province map, as well as the main river, what I've called the Kalabanjar. However, the intermittent rivers were added to give a more complete look, with a range of extra elements decided from a couple of sets of random tables, notably those in the Atelier Clandestin book "Sandbox Generator" that I've mentioned, and used, before, adapted accordingly to suit this environment. As normal, there'll be PDF and text notes to accompany the map once in the Atlas, to explain a little more about the various features, and what some of the names mean.


Comments
Continuing the process of zooming-in brings us to Sussara Village, at the heart of the Sussara area map:
This time, I chose the Desert Oasis Annual mapping style and its accompanying ArabDances font, although I also needed some trees from the Mike Schley Cities (SS5) set, as I wanted to add some cedar-ish trees, while Desert Oasis only offers palms and shrubs. To generate the base map, I combined three old village maps from the venerable Judges Guild "Village" Books 1 and 2, again adapted accordingly, as I wanted quite a scattered community. The population of Banjar overall is tiny, so there seemed little reason not to give most folks plenty of space to build on.
Some features were decided in advance, as the nature of what I'd opted for in the dungeon meant a distinct spiritual element was going to be important here, and I thought it would be fun to add to the mix a small community of monks from the vast, rather distant, but still loosely neighbouring region of Tiantang in Kumarikandam, far to the north of Banjar. Since the folk here are accepting of nomadic wanderers, it seemed natural they wouldn't balk at still more distant people wanting to settle here too. Other items were chosen from random lists in "Village Book 1" and the settlement options in "Sandbox Generator", including the fact there are naturally-occurring flower-like crystal formations "growing" out of the soil in places, especially over and around Flowerfield Peak. Hence names such as "Billawr" (one Arabic-ish variant for "Crystal") and the Village's own name (Sussara = Glass Flower). The irrigated fields were quite fun to set-up, although at this scale, most of the smaller elements (shadufs, water gates, etc.) couldn't be added, even had symbols been available, without making the map seem very cluttered. Similarly, fences, livestock pens and sheds, and small gardens near most houses weren't included. I did though add a couple of carts to the Market, and three small well-fountains, to hint at what such tiny structures might have looked like. Notes on what is visible will be in the Atlas, as ever.
Of course, we also need a means to access the dungeon map that started all these above-ground explorations, so activating the "Village Secret" toggle in the final Atlas FCW version, will reveal a couple of hidden stairwells in the cellars of two separate, and otherwise unremarkable, properties (zoomed-in here for clarity at the usual Forum-acceptable size):
Very few folks here even know they might exist (which doesn't include the current occupiers of either dwelling!), and fewer still know what potential significance the Tomb of the Prophet may hold...
All of which preparation finally brings us to the dungeon map, entitled "The Tomb of the Prophet and the Sailor Prince", albeit in the Atlas to be known by the somewhat more manageable name of "Tomb of the Prophet", which some may feel is probably no loss (sorry...):
This was drawn using the SS2 Bitmap B style, with a few bits and pieces from its "A" variant, and was selected primarily because I needed a white marble bitmap fill, sarcophagi and coffin variants. The boat was the trickiest feature, as it's intended to be a large river-going vessel, with detached masts (ceiling's not high enough!), whereas the best the "A" style could offer was a rowboat, so that needed a bit of fiddling to look like something closer. The font is "Arabian" from the 2010 Annual.
Adding a mask to half-hide the walls was a late addition, as the shadows "inside" the solid rock surrounds beyond the walls seemed too distracting. This had a serious disadvantage, as the floors and walls had been drawn rather piecemeal, largely thanks to a few quite complex shapes (areas K and L were drawn square to the grid and then rotated, for instance. Areas A and B proved devilishly complicated to get right, particularly as for some reason, during the rotated copy operations for two of those small square peripheral tombs, the room size had slightly shrunk in one direction (well, one, but then that was mirror-copied to the opposite wall), something I didn't realise until I started connecting area H to the chamber between tombs I and J. Thus I couldn't do a simple series of "Trace" commands for a Color Key inner mask, and indeed ran into so many problems with it tracing the wrong bit repeatedly, I gave up trying to do that, and did a couple of external polygons instead, albeit that wasn't much easier...
In terms of the contents and area descriptions (in the map's PDF and text files), I found some of the options for the dice designs I'd used in the accompanying Inkwell Ideas "Dungeonmorph Delves and Descriptions" book for the Crypts, Lairs and Sewers sets very appealing. Most of the occupants and mechanics originated there, with a fair bit of subsequent tweaking in places, and the assorted treasure items scattered liberally throughout - together with the caveats on removing some - also derived from the same book, many as determined from the random tables towards the back.
Once the key and scale notes had been added, there was enough space left for portraits of a couple of the people buried here, created using Character Artist 3, naturally. The Sailor Prince is as he appeared in the later prime of his life, while the more ghostly appearance of The Prophet is because that is how he may appear in the Tomb, if the right ceremony is performed, for all he is not an undead creature. His holy symbol features repeatedly in the Tomb, so it was important one version of that should be added too. All those available have an attached cord in CA3, and while I thought of using a mask to disguise this, it proved possible to "attach" this version of it to the caption, to look as if it's hanging there.
Of course, it only really needs a few extra clicks in CA3 to generate full-body character portraits, and as I wasn't sure if I might need necks and shoulders for the versions to be used in the dungeon map, simply went ahead and drew the lot. It seemed a shame to not provide an Atlas version as well, so here they are:
Now, it's off to the ruins by the mouth of the Kalabanjar!