


Wyvern
Wyvern
About
- Username
- Wyvern
- Joined
- Visits
- 3,237
- Last Active
- Roles
- Member
- Points
- 5,515
- Rank
- Cartographer
- Badges
- 24
Latest Images


-
Community Atlas: Mirror Maze of the Shrouded King, a Map for Lich Land, Peredur
In the series of small dungeon maps I've been drawing this year in my sort-of Dungeon24 project, the next was the first rolled-up using the Explorer set of Inkwell Ideas Dungeonmorph Dice designs. The Explorer set is one of the earlier in the Dungeonmorph range, so it doesn't have an accompanying descriptive book. As I'd been having some discussions with a few folks about the whole Dungeon24 concept on the Arcane Library Discord (Arcane Library is the publisher of the new Shadowdark RPG) just before starting this map, I thought it might be fun to use the numerous random tables in the Shadowdark rulebook to generate the contents for it.
Shadowdark greatly encourages making things as unique as possible - so creatures might get unusual abilities or quirks, and perhaps as importantly, their own motivations, all of which helps encourage role-playing, of course. That process was fascinating, and, with a little bit of tweaking here and there, is how the dungeon became "The Mirror Maze of the Shrouded King". It has quite a selection of undead creatures within.
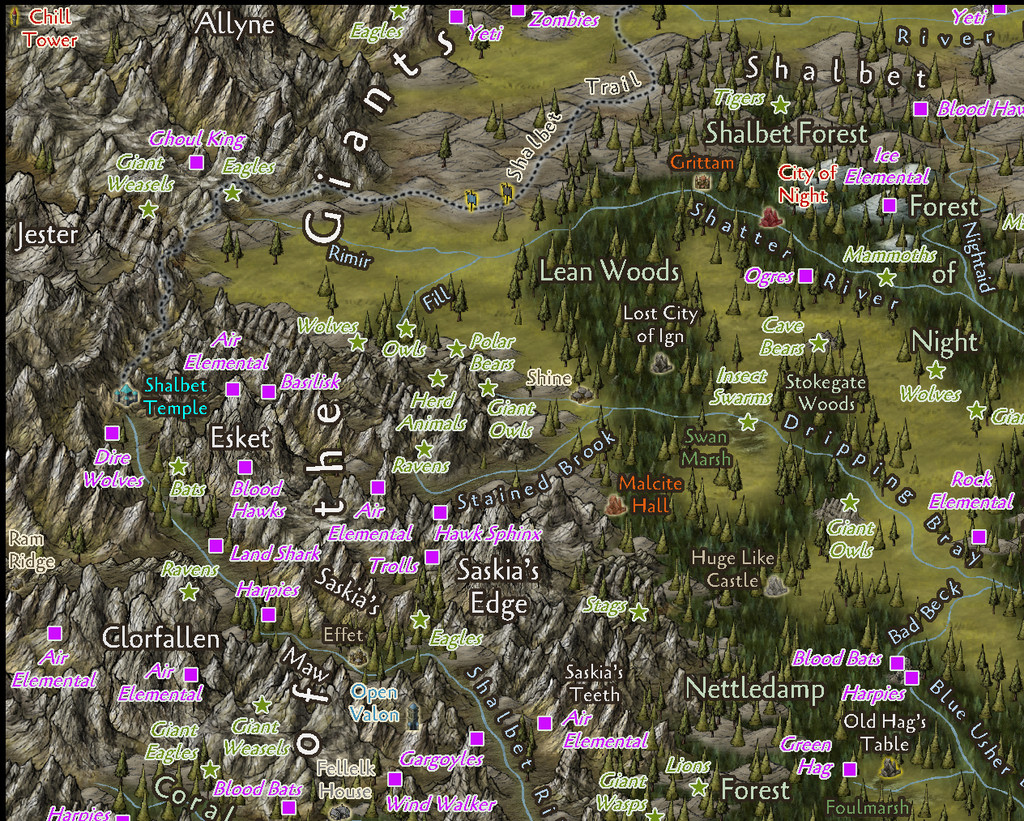
I'd also randomly decided earlier that it would be placed somewhere in the Godtagel area of northeastern Peredur:
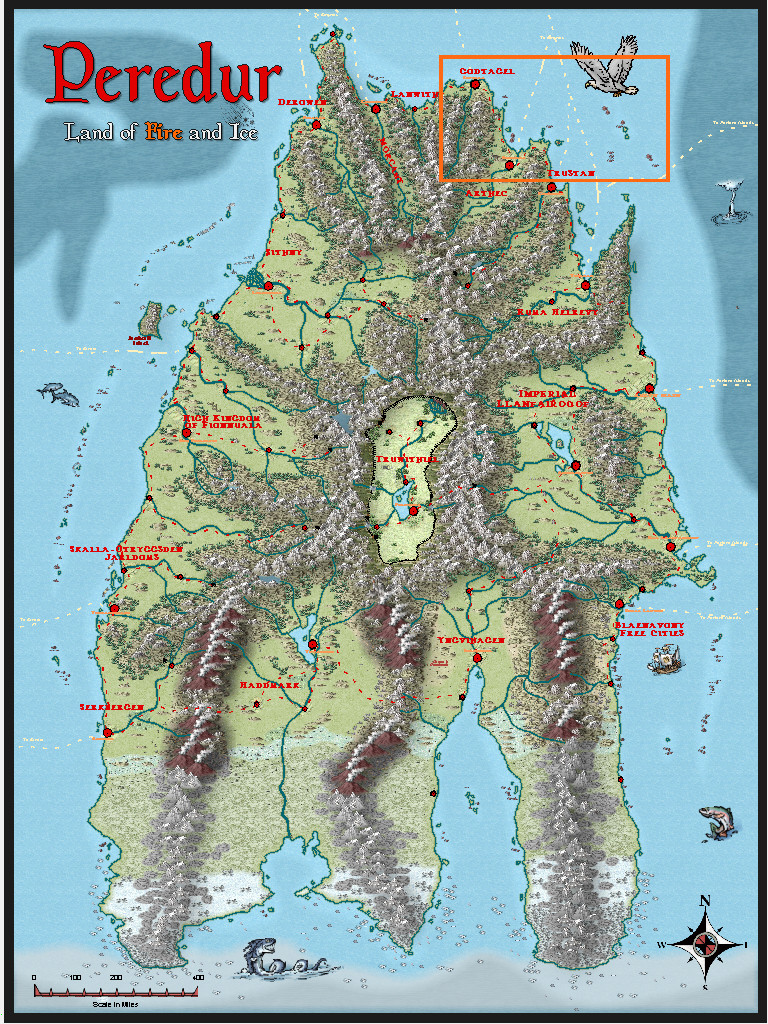
Peredur's one of the Atlas continents that's been quite heavily mapped in places so far, so I was hopeful I'd not be needing to prepare an extra area map as well this time. After quite a search (as indeed, a lot of spots have maps here already), I found somewhere that seemed vaguely suitable, a delightful spot by the name of Lich Land:
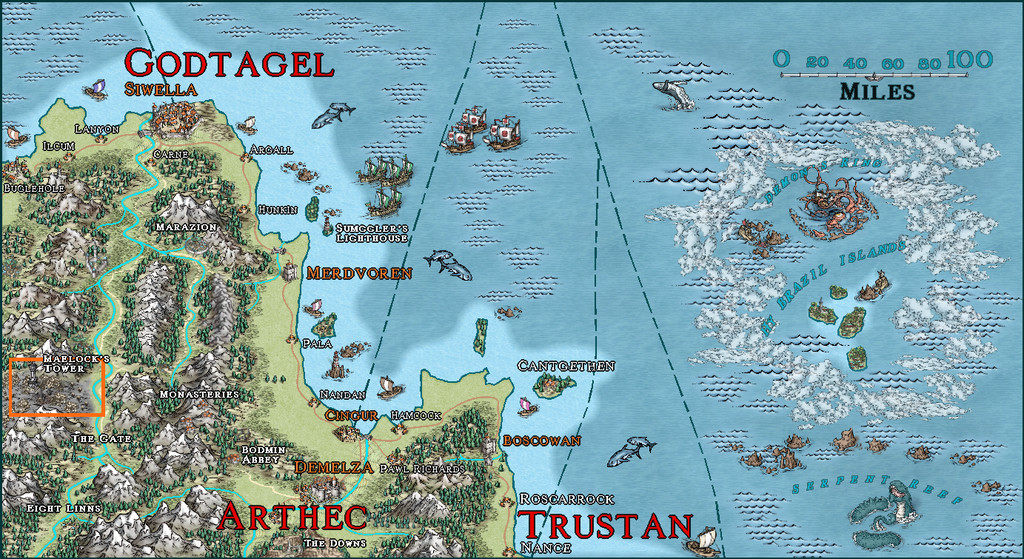
When I drilled down into the map for this area, I had a few problems finding somewhere suitable to choose, as while the pictorial drawing style used for the Lich Land map has its own charms, it has a tendency too to sometimes present the places on it as very over-sized for the map scale, which makes finding somewhere a small dungeon map can be dropped-in rather difficult. In the end, I went with what seemed the least-worst option, if not wholly ideal, a blank spot in some mountains where luckily nothing else had been sited. To give some impression of the scale of the whole mapped area, the orange square that marks my selected location is one mile per side:
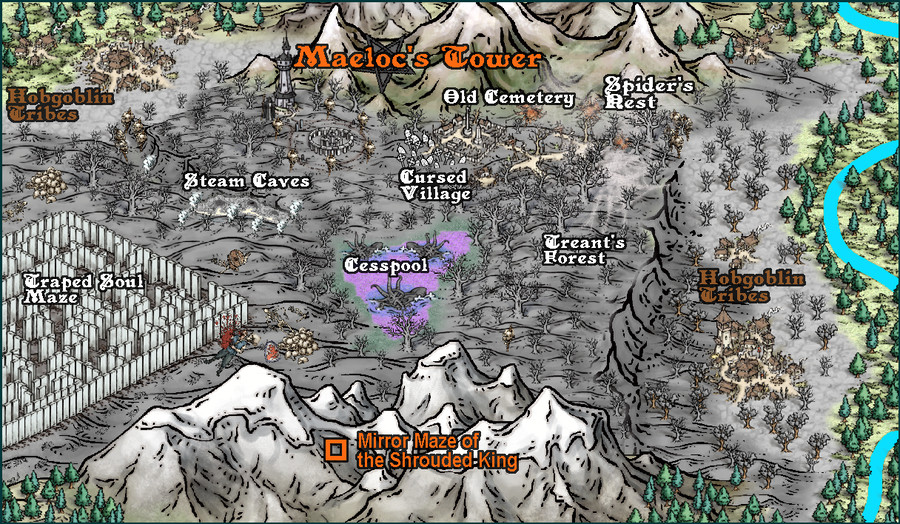
Shadowdark makes use of clear, black-and-white, hand-drawn maps with dot-shading for where the solid rock is in subterranean areas. That was definitely something I wanted to try for this dungeon map, although none of the available black-and-white styles for CC3+ really quite capture that look, especially for the shading.
What I decided upon was the OSR Dungeon style from Annual 97, as although many of the floor and rock-shading textures in that are too densely-packed with lines to fit this concept, there were other features from it I thought would work to give a closer approximation to the cleaner Shadowdark map look. And this is what I came up with:

The dot-shaded look was achieved first by laying down a base smooth polygon using the "Stones" fill texture, and then adding random selections from the two "Gravel" symbols over that on a separate sheet, all placed by hand, which allowed variable densities of such shading nearer the outer wall lines, and within the design, where rock pillars had been left in the Mirror Maze section particularly. The Stones texture had to be rescaled in the drawing to better fit the size of the Gravel symbol dots, which was pretty straightforward, and the whole does give quite a nice hand-drawn-like look to the shading.
I did experiment briefly with the Fill with Symbols and Symbols in Area commands, which often can take a lot of effort to get right. However, they both would have added many extra symbols to the map, most of which would have gone unseen as hidden below the floors, to give a similar density pattern. This way, I only had to add enough symbols to "spray-paint" those areas that needed it, and had far better control over the final appearance.
The thin grid squares on the clear floor is another deliberate choice, as this is a regular feature of Shadowdark maps, hand-drawn lines that provide a - usually - ten-foot grid scaling, while still looking somewhat like a flagstone floor texture, with occasional extra small marks suggestive of little bits of floor debris. There are some "Floor Tiles" textures in the OSR Dungeon style that have a similar look, although when scaled-up enough to give 10-foot squares, their lines look too thick, and the textures' highest resolution isn't sufficient to get a neatly clear appearance at that increased scaling level, unfortunately. Thus I simply made do with a standard 10-foot grid set above a plain, untextured floor polygon. It is a little unfortunate this'll be hidden on the Atlas images, as it's really part of the drawing, though at least it will be available for those with access to the FCW file, as well as on the Forum here.
I did need to add a compass pointer from the CA 160 Inked Dungeon set, as the OSR style doesn't have one, and even that had to have its letter-marker replaced, as the original font in the symbol jarred with the Primitive font from the 2015 OSR Annual. That just took a simple edit of the symbol to accomplish for this map only, however.
The Maze from the Inkwell dice design, of course, is what drew me to the Lich Land map, and I sort-of reused the "Trapped Soul" area-map concept from Lich Land in the Mirror Maze idea here, making it the reason so many variant undead are to be found in the Tomb Chamber; basically, they can't get out because of the Mirror Maze. There are hints in the map legend as to what Shadowdark is capable of helping to create, such as the "Muttering Lich" and "Radiant Holy Wight". Plus I added a few ideas of my own, generated because of what had already come up randomly, thus the Tomb Chamber contains the folk, now as undead, from the Shrouded King's formerly living inner court circle.
Normally, I'd just set-up descriptive text and PDF files to go into the Atlas to accompany the map. However, because this was created with heavy use of Shadowdark elements, I prepared a variant PDF that has the usual write-up, plus rules-specific notes on the creatures that aren't identical to the standard versions, monetary values for the treasures, and a couple of other items for those wanting to reuse it for Shadowdark games. I'll be adding that to the Arcane Library Discord in due course, but for those who aren't on there who might find it useful, this is a copy of the file:
Next time, I'll be staying in Peredur to find a spot to place the second "Explorer" dice dungeon, down in the southern region, somewhere in Haddmark...


-
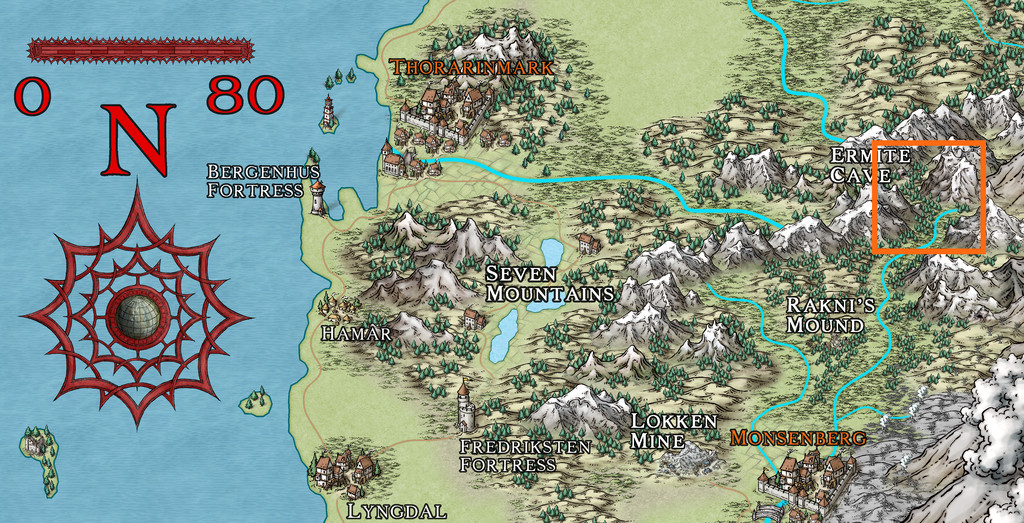
Community Atlas: Gruvrå's Mine, Serkbergen, Peredur
This map was another "two-dice-only" design from the Inkwell Ideas "Delver" set, thus similar in size and proportions to the Oracle Temple one previously on Kraken Island in the Forlorn Archipelago. One novel aspect on this occasion was I found a convenient area map in the Serkbergen region of Peredur into which I could place it, which was unusual in this project so far! This was just as well, since Peredur's quite large anyway, and the Serkbergen map covers a substantial chunk of its southwest.
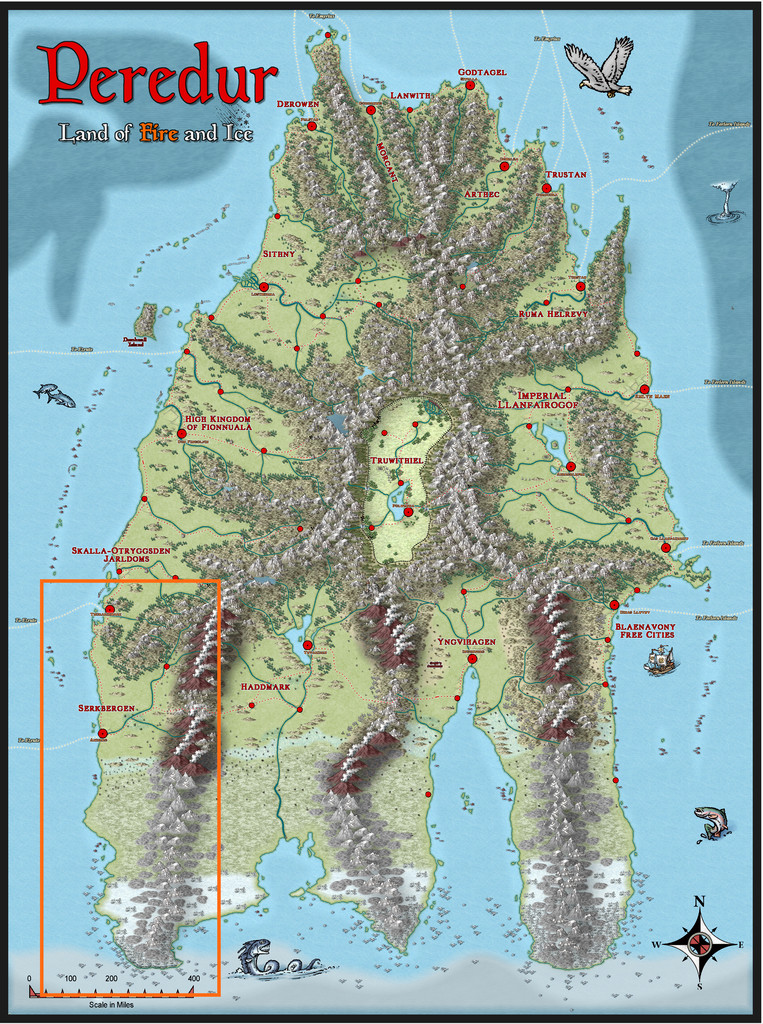

If you peer closely at the orange outline square near the top right on the Serkbergen map image, you'll see where I was aiming towards. A closer view:
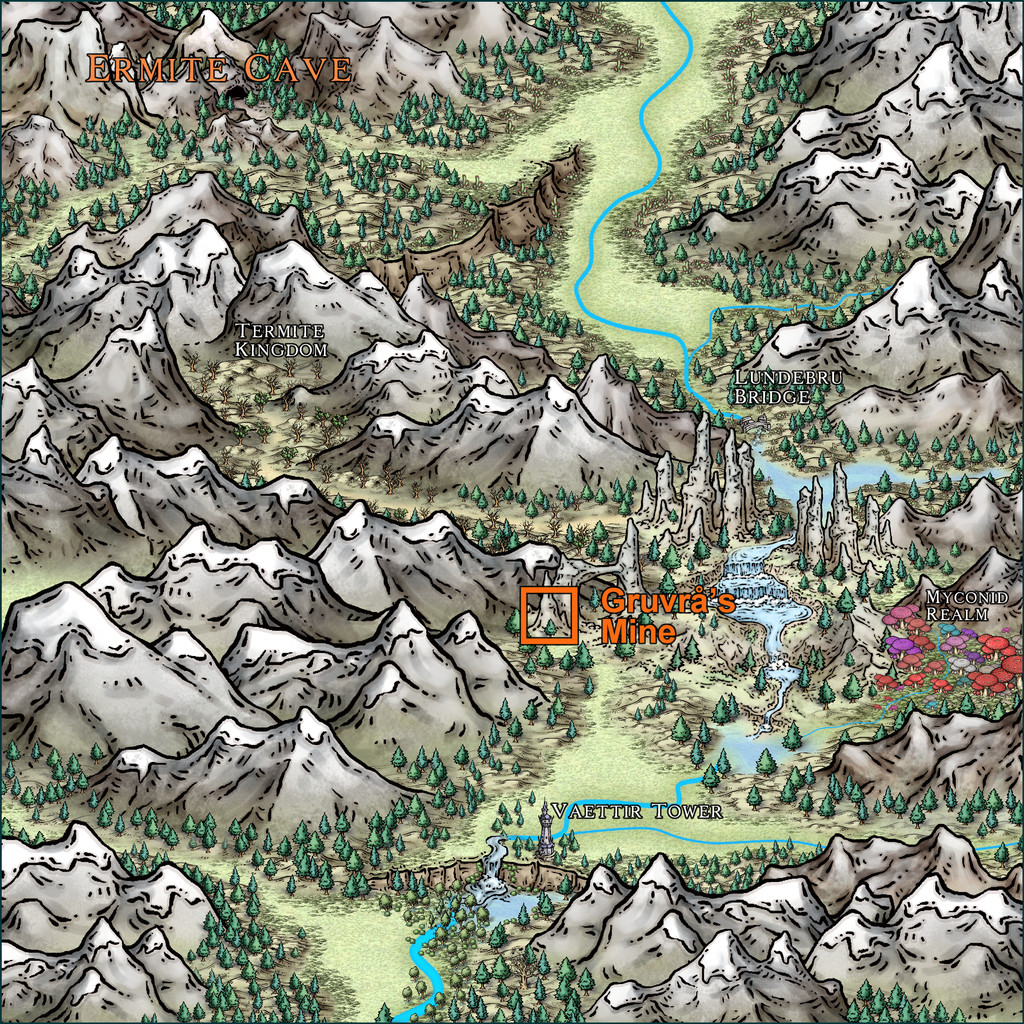
That's the area covered by the Ermite Cave map, and as luck had it, there were some interesting unlabelled mountain spire features near the middle of that map I could simply drop my little dungeon map into:
So I did!
I've mentioned before that ideas for what the contents for each of these maps will be come from various places, typically a combination of what the diced map designs look like, any descriptions available from the accompanying Inkwell Ideas books, a range of random tables from various sources, and where the map will be located on Nibirum. Here, it was the influence of the high southerly location (within Nibirum's Antarctic Circle, roughly 71°S latitude), coupled with the name of Vaettir Tower about eight miles south of the Mine. Having picked-up a copy of Free League's "Vaesen" RPG last year, and a copy of the illustrated book by Johan Egerkrans that inspired it, also called "Vaesen", I knew what "Vaettir" meant from Scandinavian folklore, so I thought that source would be a good place to look for further thoughts. A couple of ideas came from the Inkwell book too - including having undead creatures out for revenge in what's marked as "Cells" on the map, and the dangerous state of some of the caves, although the risky look of the caves on the dice designs had already indicated this latter point as of some significance. I flipped through the Egerkrans book, and settled on the Mine Guardian Spirit, or Gruvrå, as the main actor in this place, although unfortunately, this is one of the creatures in that book which didn't make the cut into the Vaesen RPG (or hasn't so far). So I simply elaborated on what was said about her in the folklore tome instead. A couple of random rolls on tables from Monte Cook Games' "The Weird" - creating a gem-studded, tattooed Golem with a horned cat's head - and everything started to fall into place!
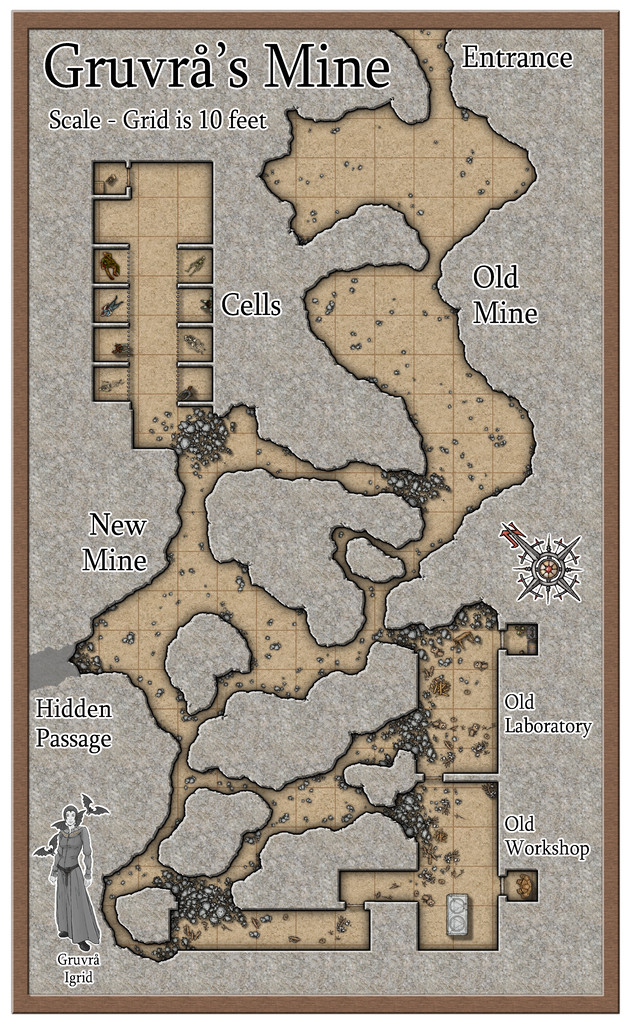
What I came up with, detailed in the map notes for the Atlas, as ever, is an old Dwarf Mine that ended up abandoned, and which was then expanded and altered by a group of inventors and alchemists determined to create a "better" Golem, using body parts from captured humanoids, possibly making them a variant kind of magical undead in the process (hence the need for a secret lair). After the Mine was abandoned, the Gruvrå's attention went elsewhere in her realm (which I decided would encompass all those interestingly spire-like mountains arcing away towards the Myconid Realm on the area map), so it was only sometime later she returned to the old Mine. Horrified at what she found there, she destroyed the Laboratory and Workshop, and drove out or killed the perpetrators. It's really easy to anger a Gruvrå if you fail to show one the proper respect. However, she didn't understand the undead creatures, so just left them, and the last Golem as well. Plus of course, she now keeps a closer watch on this old Mine than she used to.
I also felt I needed a CA3 portrait of the Lady in question, now named as Igrid, thus creating a thumbnail that could be added to the map, as the perceptive among you will have realised already! This is the full portrait, which was heavily influenced by the Egerkrans drawing:
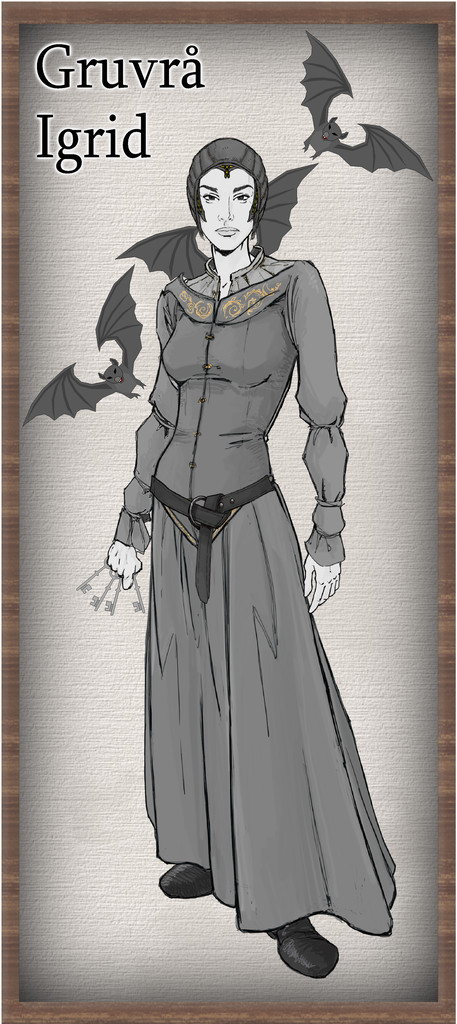
The keys and bats came from the old vector CA, since CA3 doesn't include such features. I might have added a lamp too, but neither version of CA has one of those, sadly. The bats I decided are essentially merely small aspects of the Lady, able to flit about quickly, to help keep her better informed of events in her realm. They're not "real" bats beyond that. If she appears in a black dress, that's a sure warning of impending death for someone; grey like this is her normal attire. I decided against providing that change as an option in the Atlas map though. Seemed a bit too grim.
In case anyone's unsure, the Mine map was drawn using the SS4 Mike Schley Dungeons set. I've used this before, though not for a long while, and thought it would work nicely for the somewhat dangerous, partly collapsed layout here, as it has such a fine collection of rubble and rockfall markers, aside from other features. Thanks to the Gruvrå's colouring being very greyscale overall, I did want a more washed-out, aged and worn look to the map as well, so this all just seemed to work ideally for that impression. I also wanted it to be a little off-kilter, so you'll notice the squared areas don't quite fit to the grid lines. That's quite deliberate, and isn't simply a means to annoy those using the map in VTTs - that's just an added bonus 😉!
For the next map in this sort-of Dungeon24 set, I'm being randomly guided back to Alarius, and this time quite close to my "usual" territory there, as it's to go on the adjoining North Central Alarius map...


-
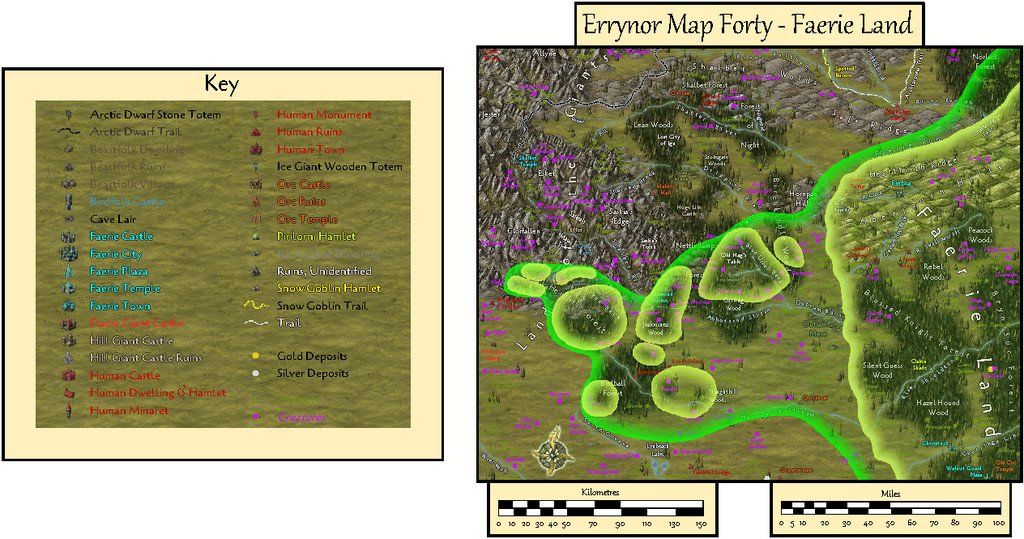
Community Atlas: Errynor Map 40 - Faerie Land
As mentioned recently in another Forum topic, the next of my 40 250 x 200 mile maps detailing the Errynor area of NW Alarius on Nibirum is now ready for submission to the Community Atlas. Despite becoming "distracted" into preparing more additional maps for the first Errynor map than I'd expected initially, Map 01 - The Cliff, I decided to continue with the next one in the order I'd originally intended, by switching right across the map to its opposite, lower right, corner:
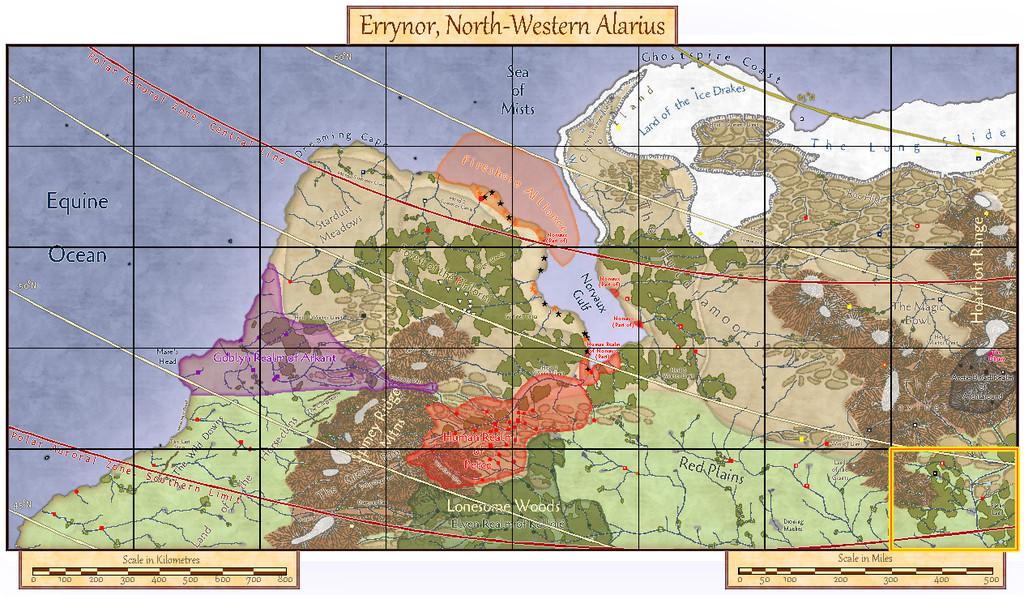
Beyond that though, much of the pattern for the mapping - using the Herwin Wielink style, some Cartographer's Annual 62 Geometry varicolor symbols, the Cagliostro (from the 2017 CA), Candara and Gabriola fonts, the latter both from standard Win 10 installations - had been set already by Map 01. There were though some differences. This time, I'd be mapping the most landlocked area in Errynor, not one that was almost entirely under the sea. While that simplified the number of different map views I'd need to create, because - clue in the title "Faerie Land" - I wanted to illustrate the effects of the two overlapping realms, the Mortal one and that of Faerie, it didn't reduce them to zero.
The initial layout was fairly straightforward, and largely involved hand-copying the details from the Errynor map area above into the template for this new map, with additional items from the hand-drawn original as discussed in the "Construction" topic. There things rather stalled though, as I realised I needed to work out details on what the Faerie influence areas were going to look like and exactly where they were going to be. Plus I also suddenly had lots of features that clearly would benefit from being named.
The Faerie areas were relatively easily worked out by simply hand sketching some ideas on a tracing-paper overlay to the original squared-paper map, and I already had some feature names from my decades-long work with earlier versions of Errynor that could be reused.
However, you know me and my fondness for random design mechanisms... One of the early Judges Guild printed works I got was their "Village Book 1" tome, from 1978, and in that is a system for generating random village names. Up to 368,000 of them! The names will work perfectly well for other sorts of places too, with the addition of terms such as "Wood", "Forest", "Marsh", "River", "Brook", etc. So I rolled up a long list of possible names. Each series of rolls generates a two-part name, prefix and suffix, effectively, though you can add more parts to vary things from time to time too. Not every combination works well, as you might imagine, but the names can be subtly altered, or only one part used, or merely used as inspiration. I was pleasantly surprised to find most were actually very suitable for what I wanted; some that seemed obvious, some a little odd, some that could be humorous, some a warning, many intriguingly evocative, much like looking at a map of real-world places in fact. So here we have Map 40, complete with place names:
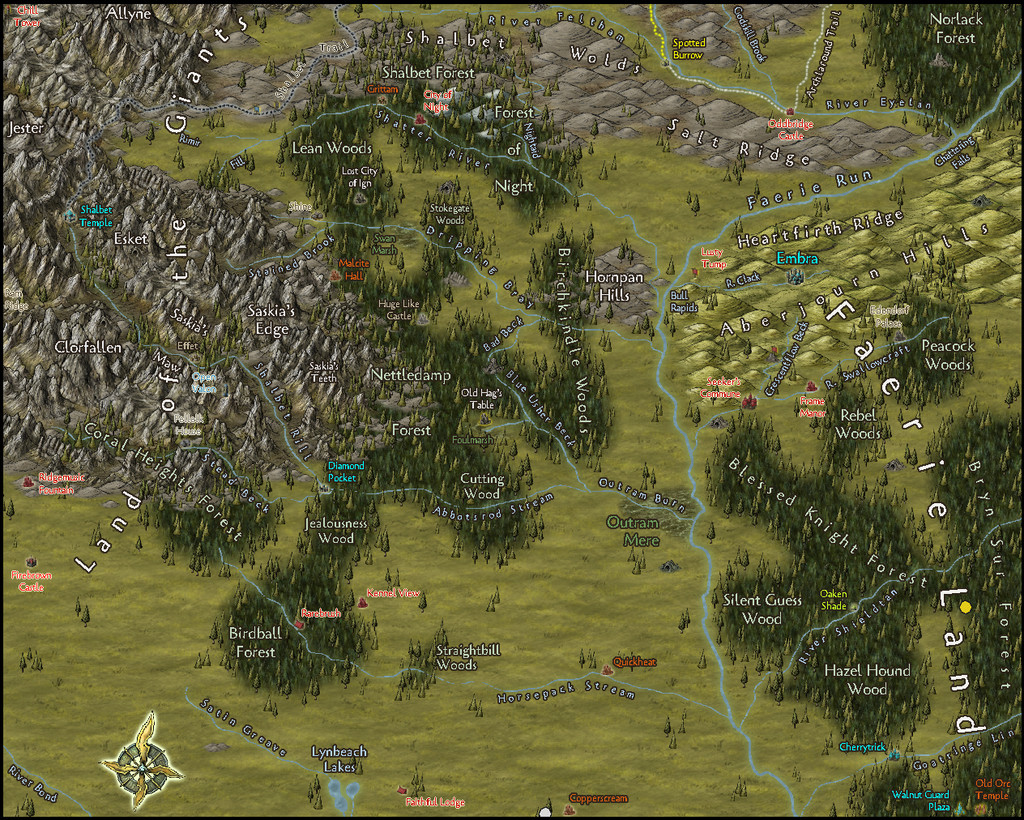
And a close-up of just the NE corner to show a bit better detail at the usual Forum resolution:

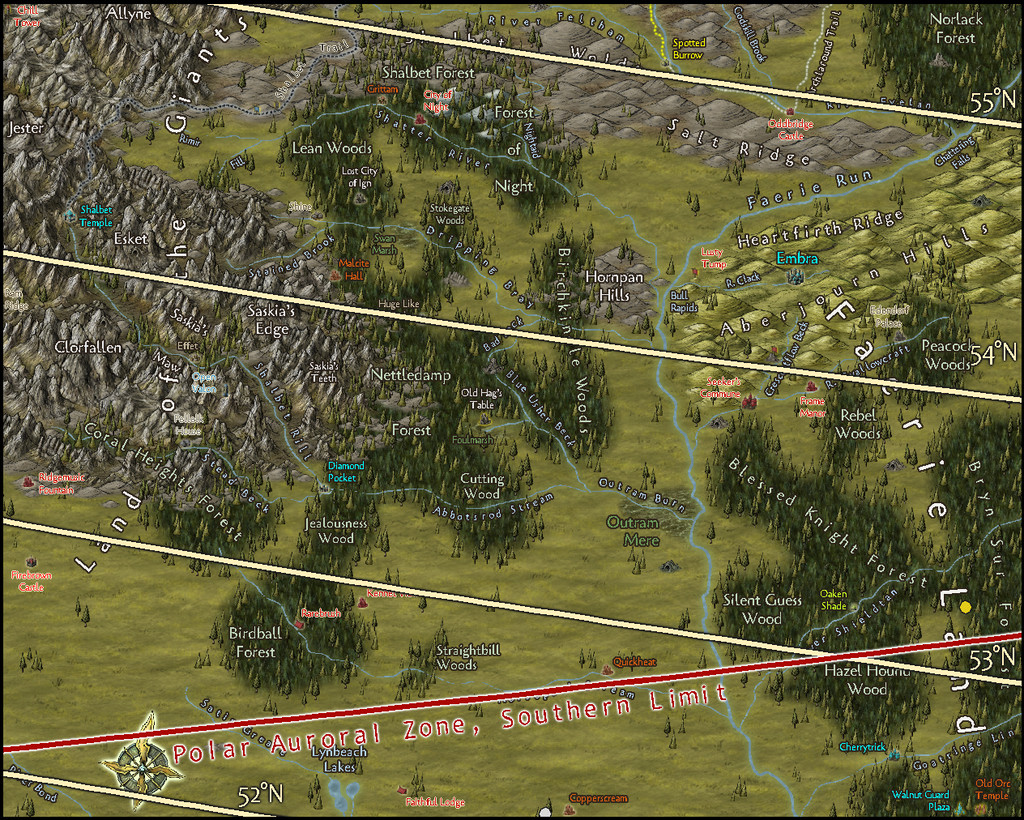
If all goes to plan, there should be a toggle in the Atlas FCW version to allow access to the latitude lines, and an arc indicating the southern limit of Nibirum's polar auroral zone, too:
That slightly offset-from-the-corner compass rose is to allow for the numerous creature markers and labels in that corner, as elsewhere across the map, to be shown (again, another Atlas version toggle is intended to allow these to be displayed or hidden):
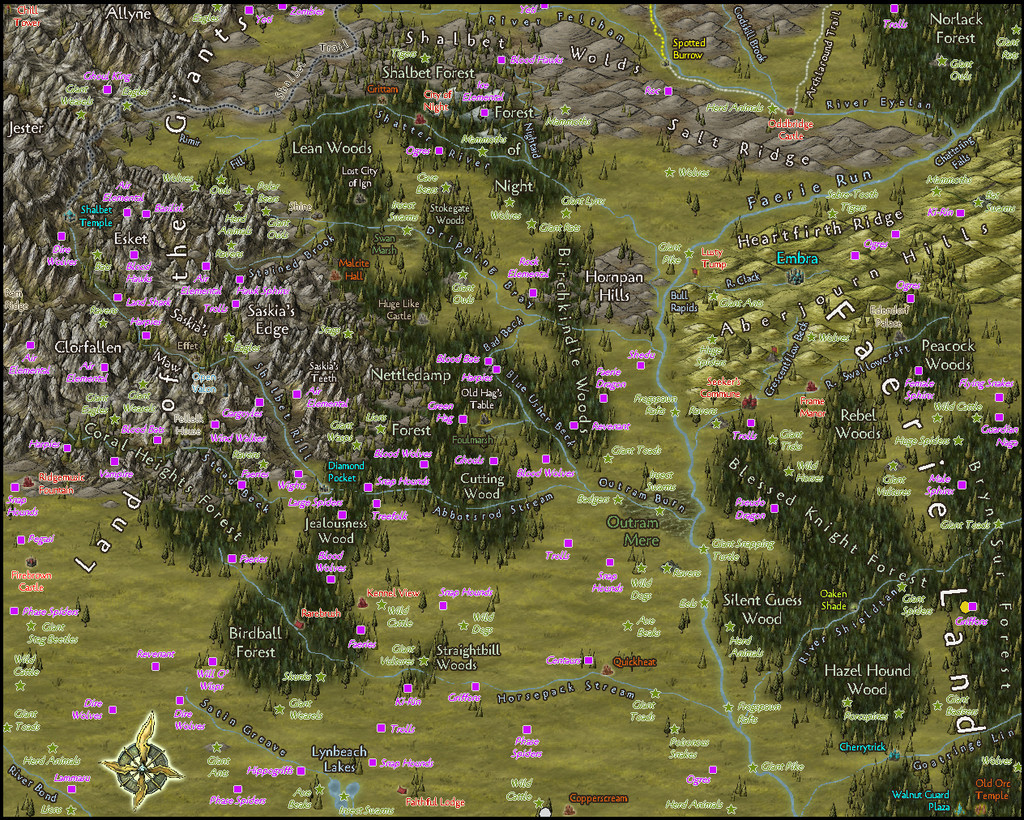
Which looks rather messy at this resolution, so another close-up may help, this time over in the NW map corner:
Plus of course, there needs to be a map key as well:
The areas where the Faerie realm overlaps most strongly with that of the Mortal plane can be shown via a further pair of toggles to indicate the core areas, and the maximum extent of the overlap on a few special nights each year. The following images are of those whole-map core areas and a close-up of the separated patches west of the great Faerie Run river, followed by the line of the maximum Faerie overlap extent:
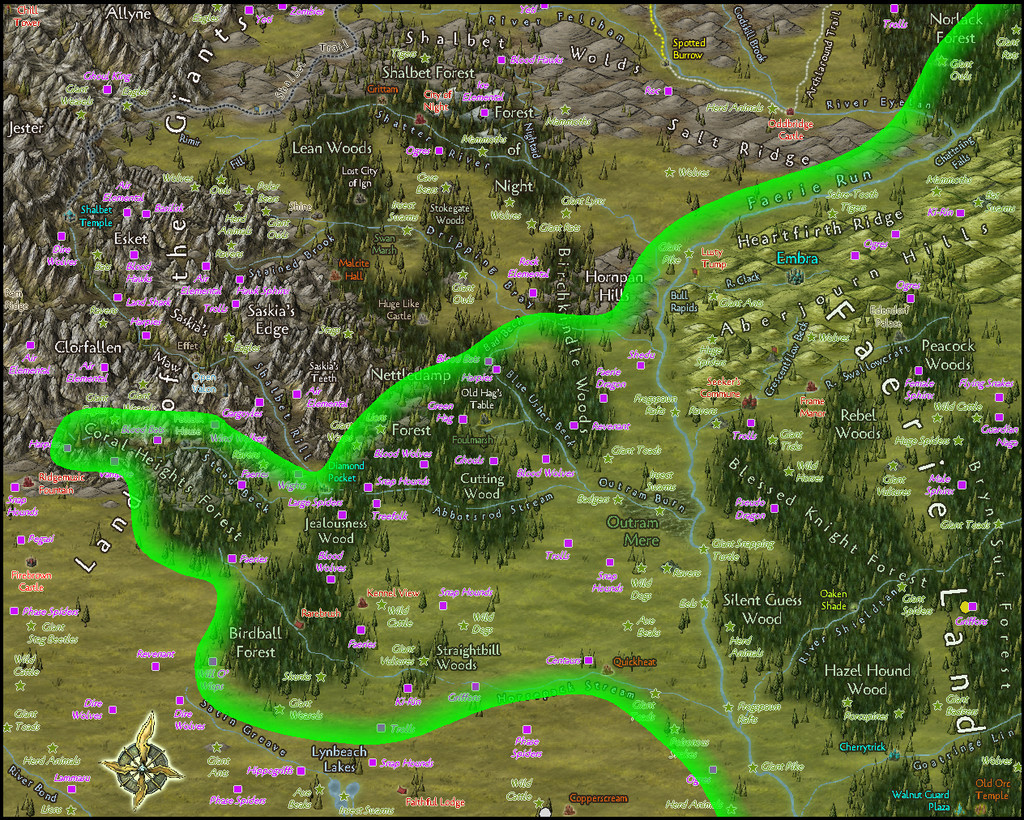
These can be shown combined with any of the other toggleable map overlays, and for anyone concerned at the lack of a scale, that's because to try to improve the resolution, I've shown just the map rectangle here till now. This is how the map really looks:
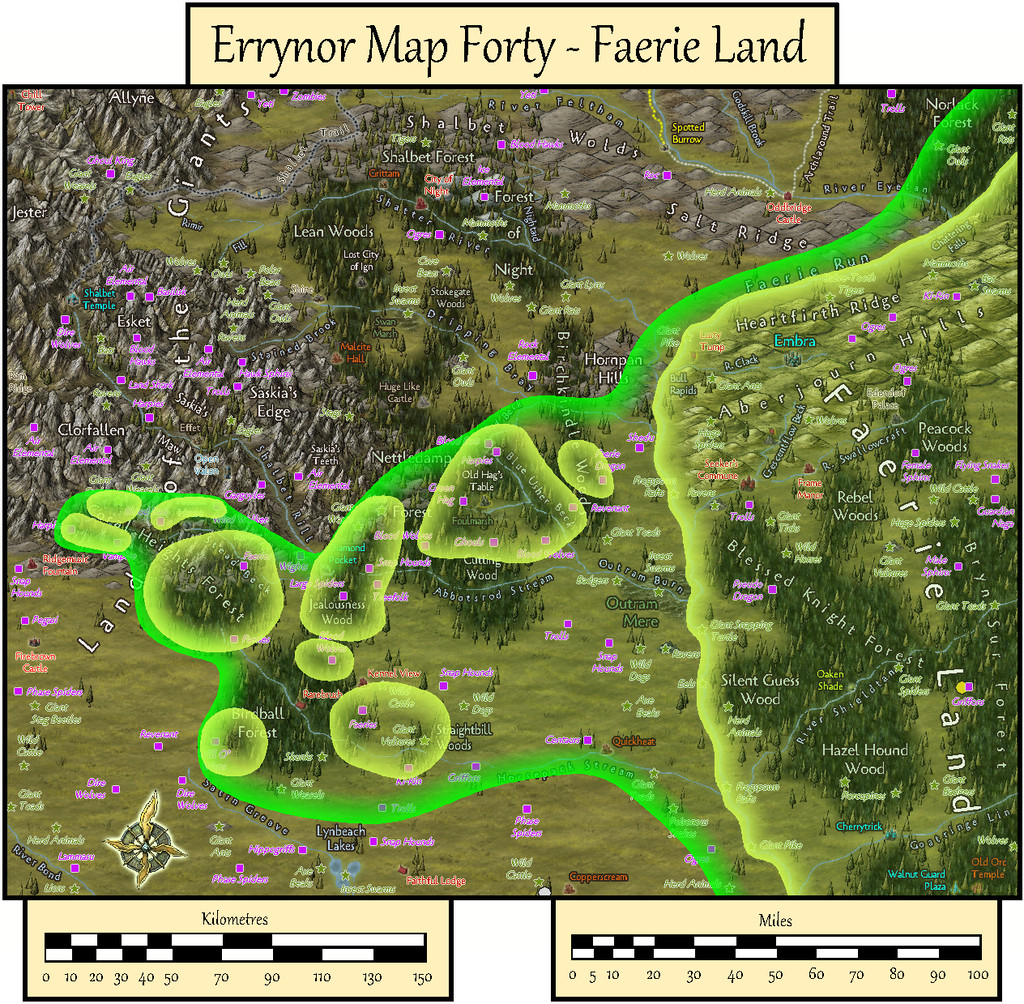
The complete layout is then this:
The Atlas will also have a 23-page PDF, and a text version, with its accompanying detailed notes, explaining a little more about the settlements and the significance of some of the creatures and resources.
I haven't quite finished with Map 40 yet either, as the River Clack valley with the great Faerie city of Embra (see the first of the detail maps above, the NE corner one, for these locations) is to receive some further mapping in the Atlas shortly too.
![[Deleted User]](https://secure.gravatar.com/avatar/c75d9a245b74d9c59be0999ea81ca541/?default=https%3A%2F%2Fvanillicon.com%2F92add7f8c954488718110edc4896ad39_200.png&rating=g&size=200)


-
Community Atlas: Isle of Zariq - Kobalt Mountain Caverns
This map details the subterranean lair of the blue-scaled Kobalt tribe - essentially D&D's Kobolds - in the central uplands of the Isle of Zariq.

As commonly with my Community Atlas mapping, I opted for a random aspect, here regarding the layout of the caverns, which came from the Curufea's Random Cave Map Generator website. This online system creates its maps from electronic versions of tiles from the huge array of those drawn some years ago by artist Ed Bourelle of SkeletonKey Games (DriveThru RPG link). I like SkeletonKey's earlier tiles, as they have an appealing clarity, and allow the construction of more varied layouts and settings in a consistent style than just about any other set of printable tiles I've come across. The Curufea system shows you exactly which tiles from which set have been used should you need to rebuild the layout as actual printed tiles, plus the PDF images in the original files can be copied and pasted into other programs to set up a GM's map showing precisely what the final layout will look like. In my pre-CC days, this was a real boon!
For this map, I decided to try some large-area random options, and saved one of those that looked especially promising for what I needed.
Of course, this random map ends up square, while the nature of the tiles means there will be several unconnected segments shown for almost all such layouts. However, by importing this base drawing into the CC3+ template, making several copies of it, rotated and moved around so different segments could be married up in the final version, something closer to what was required was achieved.
The map was always going to be quite complex. Having had a long fascination with kobolds, albeit initially in the form of the British folkloric mining goblins, I've been pleased to see how D&D's miniature draconic humanoid versions have developed under the system's 5th edition, with elements of those folkloric creatures incorporated. In particular, my ideas for this map were heavily influenced by the discussion and kobold lair map in Volo's Guide to Monsters (Wizards of the Coast, 2016, pp. 63-71). So there were to be wriggling, winding tunnels, sometimes crossing each other without linking at different vertical levels below ground, chambers with various functions, and many traps.
As another part of my Community Atlas mapping efforts has been to explore different styles, I opted for the Modern Cave Mapping style from the Caves and Caverns issue of the Cartographer's Annual, CA7 from 2007. Which allowed the creation of the map:
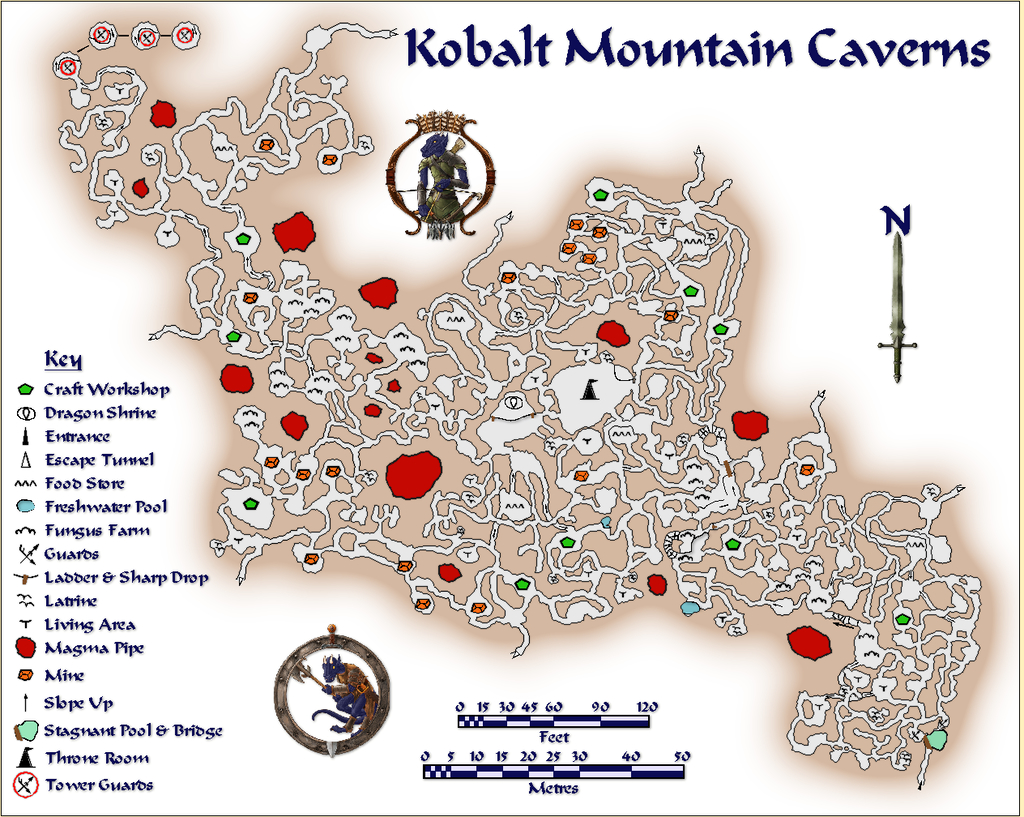
The layout was scaled and designed to fit to the locations on the Zariq map, as far as such things can be when translating pictorial side-view symbols into physical areas on a top-down plan. Consequently, the whole should be seen as sloping up gradually, if somewhat inconsistently, from the SE (lower right) to NW (upper left). The SE segment, where the entrance is, is set mostly below the "hill" symbol on Zariq, while the bulk of the Caverns lie beneath the "mountain", so the "tower" shown on the mountainside equates with the multi-level rounded cave fitted with a sloping spiral ramp inside at the top left of this map, where the "Tower Guards" symbols are.
While some of the usual Modern Cave Effects were tweaked or changed in places to better suit here, the light brown glow effect for the solid rock was left at its normal level. On a more typical map size, this would make it fade away in the larger enclosed rock areas, and at a shorter relative distance from the outer walls. However, it seemed to work better left like this to me, as it helps to emphasize the narrowness of the tunnels and smallness of the caves. Similarly, the Key labelling was deliberately scaled as larger than necessary to continue that impression. Kobalts are only about a yard/metre tall, and their tunnelling naturally matches their stature. Adding a couple of varicolor Token Treasury symbols made sure nobody might be mistaken about the nature of Kobalts!
The composite method of constructing the final layout where sometimes tiny patches of floor texture had to be added to link passageways, together with larger areas of passage and cave floors to create the illusion of under- and overlying cavern sections, meant the usual method of adding a grid - by copying the entire floor only onto the Hex/Square Grid Layer, and converting the floor fill to a suitably-sized grid - wouldn't work. Or rather it would, but the grid became inconsistent, sometimes with overlaps, across the entire map. After several tries to create a single polygon from these disparate segments, I was still unable to get the whole to work together properly, so opted to cut my losses and simply hand-drew the entire grid instead:

Yes, it's a three-foot grid. I found a five-foot grid was too difficult to read in the passageways especially, so after a very brief experiment, changed it. As that's a yard, it could be easily restated as a metre-grid instead, though for precision, that's actually closer to 0.9 metres, of course. Well, that was my excuse for not drawing a metric grid as well (that's a h*ll of a lot of lines to draw and trim to entity once...). I did though add the two scales to help in estimating greater distances.
Then I added the traps:
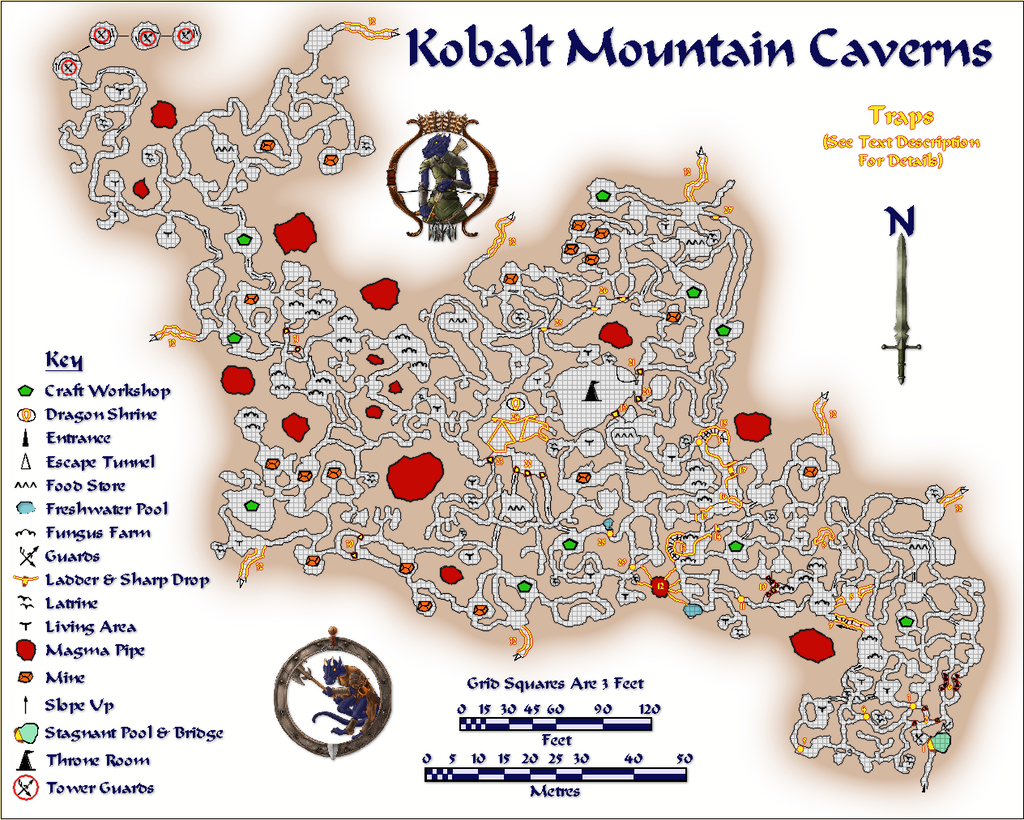
These were allocated a numerical key whose description, with other details on the Kobalts and their lair, are included in the map's accompanying PDF and text files for the Atlas. The idea is that both the grid and traps will be accessible using toggles in the final Atlas map.
Should you spot a similarity between this map's style and that used for "The Hive" maps I entered for Lorelei's Mapping for Dice competition a year ago, that's partly because they are the same; and yes, my choice for those Hive maps was heavily influenced by having worked on this map some weeks earlier!


-
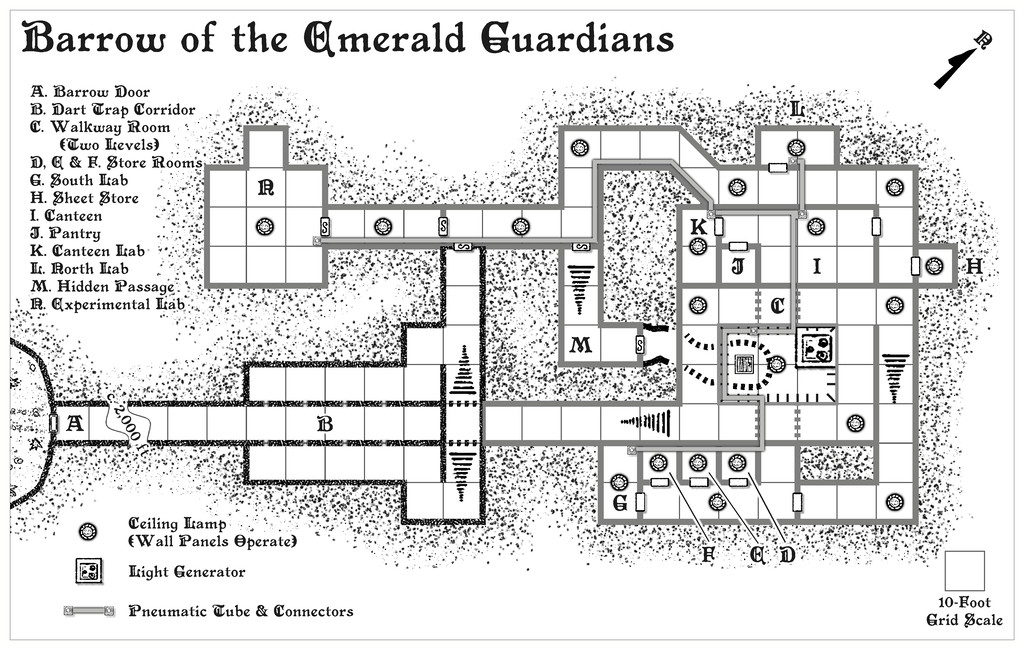
Community Atlas: Barrows of the Ferine Magi area, Feralwood Forest, Alarius
Well, that was a longer break than I'd anticipated. However, I can now update progress with this project today, having completed the first map, for the Barrow of the Emerald Guardians, and its notes. Typically, if unintentionally, along with other RL issues this month has brought so far, this first map was also the more complicated of the trio to prepare, as it had been randomly assigned both a light generator and lamps, and a pneumatic tube communications system, both of which needed adding to the map. The lamps and generator were straightforward enough, as simple individual fixtures. The pneumatic tubes though needed drawing-in as well, however, given each is meant to be about a foot, 30 cm, in pipe cross-sectional diameter. Lines are, of course, simple enough to draw onto a CC3+ map, but getting the colouring to work well enough in greyscale turned into a bit more of a challenge, and ultimately, I opted for a thin, dark outlining glow effect as well to get the tubes to stand out without making the walls seem like irrelevances. Plus the wall colouring had to be changed as well (several times, in fact, though that doesn't show here, of course...).
This then is the (probably, subject to later checking) final map in its "ordinary Nibirran" view:
And this is the view with the hidden passages those not from Nibirum can ordinarily see, displayed:
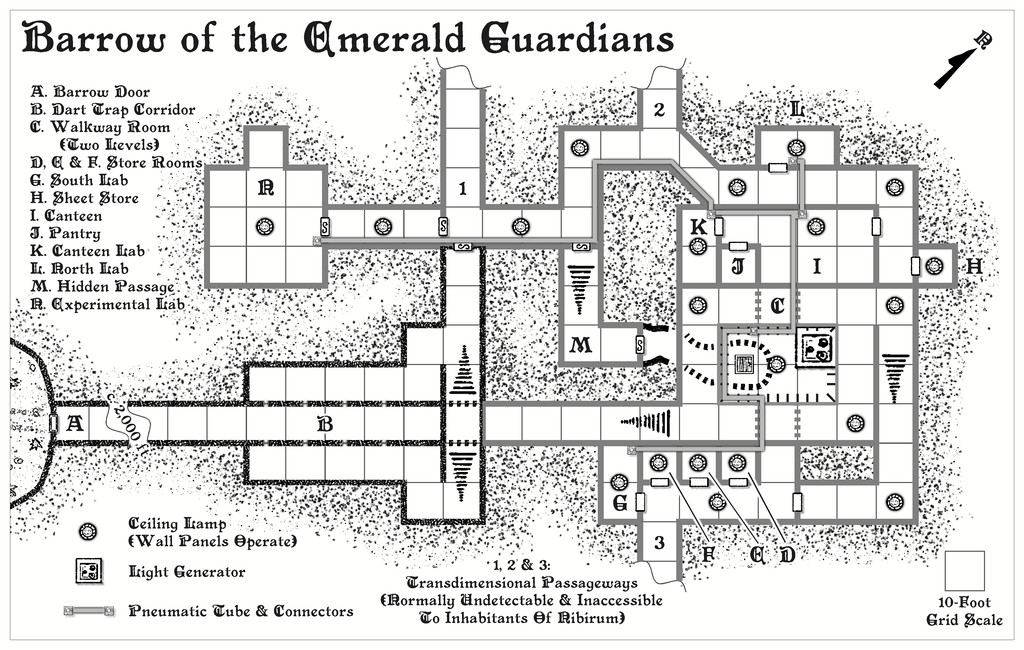
In terms of map contents and denizens/potential denizens, these were drawn, and then adapted, from, primarily, the Numenera RPG for this map. In the notes, I've identified the original source object or creature type, in case anyone should want to use the "standard" versions instead of my amended ones, for which I've also provided Shadowdark stats and comments. We have a couple of Human inhabitants, both tech-savvy mage-like inventors of sorts, and a host of curious magic-like gadgets they may have constructed or be working on (or indeed, even be using). There are also oddities from the non-Nibirum world outside (since I've assumed there is a settlement of some sort beyond one or other of the "exit" passageways), creatures that have wandered, or may wander, in, including a particularly vicious group of vaguely humanoid, communal, raiders that communicate purely by telepathy, and which have a thick, long tentacle each instead of a head. There's also a wandering envoy, a loosely insect-like humanoid, jerky of motion, actually a technological construct, liable to be off-putting to folks, despite only wanting to establish peaceful contact with other humanoids. That one can summon a group of warriors of similar type should the need arise, since there seems the possibility for some curious alliances to form among the folks here when added-to by a group of Nibirran adventurers. And then there's also the Mysterion (as I've called it), essentially a Vorlon from the old Babylon 5 TV series, should you recall that. That one's going to be in all three of the Barrows, being extremely cryptical and enigmatic. I did promise weird!
Hopefully, not quite so long a gap till the next map's ready from this trio.
[EDIT 19 November 2024: Although I originally added the provisional PDF description for the map to this post, I've removed it now, as the final version has been submitted for the Atlas!]


-
Community Atlas: Aenos Isle North, Demosthenes Swamp, Artemisia
Threshorsh promised to be an interesting challenge, as the dice designs for it had two subterranean segments linked by a surface area with a small settlement in it, so a mixture of different, though matching, mapping styles seemed like a good idea. In the end, that mixture kept getting broader as the mapping proceeded. This is the final map:
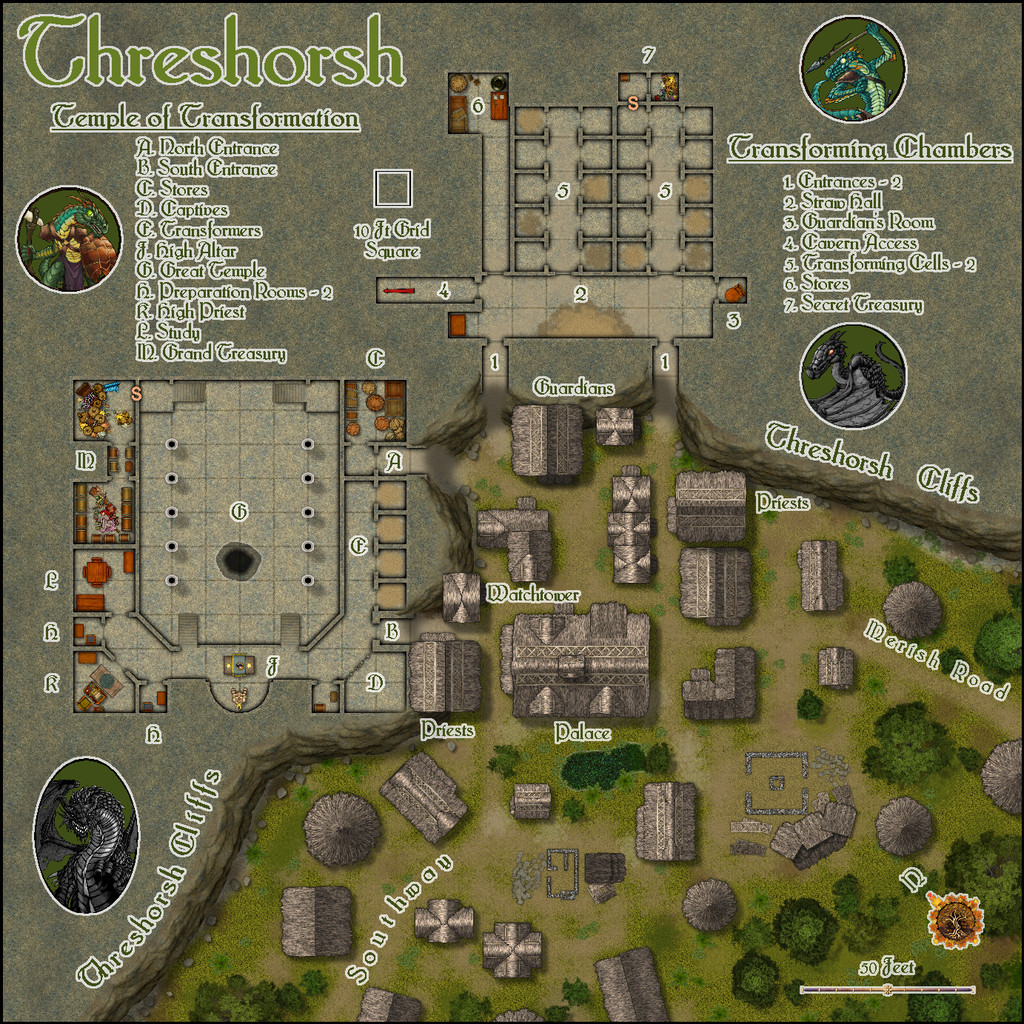
As the cliff line was such a significant feature on the dice designs, and divided the over- from the underground, I decided to start with that, and the overground segment of the drawing, thus started the map from Sue's Forest Trail and Forest Graveyard packs from the 2022 Annual. Of course, I knew already I'd be needing some buildings as well, and while I toyed with the idea of drawing just the interiors, as is often suggested with the "Dungeon" style packs, the dice showed purely roofed structures, which seemed a more interesting option here. So Darklands City from the 2021 Annual was quickly added to the plan, with repurposed ruins to show the stone foundations for structures still being built (as something the random options had come up with). One downside is the thatched Darklands City buildings all have obvious chimneys, so ideas were swiftly added for how to conceal those (tropics, after all). Luckily, the style has options for adding separate dormers and awnings, which helped greatly, and those features allowed the construction of additional building shapes as well - including what I really wanted to add beyond the area the dice design provided, some round hut shapes. And yes, those are hand-crafted from the resized smallest awning piece - hand crafted to help give a slightly more ragged outer edge, as these are huts built by Lizardfolk, after all!
The cliffs are meant to be fairly low, at most 60 to 70 feet, 18 to 20 metres - hence some of the properties built into the outer edge of them actually ARE meant to rise above their tops. That meant adjusting some of the usual options for the cliff effects (mostly on the hand-drawn shadows, which were also shortened). The Forest style allowed some playing around with the water effects as well, as while I didn't want to add a stream, because this is meant as the drier part of the Isle, I did want a freshwater source, and a rainfall pond seemed suitable. That proved particularly interesting, as I'd not used the technique for water employed here before. Chances are you may not be able to tell where it is at this resolution, but the pond lies just southwest of the Palace.
With the subterranea, the drawing was much easier, as neatly regular for the most part. I decided these areas were probably Dwarf or Gnome work, and likely commissioned long ago, perhaps by the Lizardfolk, to help account for their different appearance to the settlement (as mentioned in the notes to go with the map in the Atlas version). The chief concept behind the whole is that this is where Lizardfolk come from all across the - as the locals call it - Leminish swampland when it's time for them to begin their transformation to become Swamp Dragons. At Threshorsh, they can enter their chrysalis state during a ceremony in the Great Temple, then be taken to relative safety to continue their change in the Transforming Chambers, and returned for a further ceremony in the Temple as they begin to emerge. Following that, when they can move about unaided, the young Swamp Dragons are guided down to Thalagos Cavern, partly beneath the Temple via the Cavern Access passageway from the Chambers, where they can grow to a fuller strength and size before venturing out into the wilds. The timescales for all these changes should be highly variable between individuals I felt, and also that only relatively few Lizardfolk would ever undergo the change at all. The swamplands may be fairly vast, but dragons need a lot of land to support them, although I had opted for a more sinuous, serpentine form for these Swamp Dragons (largely influenced by the same-name dragons in the Shadowdark RPG, except those are flightless, whereas I wanted these versions to be able to fly, though not strongly or for long). This also allows for the fact that the Queen here, Shemenshra, is still in her humanoid form, despite having reigned for 40 years, for instance. In the notes, I did keep things vague as to how the Dragons may relate to their former selves and those they knew who remain as humanoids, or what mental abilities they may retain as Dragons.
Those familiar will doubtless have spotted that DD3 was called into action to expand the symbol options, and Creepy Crypts too, largely for its extra terrain patches, which are really helpful in blending and lightly altering the textures and transitions, along with providing straw piles for the chrysalises to rest upon. The straw colour in the Transforming Cells helps identify how advanced the progression may be for the chrysalis-occupied Cells (darker straw = longer time underway). Having allowed space for the map legends around all this still left some blank spaces, so finally TT1 was drawn upon for those figurative illustrations.
Next time, we find what lies beneath that irregular pit hole in the Great Temple (which probably took longer to draw to look right than the Lizardfolk spent cutting it through the rock, or that's how it started to seem...).


-
Community Atlas: Dendorlig Vale, Malajuri
If you read through the draft PDF version of my notes on Dendorlig Hall Village, part of the megadungeon/abandoned Gnome city I've been working on this year, which was added to this Forum topic on 18th Feb, you might have spotted I mentioned there a couple of places outside the Hall complex, above ground, including Dendorlig Vale. At the time, I wasn't sure if I'd be mapping that area as well, having already distracted myself far more than I'd intended away from my main focus of mapping the Errynor region in NW Alarius.
This impression wasn't helped by a couple of abortive attempts to design the map during February-March, as although I'd a hand-drawn set of ideas for the area's layout, when it came to the CC3+ mapping, I couldn't get it to look like how I wanted, in the styles I'd thought might work best. There were two main reasons for this. One was that neither of my preferred styles had a complete set of options for the structural features I wanted to add. The other was that the colour palettes involved were rather too close to the Alyssa Faden style, which I'd already used in my earlier Clack Valley map for the Atlas, and I couldn't get past the fact it felt too much like mapping the same place again; daft, of course, as it isn't, but that's what kept tripping me up.
Thus matters rested, and I'd half-decided I probably wouldn't map the Vale area after all, until I saw the brand-new E Prybylski Watercolour style in the just-released CA 196, and realised it would work very nicely for what I wanted! So here it is, still subject to amendments, given the Hall's own mapping remains in-progress only, but I am happy with the overall look now:
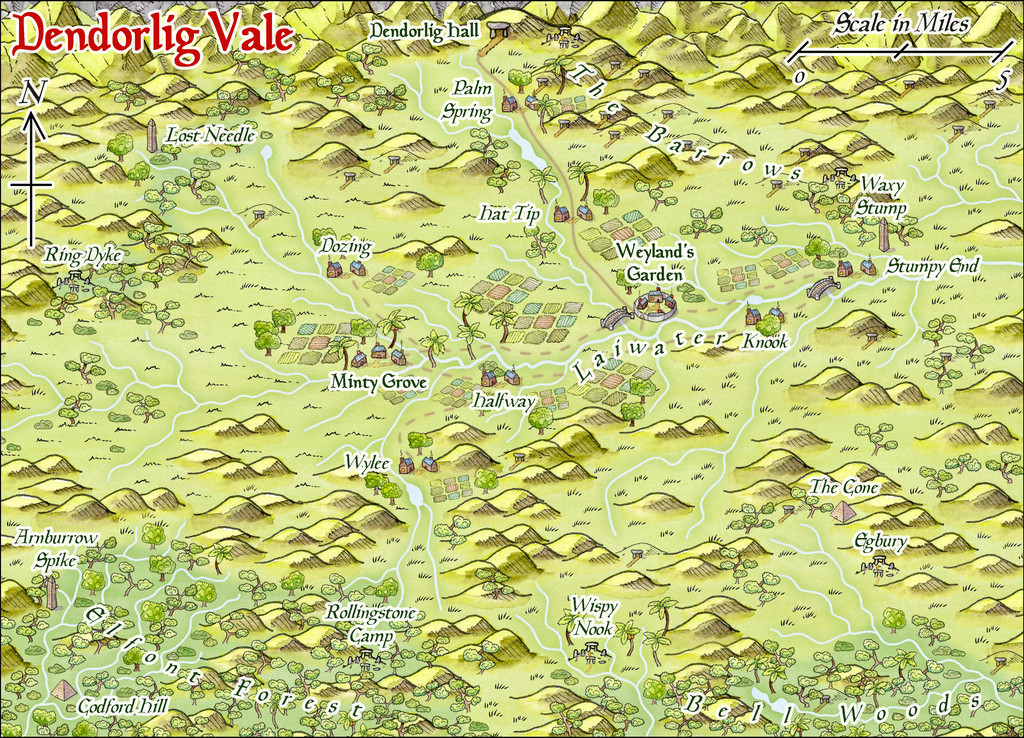
It's a very attractive style to my eye, and fits nicely with the somewhat bucolic view I had of the repopulated agricultural lands south of the Hall, peopled by Gnomes and Halflings, hence the names. There's a higher-res version in my Gallery as well, although even at the reduced-size for the Forum, the style seems clear enough already.
Now though, I've got another map to do a write-up for, besides Dendorlig Hall!
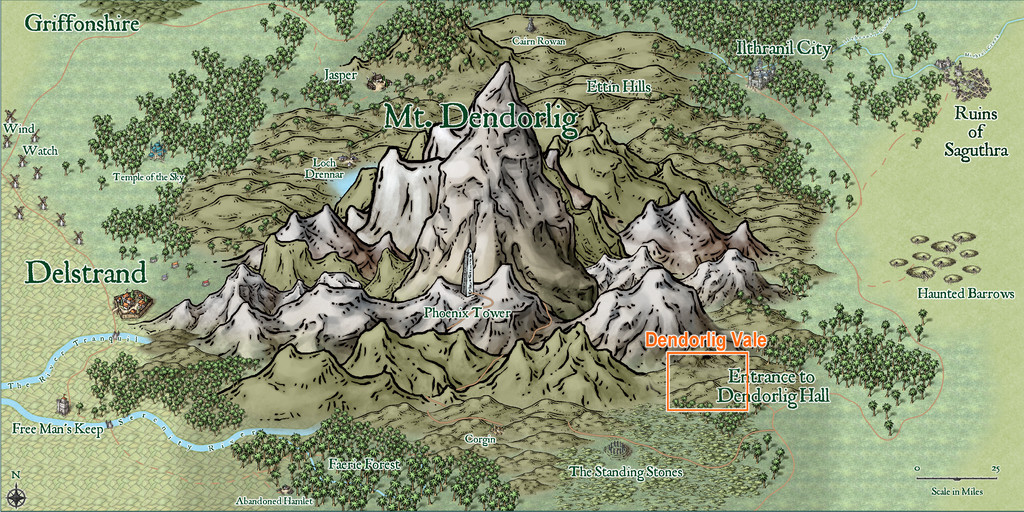
So this won't be going into the Atlas immediately, but, and with apologies for the belatedness of the request, @Monsen, could you reserve the Dendorlig Vale area on the Mt Dendorlig Region map in the Atlas for me, please...


-
Community Atlas: Errynor - Aunty MacKassa, the Area Maps
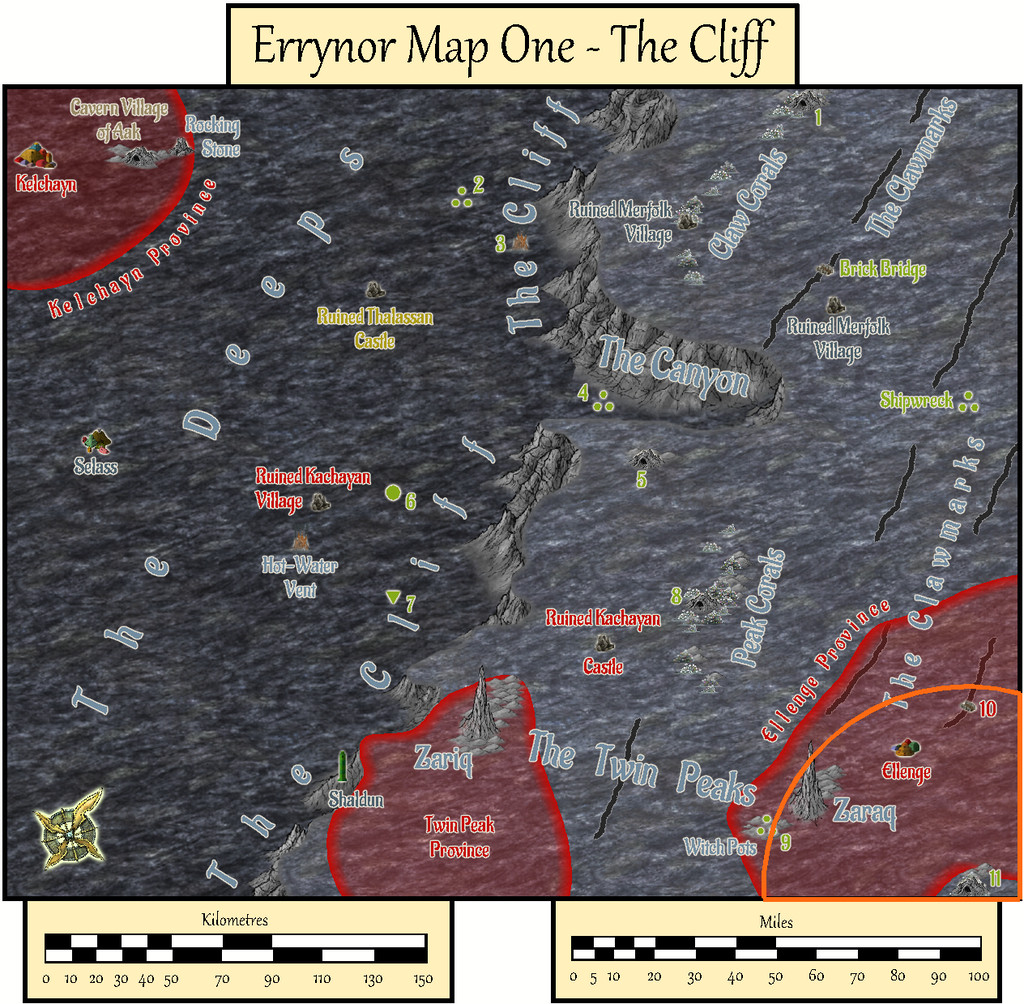
The set of Aunty MacKassa maps is the final group in the series of sub-maps from Map 01 of my Errynor mapping project. I'm not intending anything quite so extensive for the other 39 250 x 200 mile maps in the set, though you never know! Indeed this group of drawings grew rather out of hand anyway, albeit I've long found RPG scenario planning has a tendency to do that as the ideas build up along the way. My original intentions for three maps to detail deep-sea hag Aunty MacKassa's lair (site 11 in the lower right corner of Map 01) have ended-up as seven separate drawings!
Partly, this was because while working on some of the other detail maps in that corner of Map 01, I'd realised Aunty MacKassa could have been long-influencing events elsewhere across the region, especially at the Kachayan settlements of Shark Bridge and Ellenge. Aunty's backstory in all this is given among the various map notes with this set, incidentally.
As Shark Bridge is almost 50 miles from Aunty's coral cave lair, I decided to set a 50-mile radius limit to her influence overall, a zone where she might sometimes be seen, and within which she might wish sometimes to act. This had the further possibility to reduce the edge-of-the-world syndrome of Errynor Map 01, because this zone spans parts of Maps 01, 02, 09 and 10. Of which only Map 01 has so far been completed, of course:
Thus came about the first Area Map, in three versions, following the standard pattern established by Map 01, for the sea-bed, water column, and sea-surface views, using the Herwin Wielink mapping style:
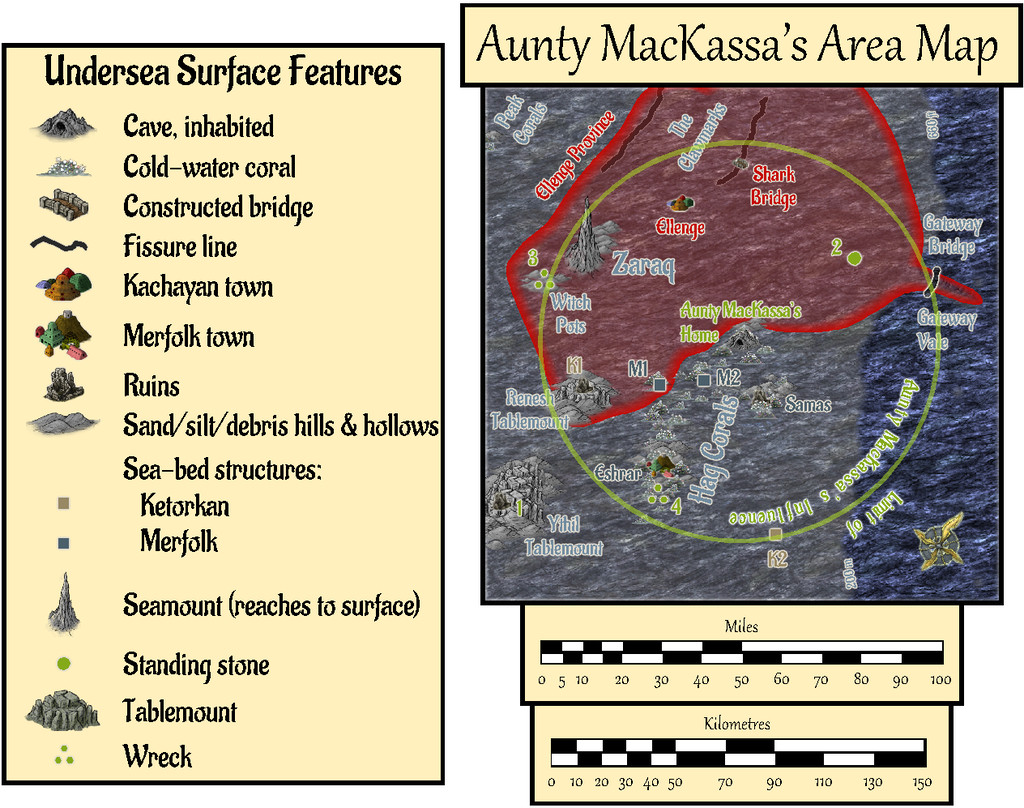
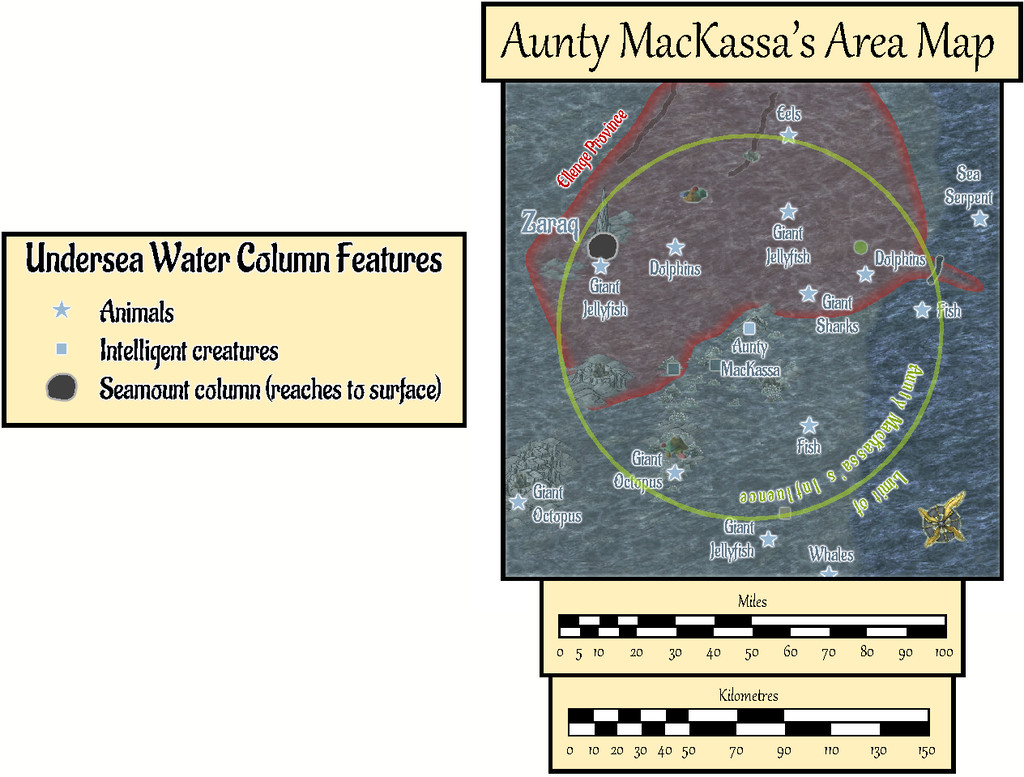
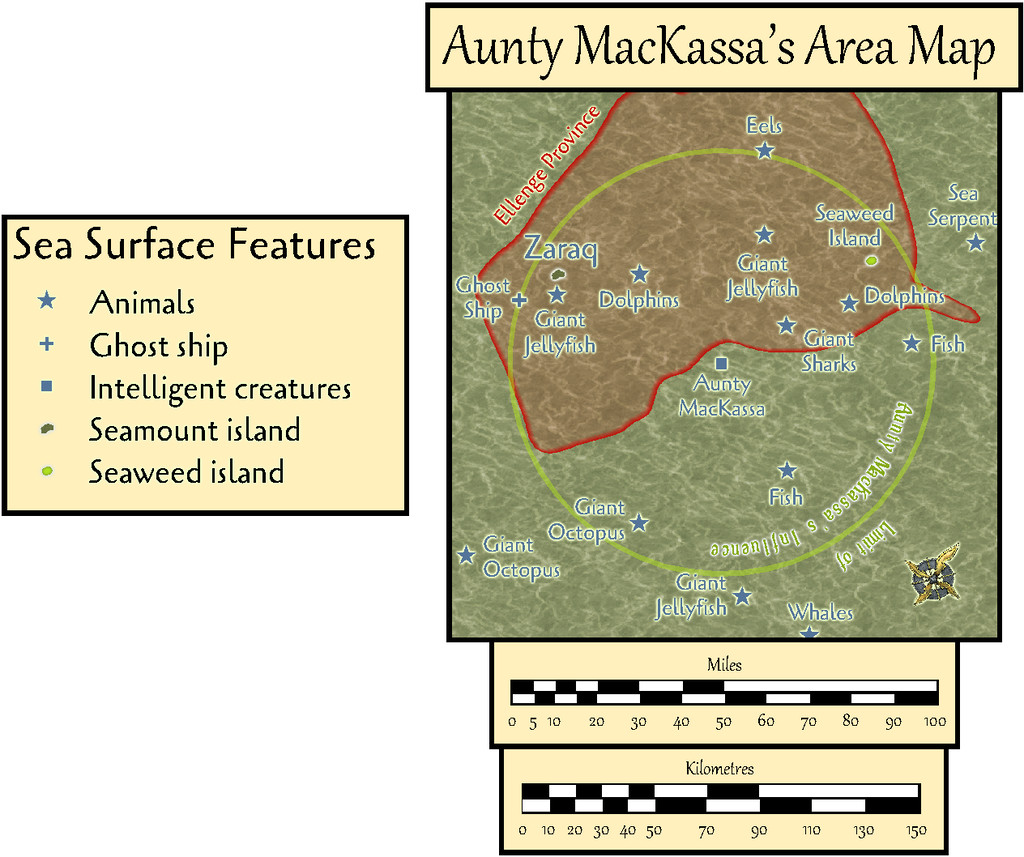
Fresh PDF and text notes were prepared to accompany this map.
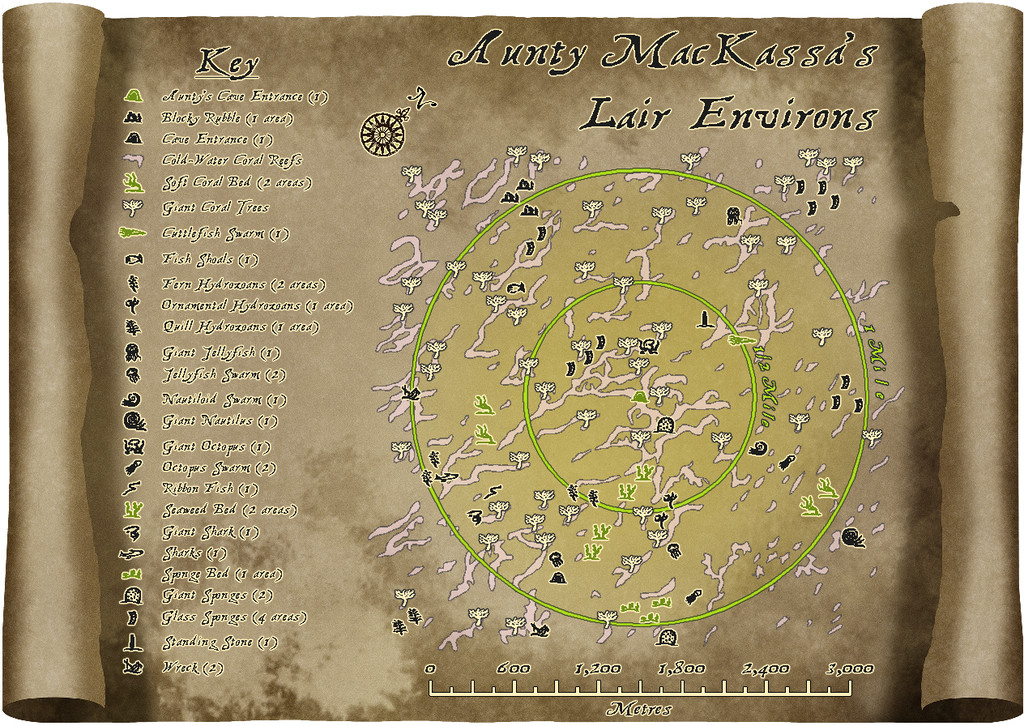
Next, I began zeroing-in on just Aunty's lair:
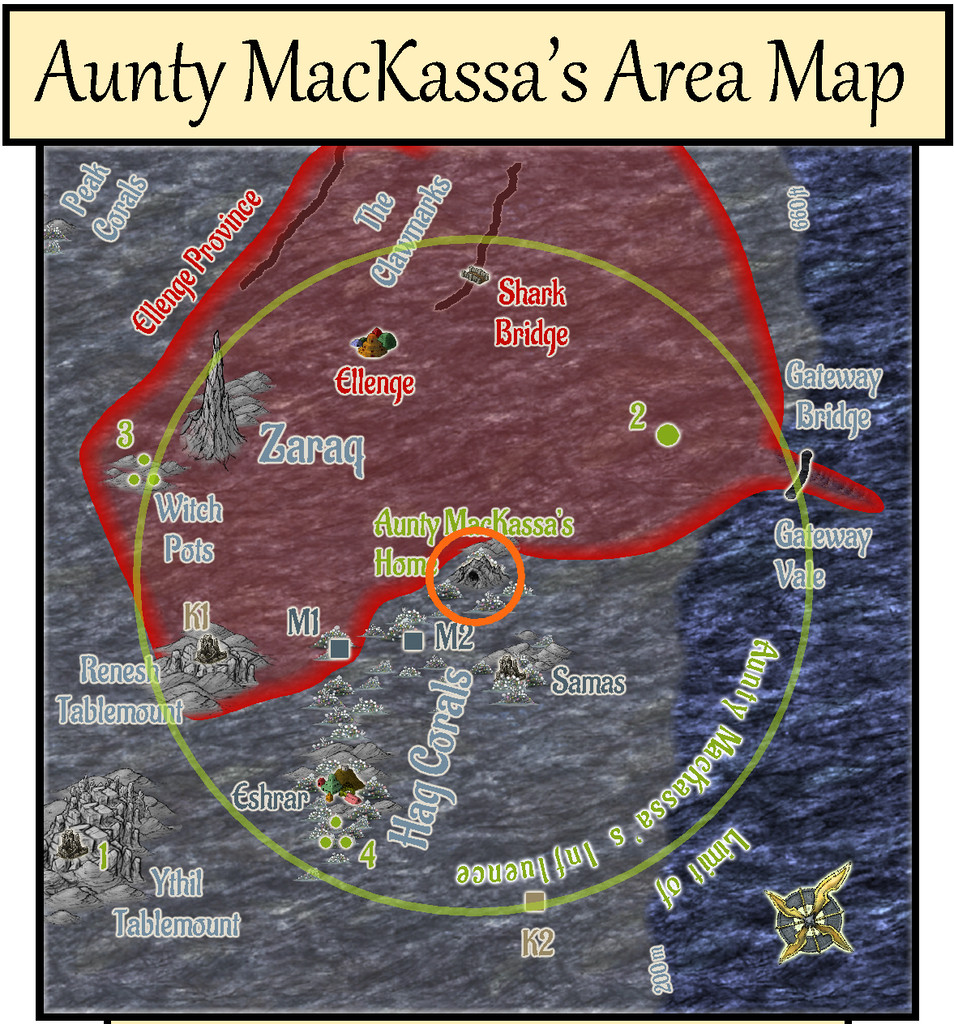
The next map shows in detail the sea-bed region a little over a mile in extent all around Aunty's Cave home. I'd rather enjoyed drawing the Shark Bridge area map earlier, using a different background and simple vector not-symbols (they're just copied small drawings, not true CC3+ symbols), so opted for a variant on that, choosing one of Sue's Parchments from CA132A for this map's backdrop, and sketching-in the cold-water coral reefs, with the local wildlife and other surface features, all of which had been previously randomly-rolled in preparation. The "symbol"-drawings were much-expanded from the collection used in the Shark Bridge map, naturally:
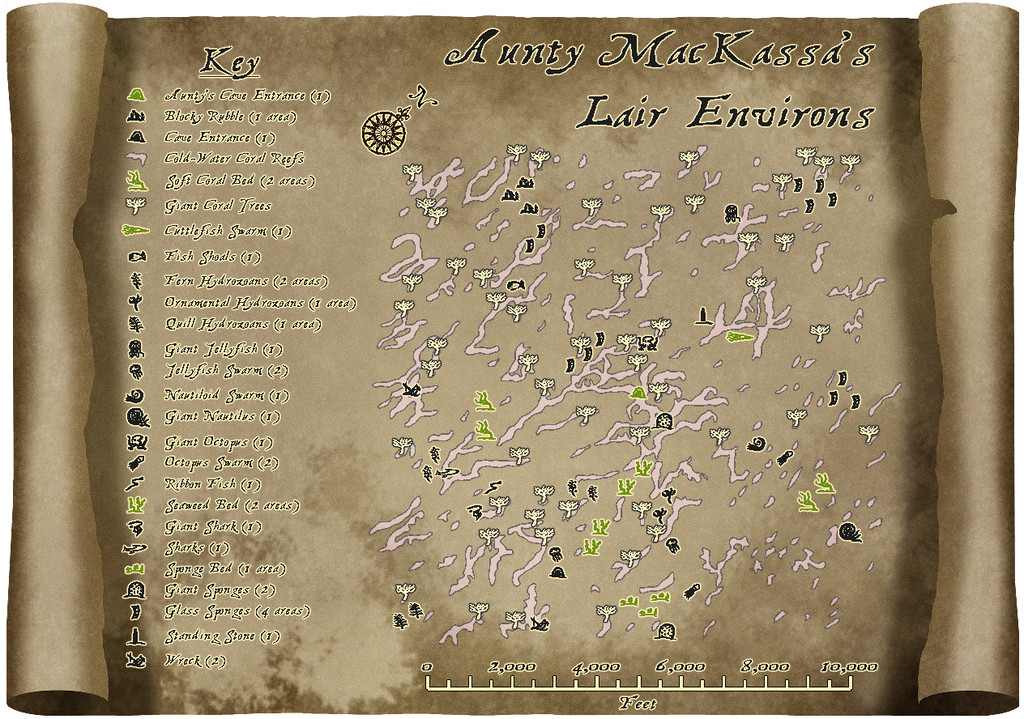

The second version allows the zones closest to Aunty's lair to be precisely identified for GMs, using toggled circle overlays. The nature of the features themselves is detailed in a further set of PDF and text-files notes accompanying this map.
There wasn't space to add a metric scalebar too, so that's been provided as an option via toggle for the Atlas FCW version:
The remaining five drawings in this set should follow shortly, all being well!


-
Community Atlas: Dragon Head, Lanka, Kumarikandam
While the map layout from the Inkwell dice designs was pretty straightforward, I'd already amended it in a few places before embarking on the CC3+ drawing, because rather than being subterranean, this was going to be a surface feature Palace building, albeit one composed of living vegetation, to fit with its key inhabitant, the Swamp Elemental known as Ssathrokkwa, the Toad Lord. The Palace is thus an extension of himself, in a somewhat loose sense. From a distance, and even quite close-up, it simply looks like one of the denser patches of swamp-jungle vegetation scattered across the whole Swamp area, while inside, being composed of living shrubs, trees and other plants, with marshy floors that sometimes include pools and water channels that pass beneath the walls, the structure isn't as solid as it may appear, albeit with thorns, cuttingly-sharp leaf edges, and dense internal branches that act as deterrents to anyone trying to force a way through walls or ceilings.
Ahead of the mapping, aspects of the Palace and specific items within it were randomly chosen, with adaptations, from a variety of tables in the main Shadowdark RPG rulebook, the free PDF adventure pack "Shadowdome Thunderdark" again, both by The Arcane Library, and the "Curiosities" tables in the "Unnatural Selection" supplement for Shadowdark published by Dungeon Damsel.
For the mapping style, this became quite an unusual mixture. One of the possibilities I'd considered for the Swamp of Toads map was the Darklands City style, and although that wasn't used there, I did like the connecting-symbol hedgerows in it, and thought they might be interesting to use here instead. The tree symbols and water options from that were also deciding factors. However, this is a dungeon-sized map, not a city-sized one, so others of Sue's dungeon-scale styles were pressed into service as well, ultimately including those for Marine Dungeon, Creepy Crypts, and Forest Trail, aside from a few more from DD3.
And so to the map:
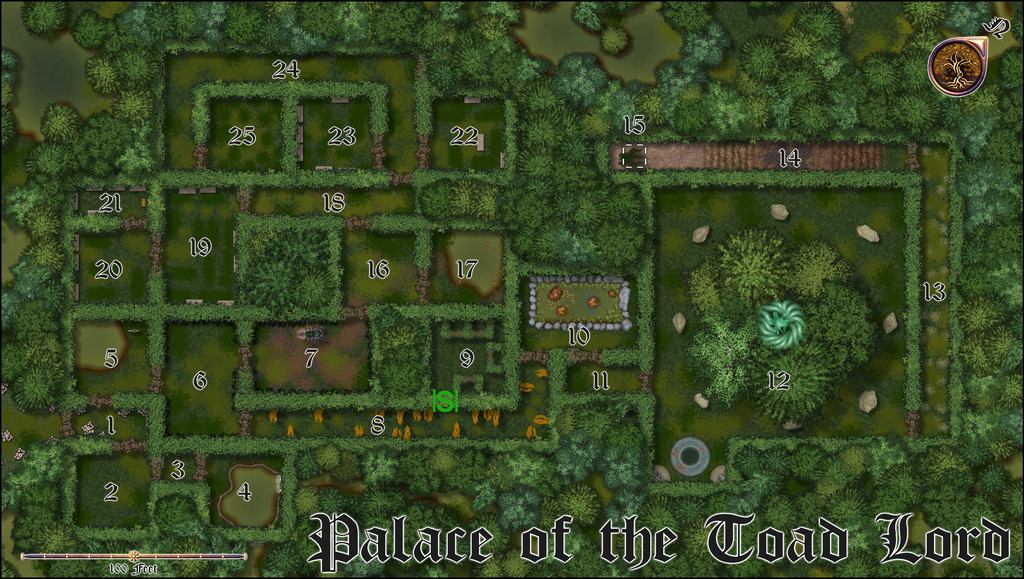
Part of the reason I wanted to use the Darklands City hedges was because they come with thinner, brown-leafed segments, which seemed an ideal way to indicate the doors to this complex. That's because they don't appear obvious to non-residents, and open like a camera iris, the branches and foliage pulling back to form a rounded opening at the touch of a living hand or tongue (the latter is the usual method for the Toadfolk, naturally). The solitary Secret door is shown on the map above ordinarily, which decided me to also provide an option to show similar marker-lines for the ordinary doorways as well, for clarity:
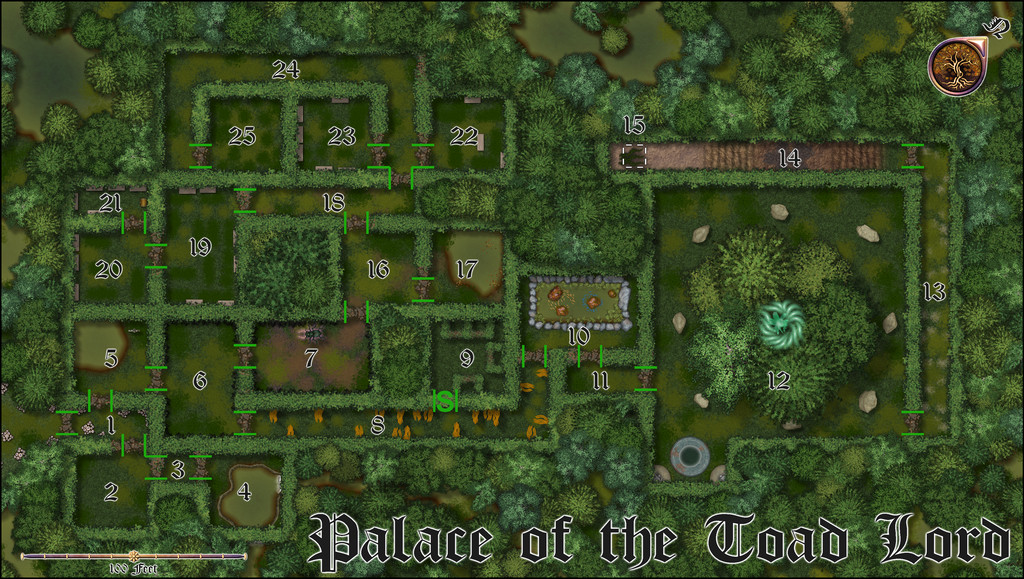
That should have a toggle in the final Atlas FCW version.
Similarly, there should also be a toggle for the map grid:
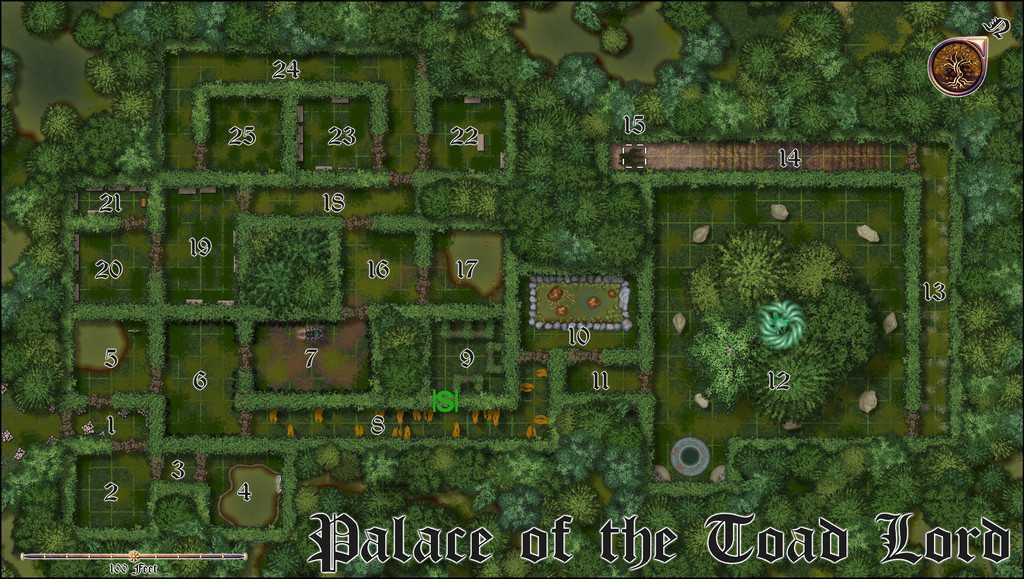
That's been kept deliberately very subtle, and sometimes well-hidden (especially by that grove of trees in the Throne Room, area 12 - the floor space continues beneath their canopy, although much more heavily vegetated than in other open areas). GMs needing a more obvious grid can of course adjust it as necessary. There's also a cluster of magic crystals in the centre of the grove, for those wondering what might be happening there - there are more notes in the PDF file for the Atlas, including Shadowdark game stats for the new and variant creatures involved.
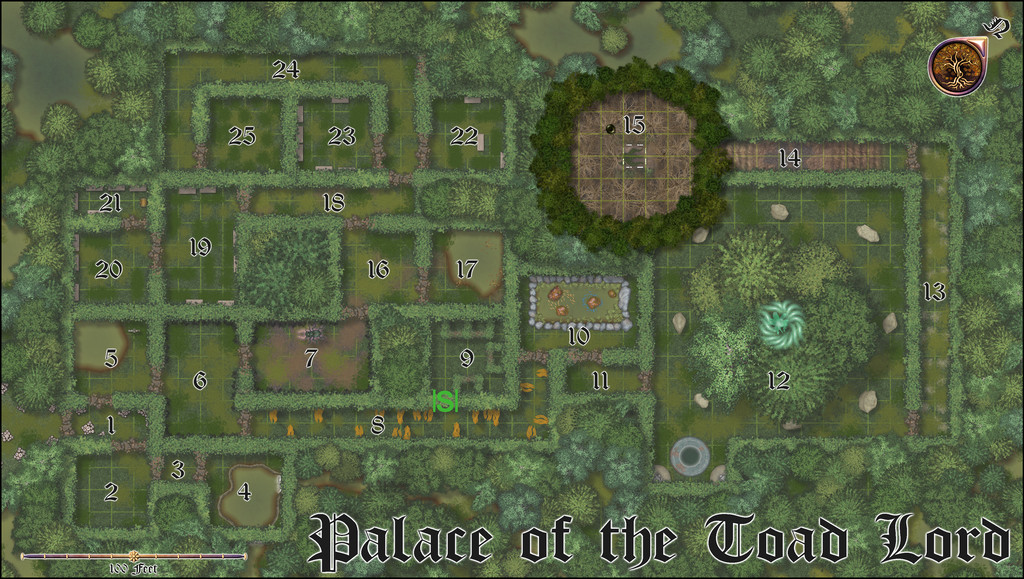
It's amazing what can be repurposed as something else at times. That long, rising passageway with two sets of mud-and-branch steps in (14), for instance. The "steps" are reused rectangles of the Fields bitmap fills from Darklands City, the mud in between the Earth texture fills from there, and the darker area (actually an ooze pit trap) beneath the "14" label, the dungeon dirt patches from Creepy Crypts. At the southern end of that passage, that dashed-white-line square is set over some strands of Kelp from Marine Dungeon, standing-in for swamp-jungle liana vines! And that square hatch and vines lead up to the Watch Tower, available on yet another FCW toggle for the final Atlas version, thus:

Of course, that Tower's of living vegetation too, so the floor is composed of interlocking branches, and the walls of canopy foliage, through which the watchers can climb to keep watch. There's a gentle, milky haze overlay across the lower parts of the map to indicate this is the highest part of the complex as well, and if required, there's an extra area of grid that can be shown for the Tower as well:
The lower grid doesn't need to be shown at the same time, as they're on separate Sheets, although both are here.
This was a lot of fun to draw, especially with the water pools here and there. Indeed, I got a bit carried away with adding water channels and pools outside the complex initially, as they just looked so interesting, and had to scale those back ultimately in places!
With this complete, the next map's scheduled for somewhere in the vast expanse of NW Doriant...

-
[WIP] Community Atlas: Snakeden Swamp, Lizard Isle, Alarius - Dedicated to JimP
Following the recent death of our long-standing regular Forum contributor, and most active Community Atlas mapper, Jim Pierce (JimP), I felt it would be appropriate to bring forward this small group of maps from my sort-of Dungeon24 project for the Atlas (now of course Dungeon25), and dedicate them to Jim's memory. They were already being planned while I was preparing those recently completed for the Demosthenes Swamp region in Artemisia, as while drawing the Seer's Hall Village map, I decided to use as its base the design from the Inkwell Ideas Dungeonmorph Dice "Cities" dice-face 6R, even though the "Ruins" dice-face 6R* version of that design was already intended for Lizard Isle, off southern Alarius. Working on the intact version set me wondering about the ruined one too, and ideas started to coalesce for that as well. Ordinarily, the 6R* map would have followed only much later in this project otherwise.
When I looked at the Lizard Isle map in the Atlas, I discovered it had been mapped by Remy Monsen for the second anniversary of the Atlas using the original CC2 mapping style, and the variant CC2 fantasy overland style from Symbol Set 1. That decided me to also construct this small set using similar "early CC" mapping styles, as something I'd not attempted before. The reason this linked with JimP in my mind was because such early styles reflect Jim's longevity as a CC mapper - longer than those still active as mappers with the program can now recall - and his longevity with role-playing games going back to the very earliest days, which latter was similar to my own. In addition, Jim was often keen to go with "no frills" mapping styles to sketch his ideas quickly, which again is reflected in the relative simplicity of such early drawing modes.
Further to that, although I'd already derived lists of items I wanted to include on the maps and in their descriptions, and decided where things were to go at least loosely, I'd not begun any CC mapping, so this topic is going to be something of a work-in-progress effort, something else Jim was noted for on the Forum, albeit I cannot match either his speed in mapping, nor his regularity of posts here. So as with this being a sort-of Dungeon25 project, this is a sort-of WIP topic!
This is where Lizard Isle is:

And this is how it was mapped, along with the location I chose for these maps, the small orange square in the north-central area of both versions. "Small" is relative at this mapping scale, however, as that square is really 20 miles per side. The fancier SS1 map is shown in the second image below:
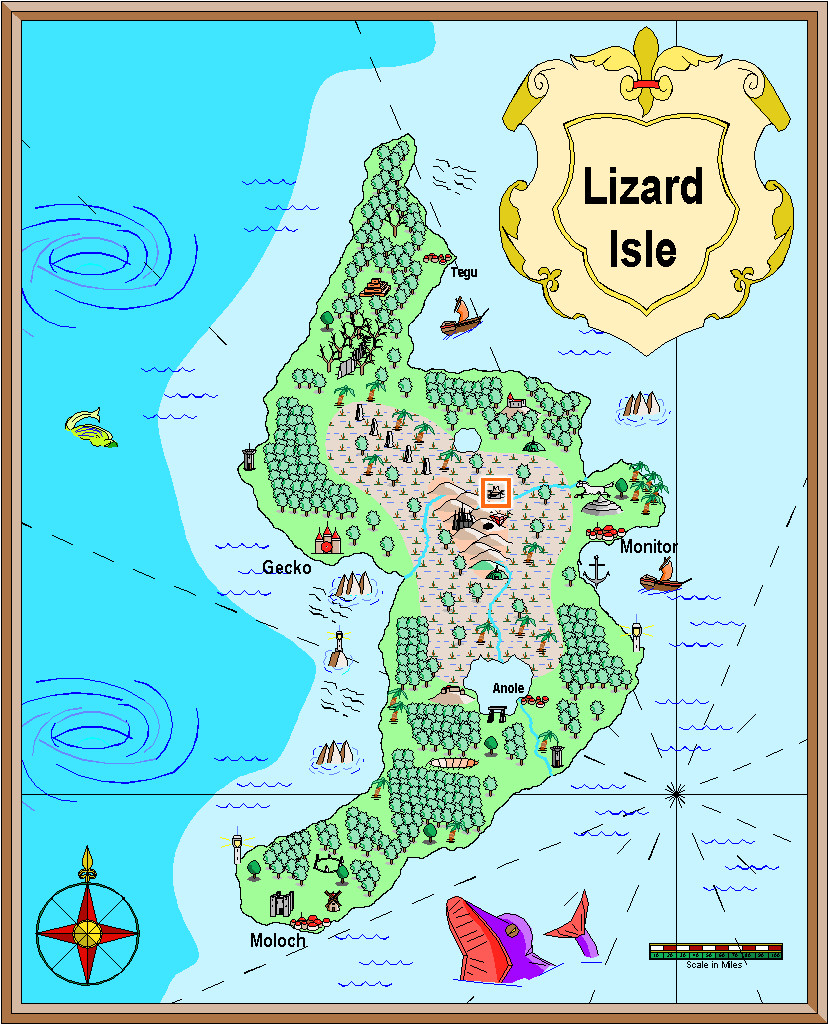
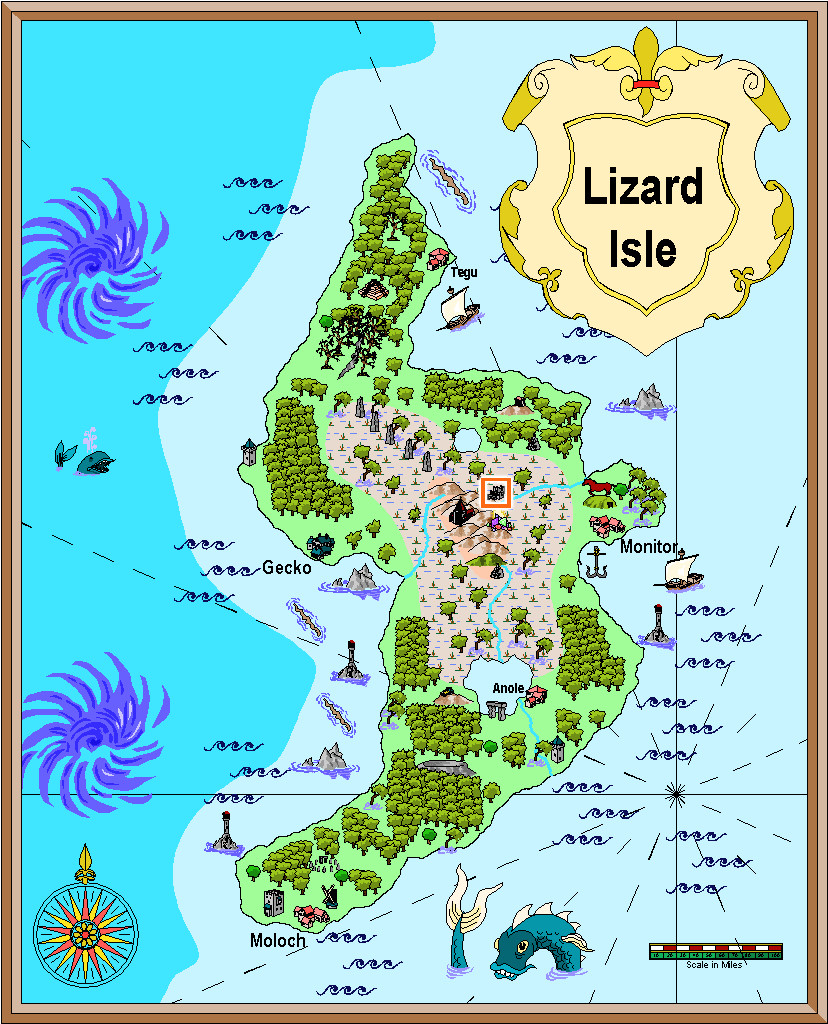
It may not be obvious at this resolution, but my chosen feature is a ruin symbol, as might be expected, given the base map I'm working with is also a ruin. The first shows a large ruin (there's also a small ruin in the style), while the SS1 map has a ruined town symbol (and there are ruins available in the style from city down to hamlet, castle, keep and tower in size), so that helped establish better what would be appropriate here.


