


Royal Scribe
Royal Scribe
About
- Username
- Royal Scribe
- Joined
- Visits
- 9,528
- Last Active
- Roles
- Member
- Points
- 3,353
- Birthday
- February 5, 1968
- Location
- San Francisco, California
- Website
- https://legacy.drivethrurpg.com/browse/pub/31814/Royal-Scribe-Imaginarium
- Real Name
- Kevin
- Rank
- Mapmaker
- Badges
- 16
Latest Images
Reactions
-
[WIP] Sea Elves Outpost
Happy June! Happy start to the meteorological summer! We're having a little heat wave in Northern California (80 F / 27 C here in San Francisco, but more like 100 F / 38 C just a few miles inland). So it sounds like a perfect time for the beach.
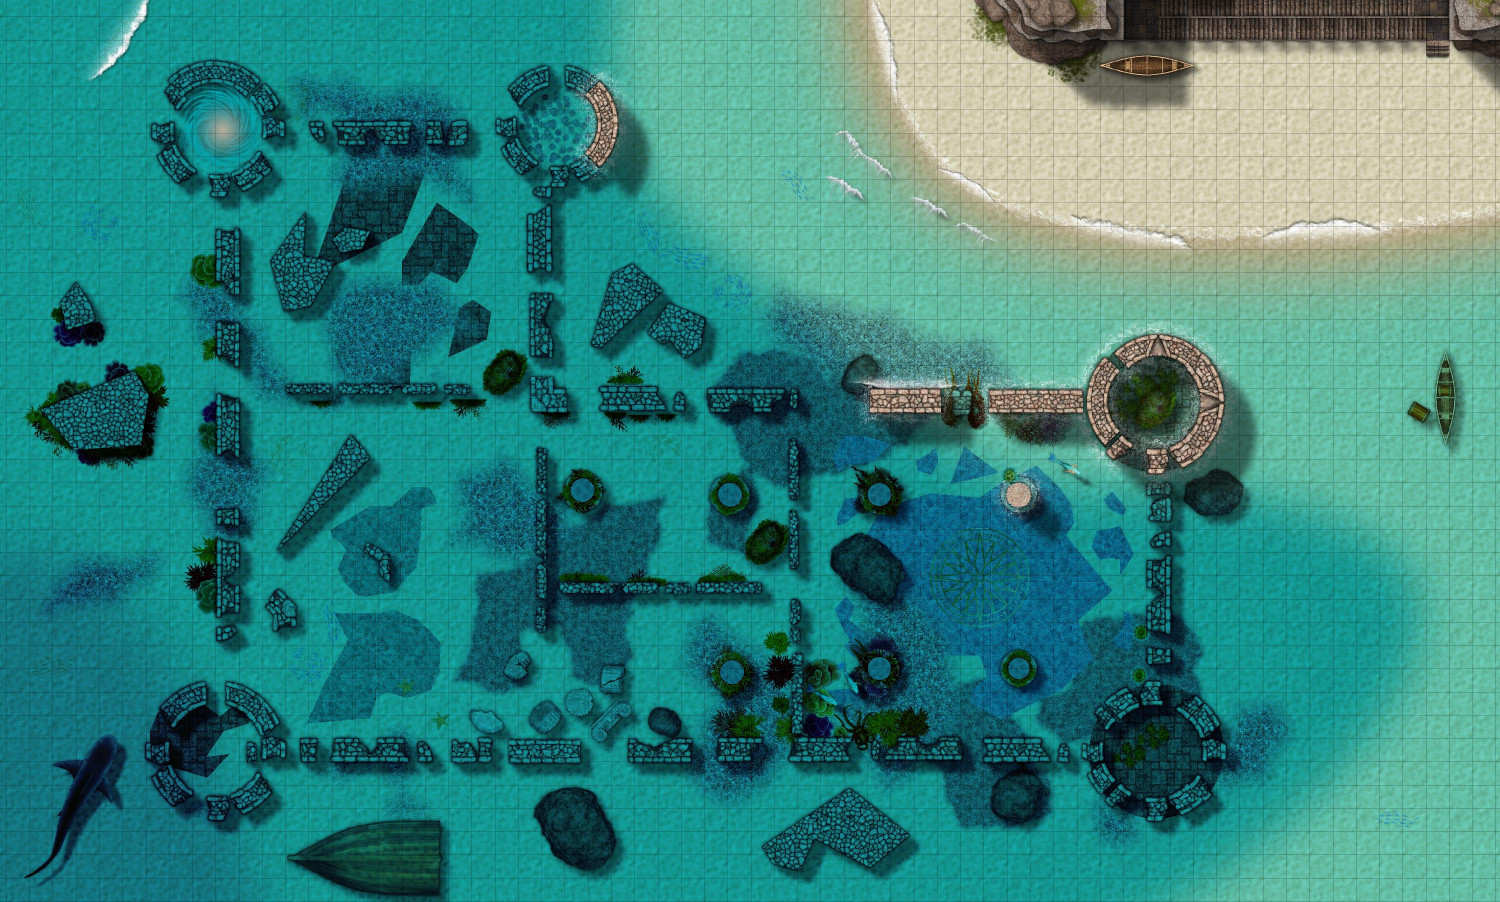
I haven't posted new maps in a few weeks because I was busy working on a few big ones. Right now I'm working on the interiors for the ziggurat I created to play with the new stairs annual. But while I was working on the lighthouse (more more experimentation with stairs), I got the idea of doing a proper fully underwater adventure. Something that the adventurers would need a Water Breathing spell or similar magic or innate ability for.
I have three ideas. One is an underwater lair of a sea witch or sea hag. That's ready to be posted next. Another is a fully underwater fortress or castle. I haven't started that one yet. But for this one, I wanted to do a Sea Elf Outpost that's a combination of caves v. construction, and underwater v. above. This Sea Elf Outpost is probably my favorite map of all of the ones I've created. It uses Marine Dungeons as the base, with fills and foliage symbols from Forest Trails and furniture from DD3.
In my campaign world, sea elves are reclusive and distrustful of the surface world. When they have to go about on land, they disguise themselves as high elves, so most "landlubbers" don't even know they exist. At this outpost, the sea elves can secretly spy on a nearby human city and the movements of the human Lord Admiral's navy.
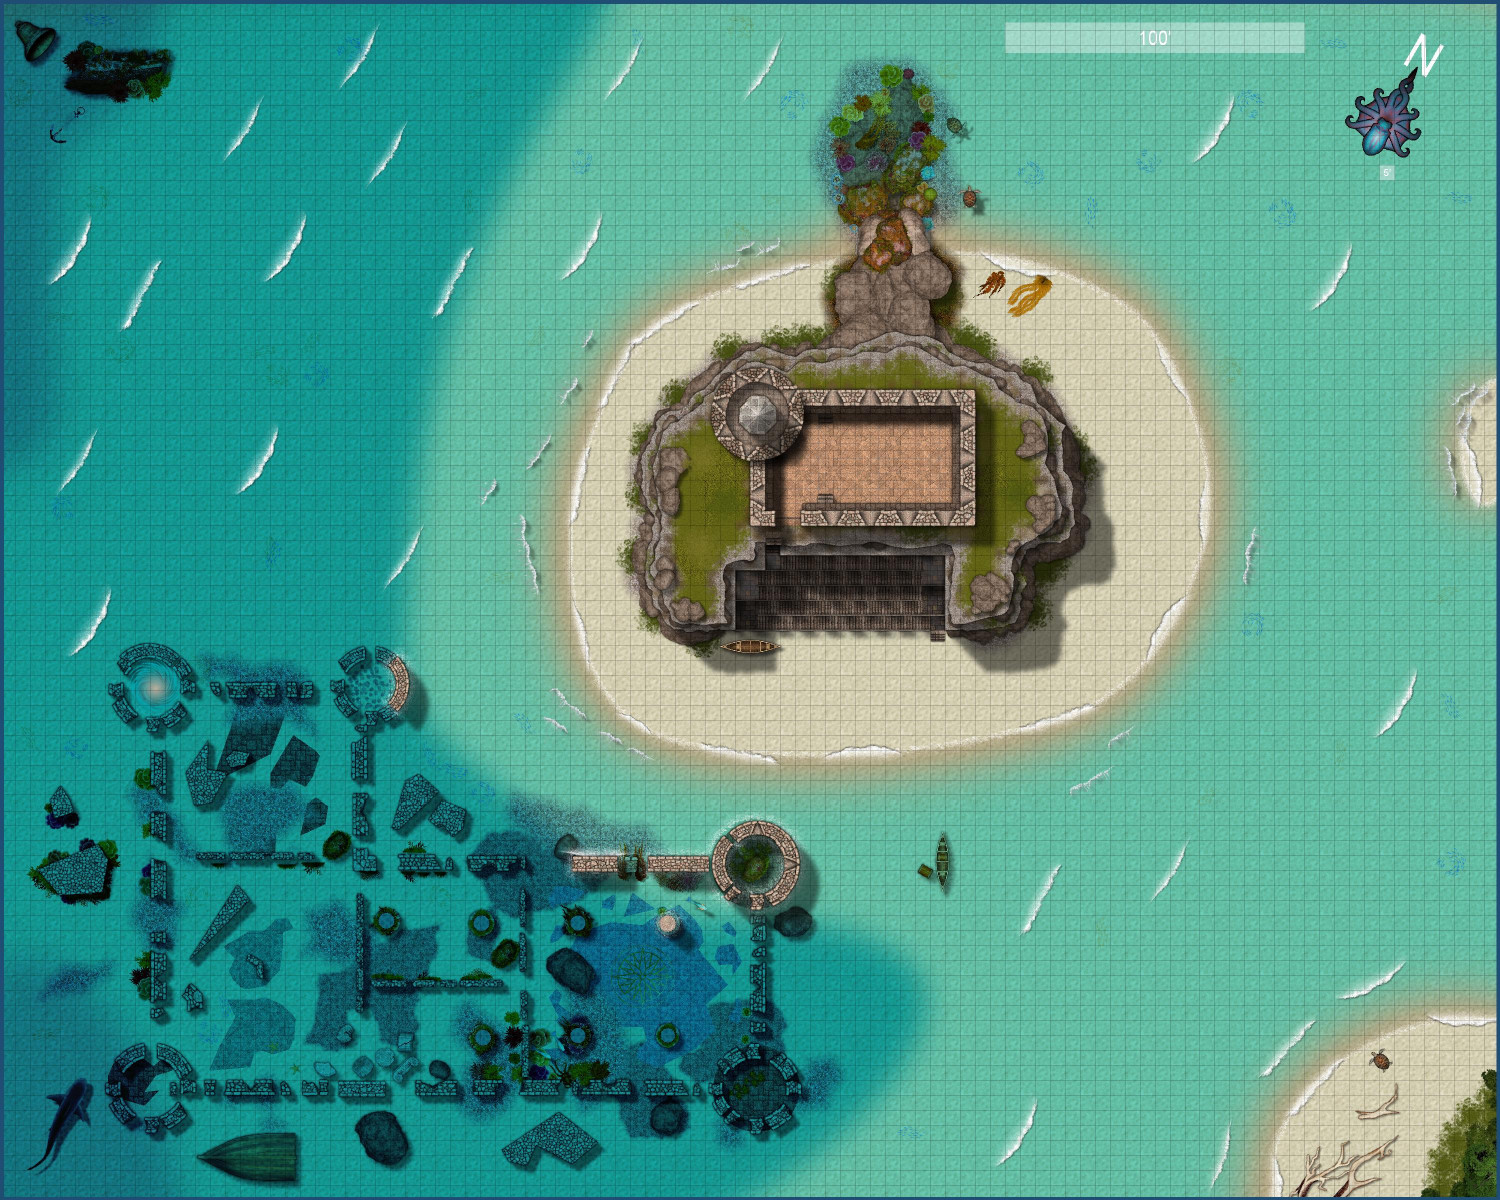
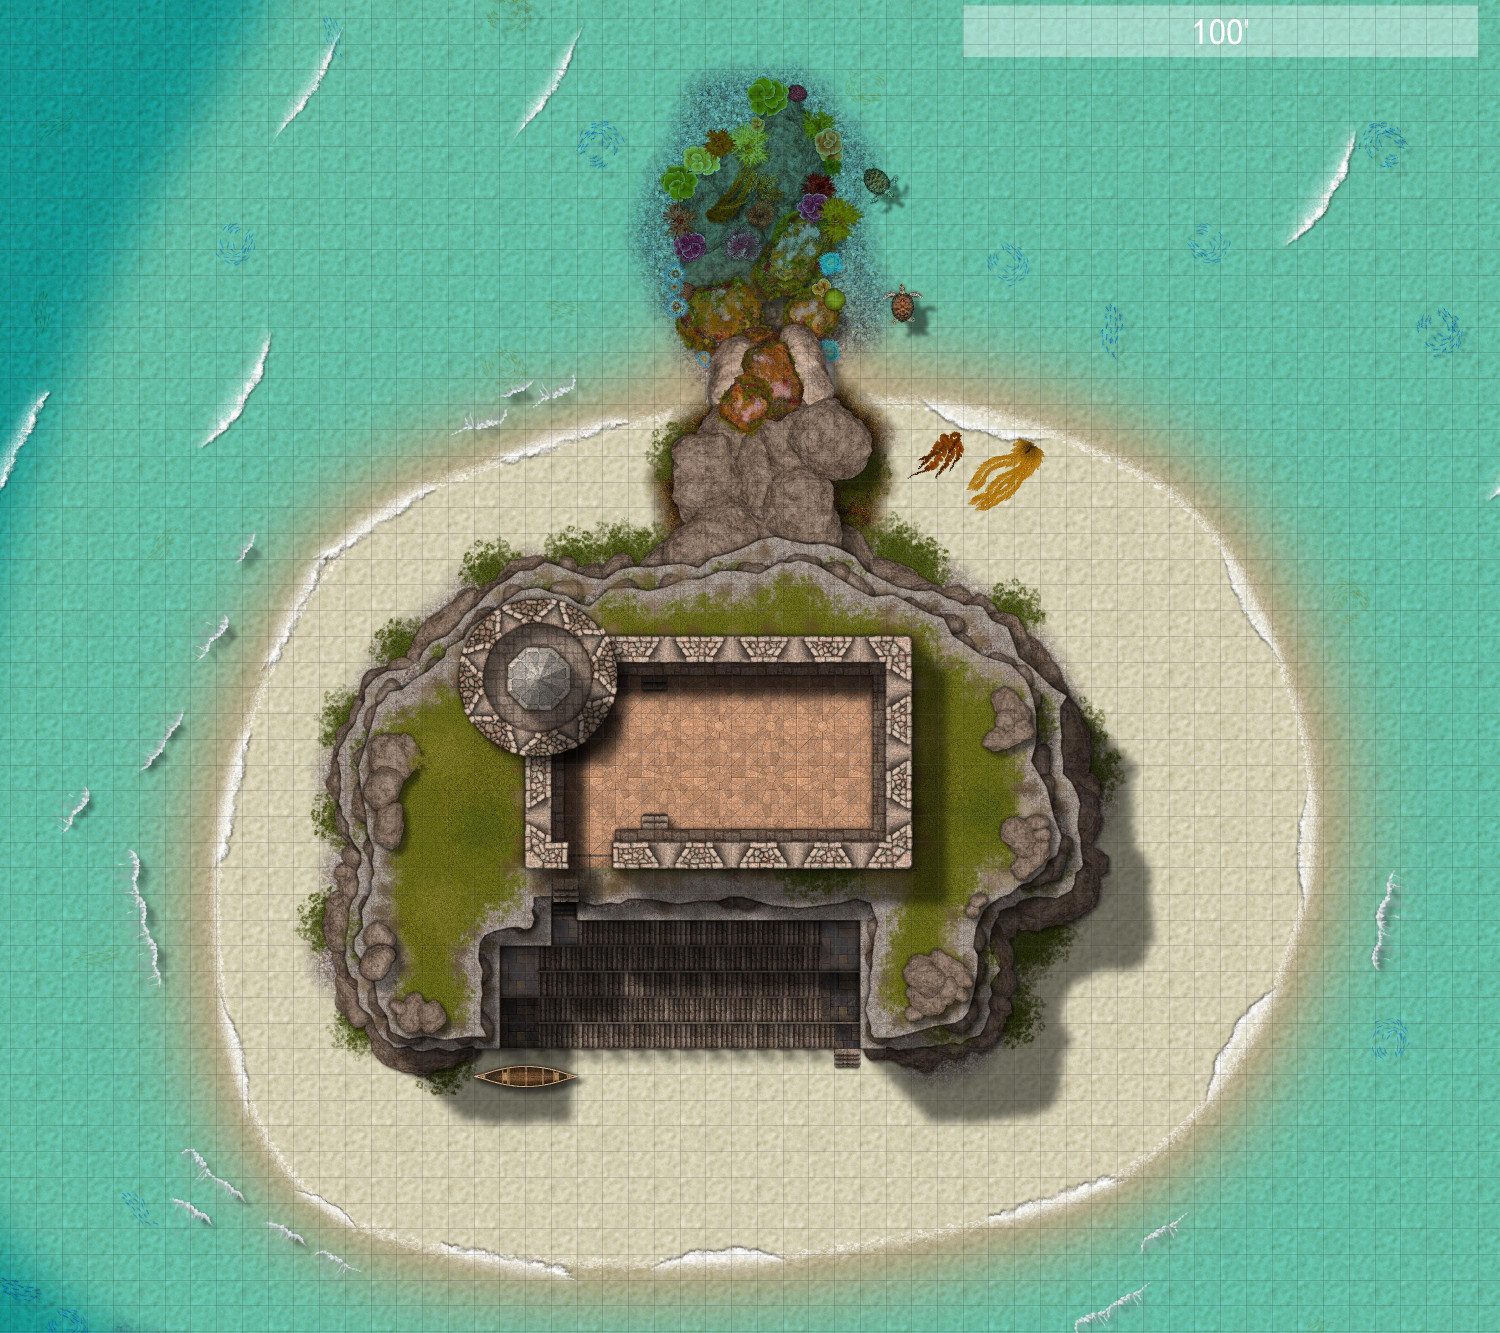
Here's the island from above as the crow flies -- or in this case, as the seagull flies.
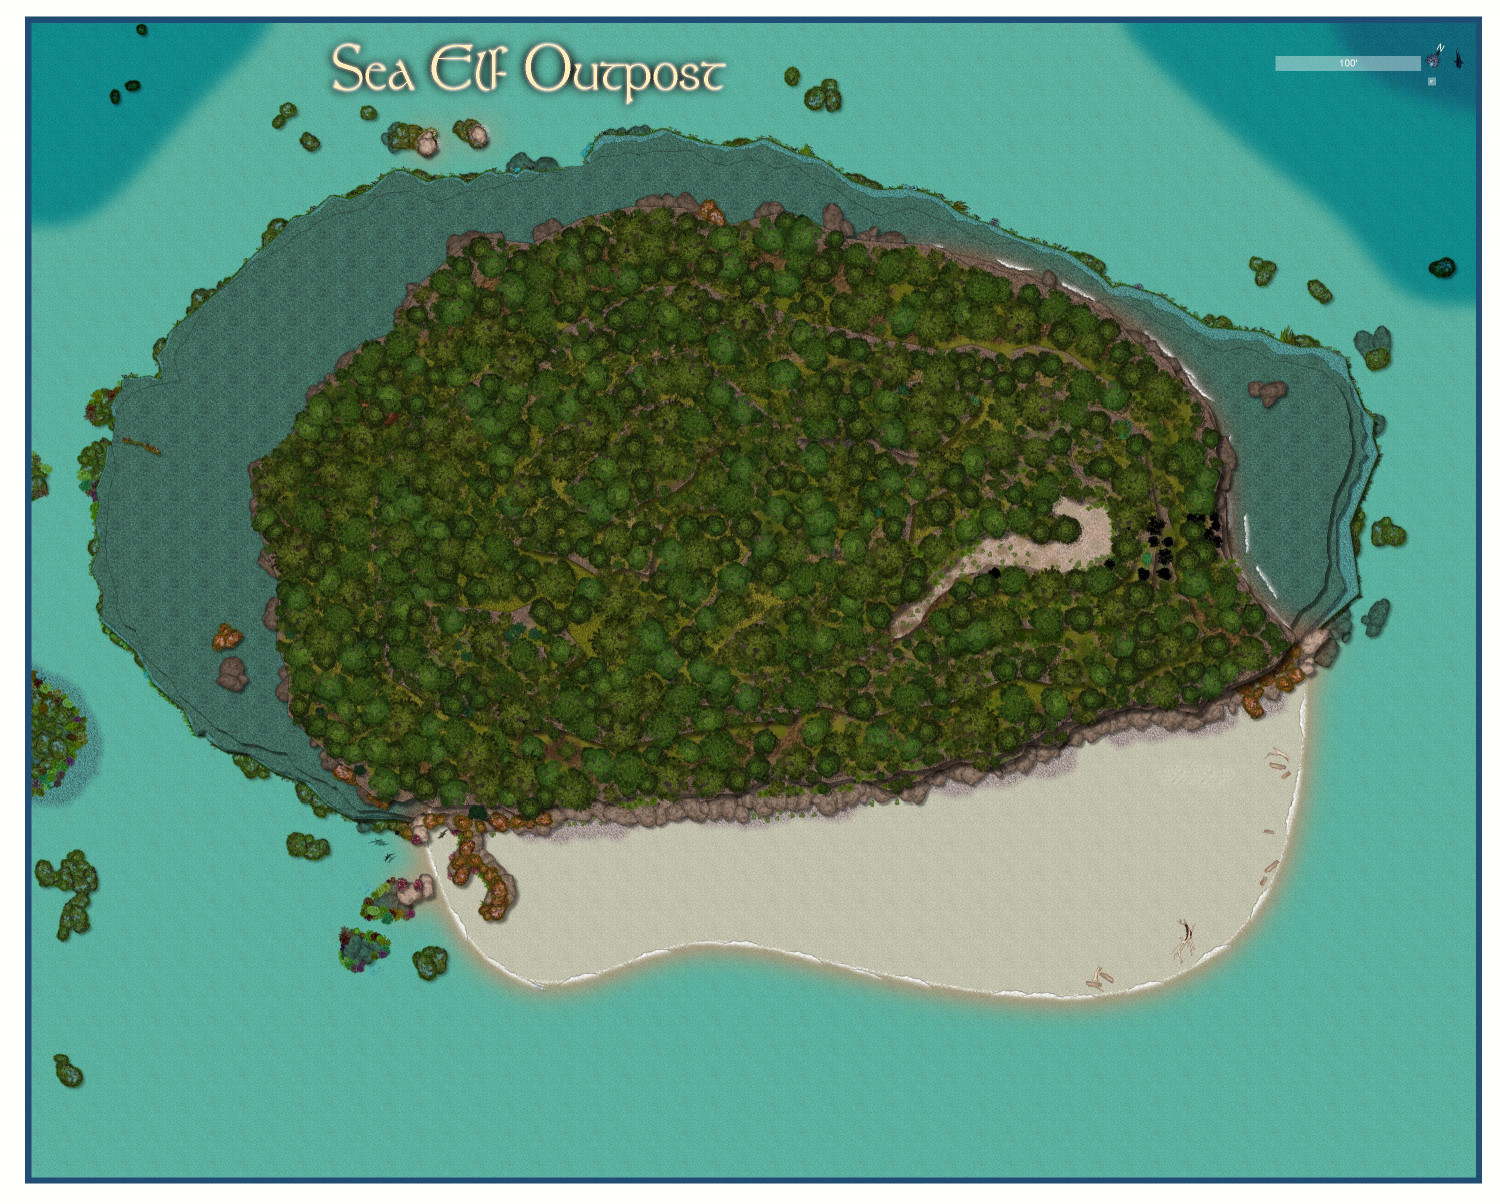
To give you a sense of perspective, this map is 1000 x 800 feet, and the hillside along the beach stretches about 625 feet. On the images with a grid, each square is five feet.
Seems uninhabited. But if we could use x-ray vision to see below the hill, this is what we'd see:
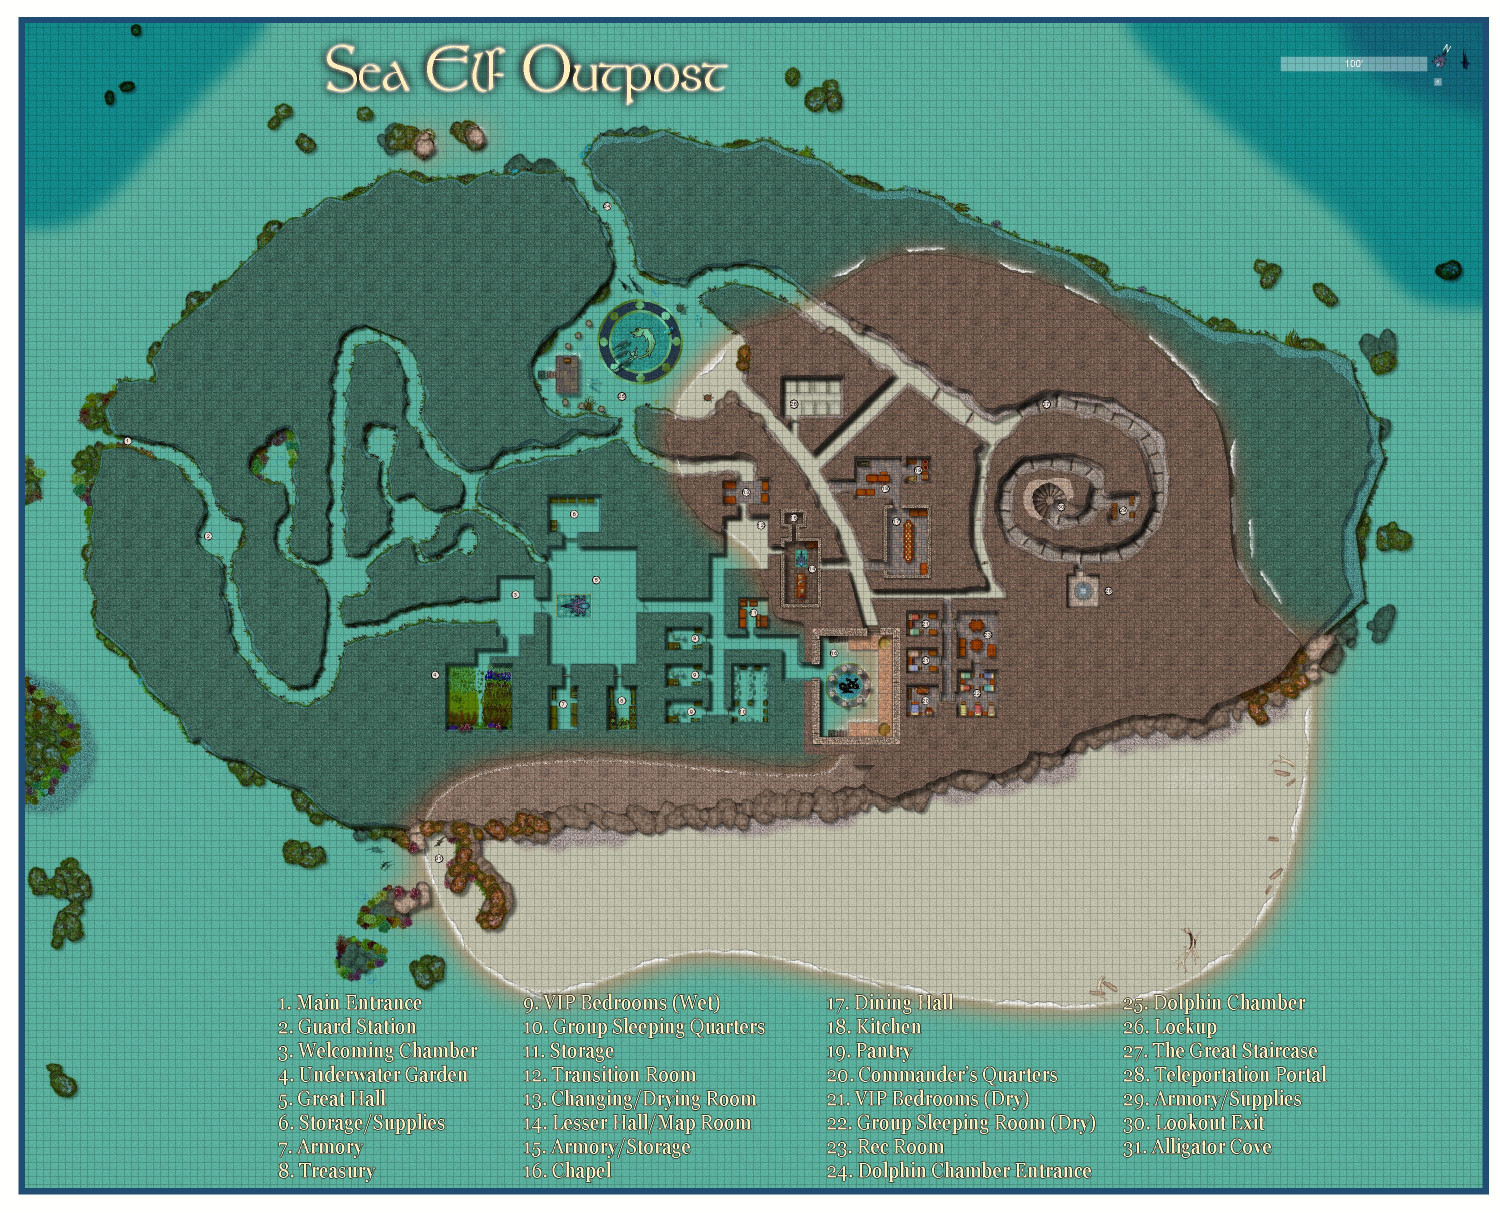
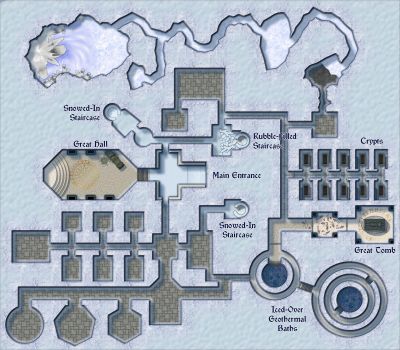
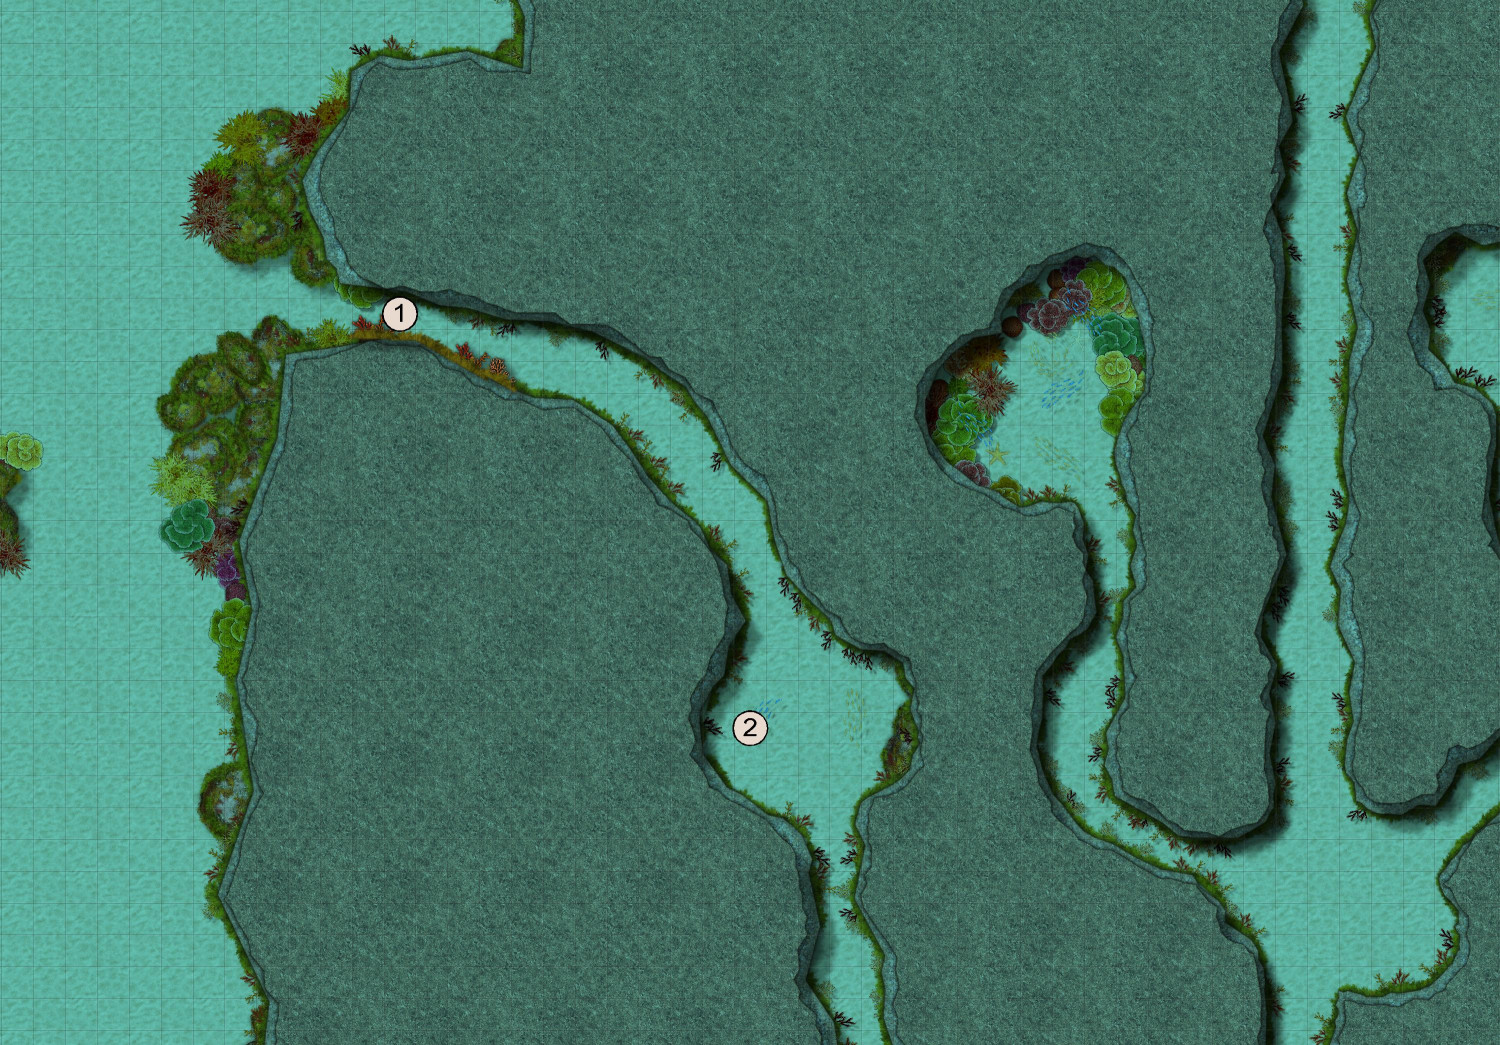
Come on in! Let me give you a proper tour. First, let's start with the main entrance (#1) and the first guard post (#2).
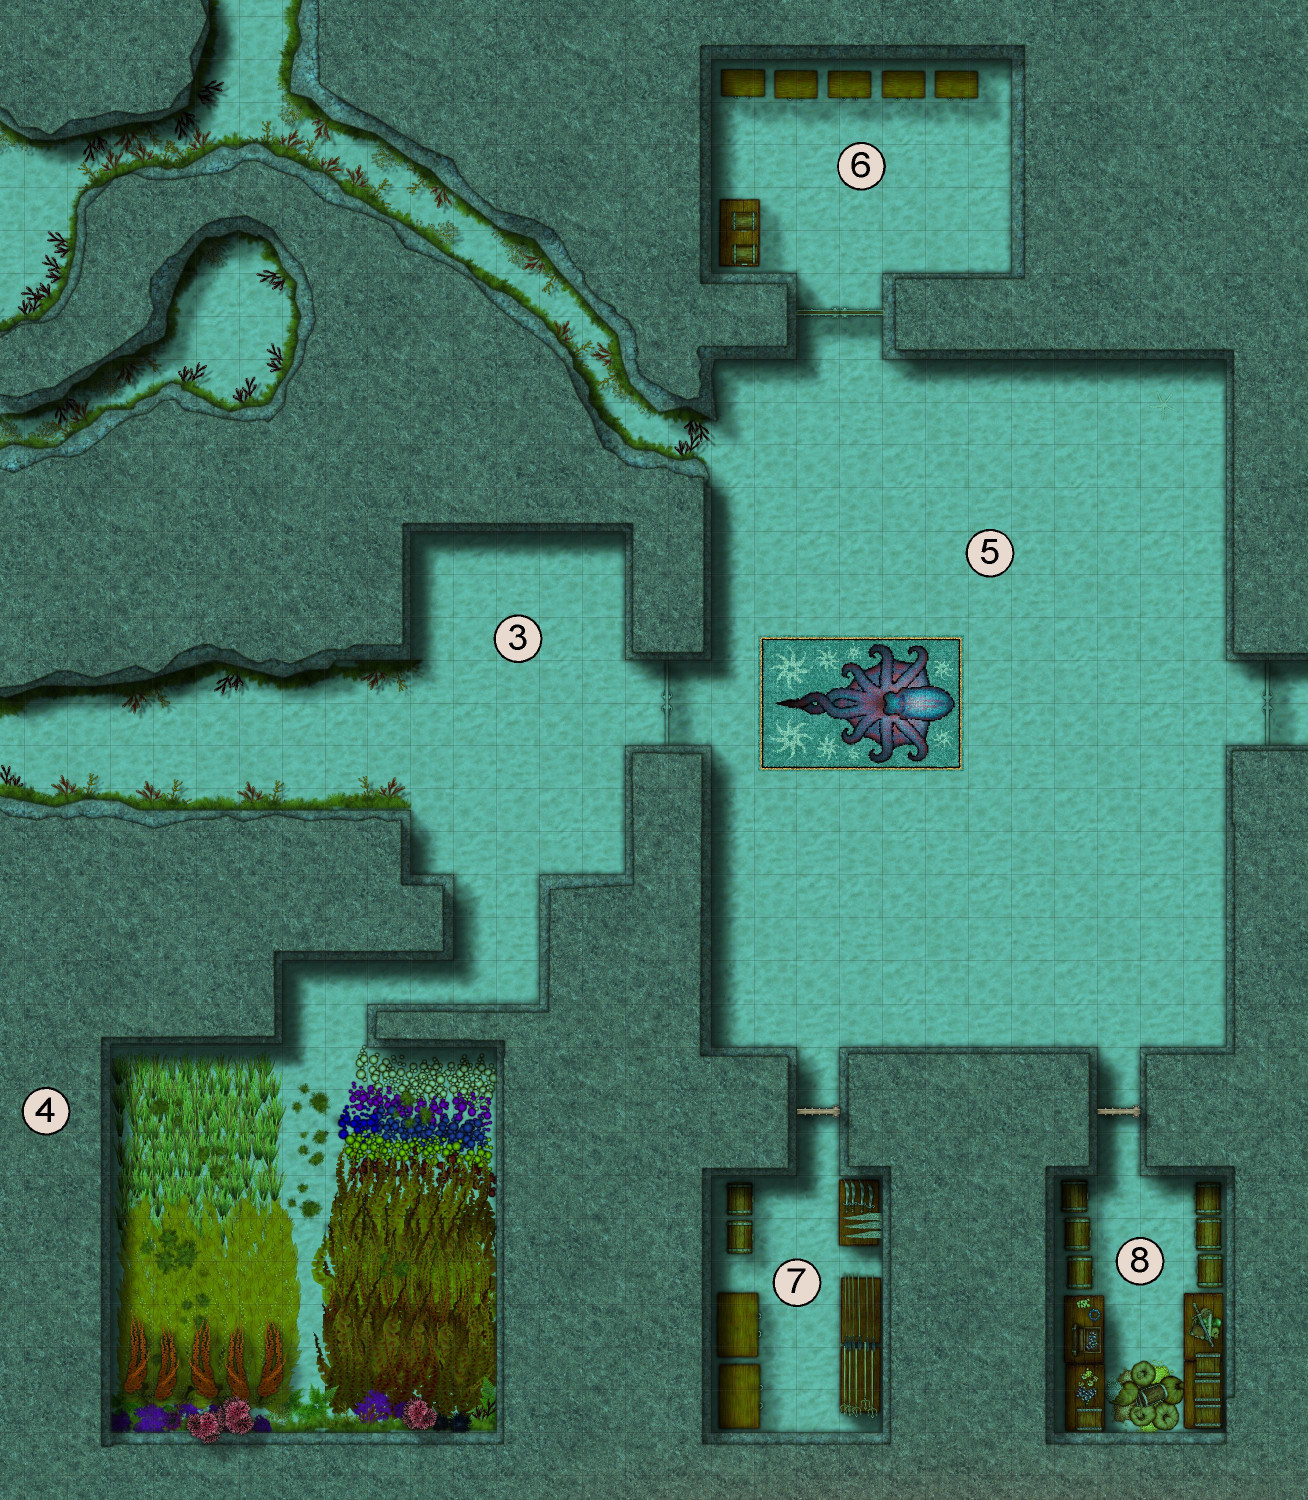
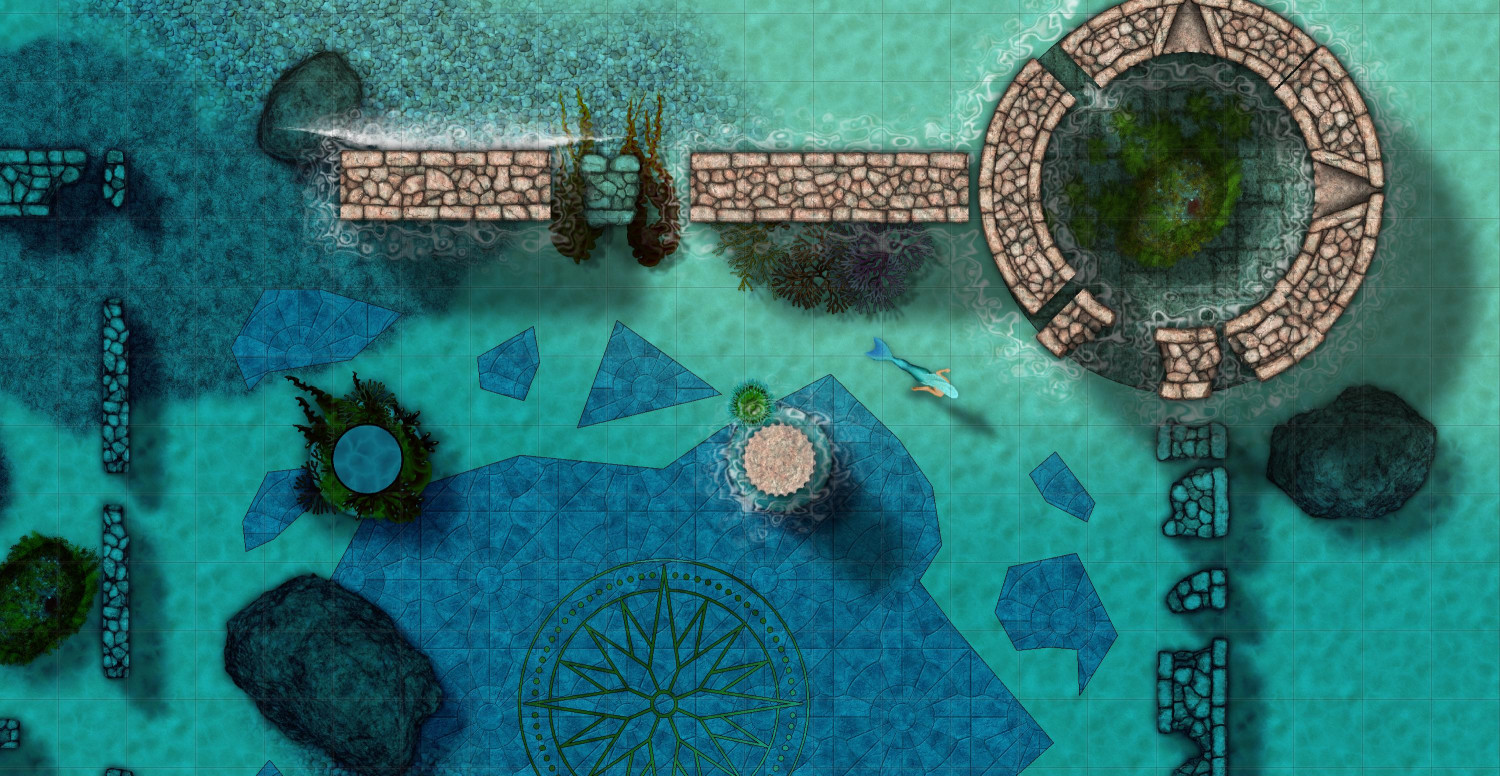
These underwater passageways eventually lead us to the Welcome Chamber (#3), sort of an underwater reception room. To the south is the underwater gardens (#4) where the sea elves grow various sea grasses, seaweeds, and marine mushrooms. To the east is the Great Hall (#5), with a storage room (#6) to the north. To the south, there are two locked rooms: the armory (#7) with spears, tridents, nets, and other weapons suitable for underwater combat, and the treasury (#8).
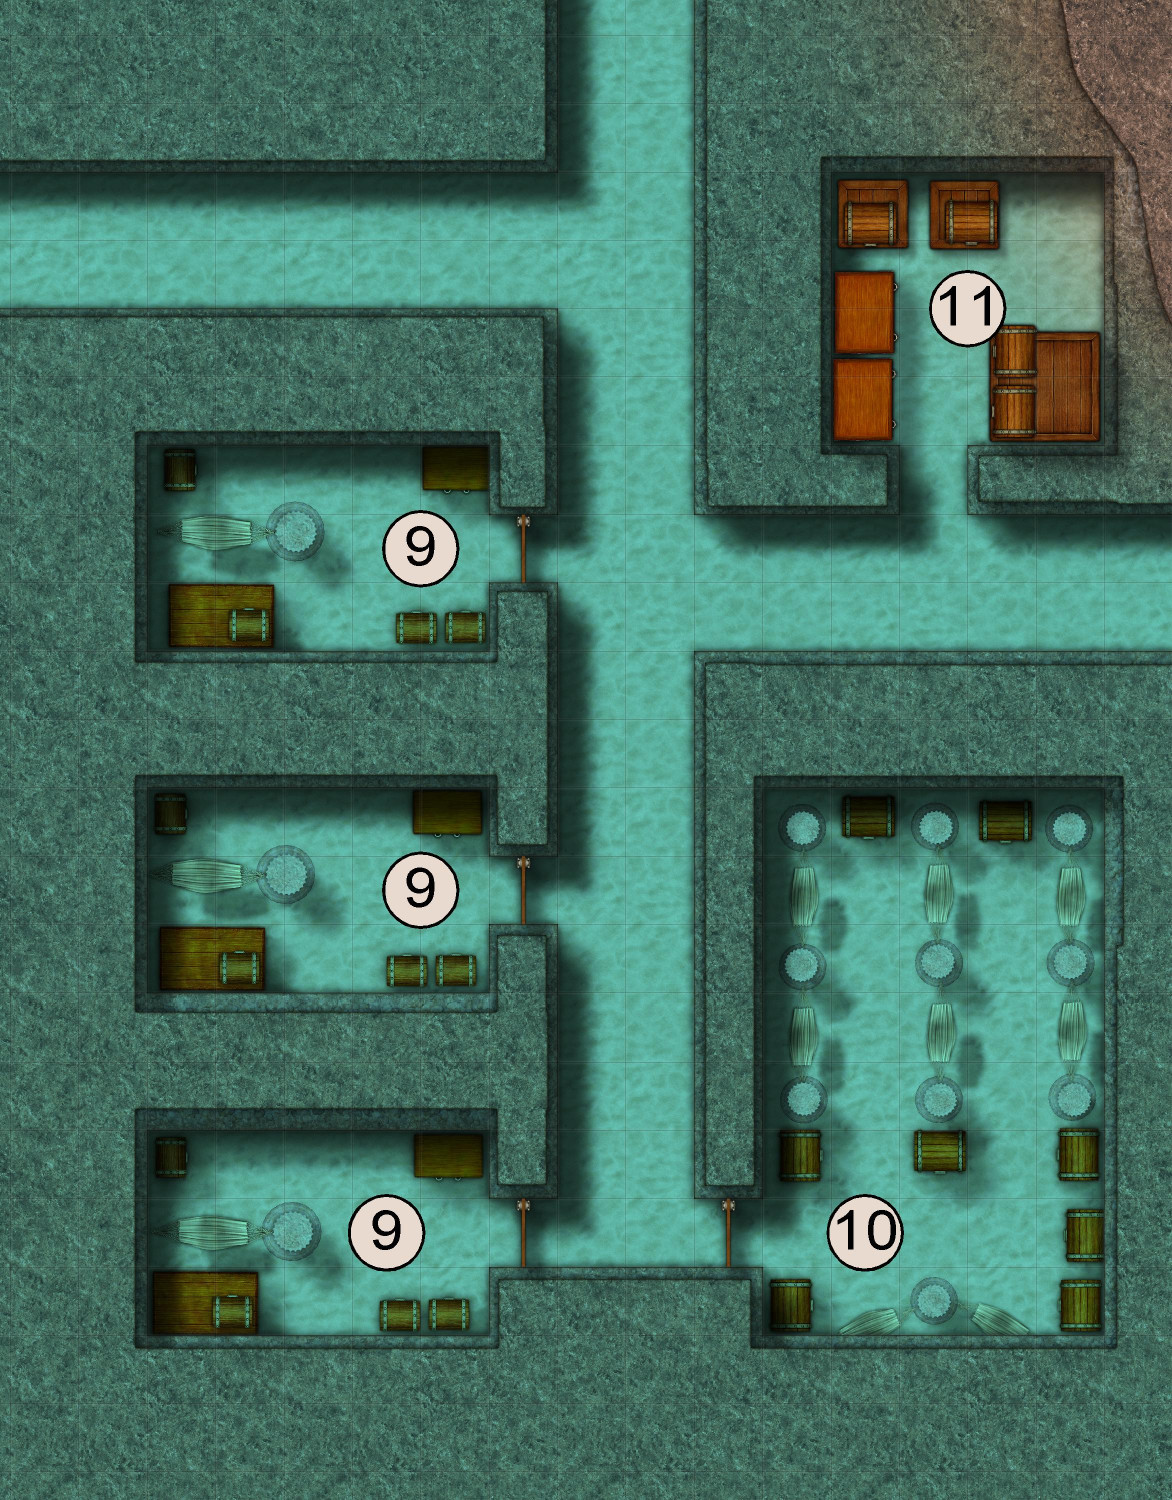
Next on our tour, we find three VIP bedrooms (#9) as well as group barracks (#10) and a storage room (#11). Of course, ordinary beds would be useless in an underwater bedroom. Who wants soggy sheets? I figured they'd probably use hammocks that they can tie themselves into so they don't drift away in their sleep (like astronauts in zero gravity). The hammocks connect to a wall on one side and a pillar on the other.
Next up, we have a room that has been nicknamed the Transition Room (#12), as it transitions from underwater to surface land. It's one of three rooms with ceilings high enough that the water doesn't touch the ceiling here, so you can pop your head above water even in the marine parts of the room. To the north is a room (#13) where folks can dry off and change their clothing, though the sea elves generally wear lightweight linen clothing that dries quickly on their own. Room #14 is called the Lesser Hall. It's nicknamed the Map Room because it's where the outpost commander and his staff pour over maps and other documents, which couldn't really be done underwater (unless they used clay tablets or waxed paper, maybe). To the north is another storeroom (#15), and then there's a dining hall (#16), kitchen (#17), and pantry (#18).
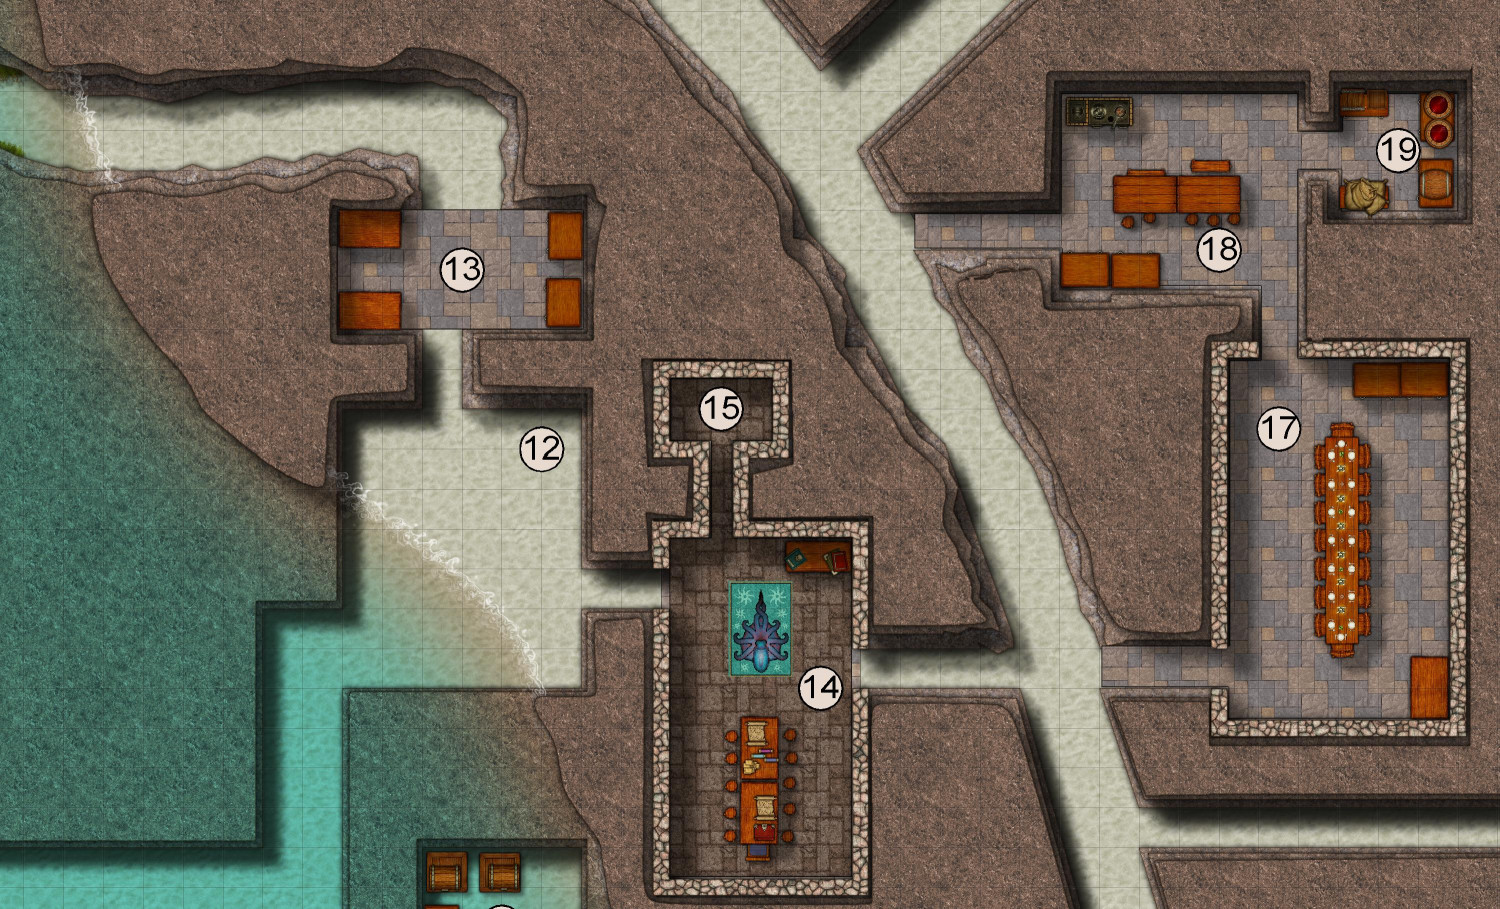
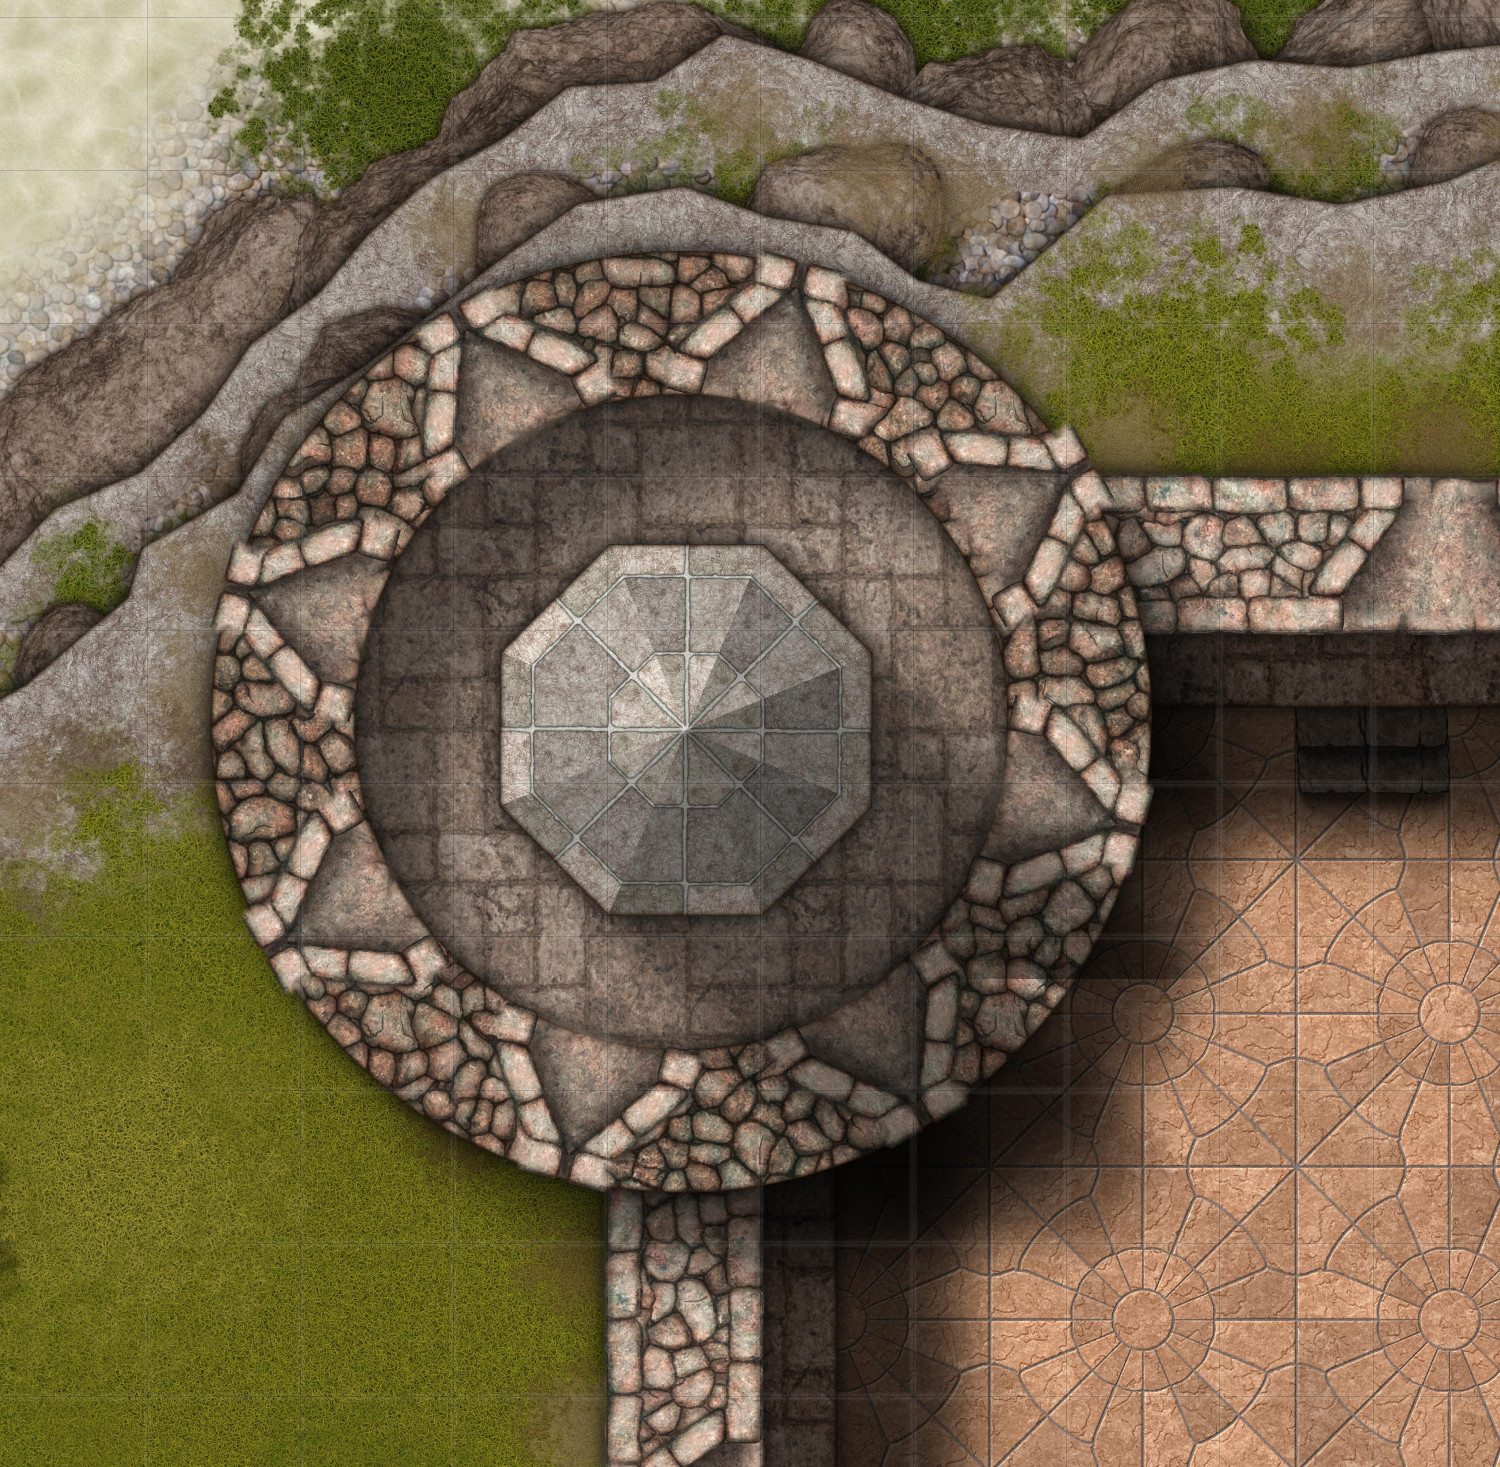
South of the Transition Room, an underwater passageway takes you to the second of the three rooms where the water doesn't reach the high ceilings: the chapel (#16). This room gave me an excuse to play with the brass inlays that I love so much, as well as the partially-submerged pillars with the ripple effect, and the partially submerged stairs. The orange/pink tiled area is an elevated platform. Maybe I should put chairs or something on it to make it clearer that it's above water. In my campaign world, elves use henge stones as places of worship, usually with seven inner stones representing the seven gods of the elven pantheon. Here, the sea elves have used pillars as a substitute.

From the dry passageways that head north from the chapel or east and then south from the dining hall, we get to the above-water bedrooms. The outpost commander's room is #20, and then there are two double-occupancy VIP rooms (#21) and dry barracks with seven beds (#22). Room #23 is a recreation room where during downtime, the sea elves stationed here can play games or make music (there's a harp on the table).

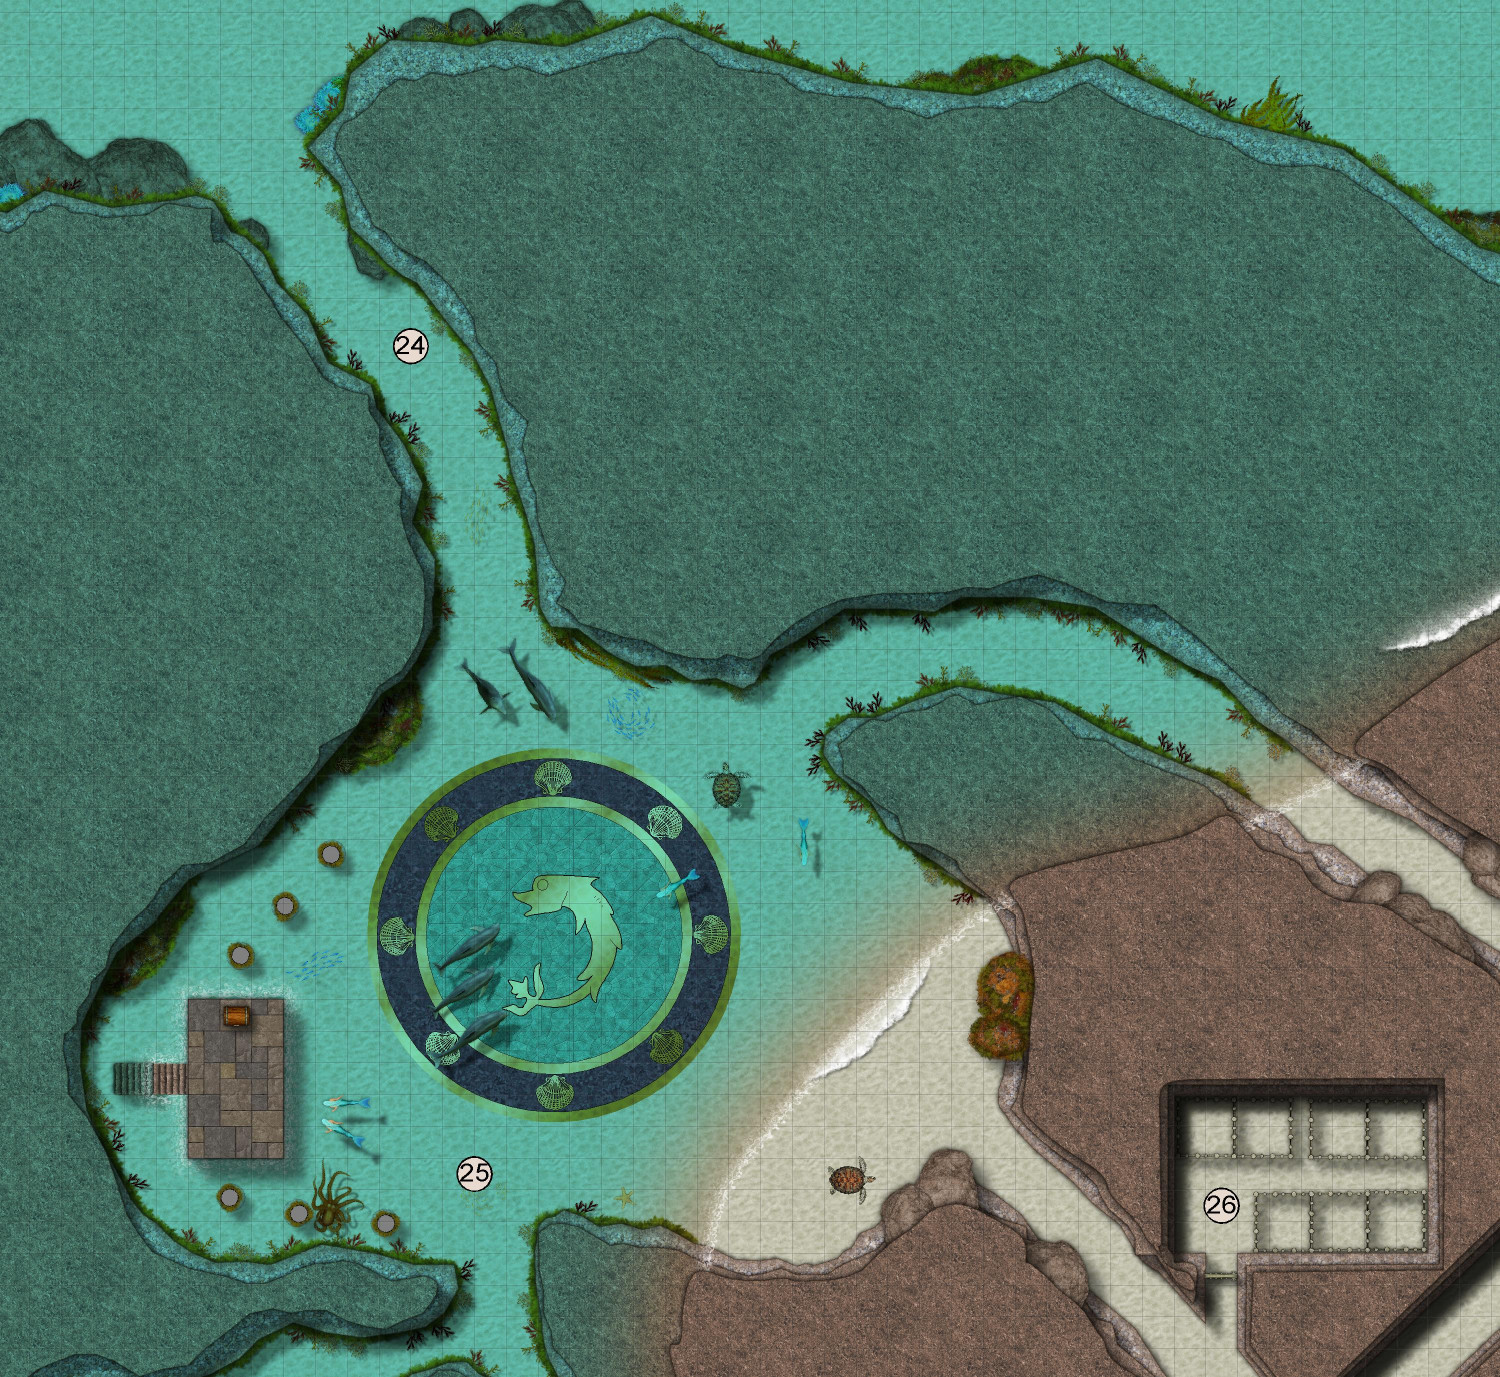
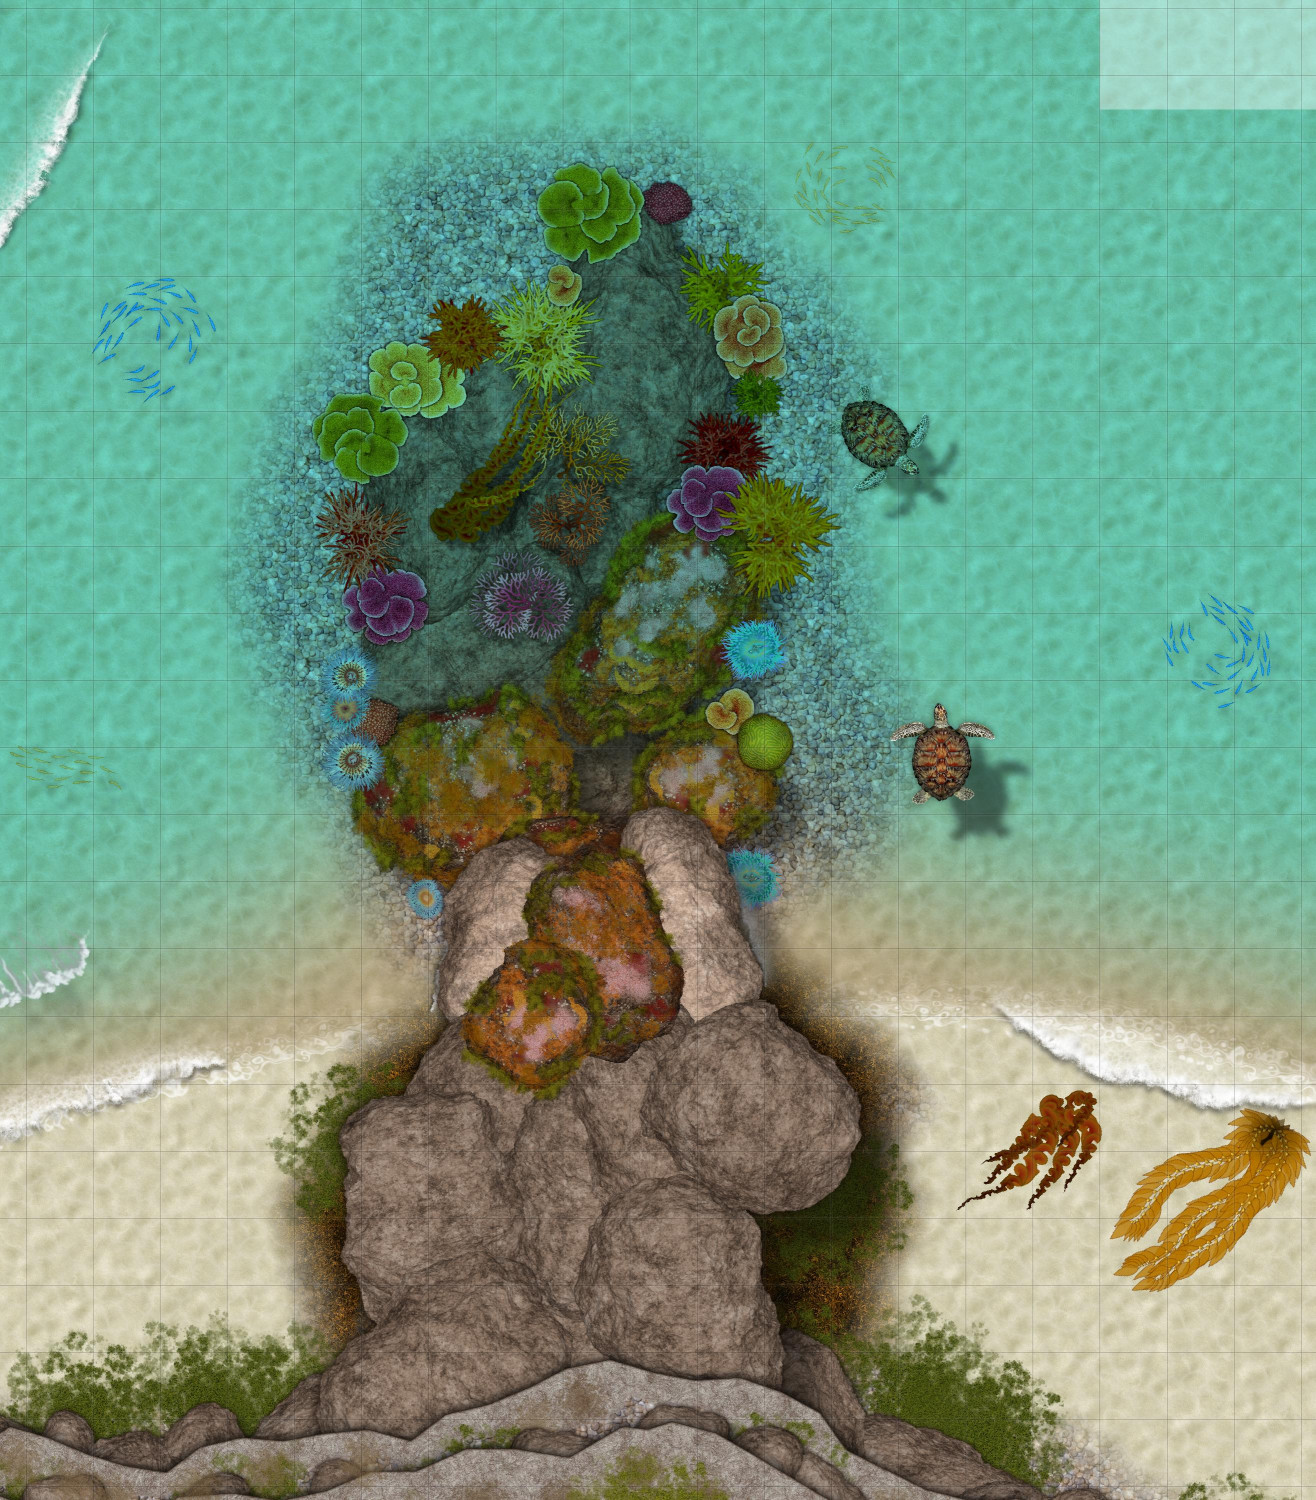
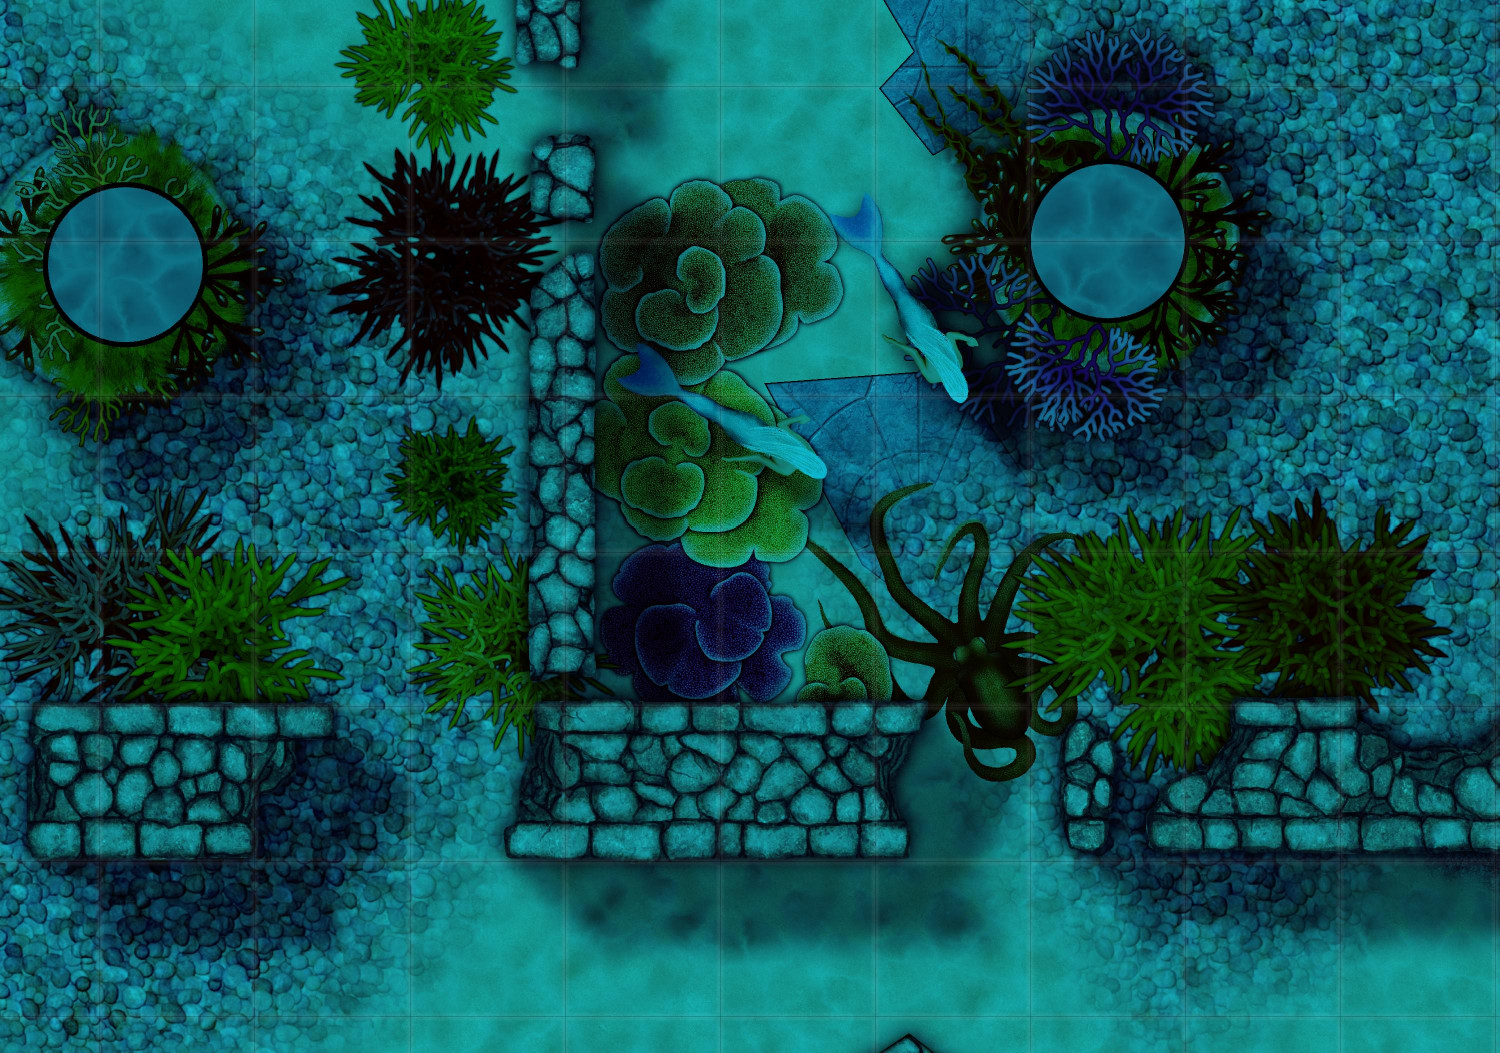
Next we come to the third room where the water doesn't touch the ceiling, my favorite room of the outpost, called the Dolphin Room (#25). Here, a separate passageway to the outside allows for intelligent marine allies to visit and confer with the sea elves: merfolk, intelligent dolphins, and an intelligent octopus. (Not sure if the turtles are also intelligent or if they just wandered in.) A platform on the west side is elevated above the water, where there's a chest with balls, hoops, and other lightweight, floating toys that the elves and dolphins use in various games they've devised. A dry passageway takes you to the lockup (#26), where unwary landlubbers who've stumbled across the elves may be held.
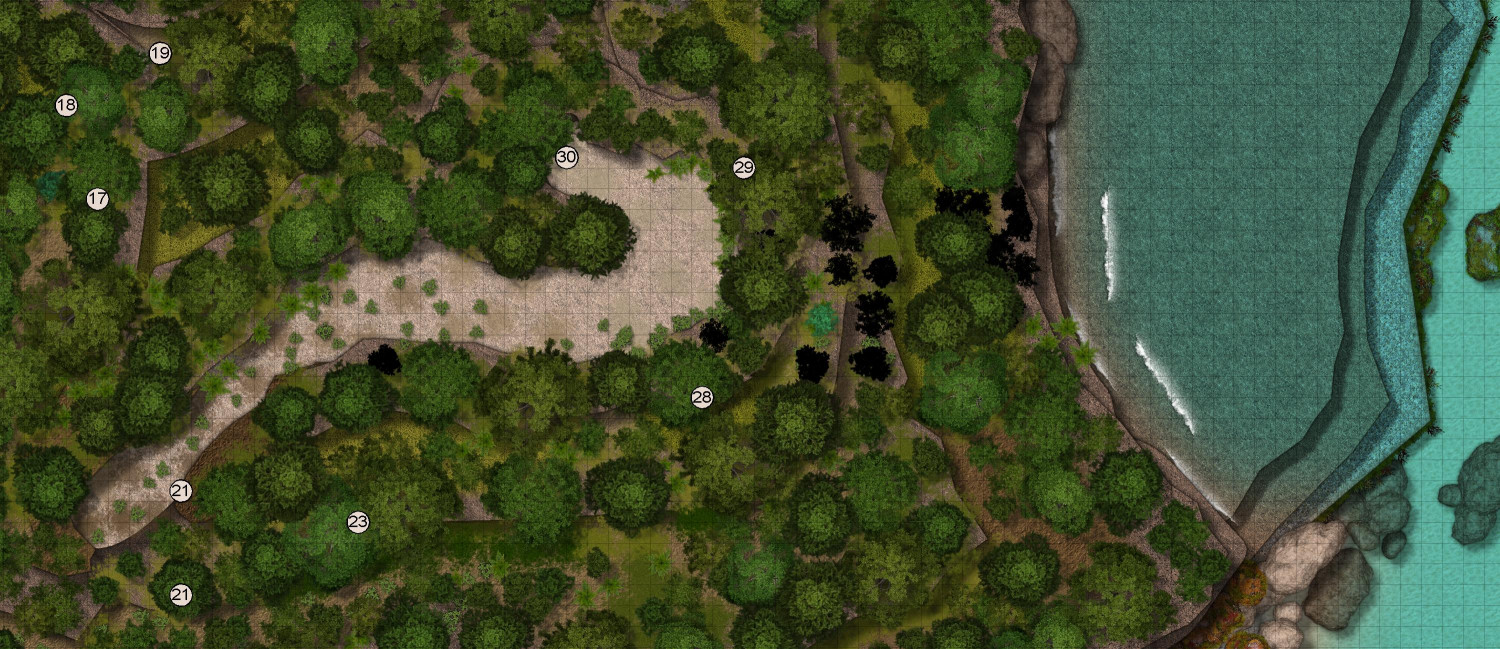
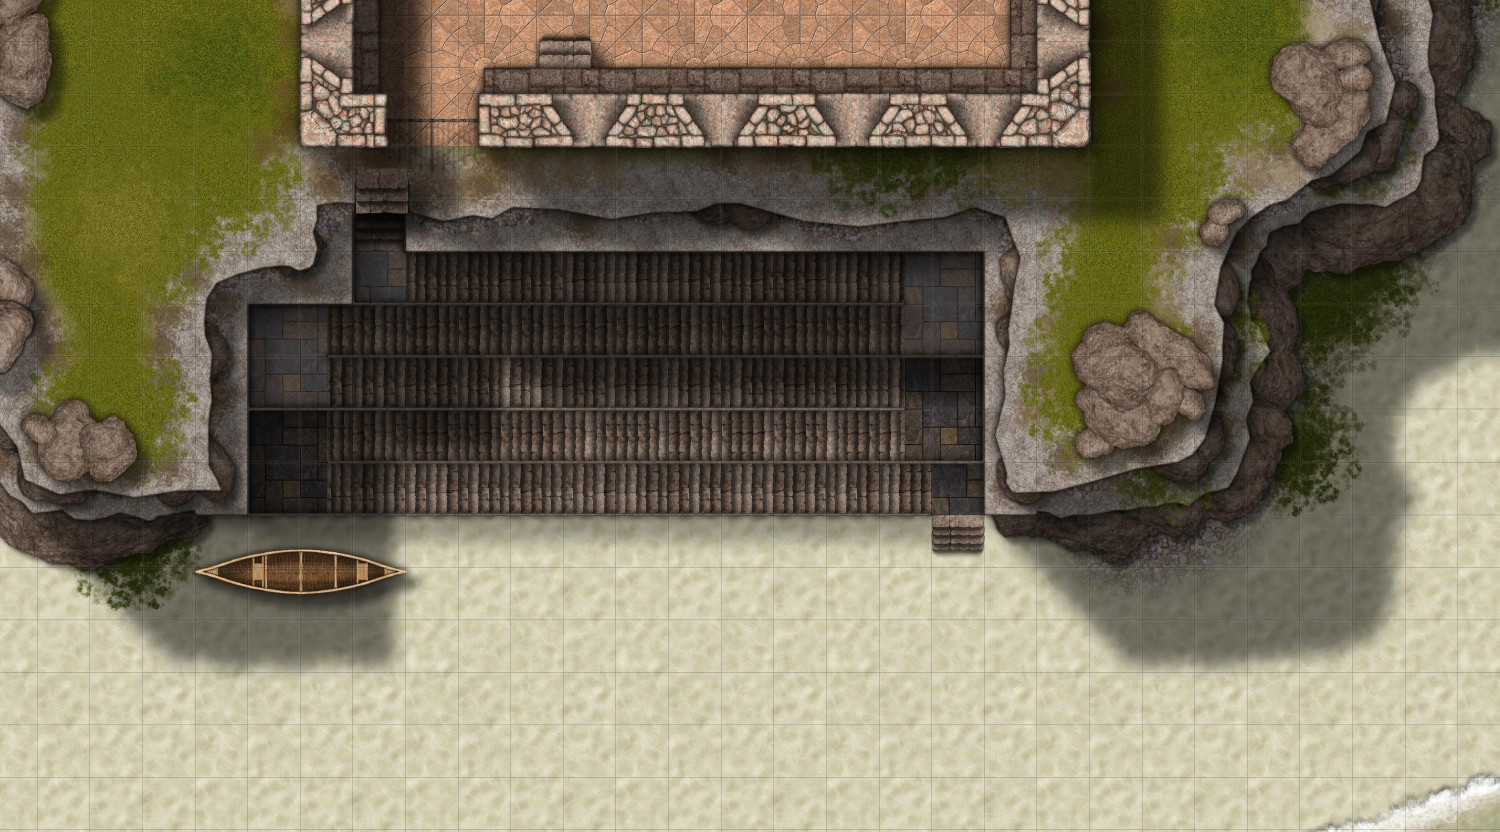
To the east, the Great Staircase (#27) takes you winding up to the top of the hill, where elves are posted as lookouts. On the way, you'll pass a locked room (#28) with a teleportation portal and an open room (#29) where the sea elves stash their bows and arrows and other land weapons.

A spiral staircase (#30) leads to the outside above the top of the hill overlooking the beach. (You can barely make out the top of the stairs above the #30 label.)
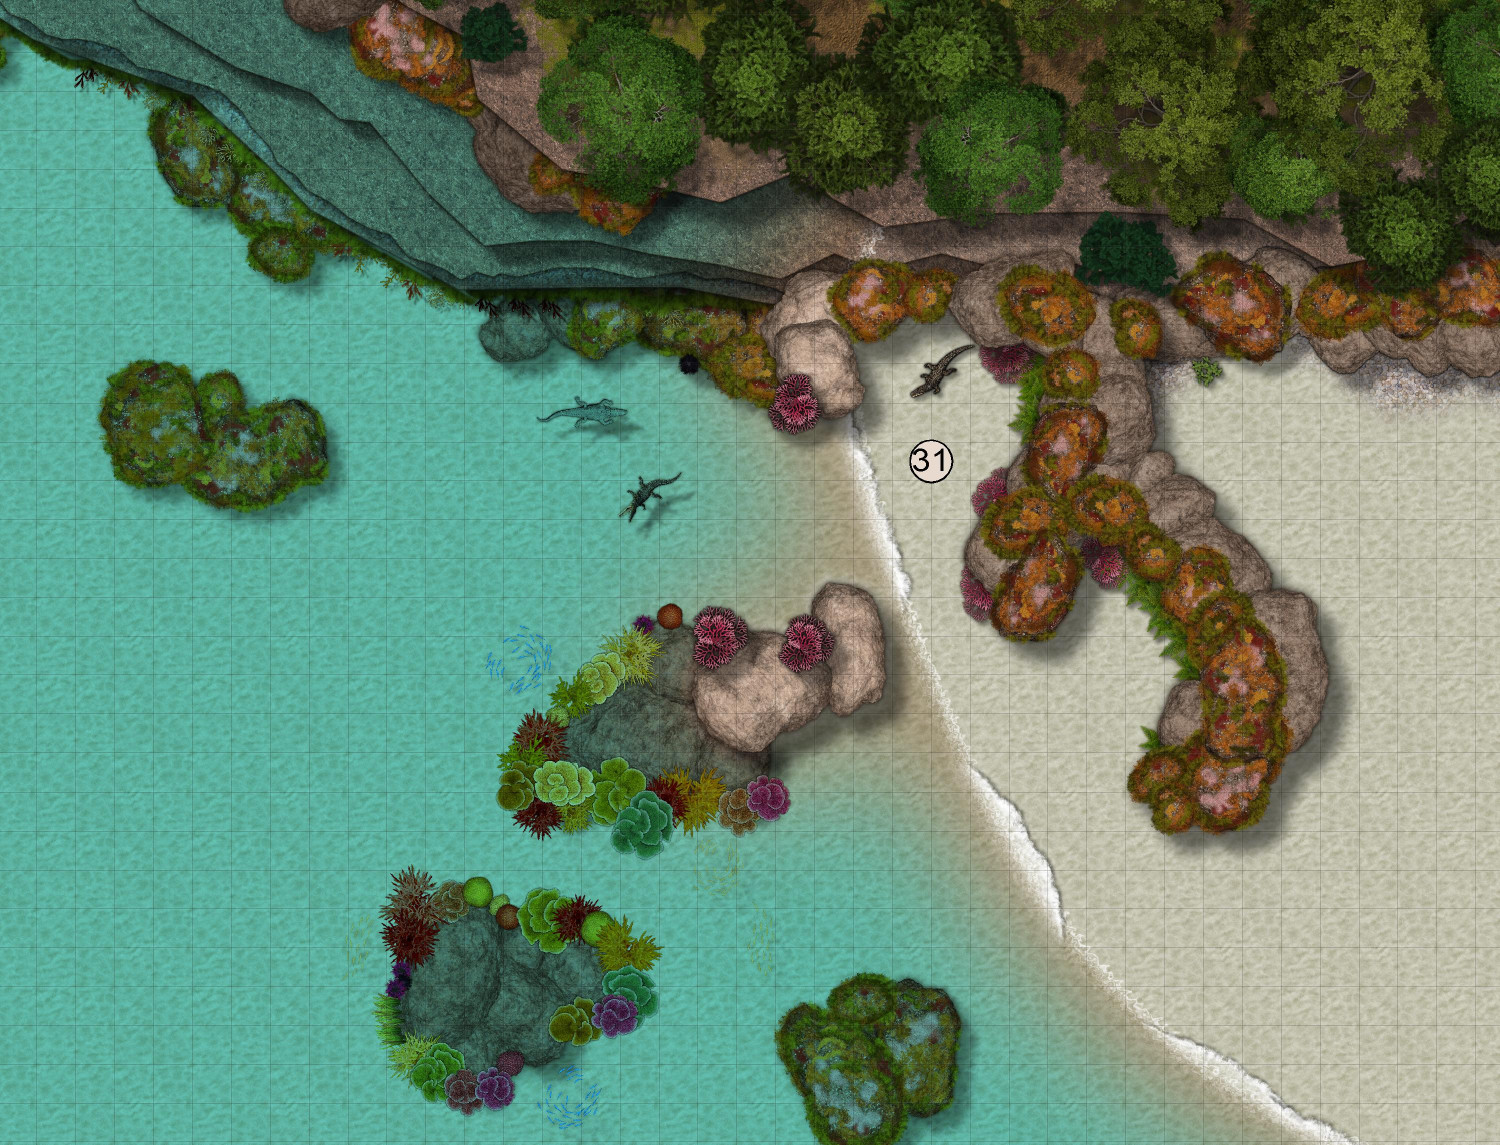
And one last feature on the island: the Alligator Cove (#31). The alligators are enough to deter casual visitors from the island, and the sea elves do enough secret mischief to more determined visitors to convince locals that the island is haunted. (The alligator symbols are actually crocodiles, but I got the names mixed up. They come from Dundjinni Archives.)
And that's the end of our tour of the Sea Elf Outpost! It took me a few weeks, which is why I haven't had a chance to post anything new recently.


 and 6 others.
 -
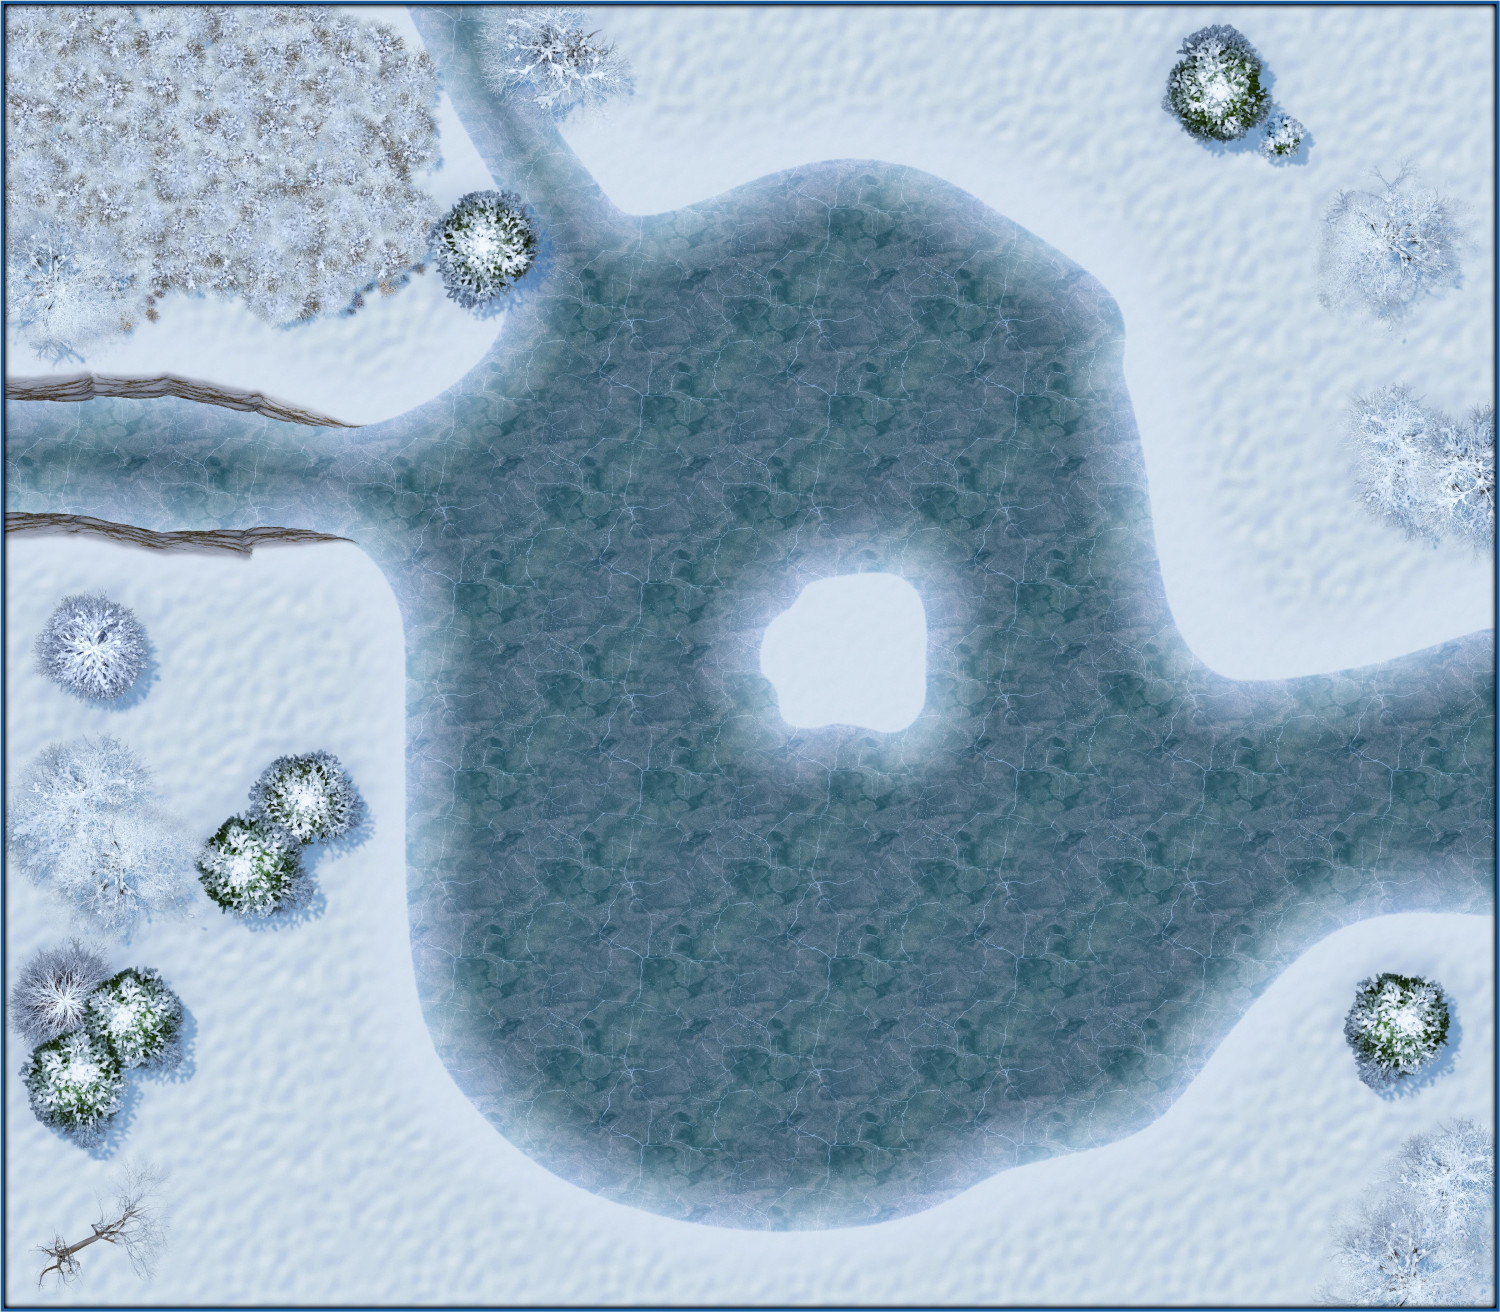
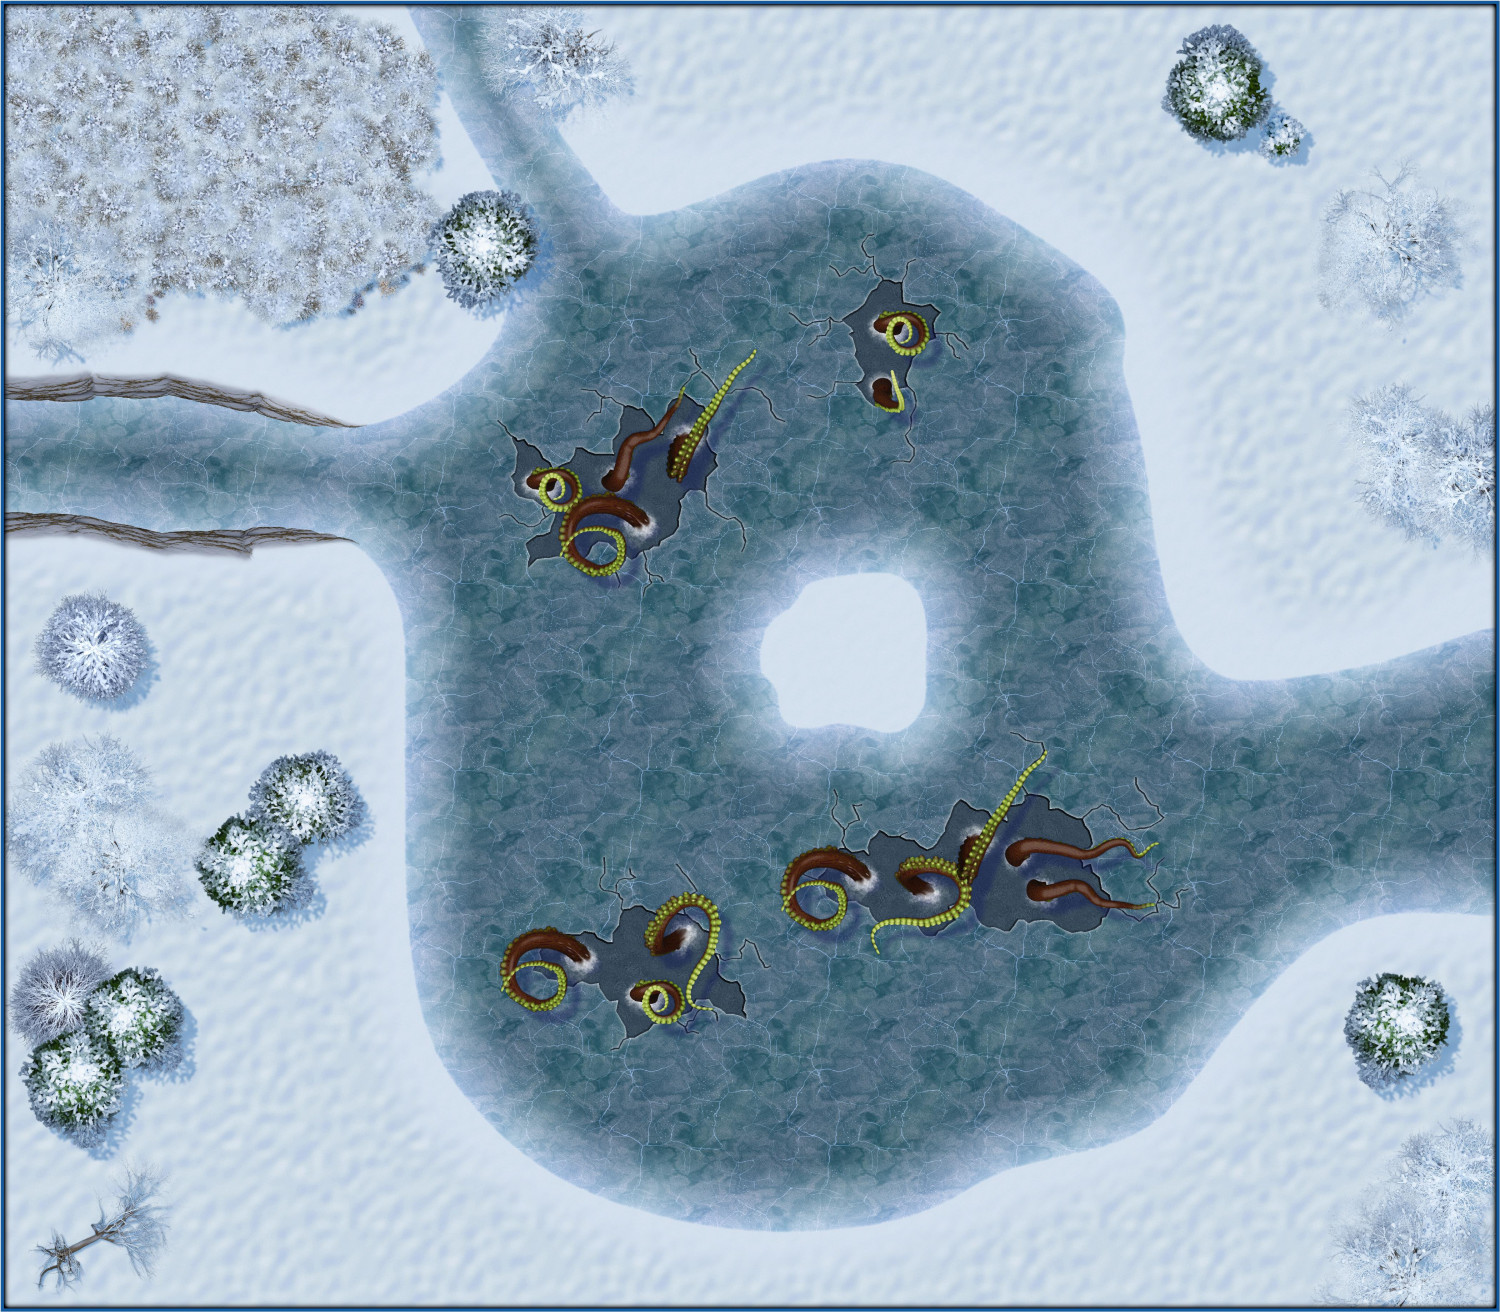
The Frozen Lake - a story in three acts
Procrastinating on something else, so decided to do a little mapping instead. A quiet, peaceful stroll around the lake in winter.
Act I
Act II
Careful out there, looks like the ice may not be so solid...

Act III
Uh oh.....


 and 6 others.
 -
Aspidochelone
Today would have been my grandmother's 105th birthday (she passed away six years ago). She was fond of turtles, so in her memory, I designed this silly little map of an aspidochelone, a giant turtle.
In mythology, the Aspidochelone was a sea creature portrayed as either a giant whale or giant turtle -- a creature so large that it would be mistaken for an island covered with sand dunes and vegetation. Sailors would camp out on the "island," but when the heat from their campfires awakened the creature, it would plunge beneath the waves, killing the intruders.
In my campaign world, one of my religions is loosely inspired by astrology. There are twelve gods depicted as mythological creatures who are shown in the heavens as constellations of stars. They each consecutively take precedence for one-twelfth of the year, when their constellation is most prominent. Each is assigned to one of the four elements, as well as one of three qualities. Chelys, the Aspidochelone, is one of these gods. He represents Water Resolute, "the great sea depths in their untamed but passive state." (The other water gods are: Tuthose, the kraken, Water Ascendant: water in its wildest, untamed form, like hurricanes at sea; and Melquart, the hippocampus, Water Adaptive: water tamed for use in drinking, cleaning, powering watermills, and the like. Chelys' month is the eleventh month of the Common Calendar at the second month of Autumn. (The calendar begins on the Winter Solstice.)
Anyway, here is an aspidochelone.
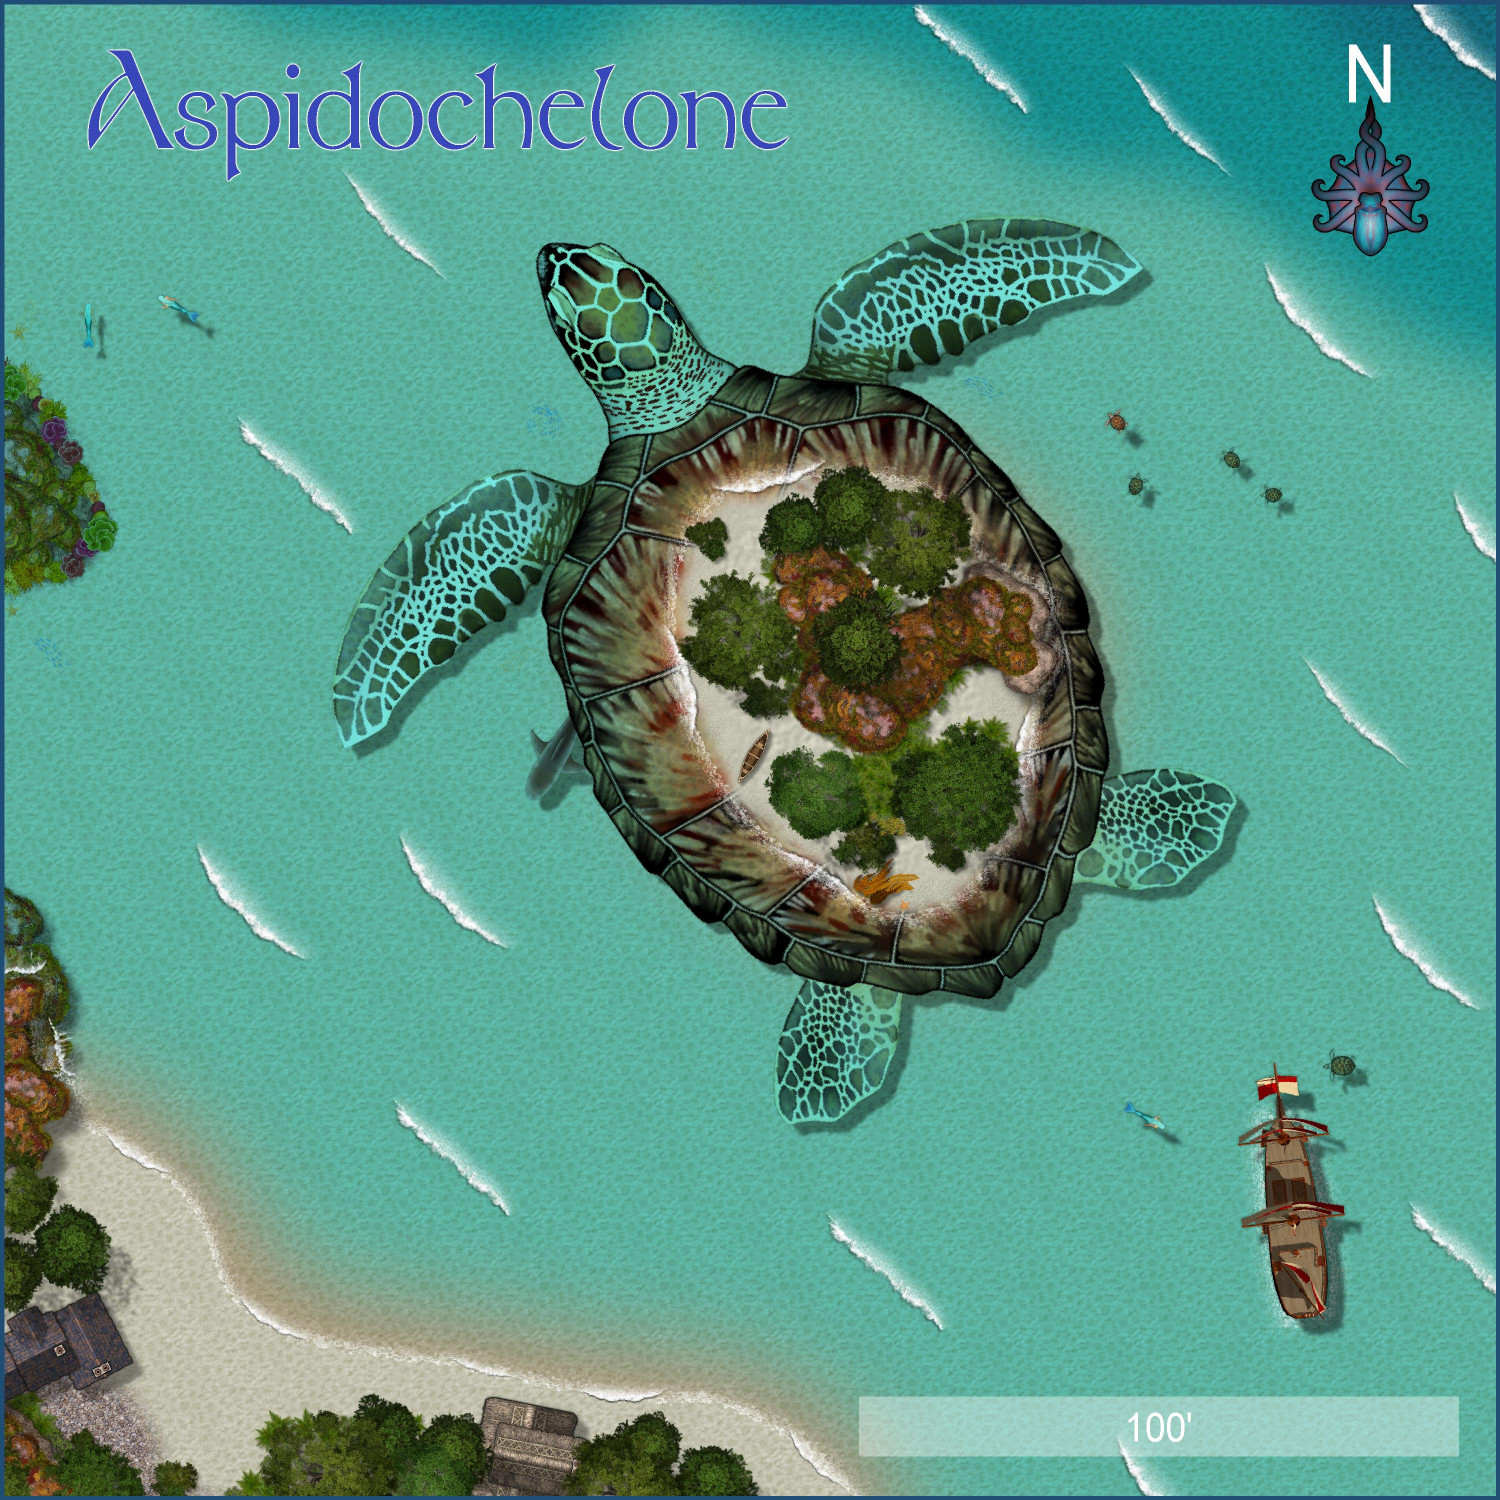
This isn't intended for the Atlas or the village competition, it's just for fun.


 and 4 others.
 -
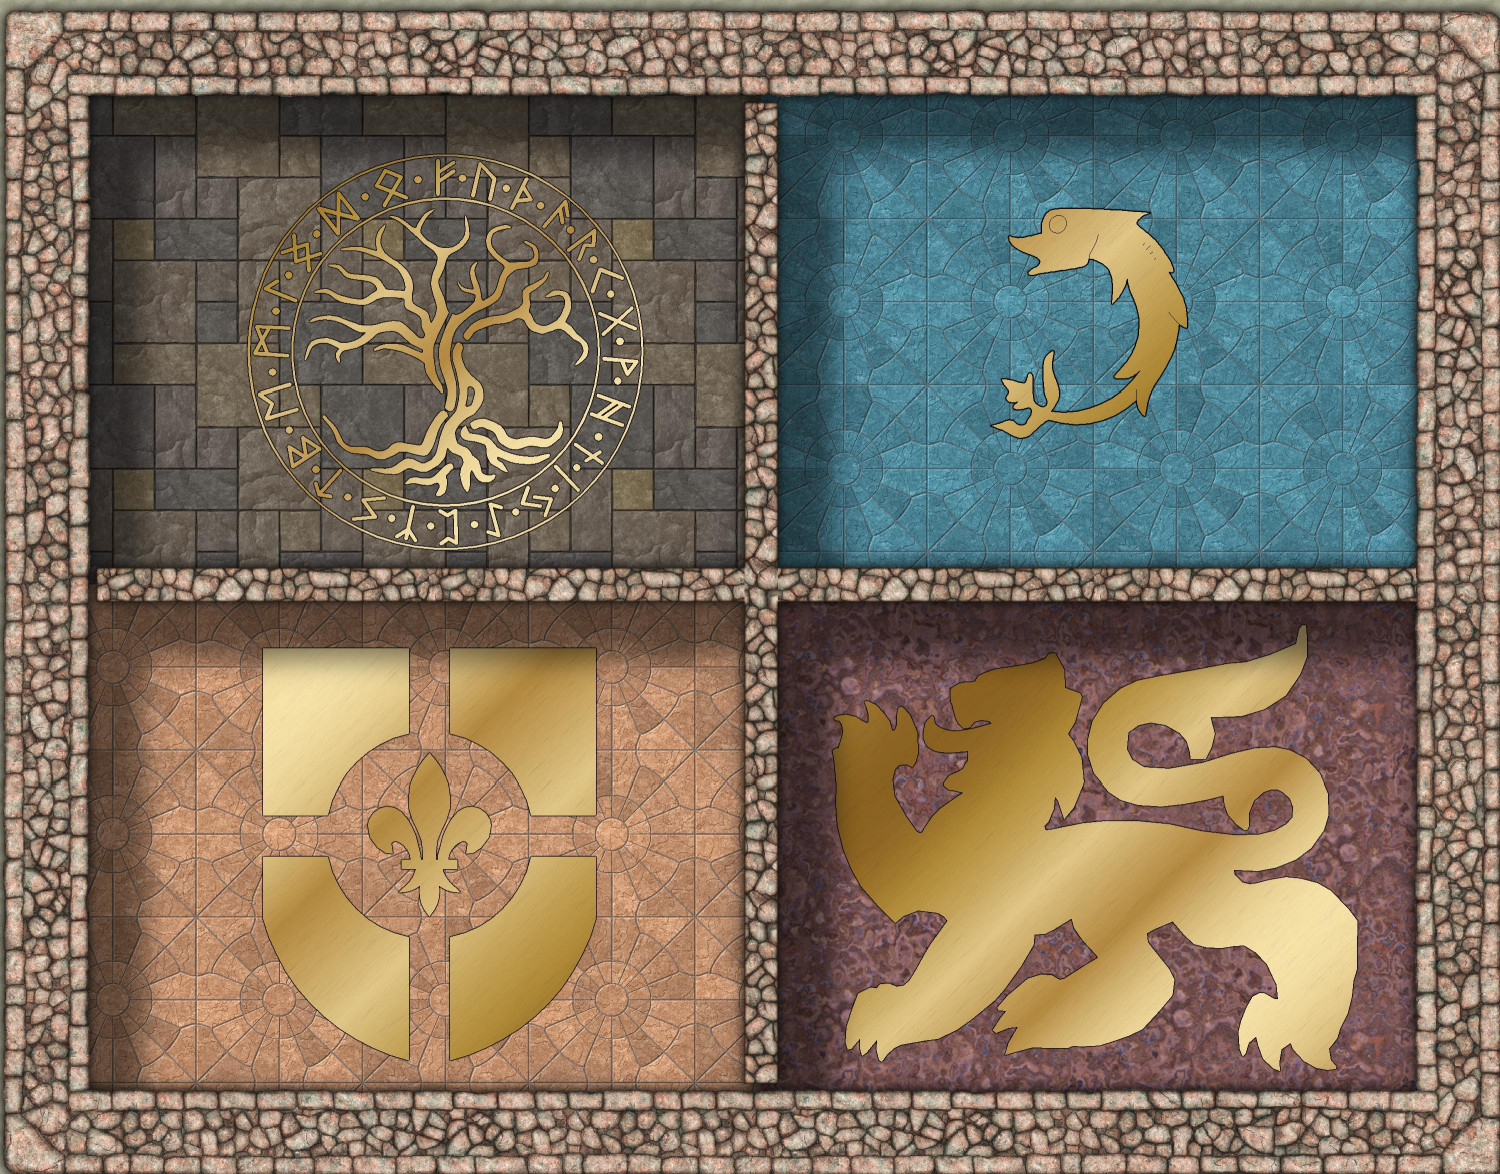
EUREKA MOMENT: CA15 Heraldic Symbols as CA180 Marine Dungeons 2 Brass Inlays
I just had an epiphany -- one that may be obvious to most of you but has tickled me to pieces.
Ever since I saw Ralf's two video demos of Marine Dungeons of using the brass inlays (which prompted me to immediately purchase the 2021 Annual), I have been obsessed with putting in brass inlays wherever I can get away with it. I even did one in my recent Sun God temple which was in a Mike Schley style, only I used a goldleaf background from Sue's Parchments with a crude, hand drawn depiction of the sun.
I have wanted to do more inlays in everything, but I am not an artist. But it suddenly occurred to me: Sue's inlays are vector images, and CA15 Heraldic Symbols (from Annual Volume 2, 2008) are vector images, and some of those vector symbols are varicolor....
So I experimented, and it worked! Upper left is one of the vector images from Marine Dungeons, just as an example of how it's supposed to work. Upper right is a dolphin symbol from Heraldic Symbols that intentionally keeps the black outline, as does the fleur-de-lys crest in the lower left. The lion intentionally omits the black border.
There aren't a ton of symbols in Heraldic Symbols, and fewer still that are varicolor, but the cool thing is: if you use CA15 Heraldic Symbols to design a coat of arms, and use the varicolor symbols set to the magenta #6, you can then have the coat of arms engraved in brass at the base of the dais in your throne room. Just copy the crest into your map and move it to the floor sheet after placing the brass inlay fill on a sheet directly behind the floor (adding the color key effect to the floor if your map doesn't already have that).

 and 5 others.
 -
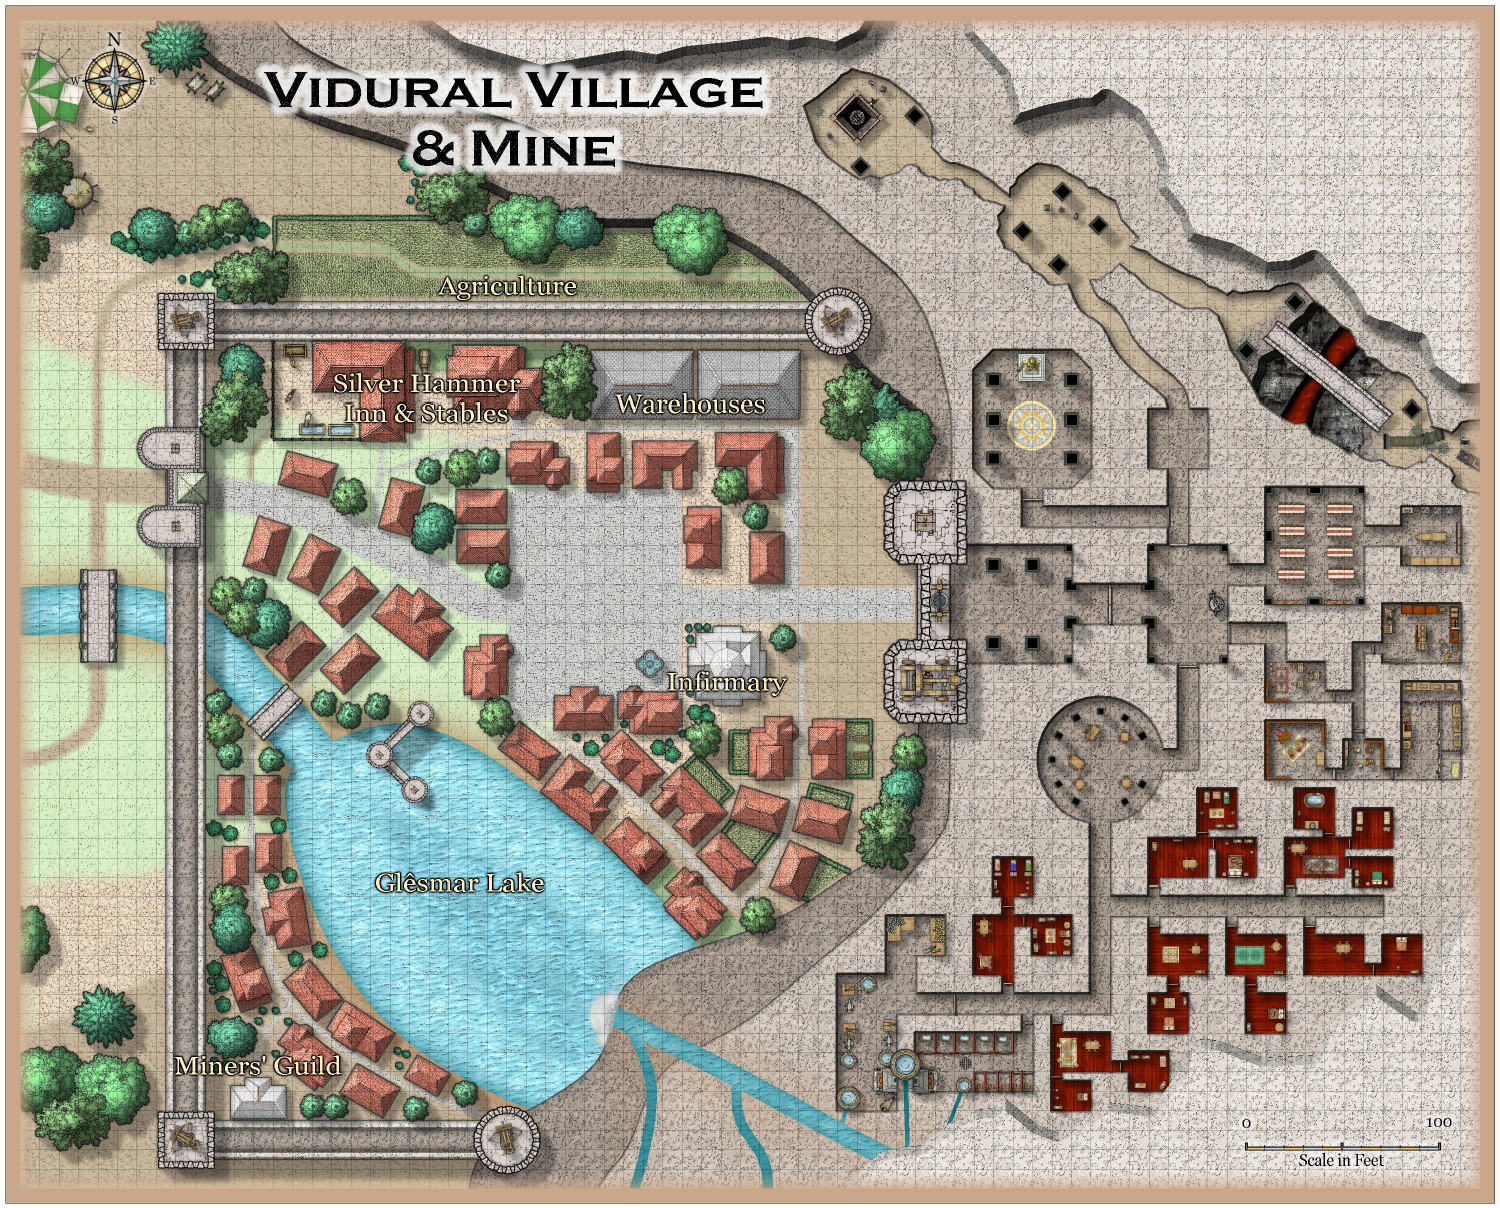
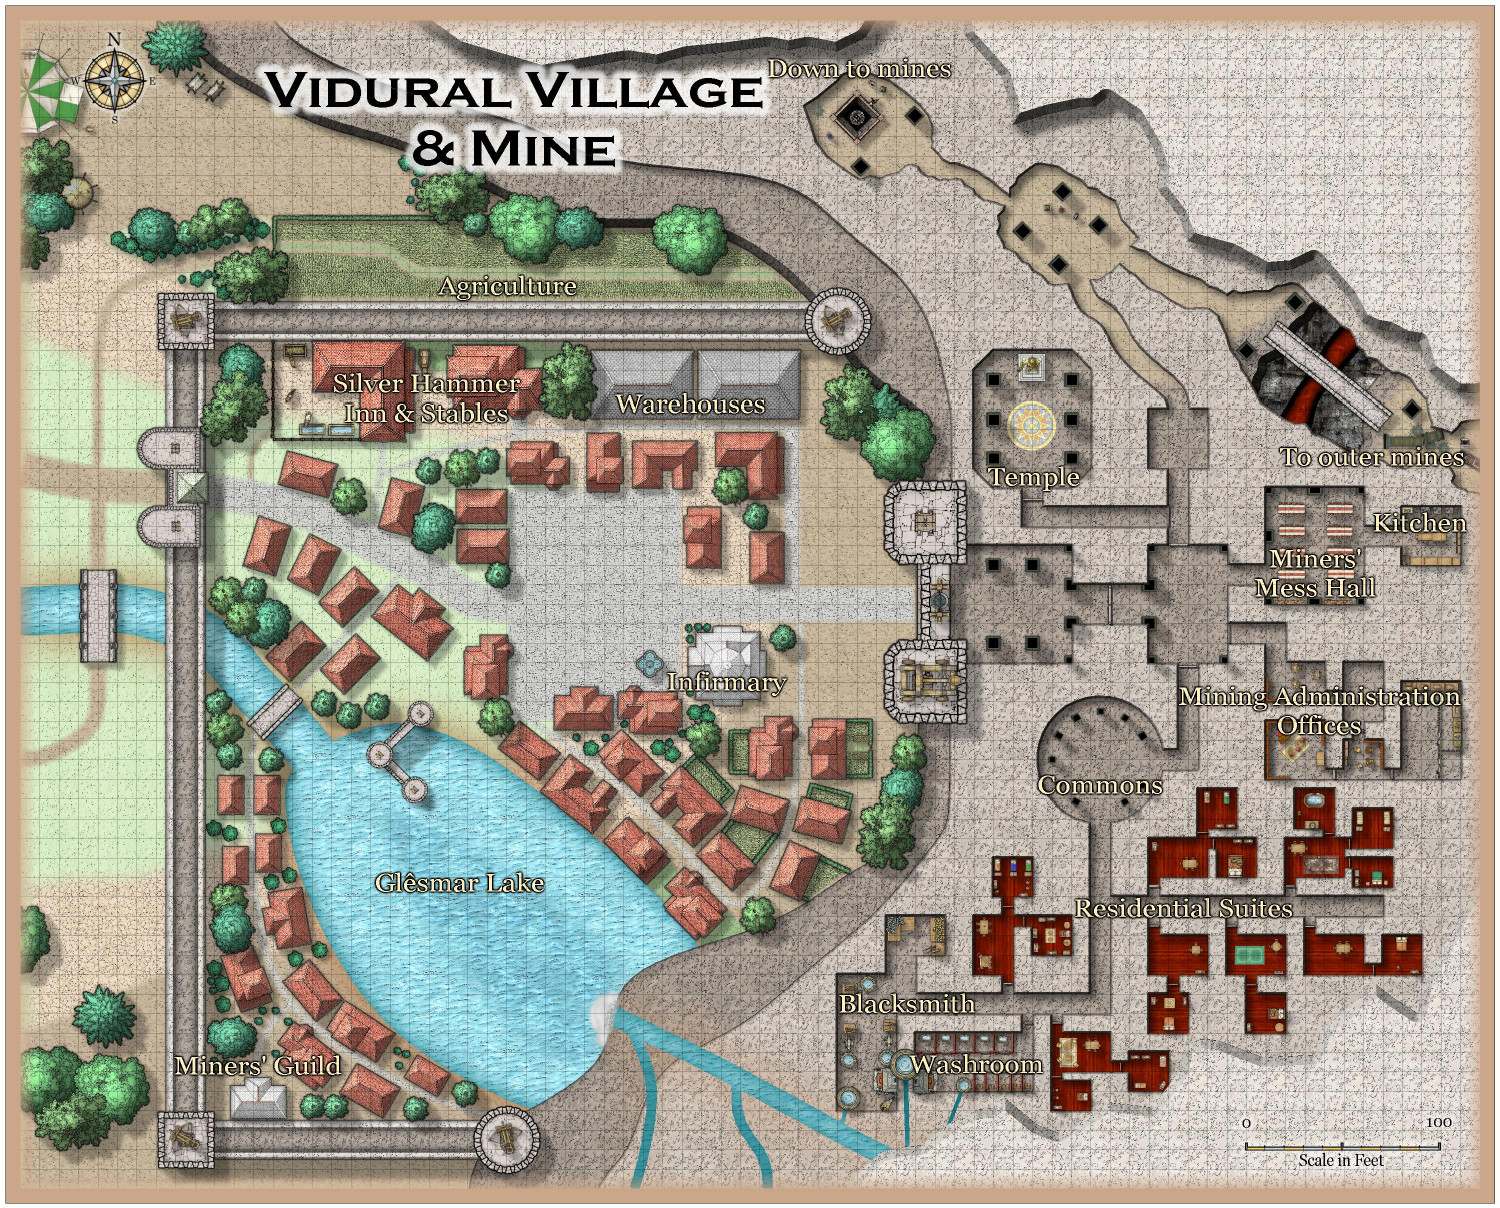
[WIP] Atlas Contest - Vildural Village & Mines
I'm working on the Description and hope to submit this to the Atlas and contest soon. Made some tweaks and wanted to see if there were any recommended changes before I finalize it. Here are images with the mountain covered, uncovered and labeled, and unlabeled (to see the interior rooms better).


 and 2 others.
 -
[WIP] Elmsbrook Township
Last month, I shared a map of a sewer system that I developed. @Lorelei recommended that I submit it to the Community Atlas...but I figured I couldn't submit a sewer system for a town without also creating the town to go with it. This one took a few weeks.

I have a hard time breaking out of orthogonal map-making. This very much looks like it was laid out on a grid, something I will have to focus on not doing next time. I was constrained, though, by the fact that the sewers were already designed and I had to make the rest of the city fit the sewers instead of the other way around.
I decided to design it in the Darklands City style. I had to include city cliffs (they're already in the sewers map, after all), and originally I considered using the City Cliffs like Ralf did in the second episode of his five episode Big City Project tutorial. Then I discovered that the rocky outcrops already in Darklands City make fantastic cliffs when stacked on one another, and there are even sheets already set up for the base, middle, and top cliffs. Honestly, the cliffs are probably my favorite part of the map. The waterfalls come from Forest Trail.
My town also has two other water features: irrigation canals to bring water to the nearby farms outside of town, and an aqueduct system to bring water from the river into the town. Of course, the aqueducts should be covered (to keep blown leaves, bird poop, etc. from contaminating the water supply), but the water looks so pretty. (I put the aqueduct water on another sheet to tone down some of the effects that wouldn't work with such a narrow band of water.) There's a mill on the water designed so that the paddles scoop up buckets of water to deposit into a reservoir that feeds the aqueducts. I couldn't find a mill symbol, so there's a big tower for the reservoir, and its roof extends enough to cover the paddle wheel. ;-)
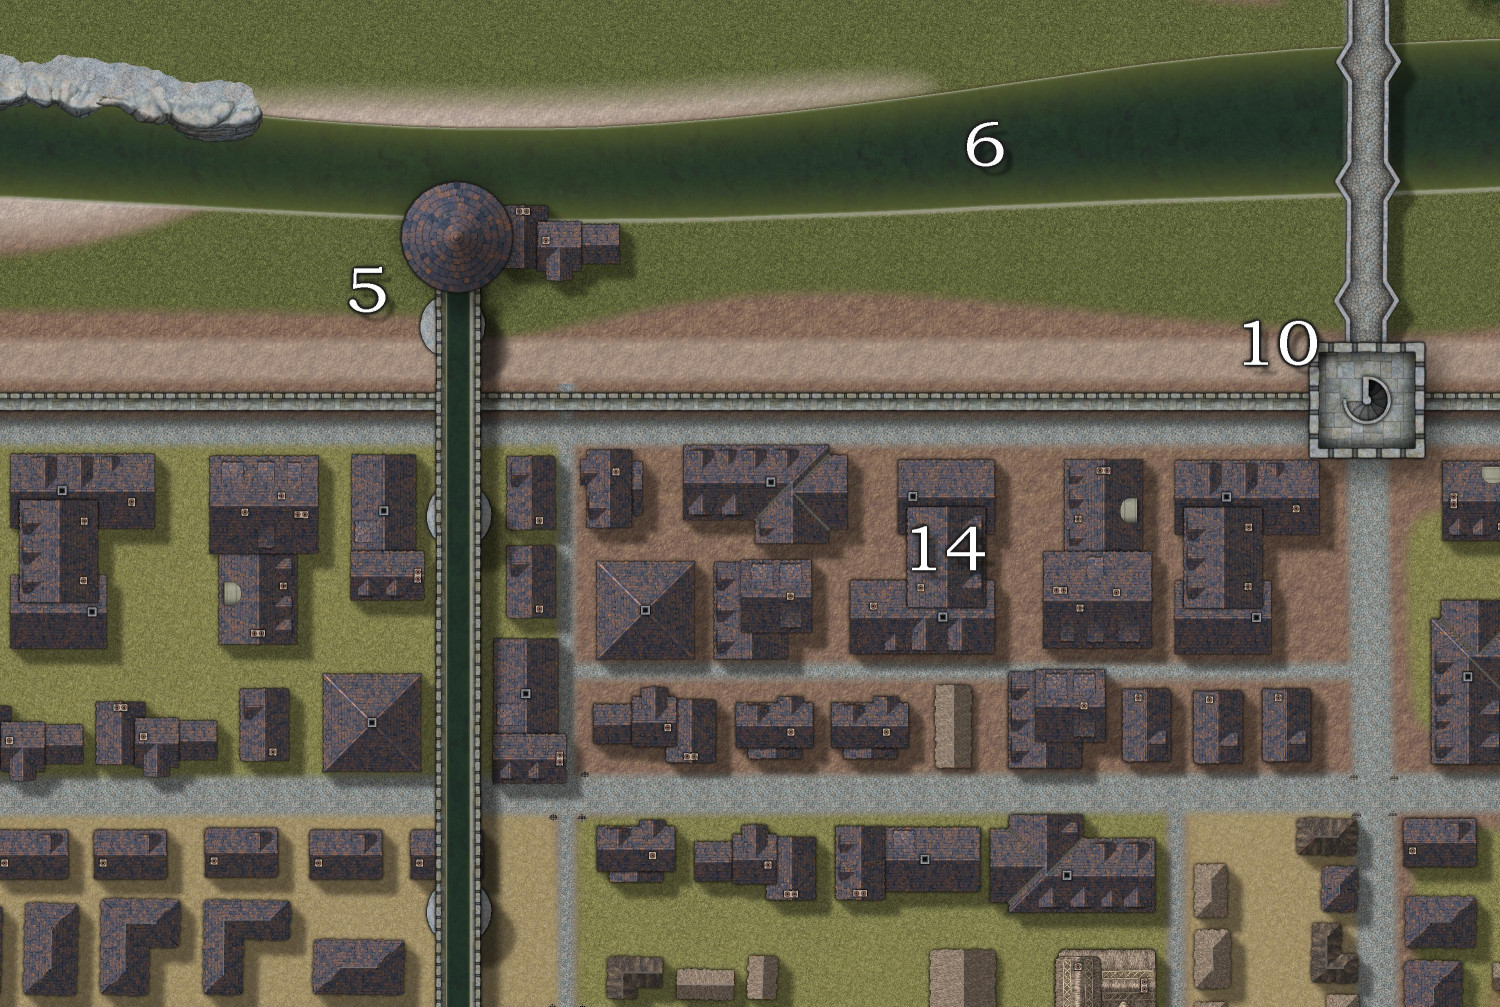
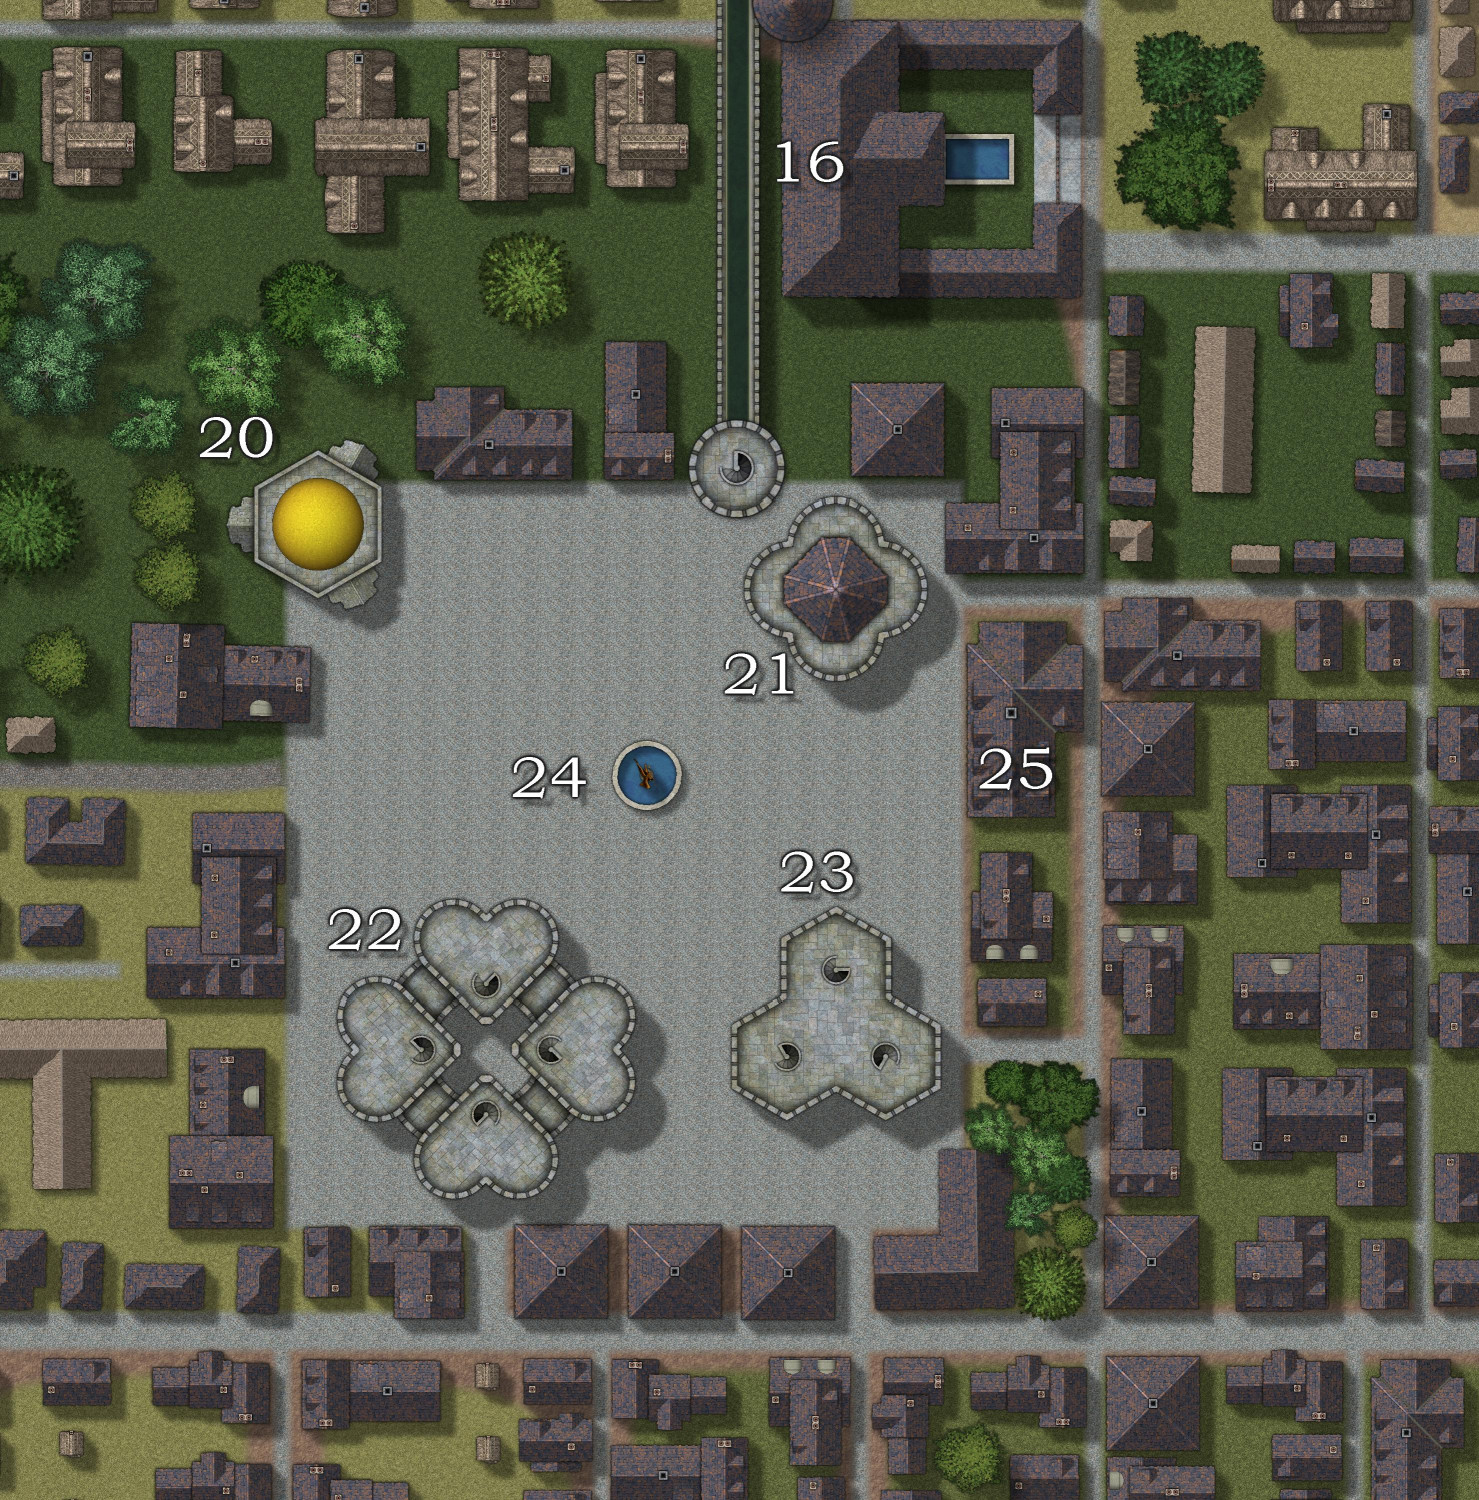
The "downtown" area includes a market square (24), temple (20), city hall (21), city watch and jail (22), and courthouse (23). The buildings around it are all merchant shops, while farmers and other merchants set up stalls in the plaza on market days. Building #16 is the community baths, located by necessity along the aqueduct line.
The upper portion of the sewer system is also shown, including the "Great Maw" (the giant pit where refuse is thrown down to be devoured by a Black Pudding), and the runoff where cleaned water is returned to the sea.
If you recall, at the lowest level of the sewers, a tentacle creature has taken up residence. I decided to put a mage's home in the town above that area (27). Still undecided: did the mage move to the town to study the creature that lurks beneath it? Or is he responsible for the creature? Perhaps he conjured it one night, summoning from the Outer Planes, and it escaped into the sewers where it eventually grew too large to escape its new home. In any event, the mage has grown prosperous by selling some of the green waste that the creature produces (as evidenced by the valuable exotic trees in his garden that he was able to afford to import). Turns out, that green goo is a useful ingredient in a lot of potion recipes, and other wizards (or their apprentices) travel to the mage to buy his green goo. They often stay at the Black Cat Inn (26) -- the proprietor named it as a sort of tongue-in-cheek reference to a wizard's familiar.

Still to come: I want to make sure that every city is properly on the correct layer for the "All Buildings with Color" effect to work properly. (This style did not come with those layers, and for some reason the "Add city layers" command didn't work, so I added them manually.)
Thoughts? Recommendations?
 and 1 other.
 -
[WIP] Marine Dungeons Lighthouse (more May Annual Stairs & Steps)
I am still working on my ziggurat, but in the meantime I got sidetracked with another Stairs & Steps project.
I was inspired by Ralf's Live tutorial for this month's annual, where he built stairs going up a mountainside. I wanted to do the same. I was also inspired by seeing the stairs of El Peñón de Guatapé featured in this season of The Amazing Race. I wanted to put my cliffs on an island, and there's no better setup for that than the Marine Dungeons. Plus, while I used that annual to create my Greco-Roman temple, I hadn't used it for a proper marine dungeon. And while the Stairs & Steps annual includes the individual steps from Creepy Crypts, I remembered that Marine Dungeons also has their own individual steps. So handy!
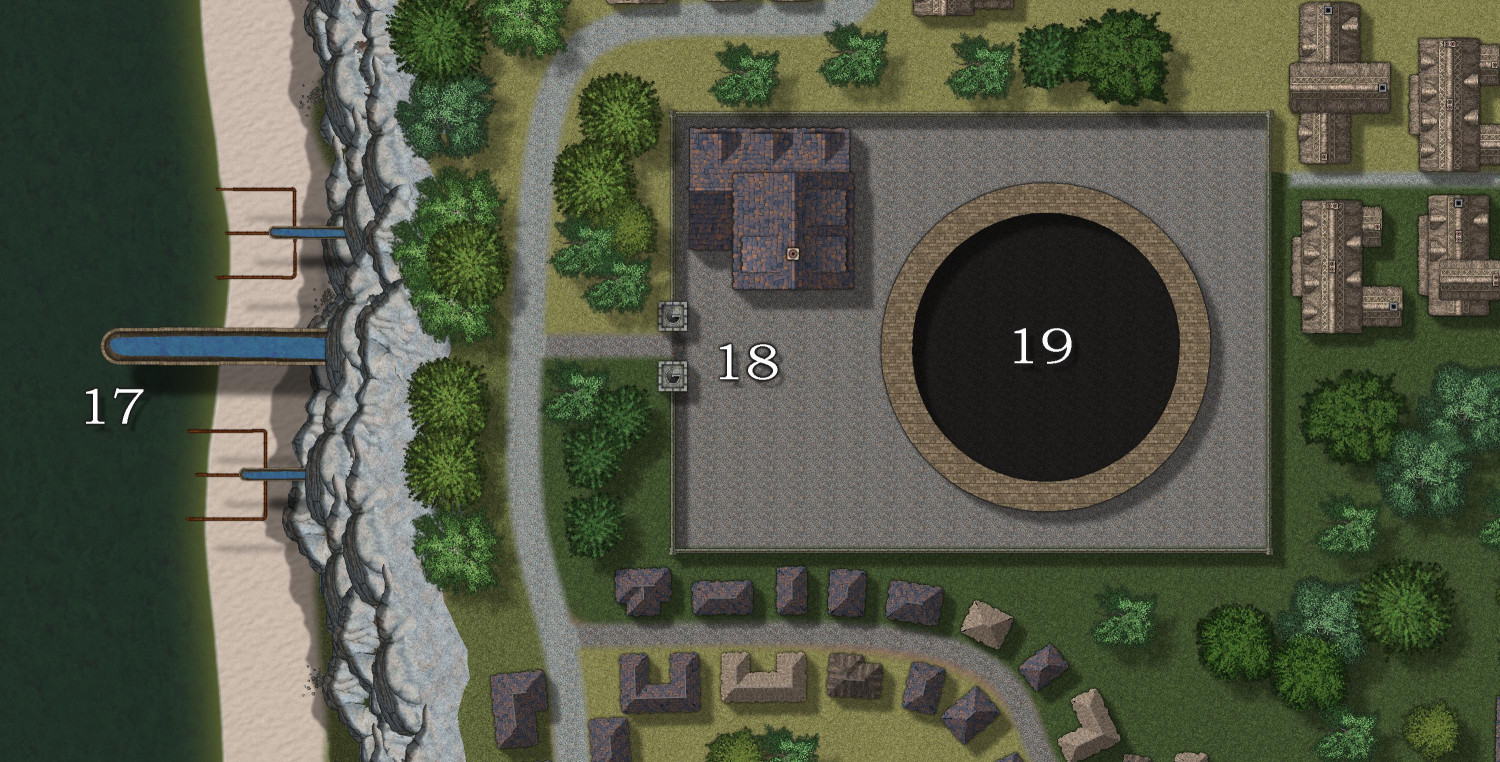
So, stairs going up a mountain. Where are they going to? First I thought there might be a temple or monetary or standing stones at the top, but I've been gravitating to those and wanted to do something different. I thought about creating an observatory but wasn't sure how to do the telescope. Maybe a wizard's tower? But really: what's the most common sort of tower on a hill on a small island? A lighthouse!
There are about 285 steps (including six landings) that ascend about 165 feet to the top of the hill. I made a courtyard for the lighthouse to take advantage of the beautiful walls, complete with arrow slit crenellations.
Of course, to really take advantage of the Marine Dungeons style, I had to create ruins in the sea. There you might find a few mermaids chatting with a wise octopus. And if you look closely, there's some sunken treasure as well.
(This has inspired me to do a few maps down the road for the realms of some sea elves.)
Anyway, here's the lighthouse by day:

The lighthouse at night is coming up in a follow-up comment.

 and 1 other.
 -
[WIP] Rise of the Crone-Mother
I have been working on a series of D&D campaign adventures that tie together in a story arc called Rise of the Crone Mother.
In D&D rules, hags are witch-like creatures (like the witch from Hansel & Gretel) whose powers are augmented when they unite in covens of three. In this story arc, there are four different hag covens who have been united by a thirteenth hag to form a Grand Coven. Their goal is to try to resurrect the Crone-Mother, an ancient hag who is said to be the origin and progenitor of all hags.
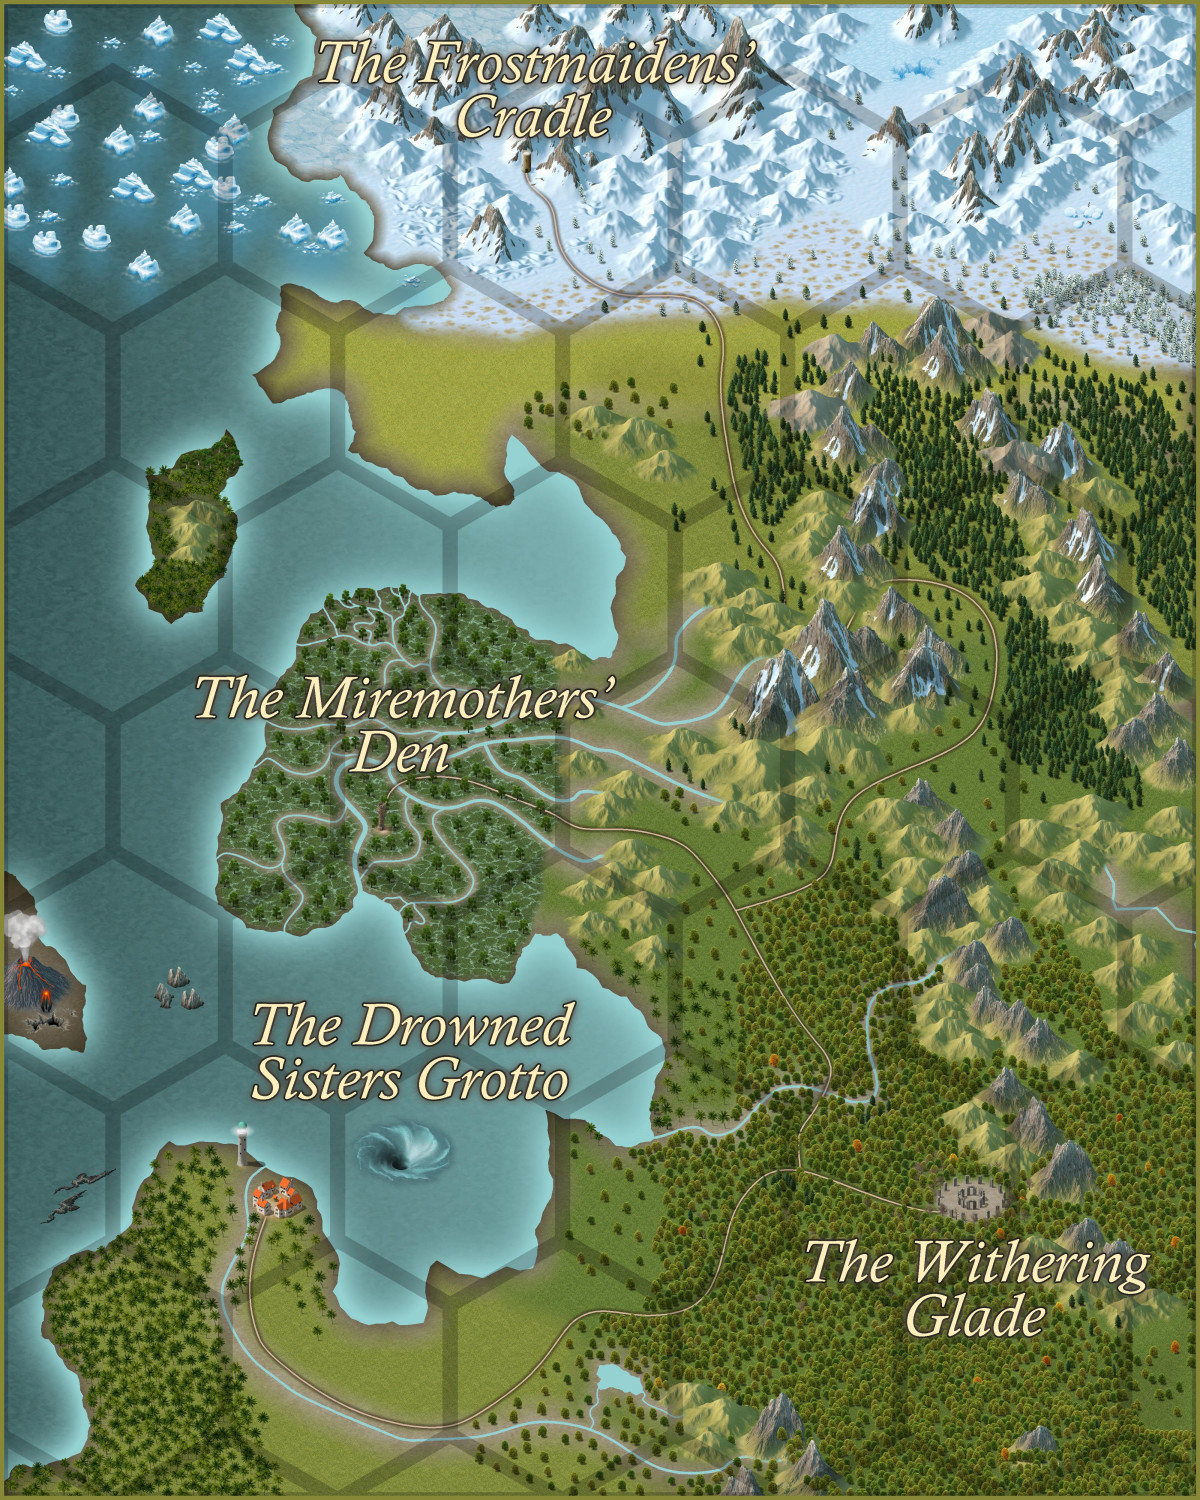
Each of the four covens will have different lairs:
- The Drowned Sisters’ Grotto: A coven of three hags in an underwater lair
- The Withering Glade: A coven of three hags deep within an overgrown forest
- The Miremothers’ Den: A coven of three hags with a lair in a foul swamp
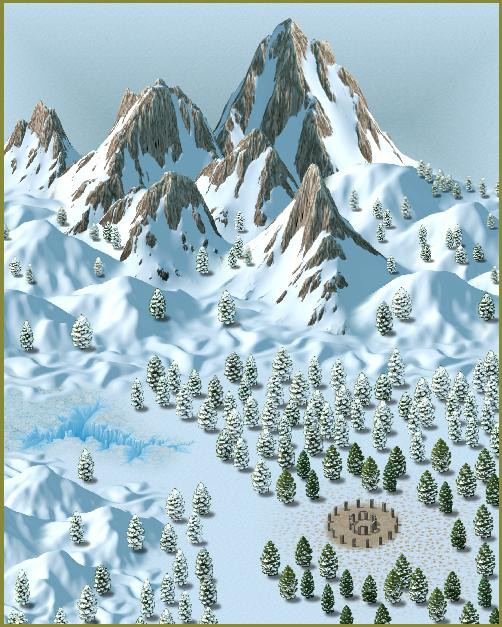
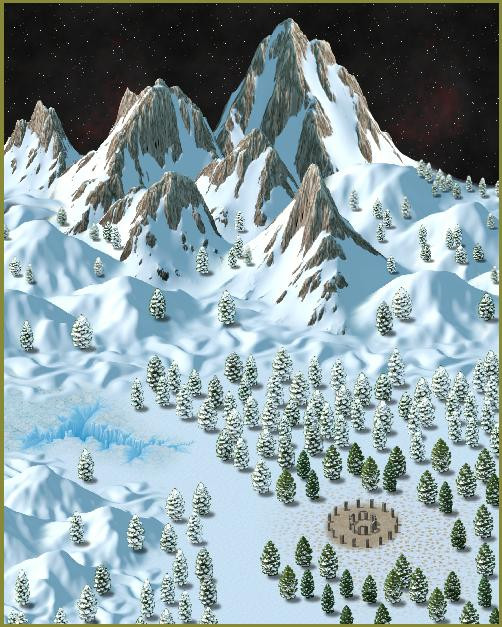
- The Frostmaidens’ Cradle: A coven of three hags high in snow-covered alpine mountains
- The Womb of Ashes: The arch-hag's volcanic lair where the ritual to resurrect the Crone-Mother will occur
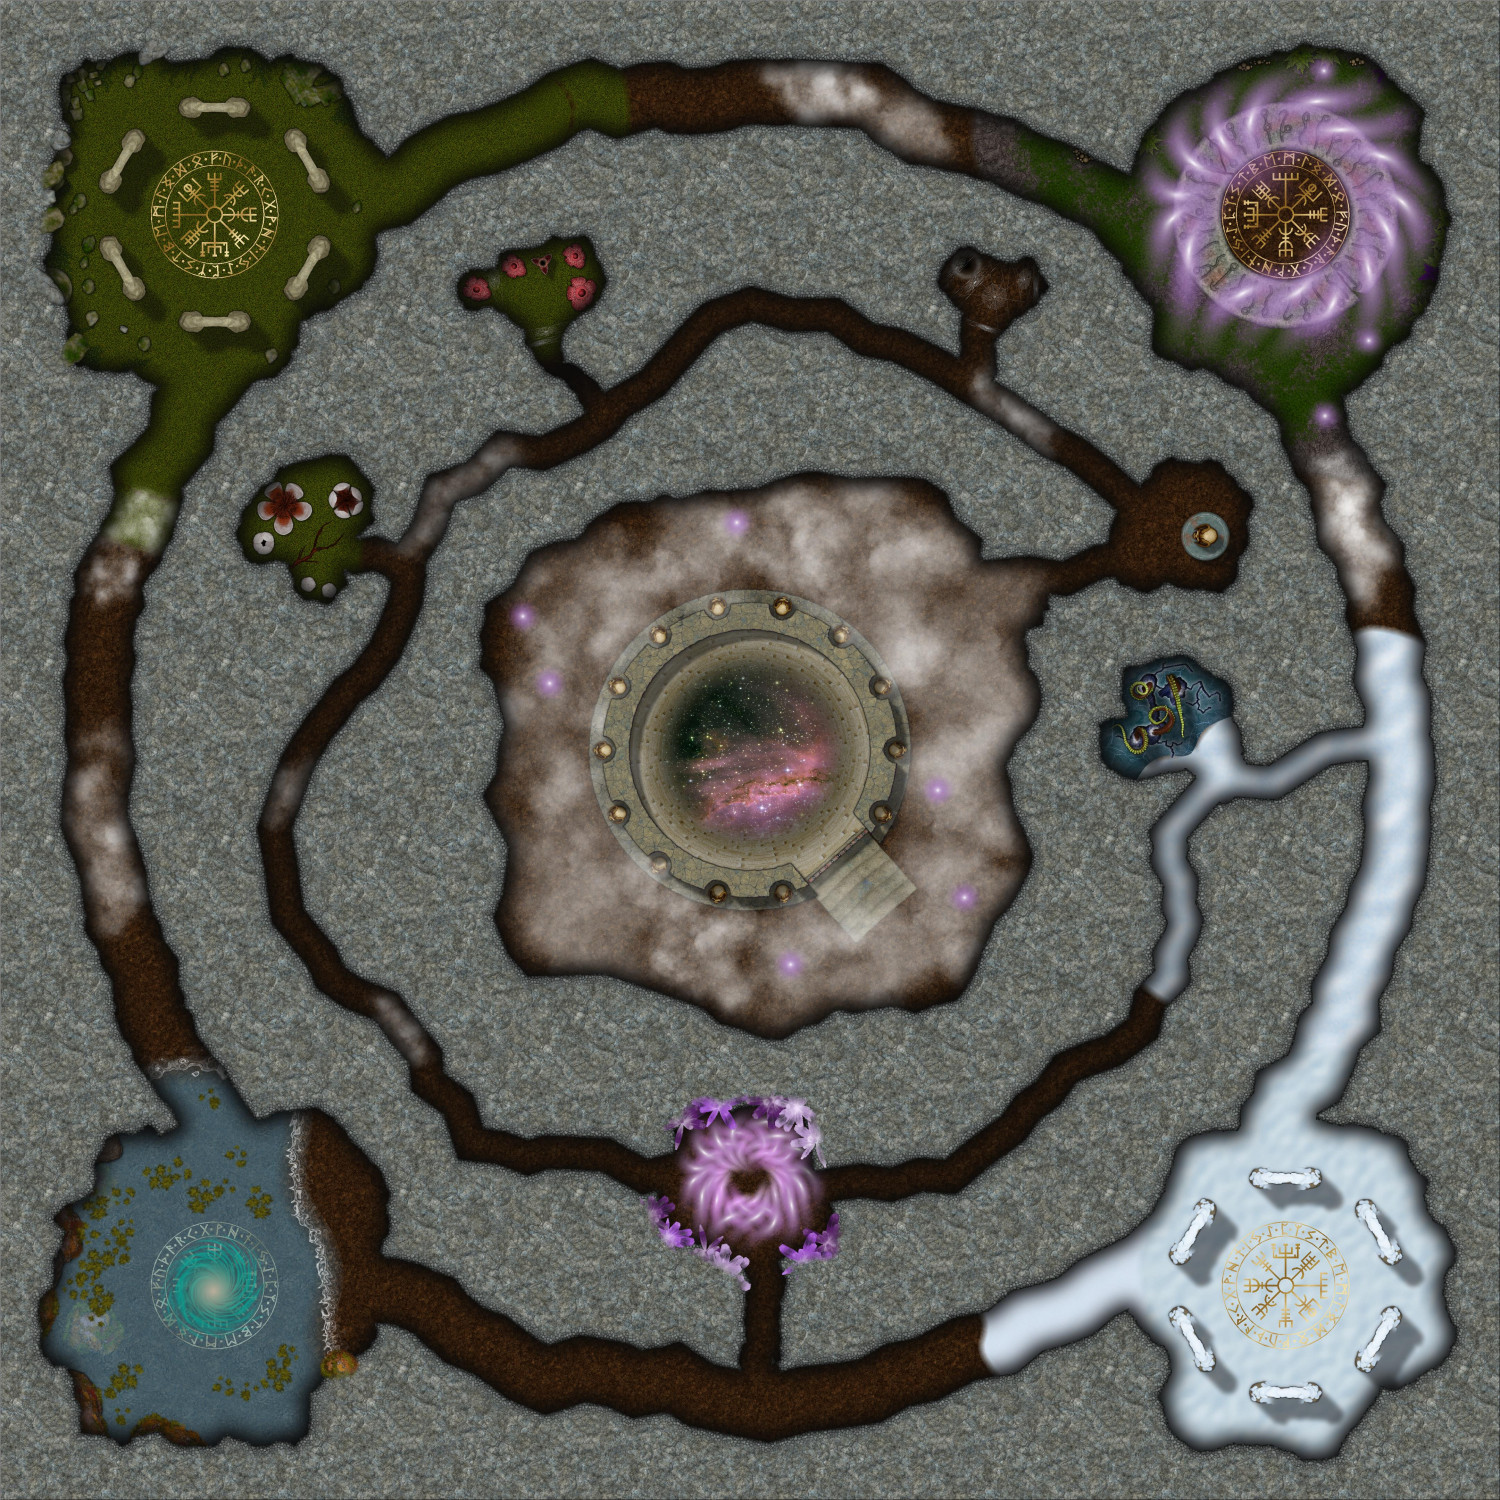
In addition to these five dungeon maps, there is an overland map for GMs who want their adventurers to travel from lair to lair, as well as an optional Web of the Crone-Mother, a sort of between-worlds nexus accessible from teleportation portals within each lair, allowing adventurers to quickly travel between them (if GMs want to skip travel time).
Overland
This is the overland map. Each hex grid is meant to represent one day's travel, but GMs can adjust that however they want if they want travel time to be faster or slower. (I know it doesn't make sense to have snowy mountains so close to a humid swamp, but chalk that up to hag magic.) It uses Sue's beautiful Spectrum Overland.
Web of the Crone-Mother
This optional map allows players to opportunity to choose which lair to go to next without having to travel over land. It is accessed from a teleportation portal in each coven's lair, but GMs could always skip this and have the portals transport the adventurers directly to the next lair. This map primarily uses Creepy Crypts with extensive assistance from Forest Trail, Winter Trail, and Marine Dungeons.
The connecting portals are in each of the four corners, starting with the sea hags' lair in the southwest corner and then continuing clockwise to the forest hags, swamp hags, and alpine hags. Lots of other encounters along the spidewebby route, including carnivorous plants, giant spiders, and a tentacle creature. In the very center, a great subterranean tower provides a gate that will hurtle players through the Astral Plane to the volcanic Womb of Ashes.


 and 2 others.
 -
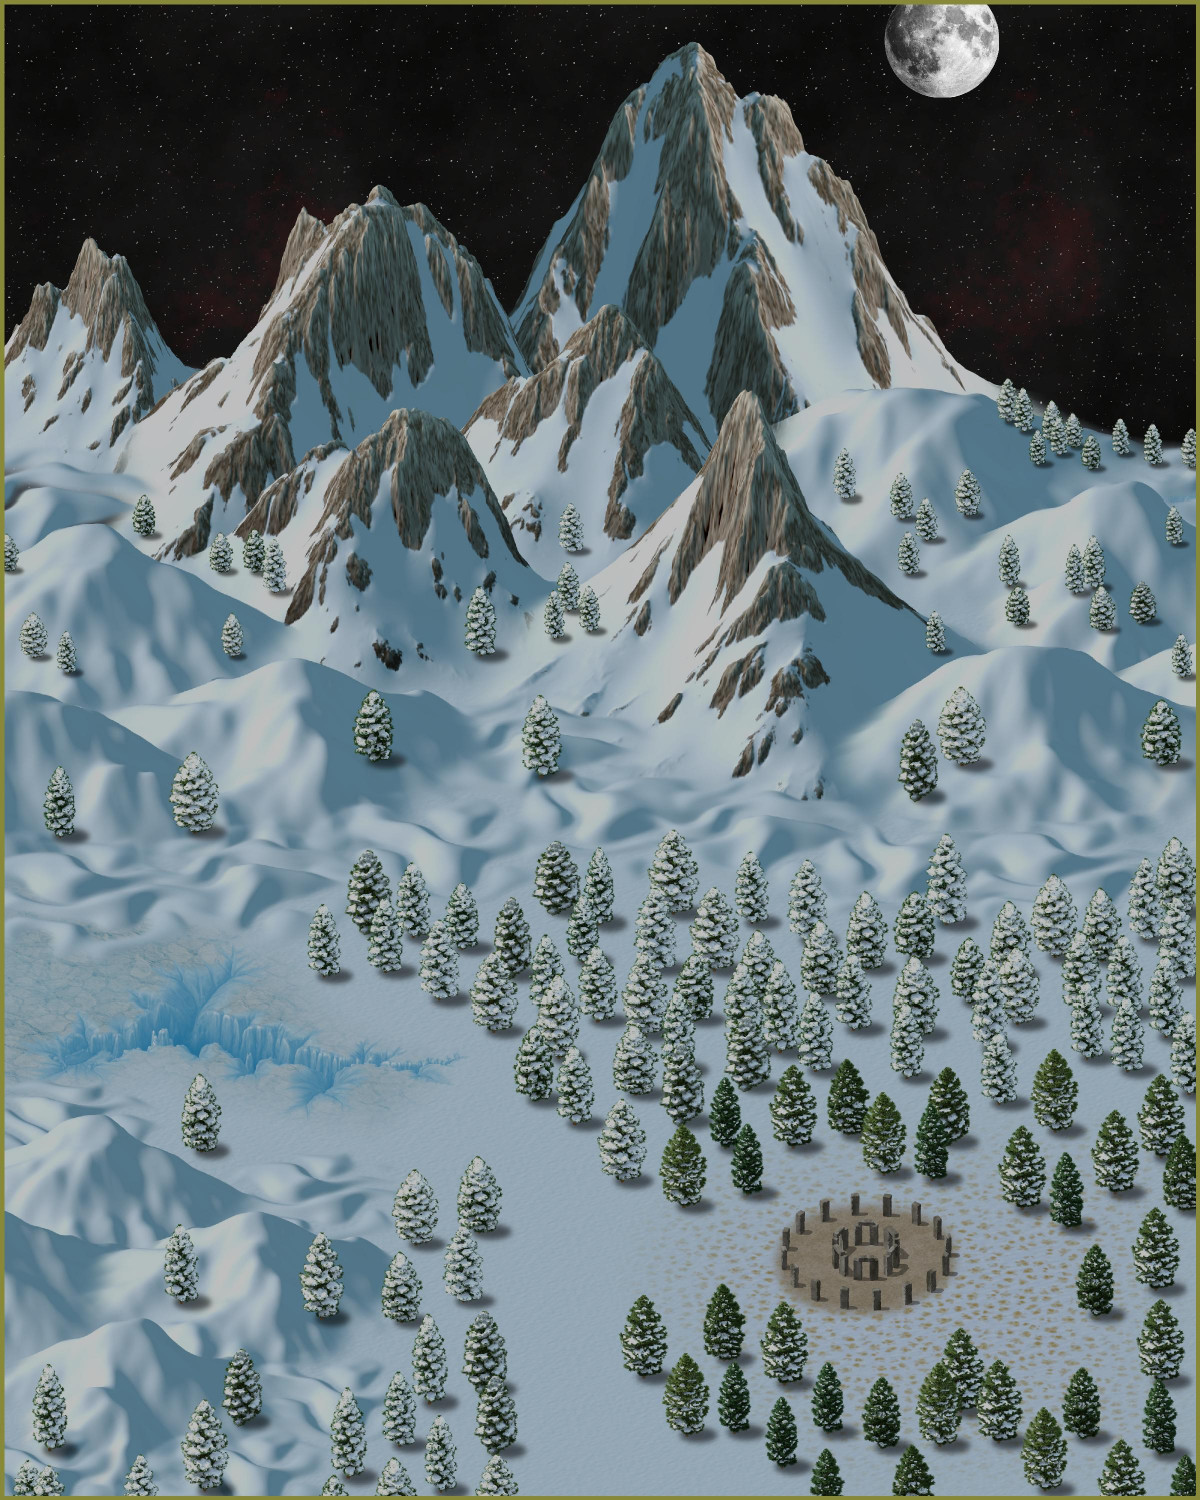
[WIP] Winter Solstice
I was going to hold off posting this until December, but I might use it to make Christmas cards, so decided I needed input sooner. (There may be other holiday maps coming, too -- a winter village celebrating yuletide, maybe even a Santa's Workshop?)
For this one, I designed a "Winter Solstice" scene using Spectrum Overland. I have attempted to do both daytime and nighttime versions. (This is the map I was seeking an image of the moon for.)
Here's the daytime version. I wanted to use the henge symbol (very solstice-y!) but at first paused because it's on a dirt background and there isn't a snowy version. Then I figured: maybe elven magic consecrates that area and protects it a bit from the weather, like Lothlórien and Rivendell. I added the tundra terrain below it, and the less snowy trees around it to show that the henge is a bit warmer than the rest. I love the ice fissure but maybe it's a little much? And I just noticed how large the hill between the mountains in the background and foreground are -- should I reduce those ones (or at least move them down a little)?
Anyway, I also tried to do a few nighttime variations. (For the night ones, I may change the border color to be black.)
Here's one with just stars, no moon. And it doesn't have lighting effects.
Here I've added a public domain image of the moon. Is it too realistic? Would the moon image in CA80 that Ricko recommended work better?
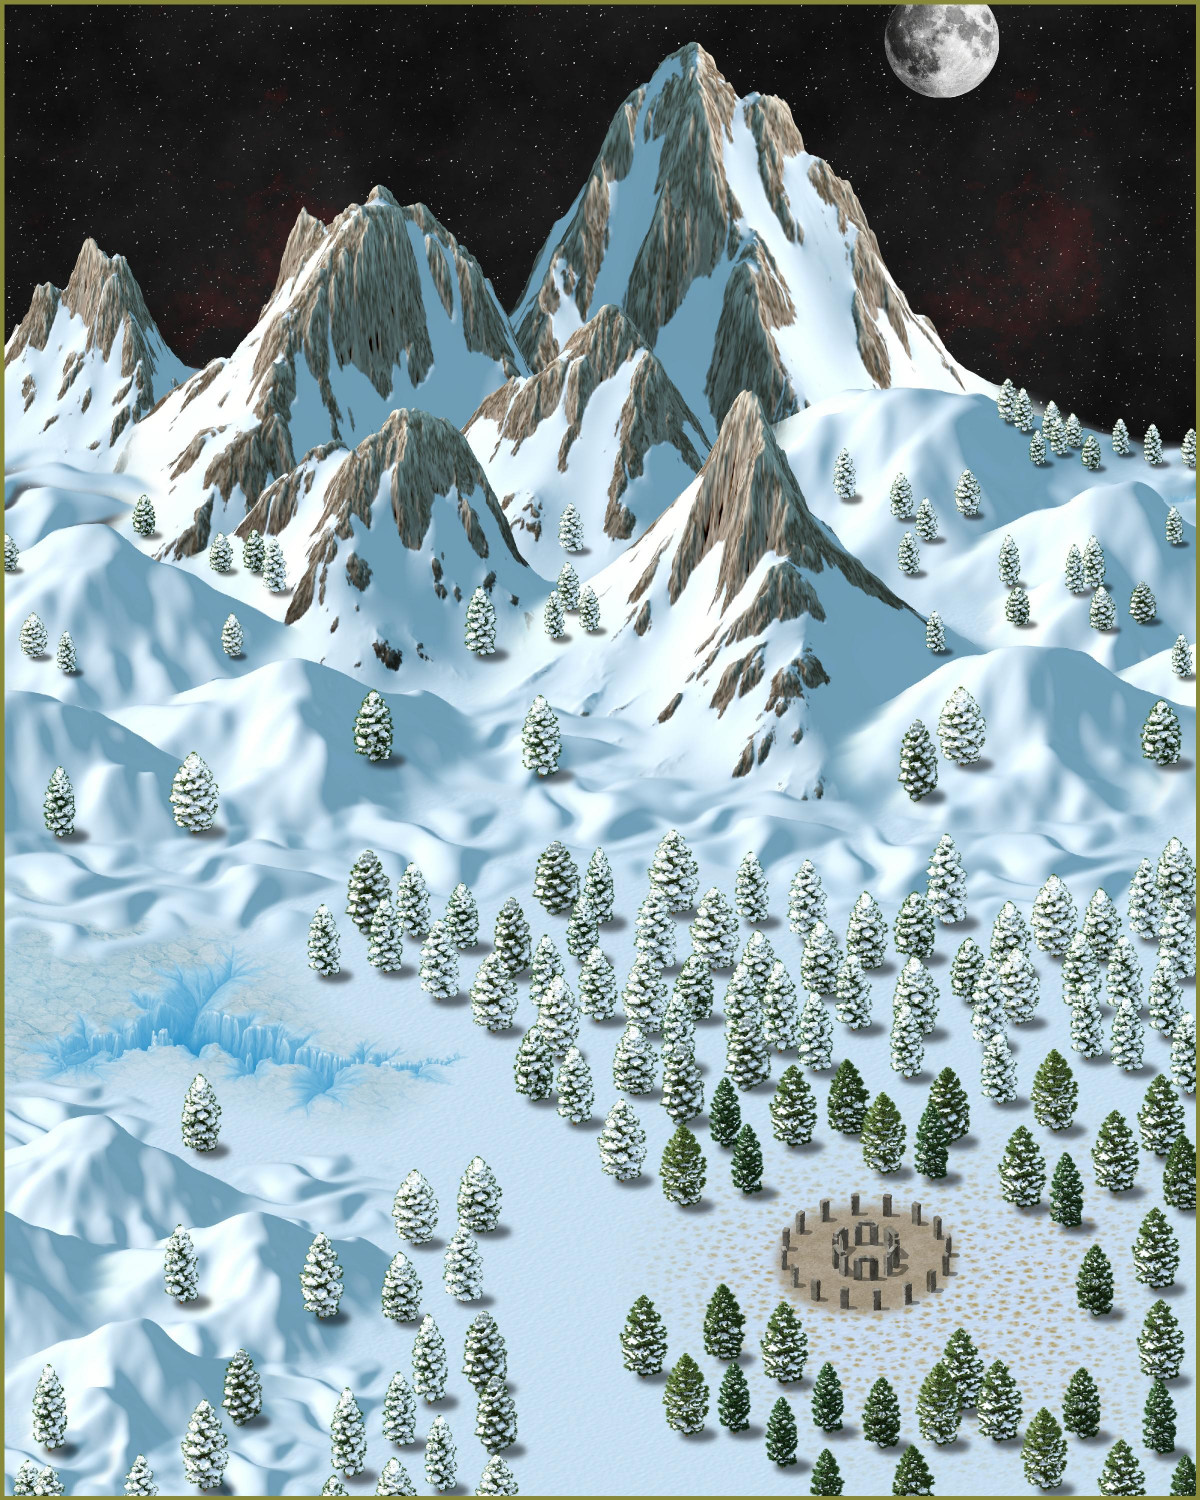
And here it is with nighttime lighting. (Since the symbols have built-in shadows, should I move the moon more to the left side?)
 and 2 others.
 -
[WIP] Atlas Contest - Vildural Village & Mines
Having done (in varying stages of "in progress" and not all submitted yet) an elven farming village, forest village, and underwater village, as well as a desert town, what other unusual village environment could I tackle. How about...underground?
I decided to build out my dwarven kingdom in order to find a home for a dwarven mining village. It ended up being more above-ground than below. I did it in the Mike Schley style because it's compatible with Monsen's Mines.
The village is more fortified like a town, but I figured that was more to protect the mine, but it's still a small village.
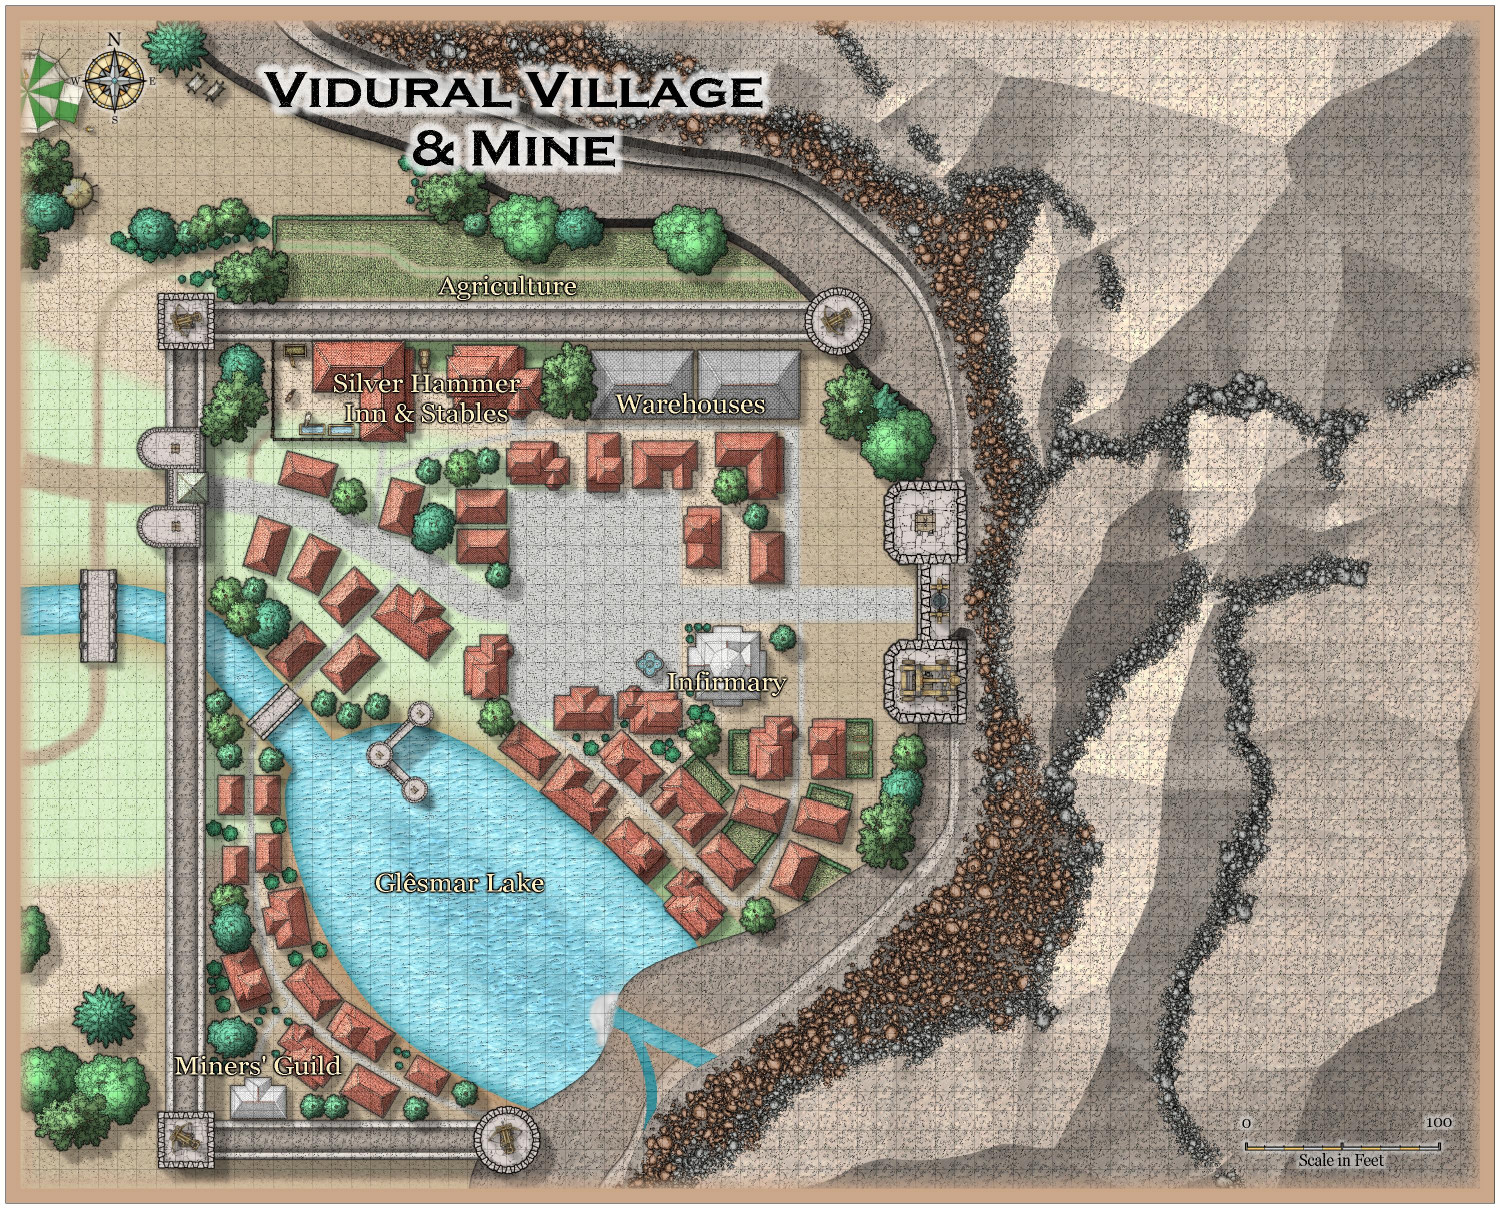
Villages don't usually have many specialized shops, so I didn't label any of the potential-retail buildings around the town square. There's a little bit of agriculture, and a few villagers have gardens, but most of the village's food is bought or traded with the wealth generated from the mines. Pretty much every family in the village has at least one family member who works in the mines, and anyone else who doesn't has some job that supports mine workers. The Miners' Guild is more like a union rather than a what we might think of as a guild, as it represents the workers rather than the mine's owners.
But no blacksmith in the village. That can be found in a (well-ventilated) space within the mines.
If we hide the "Roof" layer (that is, the top of the mountainside), we can peek into portions of the mine operations. (I still need to finish furnishing this area.) There's a temple used by the entire village, and a blacksmith. Miners can eat in the Miners' Mess Hall during the day, fed by those who work in the kitchens. There's a set of offices for the Mining Administration, where the mine's accounting and payroll are managed. One room has several locked cages to provide extra security for the mine's ore and treasury. In a pinch, it can also serve as the village jail. (One wonders if the mine administrators will come to regret putting the lockup in the treasury.) There's a washroom where miners can get cleaned up before going home, but it's mostly used by the dwarves who live underground.
The furnaces in the blacksmith's and next-door washroom also heats water. The dwarves have created a cunning pipe system throughout this level of the mines that brings both hot and cold water to the residential suites and the kitchen.
There are six luxury residential apartments underground. Most of the underground residents use the common washroom, but the Mine Administrator's family has their own private bathroom with bathtub.
 and 1 other.


