


Monsen
Monsen
About
- Username
- Monsen
- Joined
- Visits
- 723
- Last Active
- Roles
- Administrator
- Points
- 9,029
- Birthday
- May 14, 1976
- Location
- Bergen, Norway
- Website
- https://atlas.monsen.cc
- Real Name
- Remy Monsen
- Rank
- Cartographer
- Badges
- 27
Latest Images
-
Darklands City walls questions
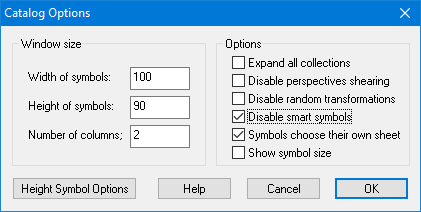
Also note that if Smart Symbols are disabled (Options button on top of symbol catalog) connecting symbols won't connect, but just behave as individual symbols.


-
Regular poly vs Irregular (shape)
Not sure exactly what you are referring to here. Polygons can be mirrored, but only along a straight line.
You may be thinking about using an offset, but if so, you'll need to draw one line, then making an offset from it, and then join them together with Combine Paths and Close Poly to create an actual polygon, and not just a series of lines.

-
Passing of Jerry Thiel
Jerry was a dedicated mapper, and loved making maps for the atlas. He was a valuable community member that will be missed.
All his atlas maps can be found from the search page by searching for Jerry Thiel as the author.


-
Black Screen with Install of Latest Schley Monthly Assets
The black background usually means that CC3+ cannot find the map file it is trying to load, so it simply uses the defaults (which is a black background). That in itself is nothing to worry about, as the background is controlled on a map by map basis. Everything will be fine when you load or start a new map.
Of course, the example map should have been loaded, so that seems to indicate you didn't get that file installed. Which may or may not indicate that the rest of the addon wasn't installed properly either. Best way to see that is to try to open the symbol catalog manually and see if it exists, and no red crosses in it...
Now, I see it is trying to show the no-SS6 version of the example, since I guess you don't have SS6, and I am guessing someone forgot to include that file in the installer (or gave it the wrong name), and the rest is fine..

-
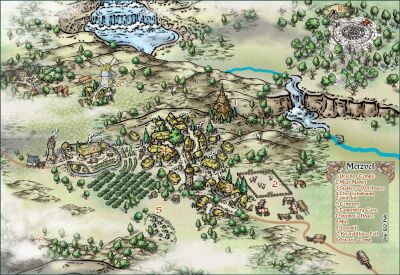
Community Atlas - Forlorn Archipelago - The Bleakness - Dungeon of the Dragon
Before I forget again, I don't see any difference visually for me. Since some of you can see a difference, would you mind explaining it to me ? Thank you very much.
Straight polygons have very visually long straight edges and sharp corners. One can increase the fractalization level to reduce the length of the straight lines, but unless you fracatalize a lot, it is very visible.
Smooth polys doesn't have a single straight edge or single corner, it is all curves. This makes a huge difference to the map, because all those straight lines and corners make it look very artificial, while the softer shapes of the smooth poly makes it much more natural.
If you have applied edge fade, it evens out the difference a bit, especially since edge fade will turn those corners into more rounded shapes, and can sometimes be just as good as alternative, but it depends on the map and the settings.
