


Monsen
Monsen
About
- Username
- Monsen
- Joined
- Visits
- 723
- Last Active
- Roles
- Administrator
- Points
- 9,029
- Birthday
- May 14, 1976
- Location
- Bergen, Norway
- Website
- https://atlas.monsen.cc
- Real Name
- Remy Monsen
- Rank
- Cartographer
- Badges
- 27
Latest Images
-
Style Guides
Note that the file structure for CC3+ is exactly the same as for CC3, with one critical difference. While CC3 kept all the data files in it's installation directory along the actual program files, CC3+ instead puts all the data files in a separate directory, C:\ProgramData\Profantasy\CC3Plus by default, insteaf of the installation directory (C:\Program Files (x86)\Profantasy\CC3Plus). You'll find everything you used to find in the installation directory in the data directory.


-
Help with Fonts
as i have opened and resaved the map many times with the Calligraphic font over and over so Listing would show that font now, right?
No, opening and saving doesn't matter. CC3+ doesn't care if you work on a map with a font that currently isn't installed. The text entity will still remember what font it was defined with originally (or changed to if you use change properties on the entity, obviously). But the visual replacement font is just a visual thing when it can't find the font, and it will display the text using Arial instead of the actual font.
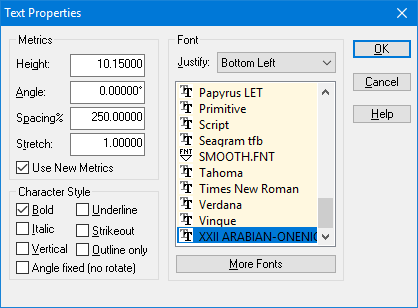
Are you sure that that Calligraphic font isn't what you are after? If you don't have it installed, maps will show using Arial, like in my screenshot above, but CC3+ will still list it as the actual font. (Just as in my example above, the text is clearly plain arial, but listed as XXII Arabian-Onenightstand, a font I don't currently have installed, which makes it look very plain indeed until you consider that isn't the font used in the display because I don't have it)

-
Help with Fonts
List should provide you with the actual font used. CC3+ uses Arial as a replacement font, so if it shows Calligraphic, that's the actual font used.
See here for an example from my own system where I am missing the font used in the map:
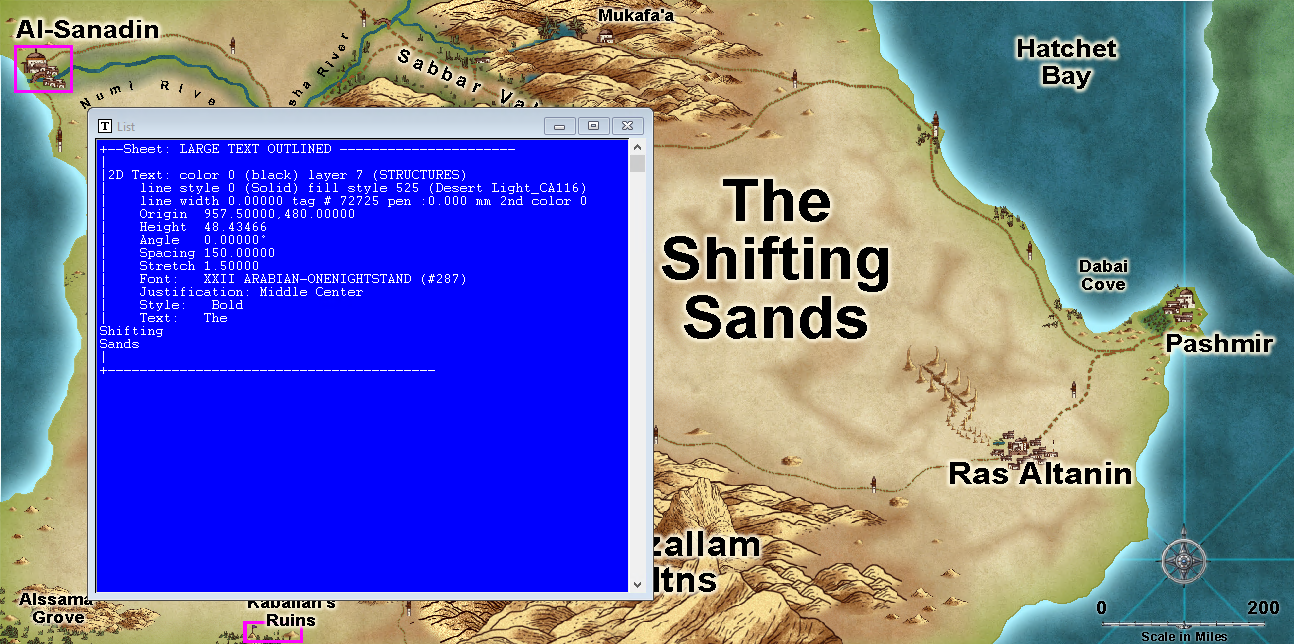
As you can see, it correctly identifies it even if it is displayed using Arial.
There is also another way to see what fonts are defined in a map though, just hit :CC2TSPEC:, the dialog shows all the font referenced from the map. You can't see what font is used for what text from here, and it shows all the fonts defined in the map, which doesn't mean you have actually used them, but it should be enough to help.
-
Is there a way to make multipolys out of broken ellipses?
This is a bit of a tricky problem.
The issues you see in figure 3 is because multipolies based what their display on the number of overlapping entities. And while a single ellipse on top of a white background will be exactly two entities, so it will generate a hole in the circle, wherever two ellipses overlap, you will have three entities which results in a solid surface at those locations.
Now, as you discovered, cutting and trimming isn't really a solution here. This is because the way CC3+ handles curves. The nodes of a curve does not lie along the curve itself, and arcs do not have nodes at all, they are a result of pure math. If you try to work with wide lines instead, you get other issues because you can't trim to the actual width of a line since that is just a property, the trim hits the center of the line.
I think the attached version should be what you are asking for though. I started from your figure 2 and converted those arcs to smooth lines. It takes a few steps per line to do this, but basically, split it open so it turns into an arch, use line to path on it, split it open again because the last command closes it, and then use straight to smooth on it. This needs to be done on all six lines individually.
Once that is done, you can start trimming them. It can be advantageous to split them in the middle of the intersections before trimming, and after that you can trim using trim to entity, trim to intersection, or just trim and targeting the endpoint of the other line. Generally, if trim to intersection fails (sometimes it does), a simple trim to the endpoint works instead.


-
Pete Fenlon Revisited symbols
I did some testing here, and I found I can replicate the issue. It is a problem that happens when you run CC3+ on top of an arm-based version of Windows (Which you do, since your new Mac is using one of the new M-chips, which are arm-chips).
Technically, CC3+ cannot run on arm-based computers at all, but Windows (and Macs) comes with a translation layer that allows the software to run, even if it was made for a different processor architecture.
However, there seem to be some kind of glitch that occur in certain situations (those particular symbols for example) that probably is due to this translation layer.
In other words, yes, it is probably something with your setup that causes this, but it is not the CC3+ installation itself that is the problem, and probably nothing you can do about this right now. This is unlikely to be some quick fix.
