


Monsen
Monsen
About
- Username
- Monsen
- Joined
- Visits
- 723
- Last Active
- Roles
- Administrator
- Points
- 9,029
- Birthday
- May 14, 1976
- Location
- Bergen, Norway
- Website
- https://atlas.monsen.cc
- Real Name
- Remy Monsen
- Rank
- Cartographer
- Badges
- 27
Latest Images
-
White Background for Traveller subsector maps
It is a template file, so it won't show in the CC3+ open dialog unless you change the file type filter to show templates instead of maps. You would normally using the new map wizard (choose a pre-defined template) to create a map from it though, not opening it directly

-
Trying out a Planescape style
Nice use of the color key effect there. Very elegant solution to the problem.


-
Map border not lined up with Snap after scale
To have it scale in just a specific direction, put the scale center on the opposite corner/edge. Scaling expands from the scale center, so if it is in the center of the drawing, it will scale equally in all direction, but if the scale center is in the top left corner, it will only expand right & down.
If you scaled up by 1.05 and want it to scale it down again, you simply scale by 1 divided by 1.05 (= 0.95238095238095). Note that you can type that formula directly on the command line, when CC3+ asks for the scale, answering with 1/1.05 is perfectly legal. Note that it may actually be impossible to scale it back with 100% precision. This is due to how computers handle numbers, and if you try doing 1 divided by 1.05 on a calculator, you can see the number have an infinite number of decimals, which basically mean it can't be represented with perfect accuracy in a computer.
To scale something up so that it still ends on the snap grid, you need to calculate based on the original size. For example, to make your shape still fit that 5' grid, the resulting size must obviously be divisible by 5. So if the original is 100', scaling by 1.05 would work (since 100x1.05 is 105, which is divisible by 5), but if it is 80, 1.05 won't work (since 80x1.05 is 84, which is not divisible by 5[, nor by 1.25])


-
Loopysue Hits 10,000 Posts!
Hmm... You're pretty bad at math..... ;-)
![[Deleted User]](https://secure.gravatar.com/avatar/c75d9a245b74d9c59be0999ea81ca541/?default=https%3A%2F%2Fvanillicon.com%2F92add7f8c954488718110edc4896ad39_200.png&rating=g&size=200)

-
Harper Street Gardens (Ink & Brown Wash-like)
Stunning as usual. What monsters hide in there since an initiative roll was called for? Some dryads wishing to take revenge on whomever stole those canopies?

-
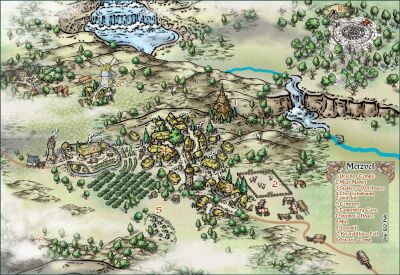
CA style development - "Darklands City" (issues for September and December 2021)
Graveyard components (graves, tombs, mausoleums, fencing/gate). Both in good and broken down/overgrown versions.
Ships. Floating and wrecked.
Ruined keep/tower
Horses. Living, zombie and skeletal.
Wagons for said horses.
-
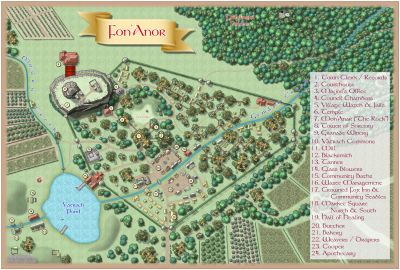
CA style development - "Darklands City" (issues for September and December 2021)
Simple wooden bridges (whole, partially ruined, and ruined)
Tents/market stalls
More options for paving
-
Harper Street Gardens (Ink & Brown Wash-like)
I'll go for the DD's.
-
Trace option missing from Polygon in Overland maps
The basic tools (from the right hand buttons) doesn't support advanced features like trace. This is available when using drawing tools (:CC2DRAWTOOLS:)

-
Trace option missing from Polygon in Overland maps
- Not following you here. Where did you find a cut polygon option?
- Yes, creating your own tool will work fine. Just remember a tool will belong to the current style, the tool won't automatically be available in other map styles unless you manually load the tools from another style.
