Wyvern
Wyvern
About
- Username
- Wyvern
- Joined
- Visits
- 3,238
- Last Active
- Roles
- Member
- Points
- 5,515
- Rank
- Cartographer
- Badges
- 24
Latest Images


-
The 'NoDucks' version 3
I think "chook" originated with some dialects of English. "Chuck" is a term of endearment still used in parts of northern England, for instance, which derives from the same source, as a variant on "chick" as an abbreviation for "chicken", or from "chick" as being a young chicken. Online sources seem to cover only the modern Australian option as in-use still, however.
And here was me thinking "duck down" was an urgent warning...

-
Scale issues with a metric map
...Thank you France for 'inventing' the metric system.
Well, technically, it was a Scot, James Watt, who advocated a standardised international decimal system of scientific measurements in 1783, and what we now recognise as the whole series of SI units, sometimes colloquially referred to as the "metric system", was the product of a great many people in various parts of the world over many years from the 18th to 20th centuries, with numerous variant definitions even for the metre during that time. What's now considered that metric system, the formal international adoption of the SI units in fact, didn't happen until 1960, and that Système International continues to evolve.
Sadly, there isn't a suitable metric definition for such pedantry though ??
-
Community Atlas 500th map and 4 year anniversary competition with prizes.
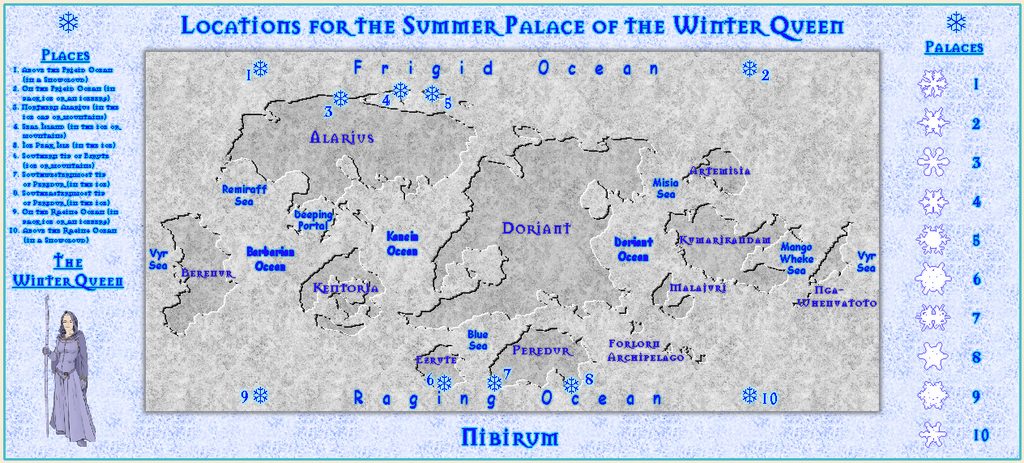
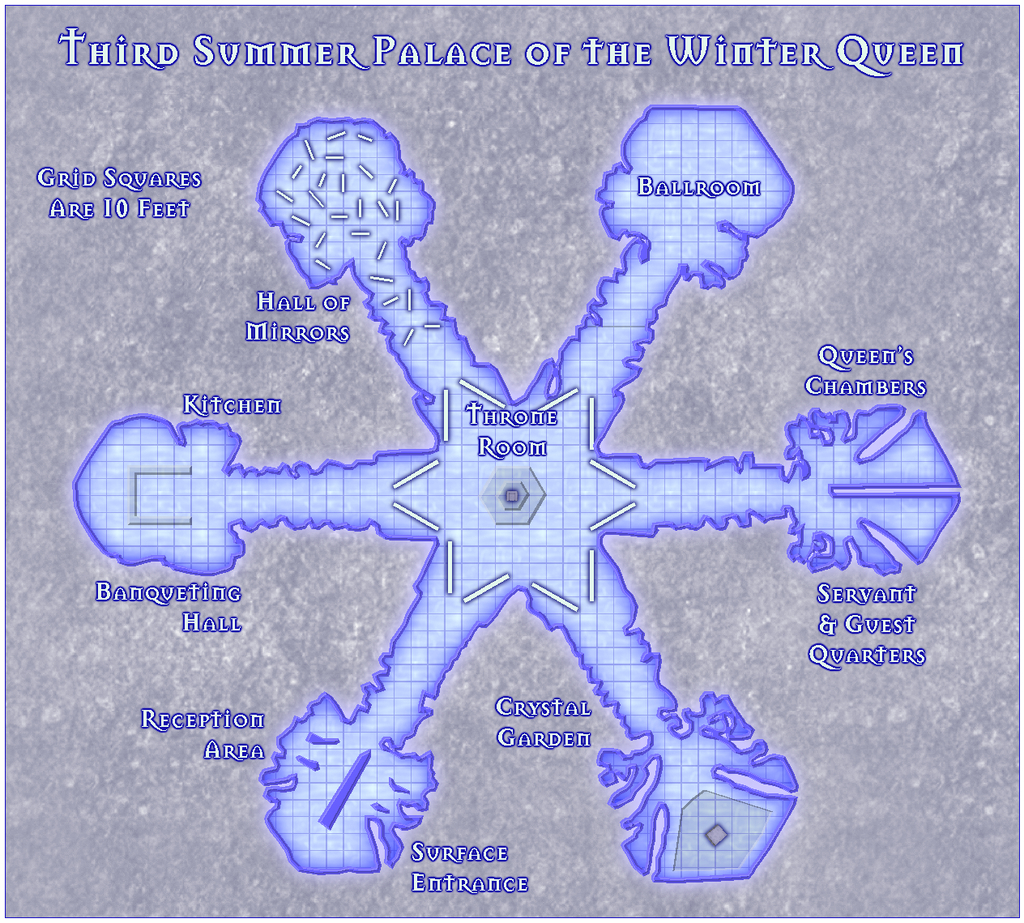
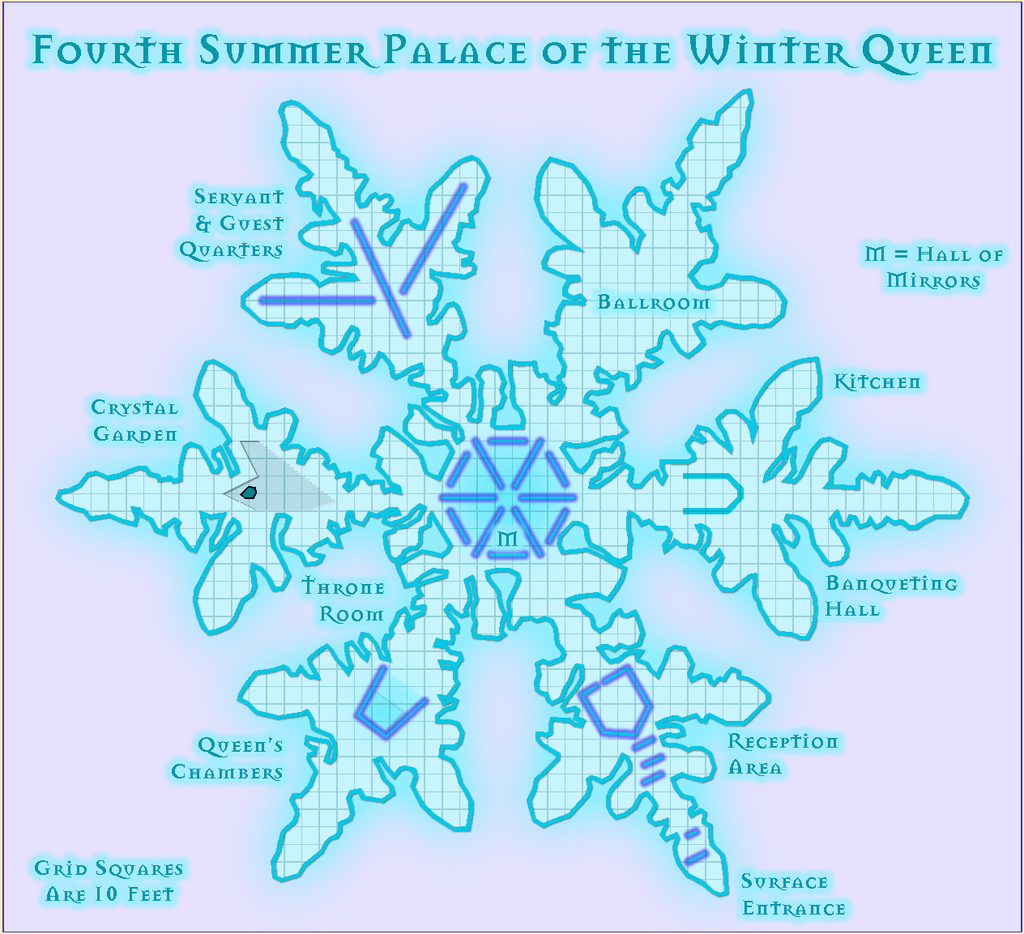
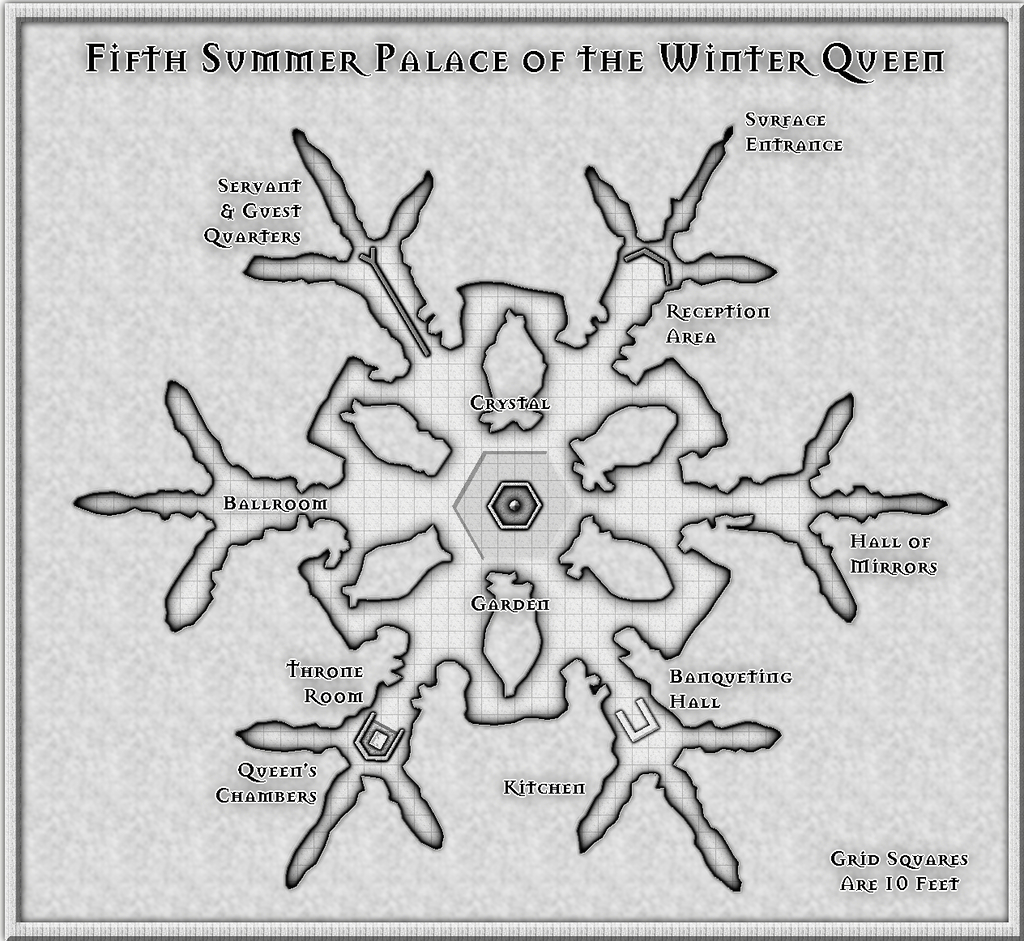
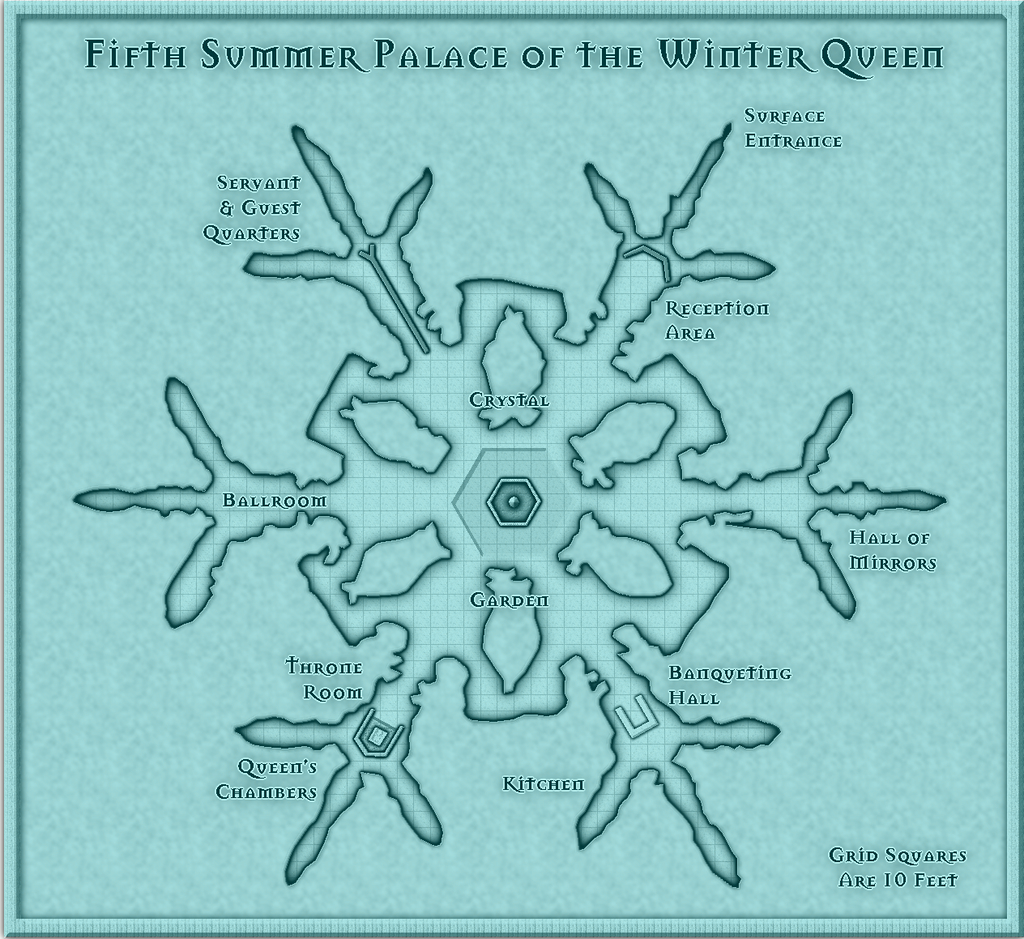
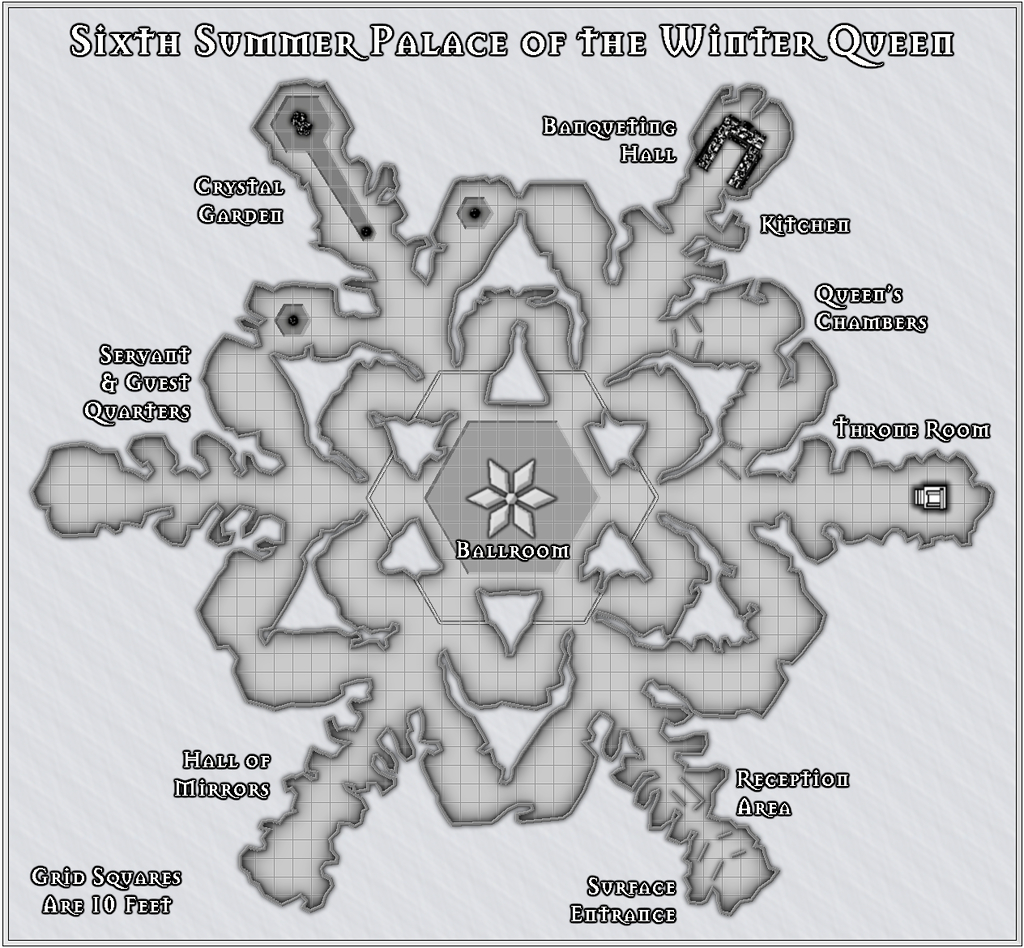
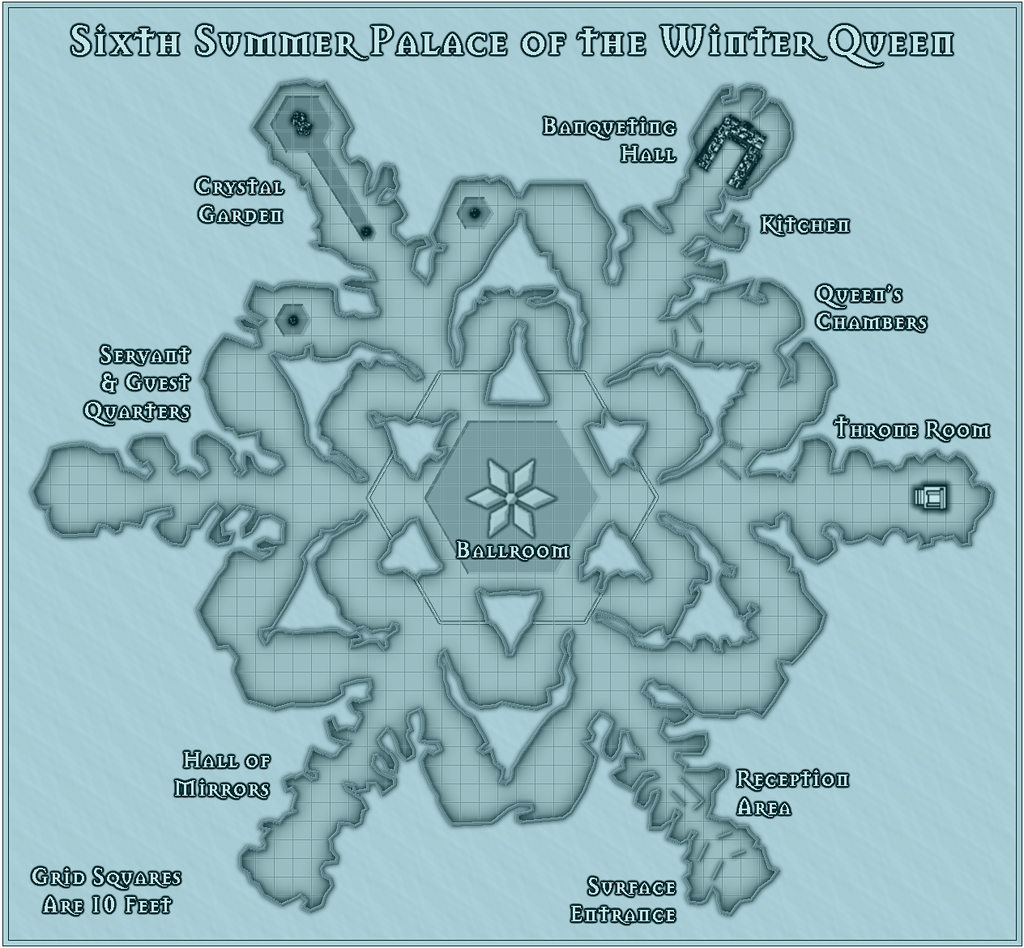
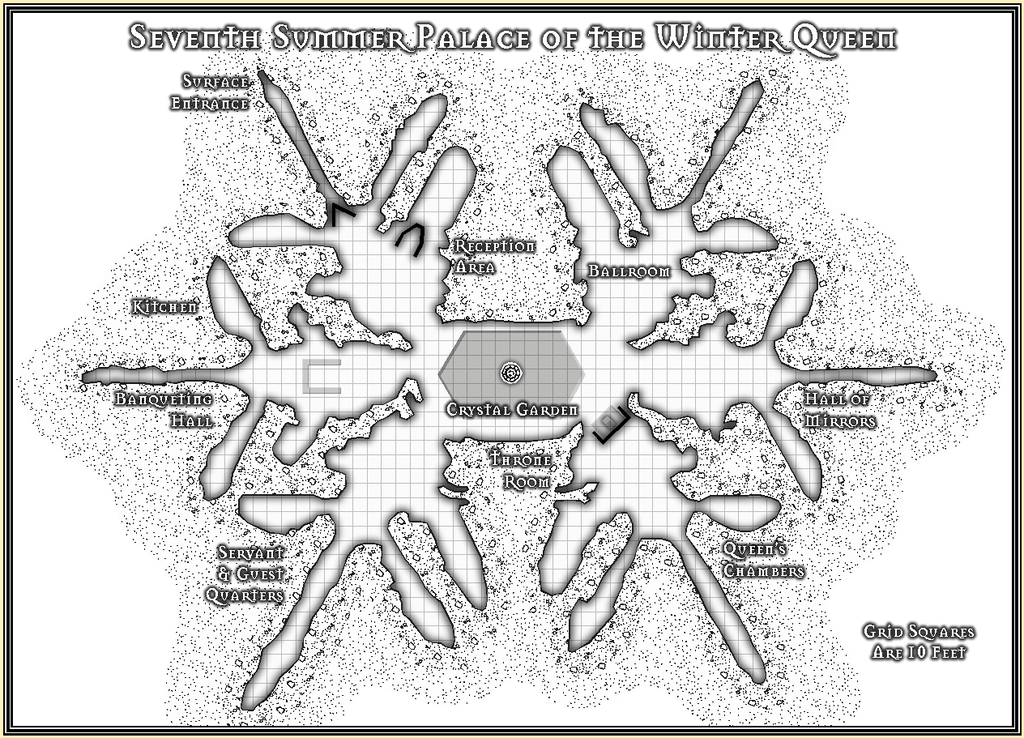
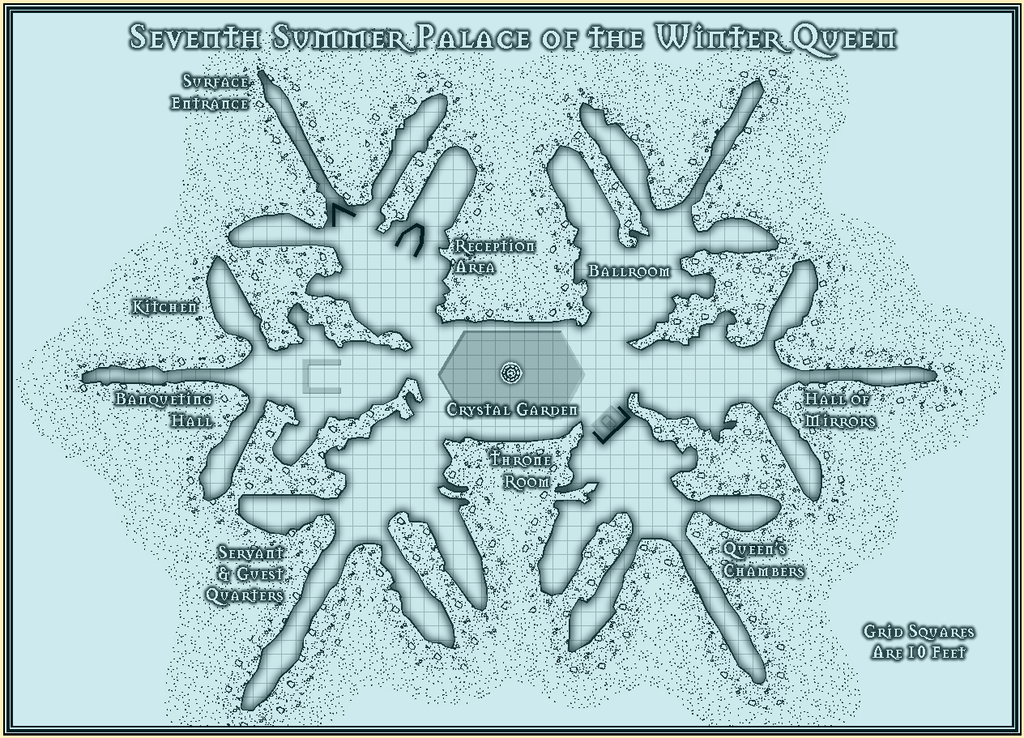
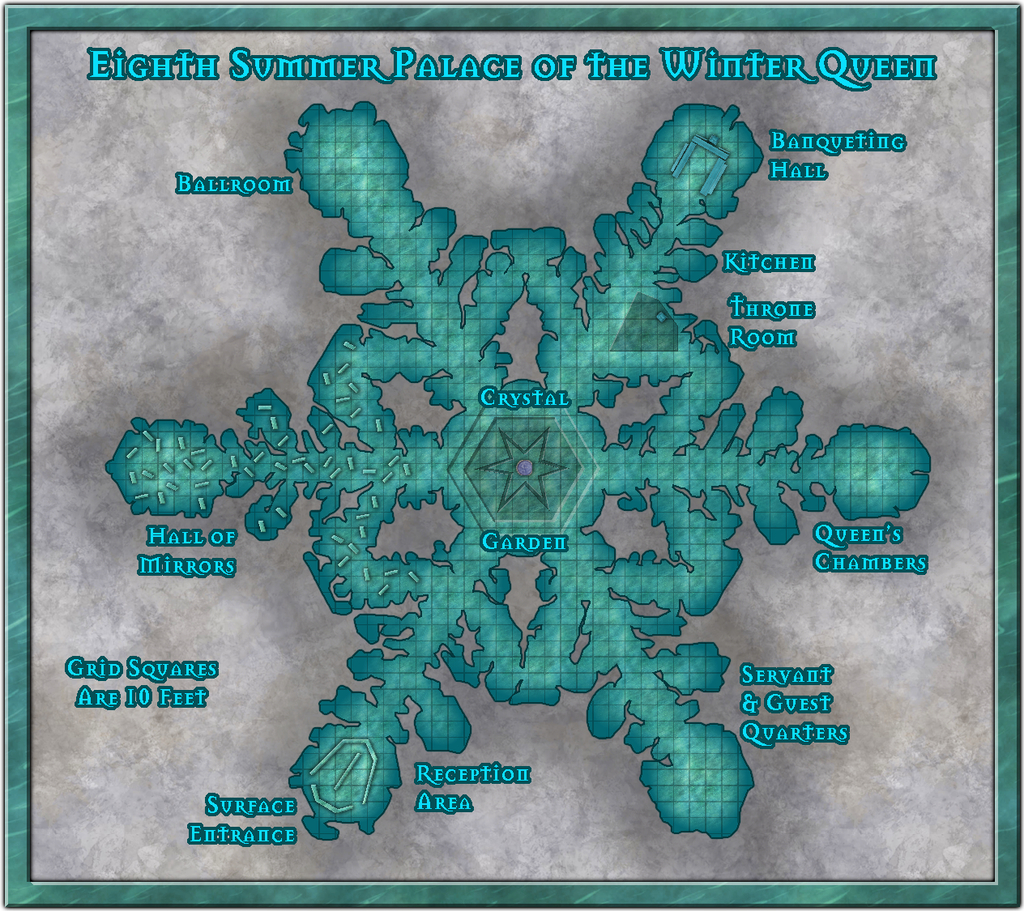
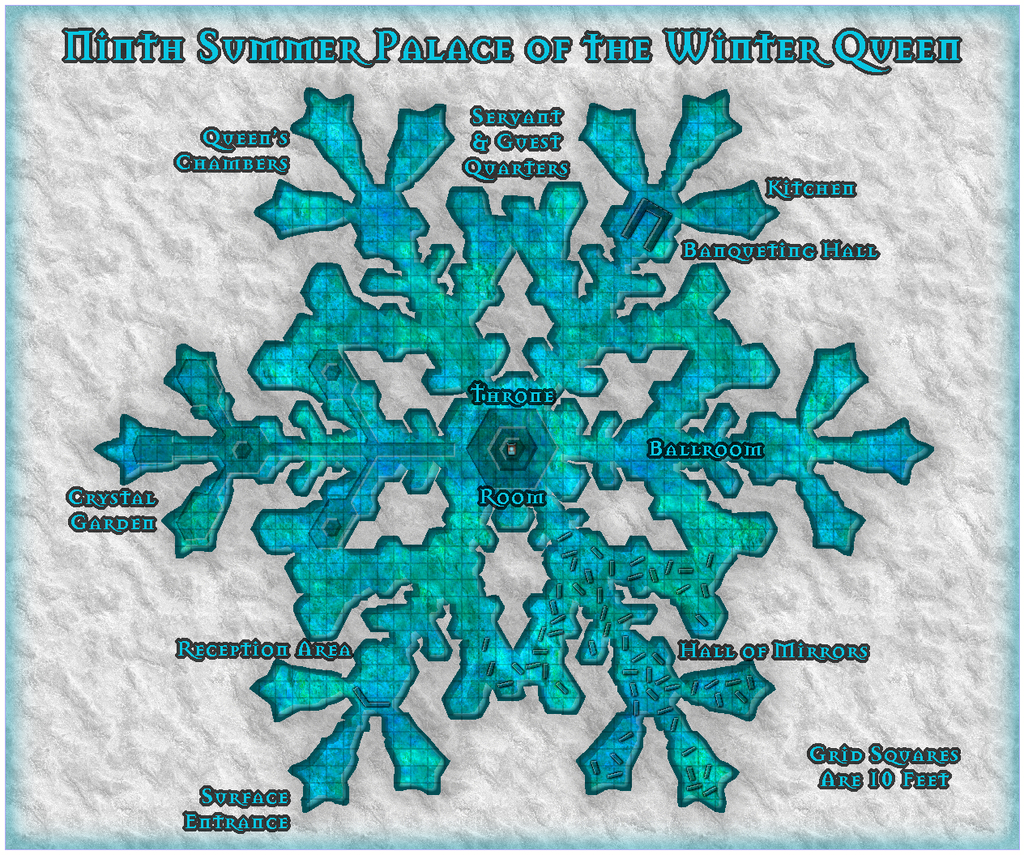
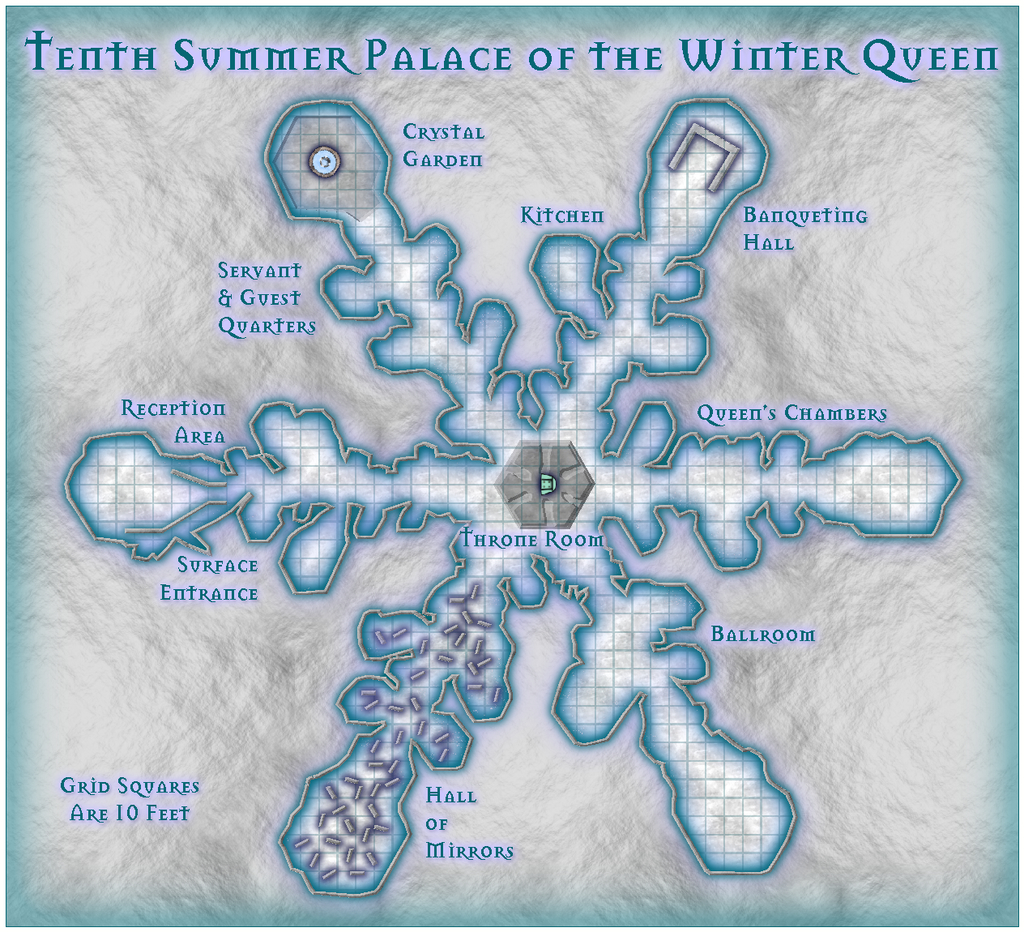
So, here are my submissions for this 500th map and anniversary contest, The Summer Palace of the Winter Queen. For the contest, these should be considered as a single entry, incidentally; I'm not trying to "stuff the ballot box" with a multiple series of maps here ?!
There's a WIP thread elsewhere on the Forum which gives more details on this set, and the construction process in places, and if all goes to plan, I should be adding higher-res versions of all twelve maps to the Gallery once I've finished this post here. Never done that before, however, so we shall see!
As there is an additional pair of detailing note files to accompany these maps for their final Atlas versions, as well as the usual Atlas submission notes to provide for Remy, I'll send the full set of FCWs, PDF and text files to @Monsen as a separate private e-mail. The FCW files are though included below, following the rules of this contest.
Note that Palaces 5, 6 & 7 come in two versions, the vanilla B&W ones and those with a blue screen superimposed.
Whew!?

![[Deleted User]](https://secure.gravatar.com/avatar/c75d9a245b74d9c59be0999ea81ca541/?default=https%3A%2F%2Fvanillicon.com%2F92add7f8c954488718110edc4896ad39_200.png&rating=g&size=200)


 and 2 others.
 -
Desert map for a commission
Sorry Quenten, I'm not sure there's enough information here to make detailed real-world comparisons with to suggest possible sea currents and prevailing winds.
The fairly narrow global belts of desert right across both northern and southern hemispheres suggests there's something odd happening generally, given the vast expanse of oceans here, which in many places are a lot deeper over vaster areas than Earth's (scarcely any part of Earth's oceans are deeper than 8,000 metres, for instance). That should suggest there'd be plenty of water available for rainfall everywhere, especially on any near-coastal areas where the prevailing winds are onshore. If the planet rotates in the same direction as Earth, that should imply west-facing coasts would be more likely to see higher rainfall tallies, but it looks as if it's more the east-facing ones that are somewhat favoured by this (albeit dependent on the prevailing winds, however).
Aside from the rotation issue, it might be useful to add some latitude lines, such as for whatever latitudes the tropics are at, the equator and polar circles, for example, and also some indication as to what parameters were used to generate the climate regimes (albeit with the latter, you could probably work out for yourself what the more likely prevailing winds at least might be).
-
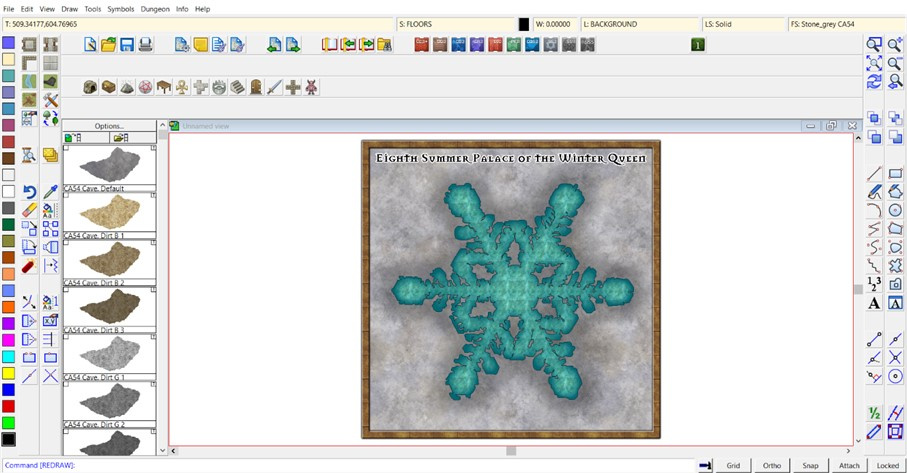
Community Atlas competition entry: The Summer Palace of the Winter Queen
Bit of an excursus today. I've never really done full "works-in-progress" reports on the Forum here, chiefly because when I'm working on a map, I'm not thinking about anything else - such as how I've got to the point I have - which means taking screenshots or jotting down notes along the way so others might be able to follow the process is quite alien to me. However, a contest is nothing if not a chance to stretch beyond the expected bounds, so here are some thoughts on how I constructed the basis of Palace 8 in this series.
Partly, this came about because with working on such a series of similar yet different maps, each using an imported bitmap image as the template, I've established a pattern for doing so, drawing on previous experience, as a lot of my earlier mapping has involved copying layouts from images into CC3+.
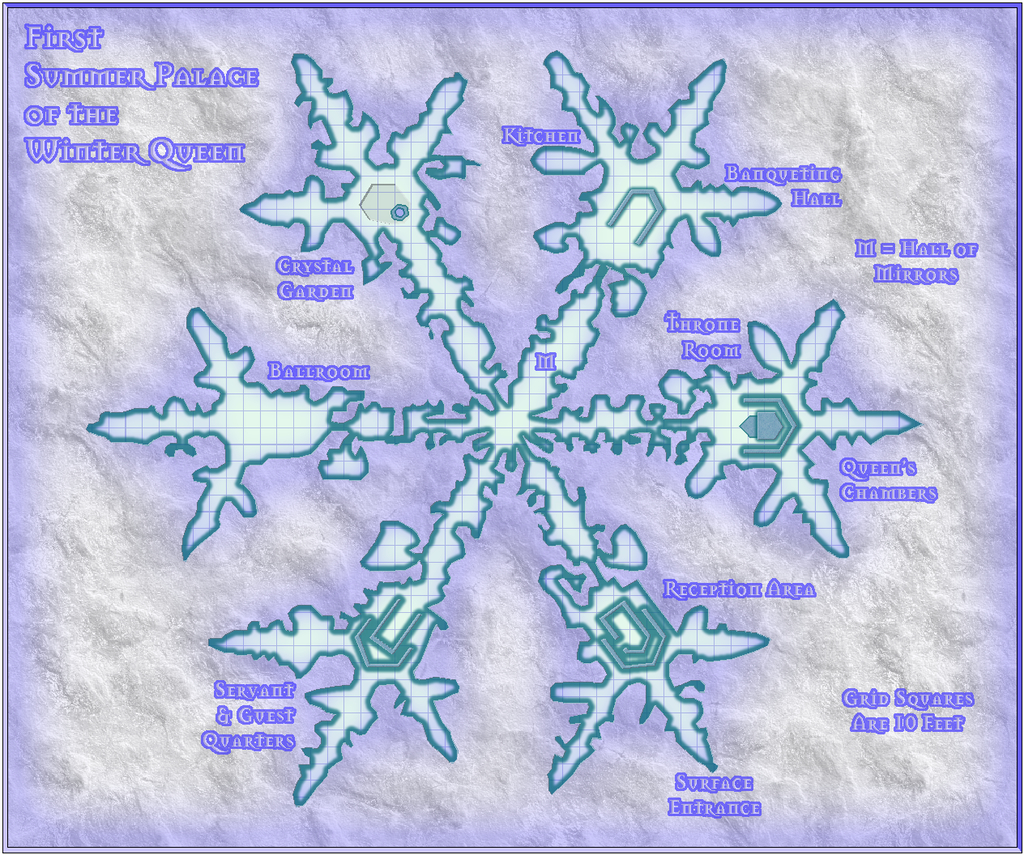
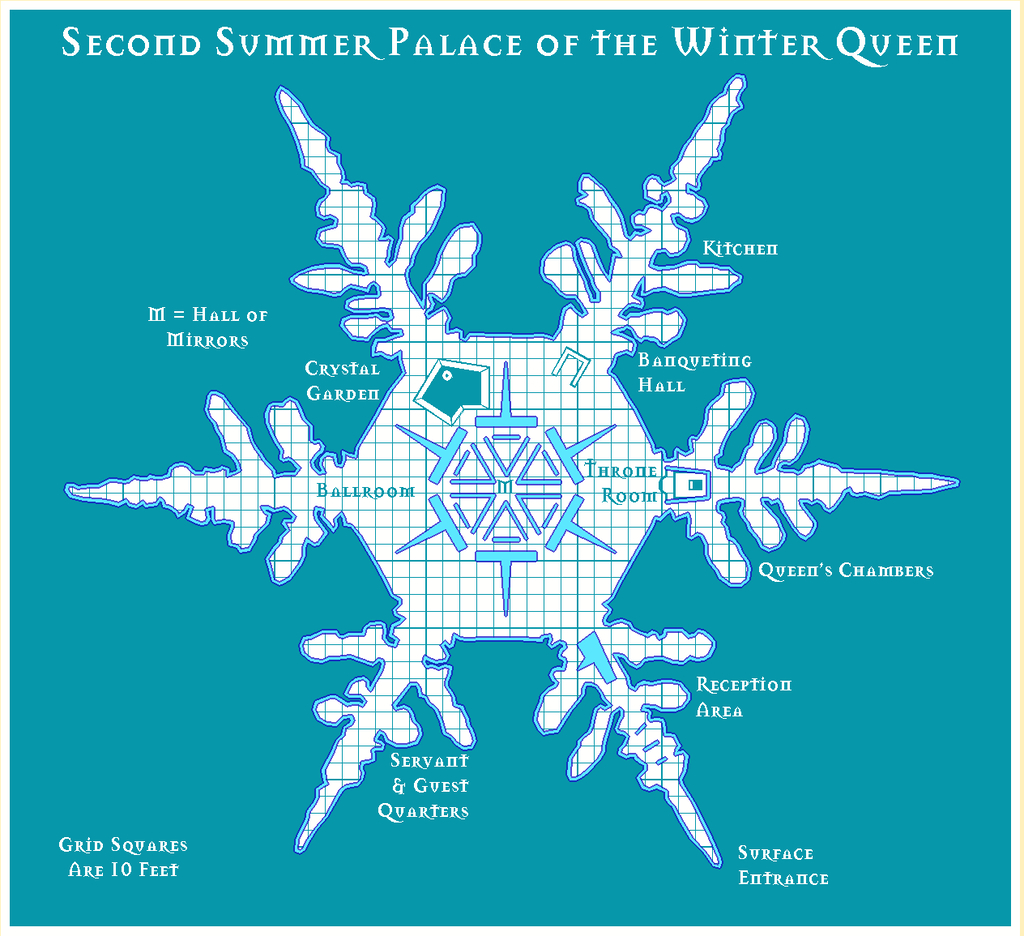
Before even starting any of the maps, I'd picked the ten photo-micrographs of snowflakes I intended to use as the individual Palace shapes, and given them a number each, so I knew what order I'd be working on them. Then I printed-off copies of the ten. I like hard copies of such things to-hand, as it means I can jot notes on them in between mapping sessions, and can think more on the map design without having to be sitting at the computer. Additionally, they can be very handy while I'm tracing the image in CC3+, and find I've suddenly hidden some key item with a polygon that I now need to see!
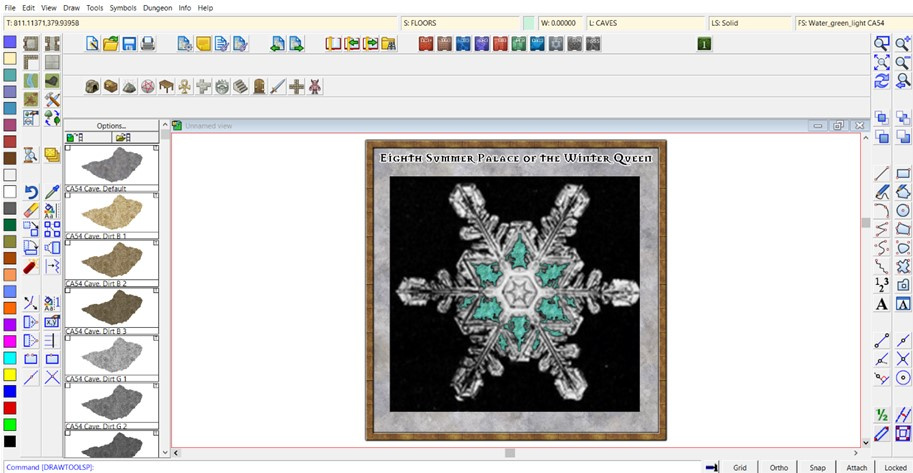
These maps were always going to be a bit unusual, because what I'm doing is taking tiny, microscopically-imaged objects and expanding them to Palaces which are several hundred feet across. So there was a scaling issue from the start in that. However, looking over the images and deciding how the final Palaces were to be drawn, it was clear the key trait was going to be the minimum passage width, to allow access to all parts of the final structure. I fixed upon a general minimum width of 10 feet, from which I could then physically measure features on the hard-copy images, that in turn gave me the approximate maximum dimensions for the area each Palace would need to fit within, and hence roughly what the size of each map would need to be to allow for titling, labels and overall layout.
Palace 8's measured image meant the Palace itself was going to be around 515 feet by 460 feet, so I guessed that a map around 600 feet square might be OK. Firing-up CC3+, and having recently worked on three black-and-white style maps in succession, I opted for the Jon Roberts Dungeon style for Palace 8, from CA54, as a complete change. Aside from setting the size in the New Drawing Wizard, I wanted a paler background than the default to represent snow or grey-white ice, and went with the Stone Light Grey option from what the style offered.
Once the new map had opened, it was clear the fills for the map's frame and background needed adjusting to avoid the dreaded tiling effect, so I greatly increased both fill sizes using Tools - Set Properties - Fill Styles from the drop-down menus, after a bit of experimentation (and locating the correct fill style after picking the wrong one for the background first of all, and wondering why nothing happened when I adjusted it...).
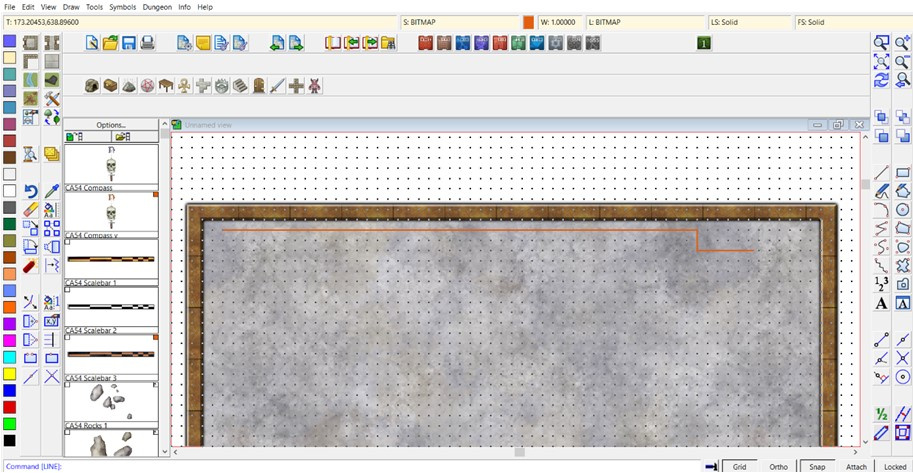
After that, I created a new Sheet, BITMAP, and Layer, also imaginatively called BITMAP, into which I could import the map image. Now, placing and correctly rescaling such imported images is something I've long struggled with in CC3+, because of its restricted redraw standards, where most of the time, you can't see what it is you're trying to resize, or where its edges (which almost never coincide with the image edges) are going to land. So my trick now is to create a rectangular polygon with only a thin outer line in a bright colour, place that in the right spot on the map, and only then bring in the bitmap image. It isn't a perfect solution, but it's the one I've grown used to.
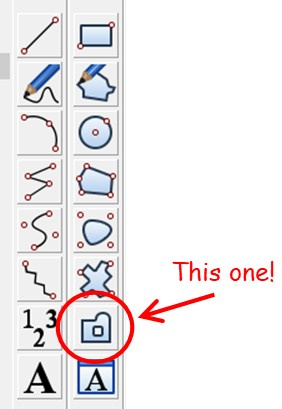
Of course, actually drawing the linear "box" is a bit of a nightmare in itself, because you can't just draw an open rectangle like this and tell CC3+ what size you want it to be as you might in a graphics program, or something even more basic, like Word. Instead it means counting dots on an appropriate-sized grid. For large areas like the Palaces, it's appallingly easy to lose track, so what I do is draw a single line with a kink in it, using the Line tool (not the Path one). For anyone unfamiliar it's:
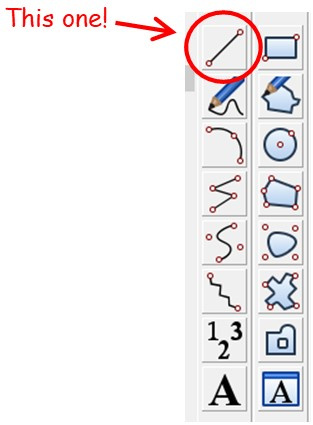
That actually creates three separate lines, not just one. On the next image, the grid dots shown are those for the 10' Grid, 2 Snap (so the snap runs at five-feet intervals, with the dots every ten feet), and the lines are in orange:
Then I rotate the longer line (that at the left side here) through -90° from its left-most point. (This is because CC3+ insists on doing angles backwards, not logically clockwise! We've discussed this on the Forum before. There are good mathematical-programming reasons for CC3+ doing so, which if nothing else will convince you that mathematics has very little to do with reality after all ?). And then draw a new linear box of the right size, using that left-most point as its top left corner, and the construction lines as templates to give the right size overall:
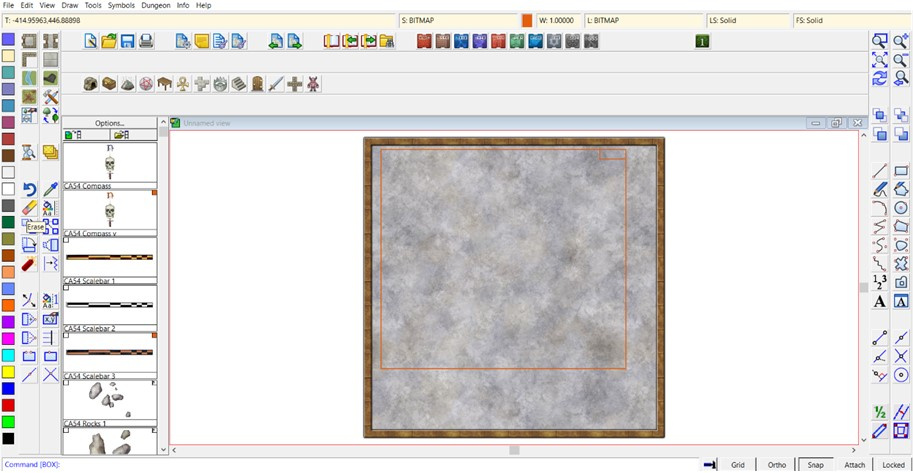
Then the construction lines can be deleted, and the new box moved to a more central position, again using the snap grid dots as a guide (not shown here, as the image size meant you could scarcely see where the box was any more with the grid left on):
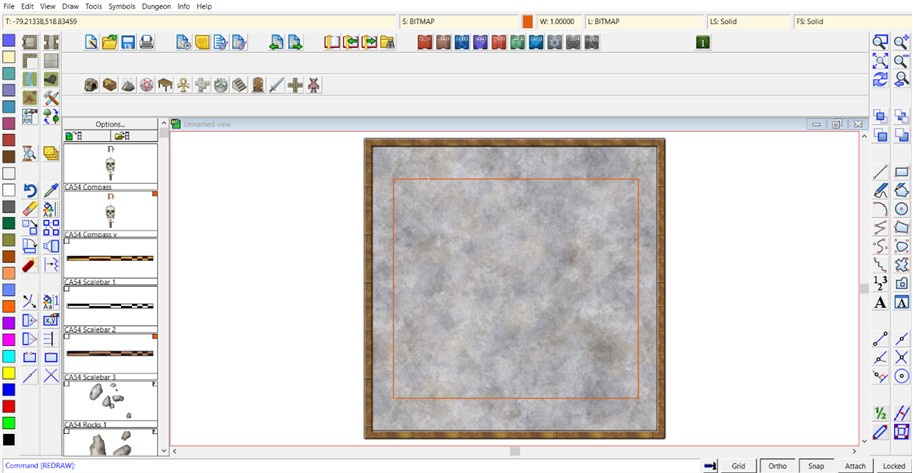
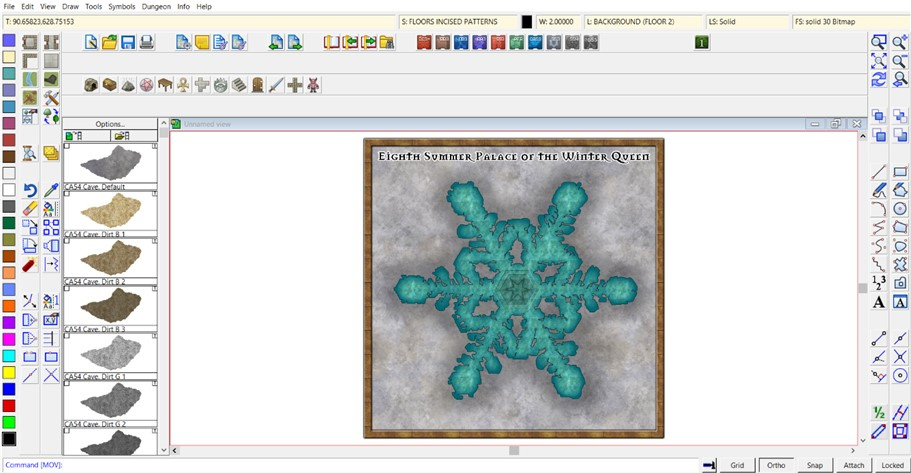
After which, using the Draw - Insert File command from the drop-down menus, the correct snowflake bitmap image can be brought in, resized and correctly positioned, using the construction line box (and a fair amount of adjusting and tweaking):
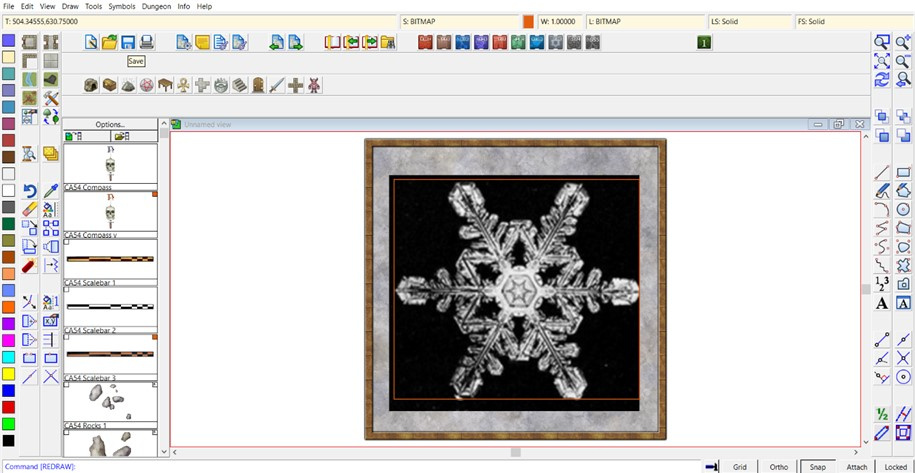
The box can also then be deleted. Sometimes, I draw in one or two crossed centre-lines like this as well, as they're useful for adding items such as the title, if it's meant to be centred somewhere near the map's periphery. Which means at this point I also often add the map's title, so I can remove all the construction lines together. (If they might be needed again later, I usually set them up on their own Sheet in the first place, so they can be hidden or called back at any stage.) In this case though, the title is long enough it's not hard to centre it without needing that:

Next up is to start the mapping proper, by drawing the floor. Looking at the image, it's clear there are several areas where the floor should be missing in the final version, within the outermost line of the flake, so I'd already decided with this mapping style, that would be best accomplished using a Multipoly command on the completed outer floor. This is easier by drawing the areas of floor that will eventually be omitted first, and although it's not so useful for seeing all the pieces you've drawn just before going to the Multipoly action, I like to use the same fill style as the final floor will be, mainly so I don't forget later... Thus:
I really liked that Water Green Light fill in the Jon Roberts style, as representing here ice instead. Just has the right colouring and texture to me to give a magical "zing" to the whole. It is a magical ice Palace, after all. You get a better impression of it once the whole outer floor's drawn:
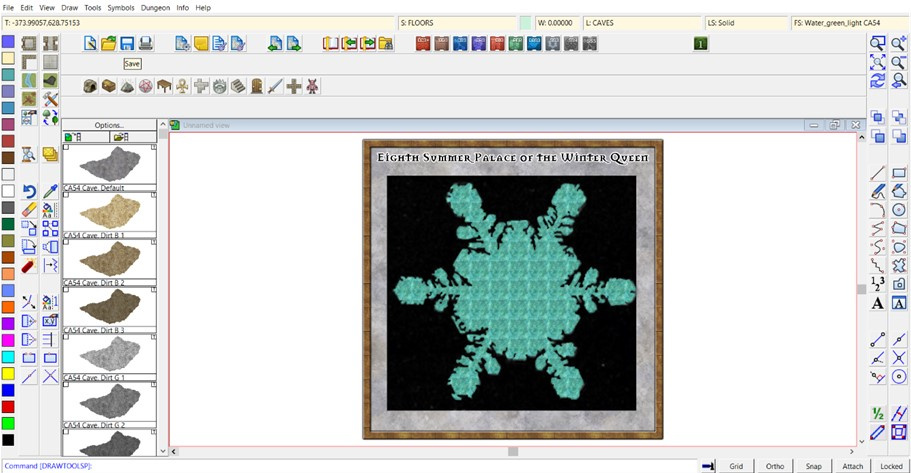
And yes, the tiling's very obvious here. While that could be changed, it'll be much less obvious on the finished drawing, so I left it alone, and just carried out the Multipoly command at this stage:
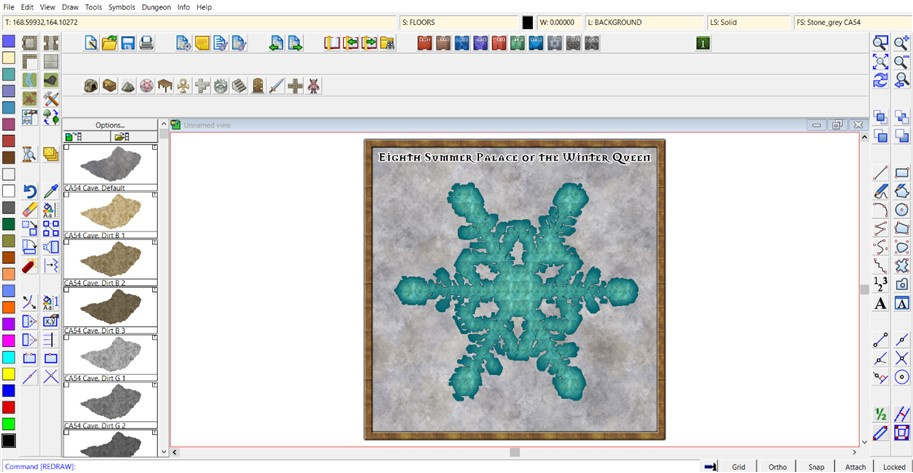
After which it was time to consider adjusting the Effects on the Floors Sheet:
and adding the central floor design based on what the imported image showed, using the Solid 10 to 30 fills, which have the perfect level of transparency to still let the underlying "ice" floor show through, even after adding a suitable Bevel Effect to make them look sunken into said floor, after one of Remy Monsen's recent blog posts about using such Effects:
Beyond which, it should be just a matter of adding other smaller details, labels and a grid. While I'd love to show you what the final map looks like, that will have to wait for another time, as the amount of time and effort involved in putting these notes together meant I didn't manage to get the map itself finished in time to post it today as well!
Starting to remember why I don't do "proper" WIP threads here now... ?