


Wyvern
Wyvern
About
- Username
- Wyvern
- Joined
- Visits
- 3,237
- Last Active
- Roles
- Member
- Points
- 5,515
- Rank
- Cartographer
- Badges
- 24
Latest Images


-
[WIP] Community Atlas: Snakeden Swamp, Lizard Isle, Alarius - Dedicated to JimP
The final stages of mapping took a bit longer than expected, as that top area, still incomplete last time, had been allocated more ruins and features than many other spots. Along with this, the additional minor stream channels were emplaced in the swamp too, with a few more shrubs and trees in places:
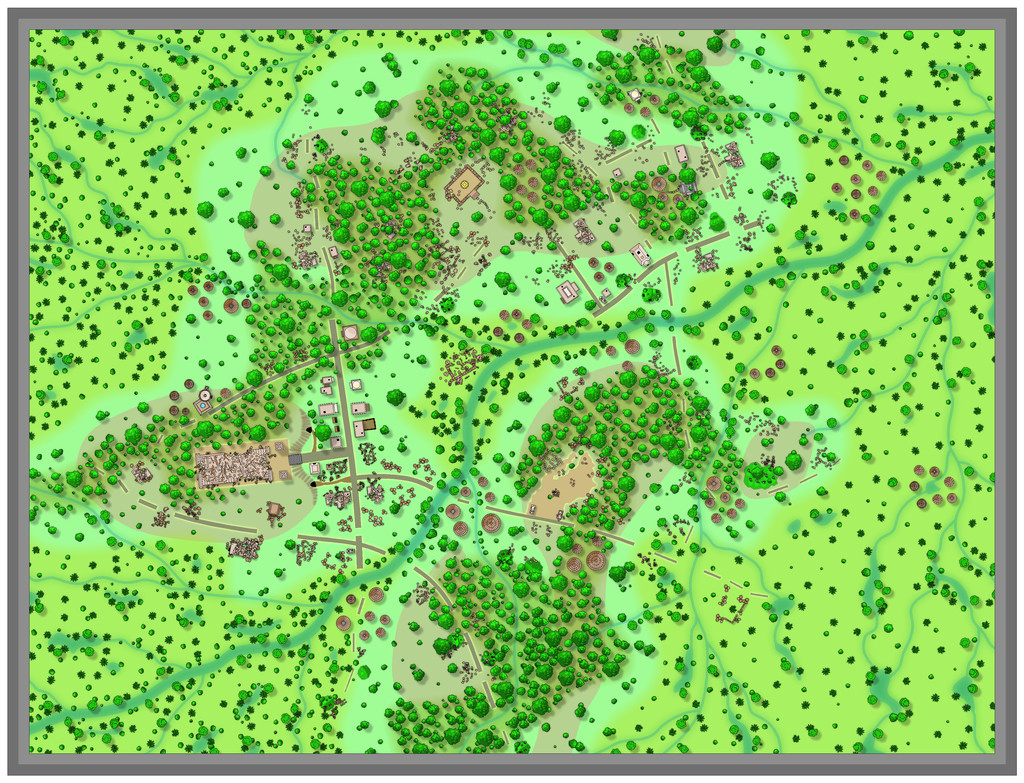
I'd always intended to replace the map border with something more rustic, like that for the Snakeden Swamp map earlier, and settled on the angled fence-line symbols from the options available in the CD3 Vector Shaded style. They also look like sharp teeth a little, a happy accident. Getting these to look right took quite a degree of trial and error though, and while the corners don't perfectly match on this final version, I was happy with that, because I didn't really want the frame to look too perfect anyway - Lizardfolk fences, after all!
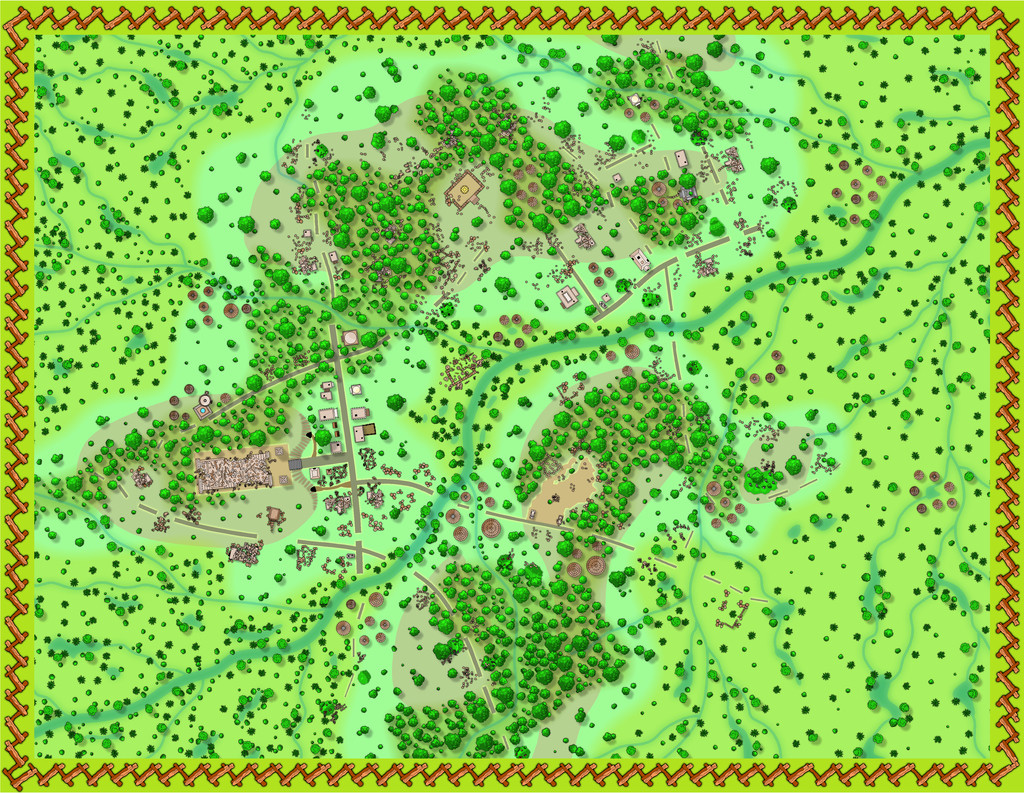
After which it was time to start thinking of labelling the map, adding a north pointer and a scale. Unfortunately, there aren't options for the latter two in this style, so alternatives from what symbols were available had to be drafted-in, again with some experimentation, and tweaking of effects:
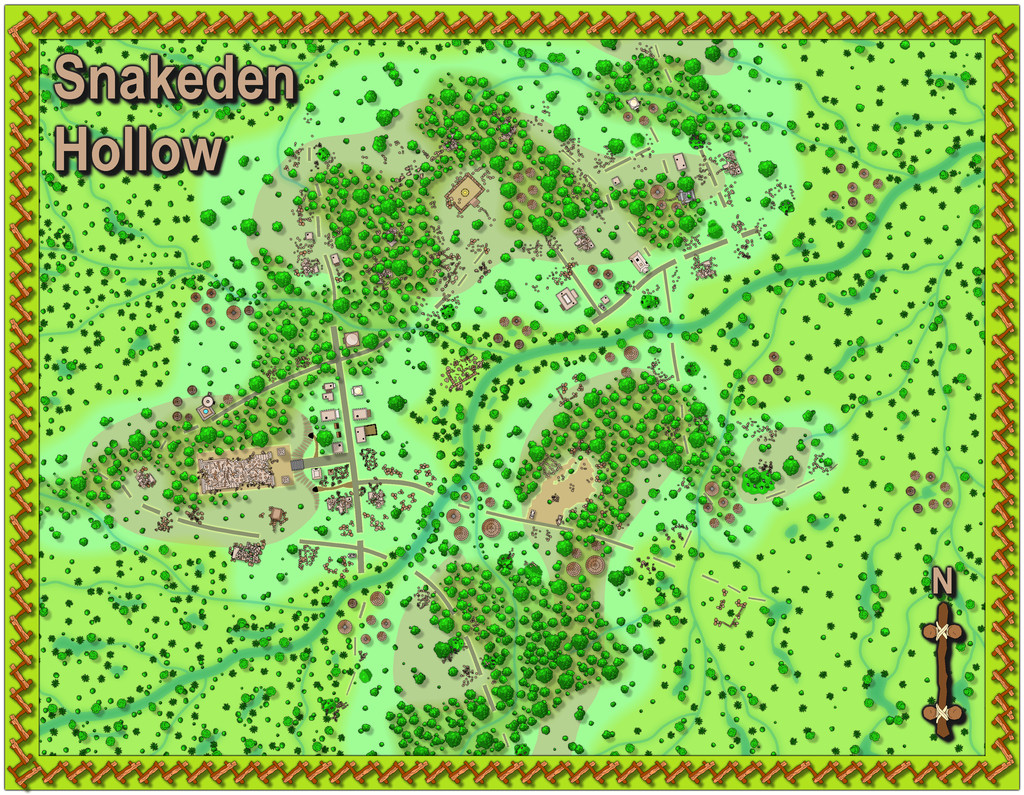
At this point, the pale brown lettering seemed fine. However, when some place-name labels started being added across the map, it rapidly became clear that both this colouring and the black shadow and glows were interfering with the effects on the mapped symbols, creating irritating bleed-through lines on parts of the text. More experiments followed to adjust both to something that was still sufficiently clear, yet which wasn't equally causing such problems. Which turned out to be this:
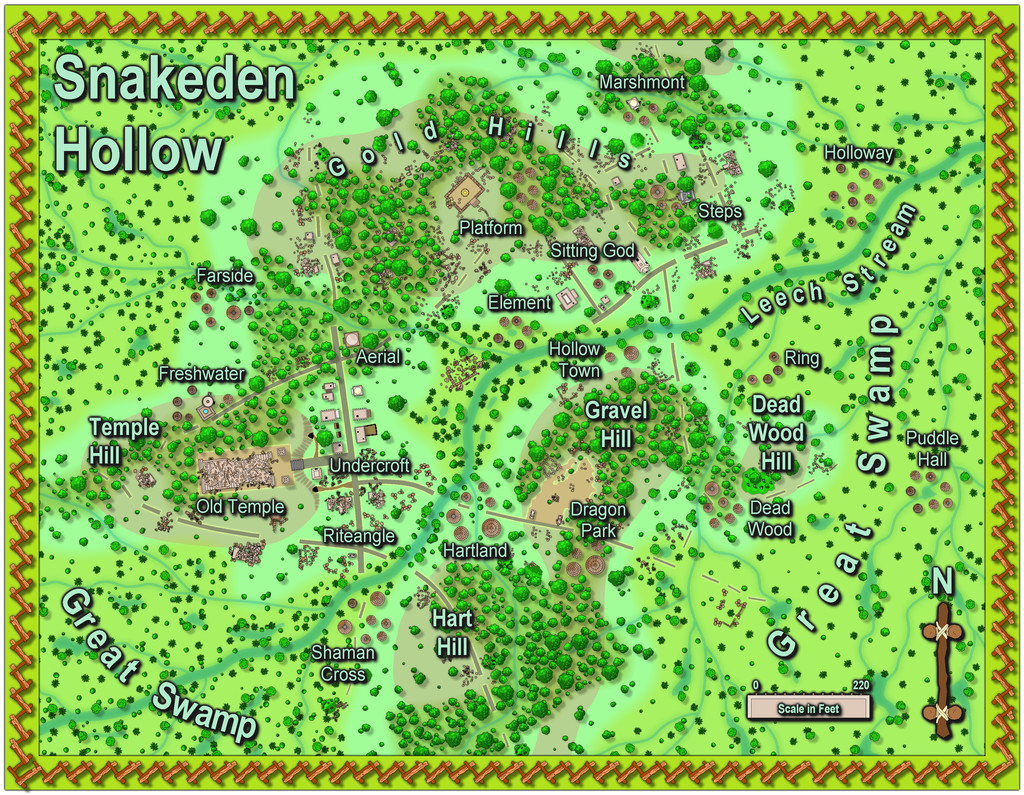
With this map finished, it's now time to head underground, since although the little square surface map with the cliff-line (the area now labelled as "Undercroft") was the original dice design that prompted these maps, it was obvious to me from the outset that the two cave entrances in the cliff would demand more attention - as to be shown next time, if all goes to plan!


-
Community Atlas: Barrows of the Ferine Magi area, Feralwood Forest, Alarius
Having decided to prepare three identical layouts for the interior Barrow "dungeons", the obvious first step was to get a version of the hand-drawn map traced in to CC3+ which would then act as a template to be refilled and adjusted for each separate interior, given their contents were not going to be identical. As the general mapping style was already well-established, drawing this was pretty quick and straightforward:
The walls are paler than those in the two previous dungeons in this group, so as to indicate their different character to the typical stonework. The semi-tech setting was going to have plastic-coated metal panelled walls (or something similar), hence this choice of wall texture. While it looks quite straightforward initially, the layout here is actually on three different levels - the rectangular pit in the lower-right quadrant has a raised pathway/passage around it, and a trapdoor access from below into it, as well as two side passageways opening directly into it, for instance, and the elongated side-passages/rooms flanking the long, straight entrance passage (with wall slits into that long corridor) have a bridge accessway over the passage, connecting them to each other and, by secret door, the rest of the complex, though not directly into the entrance route. Took me a while to get to grips with this as well!
While that was all fine, as I was drawing this out, I started wondering about how the semi-tech-world's inhabitants were going to get in and out of here. I'd already drawn-up lists of items and potential denizens from the sources noted back in my first post in this topic, especially the Numenera RPG, and had realized the three layouts would work best with these as workshops, laboratories or a museum. Ultimately, we'll be going with one of each of those. Naturally, some kind of teleportation/transporter beam option was a possibility, for all that felt a little contrived.
Ordinarily, as explained previously, any segments of the geomorphic dice designs that don't link to the main part of the layout, including the connections off the dice edges, are simply skimmed away in preparing the Atlas version. However, now, I started thinking of adding some or all of those external links to this map too, as passages/doors only the semi-tech inhabitants could see and use. This is a shot of the two Inkwell Ideas Explorer dice designs I was using here to indicate what those possibilities were (from dice "V" and "K", in case anyone might wonder about those letter labels):
And this is how they were drawn into the CC3+ plan:
Each new passageway has a wavy line ending it, to show the route goes elsewhere beyond this map, without indicating where that might be, in the semi-tech land that isn't Nibirum. In addition, they've all been set up on the GAME MASTER ONLY Layer, and a series of new Sheets (for the walls, floors, grid lines, and dot-shading symbols), so they can be shown, or not, for each individual layout, something that's intended to be possible via a toggle in the final Atlas version. Each separate layout will have a variable number of these accessways only; the rest will be removed in those final maps. It made sense to draw the set together though, because there is quite an art to doing so, so as not to forget some key element.
While doing this, I next realised the long entrance passage and the rooms/corridors flanking it probably would be in the original Barrow stonework, not the semi-tech walls. This was mostly to avoid the complications of why the semi-tech folks hadn't wandered off into Nibirum at some stage, and more importantly, why they'd have set up a passage with viewing slits to watch for nobody ever coming in down that long passageway! Instead, if this was all the original stonework by the Barrow builders, simple anti-tomb-robber floor pressure-plate traps to shoot darts from magazines that had to be emplaced before the Barrow was sealed, began to crystallize, and were ultimately adopted, as a concept. Thus the wall texture there was changed:
Plus, it no longer made sense to have any linking passageways attached to the semi-tech world from this segment of the layout, so they were removed:
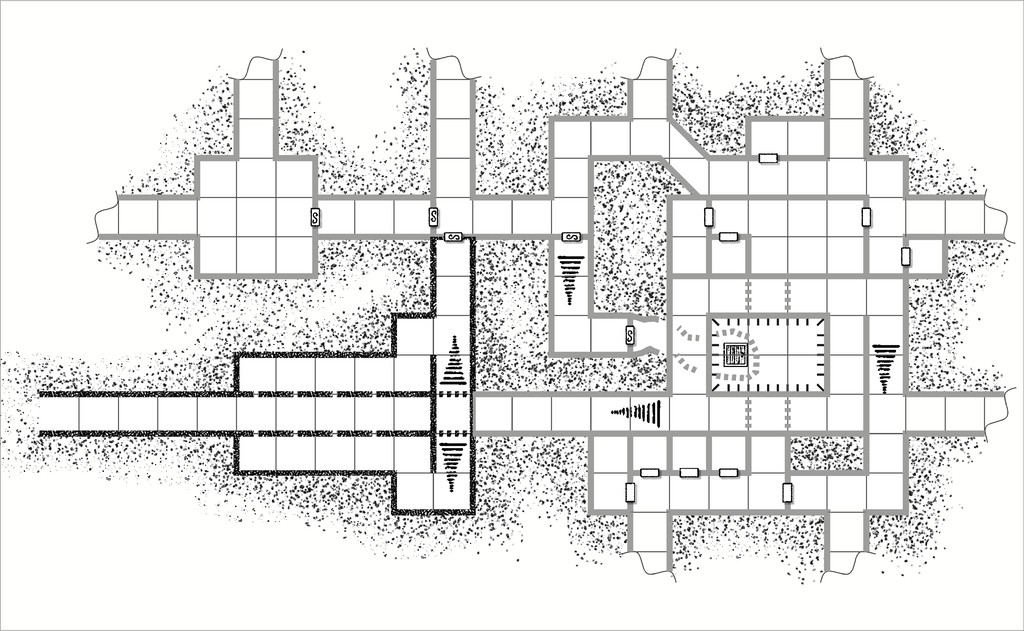
The perceptive among you will doubtless have realised that one other change has been made here, to the semi-tech wall texture. This happened because when I adjusted the new darker wall texture's bitmap scaling, I discovered that, as sometimes happens with the older Annual styles, I had to force the system to use the very high res bitmaps. I hadn't realised sooner that this wasn't happening automatically, partly because the walls lines are quite thin, I suspect. When I did that though, the selected semi-tech texture - the only one that gave a suitably pale appearance - started to vanish into the dot-shading exterior texture in places. This image shows a comparison test, where just the top left room's texture remains as it had been earlier:

Thus I ended up with simple, solid, pale grey wall lines for the semi-tech areas, rather than bitmap-textured ones.
Clearly, this is all still WIP, given that the entrance passageway doesn't go anywhere right now, nor have a blocking doorway to the outside, and the wall around the pit is likely to change too, so it doesn't look like the same solid walls as everywhere else, albeit that may be different for each of the three final layouts anyway. Plus everything needs fitting-out and labelling, something which is still rather in-flux currently, as the lists of items and denizens are allocated and consolidated to their respective layouts. Some progress though, at least!


-
Community Atlas: Barrows of the Ferine Magi area, Feralwood Forest, Alarius
So finally, an actual map I DID make here!
The area map was going to be drawn and filled first. While the basic format for the style of hex-map was already established, I had some new sets of random design mechanics I wanted to try, to determine what was going to be in those identified hexes. These would later have Shadowdark notes added into the map's PDF file, where relevant, to keep a degree of consistency with the other maps in this current collection.
So the contents for each labelled hex were determined using, or adapted from, tables and random processes in "Into the Wild - Omnibus Edition" (from Third Kingdom Games, 2023). This is designed to work with the Old-School Essentials RPG by Necrotic Gnome, so it draws on creatures from that, and other associated sources among the established "old-school-rules" form of the RPG hobby (as to an extent does Shadowdark). This was my first time using Into the Wild, and it proved something of a challenge, as its layout is not the clearest to find things quickly, or avoid accidentally missing some key element. It did though come up with a lot of interesting ideas, sometimes after a little tweaking, and with occasional additions from the random Shadowdark tables.
The nature of the area, having wildly magical, magic-free and normal magic regions, meant I was looking primarily for unusual creatures or aspects for whatever came up randomly, and so often chose tables accordingly. I also opted to check for both features and creatures in each highlighted hex, again with adaptations, so not everywhere ended up with both elements. One aspect I decided against was involving any high-tech aspects from the barrows also appearing on the surface, as I quite liked the idea that only if a party of adventurers opened one of the barrow entrances and failed to close it properly, might those denizens begin creeping out into the world.
As noted for previous of my area maps, once the features list is decided, other aspects of the map start to fall into place, here including where the streams might lie, as well as larger areas of new terrain types, including some odd, black-sand dunes, and low hills, notably towards the eastern side of the magic-free and wild magic regions. After which it was time to progress to the CC3+ mapping:
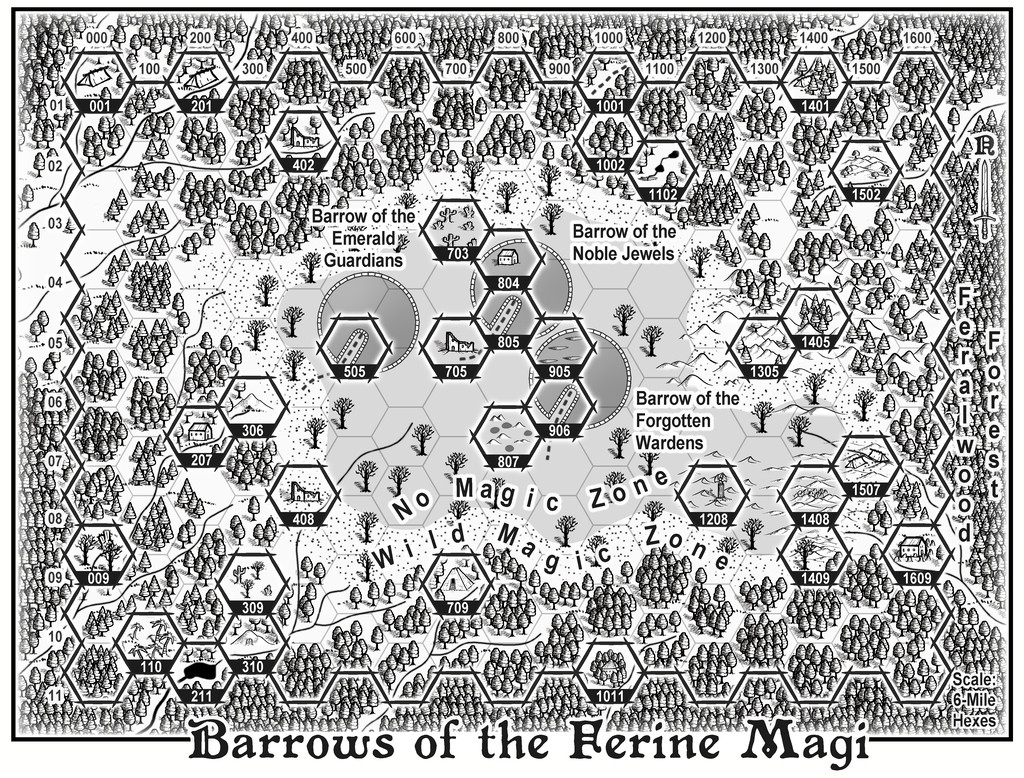
This too proved quite a challenge, since the forest density originally hid too much of the normal hex lines (those not highlighted) and had to be revised a couple of times, to try to keep things clear enough while not looking too hex-based. Similarly, ensuring the highlighted-hex symbols weren't overwhelmed by the trees involved more tinkering. The No Magic Zone was possibly the easiest, as it was just the background colour revealed by punching a Color Key hole though the overlying terrain fills, creating the Wild Magic Zone's circuit simultaneously - that circuit achieved by a desert (dot-shaded) terrain fill polygon, without any effects to ensure the edges were sufficiently obvious.
A few extra symbol-shapes had to be hand drawn, such as the little pools (of mercury) in Hex 807, and the depressions in Hex 905 (harpy dust baths), one more of which items was resized and reused as the sinkhole for the stream in Hex 1102. Most other highlighted hex features were either normal symbols, or resized ones (sometimes resized differently in one or both dimensions).
The main drawn items were the three gigantic barrows, which were so large, they needed preparing as specific items. From the start, I thought they'd be more interesting as definite circles, as that seemed weirder than making them less neat and regular, aside from, of course, being easier to draw! Ultimately, I simply drew the first one, then copied it to the other two locations. Initially, I created a new drawing tool to prepare the outer circuit as white with a dark grey outline. However, that proved problematic at the join where the avenue leading in to the centre of the barrow was, with the darker outline showing a break there. Thus that idea was scrapped, and the outer circuit drawn instead using a dark and a white line of different widths on separate sheets. The little cross-lines, helping to suggest the outer stone walling (I've pretty much envisaged these as gigantic versions of the great Newgrange barrow in Ireland), were simply hand-drawn, and are deliberately not all straight or evenly-spaced, to hint at something maybe less manufactured about these structures, despite their overall regular forms. The interior dome was drawn using a Solid White 10 fill circle, or more accurately, copied and amended to be so from one of the outer circuit lines, onto a new Barrows sheet. This had a suitable lighted bevel effect added, tweaked to help darken the domes to make them stand out better. For some reason, the Solid White fill worked better than the Solid one in doing so.
Labelling the map wasn't altogether straightforward either, trying not to hide too many of the dead tree symbols, and avoiding the highlighted hexes, while still making clear what was being labelled. The "Scale" note was the most trying (bottom right corner), as having just squeezed in a "Feralwood Forest" label on that side of the map, I couldn't decide if I should lose the eleventh hex in column 1600 to keep the scaling comment on two lines, or lengthen it to three. In the end, the latter won out, as the map felt lopsided because of that missing end-hex. Well, I kept noticing it, at least!
Onward now to the subterranea!
[EDIT 19 November 2024: Although I originally added the provisional PDF description for the map to this post, I've removed it now, as the final version has been submitted for the Atlas!]

-
Sticky Note Dreamlands - An Experiment
Thinking more about the new Sticky Note Dungeon Annual just released yesterday, while checking it over and afterwards, it occurred to me that with a few additions, it could be used equally to generate a form of point-crawl overland map too. For those unfamiliar, this is a sketch that links places of interest in a pattern to identify how the various points can be reached, without bothering too much about the exact distances, directions or terrains intervening - except that things such as intervening difficult terrain might mean no direct links, with instead a set of further points bypassing the blocking feature to be encountered along the way.
As an example, I created this map almost ten years ago now for a wargaming magazine article on Jason and the Argonauts, showing a stylized series of overland connections along the western and northern Black Sea shores of Anatolia, into about the middle of that great peninsula, and along the coast north to modern Georgia, ancient Colchis:
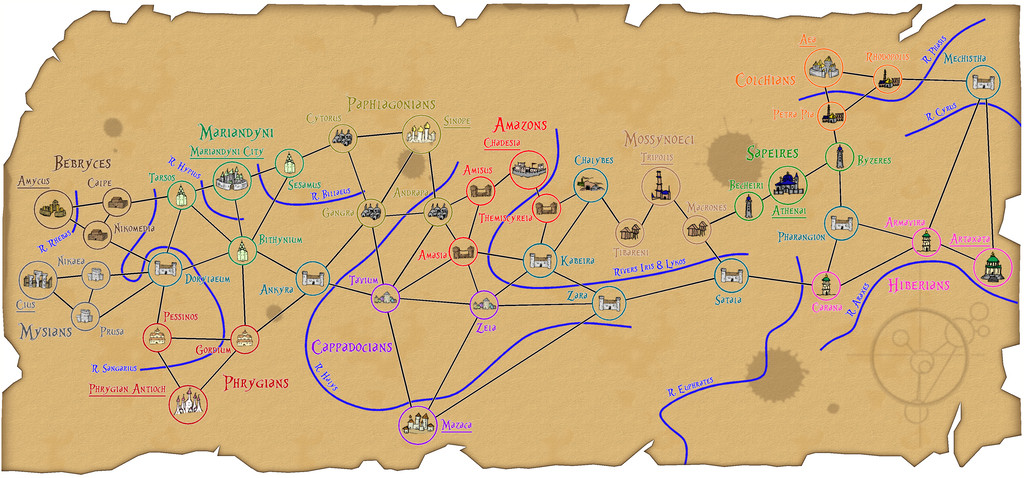
This isn't all that clear at the usual Forum resolution, so I've added a further version at higher-res to my Gallery.
Thus essentially what can be drawn for such a system is a very simplified map, one that here even ignores the coast, and features only the main river lines of significance, chiefly those that cross travel routes, all in a rather abstract manner.
Something that's long been of interest to me has been trying to map the places referred to in H. P. Lovecraft's stories concerning his Dreamlands. I've had a couple of tries at this myself, the first time almost 40 years ago, and another that sadly didn't get very far more recently, using the beautiful E Prybylski Watercolour style from last year's Annual. Several other vastly superior to me artists have created their own versions of such a map over the years too, which all have their pros and cons.
One main difficulty is the details in Lovecraft's tales don't include things such as specific distances, or where different places might lie in relation to those mentioned in one story, and perhaps only obliquely referred to in another. Distances might be given in terms of hours or days sailed or flown on sea or in the air, or overland by yak, zebra or on foot, or might just be stated as being a long way apart. It's possible to estimate real distances by making assumptions, but this still doesn't help in locating where some of the places mentioned, but not passed through, or directly connected to elsewhere, were.
In the stories, as it would in genuine dreams, this all makes perfect sense, since these aren't real places, and Lovecraft was a lifetime lucid dreamer, so was writing more or less from experience. As a mapper though, it quickly becomes problematic.
However, the Sticky Note concept helps here, by generating a means to show places with some details about them, and lines showing how they connect, without worrying about details on exact directions, distances or even the size of a given place.
So I tried a quick version as a test earlier today. Had to create a couple of new drawing tools, and import a bunch of symbols from the SS1 Handrawn Hollow set, but it was all pretty straightforward. I drew out just the places along the Southern Sea coast, heading westwards from the great city of Dylath-Leen, as described by Lovecraft, using an annotated hand-sketch I'd prepared last year when working on the E Prybylski version:
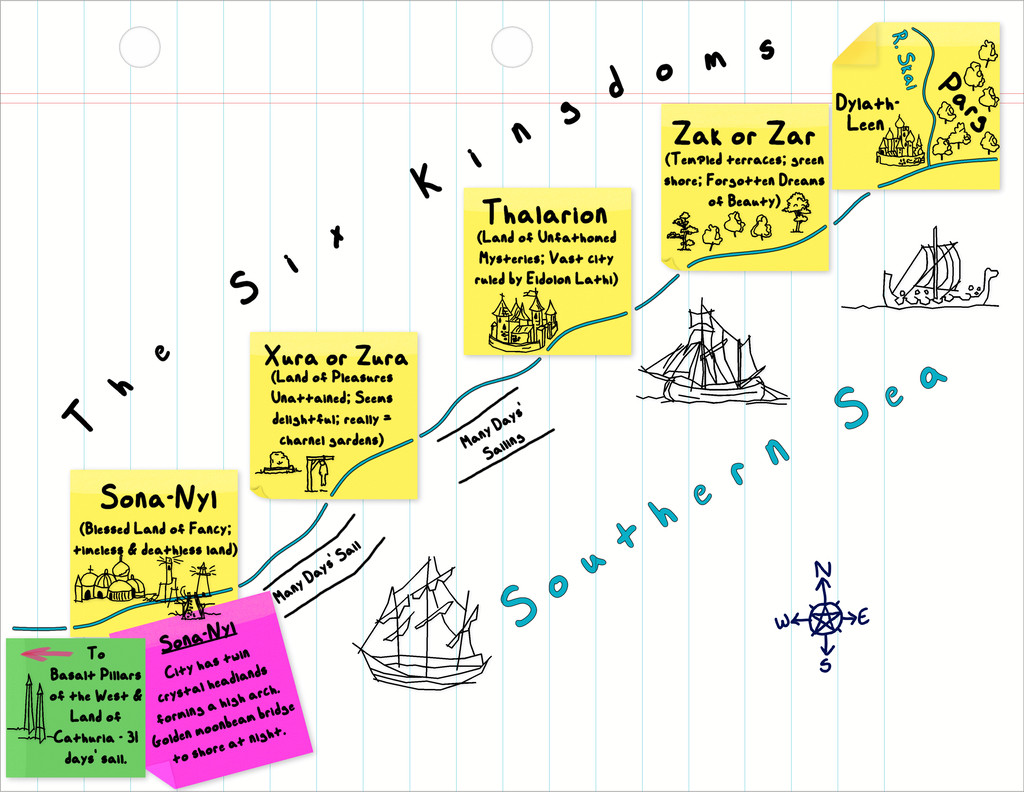
Obviously, a lot more could be done than I've tried here, and this is a bit rough-and-ready in places, but the basic concept seems sound.
These SS1 hand-drawn symbols seem to work quite nicely, although I'm sure none of us would be averse to having a purpose-made set in the C. C. Charon style, should an overland version of the Sticky Note style be offered subsequently 😁!
(We might need an A3 or larger option for the paper to draw world-sized maps though 😉)

-
Community Atlas 1000th map Competition - with Prizes [August/September]
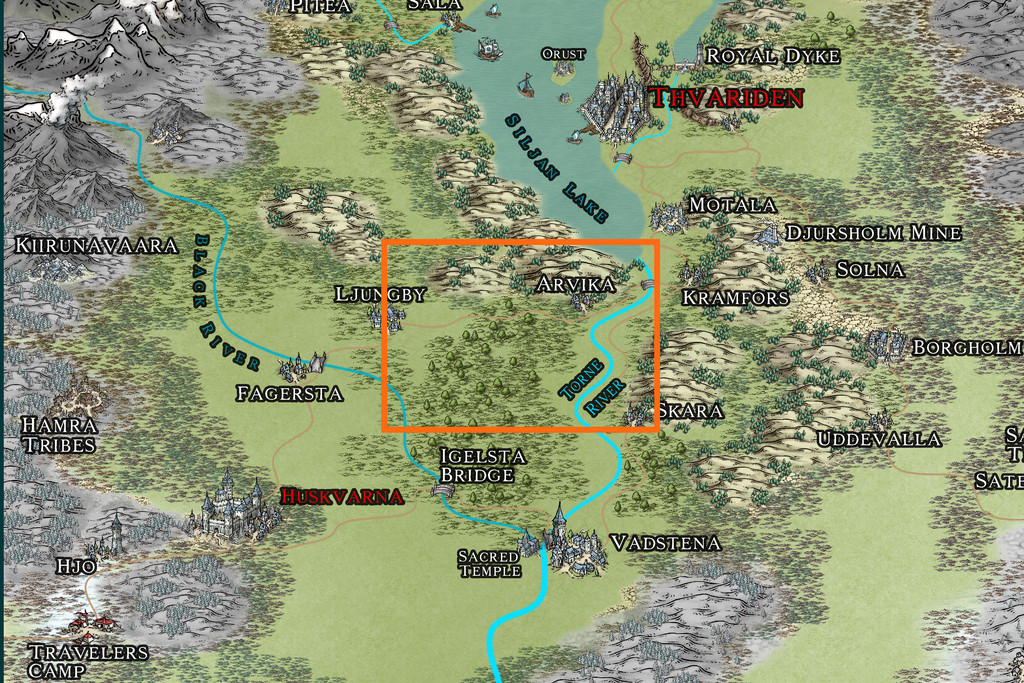
Map six is for the hamlet of Arvika:
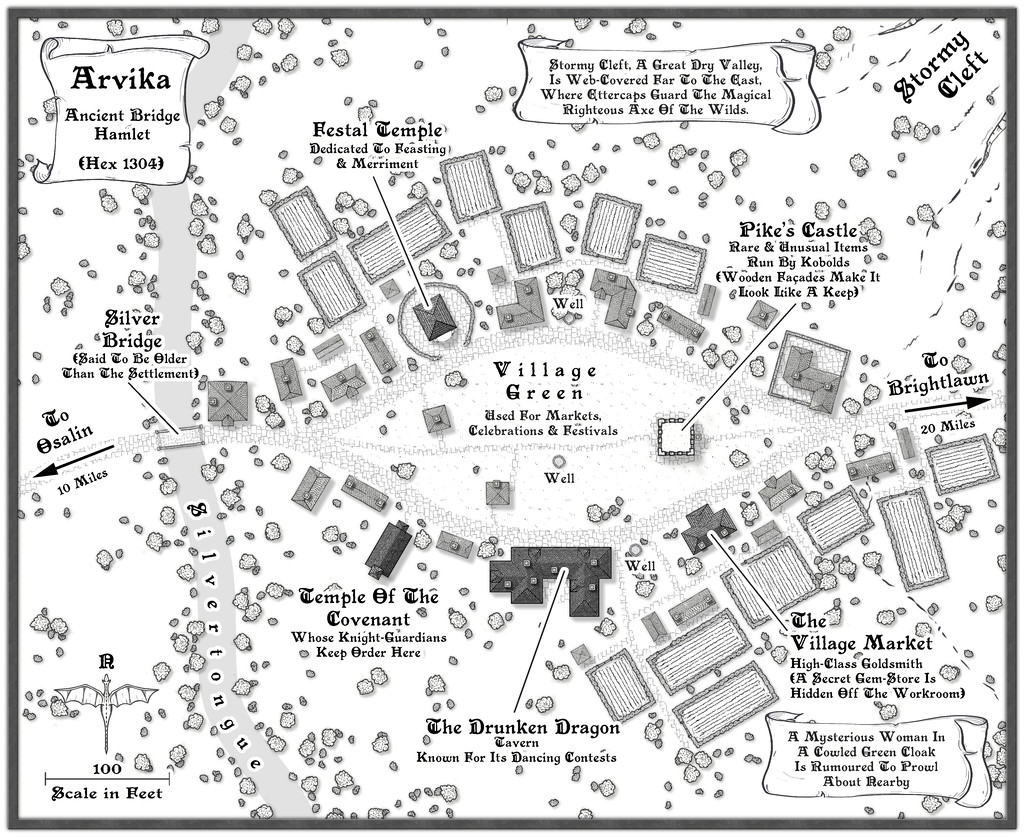
I've made the usual updates elsewhere on the Forum & Gallery too, while the FCW and PDF notes follow:


-
Community Atlas 1000th map Competition - with Prizes [August/September]
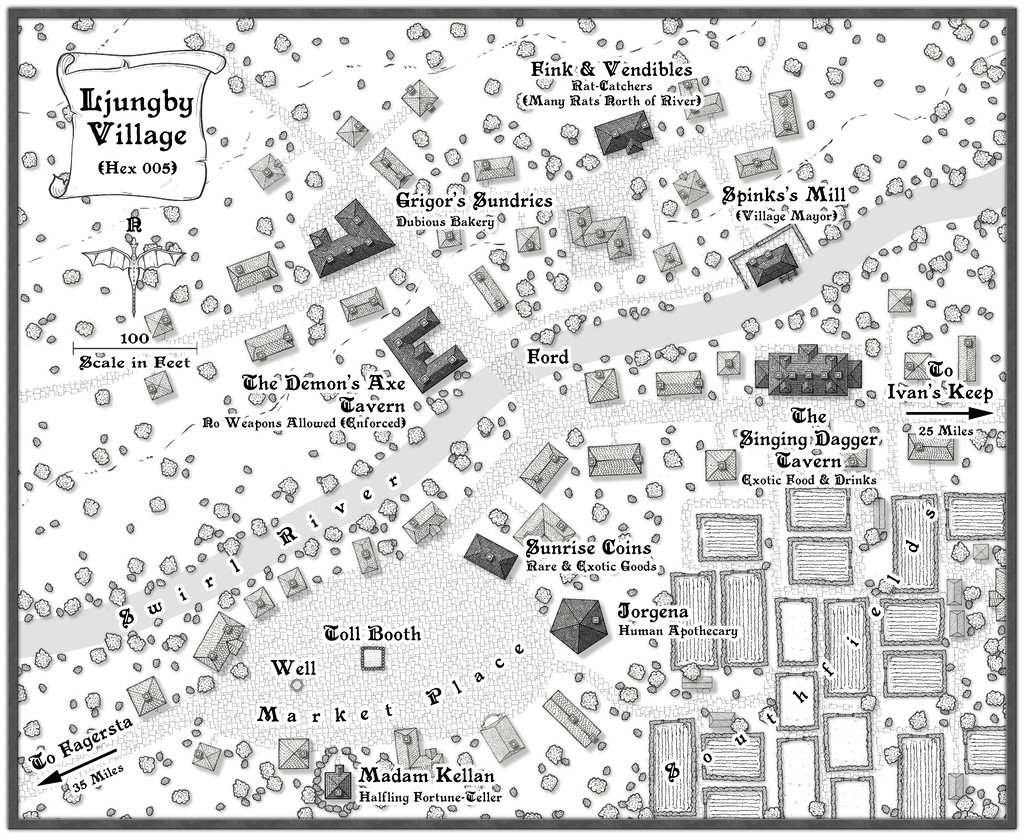
So, the first of my theoretical ten villages is ready, from Hex 005 of the hex-map somewhere above (or here, in case that's a bit easier to find!), Ljungby. A few more details are in that linked post, although the PDF is here as well for those interested. Deliberately, I've kept the notes short, hoping that might improve my chances to complete all ten village maps!


-
[WIP] Community Atlas, 1,000 Maps Contest: Villages in The Whispering Wastes of Haddmark, Peredur
Delayed for a clutch of reasons during the last couple of months, I have, off-camera, been continuing with my sort-of Dungeon24 project for the Nibirum Atlas, drawing small dungeon maps, and, where necessary, the area maps to place them in. Progress has though been a lot slower than I'd hoped of late. Plus, as I was finalising the accompanying texts for the latest pair of maps, Remy Monsen announced the 1,000 Maps Competition for the Community Atlas, which has complicated matters further. We'll get to that shortly (although if you've seen my notes in the main Competition topic, you'll have some idea already).
As I'd enjoyed developing the black and white style reminiscent of that used in various of the Shadowdark RPG supplementary materials last time, with the OSR Dungeon style from Annual 97, I decided I wanted to continue with that for the other three maps created from designs rolled-up using the Explorer set of Inkwell Ideas Dungeonmorph Dice. As it's turned out, this has also become a pleasing way to help celebrate the Shadowdark RPG's winning of no less than four prestigious Gold Awards at this year's Ennies, announced at GenCon on August 2nd (for Best Layout & Design, Best Rules, Best Game and Product of the Year)!
Back to the dungeon map and where it was to go. The random choice for its location was to be Peredur, as last time, now though in the southern part of that island continent, in Haddmark:
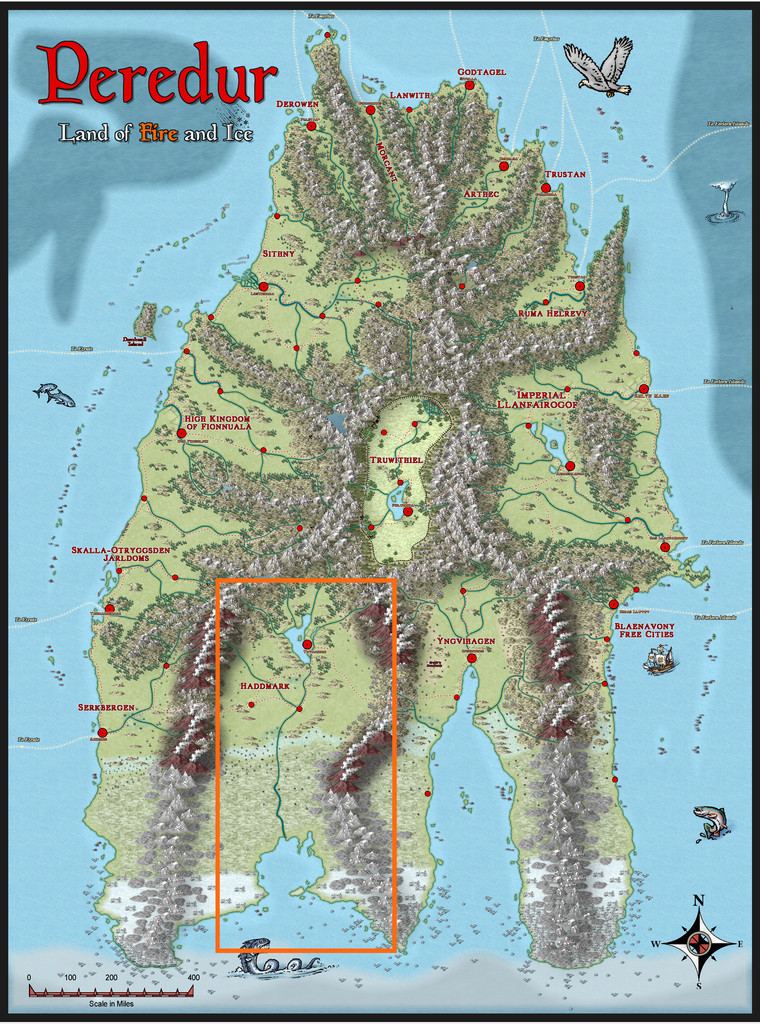
I soon discovered that this region had been less heavily mapped than others on Peredur, and as none of the regional maps really fitted with what I'd been thinking of for this dungeon, came to the conclusion I'd need to draw an area map as well. Of course, I wanted a black and white option for that too, to try to emulate the style of hex-maps used for similar areas in the Shadowdark supplements. These have a very specific size, using 6-mile horizontal hexes, with 17 columns west-east, by alternating 10 and 11 rows north-south. Typically, I had to expand my map by one column to make sure I collected all the places in the area I eventually selected (after quite some internal debate), a minor amendment. The area I went with doesn't have a name-label, so, and partly for how I'd already started developing the dungeon map, it became the Whispering Wastes, here:
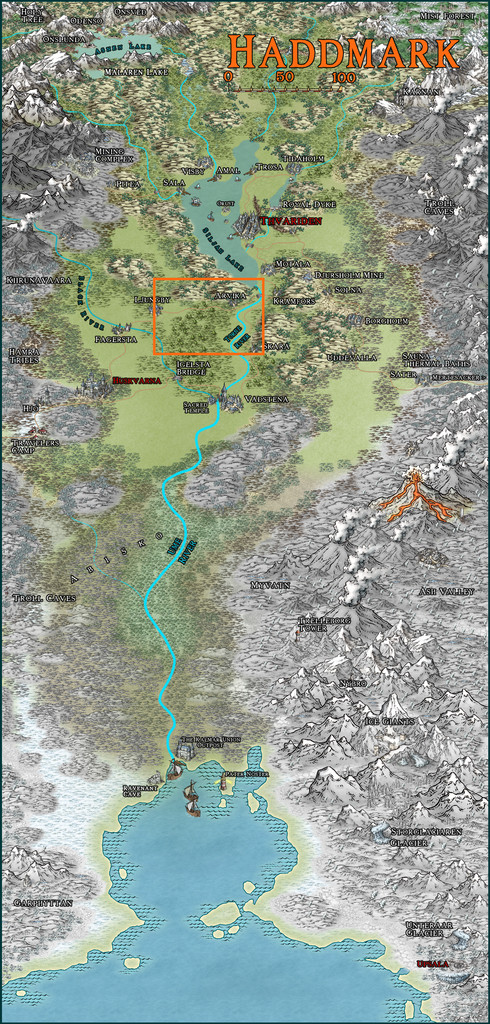
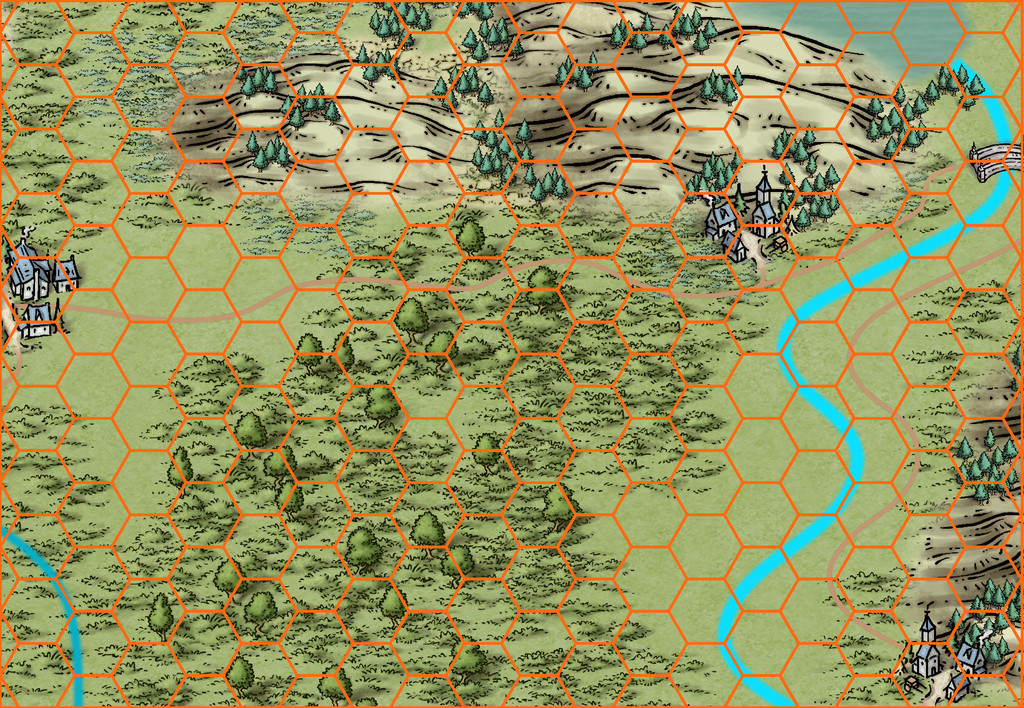
Even so, it was a bit of a squeeze! This was the base map, with a suitable hexgrid superimposed that I used to draw the final map, with the place-name labels hidden for clarity:
Then, as normal, I randomly rolled-up a variety of overland map features, in this case using tables, with occasional amendments or adaptations, found in the main Shadowdark rules (which have a specific hex-map design system). Indeed, aspects of those tables would allow the creation of more detail for many of the places. While time-consuming to do in full, I did give serious consideration to this for a while, although as luck had it, the dice came up with rather more hexes with features than the average for this map anyway - 41 instead of 31 - which acted as a deterrent.
Some places were obviously decided already, with the three small settlements and one bridge symbol (which I decided should be another settlement too), although randomness being what it is, only one of those coincided with the hex-feature rolls, so a few adjustments had to be made. I did though retain or adapt those "moved" features into the settlement hexes as well. After which, it was time for the CC3+ mapping!
I opted for the Annual 121 Black & White Fantasy overland style as the basis, since it has a useful range of symbol options, which was then labelled-up mostly using the standard Windows Arial font, except for the title, which continued the use of Primitive, from the 2015 Annual, as previously. And this is how it finished:
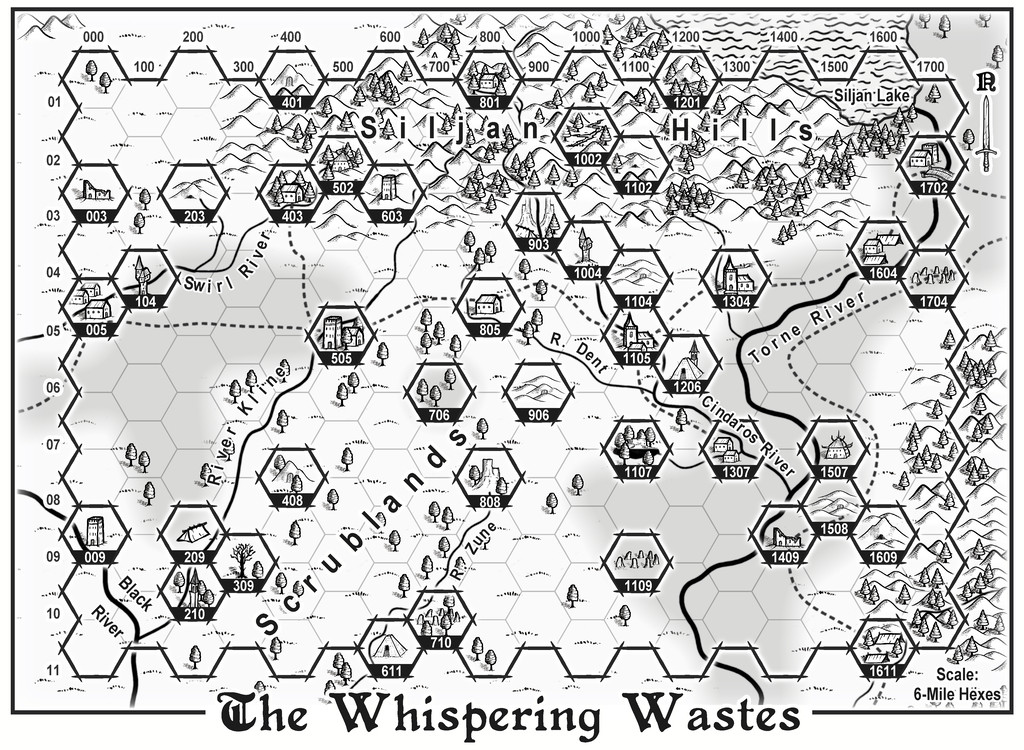
The highlighted hex-map border and individual number-labelled hexes follow the style set by the Shadowdark supplements, though I stuck with the Annual's normal road, water and river appearances for ease here. On-map labels are typically kept to a minimum on the Shadowdark maps I was mimicking, so the place-names for the one-hex features are all to be found in the accompanying PDF and text map notes once in the Atlas only. I also decided to extend the mapped region a little outside the hex-mapped zone, as while ordinarily those outer hex-lines would form the border, that felt a little too edge-of-the-world to me in this case, as well as creating problems for where to add the main title, compass pointer and scaling note.
Overall, I was pleased with how this turned-out, although I have a fondness for hex-maps anyway, so am likely biased!

-
Community Atlas: The Marshmalika Area of Kumarikandam
Completing my trip to the Banjar region of Kumarikandam recently, after the Sussara Region, I've now been visiting part of the coast by the mouth of the Kalabanjar River, the tiny red-square-marked ruined settlement at the head of the Bay of Aqesh on the area map from the Atlas (not the one in the mountains - that's Sussara!):
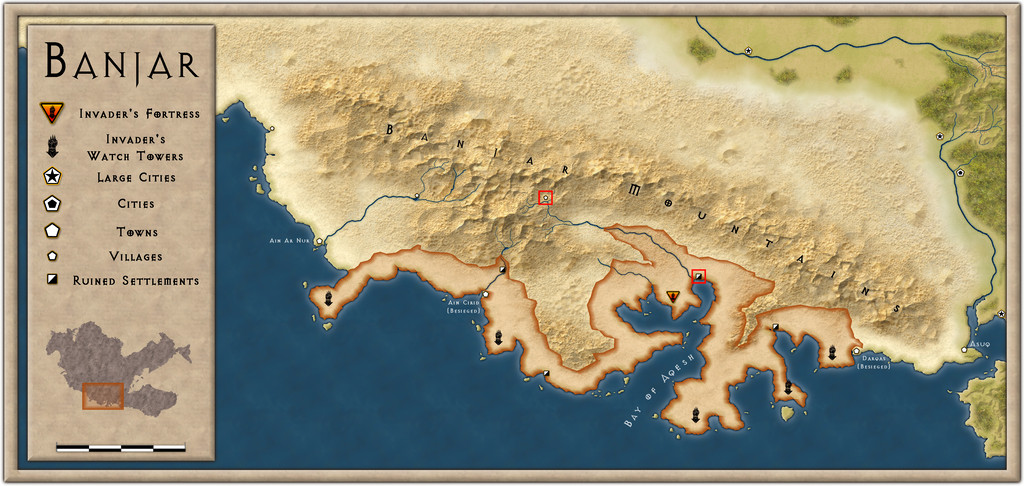
The map I'd generated in advance from the Inkwell Ideas "Ruins" dice set only covered part of the settlement, and given the large scale of the above map, as with the Sussara Region, I knew I'd have to begin with an area map to fit it into anyway. Having already prepared a 20-mile-square map for Sussara, I simply continued the process here, using the same Scorching Sun style for consistency, having generated a list of ideas for features on this map using the same random tables as for Sussara (albeit re-rolling any duplicates with that map), while taking into account the very different circumstances for this part of Banjar - invaded and devastated by incomers in the relatively recent past. Thus we arrive at the Marshmalika Area map ("Marshmalika" = Queen's Cove, incidentally):
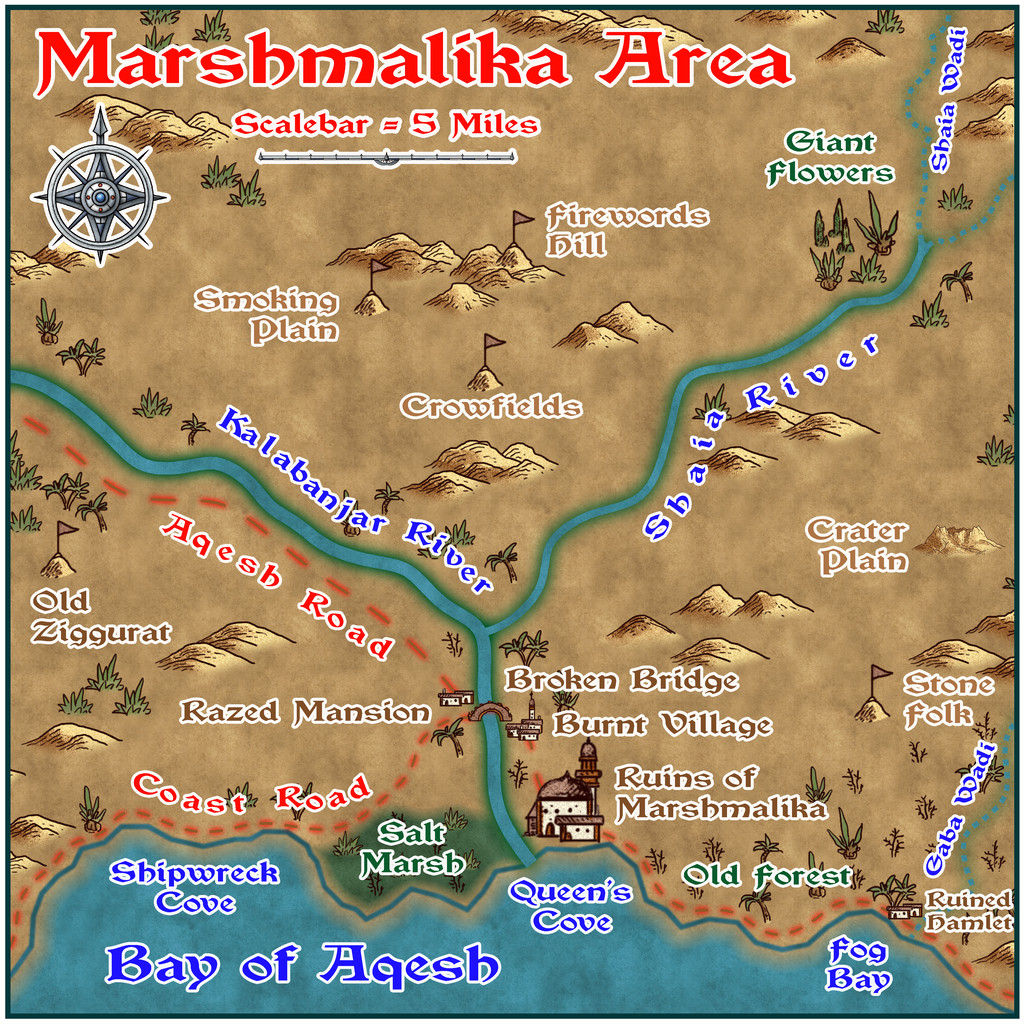
Descriptions of what's where (with how recent some of them are), and the significance of the various items shown will be provided as text and PDF files in the Atlas, as usual, although it's fair to say there are battlefields, and many signs of devastation (not all created by the invaders; war is war, after all). Oh, and there are a LOT of ghosts. They make the invaders feel REALLY uncomfortable, although all they do is stand and stare (mostly). In ever increasing numbers. At any destroyed formerly inhabited place. By day and night, continually. Until the invaders leave.


-
Community Atlas: The Witch's Valley Head Area in eastern Alarius
Constructing sets of connected maps like this is always an organic process, with ideas for one influencing the other along the way. For these "Crypts" designs, I've been referring to Inkwell's own "Dungeonmorph Delves and Descriptions" book, one of which options has included an order of necromancers that collect strange things from many places, storing them in their own tombs, along with reminders of their greatest leader. Since this chimed with a very long-standing idea of my own from many years ago (it's a useful way of explaining random dungeon layouts sometimes!), I decided to indulge especially heavily from the Inkwell notes for this design, with just a few adaptations and changes, since it all seemed to flow together quite nicely otherwise. Additional elements - notably among the treasures - came from the random tables mentioned in my first posting here, or ideas that occurred along the way. Thus we arrive at The Crypt of the Necromancers map:
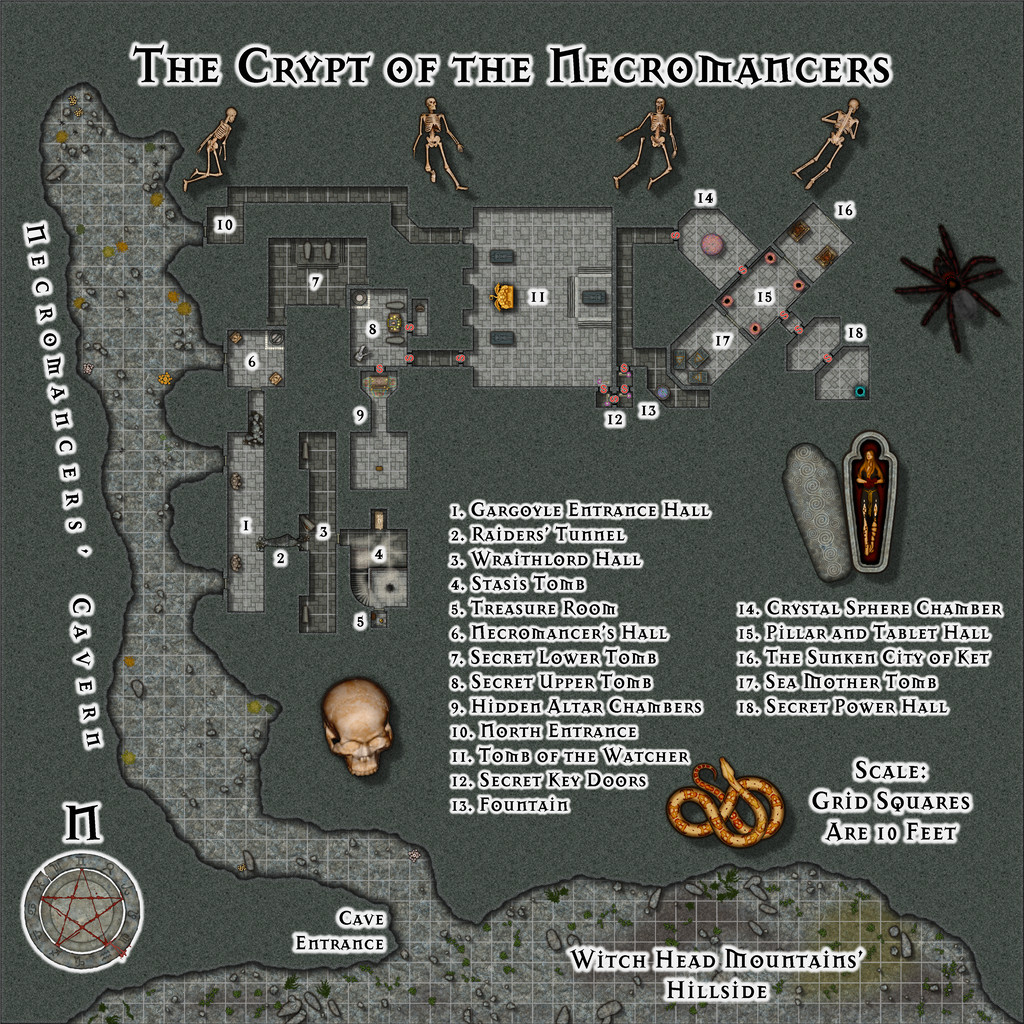
The mapping style is Sue's Creepy Crypts 1 & 2, from Annual issues CA 186 and CA 188, partly because I'd only used elements from it last time, and wanted to try out the complete style, partly because - of course - it's ideal for constructing burial layouts, and partly because it has those really invaluable individual step symbols, perfect for creating daises, or when the mapping design needs a non-standard staircase that rises straight before becoming a quarter-spiral at the top (in room 4 here - hopefully a little more visible on the Gallery version of this map). I've also used a couple of Sue's other symbols in this map, one from her City Domes Annual, CA 144A, the other from the CA 175 Marine Dungeon pack.
The outside, cave entry and long cavern to get to the dungeon proper, were simply sketched-in by hand - and those two blind side passages in the Cavern aren't accidental - after the Crypt layout had been drawn-in. The mechanism for drawing caves in this style is somewhat different to normal, and took a little experimentation to get right, particularly in relation to masking the outside of the Crypt's straighter wall-lines, as that's drawn a different way. And that 10-foot grid was actually drawn on three different sheets as a result of this - some of the lines only by hand!
I knew from the original sketched layout that there'd be space around the design to add a places list (expanded considerably by the text and PDF accompanying Atlas notes), and I opted to indulge further by using more of Sue's Creepy Crypt symbols as decoration to fill some of the spaces this left, and to add to the atmosphere. The coloration is deliberately muted and grey, in-keeping with the generally gloomy aura The Scar region encourages, aside from a Necromancers' Crypt not really being a likely place for bright wallpaper with cute puppies and kittens frolicking over it (though that would rather challenge an adventuring party's expectations)!
The next layout is to be from Inkwell's "Delver" dice set, which has a mixture of cavern and dungeon aspects to the designs. That's scheduled for somewhere on Kraken Island in the Forlorn Archipelago...
-
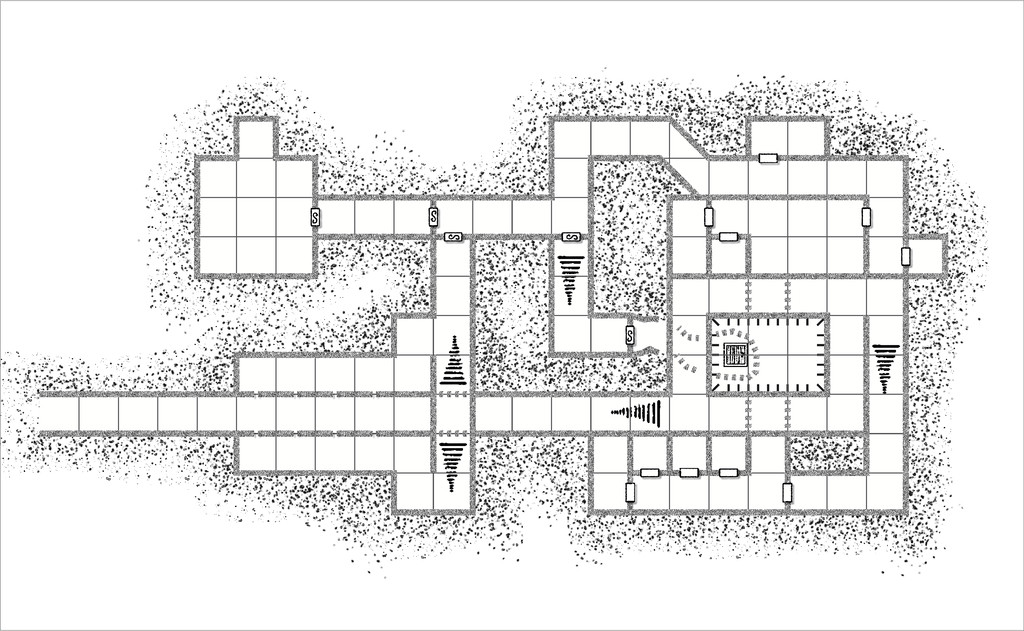
Community Atlas: Dendorlig Hall - A Sort-Of D23 Dungeon for Nibirum
So, as promised, the final submission version of the map is now completed, as of Day 280 of 2023 (i.e. yesterday!). And here it is:
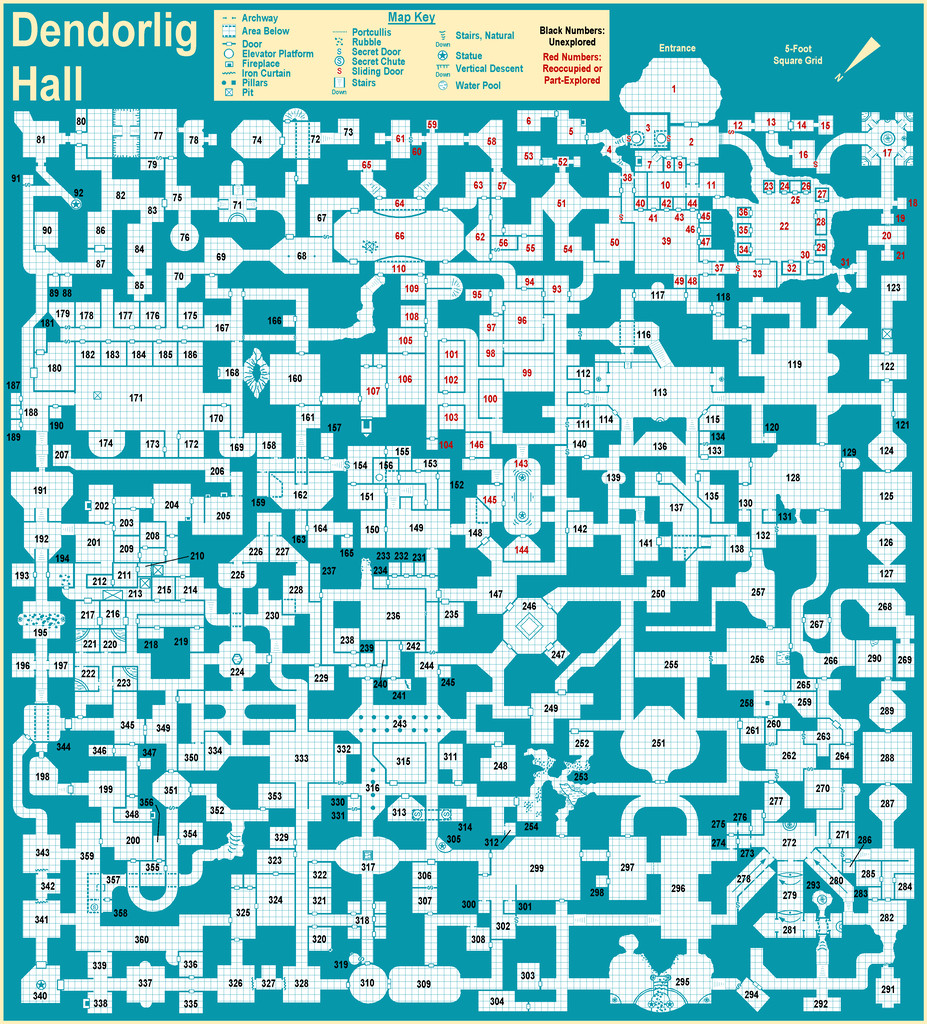
You may not notice any difference from the Day 250 version posted last time, and I'm not sure there actually is one, at least not that would be obvious at this resolution. However, behind the scenes there have been substantial changes, as following discussions with Remy ahead of submitting the map for the Atlas, I've added descriptions as CC3+ map notes for each individual area, as hotspots tied to each number on the map, and which will thus be available in the FCW version of the Atlas map. The complete set of texts for all these, and the general map notes, will also be provided as a single PDF file, as normal.
This particular mapping style is very straightforward to use, and as noted earlier, is also a very forgiving one, which uses no sheet effects. Thus it wasn't a strong challenge to map with, for all that was an interesting experience in itself. However, adding the map notes and hotspots to the map was something I've never tried before, and that proved a useful exercise in expanding my CC3+ experience. It was a great deal more straightforward, and quicker to complete, than I'd anticipated too, which was a pleasant surprise. [This is the point where Remy admonishes me for getting some key part of the exercise wrong, of course...]
I'd never really considered adding notes to my maps electronically, since I normally only use printout versions of them, and while that's unlikely to change, this would be something I'd consider for the Atlas in future now, where the map's suitable for such, having tried it out. Which of course was part of the point in my taking part in mapping for the Atlas, to let me explore elements of the program new to me!
Time to return to my Alarius mapping now though. Although it's possible there might be a further distraction before then...


