Royal Scribe
Royal Scribe
About
- Username
- Royal Scribe
- Joined
- Visits
- 9,529
- Last Active
- Roles
- Member
- Points
- 3,353
- Birthday
- February 5, 1968
- Location
- San Francisco, California
- Website
- https://legacy.drivethrurpg.com/browse/pub/31814/Royal-Scribe-Imaginarium
- Real Name
- Kevin
- Rank
- Mapmaker
- Badges
- 16
Latest Images
Reactions
-
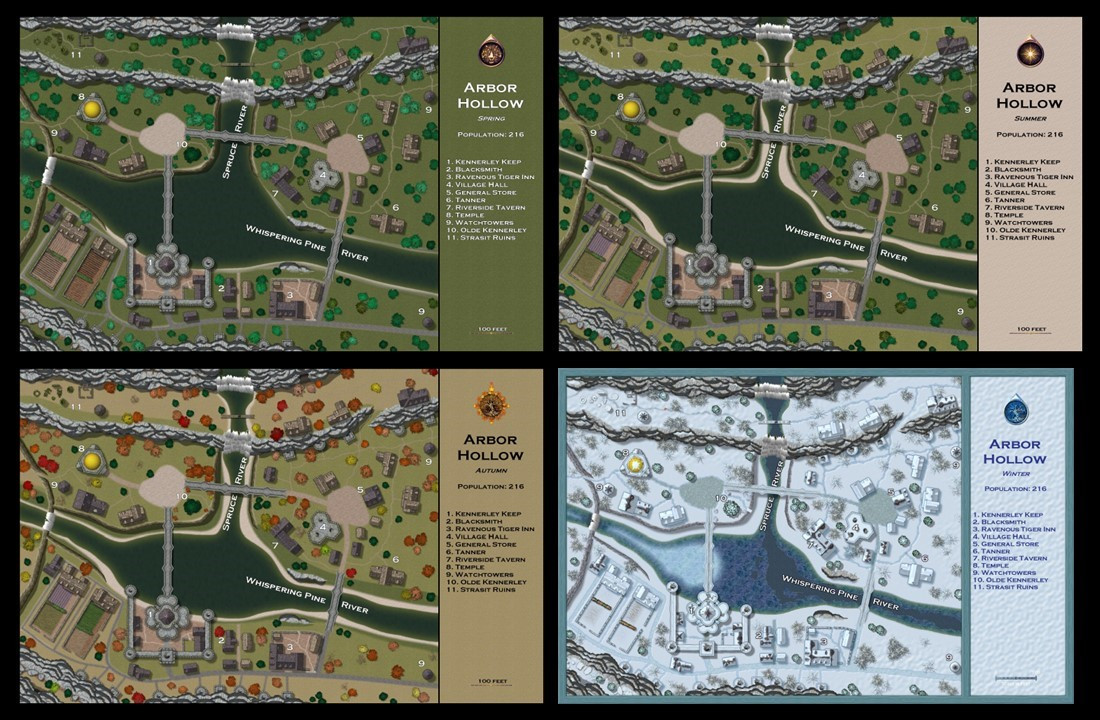
[WIP] Atlas Contest (potentially) - Arbor Hollow (summer, autumn, winter, spring)
Here's a collage of all four seasons all together. (In retrospect, I should have widened the other borders to match Winter's.)


-
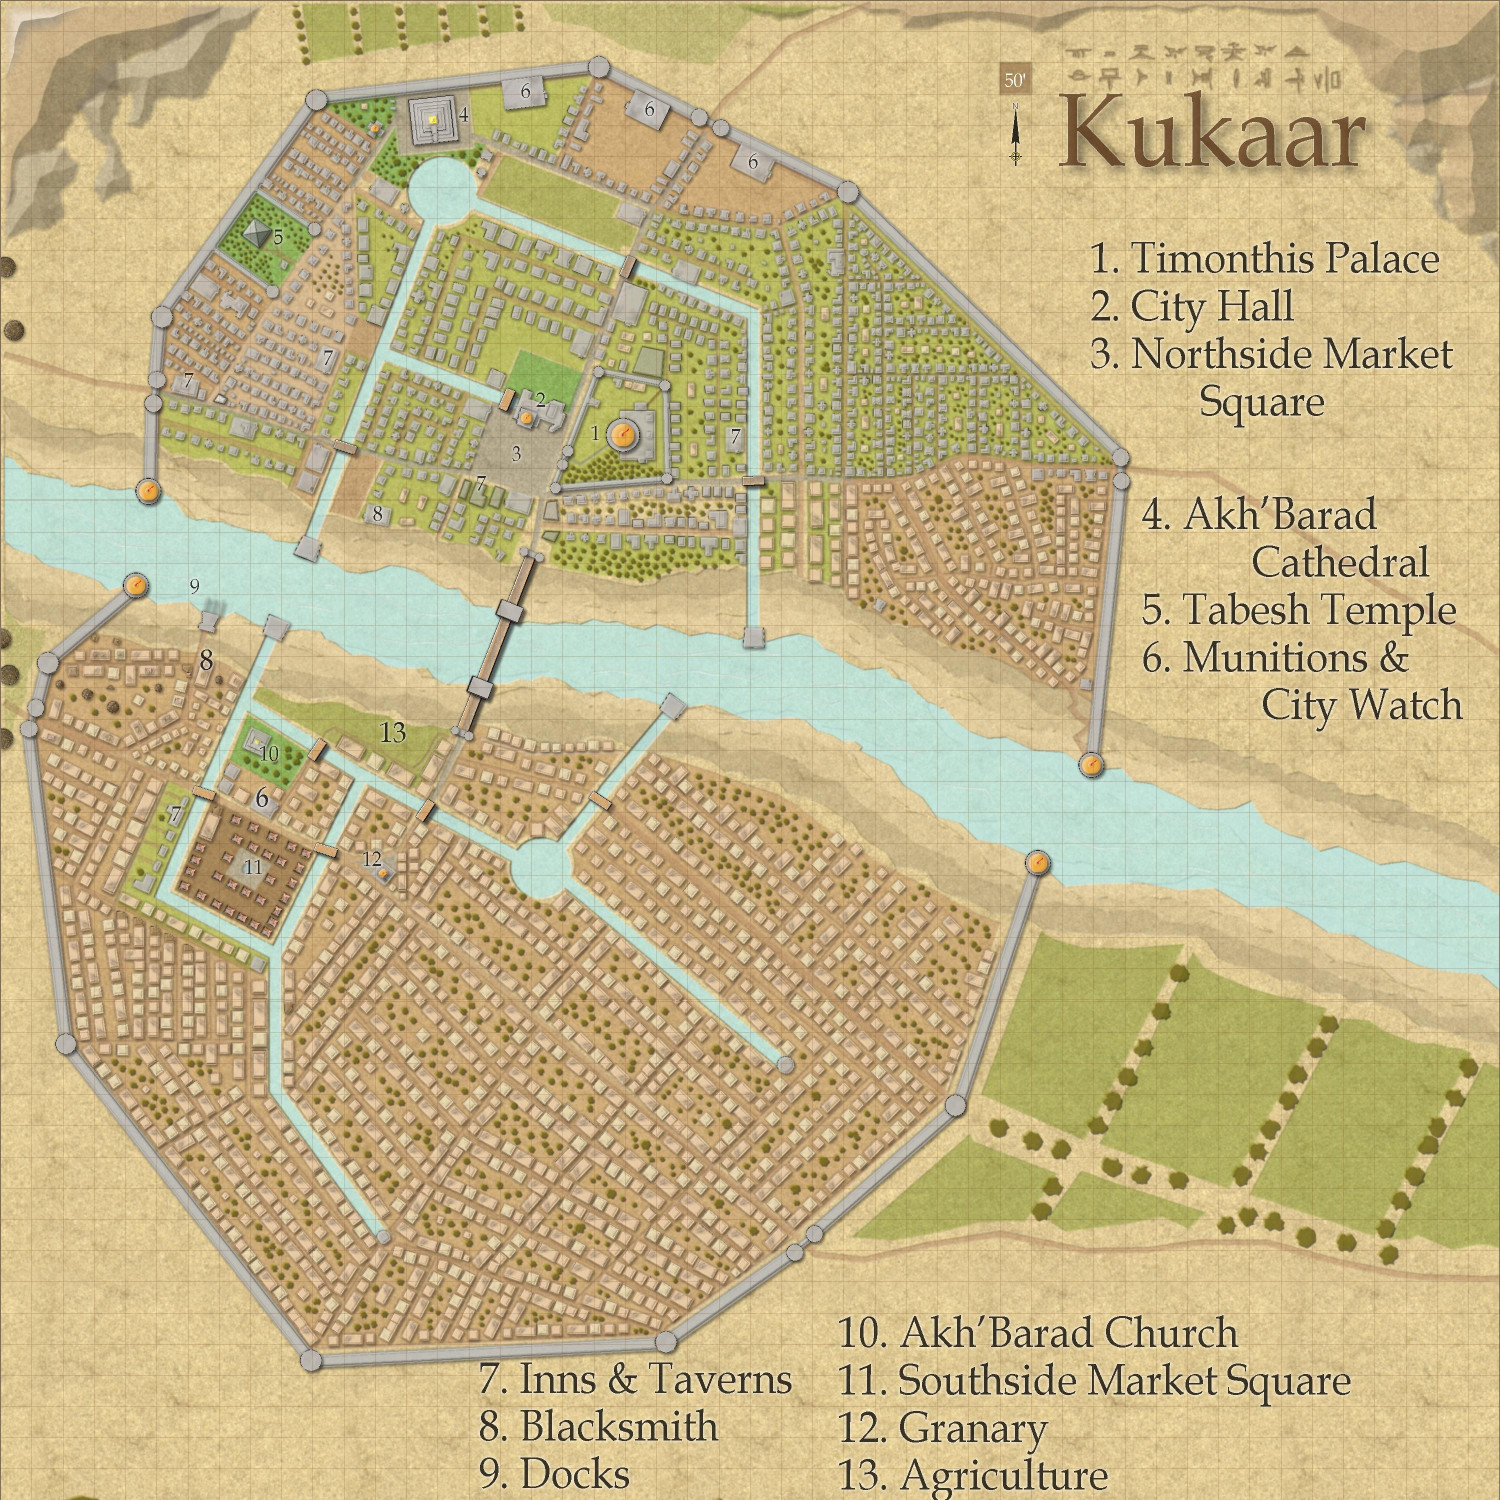
[WIP] Town of Kukaar (Ancient Cities Annual)
Revisiting my ancient town of Kukaar. Now that I'm working on a tiny sliver of the Atlas, I found a place where I would like to place this (once the parent maps are complete). However, my first just-for-fun map was just the wealthier northside district, but to put it in the Atlas, I really needed to map the entire city. I had to expand it southwards, but I didn't like how it looked as a vertical map, so I also expanded east to make it square. That forced me to also add some more residential neighborhoods in the northside, and I decided that a city this size would have a governing noble of some sort, so I also added a palace there.

 and 1 other.
 -
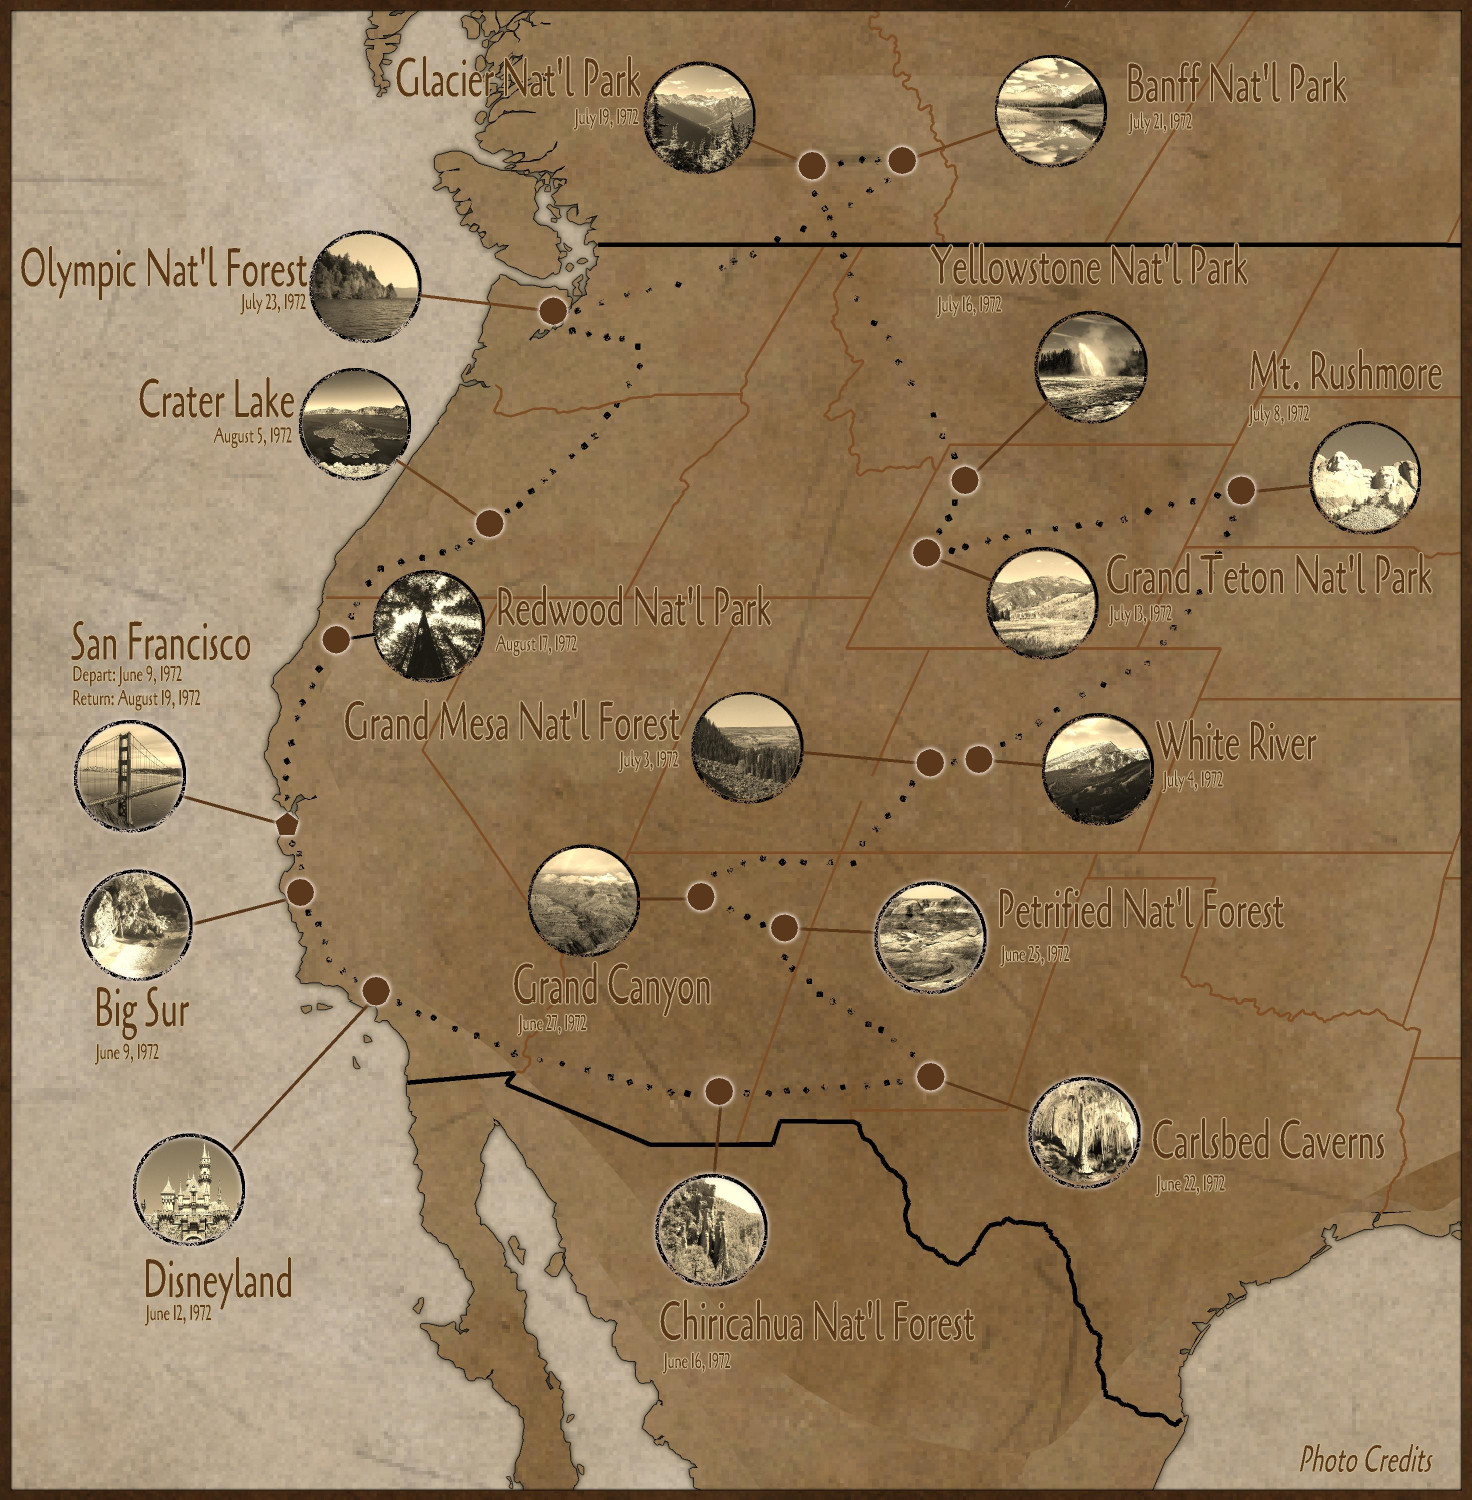
[WIP] 1972 Travelogue (CA93 Modern Journeys)
Using two of Ralf's recent tutorials, Modern Journeys and Real-World Vector Data, I was finally able to create a condensed map of a 71-day vacation my parents took me and my twin on when we were 4 years old. (The images for the icon symbols are all public domain or CC-BY. Photo credits below.)
Like Ralf's Real-World Data tutorial, I had weird gaps in the middle of my map when I tried to convert the vector lines to land. Unlike Ralf, I didn't have the skills to be able to resolve it (despite watching the tutorial three times)...so I kludged a solution by drawing more land over the gaps. There was some other weirdness on the eastern side of the map that I didn't even have to worry about once I realized that I only had to show the part of the U.S. where we traveled.
Also, because I wasn't shading each state differently, I didn't have to trace the boundaries the way Ralf did. I simply moved the lines to a Border sheet and changed their properties to be the color and line thickness that I wanted.
I originally was going to source the photos from the U.S. National Park Service's website, where they have a database of images from their parks that are all in the public domain. (In the United States, all intellectual property published by the government is automatically in the public domain.) I was struggling to find images I liked, so instead I resorted to Wikimedia Commons. I made a point of only using photos that were either in the public domain or were published by a Creative Commons CC-BY license. Those licenses allow for commercial use, unlike the CC-BY-NC licenses (even though this isn't for commercial purposes), and allow for derivatives (unlike the CC-NY-ND "no derivatives" licenses). That allowed me to edit the images to be in sepia and cropped into circles. Instead of following Ralf's approach of making them sepia in the map, I used GIMP to desaturate them to sepia and then crop them to a circle which was then exported to a PNG (with the portions outside of the circle being transparent).
I added the photo credits to a Map Note and added a hotspot in the lower right corner to open up the note. Here are the photo credits (including some I wasn't able to use because of space considerations):
San Francisco, California - Dasturias, CC BY-SA 4.0, via Wikimedia Commons
Big Sur, California - Brian Lopez, Public domain, via Wikimedia Commons
Los Padres National Forest - Damian Gadal, CC BY 2.0, via Wikimedia Commons
Disneyland - Tuxyso, CC BY-SA 3.0, via Wikimedia Commons
Chiricahua National Forest - Zereshk, CC BY-SA 3.0, via Wikimedia Commons
Carlsbed Caverns - Eric Guinther, User:Marshman, CC BY-SA 3.0, via Wikimedia Commons
White Sands National Park - uncredited NPS employee, Public domain, via Wikimedia Commons
Petrified National Forest - AndrewKPepper, CC BY-SA 4.0, via Wikimedia Commons
Grand Canyon - Tuxyso / Wikimedia Commons
Glen Canyon Dam @ Lake Powell - Christian Mehlführer, User:Chmehl, CC BY 2.5, via Wikimedia Commons
Grand Mesa National Forest - National Archives and Records Administration, Public domain, via Wikimedia Commons
White River National Forest - JasonC photography, CC BY-SA 4.0, via Wikimedia Commons
Mt. Rushmore - Colin.faulkingham at English Wikipedia, Public domain, via Wikimedia Commons
Teton National Forest - US Forest Service, Public domain, via Wikimedia Commons
Yellowstone National Forest - Brocken Inaglory, CC BY-SA 3.0, via Wikimedia Commons
Glacier National Park - TaikiMcTaikiface, CC BY-SA 4.0, via Wikimedia Commons
Banff National Park - Sergey Pesterev / Wikimedia Commons
Mt. Baker National Forest - Joe Mabel, CC BY-SA 3.0, via Wikimedia Commons
Falls View, Olympic National Forest - Forest Service of the United States Department of Agriculture. Public domain, via Wikimedia Commons
Crater Lake, Oregon - DSparrow14, CC BY-SA 4.0, via Wikimedia Commons
Redwood National Park - m01229 from USA, CC BY-SA 2.0, via Wikimedia Commons


-
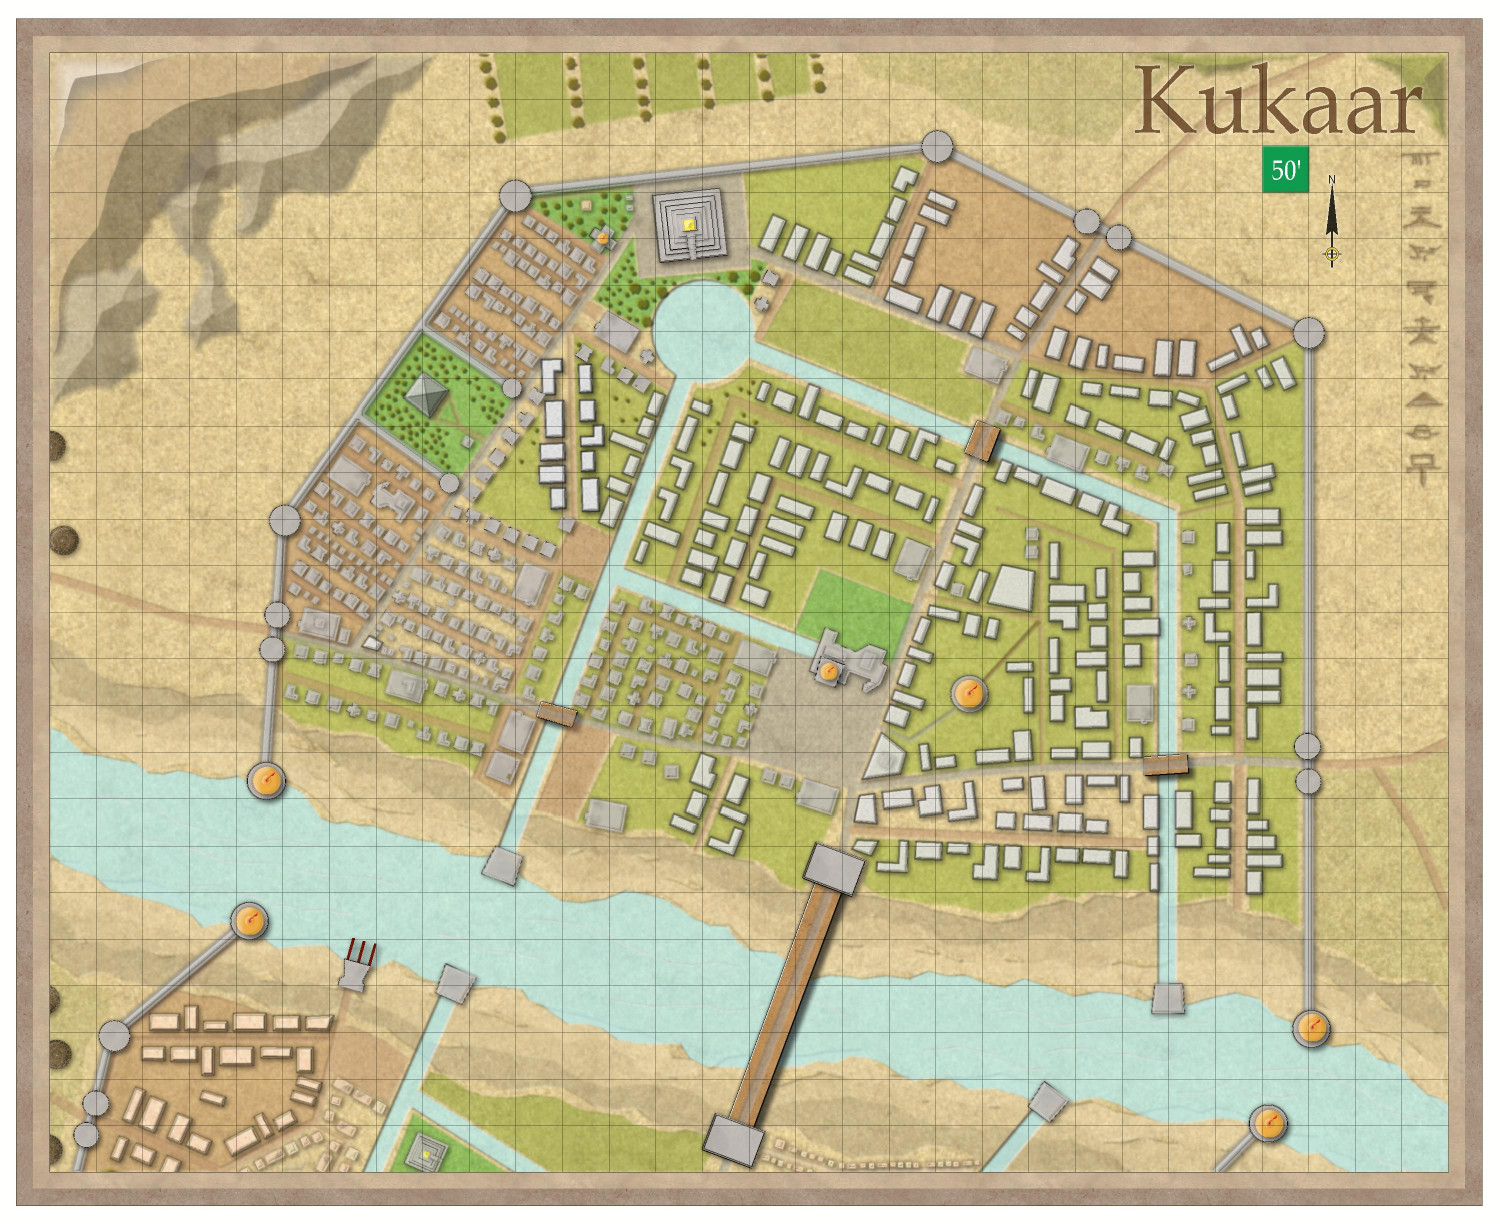
[WIP] Town of Kukaar (Ancient Cities Annual)
Oops, I forgot to add a compass and scale.


 and 1 other.
 -
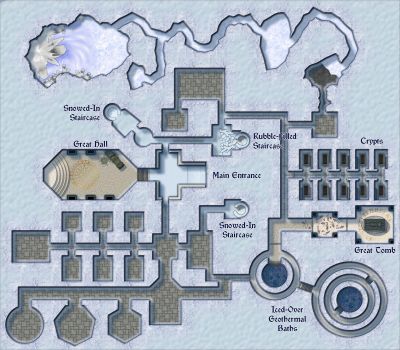
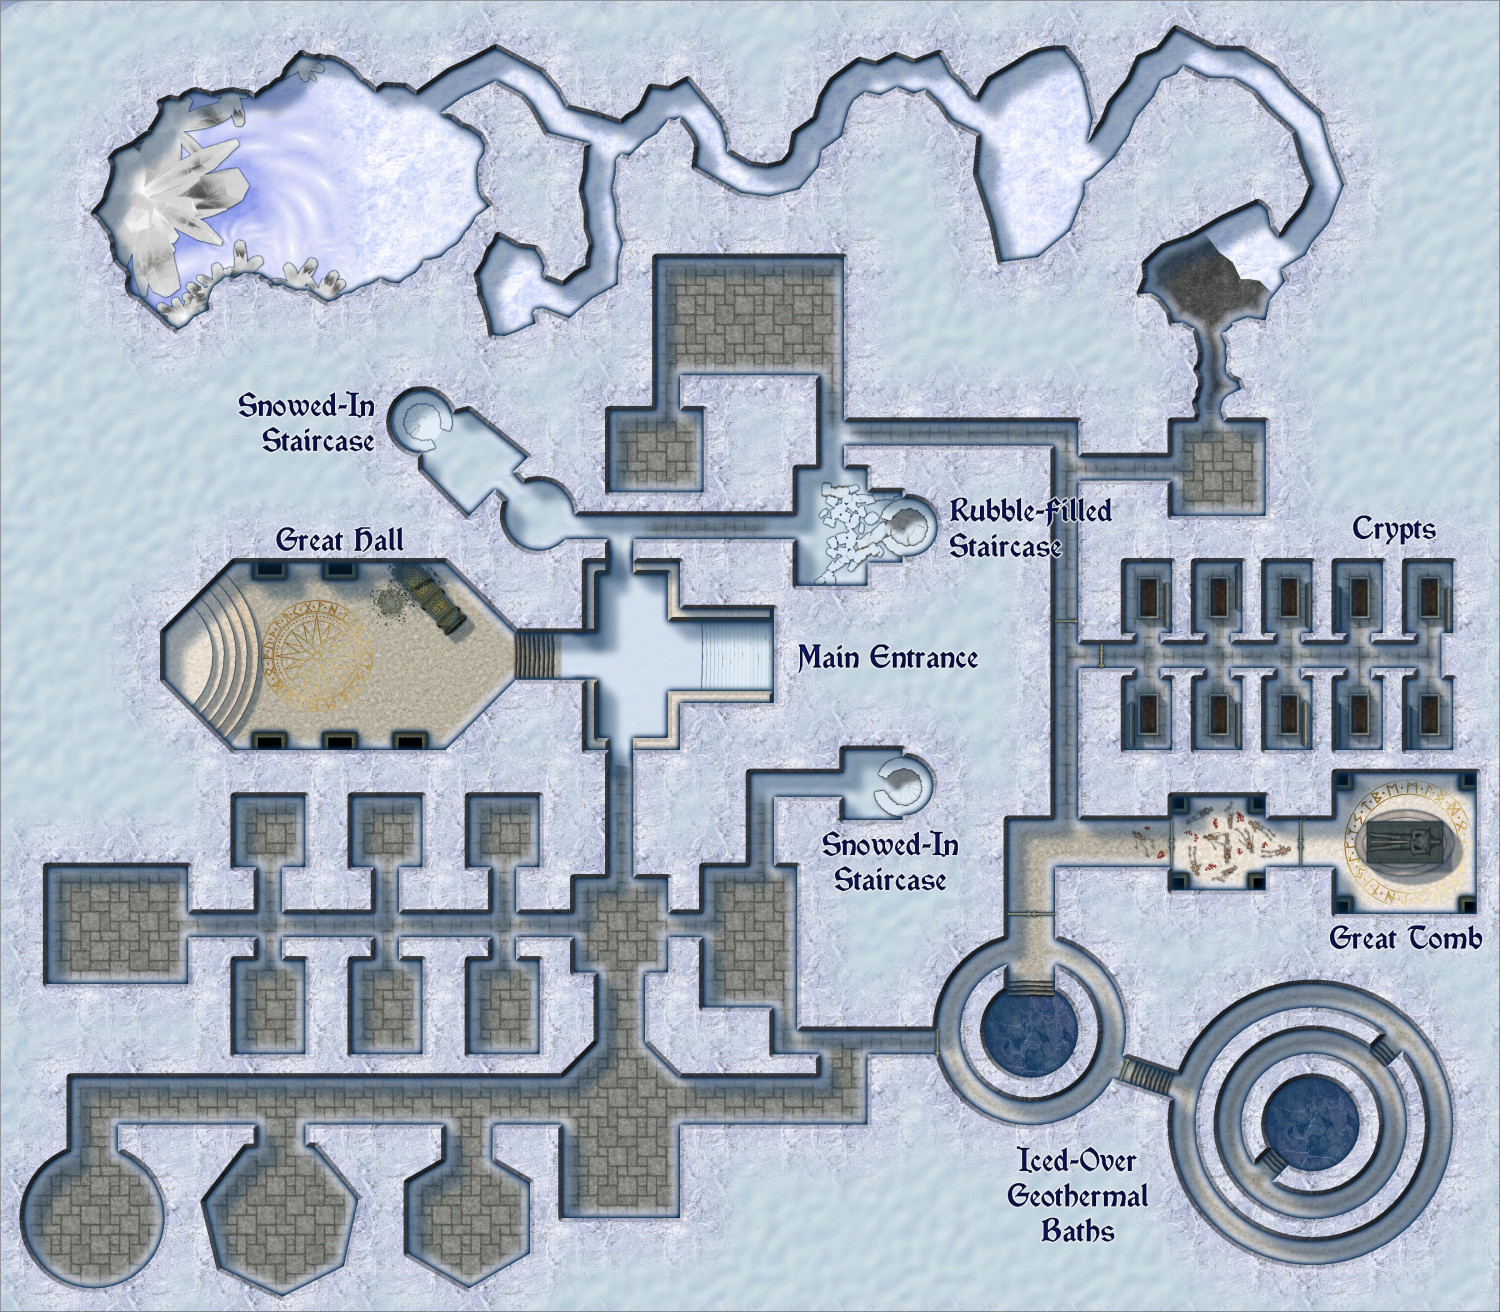
[WIP] Iced-In Ruins of a Dwarven Temple
Half of my co-workers (scattered around the U.S. and the world) are either snowed-in or have temporarily left their homes for safer weather conditions. Meanwhile, here in San Francisco, it's a not unpleasant 58 degrees Fahrenheit (14.4 C).
But cold weather is on my mind, and it inspired me to create ruins with the Ice Cave annual. This is the ruins of a dwarven temple that has been overcome by the weather, perhaps magically conjured. (Elsa, are you there?) All of the entrance staircases have been snowed-in. Although the rest of the temple remains snow-free, the walls have turned to ice, and icy frost creeps along the floor from the edges of the walls. Even the geothermal baths in the southeast corner have turned to ice.
(I originally had the entrance to those baths coming from the east, but the cutout ended up looking distractingly like a copyright symbol.)
The ten sarcophagi in the crypts have their lids pushed aside, and their contents are empty. Not so coincidentally, there are also ten skeletons in the antechamber of the Great Tomb -- perhaps rising to defend the remains of whomever lies in rest there?
On the northern side, a break in a wall leads to icy caverns and a cluster of large crystals, swirling with magic. Perhaps the source of this icy disturbance?


-
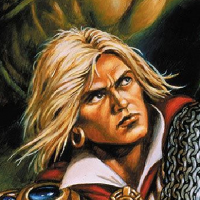
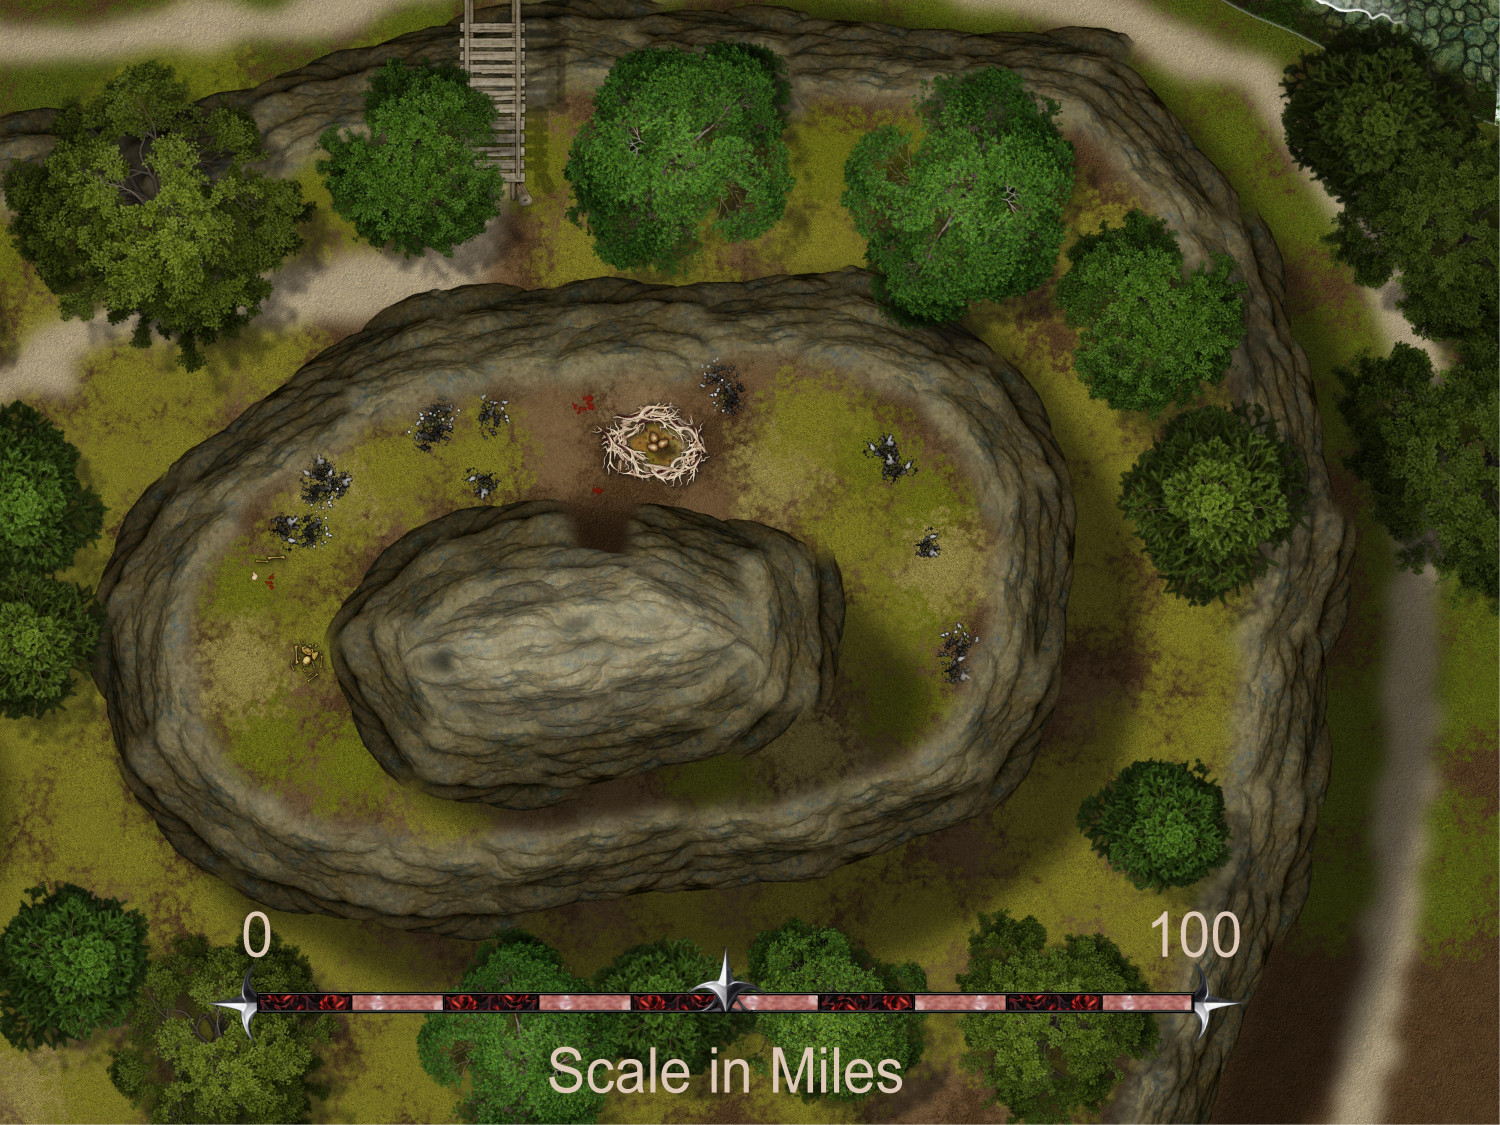
[WIP] Rise of the Crone-Mother
First pass of the outdoor areas of the Forest Hags' lair, the Withering Glade. The premise is that elves once used it as a shrine, but the hags drove them out, poisoning the Great Tree in the center of the glade.
I've been experimenting with using the Forest Trails cliff symbols back to back to make ridges. One other thing I tried, inspired by something I saw Ricko do: instead of using the grass and dirt fills with the grass and dirt patches symbols to make the edges more raggedy, I only used the dirt and grass patches. There are also two sets of all of the tree sheets (including tree parts for stumps and tree shadows), so that some could be beneath cliffs and others above. I thought I would need multiple sheets for the cliffs to show ascending elevation, but I didn't. Had to keep reminding myself that it's all an optical illusion. Amazing how things you can trick the eye, especially when, like the cliffs in Forest Trails, you draw in the shadows instead of relying on sheet effects.
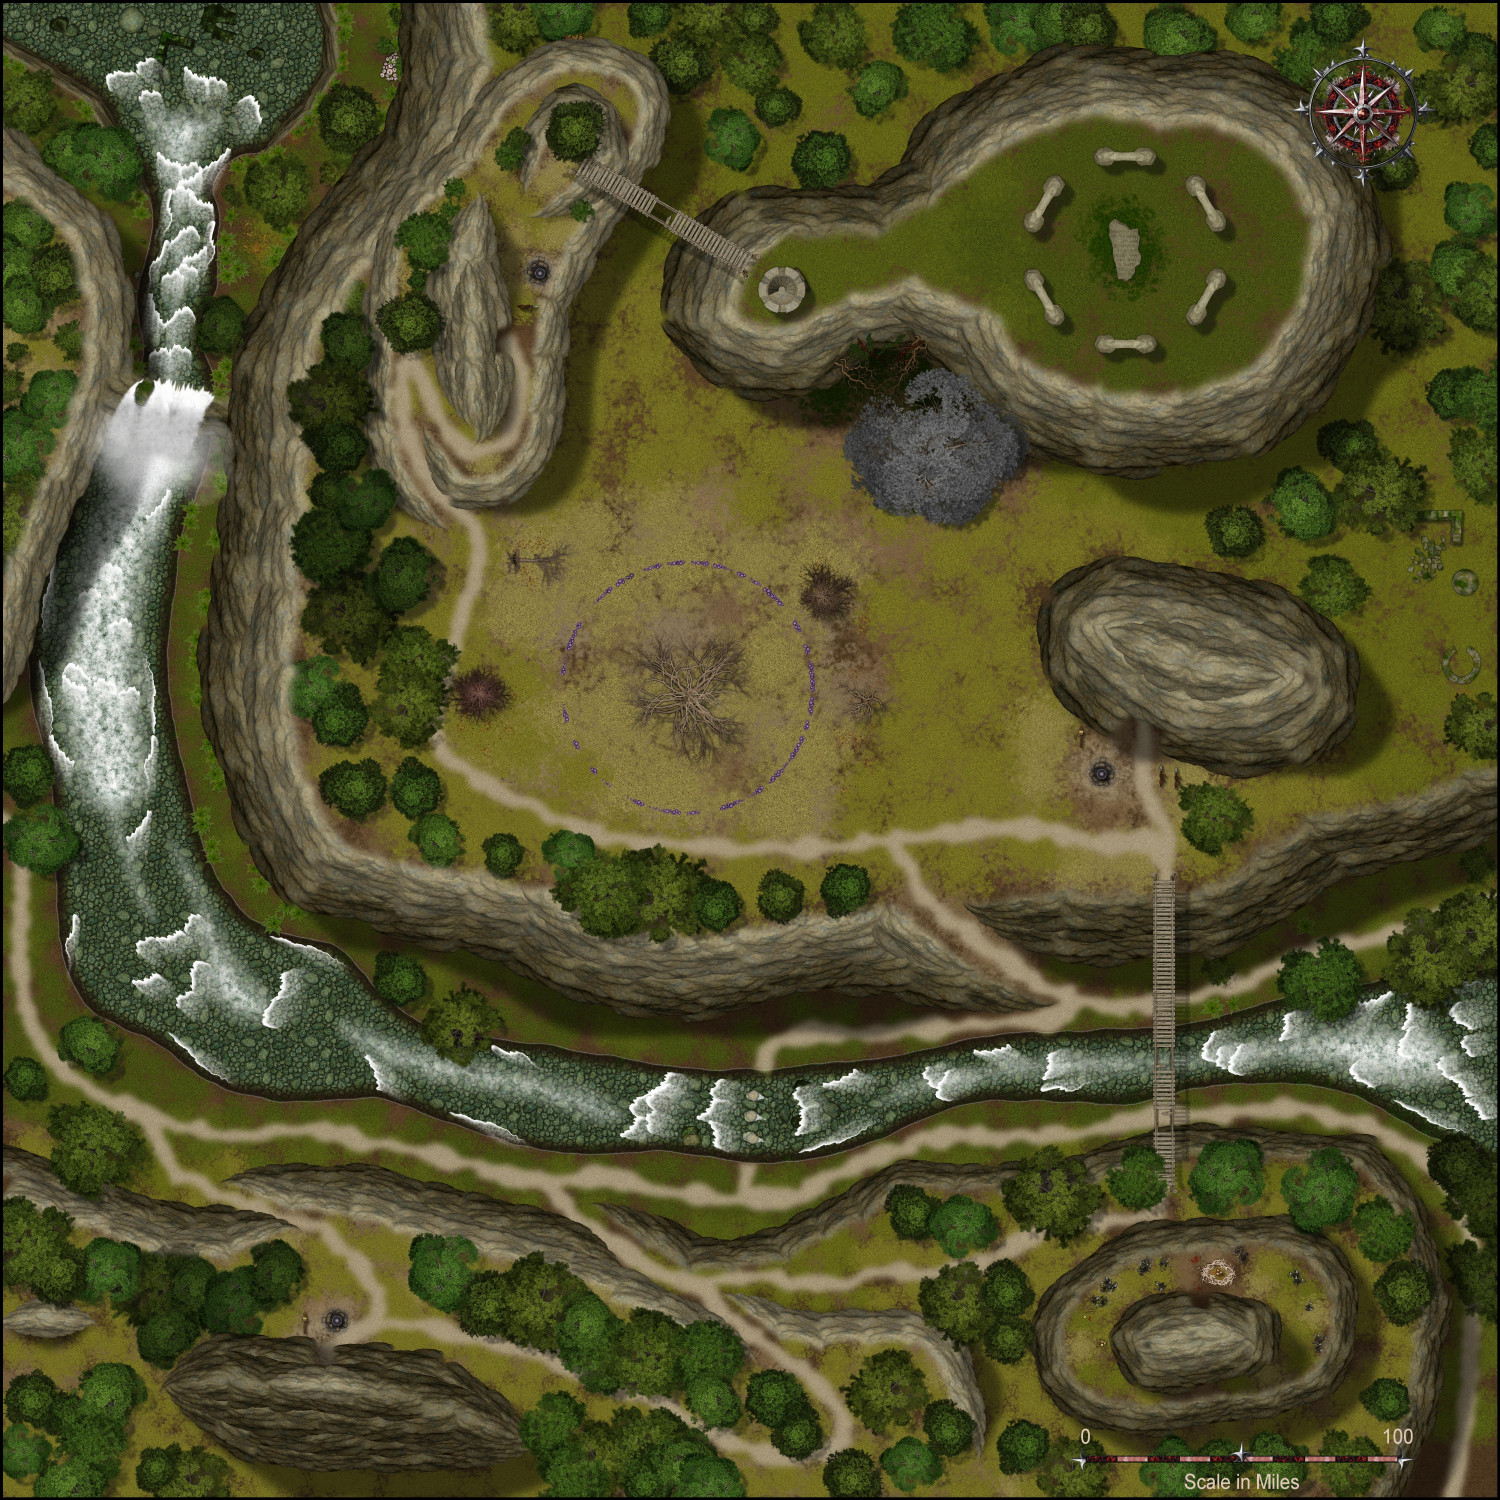
Zooming in, here's one of the three caves used by the coven of hags as bedrooms.
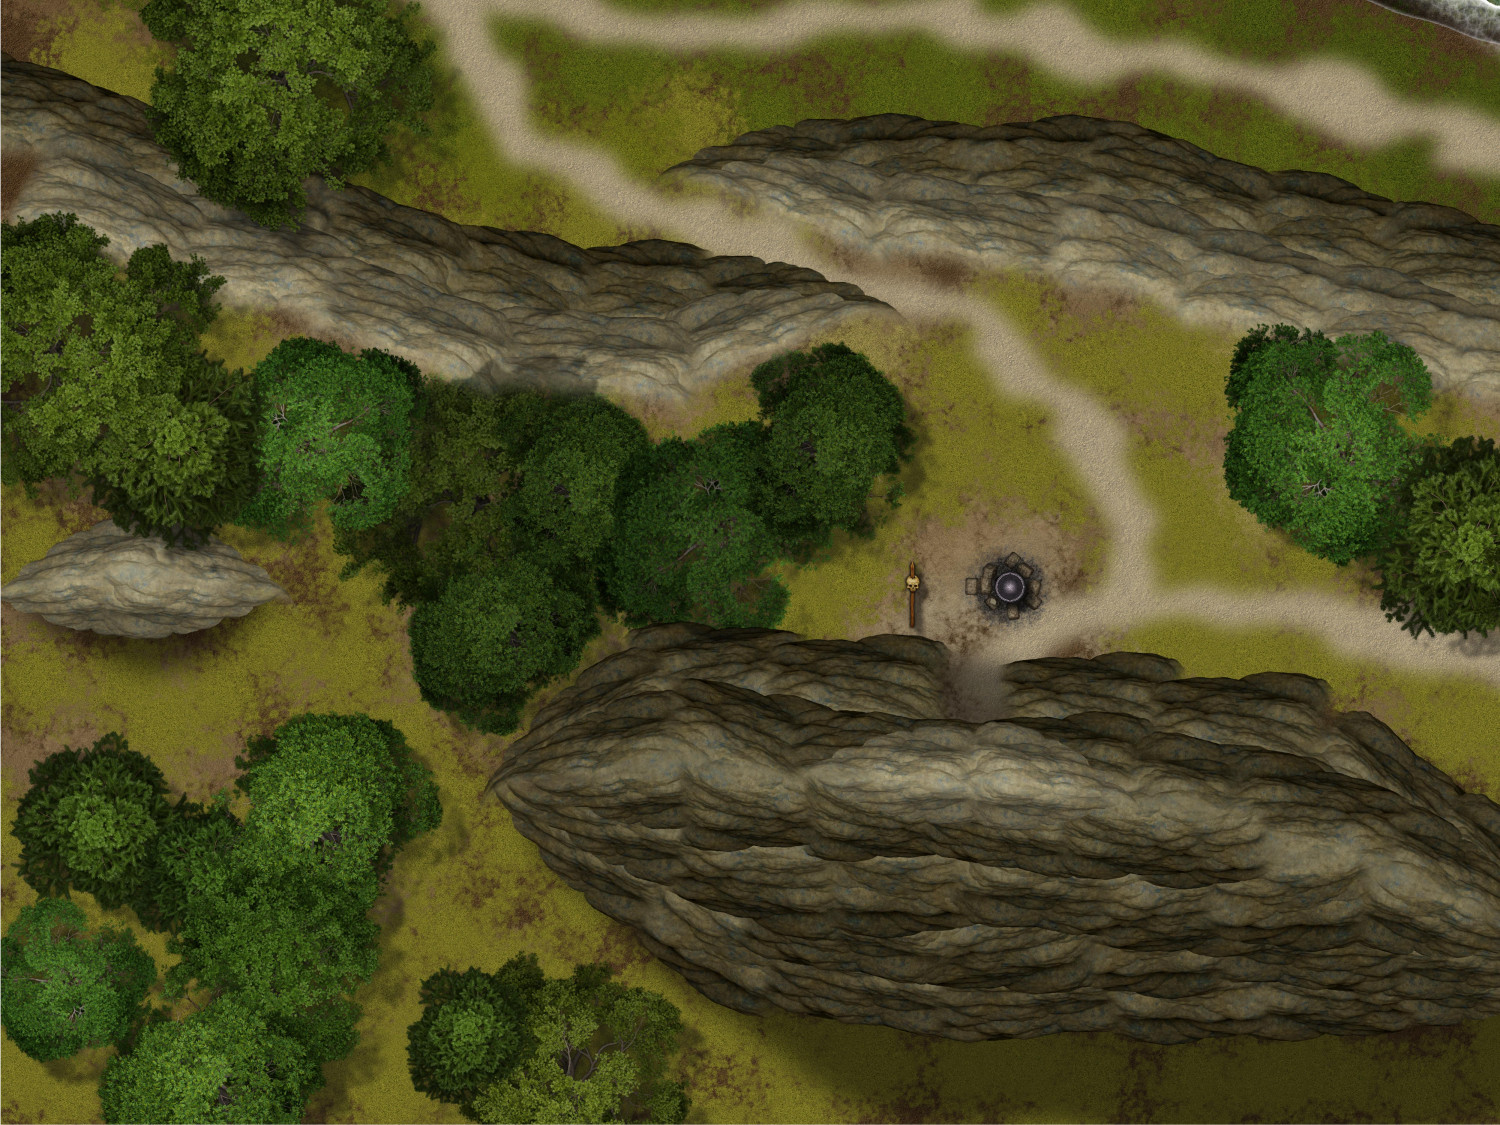
Here's a zoom in on the henge (which operates as a teleportation circle). The gray tree at the cliff base in an Animated Tree. It was a dryad's tree, but the dryad was turned into one of the hags, corrupting her tree. You might notice some vines growing out of the cliff wall near the tree. They are animated, grasping at the hags' captives and serving as organic shackles. This is the only one above ground but there are more within the caves.
Oh, and in the southeast corner, a trio of harpies have set up a nest.


-
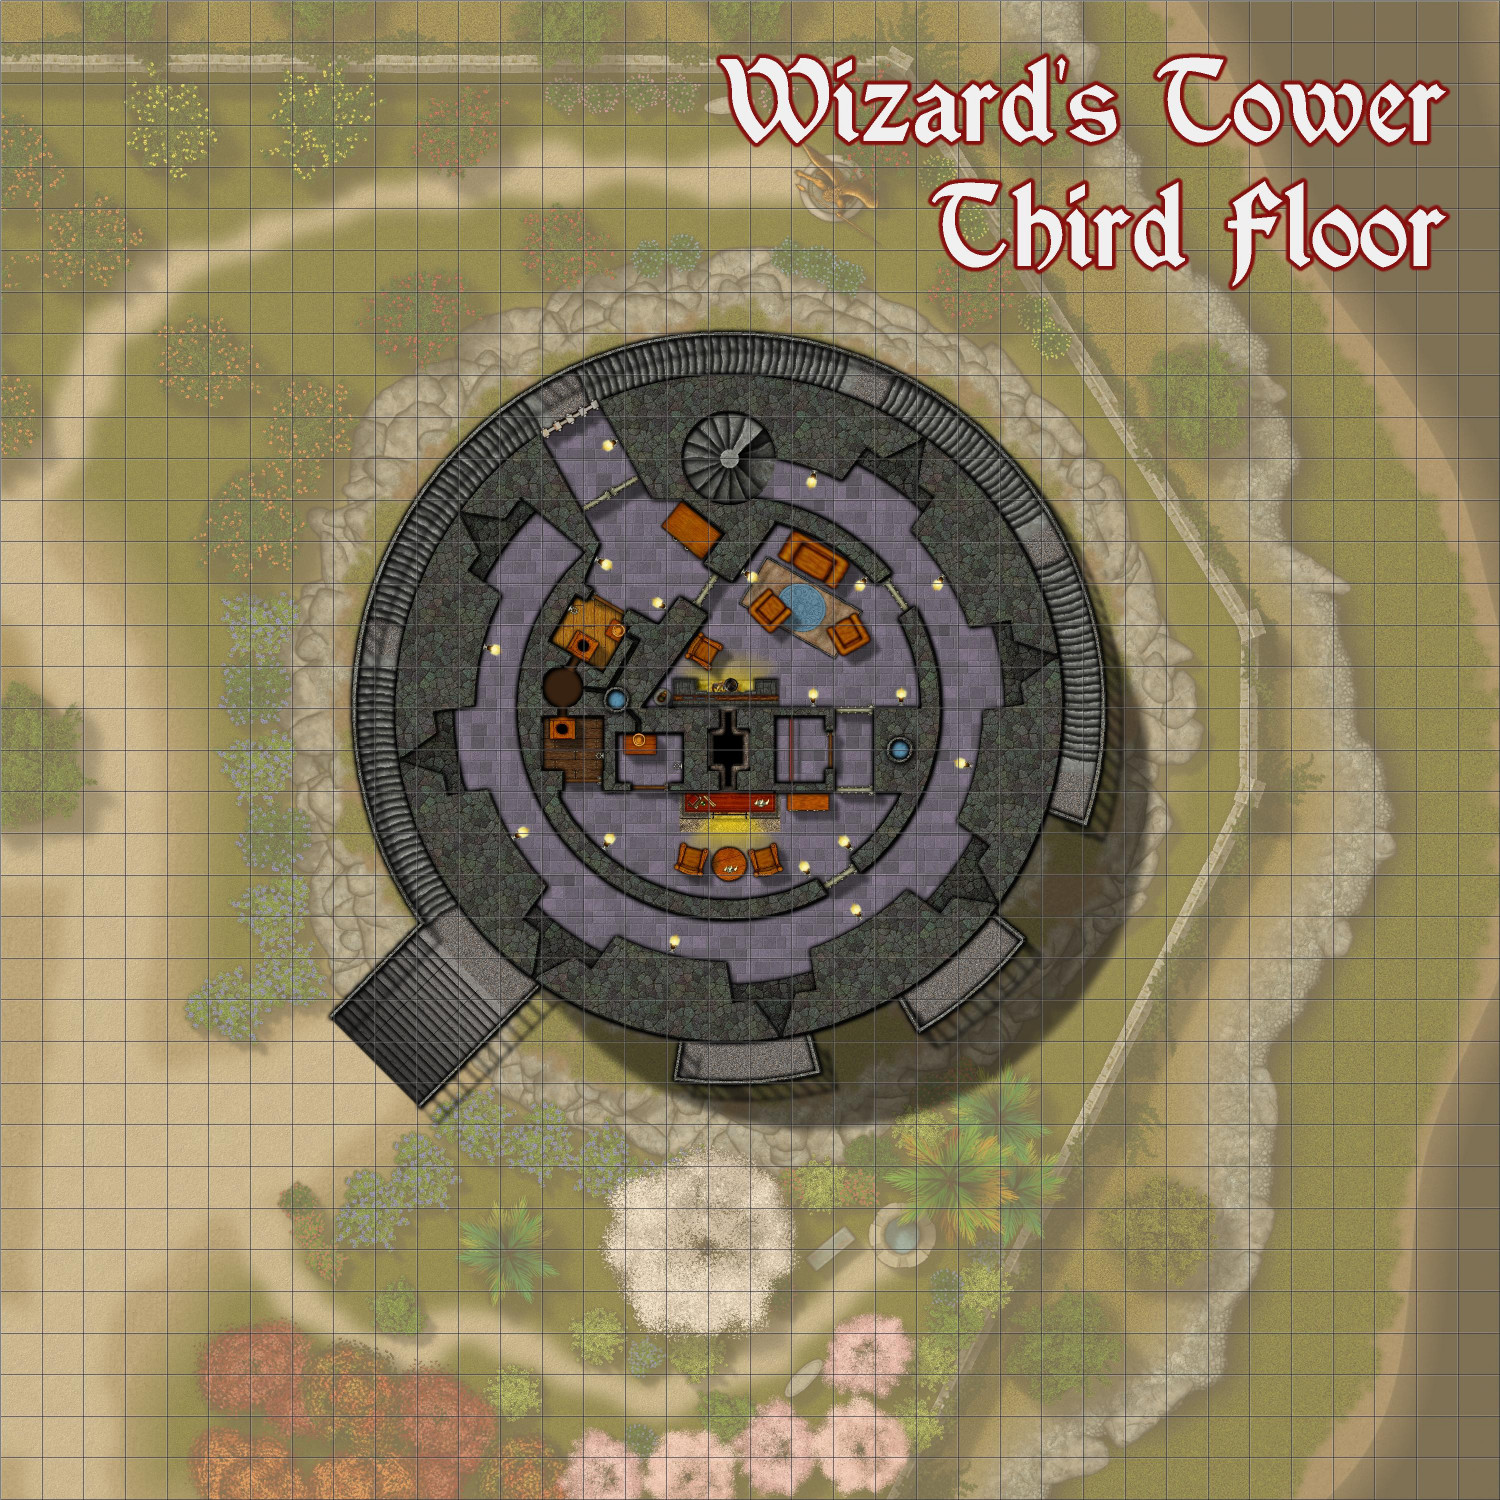
[WIP] Wizard's Tower - Interior
Because I always have at least three mapping projects going on at once, I decided to work on the interior of my Wizard's Tower while I work through experimenting with three different approaches for cliff shadows for the Hei Shan Si monastery.
I decided to start with the third floor, because that's where the main entrance is. Here, visitors can ring a bell at an outer gate to be admitted into an entry foyer, which has a wardrobe for storing cloaks and such, as well as access to a water closet (complete with a wash basin with water pumped up through an interior well). From there, guests can wait in a waiting room (complete with fireplace) until the wizard is ready to receive them in a more comfortable
Arrow slits allow the wizard or other defenders to guard the tower. The arrow slit that is immediately counterclockwise to the entrance is about waist-high to people on the stairs. The next two counterclockwise would be above anyone on the stairs; the others clockwise would be below the stairs as they continue to ascend. Plenty of magical torches keep the interior bright. In D&D terms, they have been enchanted with a Continual Flame spell that produces a smokeless, heatless flame forever, or until dismissed. (Sure, you have to spend 50 gp in spell components for each, but you'll never have to replace them.) In addition to the exterior stairs, an interior spiral staircase provides interior access to both levels two and four.
This uses Creepy Crypts as the base, with extensive use of Beaumaris Castle assets (plus vegetation from Japanese Temple and furnishings from DD3. And a few tidbits from Forest Trail.

-
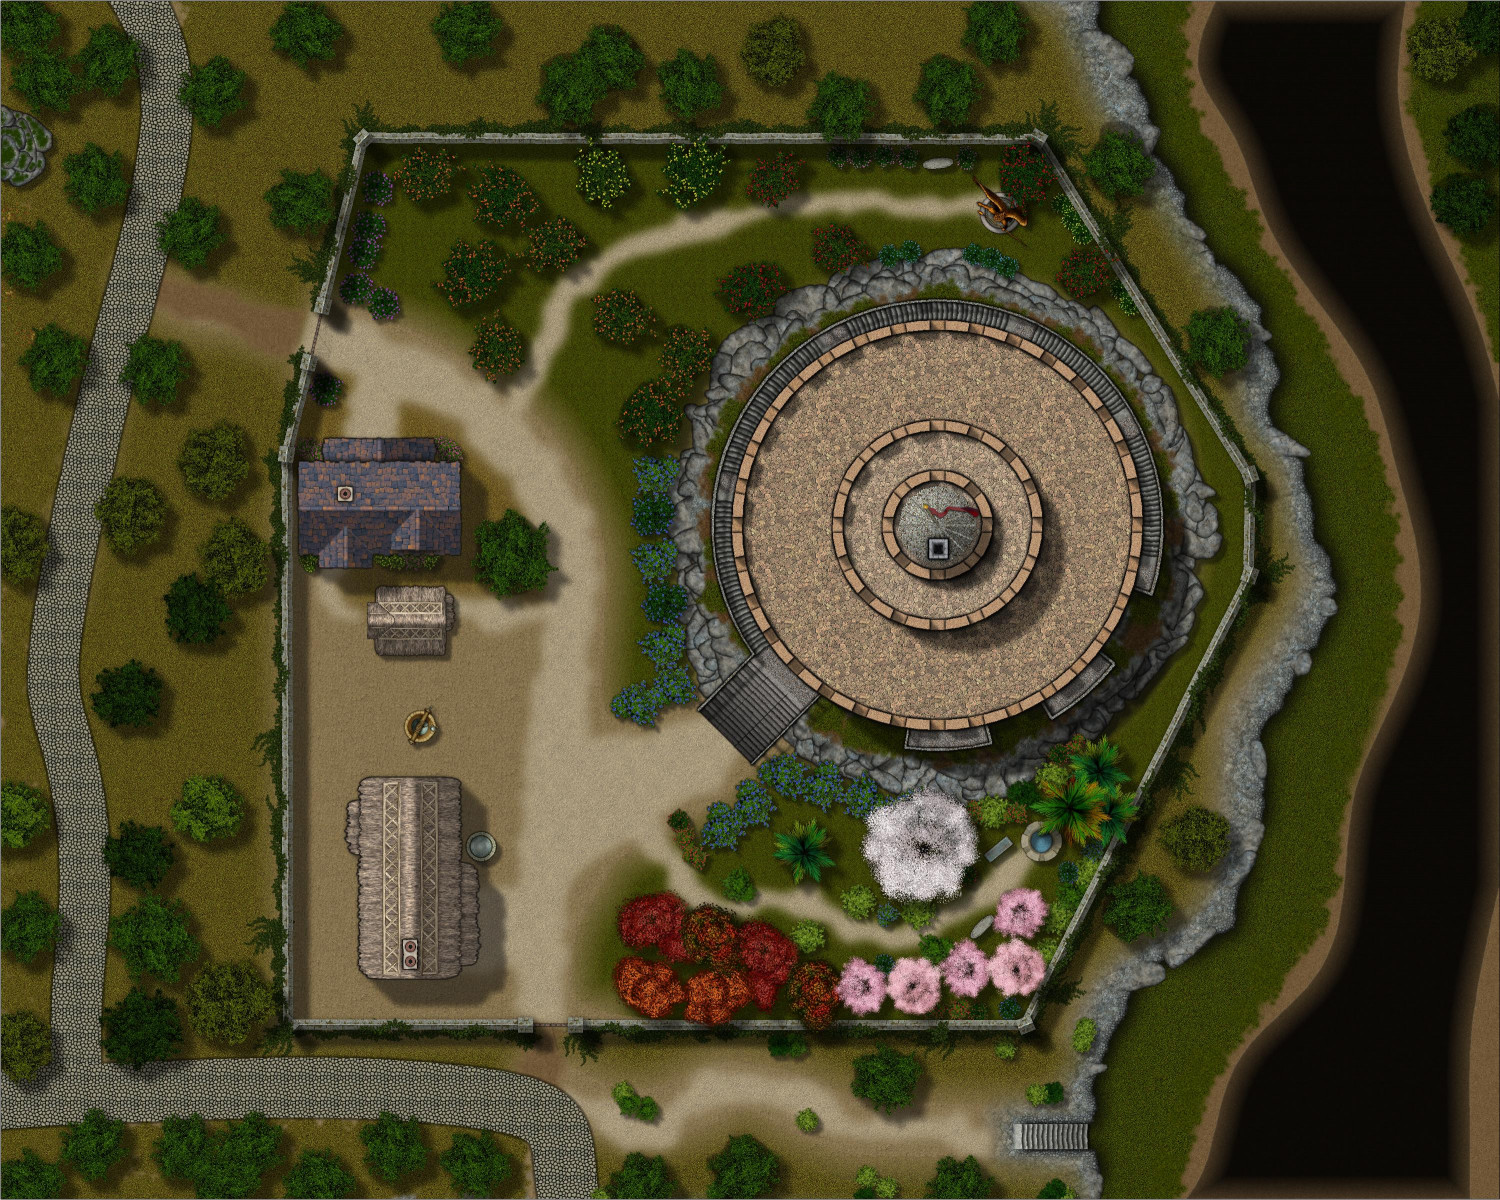
[WIP] Wizard's Tower
I have been working on a "small" wizard's tower that uses CA186/188 Creepy Crypts as the base (to facilitate doing the below-ground portions later) with heavy use of the fills and symbols from CA149 Beaumaris Castle.
I put "small" in quotes because it was intended to be the small one, but has been the victim of scope creep. I was working on a much larger wizard's tower that was the center of a much larger fortification, but put it on pause to do this one as a proof of concept. My "small" tower ended up being 80 feet in diameter with at least six stories in the main structure and at least two more stories rising above that. (There are also plans for at least three basement levels, including the sewers.)
I wanted to do a tower where the stairs wind around the outside, like the Sage Tower from Mike Schley's Overland symbols:

Given the diameter I picked, the steps ended up going about three-quarters around. It has 146 steps. Since each step has a rise of 7.5 inches, the steps reach a height off the ground of 1,095 inches, or 91.25 feet. And as you can see, the exterior steps don't go all the way to the top of the tower.
Here is the exterior view and the grounds, which includes a house for servants and/or guests, a barn, an outhouse, an exotic garden, and a fruit orchard. The tower is on a rocky outcrop on a bluff overlooking a river.
Per the discussion in this Tree Shadows thread, I drew in tree shadows for each tree so that a battlemap could be made hiding the trees but still showing the shadows of where they are, so that players could battle beneath the canopy. Here it is with the trees hidden but their trunks and shadows still shown:
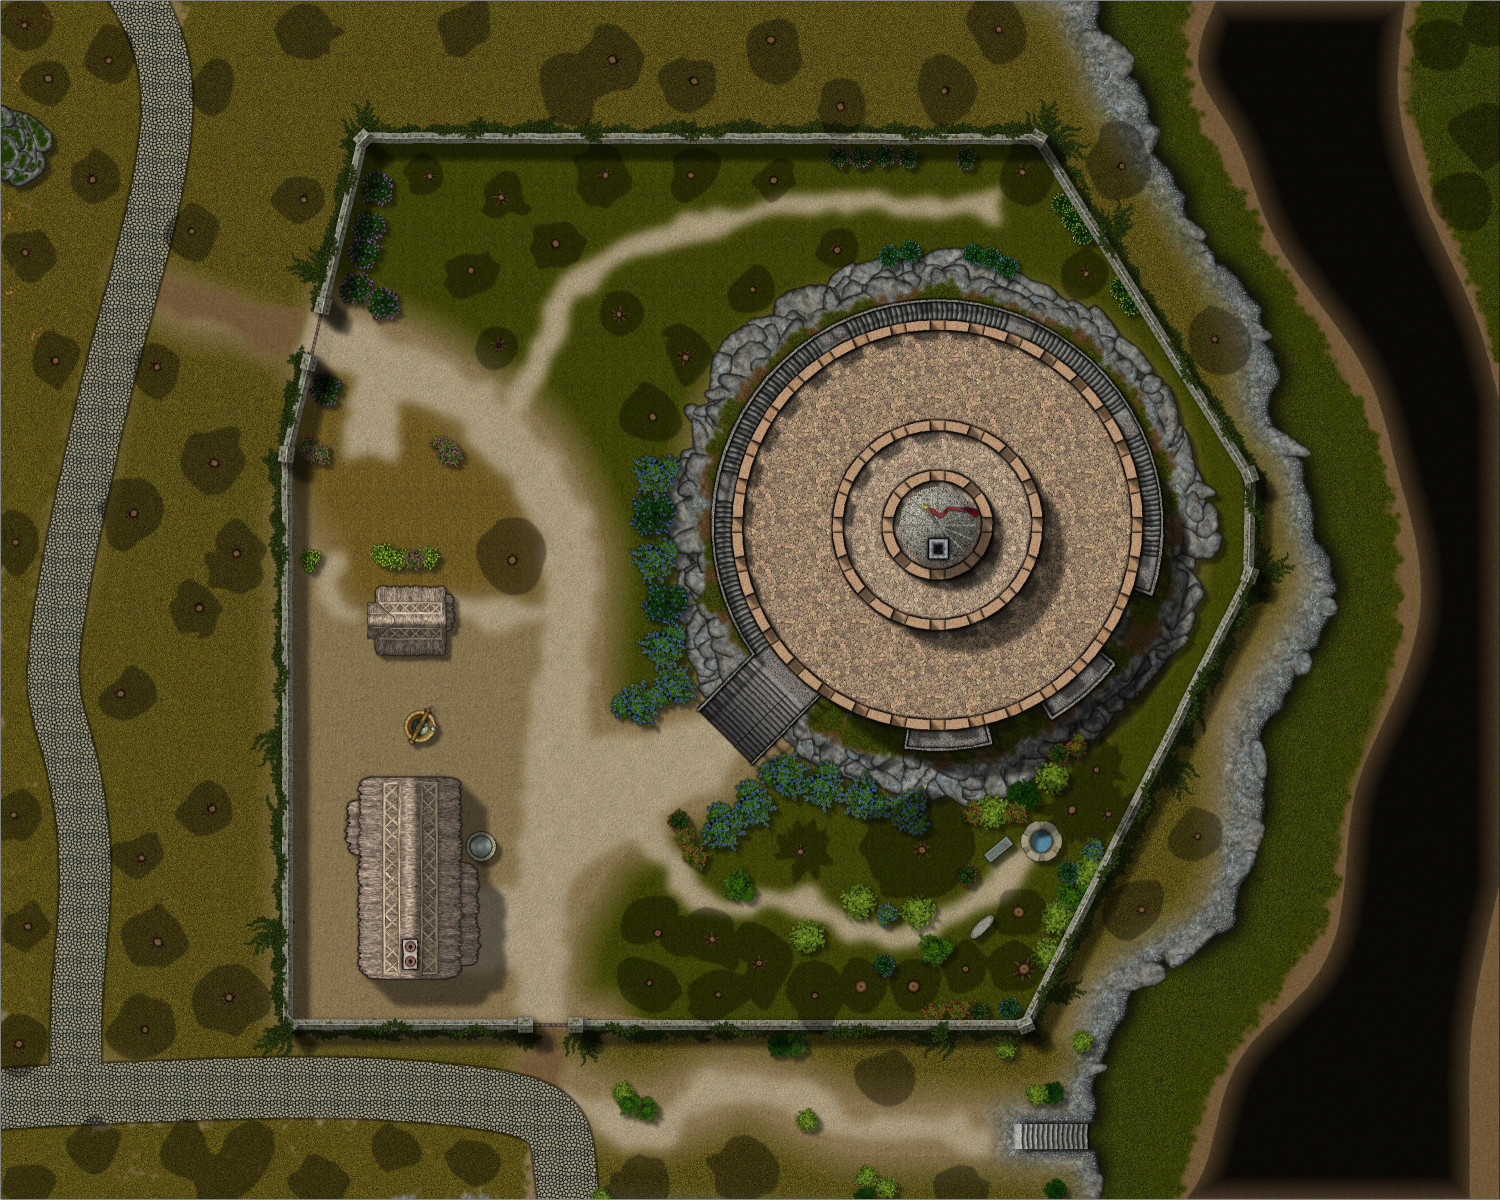
(Just noticed that the house disappeared. Must have been on the "Vegetation - Trees" layer. Fixed!
Onwards to the interior!

-
[WIP] Atlas Contest: Eilân Danaäd (Sea Elf Village)
After doing a dark elf farming village and a wood elf forest treehouse village, how could I resist revisiting my sea elf outpost and using it as inspiration for a sea elf village?
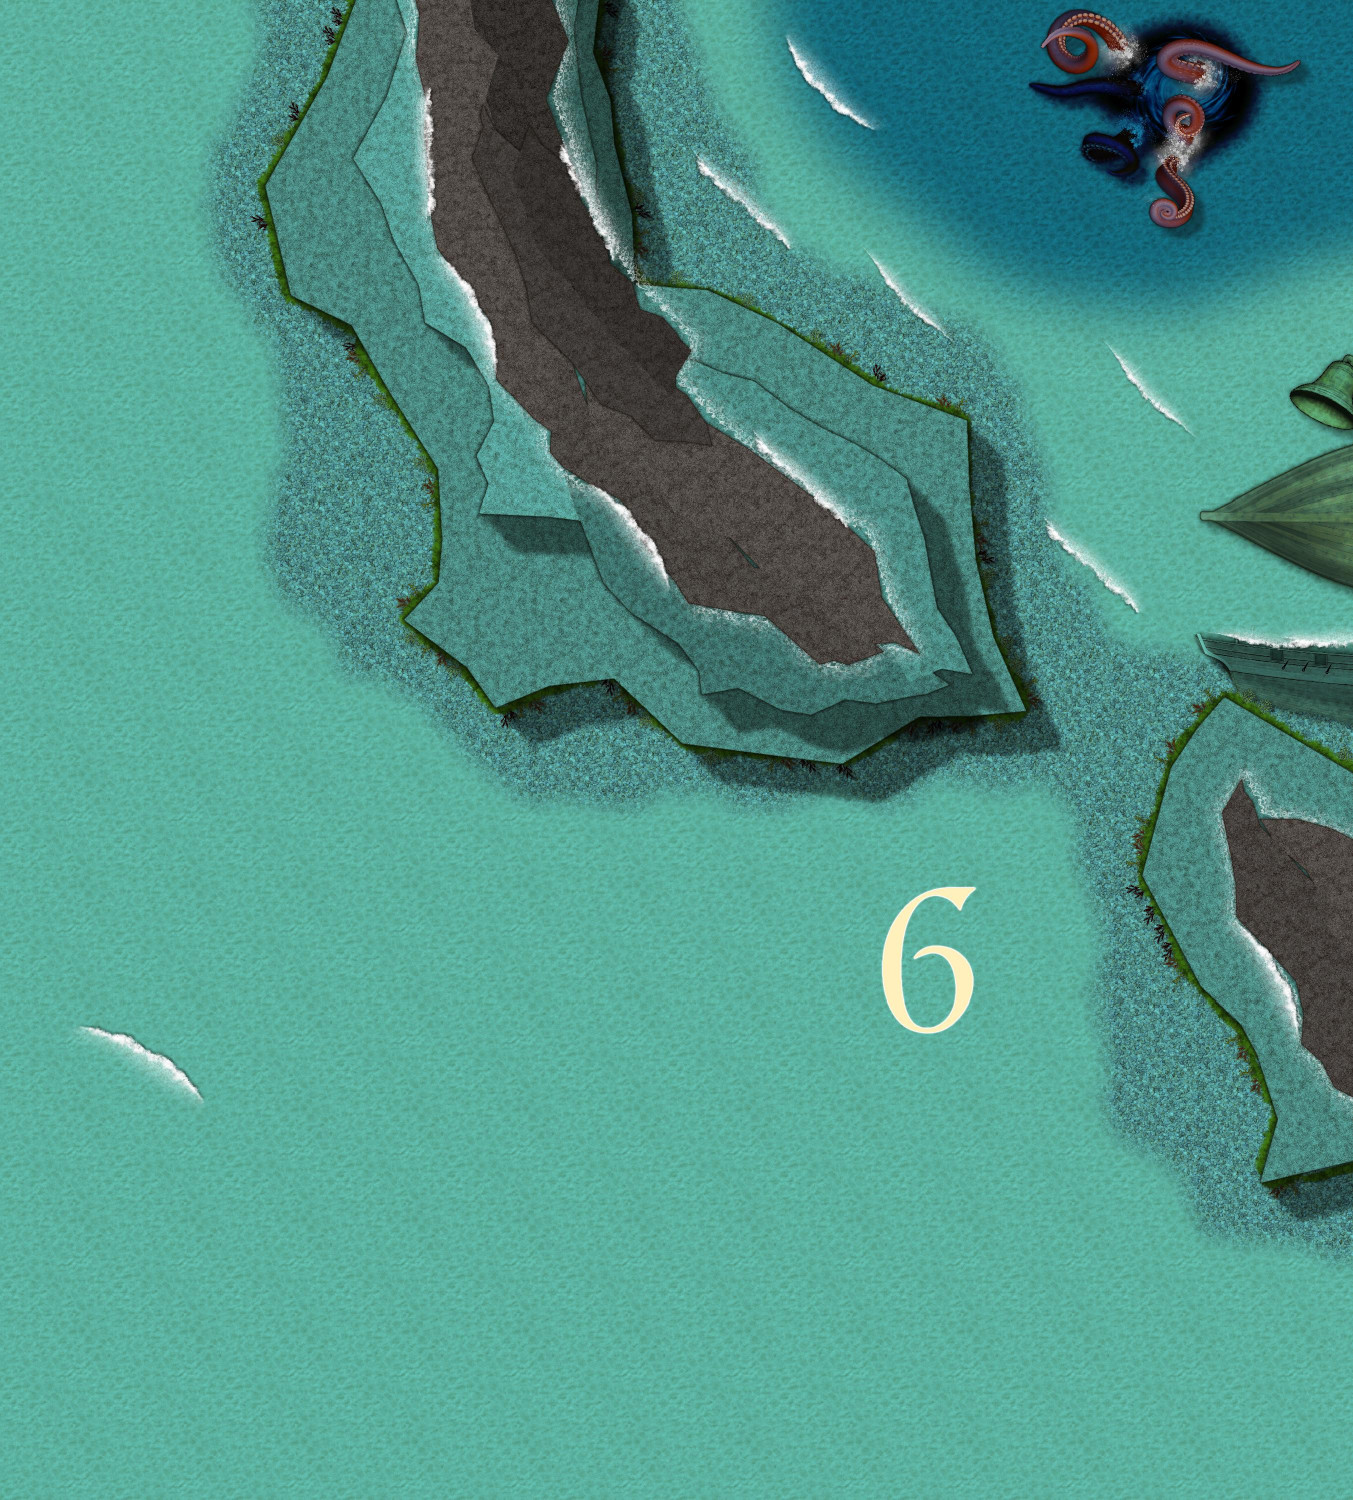
This is Eilân Danaäd, a harbor and village in a rocky reef area north of an island off the coast of Dóriant. The village includes both dry ground structures on the harbor side as well as below-water residences on the other side. The sea elves created the harbor as an opportunity to trade with sailors from the Dóriant mainland, as well as sailors traveling to Dóriant. The elves sell or trade deep sea fish and marine vegetation that would be difficult or impossible for surface-dwellers to get to. They also provide ship repair services for ships damaged at sea, and help sailors navigate through the rocky reefs.

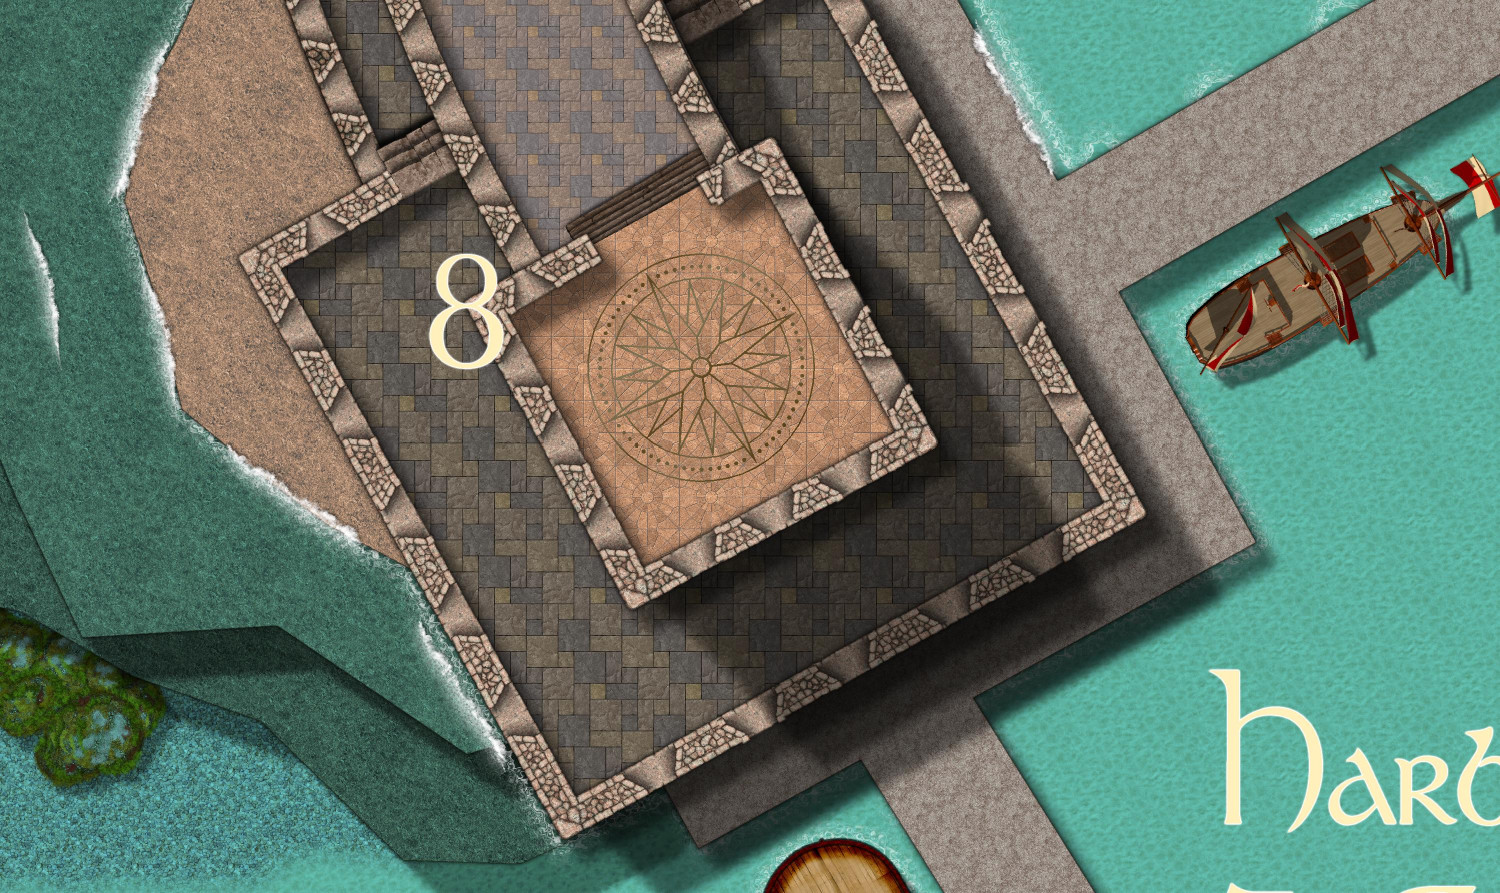
The harbor consists of a horse-shoe shaped tiered great wall, with a great tower in the center and two somewhat shorter outer towers. Each tower has a landing pad on top to accommodate aerial visitors who ride pegasi, griffons, or other flying mounts.
The Great Tower in the center extends all the way down to the sea bed. It contains the villages government, and has plenty of space both below and above the surface of the water for the sea elves to hunker down during the strongest storms. (The sea elves wouldn't drown in the storms, but they could be blown miles out to sea.)
The harbor includes an inn for sailors eager for a bit of dry land and a bed that doesn't rock. It also includes a tavern, where sea elves can imbibe with visiting sailors. (Drinking alcohol -- or any other liquids -- isn't possible below the waves, though in their marine environment, the sea elves do imbibe with hallucinogenic fungi, fermented sea cucumbers, and other intoxicants.)
There is no natural source of fresh water at the harbor, so the elves have created several cisterns to capture rainwater. Sprinkles of rain occur nearly daily, and storms (usually mild) occur frequently throughout the year.
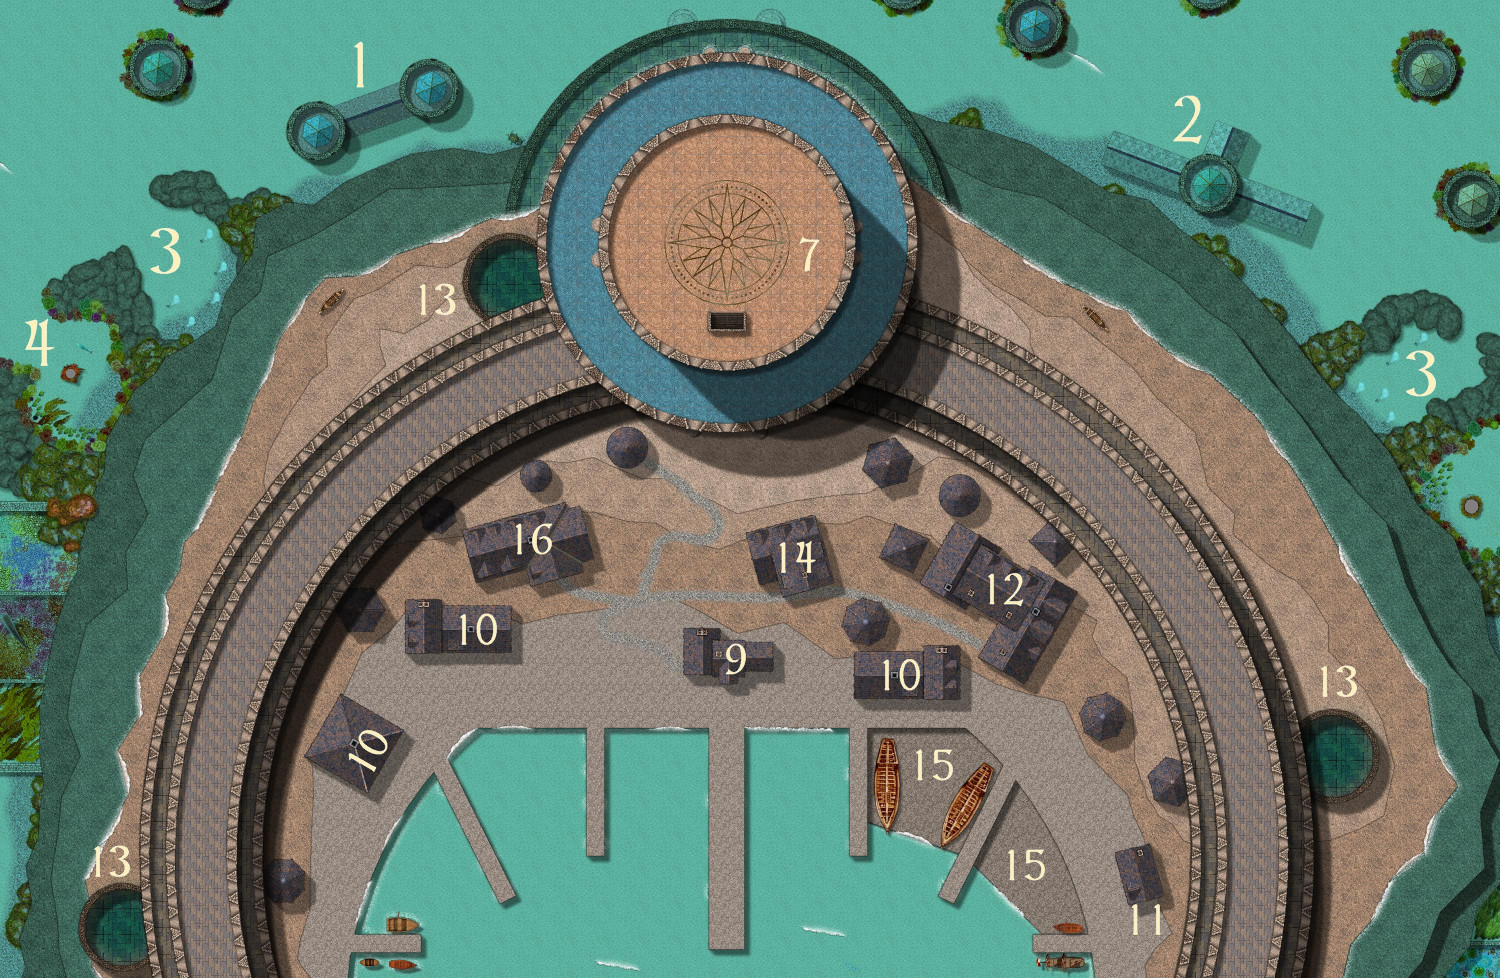
Both the towers and the wall are in two tiers, with the lower tier rising about 50 feet above sea level and the upper tier another 30 feet above that. The wall provides protection for the above-ground part of the village for all but the strongest of storms.
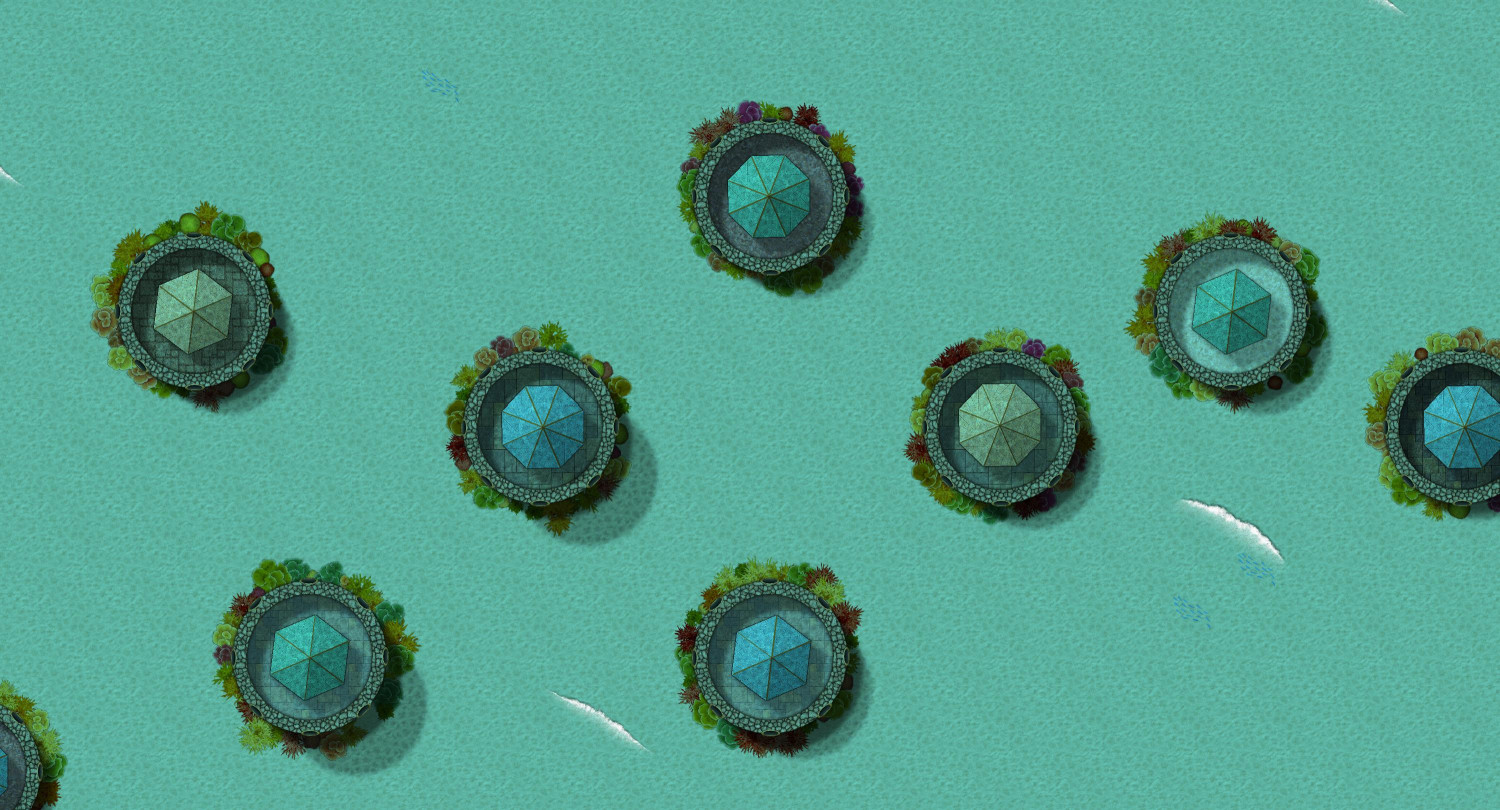
Below the waves, most of the village residents live in private homes topped by either a hexagonal or octagonal turret. Each residence is either one, two, or three stories high, not including the turret. (Note the shadows of different lengths.) The entrance to each residence is through a doorway at the turrets. There's no need to swim all the way down to the seabed to disturb the coral gardens surrounding each residence, as the entrances are at the top.
The one-story residences are basically studio cottages, with sleeping and living spaces all at one level. The taller residences will have a common area off of the turret's entrance, with bedrooms in the levels below.
None of the residences have cooking facilities. Dining at home requires food that can be eaten raw, or previously-cooked food that can be served cold. Instead, cooking is done at common cooking spaces (#3), where residents bring food on long skewers to cook over geothermal sea vents. The cooked food can then be brought back home, or can be brought to one of the dining commons (#4) for a picnic.
The sea elves do have a few marine agricultural gardens. Each of these has a pillar in the middle, where gardeners can activate an enchantment that helps keep pests away. The enchantment creates the illusion of a shark swimming around the area. The illusory shark radiates a low-grade Fear spell. Elves are immune to the spell, and it's low grade enough that most intelligent creatures only experience a mild feeling of foreboding at best. But for fish and other low-intelligent sea creatures, the spell triggers a flight reflex, which helps the elves keep their crops from being nibbled away by marine pests and predators.
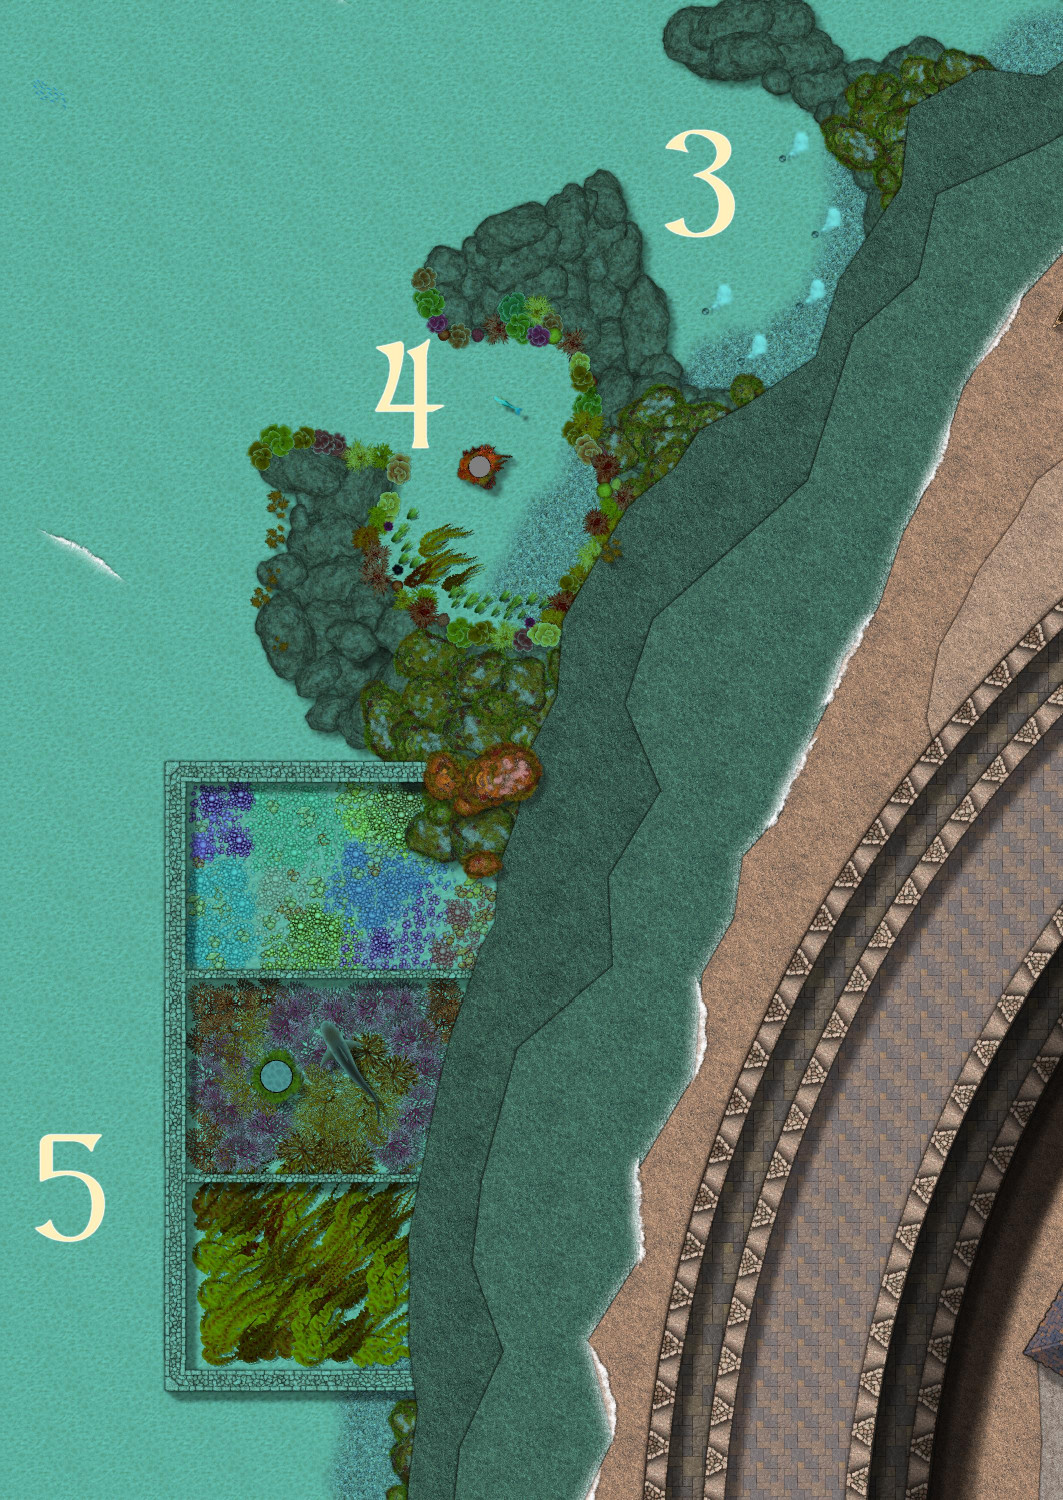
Farther away from the harbor, I created a few examples of the rocks and reefs. I tried a different approach to creating them. Instead of using polygons with a sharp bevel, I instead used several polygons with a "Shaded Polygon (Angled by Edge") effect, each with different angled slops. Let me know if you think I pulled it off.
Some sort of tentacled sea creature has taken up home near one of the reefs. The sea elves can help sailors navigate around it to avoid a Scylla v. Charybdis catastrophe.
-
Community Atlas 1000th map Competition - with Prizes [August/September]
I think my contribution to the contest is ready to submit. (If anyone notices any typos or other errors, I will delete and repost.) Here is the FCW, a text file description, and a PDF description. I will also paste the description here below the image.
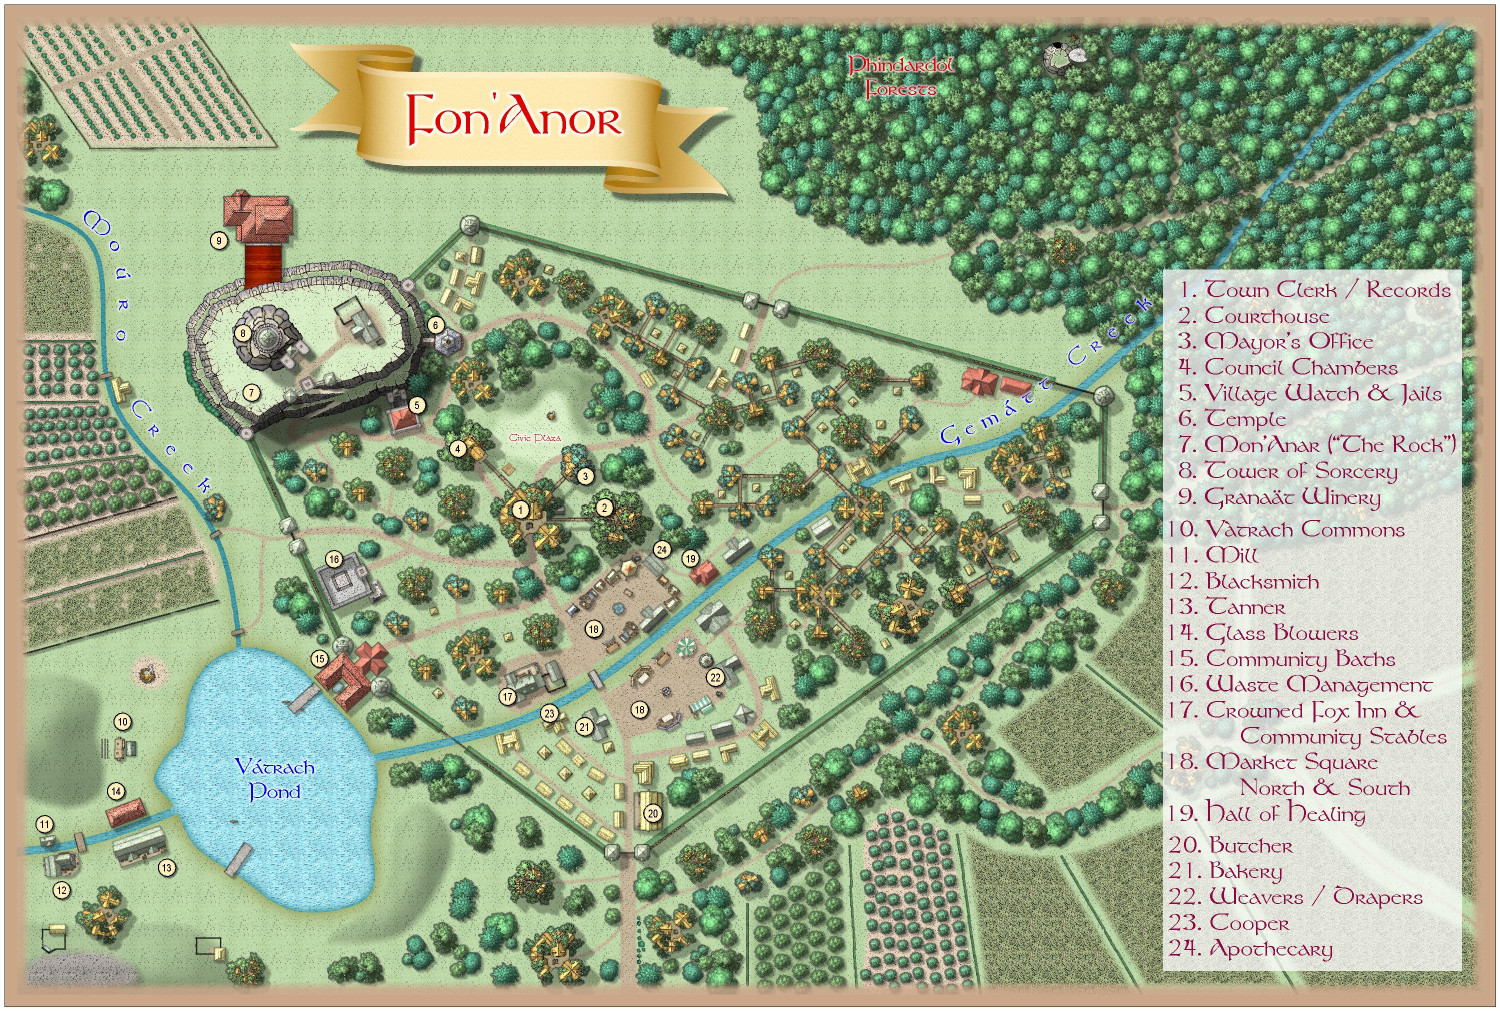
Fon'Anar is a small farming village in the matriarchal kingdom of Verinress'Arl, on the continent of Artemisia. It is a kingdom of Aeifa (surface dwelling drow) ruled by a Matriarch, where succession is by fight to the death among her female offspring. Fon'Anar is located at the edge of the Phindardo Forests on the eastern side of the kingdom.
Fon'Anar is a mostly-self sufficient farming community. It is well known for its fine wines produced at the Granaat Winery. Resellers hire teamsters to travel from other cities and towns in the kingdom to bring back barrels of the wine. Their frequent visits allow Fon'Anar to support an inn, which would otheerwise be unlikely in a village this size. The inn also serves as a tavern and watering hole for the locals. The community is also well-known for their fruit and nut orchards.
The village is governed by a mayor appointed by the local nobility, aided by a five-member village council elected by the local residents.
The village was once a military outpost, and a few military structures remain: a small fortress now used by the village watch as the local jail; a few stone towers; and a great down on top of a 40-foot high rocky outcrop named Mon'Anar, but nicknamed "the rock."
Two creeks run by the village: Gematt Creek, which is about 10-feet wide, and Mouro Creek, which is about five-feet wide. Both creeks feed into Vatrock Pond, which is about 30-feet deep at the deepest part and large enough to support a number of small rowboats. The outflow creek from the pond is also known as Gematt Creek.
A wooden palisade encircles the town. It is enough to keep most predatory animals at bay, but could not withstand a concerted military attack for long.
A great tower abandoned by the military perches on top of Mon'Anar. It was purchased generations ago by a wealthy sorceress who had retired from adventuring. Rumors persist that the sorceress was a scion of a former queen who faked her death rather than fight her sisters for the crown. When she died, she passed the deed to the property to a favored apprentice, and so it has continued to pass from sorceress to apprentice over the generations.
Many villagers live in treehouse homes, connected to one another through elevated bridge walkways. Some villagers (particularly the elderly and the infirm) live in thatch cottages on the ground.
1. TOWN CLERK - Most government is conducted by the clerk, including recording births, marriages, and deaths, and collecting taxes.
2. COURTHOUSE - Traveling judges periodically visit to hold both criminal and civil trials.
3. MAYOR'S OFFICE - The mayor is appointed by the nobility to govern the town in partnership with an elected council. Her offices are located here, as well as living quarters for those who do not have a nicer home in the village.
4. COUNCIL CHAMBERS - The town has an elected five-member council who meet here to manage the village's mundane decisions like managing the maintenance and repair of the palisades.
5. VILLAGE WATCH & JAIL - When the military abandoned their outpost at Fon'Anar, the town watch took over the small fortress, turning it into their headquarters as well as the village jail. Some prison cells have been carved out of the Rock, and the town's treasury is stored there as well.
6. TEMPLE - The temple has a marble hallway that pushes into the cliffs of Mon'Anar. Beneath the Rock, caverns have been carved out for storing church documents and religious artifacts of dubious authenticity. It is rumored that there may be sealed tunnels here that can access vast subterranean cities.
7. MON'ANAR ("The Rock") - Nicknamed "the Rock," Mon'Anar is a natural geological rocky outcrop rising about 40 feet above the village. The Tower of Sorcery is built above it, and three structures cut into the side of the cliffs: the Temple, the Village Watch's fortress, and Granaat Winery.
8. TOWER OF SORCERY - Above the rock, a tower purchased generations ago by a wealthy sorceress looms. The entire top of the Rock is her property, though aside from the tower it mostly holds a gatehouse to guard the entrance and a barn for visitors' horses.
9. GRANAAT WINERY - The wines produced here are legendary, and are sold in many larger towns and cities throughout the realm. The winery has a great barrel-roofed chamber filled with large oak tanks. The wine is later transferred to oak barrels, where it continues to ferment in cool caverns carved into the cliffside.
10. VATRACH COMMONS - Outside the palisades, on the far side of Vatrach Pond, the villagers have constructed an entertainment area. A great bonfire is lit on many nights when the weather permits, allowing locals to sing and dance around it. To the side, a small stage is set up for traveling troubadors, minstrels, and acting troops to entertain the locals, who watch from stone benches before the stage as well as on the hillside behind. A small building behind the stage houses set decorations, props, and costumes, and serves as a dressing room for performers.
11. MILL - A very small watermill is available to use the power of creekwater to grind grain.
12. BLACKSMITH - The smiths primarily creates and repairs horseshoes. They also make farming tools but are not known for making weapons or armor, though they can repair them.
13. TANNER - Tans hides from primary deer hunted in the woods, making and selling leather clothing and armor.
14. GLASS BLOWERS - The glass blowers spend a lot of their time making bottles for the winery, even though much of the wine is exported in oak barrels.
15. COMMUNITY BATHS - Include toilet and bathing facilities for locals and travelers alike, as well as access to recreational facilities. It is the only structure, other than the palisade towers, that spans both outside and within the village walls, and provides one of the only means of passing into or out of the village without passing through the town gates.
16. WASTE MANAGEMENT - Here, garbage and other waste are fed to captive gelatinous cubes and black puddings in order to maintain sanitation.
17. CROWNED FOX INN & COMMUNITY STABLES - Though it mostly serves as a local watering hole, the inn does have accommodations for teamsters and other travelers. The sign outside the inn is painted with a fox wearing a golden crown sprawling across a great throne.
18. MARKET SQUARE - Local farmers and artisans set up booths to sell their produce and goods. The market spans both sides of Gematt Creek.
19. HALL OF HEALING - Serves as a hospital and clinic for the villagers as well as a hospice for the aged who need assistance.
20. BUTCHER - The shepherds and goatherds primarily do their own slaughtering, as do villagers who hunt, but many sell excess meat to the butcher.
21. BAKERY - Also supplies baked treats for the inn and the winery.
22. WEAVER / DRAPERS - A number of fabric artisans operate out of this shop, making and selling clothing and fabric goods of all sorts.
23. COOPER - Although the coopers make all sorts of barrels, chests, and other containers, their principle client is the Granaat Winery.