

Atlas Submission: Doriant - Gold Coast - Tyr Alomere
 Royal Scribe
🖼️ 388 images Mapmaker
Royal Scribe
🖼️ 388 images Mapmaker
This thread will be dedicated to submitted all of the maps associated with the town of Tyr Alomere, including the wizard's tower. I will do a separate post in this thread for each FCW file and accompanying description to help keep everything sorted.
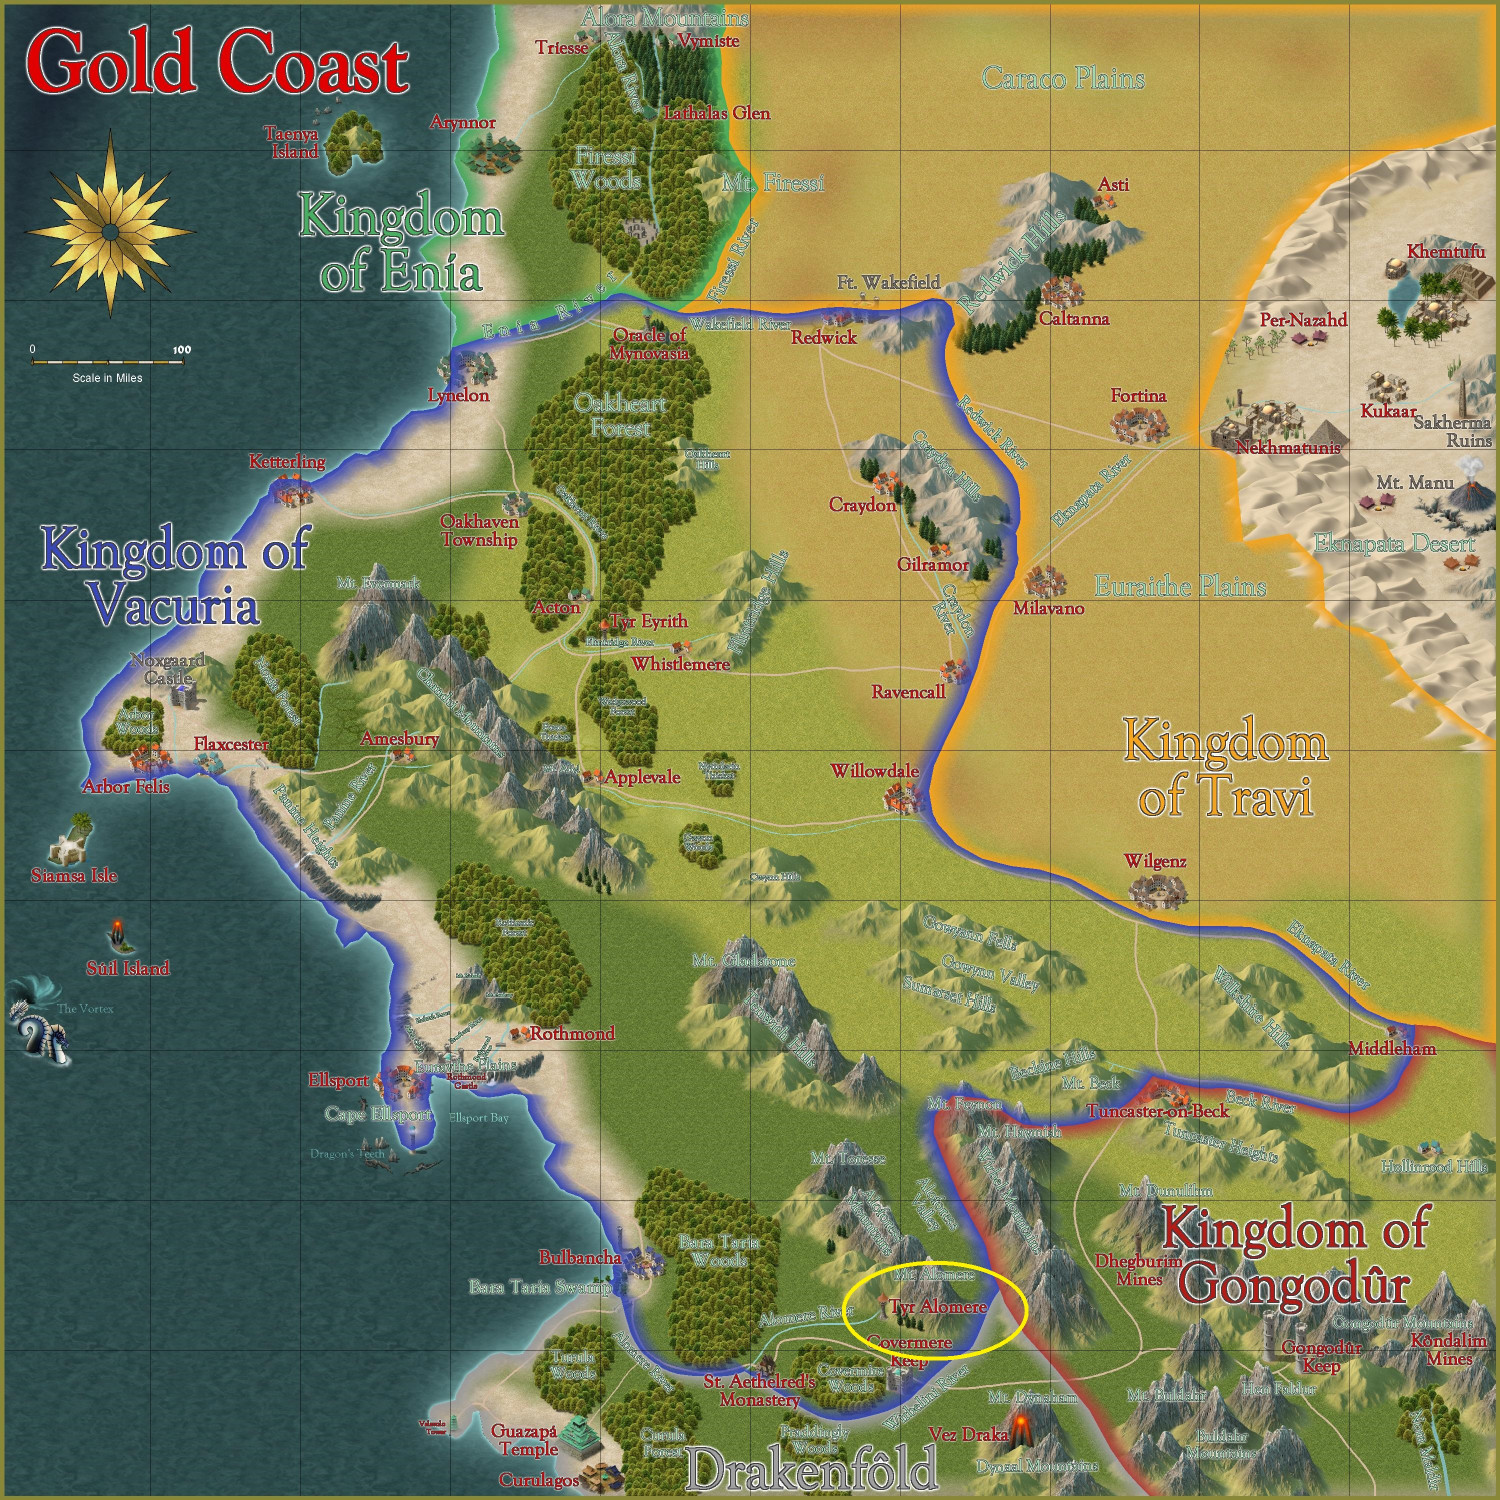
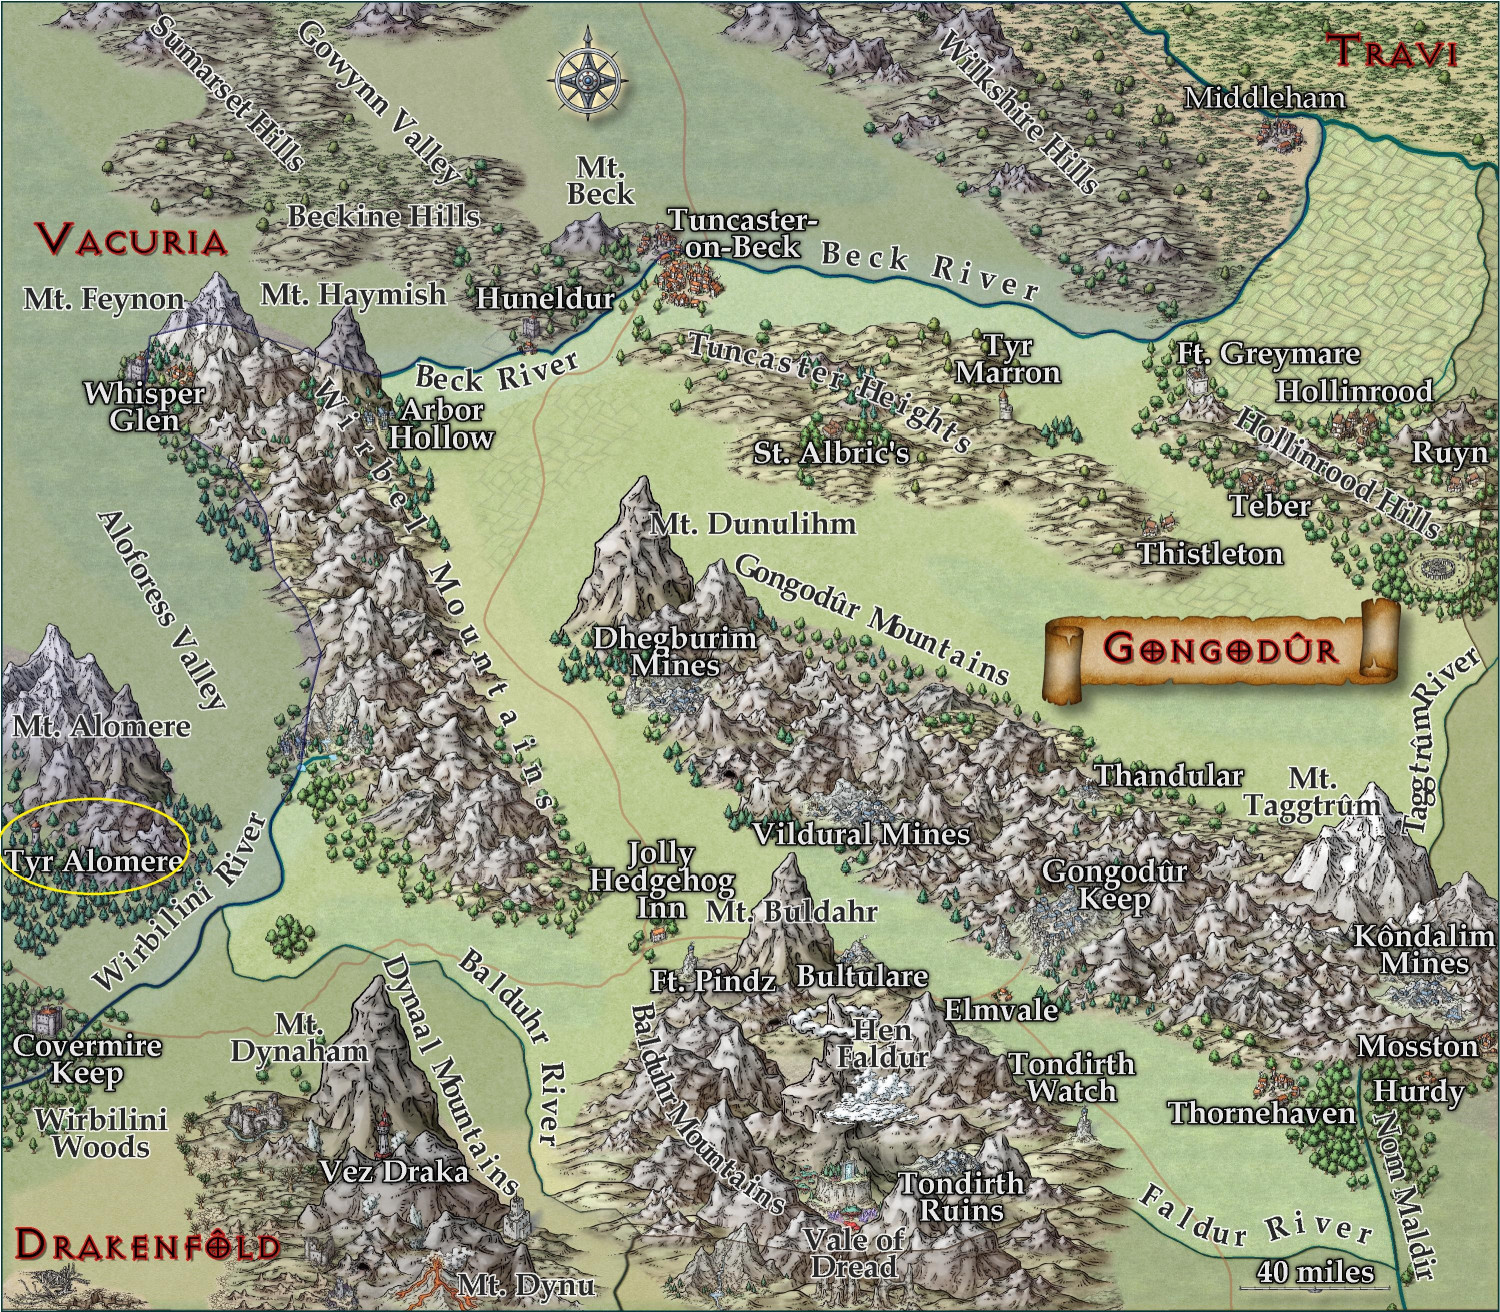
Not sure if it's easier/better for you, Remy, to link to it directly from the Gold Coast map, or from the Gongodûr map. Up to you! It is circled in yellow in the two maps below:
First submission will be in the next comment.
Comments
Tyr Alomere Township
Tyr Alomere Township
Population: 1,259
Nestled in the foothills of Mt. Alomere, the sleepy village of Alomere was primarily notable for being a local lord’s vacation villa. Generations ago, it grew to become a prosperous, bustling town when the powerful wizard Marius built a mighty tower there for his retirement.
The wizard, now known as Marius of Alomere, quickly developed a prosperous business. Adventurers flocked to his tower to seek his counsel about their quests, and to purchase scrolls and potions that Marius and his apprentices created. The adventurers then returned after their quests to have curses removed and magical items identified.
Tyr Alomere Tower was later inherited by Marius’ daughter, a powerful wizard in her own right. She bypassed her own children to leave the tower to her most powerful apprentice, and thus began the tradition of keeping the tower in the hands of a mage.
The town grew to support the influx of visitors, with local retailers well-stocked in the supplies that many adventurers need.
1. Tyr Alomere Tower: The tower is the present home of Madeleine Eyraux, a mighty enchantress, and her husband. The grounds include a cottage where the staff live, and a barn where visitors can stable their mounts.
2. Villa Citri: The vacation villa for the Earls of Westford, Villa Citri is currently occupied by Lady Amfiri Prelcort, Dowager Countess of Westford, widow of the seventh Earl of Westford and mother of the eighth. The villa is known for its orchards of orange trees and its vineyards of wine grapes.
3. Town Hall: Virtually all government functions operate from the Town Hall, including registering businesses, paying taxes, and registering records of births, weddings, and deaths. Two courtrooms are also in the Town Hall, with one generally dedicated to criminal proceedings and the other for civil lawsuits.
4. Market Square: Local farmers and traveling merchants set up carts and stalls in the Market Square three days a week.
5. Merry Sprite’s Tavern: The tavern does a bustling business every night of the week, catering to travelers and locals alike. On many nights, minstrels and bards passing through may be found performing for a few extra coins.
6. Draper/Mercer: Customers can buy bolts of fabric as well as items of clothing here.
7. General Store: In addition to selling foodstuff, the store is unusually well stocked for the typical items needed by adventurers, including torches, lamp oil, and simple tools.
8. Butcher/Fishmonger: In addition to selling fresh meat, jerked meat preserved with salt is available for sale to adventurers.
9. Apothecary: Herbalism and medicine kits are available here, as well as basic ingredients for simple potions. For more exotic ingredients, adventurers will probably have to find a larger city or perhaps go on a quest to find them. The apothecary may have simple, common potions for sale, but the availability is erratic based on what they have been able to purchase from adventurers passing through.
10. Tailor: For the mending and sale of clothing.
11. Cobbler: For the mending and sale of shoes and boots.
12. Jeweler: The jeweler buys and sells both jewelry and individual gemstones. A town this size normally would not be able to sustain a business of this nature, but the wizard’s presence has brought in a lot of travelers with loot to sell, as well as spellcasters who need specialty items for their more complex rituals.
13. Bakery: For the sale of fresh bread, pastries, cakes, and pies.
14. Scrivener: This is another business that is unexpected in a town of this size. In addition to being able to transcribe and notarize documents, the clerks who work here can sell parchment, ink, and books with blank pages suitable for use as a spellbook.
15. Blacksmith: Like most village blacksmiths, the smiths here spend a fair amount of time making horseshoes and making and repairing farm tools. Although they tend not to make arms and armor, they are trained in repairing them. From time to time, they may have armaments for sale that have been purchased from adventurers who have upgraded their equipment.
16. Kotaran Monastery: The Kotaran faith is as much a philosophy as it is a religion. Followers believe that there is strength and power when the universe is balanced, and that that most things in nature are symmetrical for a reason. Kotaran Monasteries are famous for providing support for travelers. Its knights help keep the roads safe from bandits, its priests tend to the injured and sick, and its temples serve as moneylenders and banks in many communities. Adventurers will be able to exchange exotic coins here, and may be able to deposit their excess gold for safekeeping.
17. The Golden Griffon Inn: The inn does a brisk business catering to travelers who seek an audience with the mage. Like at the Merry Sprite’s Tavern, traveling minstrels and bards will often be found performing here in the evenings.
18. Guildhouse: The various merchant guilds share this space for their meetings.
19. Community Baths: Free restrooms and bathing facilities are available for all as a means of controlling the spread of diseases. For those willing to spend a little coin, more luxurious bathing options are available.
20. Public School: The school provides basic reading, writing, and arithmetic instruction for the children of the town and nearby farms. Some will also attend classes at one of the local temples for religious instruction.
21. Tanner: Leathergoods are made, mended, and sold here.
22. Watermill: Locals will bring their own grain here to grind for a small fee, or may purchase ground grain from the miller.
23. Theosi Temple: This Greco-Roman style temple is for the worship of the eight greater gods and twelve lesser gods of the Theosi faith. As with the Kotaran Monastery, the temple has a small medical facility to tend to the injured and the sick,
24. Áes Camáir Temple: For the worship of the five primary gods, the Children of Dawn, and their descendants. Like the Kotaran and Theosi temples, the church has a small medical facility.
25. Town Watch & Jail: The town watch is headquartered here. A basic jail is used to hold prisoners awaiting trial in the courthouse. Those sentenced to longer incarcerations are generally transported to a bigger city to serve their sentence.
26. Summit Stairs: This tower is home to a spiral staircase that allows ascent to the top of the cliffs, and to the observatory housed there.
27. Observatory: Scholars visit from far and wide for the opportunity to study the heavens through the observatory’s rare and valuable lens.
28. Waste Management: The town’s complex sewer systems converge here, where a giant pit allows for the disposal of other forms of rubbish. Captured gelatinous cubes and black puddings are used to dispose of the town’s waste.
Tyr Alomere Tower
Here's where the tower is located on the town map:
And here are the details for the overhead map:
Tyr Alomere Tower
Nestled in the foothills of Mt. Alomere, the sleepy village of Alomere was primarily notable for being a local lord’s vacation villa. Generations ago, it grew to become a prosperous, bustling town when the powerful wizard Marius built a mighty tower there for his retirement.
The wizard, now known as Marius of Alomere, quickly developed a prosperous business. Adventurers flocked to his tower to seek his counsel about their quests, and to purchase scrolls and potions that Marius and his apprentices created. The adventurers then returned after their quests to have curses removed and magical items identified.
Tyr Alomere Tower was later inherited by Marius’ daughter, a powerful wizard in her own right. She bypassed her own children to leave the tower to her most powerful apprentice, and thus began the tradition of keeping the tower in the hands of a mage.
The tower is the present home of Madeleine Eyraux, a mighty enchantress, and her husband. The grounds include a cottage where the staff live, and a barn where visitors can stable their mounts.
Floor 1
This floor is used primarily by the wizard’s staff. It included a kitchen with a dining nook. There are two rooms for food storage that are kept chilled through the use of magical crystals – one cold enough to freeze water into ice. The boiler room also includes laundry facilities.
As this is the ground floor at the base of the stairs, there is no external access to this level of the tower. An internal spiral staircase on the northern wall allows for descending into the basement or rising to the second floor.
1. Kitchen
2. Dining Nook
3. Freezer
4. Cold Storage
5. Boiler Room & Laundry
6. WC
Floor 2
The tower’s main dining room dominates this room. It is accessed through a staging room where the tower’s staff can plate dishes before serving them to the wizard’s guests. A small lounge off of this room includes a balcony overlooking the main stairs leading up to the tower, allowing the wizard to greet guests and direct them up to the second landing. Although there is a secure, metal door leading to the exterior stairs, this is primarily used as an emergency exit, and this floor is generally only accessed through the interior spiral staircase. That staircase leads down to the kitchen and up to the tower’s main entryway. This floor does not have proper windows, but arrow slits allow for a little light during the daytime. It is primarily illuminated with torches enchanted with a Continual Flame spell that allows for perpetual heatless, smokeless flames.
1. Dining Room
2. Lounge
3. Balcony
4. Staging Room
5. WC
6. Emergency Exit
Floor 3
The tower’s main entrance is actually on the third floor of the tower, guarded by an iron gate and a steel door. It enters into a vestibule equipped with an armoire for guests’ cloaks, and a small WC. This room provides access to a cozy sitting room with a fireplace where the wizard can greet guests, as well as a private lounge where the wizard can have more discrete conversations with select guests. Most of the rooms on this floor do have have windows to the outside, but a circular passageway provides access to seven arrow slits. An interior spiral staircase allows occupants to move throughout the tower without having to return to the exterior stairs.
1. Entryway
2. Vestibule
3. WC
4. Reception Lounge
5. Private Lounge
6. Security Hallway
Floor 4
Although this floor has a doorway to the exterior stairs, it is generally accessed by a spiral staircase on the northern side of the floor. This is the lowest floor in the tower to have proper windows rather than arrow slits. The main room on this floor is a comfortable lounge equipped with a wet bar, with water piped all the way up, where the wizard can entertain overnight guests. The floor is also equipped with a private chapel, two guest bedrooms, a WC, and a bathing chamber with a fireplace for heating water.
1. Lounge
2. Chapel
3. Guest Bedrooms
4. WC
5. Bathing Chamber
Floor 5
This floor is entirely devoted to guest accommodations. The best suite includes a spacious sitting room with a fireplace and a rare upper-story sink with running water, and best of all, a balcony overlooking the river and gardens. The second best doesn’t have a balcony, but does have an extra large window in the sitting and a double window with garden views in the bedroom. Both of these suites are large enough to accommodate an entire adventuring party if they don’t want to split up and some are willing to sleep on couches or the floor. There is also a third, much smaller room without a lounge, as well as a WC and bathing chamber.
1. Balcony Suite
2. Garden View Suite
3. Guest Bedroom
4. WC
5. Bathing Chamber
Floor 6
This floor has the wizard’s own bedchamber, complete with a fireplace, sink with running water, and both a double window and a balcony overlooking the garden. Two smaller rooms have been used as bedrooms for younger children, but are currently used as a small office and for storage. The floor also includes a WC and a bathing chamber. It is the topmost floor that the exterior stairs reach. It is also the topmost floor that the northern spiral staircase reaches. Another spiral staircase towards the center of the tower begins here and extends up through the tower’s central turret.
1. Wizard’s Bedroom
2. Office
3. Storage
4. WC
5. Bathing Chamber
Floor 7
This is the top-most floor of the main tower before reaching the tower’s roof and turret. This floor includes the wizard’s library and arcane workshop. A secret passageway leads to the wizard’s private teleportation portal, and another leads to a secret summoning circle.
1. Library
2. Workshop
3. Teleportation Portal
4. Summoning Circle
Floor 8
The lowest floor of the tower’s turret has a gated metal door that provides access to the tower’s roof, where the wizard can stargaze, enjoy the views, or defend the tower. The turret has seven arrow slits that can be sealed with metal shutters. The granite spiral staircase continues up.
1. Turret Floor
2. Tower Roof
Floor 9
The second floor of the turret provides eight arrow slits for defending the tower’s roof. The spiral staircase ends here, but metal handholds on the wall allow for ascending to the turret’s roof.
1. Turret Floor
2. Handholds to Turret Roof
Floor 10
The metal handholds lead to a tiny room at the top of the turret, where luminescent crystals shed bright light through three windows, lighting up the top of the tower like a lighthouse. These windows can be shuttered when darkness is preferred, to study the stars or to hide from airborne attackers at night. A locked metal door provides access to the turret’s roof.
1. Upper Turret Floor
2. Turret Roof
Basement 1
The first level of the basement includes a wine cellar, a freezer chilled by enchanted crystals, a cold larder, and a storage room. A small room provides access to a 10-foot-wide shaft, a chute for depositing debris and other waste. This waste will be managed on the third level of the basement, which connects to the township’s sewers. The spiral staircase continues down another level.
1. Wine Cellar
2. Freezer
3. Cold Larder
4. Storage Room
5. Waste Management
6. Waste Chute
Basement 2
The spiral staircase ends at the second level of the basement. A square room secured by a locked stone door provides access to the sewers. This room is brightly lit by luminescent crystals that are bright enough to deter light-adverse oozes used to digest waste in the sewers. While the light isn’t bright enough to damage the oozes, who are hypersensitive to sunlight, it does trigger their flight reflexes. Several flights of stairs descend down into the sewers. Although inaccessible from this level, WC and waste chutes pass through this area to the sewers, while wells bring up water piped in from the river.
The most striking room in this level, perhaps of the entire estate, is the wizard’s Subterranean Grotto. The room is lighted with different-colored luminescent crystals and luminescent fungi. A pond is kept at a refreshing temperature through the use of heat-producing enchanted crystals, while even more crystals are used to warm a second pool to be as warm as a piping-hot bath.
The remaining rooms on this floor are concealed by secret doors. A secret passageway near the spiral staircase leads to the wizard’s hidden treasury. The outer room contains valuable coins, gemstones, jewelry, and other valuables. A second chamber protected by a Glyph of Warding contains magical treasurers. In addition to being deep below ground in solid rock, these rooms are lined with marble walls that are ten feet thick, as well as a second one-foot wall of lead to prevent scrying.
Another secret passage near the stairs to the sewers leads to a mostly empty cavern. An open doorway on the west wall leads to another Teleportation Circle. In the southwest corner of the room, a passageway has been sealed by a Wall of Steel, with a Glyph of Warding inscribed before it for extra protection. Beyond it, a passageway is blocked by the collapsed cavern roof. The passageway has been sealed for so long that no one now knows about the existence of the passageways beyond the collapse, much less where they go. Human remains punctuate the dangers of the parasitic rafflesia plants that grow there.
1. Sewer Security Room
2. Stairs to Sewers
3. Waste Shaft to Sewers
4. Subterranean Grotto
5. WC & Changing Room
6. WC Shaft
7. Treasure Chamber
8. Magical Treasures
9. Hidden Cavern
10. Teleportation Circle
11. Collapsed Passageway
12. Rafflesia Cavern
Basement 3
The stairs from the second level of the basement end up in a room used to manage the portion of the municipal sewers that are below Tyr Alomere Tower. Here, maintenance workers are able to open and shut sewer gates and the water pipes that keep the system flushed.
Gelatinous Cubes patrol the system on a circuit, traveling throw the sloped drains and gobbling up everything in their paths. Softer organic waste is digested while harder inorganic matter (like bones) as well as inorganic waste (like metal, glass, ceramics, and bones) are captured and ferried about. When the cubes return up the sloped return canal, they jettison indigestible matter, which is processed elsewhere in the municipal sewers. From time to time, a Gelatinous Cube may be diverted into a canal for harvesting. The cube is split, with portions lured into glass containers. When the cube is exposed to sunlight, its acids are rendered inert and the cube quickly breaks down to a nutrient-rich liquid suitable for fertilizing crops.
1. Stairs from Basement 2
2. Sewer Management
3. River Waterpipe
4. Outhouse Chute
5. Barn Manure Chute
6. Tower WC Chute
7. General Waste Chute
8. Subterranean Grotto Bottom
9. Return Canal
10. Diversion Canal
Tyr Alomere Tower - Floor 1
Toggle: TEXT LABELS layer to hide/reveal the numeric labels.
Toggle: OUTSIDE MASK sheet to hide/reveal the semi-transparent parchment filter over the outside.
Description
This floor is used primarily by the wizard’s staff. It included a kitchen with a dining nook. There are two rooms for food storage that are kept chilled through the use of magical crystals – one cold enough to freeze water into ice. The boiler room also includes laundry facilities.
As this is the ground floor at the base of the stairs, there is no external access to this level of the tower. An internal spiral staircase on the northern wall allows for descending into the basement or rising to the second floor.
1. Kitchen
2. Dining Nook
3. Freezer
4. Cold Storage
5. Boiler Room & Laundry
6. WC
Tyr Alomere Tower - Floor 2
Toggle: TEXT LABELS layer to hide/reveal the numeric labels.
Toggle: OUTSIDE MASK sheet to hide/reveal the semi-transparent parchment filter over the outside.
Description
The tower’s main dining room dominates this room. It is accessed through a staging room where the tower’s staff can plate dishes before serving them to the wizard’s guests. A small lounge off of this room includes a balcony overlooking the main stairs leading up to the tower, allowing the wizard to greet guests and direct them up to the second landing. Although there is a secure, metal door leading to the exterior stairs, this is primarily used as an emergency exit, and this floor is generally only accessed through the interior spiral staircase. That staircase leads down to the kitchen and up to the tower’s main entryway. This floor does not have proper windows, but arrow slits allow for a little light during the daytime. It is primarily illuminated with torches enchanted with a Continual Flame spell that allows for perpetual heatless, smokeless flames.
1. Dining Room
2. Lounge
3. Balcony
4. Staging Room
5. WC
6. Emergency Exit
Tyr Alomere Tower - Floor 3
Toggle: TEXT LABELS layer to hide/reveal the numeric labels.
Toggle: OUTSIDE MASK sheet to hide/reveal the semi-transparent parchment filter over the outside.
Description
The tower’s main entrance is actually on the third floor of the tower, guarded by an iron gate and a steel door. It enters into a vestibule equipped with an armoire for guests’ cloaks, and a small WC. This room provides access to a cozy sitting room with a fireplace where the wizard can greet guests, as well as a private lounge where the wizard can have more discrete conversations with select guests. Most of the rooms on this floor do have have windows to the outside, but a circular passageway provides access to seven arrow slits. An interior spiral staircase allows occupants to move throughout the tower without having to return to the exterior stairs.
1. Entryway
2. Vestibule
3. WC
4. Reception Lounge
5. Private Lounge
6. Security Hallway
Tyr Alomere Tower - Floor 4
Toggle: TEXT LABELS layer to hide/reveal the numeric labels.
Toggle: OUTSIDE MASK sheet to hide/reveal the semi-transparent parchment filter over the outside.
Description
Although this floor has a doorway to the exterior stairs, it is generally accessed by a spiral staircase on the northern side of the floor. This is the lowest floor in the tower to have proper windows rather than arrow slits. The main room on this floor is a comfortable lounge equipped with a wet bar, with water piped all the way up, where the wizard can entertain overnight guests. The floor is also equipped with a private chapel, two guest bedrooms, a WC, and a bathing chamber with a fireplace for heating water.
1. Lounge
2. Chapel
3. Guest Bedrooms
4. WC
5. Bathing Chamber
Tyr Alomere Tower - Floor 5
Toggle: TEXT LABELS layer to hide/reveal the numeric labels.
Toggle: OUTSIDE MASK sheet to hide/reveal the semi-transparent parchment filter over the outside.
Description
This floor is entirely devoted to guest accommodations. The best suite includes a spacious sitting room with a fireplace and a rare upper-story sink with running water, and best of all, a balcony overlooking the river and gardens. The second best doesn’t have a balcony, but does have an extra large window in the sitting and a double window with garden views in the bedroom. Both of these suites are large enough to accommodate an entire adventuring party if they don’t want to split up and some are willing to sleep on couches or the floor. There is also a third, much smaller room without a lounge, as well as a WC and bathing chamber.
1. Balcony Suite
2. Garden View Suite
3. Guest Bedroom
4. WC
5. Bathing Chamber
Tyr Alomere Tower - Floor 6
Toggle: TEXT LABELS layer to hide/reveal the numeric labels.
Toggle: OUTSIDE MASK sheet to hide/reveal the semi-transparent parchment filter over the outside.
Description
This floor has the wizard’s own bedchamber, complete with a fireplace, sink with running water, and both a double window and a balcony overlooking the garden. Two smaller rooms have been used as bedrooms for younger children, but are currently used as a small office and for storage. The floor also includes a WC and a bathing chamber. It is the topmost floor that the exterior stairs reach. It is also the topmost floor that the northern spiral staircase reaches. Another spiral staircase towards the center of the tower begins here and extends up through the tower’s central turret.
1. Wizard’s Bedroom
2. Office
3. Storage
4. WC
5. Bathing Chamber
Tyr Alomere Tower - Floor 7
Toggle: TEXT LABELS layer to hide/reveal the numeric labels.
Toggle: OUTSIDE MASK sheet to hide/reveal the semi-transparent parchment filter over the outside.
Toggle: SECRET layer to hide/reveal secret passageways and chambers as well as to hide/reveal the labeling for those secret areas.
Description
This is the top-most floor of the main tower before reaching the tower’s roof and turret. This floor includes the wizard’s library and arcane workshop. A secret passageway leads to the wizard’s private teleportation portal, and another leads to a secret summoning circle.
1. Library
2. Workshop
3. Teleportation Portal
4. Summoning Circle
Tyr Alomere Tower - Eighth Floor
Toggle: TEXT LABELS layer to hide/reveal the numeric labels.
Toggle: OUTSIDE MASK sheet to hide/reveal the semi-transparent parchment filter over the outside.
Description
The lowest floor of the tower’s turret has a gated metal door that provides access to the tower’s roof, where the wizard can stargaze, enjoy the views, or defend the tower. The turret has seven arrow slits that can be sealed with metal shutters. The granite spiral staircase continues up.
1. Turret Floor
2. Tower Roof
Tyr Alomere Tower - Floor 9
Toggle: TEXT LABELS layer to hide/reveal the numeric labels.
Toggle: OUTSIDE MASK sheet to hide/reveal the semi-transparent parchment filter over the outside.
Description
The second floor of the turret provides eight arrow slits for defending the tower’s roof. The spiral staircase ends here, but metal handholds on the wall allow for ascending to the turret’s roof.
1. Turret Floor
2. Handholds to Turret Roof
Tyr Alomere Tower - Floor 10
Toggle: TEXT LABELS layer to hide/reveal the numeric labels.
Toggle: OUTSIDE MASK sheet to hide/reveal the semi-transparent parchment filter over the outside.
Description
The metal handholds lead to a tiny room at the top of the turret, where luminescent crystals shed bright light through three windows, lighting up the top of the tower like a lighthouse. These windows can be shuttered when darkness is preferred, to study the stars or to hide from airborne attackers at night. A locked metal door provides access to the turret’s roof.
1. Upper Turret Floor
2. Turret Roof
Tyr Alomere Tower - Basement 1
Toggle: TEXT LABELS layer to hide/reveal the numeric labels.
Description
The first level of the basement includes a wine cellar, a freezer chilled by enchanted crystals, a cold larder, and a storage room. A small room provides access to a 10-foot-wide shaft, a chute for depositing debris and other waste. This waste will be managed on the third level of the basement, which connects to the township’s sewers. The spiral staircase continues down another level.
1. Wine Cellar
2. Freezer
3. Cold Larder
4. Storage Room
5. Waste Management
6. Waste Chute
Tyr Alomere Tower - Basement 2
Toggle: TEXT LABELS layer to hide/reveal the numeric labels.
Toggle: SECRET layer to hide/reveal the hidden passageways and rooms, as well as the labeling for these hidden areas.
Description
The spiral staircase ends at the second level of the basement. A square room secured by a locked stone door provides access to the sewers. This room is brightly lit by luminescent crystals that are bright enough to deter light-adverse oozes used to digest waste in the sewers. While the light isn’t bright enough to damage the oozes, who are hypersensitive to sunlight, it does trigger their flight reflexes. Several flights of stairs descend down into the sewers. Although inaccessible from this level, WC and waste chutes pass through this area to the sewers, while wells bring up water piped in from the river.
The most striking room in this level, perhaps of the entire estate, is the wizard’s Subterranean Grotto. The room is lighted with different-colored luminescent crystals and luminescent fungi. A pond is kept at a refreshing temperature through the use of heat-producing enchanted crystals, while even more crystals are used to warm a second pool to be as warm as a piping-hot bath.
The remaining rooms on this floor are concealed by secret doors. A secret passageway near the spiral staircase leads to the wizard’s hidden treasury. The outer room contains valuable coins, gemstones, jewelry, and other valuables. A second chamber protected by a Glyph of Warding contains magical treasurers. In addition to being deep below ground in solid rock, these rooms are lined with marble walls that are ten feet thick, as well as a second one-foot wall of lead to prevent scrying.
Another secret passage near the stairs to the sewers leads to a mostly empty cavern. An open doorway on the west wall leads to another Teleportation Circle. In the southwest corner of the room, a passageway has been sealed by a Wall of Steel, with a Glyph of Warding inscribed before it for extra protection. Beyond it, a passageway is blocked by the collapsed cavern roof. The passageway has been sealed for so long that no one now knows about the existence of the passageways beyond the collapse, much less where they go. Human remains punctuate the dangers of the parasitic rafflesia plants that grow there.
1. Sewer Security Room
2. Stairs to Sewers
3. Waste Shaft to Sewers
4. Subterranean Grotto
5. WC & Changing Room
6. WC Shaft
7. Treasure Chamber
8. Magical Treasures
9. Hidden Cavern
10. Teleportation Circle
11. Collapsed Passageway
12. Rafflesia Cavern
Tyr Alomere Tower - Basement 3
Toggle: TEXT LABELS layer to hide/reveal the numeric labels.
Description
The stairs from the second level of the basement end up in a room used to manage the portion of the municipal sewers that are below Tyr Alomere Tower. Here, maintenance workers are able to open and shut sewer gates and the water pipes that keep the system flushed.
Gelatinous Cubes patrol the system on a circuit, traveling throw the sloped drains and gobbling up everything in their paths. Softer organic waste is digested while harder inorganic matter (like bones) as well as inorganic waste (like metal, glass, ceramics, and bones) are captured and ferried about. When the cubes return up the sloped return canal, they jettison indigestible matter, which is processed elsewhere in the municipal sewers. From time to time, a Gelatinous Cube may be diverted into a canal for harvesting. The cube is split, with portions lured into glass containers. When the cube is exposed to sunlight, its acids are rendered inert and the cube quickly breaks down to a nutrient-rich liquid suitable for fertilizing crops.
1. Stairs from Basement 2
2. Sewer Management
3. River Waterpipe
4. Outhouse Chute
5. Barn Manure Chute
6. Tower WC Chute
7. General Waste Chute
8. Subterranean Grotto Bottom
9. Return Canal
10. Diversion Canal
I am ready to submit the maps for the Villa Citri in the town of Tyr Alomere. I will do each map as a separate post in this thread, starting with the main outdoor map.
Toggles
TEXT LABELS (NUMBERS) layer to hide/display the numbered labels.
TEXT LABELS layer to hide/display the legends describing the labeled numbers.
Files
Description
In the village of Tyr Alomere, the Earls of Westford have owned the Villa Citri for generations. The villa is known for its orchards of orange trees as well as its vineyards of wine grapes.
It has at times served as a summer vacation home for the noble family, but at the present is the regular residence of Lady Amfiri Prelcort, Dowager Countess of Westford, widow of the seventh Earl of Westford and mother of the eighth. She lives there with a few close friends, attended by faithful servants and guards, where she receives a steady stream of family visitors and other guests.
The villa’s grounds includes a detached bathhouse, or ballneae, as well as detached quarters for servants and for the guards, along with a barn.
Outside Areas
1. Muri Magni
The great outer wall, called the Muri Magni, is 20 feet thick (with crenellations that extend a bit beyond the edge of the wall), with the parapet rising 25 feet above the ground.
2. Portae Turres
The gatehouse towers extend 15 feet above the parapet. They have ground-floor entrances on the inside of the fortified wall. The gates themselves include an outer portcullis, a metal gate that is generally left open, and an inner portcullis. Each gatehouse has control mechanisms that allow for independently opening or closing the gates, and for raising or lowering the portcullises.
3. Turres Anguli
The corner towers of the fortified wall extend ten feet above the great wall’s parapets. They can be accessed through external stairs that climb fifteen feet to the second story.
4. Stabulae
The stables are sufficiently large to house the Dowager Countess’ horses as well as those of any visitors.
5. Custodum Domus
The residence of the estate’s guards.
6. Sevorum Domus
The residence of the estate’s servants.
7. Portico
The villa’s covered porch, supporting by four columns, two on either side of the stairs.
8. Villa Citri
The villa is three stories above ground.
9. Colonnade
The covered walkway connecting the villa to the balneae is lined with column pillars but has no walls.
10. Balneae
The villa’s bathhouse is used by residents and guests as well as by the villa’s staff (at separate times) for personal hygiene, exercise, and recreation.
11. Pomaria
The orchard has an abundance of orange trees.
12. Vinetum
The vineyard where the estate grows grapes that are then fermented into wine.
Here's the first floor:
Toggles
PARCHMENT layer to hide/reveal the layer of parchment that provides a sort of sepia filter over the outdoor areas.
TEXT LABELS (NUMBERS) layer to hide/display the numbered labels.
TEXT LABELS layer to hide/display the legends describing the labeled numbers.
Files
Description
The ground level of the Villa Citri and its estate.
Outside
1. Muri Magni
At the ground level, the great walls that surround the estate are solid stonework, as are this section of the corner towers.
2. Portae Turres Controls
Each of the gatehouse towers has a chamber access by a short flight of stairs that house the controls for the gate and the portcullises. Both sets of controls can operate the gates independently of the other. Solid metal doors guard the entrance to these chambers, and metal gates at the top of the stairs also provide further protection. A spiral staircase in each ascends to an upper story of the gatehouse.
Villa
3. Portico
This covered porch of red marble has four column pillars supporting the roof, as well as a railing of black marble.
4. Vestibulum
The entryway leads to the atrium, where guests may be greeted by their host.
5. Atrium
Guests are received by their host in this central area. Though the walkways are covered by the floors of the second story, sunlight from an opening in the roof (called the Compluvium) over the central pool keeps the room well-lit during the day.
6. Impluvium
The pool in the center of the atrium, called the impluvium, is positioned beneath an opening in the ceiling, called the compluvium. Rainwater collects in the pool and is then piped to a cistern used in the kitchen.
7. Triclinium
The villa’s main dining room has couches arranged in a U-shape, with a short table for food in the center of them.
8. Tablinum
The open office is used by the proprietors of the villa to conduct business with guests while keeping an eye on both courtyards. An enclosed chamber (8A) allows for more private work.
9. Culina
The villa’s kitchen includes a well with water piped in from the impluvium, though this villa supplements it with additional water piped in from the river. The wood-burning stove vents directly to the outside.
10. Cellarium
The pantry for the kitchen can only be accessed from the kitchen.
11. Lavatrina
The lavatories on this level all have shafts where waste is deposited directly into the sewers.
12. Horreum
These rooms are used for storage.
13. Cubiculum
On this level, there are six cubiculae, or bedrooms, surrounding the peristylium courtyard. On this level, the bedrooms are mostly used by guests.
14. Scalae Graecae
A staircase enclosed by walls provides access to the second story. An archway also provides access to stairs that lead to the basement.
15. Andron & Gynaeceum
In ancient times, the Andron (#15a) was used exclusively by the men of the household for libations and conversation, while the Gynaeceum was used by the household’s women. Both are now used as front parlors for socializing.
16. Alae
These two chambers flanking the courtyard are used to honor the family’s ancestors.
17. Peristylium
This courtyard, which is also open to the sky, has a central fountain, with column pillars surrounding the courtyard.
18. Piscina
The central fountain beneath an opening in the roof collects rainwater, but water from the river is also piped in to keep the fountain operational in dry months.
19. Exhedra
This semicircular seating area is used for socializing. A brazier enchanted with a Continual Flame spell allows for heatless, smokeless flames to provide lighting in the evenings. A second enchantment allows for heat to radiate from it when desired on colder evenings.
20. Lararium
The chambers flaking the exhedra are shrines for the household’s favored gods. The braziers here, like that in the exhedra, are enchanted with a Continual Flame spell.
21. Posticum
The rear exit is used by the villa’s servants, as well as by the villa’s residents and guests when they wish to avoid the front entrance.
22. Heating Caliduct
This pipe brings hot air from the hypocaust in the basement to warm the villa’s upper stories.
23. Puteus & Puteal
A chamber (puteal) that houses a wellhead inside the villa. Water is piped in to the well from the river.
24. Colonnade
A covered walkway surrounded by columns instead of walls connect the villa to the balneae, the bathhouse.
Balneae
25. Scalae Graecae
Walled stairs ascend to the bathhouse’s second floor and descend to the basement.
26. Lavatrina
Lavatories with shafts that descend directly to the sewers.
27. Hypocaust Chimney
Connects to the hypocaust in the basement which is used to heat both the bathhouse and the villa, and to provide for hot water.
28. Apodyterium
A changing room for those using the balneae’s amenities, as well as to wash up before using the communal pools.
29. Frigidarium
A cold-water pool that provides for an invigorating plunge before being warmed up in the bathhouse’s warmer pools. The hypocaust does not extend below this room, so it is kept chilled even as the rest of the bathhouse is kept warm.
30. Caldarium
A hot-water pool located directly above the hypocaust’s furnaces keep the water as warm as any bath.
31. Tepidarium
The water in this pool is piped in from both hot- and cold-water cisterns, keeping the water at a comfortable and refreshing temperature. Though this area is open to the sky, at least over part of the pool, the tiled floor is heated by the hypocaust.
32. Sudatorium
A steam sauna, with hot water from the hypocaust poured over heated rocks to provide for steam.
33. Laconicum
A dry sauna heated from the hypocaust in the basement below.
Here's the second floor.
Toggles
PARCHMENT layer to hide/reveal the layer of parchment that provides a sort of sepia filter over the outdoor areas.
TEXT LABELS (NUMBERS) layer to hide/display the numbered labels.
TEXT LABELS layer to hide/display the legends describing the labeled numbers.
Files
Description
The second story of the Villa Citri and its estate.
Outside
1. Muri Magni
On this level, the great outer walls of the estate have a ten-foot-wide central corridor that allows for defenders to be protected while shooting arrows through arrow slits.
2. Portae Turres
The second story of the gatehouse towers includes a spiral staircase that extended from the first floor all the way through to the third floor. Arrow slits allow for defending the main entrance to the villa’s estate.
3. Turres Anguli
The corner towers can be accessed from the ground floor via external staircases. Each has a spiral staircase leading to the third floor.
4. Scalae
These external staircases, unwalled on one side, provide access from the outside grounds to the second stories of the corner towers.
Villa
5. Portico Roof
Windows from the second story provide a view of the roof of the covered portico, or front porch.
6. Scalae Graecae
Staircase enclosed by walls on both sides.
7. Scala Spiralis
Spiral staircases that provide access to the third story.
8. Cenaculum
The private upstairs dining room on an upper floor of Roman houses.
9. Heating Caliduct
Hot air from the hypocaust is piped through here to heat the second story floors.
10. Puteus & Puteal
A chamber (puteal) that houses a wellhead inside the villa. Water is piped in to the well from the river.
11. Lavatrina
On this floor, the lavatories do not have a direct connection to the sewers. Instead, each has a cabinet over a chamber pot that is periodically emptied and clean by the villa’s servants.
12. Cubiculum
The guest bedrooms on this floor are a bit nicer than the ones below.
Balneae
13. Colonnade Roof
As the colonnade is only one story high, the views here provide a glimpse of its roof.
14. Scalae Graecae
Walled stairs connects this floor to both the first and third floors of the bathhouse.
15. Hypocaust Chimney
Brings the smoke from the hypocaust’s furnace to be vented to the outside.
16. Armorium
A closet.
17. Bibliotheca
The villa’s main library has a vast collection of books and scrolls, as well as several seating areas, including a lounge overlooking the tepidarium.
18. Palaestra
This exercise area includes a promenade overlooking the tepidarium.
19. Gymnasium
This room includes exercise equipment for use here or in the palaestra.
Third floor.
Toggles
PARCHMENT layer to hide/reveal the layer of parchment that provides a sort of sepia filter over the outdoor areas.
TEXT LABELS (NUMBERS) layer to hide/display the numbered labels.
TEXT LABELS layer to hide/display the legends describing the labeled numbers.
Files
Description
The third story of the Villa Citri and its estate.
Outside
1. Muri Magni Parapet
The open-to-the-sky crenellated rooftop walkway of the Great Walls can be accessed through arched doorways from the corner and gatehouse towers. Metal doors protect the towers from intruders. Stairs ascend to the rooftops of the corner and gatehouse towers.
2. Portae Turres
The upper stories of the gatehouse towers have spiral staircases descending to the second floor, and arched doorways providing access to the parapet. It also provides access to the Porta Rampart, a parapet over the gates.
3. Porta Rampart
A parapet over the gates from which guards can address visitors to the villa.
4. Turrim Cubiculi
The chamber at the top of the corner towers. Each has a staircase that descends to the second floor and arched doorways that provide access to the Great Wall’s parapets.
5. Gradus Superiores
Staircases that ascend from the crenellated parapets to the rooftops of corner and gatehouse towers.
Balneae
6. Scalae Graecae
Walled staircase that descends to the second floor.
7. Horreum Cenaculum
An attic used primarily for storage.
8. Camini
The chimney venting smoke from the hypocaust’s furnace.
Villa
9. Viridi Residentiae
The “Green Apartments,” so named for the color of the tiled floor, is one of the two luxury suites. In prior generations, the Lord and Lady of the villa sometimes maintained separate residences. This suite is currently used by the Earl of Westford when he visits his mother.
10. Viridis Vestibulum
An outer reception area for the Green Apartments.
11. Viridis Zotheca
A private lounge and dining area for the Green Apartments.
12. Viridis Bibliotheca
An office and small library.
13. Magnus Cubiculum
The main bedroom for the Green Apartments.
14. Caeruleum Residentiae
The “Blue Apartments” are named for the blue tiles on the floor. Unlike the Viridi Residentiae, the floors here are heated. The Dowager Countess of Westford occupies this suite as her own residence.
15. Caliduct
Hot air from the hypocausts vents from here to heat the floors of the apartment,
16. Caeruleum Vestibulum
An outer reception room for the Blue Apartments.
17. Caeruleum Zotheca
A private lounge and dining area for the Blue Apartments.
18. Caeruleum Bibliotheca
An office and small library.
19. Magnus Cubiculum
The main bedroom for the Blue Apartments.
Toggles
PARCHMENT layer to hide/reveal the layer of parchment that provides a sort of sepia filter over the outdoor areas.
TEXT LABELS (NUMBERS) layer to hide/display the numbered labels.
TEXT LABELS layer to hide/display the legends describing the labeled numbers.
The basement of the villa.
Toggles
FURNACE ROOF layer to hide/display the roof over the furnace
FLOW ARROWS layer to hide/display arrows showing direction of hot water, cold water, and warm air
PARCHMENT layer to hide/reveal the layer of parchment that provides a sort of sepia filter over the outdoor areas.
TEXT LABELS (NUMBERS) layer to hide/display the numbered labels.
TEXT LABELS layer to hide/display the legends describing the labeled numbers.
Files
Description
The basement of the Villa Citri and its estate.
Villa Basement
1. Villa Fountain
The base of the fountain in the villa’s peristylium courtyard, with water pipes to keep it filled even in the dry months, and a drain valve to empty the fountain for maintenance.
2. Villa Impluvium
The base of the villa’s impluvium.
3. Heating Caliduct
Heat vent brings hot air from the hypocaust to the upper levels of the villa.
4. WC Shaft
Shaft brings waste from the lavatories to the sewers.
5. Water Well Shaft
Pipes bring river water to the upper floors of the villa.
6. Cella Vinaria
The villa’s wine cellar.
7. Horreum
A storage room.
Balneae Basement
8. Frigidarium
The lower portion of the cold-water pool, with the pipes to bring water in and the release valves to drain it when necessary.
9. Caldarium
The lower portion of the hot-water pool, with the pipes to bring water in and the release valves to drain it when necessary.
10. Tepidarium
The lower portion of the warm-water pool, with the pipes to bring water in and the release valves to drain it when necessary.
11. River Water Pipe
Water piped in from the river.
12. Cold Water Tank
River water is piped to this massive tank to provide water for all of the villa’s operations.
13. Hot Water Tank
River water heated by the hypocaust is stored here to provide the villa and bathhouse’s hot water needs.
14. Sudatorium Steam Vent
This vent provides hot steam to the steam sauna above.
Hypocaust
15. Praefurnium
The wood-burning furnace used to provide hot air and water for the villa and the bathhouse.
16. Furnace Chimney
The chimney to vent the hypocaust’s smoke.
17. Firewood
The hypocaust naturally needs an endless supply of firewood to keep air and water hot.
18. Alveus
The hollow space beneath the building's floor, where hot air from the hypocaust circulates.
19. Pilae Stacks
These are the small pillars of tiles that support the raised floor above the hypocaust, creating the space for hot air to circulate.
20. Cold Water Pipe
Pipes bring cold water throughout the bathhouse and villa.
21. Hot Water Pipe
Water heated by the hypocaust.
22. Hot Air Pipe
Hot air from the hypocaust used to heat the bathhouse and the villa.
23. Hypocaust Controls
A complex series of controls allows water pipes and heating caliducts to be opened or shut as needed, either for maintenance or when warmer weather precludes the need for heated floors.
24. Drain Valve
Used to drain water from pools directly into the sewers.
25. Sewers
Stairs that descend into the portion of the municipal sewers that services the villa.
A superb effort, Royal. And lots of beautiful maps.
Thank you, Sue! I’m delighted that Marine Dungeons can be so versatile for even things that aren’t mostly underwater. I’ve been wanting a Roman style annual and it was there all along. 😉
I realized in the middle of the night that I forgot something -- the cutout in the parchment that allowed the courtyards to be shown without the parchment filter. There should be another toggle for the Floor 2 and Floor 3 files, second and third floors: the COURTYARD layer. Hiding it hides the magenta polygon, causing the courtyards to be hidden behind the gauzy parchment.
Or if you think that will just be too confusing, here are some FCW files that delete the magenta polygons, so the courtyards are always included when the outside areas are grayed out.
These maps are now in the atlas. Thanks for a great set of maps @Royal Scribe
Wow, thank you!