

[WIP] Community Atlas: Map for the Duin Elisyr area, Doriant
 Wyvern
🖼️ 205 images Mapmaker
Wyvern
🖼️ 205 images Mapmaker
Since the next map in my sort-of Dungeon24 project was scheduled for a new continent for me, and the largest on Nibirum, Doriant, that seemed an opportunity to try to present it as a WIP topic for once. This is something I rarely try, as I usually forget to record what I've been doing as I go along when mapping. So, while making no definite promises, let's give it a try!
The starting point was, as usual for this part of the project, the base map generated by rolling, in this case three, of the Inkwell Ideas Dungeonmorph dice from the "Delver" set, which produced this layout:
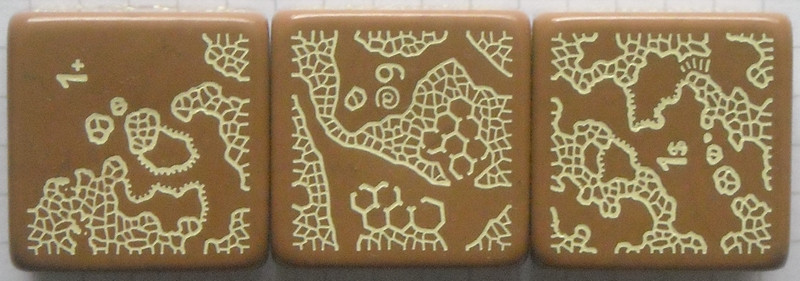
Each die in the Inkwell dice sets has the usual number somewhere on every face, and a unique symbol or letter to show which it is in that set (which is also keyed to descriptions in the accompanying book, for those sets that have them). The symbols have become more complex and non-ASCII as the series has progressed! Here, the "+" die is the one with the entrances, as mentioned last time (see the Petroc Hills topic). Ordinarily, I construct the layout based on the orientation and relative positions of each die as thrown, connecting them to form a pattern. Here though, the entrances die needs to be oriented to fit the rest of the pattern.
Naturally, being geomorphic, there will always be parts of the designs that can't be used, commonly exits that probably won't exist on the final map, or short stretches of dead-end passageways, like that in the lower left of the "1+" die. In this case, a large proportion of the design on the "1$" die and about one-third of that on the "6@" die don't link with the rest. Those might be connected up easily by adding short sections of new tunnel to the linked caves, or they could be left out. As none of these unconnected sections had any of the intriguing hex-rooms, or any other features not present in the rest (except the natural stone steps, which I'd just used in the previous map), I was already thinking to leave them off the final design. What convinced me to do so was checking the text in the accompanying "Dungeonmorph Book of Modular Encounters: Delver, Trailblazer & Voyager Edition", as that suggested using the caves as a bee-folk lair, with the two hex-room caverns as having five vertical levels in each.
Naturally, those could be done as a set of separate maps, one for each level. Given the relatively small areas though, I thought it would be more interesting to try to present them on a single map, with labels to indicate which level was which instead. That would need space leaving on the base map where those could be drawn, so losing the upper segment from the dice design made sense. Thus we come to something like this:
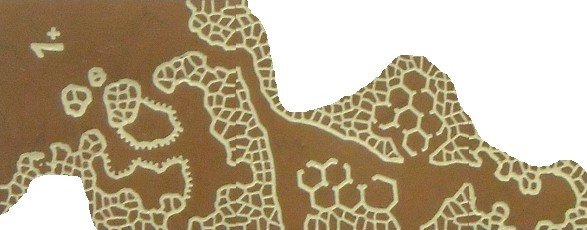
from which a hand-drawn base map can be prepared, smoothing-out the no-longer-exist exits, and fitting the hex-rooms more tightly into that southern cavern especially. As my original hand-drawn version is now so amended and annotated I suspect nobody but me could make sense of it, I've redrafted just the map from it in a clearer form for use here, a scan of which can be inserted later into the CC3+ map for copying:
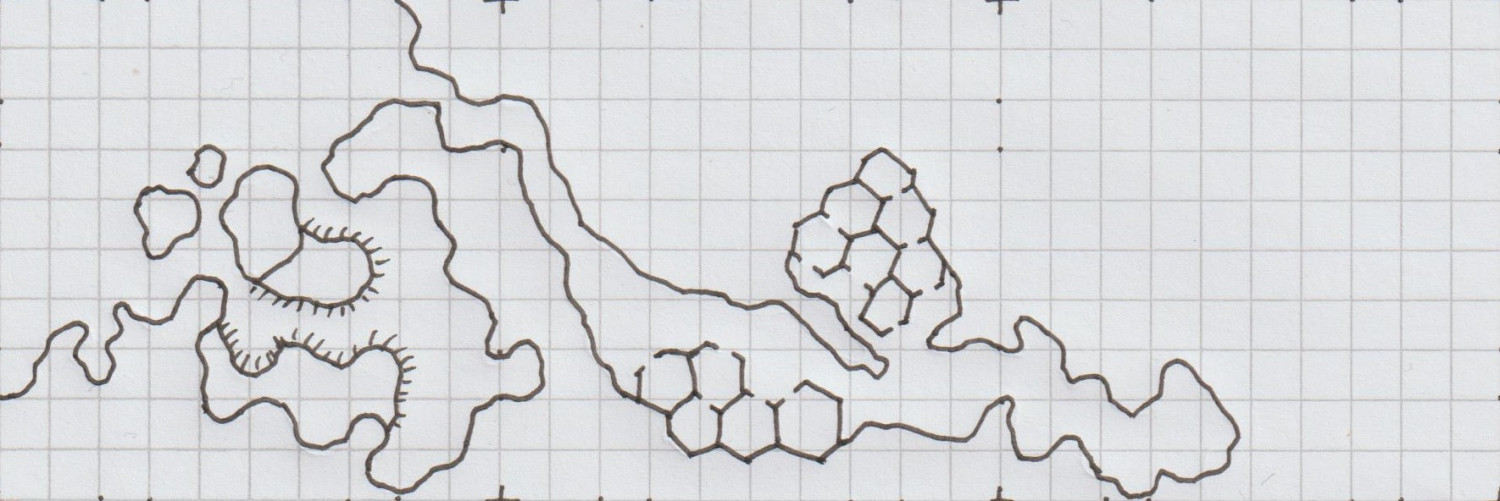
Graph paper makes copying the designs easier, as the dice geomorphs are based on a 10-square layout, with the exits always 3 squares from each die-face corner (hence the layout marks and dots, mostly cropped-off the edges in this diagram). I take each graph-square to be 10 feet per edge, which squares of course make rescaling the image in the CC3+ map much easier too.
A by-eye estimate, coupled with years of practice, suggested a base-map size of about 350 feet by 150 feet should work OK to start with (it can always be enlarged later, if needs-be), and having decided already to use the basic DD3 style of Caves & Caverns from Cartographer's Annual 7 for the map, I went ahead and created a new map, followed by inserting this base map onto a new BITMAP Sheet and Layer created for the purpose:

This screenshot shows the 10-foot grid squares, for easy comparison with the graph paper ones. And so it begins...


Comments
Those are really appealing dice, and a fantastic idea, Wyvern.
Thanks very much Sue!
Inkwell indeed have a fascinating collection of RPG-ideas mechanics like the dice and accompanying books, and a range of cards as well, for settings, adventures and characters. In fact, they currently have an active crowdfunding campaign on Backerkit that has only 36 hours left as I type this (ends 2024 May 10, 03:00 GMT) for some new cards.
Meanwhile, resuming from where I left off, the first thing I wanted to do was draw the base shapes for those hex-rooms, so they'd be actual hex shapes, not my wonky hand-drawn efforts. This would give a clearer impression of where the four upper level layouts could go, and allow adjusting the position of the inserted base-map, before starting the mapping. So I set-up a suitable 10-foot hex snap-grid:
The "Edit Hex Grid System" dialogue pane does pretty much all the work for you, as once you type in the first hex dimension, it automatically calculates the second. For everything else, apart from the grid system's name, I just used the default settings. The resulting maze of dots allows an easy check that the size will work for what's needed. One hex-room is larger though, so I also created a second, 15-foot hex grid similarly.
Then I created a TEMP Sheet and Layer, drew out both the hex-room layouts onto those, using 0.4-width lines, and made four copies of each that could then be moved around to test different layouts. The next illustration shows what I settled on just before beginning the map. In it, the BITMAP sheet now has a 50% transparency effect activated:
The locations for those upper levels are liable to need further adjustment, since I'm likely to want to vary the individual layouts, plus the cave walls will need to be shown too. That will mean more shuffling about, and could require the map border and background to be expanded as well. Neither should be all that difficult, at least in theory...
And so to the basic cave mapping:
Nothing fancy here as yet, as I've just dropped in a simple hand-copy fractal polygon of the main cave floor and the exterior, using the Cave, Default drawing tool (which also adds walls automatically). Using the drawing tool means it's easy to trace the exact outer lines of those hex-rooms in each respective cavern, although it does mean the cave floor won't be drawn beyond the map border. That creates a couple of problems, as the Outer Glow effect is larger than the current SCREEN sheet's mask (that thin white strip just outside the map's edge) can hide, and there's also a darkening towards the top left map corner due to the Inner Glow on the cave floors.
Enlarging the SCREEN's mask (typing-in the commands "collardel" - which removes the existing Screen Sheet mask - and then "collarauto" - which creates a new, larger, mask on the SCREEN Sheet) is easily done, but I'll wait a while for that, because I also want to draw on some exterior terrain over the cave's base design here, with some vegetation, to make clear it's the outside. Drawing that terrain "floor" so it extends beyond the map's border will also hide the "Inner Glow" issue there currently. That's something for another day though.
As the perceptive among you will have noticed, I made a further change to the locations of some of the upper level layout designs after hiding the bitmap sheet I'd been tracing, something that I find happens all the time, when things don't look quite right. And which are liable to be changed repeatedly thereafter till I'm happy (or happier...) with them!
However, to today's update. The exterior is done for now, with ground cover, some vegetation and a few tumbled smaller rocks. I've also added the new SCREEN Sheet mask to hide what's beyond the map border:
The effects on the various external ground and symbols sheets has needed a degree of amending as well to reach this point, and I've also added those three free-standing boulders/rock pillars at the mouth of the southern front cavern. Haven't done anything inside the caves as yet, although I have had to add a small polygon of one of the patchy grey dirt terrain bitmap fills (one of the "T" types) to better disguise one of the outer-inner transitional passageway ends, where (as sometimes happens), the Edge Fade, Inner effect was giving too sharp a line where the outside brown dirt bitmap fill met the grey of the cave floor.
Next will be the initial interior cavern features.
A little further on now, and the cave's starting to look a bit more lived-in:
Getting the effects to look right for the two raised rock platforms in the southern front cave took quite a while, and may need further tweaking. I also tried adding some texturing patches to the cave floors in places, but they started to feel a little too much for the drawing, so were removed after a while. Might have a rethink on those later, perhaps.
I was happier with how the hex-room walls worked out, again after quite a bit of trial and error. Being the basal level here, they're attached directly to the cave floor, and I did add - and left there still - some texture patches inside those rooms. All I did beyond that was move them to a new sheet with some suitable effects, broaden the lines a little and change their colouring. And then cut some narrow doorways using the Break command. Working on the principle the humanoid bee-folk are slim and not too tall, so they don't really need large doorways!
Upper levels to start after this. More when it's done!
For the upper hex-room cave levels, I hand-sketched some ideas using a mix of graph and tracing paper to make sure I had the general sizes and layouts correct. Then, I redrew those into the CC3+ map, using the same TEMP Sheet and Layer as for the base hex-room layouts earlier. I decided not to scan-in and insert the hand-drawings this time, as I knew things would need adjusting in-map to fit with what was already drawn there.
After that, a great deal of tweaking, changing and moving about followed, to improve the look and layout of the whole. Indeed, this took so long, I didn't have time to start converting the drawn lines to parts of the map, although I did identify one new item, which was the need to indicate a specific hex-room in all the "northern" hex-room cave layouts, to help with orientation (the one larger hex-room on all the "southern" layouts solves that problem there already).
Oh, and I changed all the layout lines to white!
Layout of the upper levels, and what each of these levels will look like, are of course subject to change once converting them to the appearance of the rest of the map begins, and the red-wall room isn't definitely how it will be in the end either. The external exits from some of the higher levels were suggested as existing by the Inkwell Ideas book for these designs, incidentally.
While these were all essential tasks, hopefully, there'll be some "real" mapping progress to report by next time!
Didn't get quite as much done as I'd hoped before reporting back here (though that's often the case), as sometimes tweaking the effects or making subtle colour changes just needs more time that you can easily predict. However, a bit further forward:
The basic cave outlines were swiftly converted from their previous white outlines by simply using the "Change like draw tool" option under the right-click list of the Change Properties button, although the floors had to be moved to their correct sheet for the effects to work after that too. I also added a "Solid 30 Bitmap" fill over these new floors (by simply copying the existing floors to a new sheet, and changing the properties of the floor piece so-created), to try to give an impression that the floors aren't attached to the hex-rooms on these upper levels. Note that two of the exterior exit upper levels in the lower right corner haven't had their new fills added yet, because they have to be drawn in freshly, as the tunnel floors are really floors at the new level, with a ledge where they begin. That's all still to sort out.
The hex-room walls were simply converted to their thicker, coloured versions by changing properties of the original white versions. I've also changed the "identified" room colour in the upper cavern to be less jarring, though I think now this may be too subtle! Suitable floors, hopefully looking enough like the cells in a beehive, were added by again copying the hex-walls to another new sheet and amending their properties accordingly. I also added an Inner Glow effect to this sheet to alter the look of the floors a little more. I've not added doorways (which may include floor hatches - haven't finally decided) to the upper levels yet, as I wanted the basic room shapes to be completed first. Cutting the walls beforehand would have made this problematic.
Been MIA for most of this week thanks to RL things. However, another short update.
More tweaking of effects, and adding new, mostly minor, items, along with some new small outdoor patches for the upper tunnel exits this time. I also added some floors to the basal hex-rooms, to make them sit a little better there.
While experimenting with the bevel edge lines for the upper tunnel inner ledges, I chanced upon a better looking option for those raised areas in the southern entrance cave too. I also ended up redrawing both the floors for the upper exit tunnels, so the bevel would work there, and the walls for those same three upper caves. The latter showed up as a problem when I added some of the outside dirt texture patches, as it was suddenly obvious there were some unwanted lines and pseudo-gaps in the wall lines due to the classic "too many nodes" problem. For some reason, the Break command wouldn't work on those two right-hand edge corner exits, possibly because I couldn't identify exactly where the lines were due to the nodal weirdness, and trying to delete nodes turned into a complete nightmare, as some of the lines looked almost as if they had gone around the entire map-border-line edge. So I just cut my losses, deleted all those wall lines, created a new drawing tool to prepare identical, but open-ended, wall-lines to those in the default cave tool, and redrew the lines by tracing the cave floor areas and, without tracing, to a little beyond the map border.
This amount of time-consuming, if relatively minor, amendments is pretty typical for this stage of the drawing process, I find, as it's among the most important elements to get as right as possible.
Ran out of time to get the hex-room doorways cut, with labelling and a scale-grid to follow. After that, it'll be time to start the area map for where this map's going to go in the Atlas...
I can't really see on this low res shot, but it's looking really good :)
Thanks Sue! I've been deliberately making the WIP images smaller than the maximum Forum res because they are still very much subject to change along the way, and I didn't want to spam the topic with higher-res shots that were only going to have changed, perhaps quite significantly, by my next posting. On which topic...
Plunging into more of the detailed work within the caves quickly indicated there were several issues in need of resolving or changing. Most revolved around the hex-room caves working as a 3D maze, which needed a mixture of doorways, floor and ceiling openings to work properly. Further complications came about as there were also new, higher, floor levels over parts of what had been simply darkened open areas previously, that were in need of amending. I even managed to find one place where the roof of a lower hex-room needed illustrating, as forming a new piece of "floor"! So, quite a bit of redrawing, adding a new sheet or two, tweaking the effects, and so forth, followed in what needed to be a quite intense spell of mapping.
Rather than post the results of just that, these last notes on the subterranean map condense what were really several sessions spread over a couple of days, as I also added the scaling grid, and then the labels. After reflection, I then changed almost all the labels, as I realised some weren't sufficiently descriptive, and a couple more needed adding! Of course, this is what happens sometimes. Well, it does to me 😁!
Thus the final map:
I opted for a subtly pale, 5-foot square grid for this map, after a few trials. The yellow labelling with a black outer glow is naturally quite deliberate for a bee-folk cavern. The font is Gaeilge 1 which comes with CC3+. I'd have preferred a bee or wasp option for the compass pointer, but settled instead for one of the varicolor options from the Pete Fenlon Revisited style from CA 179, because it was spiky and let me continue the bee-flavoured label colour scheme!
Now to work out where it fits on Nibirum...
I love the labels :)
Long preamble post today, sidling-up to the area map.
It's never been a secret where the underground map's to go, but the Duin Elisyr area in Doriant is huge, so clearly I needed to zoom-in to find somewhere suitable as an actual location. This is where Duin Elisyr is (the orange rectangle is about 1,000 by 800 miles):
Nibirum's equator runs through this area, so from early on, I was contemplating vaguely warm to hot tracts of jungle-like vegetation, perhaps with savannah stretches, and of course mountains, as the whole area is somewhat elevated (albeit fairly modestly compared with other mountainous areas of Doriant). So it was something of a surprise to open the Duin Elisyr map and find only typical temperate vegetation symbols had been used there, even into the lower lands in the map's southeast corner, not that far from the near-desert lands a little further south.
However, that's what the map showed, and it didn't have a great bearing on my choice of a humanoid bee-folk as the inhabitants of the caverns. So I simply hunted around for a suitable spot, not too near any habitation, to create a new small area map, as no other smaller maps linked from this one when I arrived there. Snag was, my typical choice of about 20 miles square for such a map looked tiny in this vast region. I doubled it, only to find that still looked ridiculous, as just covering half the mountain pass zone I was looking at. Thus - gulp! - I doubled the horizontal length again to be now 80 miles by 40...
The Duin Elisyr map, complete with my selected rectangular zone:
And a closer look:
The new map's name had become obvious as "Evth Pass" by this stage, and suddenly those innocuous-seeming bee-folk had become bee-folk raiders, waiting to snare passing travellers using the mountain route from their hidden cavern lair, in this corner of rather peripheral lands to the Uthold Dwarfen realm.
For map-planning of course, we need a still closer view, and preferably without the labels:
Ordinarily, I'd hand-sketch the proposed area onto graph paper, having set an appropriate scale for each square first, which is typically a mile or two. As I'd intended to present the process here on the Forum this time though, I decided a version others might make sense of would be useful instead, so I simply added a two-mile-square grid to the area, thus:
As usual, I then rolled to see what random squares might contain points of interest at this mapping level. I choose a rough percentage value first of all, dependent on the overall terrain and what indications of habitation there may be nearby, which is normally between 10 and 20%. Here, as this is pretty wild country without substantial nearby settlements or farmland, I opted for 10%, of which I decided around 12% might be surface settlements of some kind (this proportion I often vary between roughly 8 to 20%). In this case, that meant rolling quite a lot of D10s (any 1s = the required 10%), and then checking which of those might be settlements by rolling a D8, with again "1" allocated as the determinative.
Once that was done, I had to identify what each feature actually was. The settlements were decided using my own random tables, but for everything else, I opted to use various published sets of information cards. One was a newly-arrived set of Monte Cook Games' "The Weird" cards (like their random RPG tables book of the same name that I've used before, but adding a whole fresh array of options for people, places and things beyond what's in the book). The others were seven different sets of Inkwell Ideas "Sidequest" decks with 52 to 54 cards in each, which provide an array of ideas for enlarging into RPG adventures. The choice of deck was rolled randomly from this group of eight, and then a random card from the relevant deck selected. From that, an option, or sometimes more than one, was picked, or adapted, to fit the map and what terrain the spot was in.
After completion, and some time spent poring over what all this showed, allowed the sketching-in of some basic river lines too (living settlements need a water source of some kind, after all). Which brings us to:
Here, white squares are the surface settlements (8), the white triangle is the bee-folk cavern location, and the numerous white circles are all the other points of interest (68), just a little under the expected random average of 80 items in all. The blue lines, of course, are the potential watercourses (including a substitute place-holder for the one actual river from the original map, up in the top left corner.
As the "new" river lines suggest, the terrain symbols here are simply being used to indicate raised areas and valleys now, and as if being viewed from top-down, not from their pictorial side-on appearance.
All of which (as I warned at the start😊) lengthy preamble means choosing the style and starting the area mapping will have to wait now till next time!
But it was a pretty awesome ramble, Wyvern :)
Well, it's an awesomely big area to stumble around in, Sue 😁! Thanks though!
There are a great many parts of Doriant that remain unmapped, except at the global/continental level, so it's worth "advertising" it as widely available for mappers, I think. I suspect from the start a lot of folks were just a bit intimidated by its sheer size.
Yes, me! I would like to start submitting some of my stuff to the Atlas but I have been intimidated about figuring out what’s available. Don’t want to tread on anyone’s toes if they were planning to get to a section that I jumped into. (Any advice on how to find unclaimed territory is appreciated.)
All the places that have been either mapped or reserved are shown as such in the online Atlas. Everywhere else is free to choose from - and don't forget that even if somewhere has already been mapped at some level, you could always map a smaller piece of that, down to a room in a house or a dungeon (or even smaller places!) if that hasn't been mapped in detail yet, should you choose to. There are no limits except your imagination!
You can reserve a place or places by commenting on this Forum topic, or by contacting the Atlas' organiser and coordinator, Remy Monsen.
Full information can be found out regarding all aspects of mapping for the Atlas on the How to Contribute page of the Atlas.
Thank you! I will begin exploring.
Where is this "online Atlas". I went back and forth over the site, but found no spot where it showed the reserved areas. Maybe I'm blind.
I requested the Ranuar area in Doriant in the Community Atlas Thread.
The atlas is at https://atlas.monsen.cc
Generally, the amount of reserved areas compared to the number of maps is quite low, so finding one is actually difficult, but if there are any reserved areas on the current map, there will be a button below it named "Show reserved areas". That that button does is just to enable reserved ares to show up with a hotspot just as the existing areas, meaning every hotspot marked on the map leads to either an existing map, or a place someone has reserved, while a non-marked area of the map is open for the taking.
I absolutely didn't notice you could click the globe, I just thought it was an animated .gif. Makes more sense now.
There should be a "Browse Maps" entry in the main menu as well. The globe is just a secondary entry point for people who like to click on images.
It seems we may soon be looking to more new maps, and some fresh mappers, for the Atlas, which can only be A Good Thing!
Meanwhile, back at the camp, and wondering which style to choose for the area map...
One of the issues with symbol-based overland styles is the hidden "north" side of everything, where you can't properly show what's happening there without using some sort of indicator or map notes. Often, that doesn't matter too much, but for details of what's where within a mountain range, it can become more problematic. For this area map, I decided to use a top-down drawing style instead, and picked one I've been intending to try for a while, the Worthington Historical from CA91. This has only a few symbols for the settlements particularly, with the terrain and vegetation all illustrated using bitmap-fill drawing tools and sheet effects.
As the area's size had been determined already, the one thing I changed when creating the new map in CC3+ was the background fill style, opting for the green Farmland fill in place of the default blue Sea one, as there's no large expanse of open water here. After that, I simply created the usual new BITMAP Sheet and Layer, and inserted my features map onto them:
The grid dots that are showing are from a new "2 miles, 2 snaps" one created for the purpose as well, making for both easy placement of the inserted map, and a check that the scaling was correct (I did a double-check using the Info -- Distance drop-down menu command as well, just to be sure).
I sketched in a base colour for the rising land that fills much of the map except in the top right and lower left corners using the Terrain Default, Hills tool. That was rather hard to distinguish, as it uses the Solid 10 fill, the palest of the transparent "Solid" fills. I tried changing it to Solid 20, and while the Glow effect on the TERRAIN HILLS Sheet looked interesting, the fill itself still didn't really show clearly enough. After a further couple of failed attempts using the darker Solid fills, and an examination of what effects were on which sheet, plus a few more experiments, I ended up simply copying the drawn HILLS area to the CONTOURS (LAND) Sheet, and changed the fill style to the Land, Default style, which produced this:
Happy with that, I began draughting-in the hill and mountain terrain using the Terrain Default, Mountains drawing tool, only to find that the two Mountain sheets had no effects on them. I'm not sure if this may have been corrected subsequently in that Annual's download file. If not, it's easy enough to correct by just copying the effects over from one of the sample maps for this Annual issue instead. Which I did!
I had a couple of false starts in drawing the terrain. While it's important to try to mimic the placement of symbols with where the more dominant features are in this kind of "zooming-in" area map, I find it's often a question of trial and error to see what looks best when converted to a different, in this case more topographical, drawing style, something that will likely also need testing variations in the sheet effects subsequently as well.
As the mountain terrains are all drawn using the same fill and effects in the unadjusted Worthington Historical style, stacking mountain contours atop one another also creates the dreaded mottling of transparency acne, thus a series of "BACK" sheets without effects and a different fill had to be added - and changed - each time I redrew the various contours during this. So long as you do this singly or in batches, to make best use of the "Prior" selection option, that's not too bad though.
This shot is only partway through the process of changing the contours, so it looks really messy still in places. The Glow effect on the various terrain sheets is obviously too strong as well, for all it helped keep things clearer for me while drawing to this point. Hence why I hadn't changed it at this stage. This is as far as I got during the session:
The final image for today shows what happens when one of those "BACK" Sheets is deactivated:
Someone's knocked over the pepperpot 😉.
More to follow.
Further progress now, with the contours mostly mapped-in, except for the highest peaks. I felt it was growing less easy to separate the upper contours, so experimented with some colouring alternatives. The range of fill-colour options in this style is very limited, so that meant trying out some effects as well, including one or two I've only rarely tested previously. Naturally, everything remains in flux at this stage. However, this option seemed satisfactory, using a combination of an RGB Matrix Process, retaining the Glow to highlight the contour's edge, and a Blend Mode using the Phoenix setting:
As should be obvious enough, I've also hugely toned-down the contour-edge Glows since my previous post, when I was still trying to get the contour shapes right, and being able to quickly identify which was which was more important. The "woodcut look" of earlier has its attractions, and has been used to good effect in other maps presented on the Forum over the years. It seemed much too strident for the Worthington style's subtle colouring at this scale though.
Whilst blundering about among the effects, I chanced to find there was an inactive Texturize effect on the whole map. Turning it on did nothing obvious, even when I changed its settings. When I looked closer at what file it was reaching for though, the reason became obvious, as the file it was trying to find was located at D:\Programme\ProFantasy\CC3\Filters\Images\CA91 Texture.png. The correct file location for a standard CC3+ installation should be C:\ProgramData\ProFantasy\CC3Plus\Filters\Images\CA91 Texture.png. So I changed that, with this result (without altering any of the default settings):
While quite subtle, especially at this res, it does create a somewhat different appearance, as might be expected, rather like watercolour paper. I do like how it softens everything, even if I'm not sure if it'll stay to the end of the mapping at this point. While mapping, it'll have to stay off for best clarity (as it affects EVERYTHING in the drawing, of course, including the bitmap version I'm copying-in details from).
Further exploration showed a possible reason why this global effect had been turned off (and perhaps forgotten, given the non-standard file-path), as there's also a TEXTURE sheet, which has a Transparency effect, set to 70% opacity by default, and another copy of the texture PNG on it. This is right at the top of the list of sheets (actually, of course, at the bottom in the Drawing Sheets and Effects pane), so it affects the entire map and its frame. Naturally, this is why the whole map looks quite misty, and a little faded. I ran a series of experiments with both the global effect setting and this TEXTURE sheet on or off (hidden or shown for the sheet), though I'm undecided as to which is preferable still. I suspect I'll need to see how the finished map looks before making a final decision. The contours alone probably aren't enough to judge by at present.
All of which lengthy fiddling about only left enough time to add the highest mountain peaks, with a further colour change, this time making use of the CA91 Ice bitmap fill for a suitable pale topping. With whole-map texturing and the texture sheet visible:
and with just the texture sheet shown:
Without the global texturing is certainly clearer. As noted above though, have to see how I feel about it another day 😊.
I'm interested to see how this turns out.
Me too!😁
Forgot to mention last time that I'd deleted and created a new beyond-map mask on the SCREEN sheet after laying-down the final terrain segments, using the same typed commands as mentioned back in the mists of time in this topic (end of the May 8th notes for the Bee Caverns map 😊). I do this for almost all CC3+ mapping, as I generally extend such areas well beyond the map border, to ensure any effects on their sheets won't create an unwanted edge-of-the-world outline look inside the map's frame. Similarly, any drawing tools I'm using that will run beyond the border need to have their "Restrict to map border" box unchecked, and then the tool saved so it'll remember I've done that. Thus for the River, Current Width tool:
Which of course is a not-so-subtle clue that things have progressed to drawing in some rivers now!
The next stage of the process began by sketching the base line for the road through the Pass, and the rough river lines, all hand traced from my inserted bitmap image design. All of these are going to be changed as the mapping proceeds, as they now have to fit the new terrain that's already there, so the lines are very approximate to begin with. More minor river lines will be added, others removed, for instance, as well as some new trails added. Plus to get the river and road lines right, the various randomly-located map features also need to be emplaced, as they'll help identify where such things need to be.
While the random allocation of features to squares is fine for the planning stage, they have to be moved around to suit the look of the map now. If two (or more) things are in adjacent squares, I might keep them separate, or combine them at one place, depending on exactly what they are, for instance. Some creatures or monsters have preferred habitats, such as woodlands or marshes, so that provides an opportunity to add some smaller patches of woods, aside from those the base map had already indicated in the lower left corner. Consequently, this part of the process can be quite complex, fairly slow, yet also fascinating, as there's a lot to think about, and try to be creative with.
Hence the limited amount of new features added or changed so far in this image (all the texturing options have been turned off for now):
As this shows too, labels need adding (mostly so I don't lose track of what each thing is meant to be). Red are creatures or monsters (in the RPG sense), green is vegetation, brown are occupied Dwarf settlements, grey unoccupied or ruined places, and blue unusual water features. The accompanying notes will clarify this in the final Atlas version, though I may add a map legend as well. The limited range of symbols has meant all have been repurposed so far beyond what their "official" titles suggest - those very popular circles are listed as "Hamlet", for example. Luckily, all have varicolor options, so identifying what's what becomes fully practical.
My original intention was to use the Gaeilge 1 font for the labels again, as with the Bee Caverns map. However, I couldn't get that to look sufficiently legible at reduced size, so have switched to the good old standby of boldfaced Arial for now. Place names were selected from a pre-rolled list of random options constructed from the name-tables in North Wind Adventures' "Hyperborea" RPG, adjusted or added-to in places, as those tables generate what are meant as personal names, based on a number of different Earthly cultures (although I ignored those tables for the more recognisable Greek, Latin and Old English/Anglo-Saxon ones in this case).
As usual, all that's been done till now remains subject to change, including the exact locations of the various features - aside from those sketchy, unadjusted river lines away from the area developed so far. I'm not happy with the look of that patch of Cedar Woods forest either. I've heavily adjusted the effects on the FOREST sheet already, and ran out of time to do more. I'm thinking currently to add a new sheet to outline the woodland area, so I can make the inner part, still on the FOREST sheet, transparent enough to show the contour lines for the rising mountains. There is a Transparency effect on that sheet now. Unfortunately, Transparency's something of an odd effect, which tends to interact poorly with glows on the same sheet (which is what's presently outlining the wood), so it's no longer properly see-through. I've had to set the Transparency to 90% opacity just to stop the glow from doing all sorts of unwanted things to the whole polygon to get this appearance. Then again, even if the opacity is set to 100%, objects on a sheet with only Transparency active look more washed-out, and sometimes slightly transparent still, than if the effect is turned off entirely.
Still, a typical level of progress so far!
Rather a longer gap between posts here than I'd hoped, but such is the way of things sometimes.
However, coming back to the map with fresh eyes, it was obvious the symbols were over-sized for its scale, so I resized them all, changed one and moved a few others, and then had to move all the labels to reflect their altered locations. The usual two steps back and one forward; all part of the process!
Plus I also changed the look of the woods in the manner suggested last time, adding a new outline sheet, copying the wood onto it, and setting it to a suitable solid green colour of a satisfactory width, so the main woodland area could be made transparent enough to still show the rising contour lines in the trees. After which, I added another segment of map symbols in the lower right, tweaked the northern line of the pass road more, and added a few smaller river lines. This is how it looked before I started adding the next batch of labels (still with none of the texturing active):
The two new purple symbols are the entrances to a pair of subterranean Gnome settlements. That nearest the southern border has been moved some distance west of its original location, as the mountain tip there from the side-on symbols didn't make the cut into this topographic view. I had been treating those tips across the map as the northern side of what would be shown - which also explains why so many of the symbols in the northeastern quarter have migrated southwest, to be in the northern slopes of where those mountains were drawn here, of course. Those pictorial symbols can be so misleading sometimes 😉.
Before I added the labels though, I grew distracted by some of the contour lines, which didn't look quite clear enough in places. So that took up a bit more time, tweaking and re-tweaking, to get to something more satisfactory (I hope!). And then I changed some more river lines, mostly in the southeast quarter, to be nearer their final versions.
And finally, I added the next batch of labels!
A couple of new stretches of woodland have sneaked into the lower right corner as well, and I suspect there may be a few more before this is finished 😁.
I like how the different varieties of things on the map have different colours.
For me personally the text looks to fuzzy. Can the glow be lowered so the text edges are sharper, or is that the aesthetic you are going for?
(or did you compress the image a lot during conversion?)
@Don Anderson Jr. commented: For me personally the text looks to fuzzy. Can the glow be lowered so the text edges are sharper, or is that the aesthetic you are going for? (or did you compress the image a lot during conversion?)
I think it's just an issue with the resolution here on the Forum Don. The symbols also look pretty fuzzy to my eye right now on these shots. At a higher res on screen and in printout (at the level the map'll be available in its final version in my Gallery), it looks fine. I am also using a smaller size image than the maximum allowable here for these WIP shots to try to keep things a bit more manageable, as they're really just for general illustrative purposes. I did run a few tests to adjust the text glow early on, and this was certainly the better option from those at the "proper" resolution levels.
Back to the mapping, if with a shorter update today.
Adding the randomly-allocated features to the lower left quadrant meant dropping-in a couple of more substantial pieces of woodland, as already identified from the Duin Elisyr base map. That in turn meant thinking of adding some further smaller scraps of woods elsewhere, all of which quickly snowballed into adding place names for some of the main rivers, peaks and valleys, along with the first extra trails. There was also some tweaking of a few river lines, thinning some out, adjusting the courses of more, and suchlike. Plus amending the line of the pass road to better fit alongside the southern river out of it, now named as the Saskulaana. So it's all starting to look a bit more "lived-in", with just the upper left quarter to complete:
More tweaking of already-placed elements is likely, of course, and at some stage soon, I'll need to find somewhere to put the title, scale and compass pointer!
Interesting usage of transparency for the woodlands. So you can still see the contours and rivers within them.
Yes, this can be a problem with some of the topographic mapping styles, and it's not possible to solve them all the same way (as they don't all use effects that will work equally well with things such as transparency). Luckily, this one does work that way.
Back at the mapping, the fourth quadrant has now been completed, and various items tweaked to a greater or lesser extent that seemed to need them. Names have been added for the main rivers and uplands, as appropriate, and a few more smaller patches of woodland "grown" in parts:
Then I added the title, scalebar and compass rose, and did some tests with the texture options activated. This image shows both in place:
While that looked sort-of OK, I wasn't very satisfied with it, so I tried various alternatives, ultimately deciding to have two separate sheets with the texture on them, because doubling-up helps accentuate the "water-colour-paper" look, and I could also restrict the textured areas to the newly-expanded upper and lower map borders only. That's not possible with the all-map Texture effect. Which brought me to:
However, I wasn't convinced this was sufficiently clear, as apart from darkening the map in general, it also further blurs everything. So I'm now thinking to leave the texturing options off entirely:
A few more minor adjustments are likely while preparing the notes to go with the Atlas version. At present, I'm intending to add some bridges to help clarify where the fords are over the lesser rivers, for instance. This is though probably close to the final version now. Until I find I've missed something, that is!
I prefer the texture. Just makes it look less clinical. That's just my opinion.
IT does mute the reds a lot. Could you cheat it and move the reds up so they don't get affected?