

Deepzoom images for web display
 roflo1
🖼️ 3 images Surveyor
roflo1
🖼️ 3 images Surveyor
While reading the World Builder's Compendium, I opened the beautiful Earlsdale map by Grimur Fjeldsted (http://earlsdale.grimur.de) and realized I actually know a more efficient way to serve a very large image in the web for everyone to view.
Why is this an issue?
Well you see, when you open the webpage above, the server sends you a single, 12MB, 7300 x 5902 image. And then a script allows you to zoom and pan. And while 12MB is not that much by today's standards, what if you want to serve a 73000 x 59000 image? Well, you'd have a 1.2GB image, for starters, and it's time to look for other options.
Enter OpenSeadragon. And deepzoom images.
There are many formats equivalent to Deepzoom (or DZI), but I'll only talk about DZI (sometimes also called a "pyramid image"). Take the following screenshot of this folder as an example:

In this example, I split a 15000 x 12000 image in smaller tiles, each 256 x 256 pixels; and they're inside a folder named "14" where 14 is the deepest zoom level available. In other words, these tiles have the maximum resolution I have available for this map.
At a zoom level of 10, these are the files in the corresponding folder:
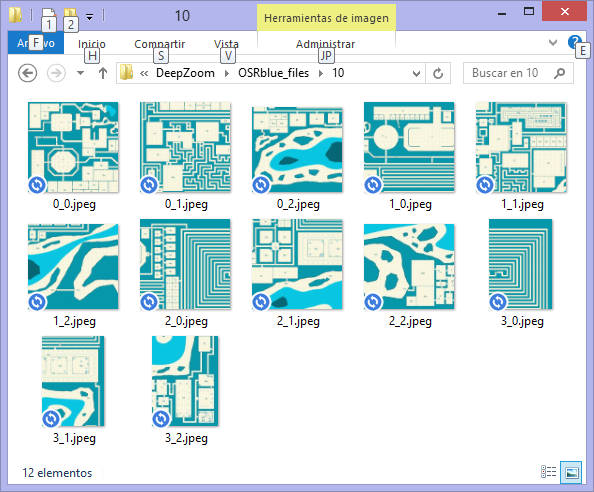
They're still 256 x 256 pixels (except at the edges), but they are downscaled. And this is where the beauty of a script like OpenSeadragon comes in.
If you zoom out the window, the server will send you the downscaled images, because that's what you really need to be displayed in your window. And if you zoom in, only a few high-resolution tiles will be sent to you (a link to the working example is at the end).
If you've ever used Google Maps, you've already used something similar.
How to do it?
To create all the "tiles" in one go, I discovered this tool called vips. It's a programming library and much more, but it does come with a single command-line tool (vips.exe) that offers most -if not all- the functionality.
To create a deepzoom image, you should type something like this:
vips.exe dzsave "MyBigImage.jpg" MyResultingDZI
But do mind the paths and quotes (quotes are mandatory if any folder or file name has a space in them):
"C:\Path\To\vips.exe" dzsave "C:\Path\To\MyBigImage.jpg" MyResultingDZI
This will create, in your current folder, the following:
- A text file named
MyResultingDZI.dzi - A folder named
MyResultingDZI_files(this folder contains the "zoom level" subfolders with the tiles)
In order to upload this to your webpage, you need to create an HTML webpage and upload the OpenSeadragon scripts (which you can download from here).
A bare-bones HTML file looks like this:
<html>
<head>
<title>OSR Dungeon</title>
<script src="./openseadragon-bin-2.4.2/openseadragon.min.js"></script>
</head>
<body>
<div id="openseadragon1" style="width: calc(100% - 20px); height: calc(100% - 20px);"></div>
<script type="text/javascript">
var viewer = OpenSeadragon({
id: "openseadragon1",
prefixUrl: "./images/",
tileSources: "./OSRblue.dzi"
});
</script>
</body>
</html>
Note that the id "openseadragon1" is used in both the div and when creating the instance in the script.
You'd need to place this HTML file in a public folder in your webpage, and place the other resources (bolded above) in the specified location. In this case, the .dzi file is in the same folder as my HTML file, the OpenSeadragon script (openseadragon.min.js) is in a subfolder named openseadragon-bin-2.4.2, and the generated pyramid files also next to the HTML file.
And this is the resulting web page: https://rpg20.com/vips/osr.html
Bonus:
If you already have multiple tiled images, and want to "glue" them and create the DZ in one step, you can still use vips like this:
vips.exe arrayjoin "File1.jpg File2.jpg File3.jpg File4.jpg" mypyr.dz --across 2
(of course, assuming 4 files, arranged 2 images across)

![[Deleted User]](https://secure.gravatar.com/avatar/c75d9a245b74d9c59be0999ea81ca541/?default=https%3A%2F%2Fvanillicon.com%2F92add7f8c954488718110edc4896ad39_200.png&rating=g&size=200)


Comments
Thanks for posting this and making a tutorial for it.
I haven't heard of OpenSeadragon before (been using Zoomify myself) but it looks like it does the job very nicely and easily.
Could you show us a working example?
I belive he did, see the URL near the end of his post.
@Quenten ..
Could you show us a working example?
Ah, yes. It was in the original post, but perhaps got lost in the wall of text:
And this is the resulting web page: https://rpg20.com/vips/osr.html
(I've since added some bold text)
I think I might give it a go with my Myirandios world. Now to get a 20,000x20,000 pic.
Now to get a 20,000x20,000 pic.
That's doable, but you'll need to export the map in sections to accomplish that. I've done up to 200,000 x 200,000 that way.
And then share it with us? ;)
Of course. Hope you can hold your breaths for some months. Very drastic personal changes for me, so not much mapping till well into the new year.
Thanks @roflo1 !
That's a nicely done and useful post!
Bonus #2: Slice only (no pyramid)
Perhaps you don't have a need to create the full pyramid structure, but do have a need to split/slice into tiles. Vips can also be instructed to process a single depth level:
vips.exe dzsave MyImage.jpg MyResultingFolder --overlap 0 --tile-size 700 --depth oneIn this example (something I actually use) I'm specifying: no overlap (0 pixels), 700 px tiles, and to process only one depth level. This will still create a folder named
MyResultingFolder_files, but inside that one, a single subfolder will be populated (with the sliced but not downscaled images).For the curious, the VTT I use (Astral) supports something called "Viewport Occlusion", which basically means that my players' computers will only need to load the images within their vision range. So I can have a huuuge map divided in tiles and the VTT will still perform nicely
I've been trying to make a bigger map for DeepZoom and I stumbled upon a few things I wanted to share.
I've had 2 main problems:
My strategy was creating several smaller images with CC3 and glue them together with Vips. Now, I know CC3+ can't do much about it
unlessuntil it gets 64-bit addressing, but vips should be able to produce larger images, right? And that's when I decided to investigate a bit deeper into things.I was getting an odd message saying "Insufficient memory (case 4)". If you search the web for this message, you'll see that many image processing suites, tools, and even plugins for seemingly unrelated software throw the exact same message. The culprit? A library called libjpeg, which is used pretty much everywhere (including Vips and ImageMagick). So why does libjpeg say that there's insufficient memory? I believe it's because of the JPEG format itself. From Wikipedia:
JPEG/JFIF supports a maximum image size of 65,535×65,535 pixels
.. and my resulting image would be a whopping 100,800px * 114,800px.
Still, that would be if I wanted a single image, but what I really want is several tiny images (as explained in my first post at the top). I guess Vips tries at some point to create an image larger than 64k*64k? But, while I haven't yet succeeded 100%, I did manage to exclude a few rows and columns and created a DZI which would be 84,000px * 86,100px if placed in a single image. I might have to write my own tool if I want to get around this obstacle. But I'm getting there.
I present to you, Greengulf: https://rpg20.com/vips/greengulf.html
The map itself is still a WIP... just something I'm doing for my cousin since I wanted a project and he wanted a map. :)
One of the annuals had macros that will automatically export in sections, and stich them together with ImageMagick. It can handle some really large final images (if you get the 64 bit version of ImageMagick).
Oh, right! Thanks for the reminder. That's one annual issue I've been meaning to get.
For this experiment I also tried ImageMagick, but it also failed. I stuck with vips because I read that it's optimized to be faster, but I didn't test it myself. Then again, perhaps the answer is to use something other than a JPEG for the intermediate file.
Still, a macro that does all the exporting in sections may be worth by itself. I'll take a look.
It's worth the cost of the annual for that one item, if you want large exports.
Your trouble with ImageMagick was probably due to using the 32 bit version. The PDF for the annual includes instructions on how to install the 64 bit version (including a link to the download page for it, which I just verified is still accurate). There's a configuration change for CC3+ rendering that you need to update, too, which is also in the instructions (and which you may have already done).
I'm reasonably confident I used the 64-bit version.
And since the JPEG format doesn't support dimensions larger than 64k*64k... I'm inclined to think that's the culprit. Hopefully, PNG doesn't have such a limitation, so it should be easy to test.
As for the annual... it's still on my wishlist, though I'll have to wait a bit (mortgage + third-world economy is not a good mix).
The macros in the annual use .bmps for the intermediates, IIRC. I don't recall what the final format was, but I think it was PNG.
No they use PNG files but if you want to use the individual files you need to stop the process during the stitching as the individual PNG files are deleted once the stitched file is created.
If you want to keep the temporary files (the tiles) when using the large exports annual scripts, you can just comment out the line that deletes them from the @Annual\Issue 129 - Large Exports\tile.cmd script:
DEL /q tile*.png(This line appears two places in the script due to branching paths)
Do remember that this also means you need to manually clean them out before doing the next export however, or the stitching process will get confused.
And if you just want the tiles generated, and not stitch them together at all, you can comment out the two lines in the script starting with magick mogrify and magick montage.
And yea, you do absolutely need to use png when working with large images, as stated above, jpg cannot do these image sizes. But if you just export things as tiles from CC3+, you could switch that export to jpg to get jpg files instead of png tiles, since each tile is small enough, it's only when stitched together it becomes too large.
In the final deep zoom images I have made for the atlas (like Sanctuary) I exported as png from CC3+, but the final tiles used by the deep zoom script itself are jpg images as this gives much better performance due to smaller file sizes.
So yes, after changing the input images to PNG, I was finally able to create the very large image I was intending to create. I'm currently uploading the updated Deep Zoom to my page, but its taking ages. I was holding this post until the upload finished, but it's best to get on with it. Especially since you might see some weird stitching in the meantime, it's best to let you know this is not how it will look like in the end.
(Edit: it has finally finished uploading)
I stuck with vips because I read that it's optimized to be faster, but I didn't test it myself.
The result are in! Kind of.
I tried timing Imagemagick's "montage" versus Vips' "arrayjoin". Sadly, I couldn't provide a fair comparison, but this is actually good news for Vips (note that I had 9.77GB worth of input PNG files to stitch):
IM's montage took 50 minutes just to load the images, and in doing so it created 92GB worth of temporary files (aproximately). When the actual montage operation began, I didn't have enough disk space to allow it to continue and it crashed (elegantly, I must admit).
Vips on the other hand, took 11 minutes for the whole process and didn't punish my storage. It produced a single 12.7GB PNG file.