

Community Atlas Mega Dungeon: The Lost Temple of the Screaming Stars
 Wyvern
🖼️ 284 images Cartographer
Wyvern
🖼️ 284 images Cartographer
I wasn't sure I'd be able to complete this in time for the February Mapping Challenge deadline, but the open-ended nature of Community Atlas mapping is rather more forgiving, so I decided to at least try. In the end, I just made it!
As all my previous Community Atlas mapping has involved some use of random design elements, I did a few sketched trials using the random dungeon design tables in the 1st edition AD&D Dungeon Master's Guide and the current 5th edition DMG, though I already had in mind a few ideas loosely based on one of my past scenarios for the Call of Cthulhu RPG, and another couple for GDW's 1991 Dark Conspiracy system. The random trials didn't really produce what I needed, as this was starting to require something more symmetrical than randomness is easily capable of creating. Part of one of the layouts looked interesting however, so I decided to use that with its mirror image, and add some extra features to link what was really a quite separate dungeon level in many respects - The Temple - with the levels above and below it for the Mega Dungeon.
Since my initial, somewhat accidental, contribution for the Atlas during the Project's first anniversary in 2018 February was of the Nibirum night sky, my decision about reusing and reworking some of my previous scenario materials was prompted as they'd used various, if real-world, astronomical elements too. This seemed a suitable excuse to revisit the Nibirum star maps, and derive a few constellations for them. However, even that allowed me to draw in some more random elements, as I'd already constructed a list of a hundred constellation descriptions from the random constellation generator page on the Chaoticshiny website. I needed eight constellations here, two for each of the four annual seasons, so rolled for which of the hundred they were going to be, and worked out where they all were in Nibirum's night sky, constructing a couple of night sky maps to illustrate them in the process.
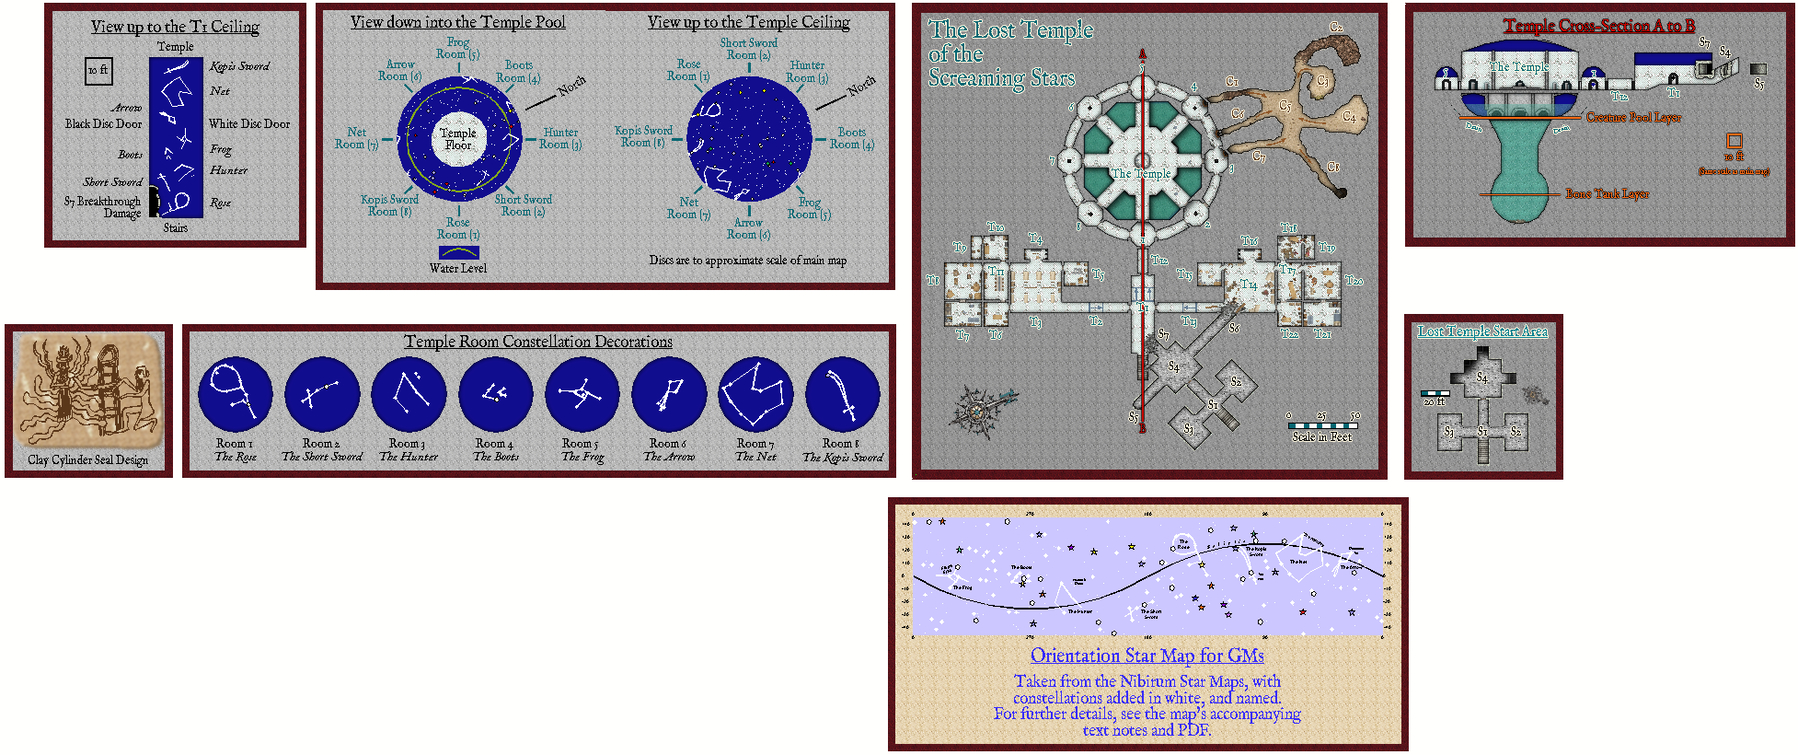
Then I started transferring my hand-sketched random-plus dungeon design to a CC3+ map, having already chosen the SS4 Dungeons of Schley style for the map. Or as it turned out, the main map. So here it is:
[Image_12383]
A few adjustments had to be made in places, and some creativity employed in what symbols to use for certain things (not what they were necessarily meant to be originally...). Plus I had to draw on T J Vandel's Dwarven Dungeons symbol set from the Annual for 2014 October too - oh, and the labelling uses the IM FELL English font from the 2016 Annual. This collection though did everything I'd wanted it to in the end, and came out pretty much how I'd envisaged it.
The off-axis S-rooms segment is what connects with the previous level up in the dungeon, "S" here being for "Start Area", with the "C" for "Caves" segment being that which connects to the next level down (via the spiral staircase in C8). The bulk of the level, the Lost Temple itself, comprises the dominant octagonal-circular Temple structure, and its attached ancillary complex of living quarters, the T-rooms. The idea is that the builders of the S-rooms were expanding downwards, and chanced-upon something unexpected. They investigated, with more than a little looting, not all of it in an entirely sober fashion, but ran into serious trouble and were forced to flee before they'd found all the interesting things they might have done. The tunnellers coming up from below were only trying to find the natural caves originally, but their magical air-space detectors showed them there was something more a little way off and somewhat higher up still. So they dug on, and discovered the outer parts of The Temple. And that too was going quite nicely until they tried stealing some of the gemstone decorations they found there, which got them chased off as well. By what? Well, there's a 26-page PDF (also available as a text file) to accompany the Atlas version, so read that to find out! The Temple was last used 135+ years ago though, and was completely sealed-off when its latest inhabitants left, though that actually isn't too much of a clue - so no, not undead after all...
I thought it might be helpful to set up an additional small map showing the S-rooms in a square-to-the-grid manner, for any GMs who like to subvert players' expectations by suddenly switching map angles on them, so I added this little map to go alongside the main one (visible by activating the START LEVEL Layer in the FCW file):
[Image_12386]
The shadowy areas in S4 seemed a bit of a giveaway though, so I also added an S4 MASK Sheet that can be shown to hide this room until the connecting door is opened:
[Image_12387]
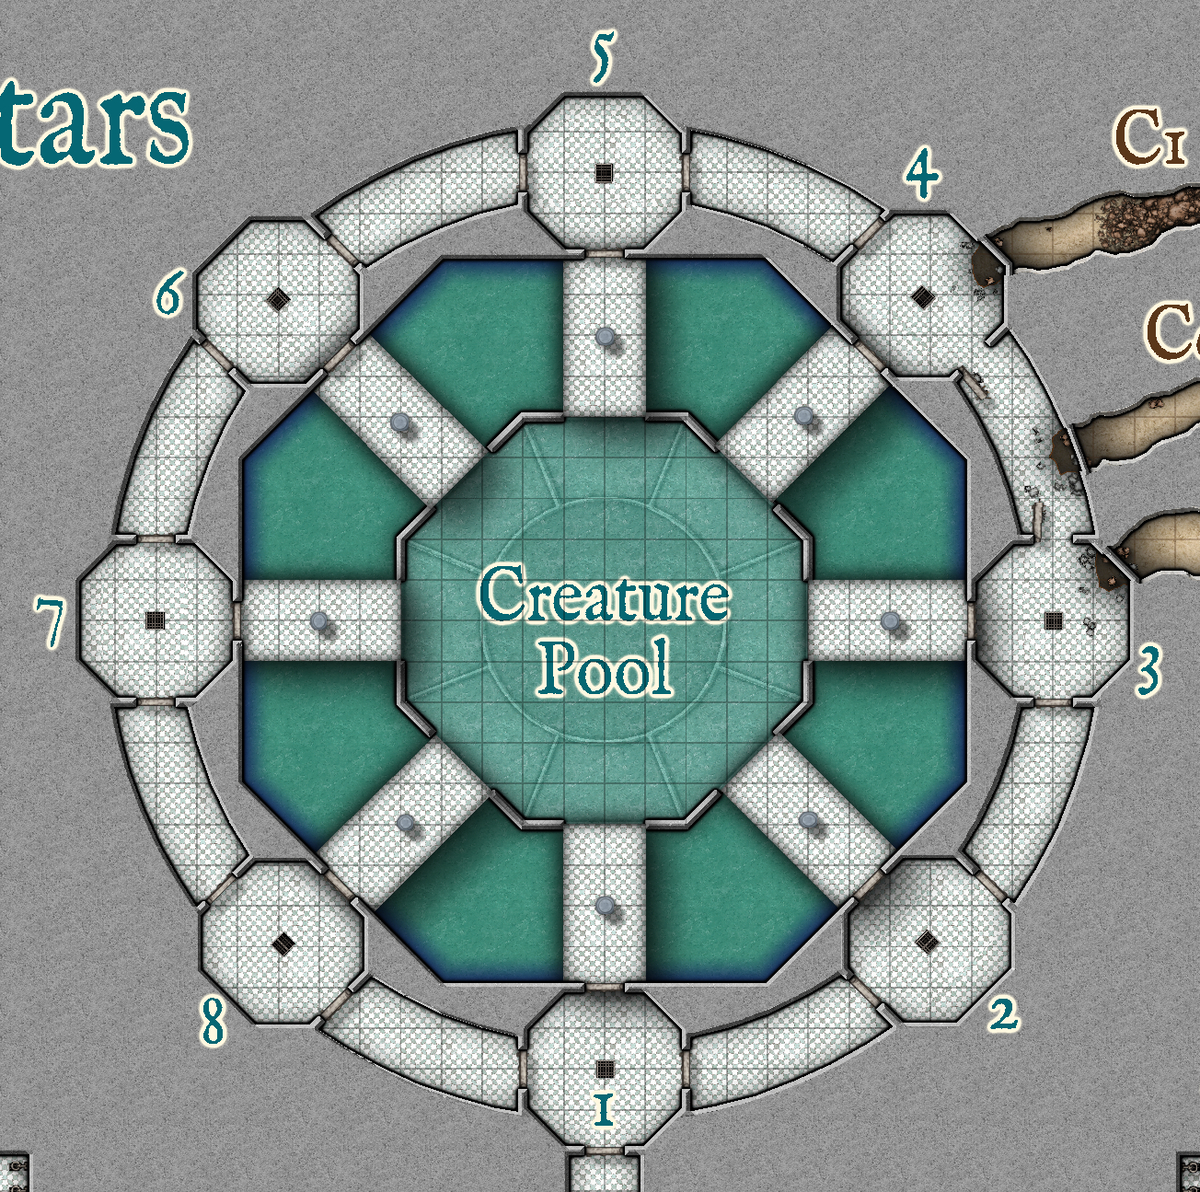
There's more going on below that vast Temple structure than is obvious on the main map as well, so I added two Layers as illustrations. Firstly, by hiding the TEMPLE FLOOR CENTRE Layer and showing the CREATURE POOL Layer we have:
[Image_12388]
(Although in fact, the main map works well with both of these Layers turned on - the POOL Layer is hidden by the FLOOR CENTRE one, but the effects from some of the POOL Layer's Sheets add a little extra "zing" to the FLOOR there.)
Then by hiding both the TEMPLE FLOOR CENTRE and CREATURE POOL Layers, while showing the BONE TANK Layer, we get:
[Image_12389]
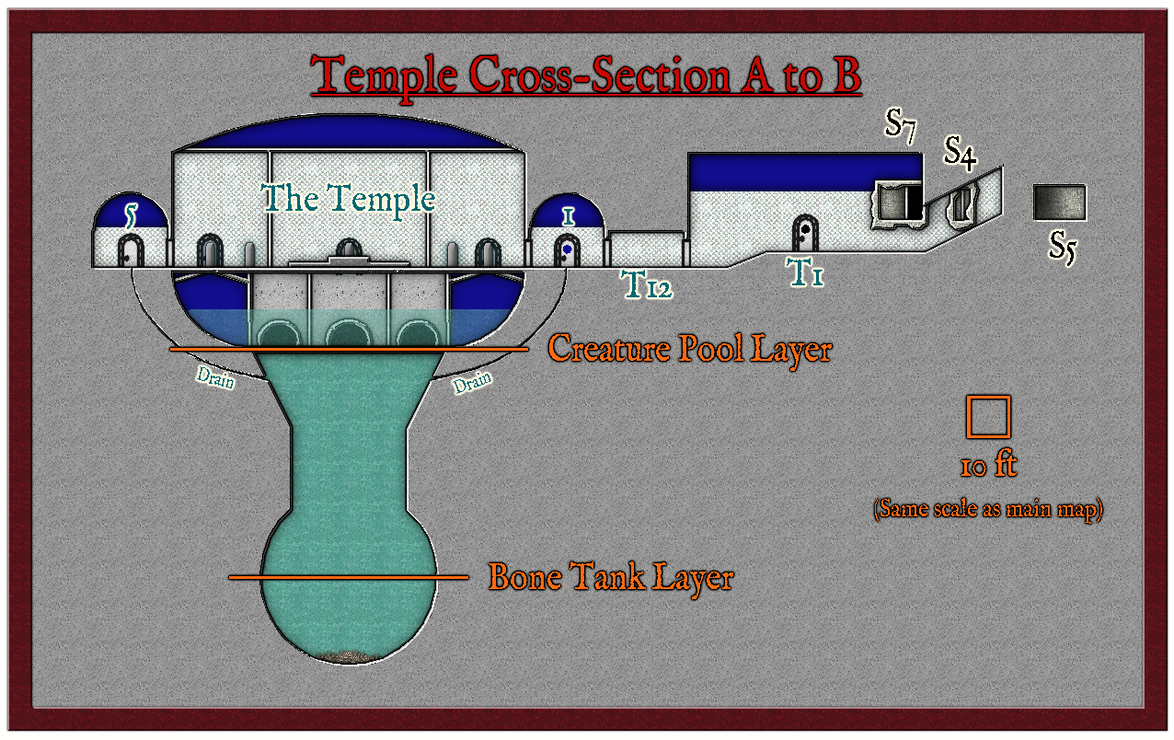
This doesn't tell the whole story for where these are or what they look like, so I knew from the beginning I was going to have to add a cross-sectional diagram for at least part of the map as well. Most features for this were quite easy to draw - floor textures became walls, and wall-lines floors as well as the lines where actual walls meet, or cut the section and so forth. I had thought to use a different style for the cross-section in fact, the 2011 Annual Vertical Dungeon Geomorphs, but that didn't match well enough with the style of the main map. I did though decide to use the door symbols from that, as they were helpfully arched-top ones, which is exactly what I had in mind for the doors throughout the Temple and its complex. By activating the CROSS-SECTION A-B Layer, the section line is added to the main map, while the cross-sectional diagram itself pops up alongside the map:
[Image_12390]
[Image_12391]
You may notice there are a lot of dark blue ceilings on the cross-section, and that the Temple Pool's base appears similarly coloured. Well, you remember that talk of constellations and decorative gemstones earlier? Yep, there are several state-ransom's worth of gems attached to some of the ceilings and in the Pool here, showing night sky and constellation depictions. The blue is thousands of millions of pieces of lapis lazuli alone, for instance. Except in the T1 Hallway, where only crushed gemstones have been added to the paint used there, not the stones themselves. This is mainly because the Hallway, indeed the whole ancillary complex, is a very recent addition, only a few hundred years old, while The Temple dates back thousands of years. So, I added some panels to show what the decoration looks like alongside the map, when the TEMPLE DECORATION Layer is active:
[Image_12392]
[Image_12393]
[Image_12394]
The third panel of these here also includes constellation lines that are NOT actually part of the Temple Ceiling and Pool decorations. I added those via a separate Layer instead, which was also active for that image, GM'S AIDS, to assist anyone trying to orientate the star-patterns to the Nibirran night sky. The GM'S AIDS Layer also provides the following chart showing where all the eight constellations used are on the long equatorial night sky strip-chart:
[Image_12395]
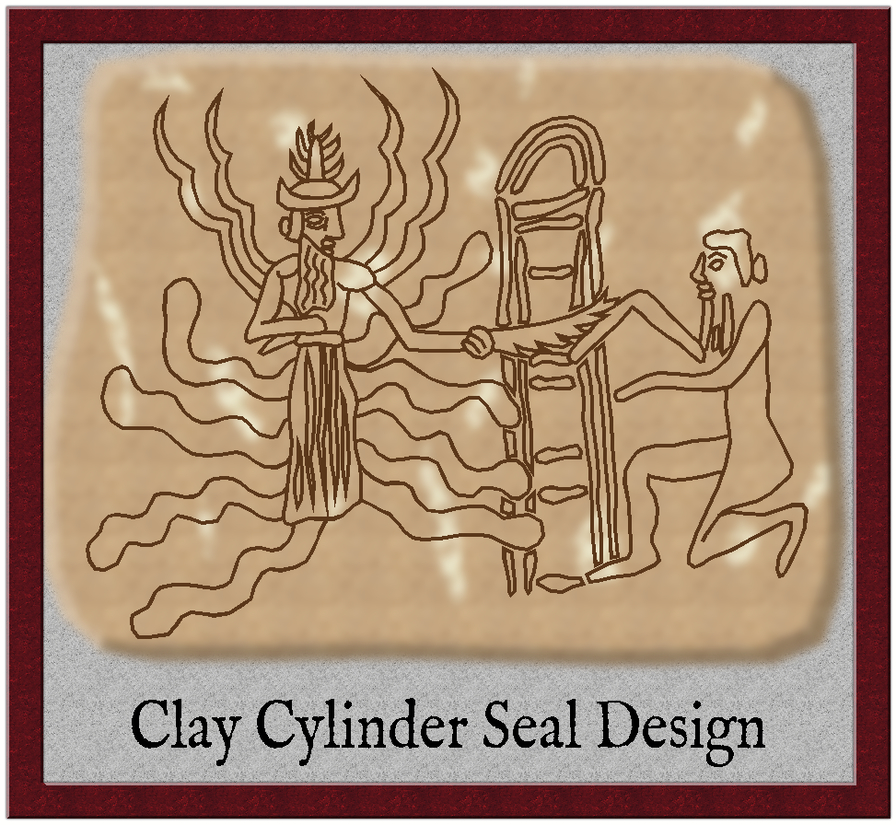
Descriptions for the eight constellations are naturally included in the accompanying PDF and text files, along with notes from the original random listing that weren't needed for the dungeon, but which might be useful as inspiration for GMs, plus some additional thoughts I added while putting together the constellations. The PDF has extra illustrations of each constellation too. Also included in the PDF is a copy of one final item in the FCW map file, an illustration taken from the (potentially deadly) clay door sealings that are used in parts of the Temple Complex, but there reduced - when printed out at full size for the PDF (A4) pages at least - to its real size. The original should be around 1.25 inches high:
[Image_12396]
Stylistically, and in terms of its nature and size, this is based on real-world examples from ancient Mesopotamia (modern southern Iraq) in the Akkadian period, circa 2300 BCE. The complete design details are fictitious, however...
Thus the whole "map" as can be seen in the FCW file with the full spread of Layers active (but obviously not all, as some hide one another in places) looks like this:
[Image_12397]
In regard to the suggested scenario, as the octagonal nature of the Temple, its vast water-filled Pool and Tank, and the wiggly, eight "legs" on the clay seal deity figure (the horned headgear is the giveaway for ancient Mesopotamian deities) may have hinted already, aside from my mentioning Call of Cthulhu and Dark Conspiracy, there's definitely something of the Cthulhoid about The Temple. So the whole setting, while largely uninhabited as described in the accompanying texts, at least in the conventional sense, is meant to have a spooky-menacing cosmic horror feel about it. Though of course, that's really up to the GM to decide!
As all my previous Community Atlas mapping has involved some use of random design elements, I did a few sketched trials using the random dungeon design tables in the 1st edition AD&D Dungeon Master's Guide and the current 5th edition DMG, though I already had in mind a few ideas loosely based on one of my past scenarios for the Call of Cthulhu RPG, and another couple for GDW's 1991 Dark Conspiracy system. The random trials didn't really produce what I needed, as this was starting to require something more symmetrical than randomness is easily capable of creating. Part of one of the layouts looked interesting however, so I decided to use that with its mirror image, and add some extra features to link what was really a quite separate dungeon level in many respects - The Temple - with the levels above and below it for the Mega Dungeon.
Since my initial, somewhat accidental, contribution for the Atlas during the Project's first anniversary in 2018 February was of the Nibirum night sky, my decision about reusing and reworking some of my previous scenario materials was prompted as they'd used various, if real-world, astronomical elements too. This seemed a suitable excuse to revisit the Nibirum star maps, and derive a few constellations for them. However, even that allowed me to draw in some more random elements, as I'd already constructed a list of a hundred constellation descriptions from the random constellation generator page on the Chaoticshiny website. I needed eight constellations here, two for each of the four annual seasons, so rolled for which of the hundred they were going to be, and worked out where they all were in Nibirum's night sky, constructing a couple of night sky maps to illustrate them in the process.
Then I started transferring my hand-sketched random-plus dungeon design to a CC3+ map, having already chosen the SS4 Dungeons of Schley style for the map. Or as it turned out, the main map. So here it is:
[Image_12383]
A few adjustments had to be made in places, and some creativity employed in what symbols to use for certain things (not what they were necessarily meant to be originally...). Plus I had to draw on T J Vandel's Dwarven Dungeons symbol set from the Annual for 2014 October too - oh, and the labelling uses the IM FELL English font from the 2016 Annual. This collection though did everything I'd wanted it to in the end, and came out pretty much how I'd envisaged it.
The off-axis S-rooms segment is what connects with the previous level up in the dungeon, "S" here being for "Start Area", with the "C" for "Caves" segment being that which connects to the next level down (via the spiral staircase in C8). The bulk of the level, the Lost Temple itself, comprises the dominant octagonal-circular Temple structure, and its attached ancillary complex of living quarters, the T-rooms. The idea is that the builders of the S-rooms were expanding downwards, and chanced-upon something unexpected. They investigated, with more than a little looting, not all of it in an entirely sober fashion, but ran into serious trouble and were forced to flee before they'd found all the interesting things they might have done. The tunnellers coming up from below were only trying to find the natural caves originally, but their magical air-space detectors showed them there was something more a little way off and somewhat higher up still. So they dug on, and discovered the outer parts of The Temple. And that too was going quite nicely until they tried stealing some of the gemstone decorations they found there, which got them chased off as well. By what? Well, there's a 26-page PDF (also available as a text file) to accompany the Atlas version, so read that to find out! The Temple was last used 135+ years ago though, and was completely sealed-off when its latest inhabitants left, though that actually isn't too much of a clue - so no, not undead after all...
I thought it might be helpful to set up an additional small map showing the S-rooms in a square-to-the-grid manner, for any GMs who like to subvert players' expectations by suddenly switching map angles on them, so I added this little map to go alongside the main one (visible by activating the START LEVEL Layer in the FCW file):
[Image_12386]
The shadowy areas in S4 seemed a bit of a giveaway though, so I also added an S4 MASK Sheet that can be shown to hide this room until the connecting door is opened:
[Image_12387]
There's more going on below that vast Temple structure than is obvious on the main map as well, so I added two Layers as illustrations. Firstly, by hiding the TEMPLE FLOOR CENTRE Layer and showing the CREATURE POOL Layer we have:
[Image_12388]
(Although in fact, the main map works well with both of these Layers turned on - the POOL Layer is hidden by the FLOOR CENTRE one, but the effects from some of the POOL Layer's Sheets add a little extra "zing" to the FLOOR there.)
Then by hiding both the TEMPLE FLOOR CENTRE and CREATURE POOL Layers, while showing the BONE TANK Layer, we get:
[Image_12389]
This doesn't tell the whole story for where these are or what they look like, so I knew from the beginning I was going to have to add a cross-sectional diagram for at least part of the map as well. Most features for this were quite easy to draw - floor textures became walls, and wall-lines floors as well as the lines where actual walls meet, or cut the section and so forth. I had thought to use a different style for the cross-section in fact, the 2011 Annual Vertical Dungeon Geomorphs, but that didn't match well enough with the style of the main map. I did though decide to use the door symbols from that, as they were helpfully arched-top ones, which is exactly what I had in mind for the doors throughout the Temple and its complex. By activating the CROSS-SECTION A-B Layer, the section line is added to the main map, while the cross-sectional diagram itself pops up alongside the map:
[Image_12390]
[Image_12391]
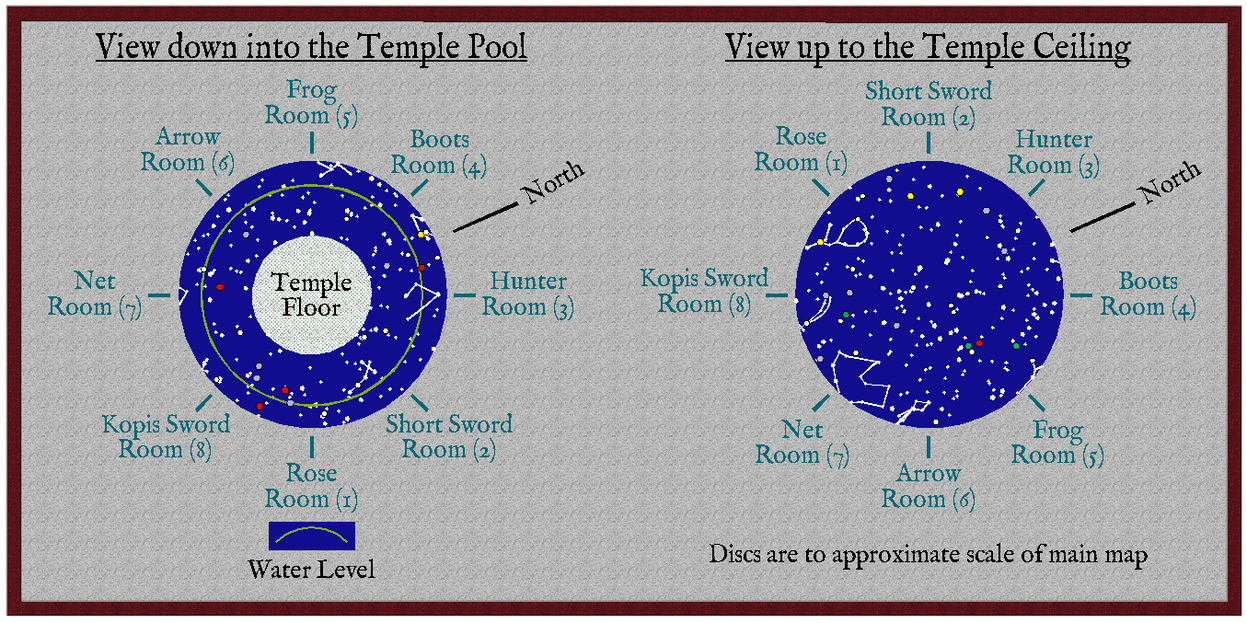
You may notice there are a lot of dark blue ceilings on the cross-section, and that the Temple Pool's base appears similarly coloured. Well, you remember that talk of constellations and decorative gemstones earlier? Yep, there are several state-ransom's worth of gems attached to some of the ceilings and in the Pool here, showing night sky and constellation depictions. The blue is thousands of millions of pieces of lapis lazuli alone, for instance. Except in the T1 Hallway, where only crushed gemstones have been added to the paint used there, not the stones themselves. This is mainly because the Hallway, indeed the whole ancillary complex, is a very recent addition, only a few hundred years old, while The Temple dates back thousands of years. So, I added some panels to show what the decoration looks like alongside the map, when the TEMPLE DECORATION Layer is active:
[Image_12392]
[Image_12393]
[Image_12394]
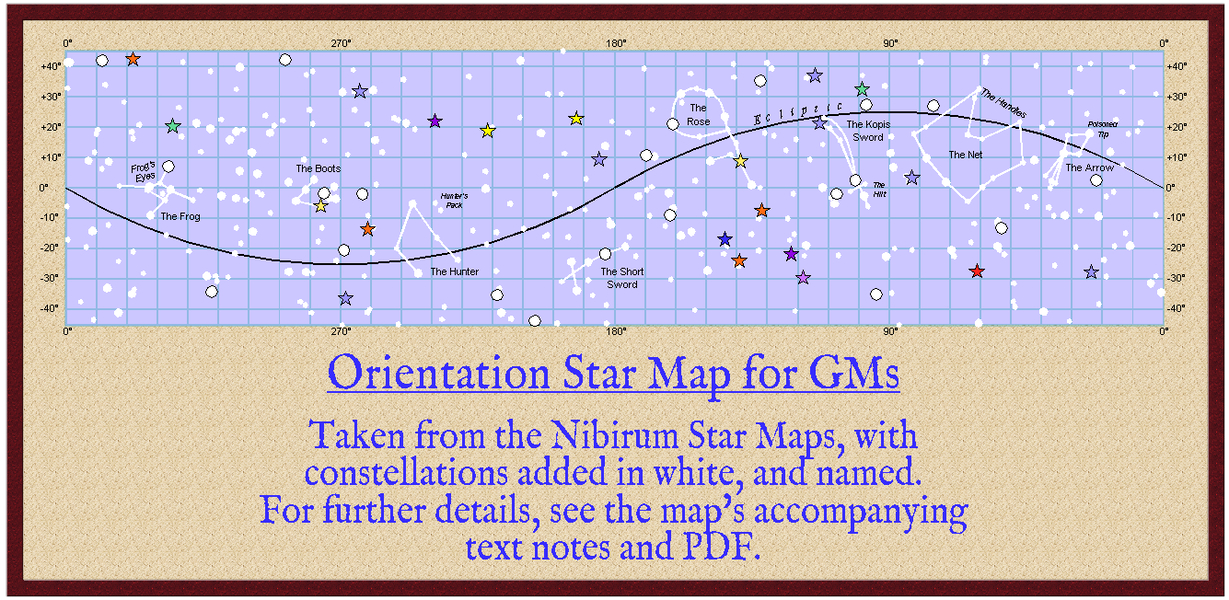
The third panel of these here also includes constellation lines that are NOT actually part of the Temple Ceiling and Pool decorations. I added those via a separate Layer instead, which was also active for that image, GM'S AIDS, to assist anyone trying to orientate the star-patterns to the Nibirran night sky. The GM'S AIDS Layer also provides the following chart showing where all the eight constellations used are on the long equatorial night sky strip-chart:
[Image_12395]
Descriptions for the eight constellations are naturally included in the accompanying PDF and text files, along with notes from the original random listing that weren't needed for the dungeon, but which might be useful as inspiration for GMs, plus some additional thoughts I added while putting together the constellations. The PDF has extra illustrations of each constellation too. Also included in the PDF is a copy of one final item in the FCW map file, an illustration taken from the (potentially deadly) clay door sealings that are used in parts of the Temple Complex, but there reduced - when printed out at full size for the PDF (A4) pages at least - to its real size. The original should be around 1.25 inches high:
[Image_12396]
Stylistically, and in terms of its nature and size, this is based on real-world examples from ancient Mesopotamia (modern southern Iraq) in the Akkadian period, circa 2300 BCE. The complete design details are fictitious, however...
Thus the whole "map" as can be seen in the FCW file with the full spread of Layers active (but obviously not all, as some hide one another in places) looks like this:
[Image_12397]
In regard to the suggested scenario, as the octagonal nature of the Temple, its vast water-filled Pool and Tank, and the wiggly, eight "legs" on the clay seal deity figure (the horned headgear is the giveaway for ancient Mesopotamian deities) may have hinted already, aside from my mentioning Call of Cthulhu and Dark Conspiracy, there's definitely something of the Cthulhoid about The Temple. So the whole setting, while largely uninhabited as described in the accompanying texts, at least in the conventional sense, is meant to have a spooky-menacing cosmic horror feel about it. Though of course, that's really up to the GM to decide!


Comments
You need to do more maps in the future
Golf course? Well, you could already play a sort-of miniature clock golf around the rooms and corridors surrounding the main Temple - there's an 18-inch drain cover in every octagonal room that leads down into the Creature Pool. Getting the balls back could be problematic though (the water is tainted), plus you're in trouble if you keep more than three consecutive doors in the circuit open simultaneously, as that triggers the Guardians. Oh, and you may notice traces of long-dried humanoid blood on the drain covers as well... There's also an unpleasantly acrid tang to the air around those rooms and corridors - hints of something-rotten-in-the-sea kind of thing, with expectations of you-could-be-next-ow-it-burns-it-burns. That'd be those pesky drains again. And hang around too long in The Temple overall - assuming its oddities don't cause you to simply flee in terror, that is - and you may find yourself wanting to reopen it for "business" again. On the whole, anyone wanting to stay there is someone you'd really need to avoid.