Hatch Style modification
 kathorus
Traveler
In working on a new map using the new annual CA 145, I ran into an 'issue' (most of the time the issue is my lack of knowledge.)
There is a tool to do a forest fill, but it is not the symbols. I've seen these before, but always assumed they are all just bitmaps, and can generally just go into the Fill Style dialog and adjust the size so that it looks proper.
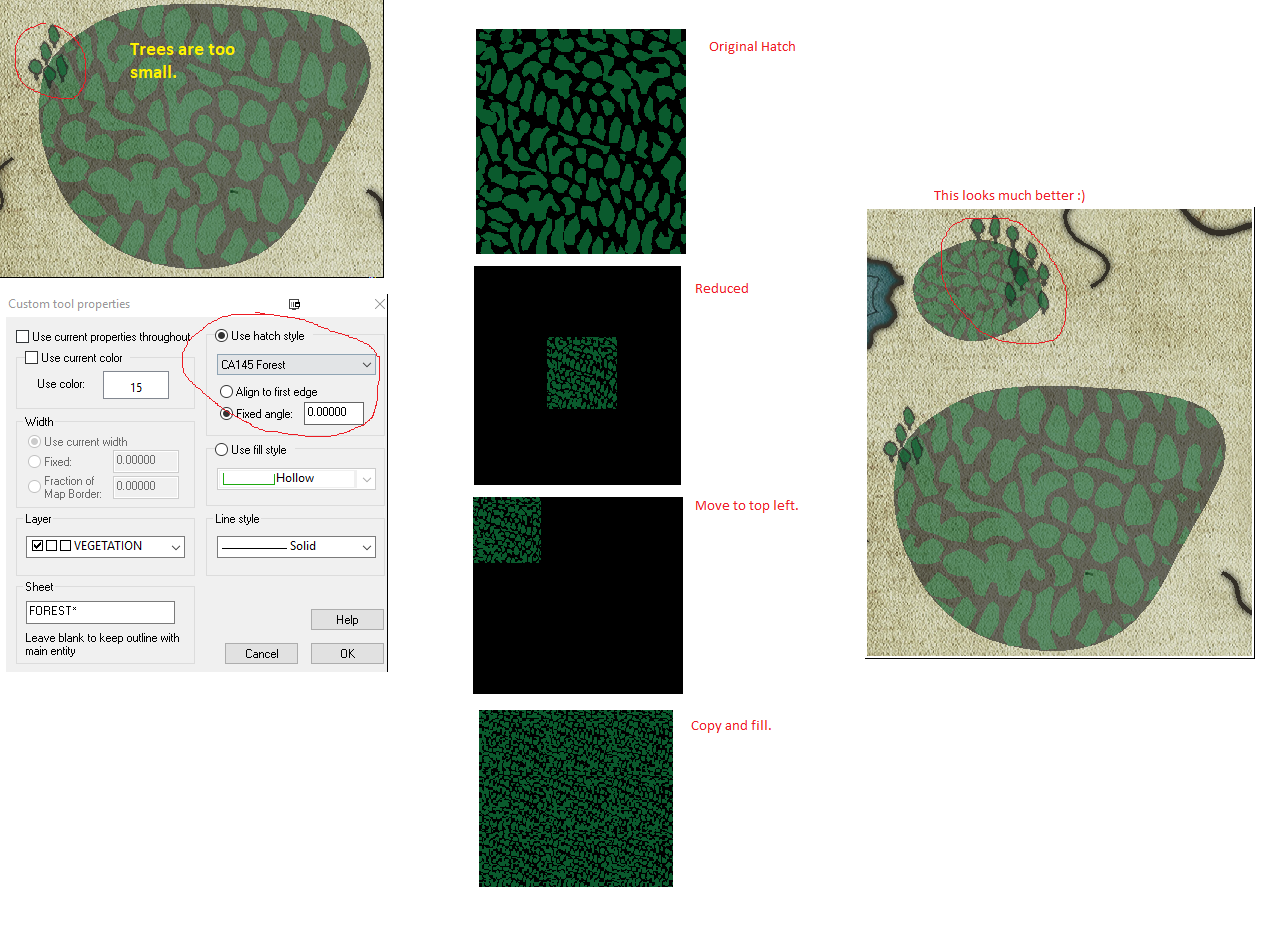
So I lay down the fill and then start to place trees, however, the trees look too small. This is because my map is smaller than the 1000x800 default. I then spent some time trying to find how to make this look smaller, only to find that it is not a bitmap or scalable hatch. I can see in the tool properties that it has a name, CA145 Forest, and that it is a hatch style.
Come to find out, Hatch Styles are just CC3 files stored in a special folder and only usable as outline extra entities for tools (when in doubt, read the instructions).
After a bit of messing around, I did the following.
1. Open the Hatch Style.
2. Rename it to CA145 Forest Small.
3. Group all the polygons together.
4. Reduce the size of the grouped polygons using non-visual scale to as close to my map scale as I can.
a. The symbols in my map were scaling to .36, but this didn't fit when lining them up, obviously. .33 wasn't enough, .33333 was too much, .333 seemed just right.
5. Move the scaled polygons to the top left corner.
6. Copy the polygons, since they are still grouped you only have to click one of them.
7. Place the copied set to the right of the first set, lining up the edges to match
a. Repeat this a third time to span the entire area.
b. Copy the top row and put that under, and repeat. (In general, I'm making a 3x3 box of the reduced polygons.
8. Save file.
9. Make a copy of the draw tool with a new name and point the hatch style to the new file.
10. Use the tool!


Comments
Note that you didn't have to copy the trees to a 3x3 grid just because you reduced them though, hatch styles tile automatically, all you need to do is to reduce everything, including the background. Saves a bit of work.
I did try just to non-visual scale the whole thing, but all I get when I try to use it was a black background. Perhaps I'm not changing something right, any guidance?
It almost seems like what is missing is that the hatch doesn't tile anymore.
The sample width only controls the size of the preview window in the dialog, it does not affect what is drawn in the map at all.
I'm not sure, I did do that, and I just redid it again, checking that I got everything, no hidden layers or sheets, etc....
When I put it in it worked, I then checked the one I did the other day and it also works.
I think that the likely culprit is that I had multiple instances of CC3+ open and perhaps it wasn't updating right.
So, the edited steps are.
1. Open the Hatch Style.
2. Rename it to CA145 Forest Small.
3. Group Everything together.
4. Reduce the size of the grouped polygons using non-visual scale to as close to my map scale as I can.
a. The symbols in my map were scaling to .36, so that is what I used.
5. Move Origin to lower left corner. Not sure if this is needed or not.
6. Save file.
7. Make a copy of the draw tool with a new name and point the hatch style to the new file.
8. Use the tool!