

Getting jpg map into FT3

I know FT has a map for Mars, but it is the much smaller version that doesn't include the north pole.
I want to import the correct version into FT to use but I am new to all this and require some assistance.
I've searched through the forums and found a way to get an image into FT using CC and Wilbur however how do I get the initial image into CC and then what do I need to do with it once it is there to get it ready for Wilbur?
Any help would be greatly appreciated.
Here are some links for reference:
Tutorial for getting image from CC to FT
Map of Mars to use
Comments
Use Image Overlays>>Show Overlay Window to show the Image Overlays window.
Use Add on the Image Overlays windows to bring up the Edit Image Overlay window.
Use Import Color Image on the Edit Image Overlay window to select your JPEG file. One wrinkle here is that FT only allows a 5100 pixel wide overlay, so set the Width to 5100 and Height to 2600 after selecting the image.
Click OK to dismiss the Edit Image Overlay window. Your image should now be displayed (upside down) in the main FT window.
Note that this technique gives you an image, not an editable planet surface. For that, you'd want to download one of the MOLA altitude data sets rather than an illuminated image. You can import that data into FT as a binary surface (File>>New, select Binary File at the Type window).
If you'd like to use the data in Wilbur, consider working with the MOLA altitude data directly in Wilbur.
What is it that you're planning to do with the data?
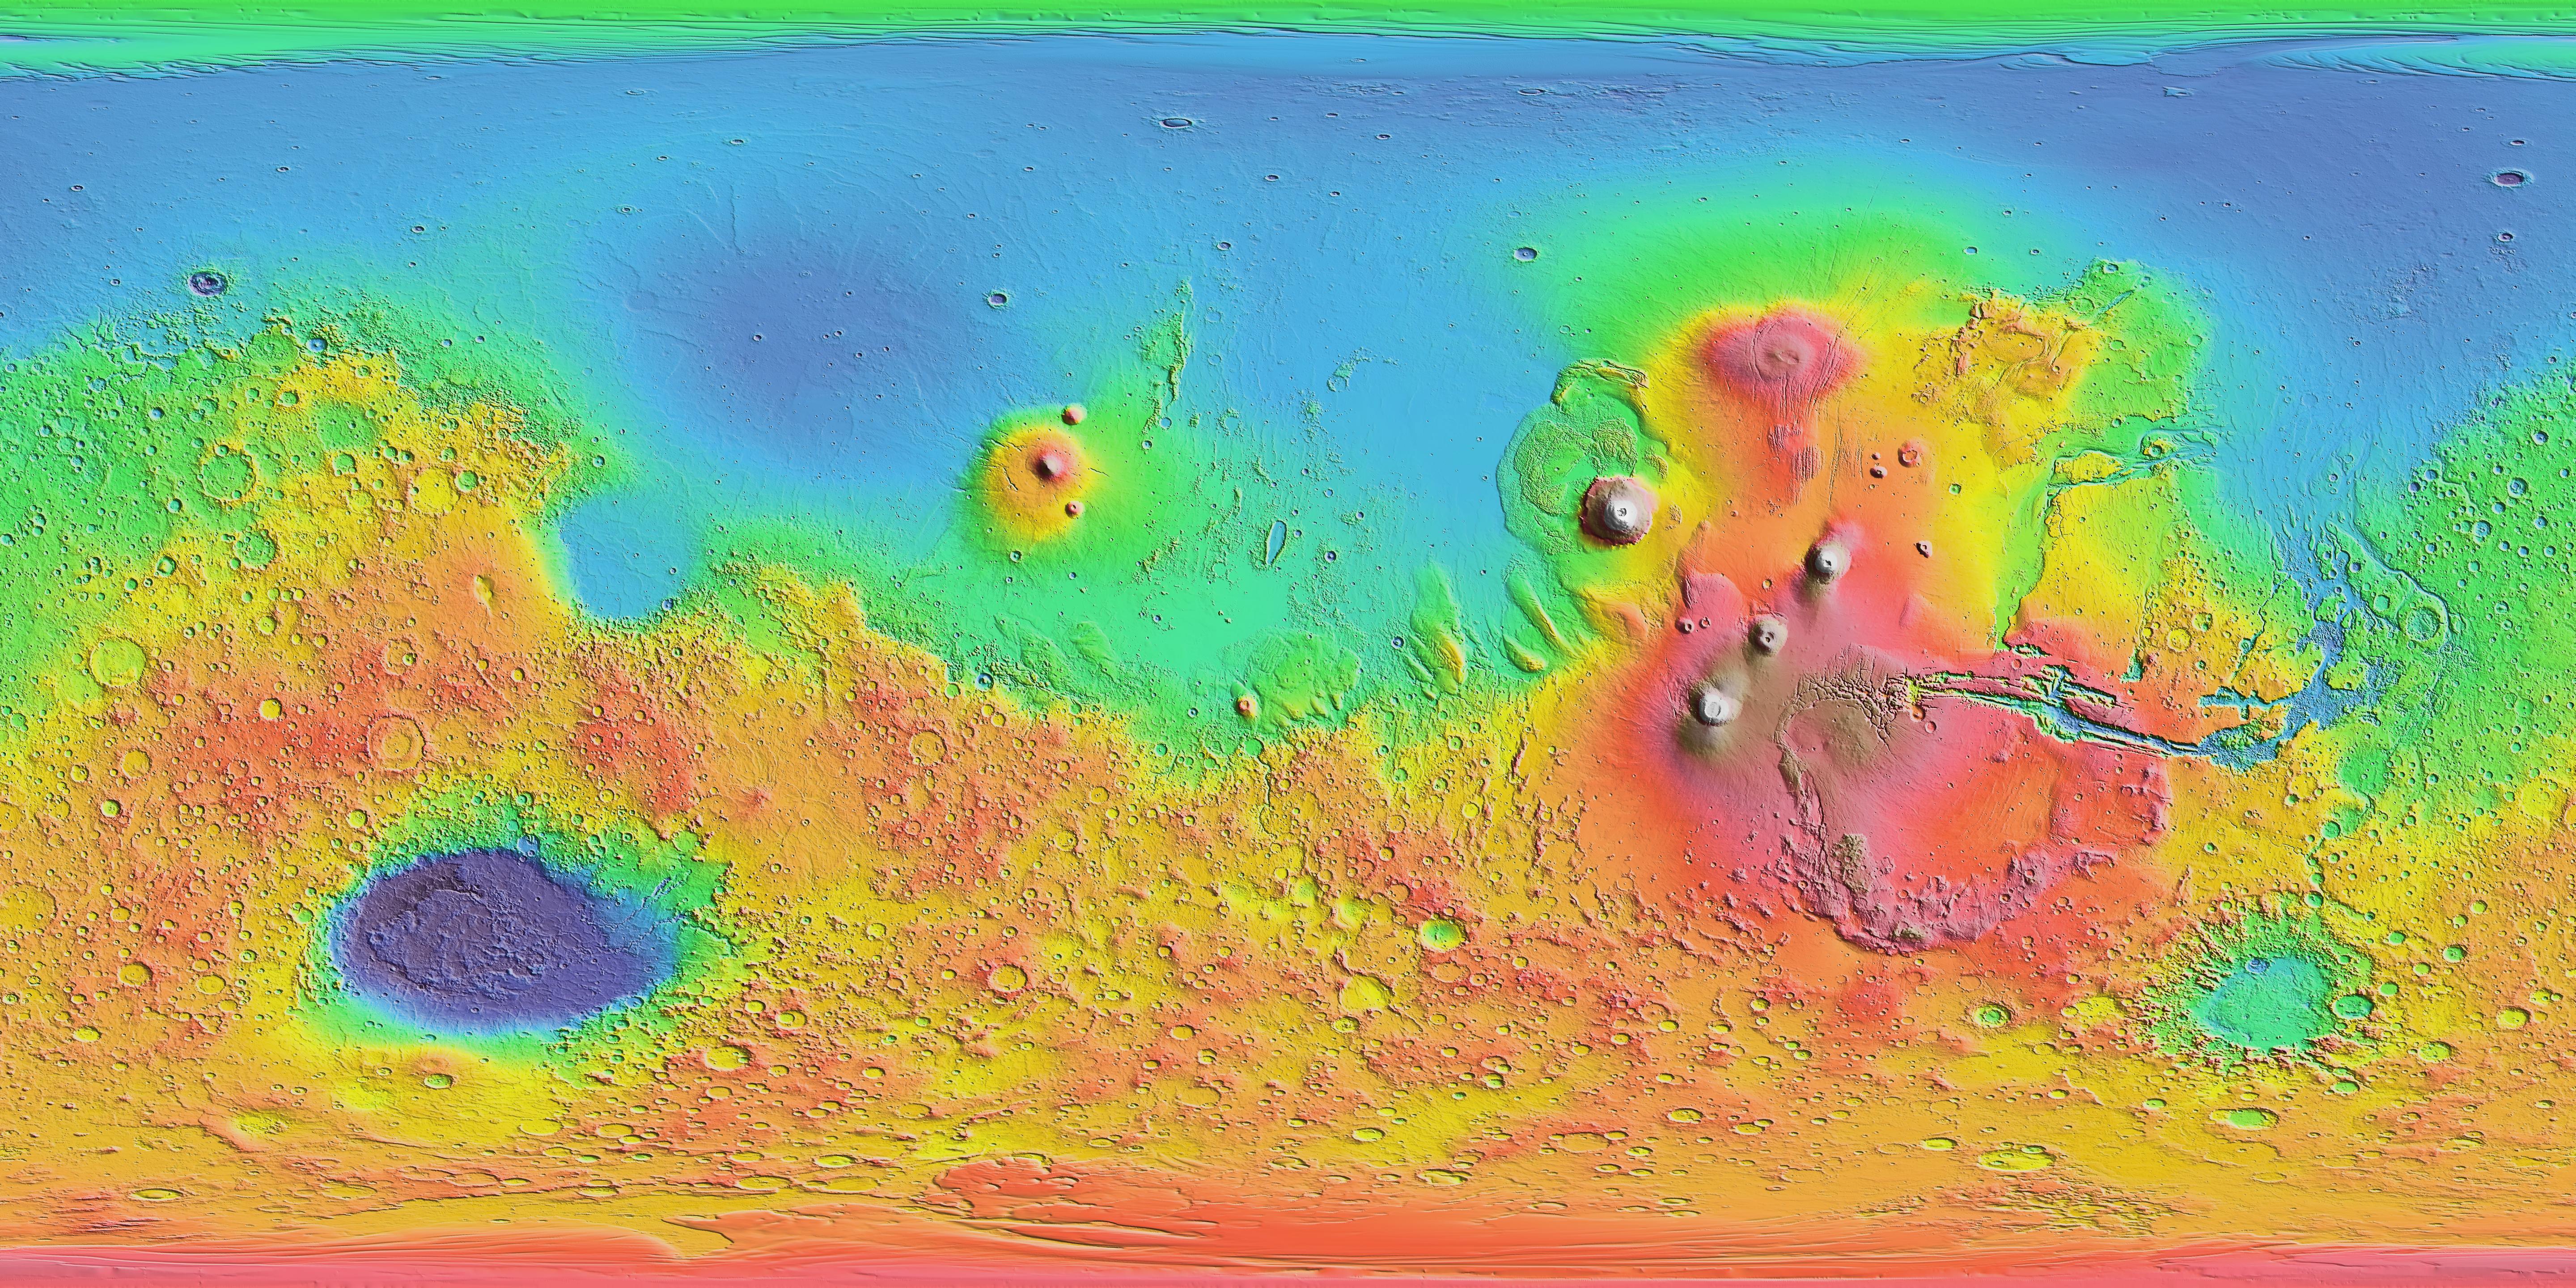
It looks like the one they used is here. If you look between the two you will see the significant area that was cut out.
The second Mars image that you showed in your last post is a lighted Mercator projection image generated from MOLA altitude data by NASA. A Mercator projection can't show a whole globe. The Mars image that you showed in your first post is a lighted Equirectangular projection image also generated from MOLA altitude data by NASA. In contrast to a Mercator projection, an Equirectangular projection can show a whole globe, but with significant distortion in the polar regions.
Well then it looks like it in fact does have what I need. Although I need to adjust the elevations a bit to get the "sea" level higher.
Is there a way to mass edit all elevations and increase them by a certain amount or something?
Basically, I want to make it so that based off MOLA altitude data the sea level is at around -10000 ft instead of at 0.
Use Map>>World Settings and change the Editing resolution to something like 5000.
Use Tools>>Actions>>Burn In To Surface.
Now lower the altitude of the data using Tools>>Global Lower>>Land Offset and use an Amount of -10000.
Now is there a way to flatten out the craters into the same altitude of the surrounding land? I tried doing Global Smooth>Land Offset but then it just seems to blur every thing together. I don't want to lose detail but simply raise the craters to match the surrounding terrain, ala a Mars before planetary bombardment via meteors.
Do you have any recommendations as to the easiest/most convenient way to do this. Is it better to have it at a higher or lower resolution in the world settings? Smaller or larger brush sizes? I assume I need to simply use the Paint Raise>Land Offset brush?
Once I get it finished I'll post up a link to the export in case you want to utilize it for anything.
One tip that might help is that if you hold down the Ctrl key the paintbrush tools allow you to directly resize the tool without having to click elsewhere. Sadly, there is no modifier that allows you to pick an altitude from the display, though. Not even a median paint tool...
In any case, thanks for all the help and I'll let you see the results once I get something together. Right now I'm adjusting some of the world settings to closer match that of Mars and also a new Color Altitude overlay since it has a much larger height variation than on earth, even if most of it is all close to the same height.
But you can import the MOLA data directly into Wilbur as easily as you can import it into FT, so what is the advantage of starting in FT, going to Wilbur, then back to FT when you can start in Wilbur and go to FT for finishing?
What I did to get it this far was turn off the color shading and increased the color range to 60. Not sure if maybe it would be better to put it back to a lower level or increase it higher or what. Then I simply used the raise and lower terrain tool at about 100 value.
Any suggestions of thoughts on trying to get this smoothed out and more natural looking would be much appreciated! I even tried selecting by Altitude Range and doing a global smooth but then it just makes things look all blurry.
http://www.thegeekenders.com/resources/misc/map1.jpg
Is there any way I could move it over into photoshop use the copy tool and then move it back into FT? I don't know if there is a way to generate the height off of the colors because then I could just copy the colors as appropriate and then re-generate the terrain or maybe there is some other way since the copy function does not work in Wilbur as per an earlier suggestion?
Ran into one issue however. When I brought the map back into FT3 now it has extra water around the entire map.
http://www.thegeekenders.com/resources/misc/map/issue.jpg
I followed the instructions here http://www.ridgenet.net/~jslayton/CGTutorial/index.html and started generating the rivers.
The problem is that on the far right and left sides of the map, around the middle the rivers just go off the edges of the map and don't trail into an ocean anywhere. It's almost like it is treating the edge of the map as the ocean for purposes of generating the rivers.
Any thoughts? See below:
http://www.thegeekenders.com/resources/misc/map/issue2.jpg
This is what I am particularly interested in: How did you use these files to generate the Mars data? I was going to see about using the higher resolution ones if possible. I've got 16GB or RAM so my PC can handle the processing.
To use the MOLA data:
I downloaded megt90n000eb.img and megt90n000eb.lbl from the above site. Opening and reading the .lbl file shows that the .img file has 2880 lines, 5760 samples per line, 16 bits (2 bytes) per sample, and is in MSB_INTEGER format.
Then in FT, File>>New, Binary File. Then click Choose Elevation File and enter the above information as shown in the attachment (the only weird bit is the 11520 that comes from 5760 samples * 2 bytes per sample). Click OK, Next, and Finish. The Mars data will appear in FT.
What about opening the raw data of the completed Mars that you have in WIlbur instead of transfering from FT to Wilbur and then back to FT? I get that extra border around the whole world when I do it that way, which is why I think I have the issues with the rivers.
When going back and forth between FT and Wilbur, I recommend the MDR file format. For whole-world data sets, try the "Special MDR" format under FIle>>Save As. FT can directly use the MDR as input to the binary file import and Wilbur can read an MDR file using File>>Open. There may still be a vertical flip issue between FT and Wilbur; I can't remember if I've fixed it or not.
I am now working on the climate/regions etc There is the one large area in the middle that it classifies as Alpine/Tundra I assume mainly because of the height data. This should be a volcanic region so I would think the temperatures would be higher due to the volcanic activity from the three huge volcanoes in the region.
Do you have any recommendations on adjust just that region or what are your thoughts?
http://www.thegeekenders.com/resources/misc/map/volcanic.jpg
How can I get a .jpg image or something similar, ie a flat image into FT and have it calculate height? Does it calculate it based off colors or how does that process work?