

Community Atlas: Hopes Lost, Lampoteuo Region, Artemisia
 Wyvern
🖼️ 291 images Cartographer
Wyvern
🖼️ 291 images Cartographer
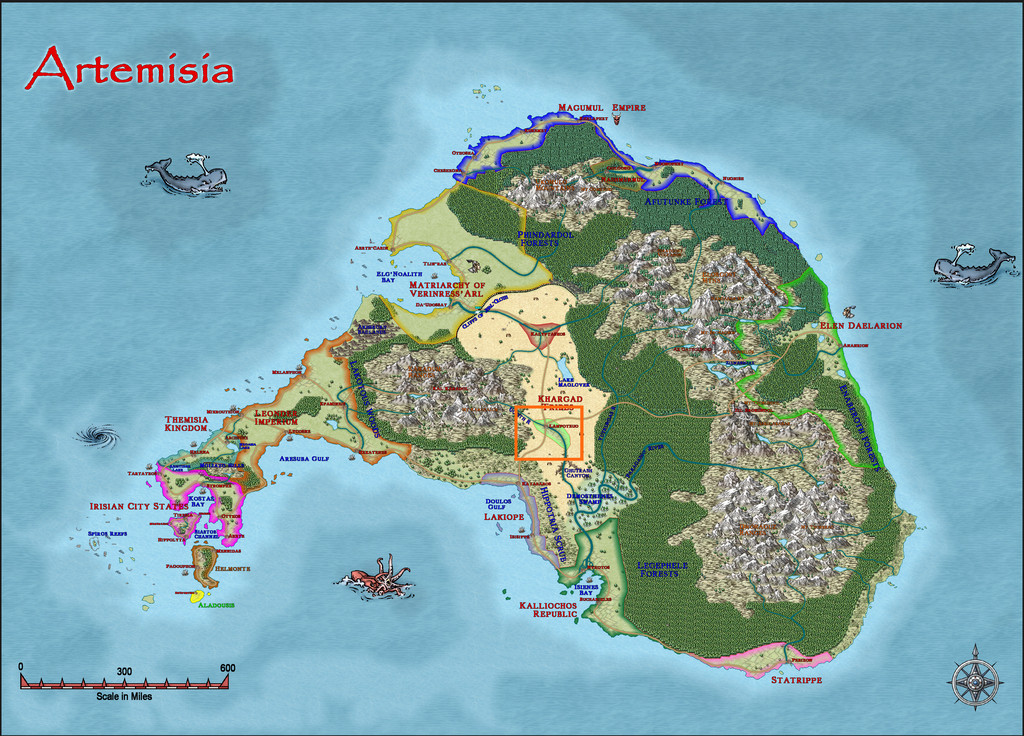
A fresh visit to Artemisia randomly took me off to the Lampoteuo Region in the central-southern part of that island continent:
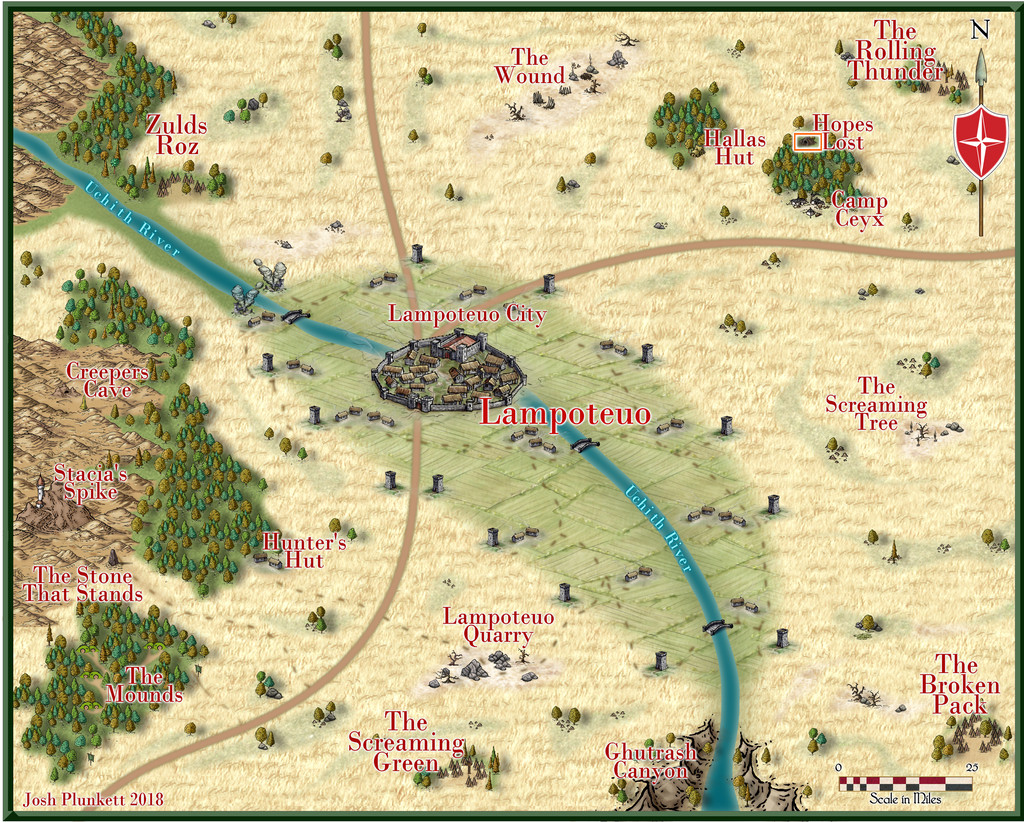
Like much of Artemisia, this area has been mapped at a regional, and often smaller, level already, so checking the existing Lampoteuo area maps narrowed down the options for where this latest small dungeon design could go. After much deliberation, heavily influenced by what I'd determined the contents of said dungeon were to be, I finally selected a cave symbol labelled as "Hopes Lost" here:
Having finally remembered there was a book of scenario suggestions that accompanied the Trailblazer set of Dungeonmorph Dice from Inkwell Ideas, the "Dungeonmorph Book of Modular Encounters: Delver, Trailblazer, & Voyager Edition", when preparing the previous map (Ruins of Shadow Keep), I'd already made use of that here prior to settling on a location. The essentials so-determined were that the place was run by Gnomes, and that it contained a planar nexus, with attendant higher-level magic-users. I reused and amended many of the details from the Inkwell book, as it provided some interesting architectural and decorative options, besides these aspects.
One complication was that one of the three randomly-chosen dice provided an elaborate tomb. Ultimately, that was converted into quarters for the Archmage and the four leading elemental mages at the complex, while retaining much of the design's layout.
A few other amendments were made, as usual, although handily, the Trailblazer set comes with one die of entrances, making an imposing way into the complex. Along the way, I'd decided this was also going to be both a teaching place for elemental mages, and a location people could come to and pay for scrying and access to other planes.
While there are no descriptive notes for the Lampoteuo map, there are general notes for Artemisia touching on who and what is around in this region, which beyond Lampoteuo city-state (central to the second map above), comprises a number of semi-nomadic tribes. Thus a new backstory developed. The complex originally had been a cave system in some rocky hills, in which was an oracular shrine where the local tribes would gather for an annual celebration. Generations ago, a disaster occurred during one festival, killing most involved, with the few survivors left to tell only conflicting tales. All were clear the site could never again be used, as the oracle had been either destroyed, or buried too deeply.
More recently, some Rock Gnome prospectors turned-up, and found there was something magically unusual here. The Rock Gnomes were chosen as having magical and physical expertise in handling rocks, precious stones and general stonework. Gnomes aren't mentioned as major inhabitants of Artemisia, and came just from the Inkwell book's ideas, as well as making a change from the more prevalent Dwarves.
The Gnomes set-to, called-up more of their folk, and reworked/rebuilt the lost caves into the current subterranean complex, reopening the planar gate in the process. So to the map:
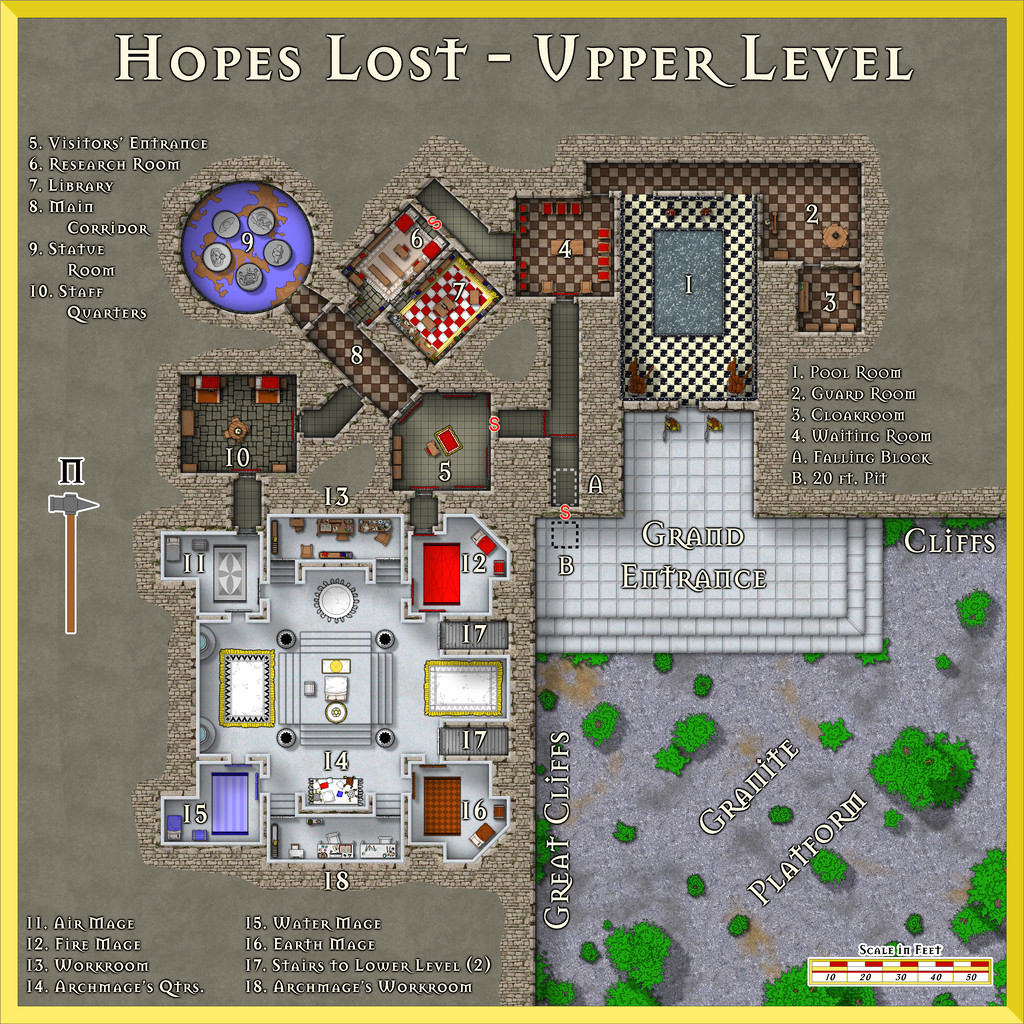
Much in the dice design was strongly rectilinear, so that became a distinctive feature, with straightened rock cliffs faced with granite brickwork, the spilled-over granite-brick fill around the complex hinting at how the former cave area had been reopened and restructured. The area outside then became levelled-off granite, with a great white marble stepped platform leading up to the way in.
I picked the DD3 Dungeon Digital style for the map, only to discover this was quite tricky to use, as rather than presenting the older-style vector symbols (I think from the "Filled" set of DD3 options; that's what I used, anyway), it tended to default to the normal DD3 raster ones instead. It does encourage use of the SS2 set as well, and that was heavily pressed into service. Being vector sets, there are plenty of options for all manner of objects. Dungeon Digital does use the DD3 bitmap fills too, partly why I'd picked it, because I knew there were going to be several square-tiled areas.
For the black-and-white marble in area 1 though, I drew out a series of small squares using the two marble textures, gradually combining them into larger strips to duplicate over the whole floor using the snap grid. I did try the standard chequerboard fill (in areas 2, 3, 4 and 8) with an RGB Matrix Process set to greyscale, but this looked a bit too washed-out compared to the white marble platform, black marble pool base and wall tiling of area 1. Then for the red and white check carpet in area 7, I selected a suitable red rug, enlarged it, and added a series of white, square cushions across it, as they gave a slightly textured look to the whole, more soft-carpet-like than the tile textures. A row of small rectangular white panels were added at the carpet's long ends, because the cushions didn't fit perfectly to both length and width, after a couple of quick trials.
Area 9, the Statue Room, is the planar gate. It has five 10-foot-tall statues in it, each of a different, loosely humanoid, creature from a different plane. When four of the five's "hands" are linked (their arms, only, can be moved and repositioned), this opens the gateway within the centre of their ring. The floor is decorated with a mosaic of an unknown world, as stated in the original notes, so I found a nice vector planet among the Cosmographer 3 designs that didn't have the spherical shading that so many do, and added that. The blue is intended to be lapis lazuli, the browns sardonyx. The Inkwell book provided various options for the planes involved, and I picked five that are a little unusual: Ash (a mix of Fire and Negative Energy), Dust (Earth + Negative Energy), Lightning (Air + Positive Energy), Minerals (Earth + Positive Energy), and Radiance (Fire + Positive Energy). It's also suggested in my notes for the Atlas that these may change, along with the statues, over long periods. I wanted to suggest that whatever had happened in the past to wreck the ancient oracle, was still having an unusual effect here.
The white marble southern part of the subterranean area was a design choice from the Inkwell descriptions for the original tomb there, including the wall-tiling, and it seemed to me the luminous look this gives the whole was delightfully striking. As is obvious, there are two staircases down from it, and they're weirdly located, because they're off the standard geomorphic connection points by 10 feet each. They should be where the two shallow indentations are in the adjacent walls of rooms 12 and 16. This is most unusual among the Inkwell designs, and initially caught me by surprise, as I thought I could simply rotate the design, and have this white marble area be at a lower level than the rest - except of course, the stairs don't fit to the entrances from areas 5 and 10! So that meant I needed to design a Lower Level as well. We'll come to that next time.


Comments
Sorry to change the subject of the original thread, but I'd like to consult with you (or anyone else), who knows more about these topics than I do, if there's any suggestion or order for diagramming the numbers on a map. Example: From top to bottom, clockwise or counterclockwise, etc.
I was going to say this is probably better discussed as a new topic, but I see Royal Scribe has beaten me to it! The snag is here, anything useful will end up muddled-in with the maps and notes for this topic, making it harder for someone else to find in future.
Meanwhile, back at the topic in-hand...
Hunting for a potential Lower Level design meant checking through those unused from the Trailblazer dice, leading to one with suitable architecture and features being semi-randomly decided-upon, and mapped:
As a one-dice design, it did leave a bit of space around it, so picking the four elementals from the first Token Treasury set seemed an obvious decorative addition here. This time, I also opted to use the usual square-tile bitmap fill design for the chequered marble, now with that greyscale RGB Matrix Process effect I'd decided against for the Upper Level, because here, it IS the entire floor covering, so there's no unhelpful comparisons to be made with the "real" B&W marble textures. The Inkwell notes stated the design was diamond-form, and while I experimented with copy-and-pasted strips of my hand-drawn B&W marble chequer floor from the Upper Level, their sizing wouldn't fit evenly to the layout here. I then tried using the standard check fill for just the passageways and rooms, but trying to get those angled-by-edge to a neat 45° proved impossible for the shapes involved. So in the end, I just drew a large rectangle, rotated it, and then changed the design with angle-by-edge (and got rid of the roof shading look too, naturally).
This does lose the mild glow effect on the floor edges where they ordinarily meet the walls, although as I'd already left some pale shadow effects on the Upper Level walls anyway (which began as I wanted the external cliffs to have shadows on the outside), that shadowing, with the wall glows, seemed to work sufficiently well anyway. I don't often use shadows for dungeon maps, but in this case, they seemed to help everywhere.
Of course, there are elementals here, and the "pools" can be opened as scrying devices to their linked planes, as well as gates into them. If you look closely at the Elemental Grand Mage's Quarters (probably easiest on the Gallery version), you'll find how my attempt at making the view of a "roofless" four-poster bed turned out, as mentioned elsewhere on the Forum a few weeks ago.
Next time, it's back to northern Alarius, to find a spot somewhere in the Emerald Crown Forest region...
These maps have now been added. Thanks Wyvern.