

Community Atlas: Kara's Vale, Ethra, Doriant
 Wyvern
🖼️ 293 images Cartographer
Wyvern
🖼️ 293 images Cartographer
Returning to Doriant for my next Atlas maps, this time I was heading for somewhere on Ethra, the huge island in the great, almost-landlocked, southwestern sea there:
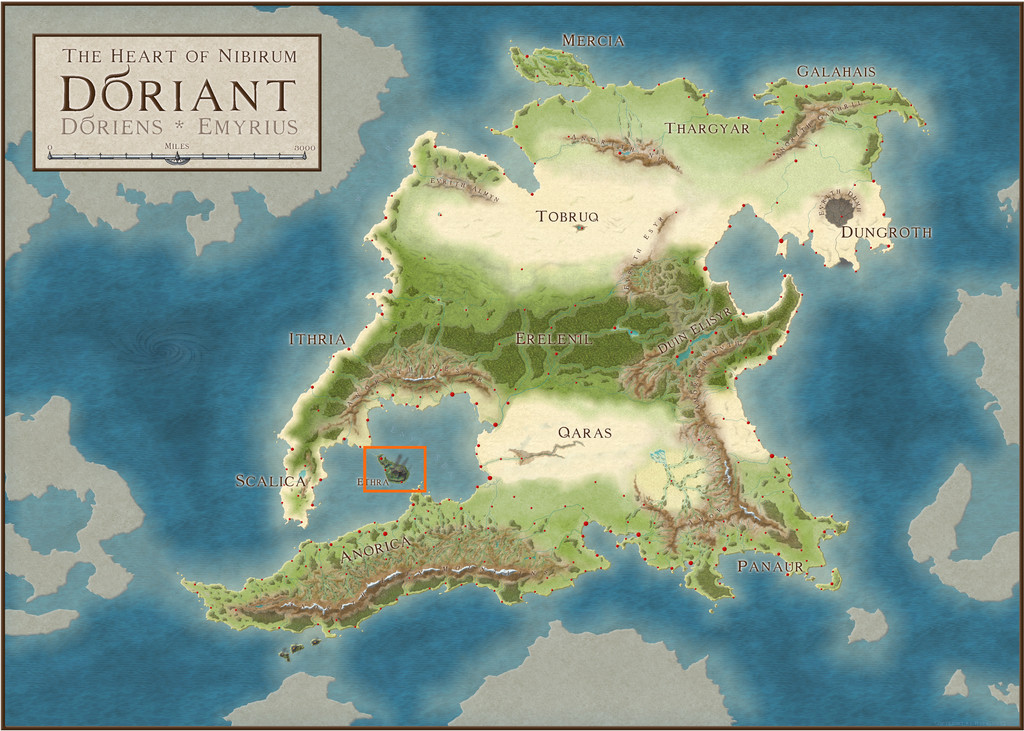
Examining the notes for Ethra indicated the island was split into a series of provinces, although much of those descriptions centred only on the major settlements, so it seemed there'd be plenty of options to slide-in a small dungeon map somewhere unobtrusively, even when surrounded by one of the typical 20-mile-square area maps I've favoured for much of this project. The Inkwell dice-map dungeon layout had already sparked vague thoughts of something alchemical, so a quiet spot might be useful, and while there are plenty of such potential places in the vast, volcanic barrens on Ethra, my eye kept being drawn to a small, labelled area, Kara's Vale;
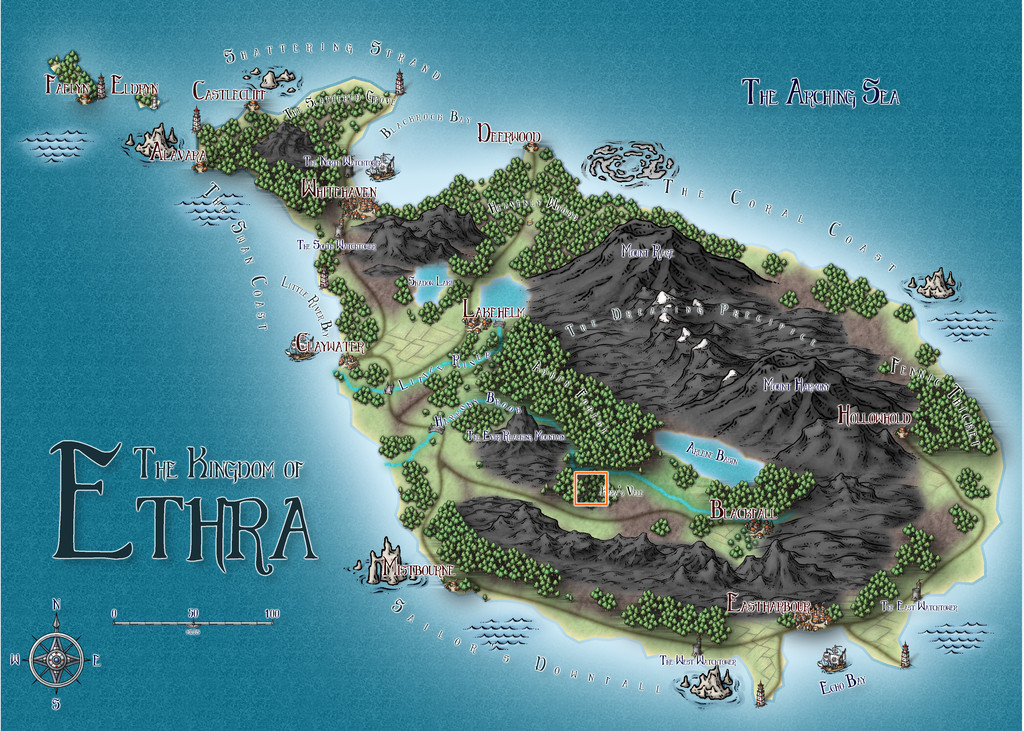
The way this area was mapped intrigued, as the Vale's woodland looked to be sunken compared with the woods to either side, yet had no major river shown flowing through it. With the volcanic nature of the whole island, this made me think of a small rift valley, so that's what it became:
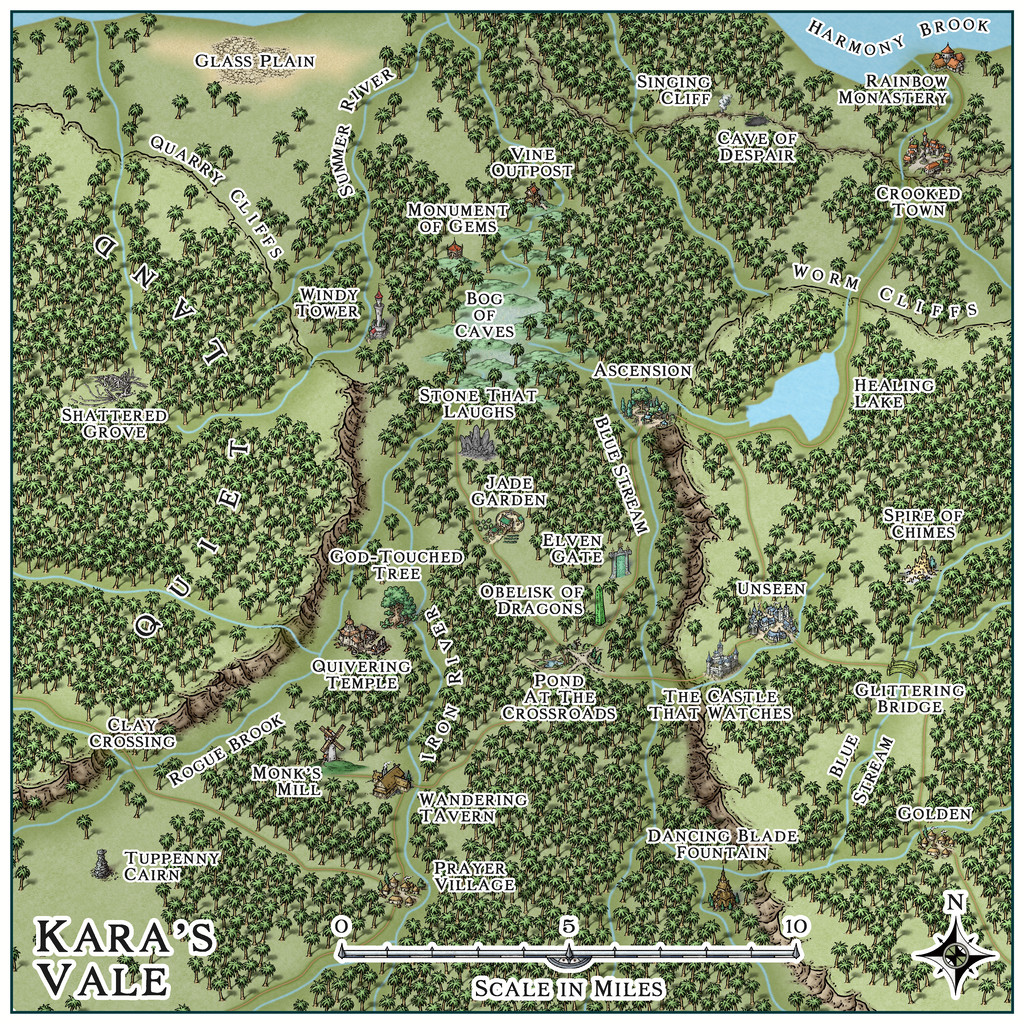
In an effort to persist with using linked mapping styles for this area, I decided on the Mike Schley styles (SS4 for the dungeon and the surface entrance site), something I've not really used much for overland mapping before. While the original Ethra maps showed deciduous and conifer woodland symbols, because the site is in the tropics, around 23°S latitude, here I went with "jungle" style trees instead. As I wanted to suggest higher plateaus to either side of the Vale, there was a bit of a battle to show the north-facing cliffs, as such options aren't available in this style, so I had to use the normal cliffs, and then hide everything except the upper parts with a suitable land-textured mat, something adding a second, lower, cliffline in the northeastern corner, greatly complicated! However, the jungle helps hide most things, one way or another...
The general map design was set by how the shadowed valley and unshadowed woods were shown on the Ethra map, and where the major river, just on the northern edge here, lay, while the specific features were all placed randomly, using my usual grid and dice method, with a one-mile grid spacing. What those places were was determined using or interpreting cards from various prompt decks produced by The Story Engine, a little like last time's for the Selenos maps in Artemisia, except this time also drawing from their "Deck of Worlds" as well as the "Loremaster's Deck" main sets, plus the "Worlds of Myth & Magic", "Loremastery" and "World & Lore Bridge" expansion sets. That's where pretty well all the on-map names came from too.
Map notes expanding on some of the place-names, again largely based on what the cards came up with, will be in the final Atlas version of the map, and also much as last time, the cards inspired thoughts and details beyond what I'd expected, which of course is their whole point. As for where the dungeon layout might be placed, there wasn't a shortage of possibilities. Ultimately, Windy Tower, northwest of the map's centre, won out, as we'll see next time.


 and 1 other.
Comments
Usually for Mike Schley I use Sue Richards Darklands cliffs when I need to make a cliff marked mainly in the north direction.
I use a darker default terrain in the lower parts and a lighter-colored default terrain in the upper areas. Here the biggest work is to make the contour with the default terrain on the cliff lines in the north orientation.
Mike Schley's cliffs are very good at diagonals in the overland, and he could well make one with all orientations, just like Sue did.
Thanks @Ricko. In cases like this, I simply try to work with the original style as far as possible, and it is practical to "force" the Mike Schley cliffs to work as north-facing, even if it does mean quite a bit more effort. It would certainly be helpful to have some north-facing cliffs in this style already though!
For the central valley here, I simply added a Solid 10 polygon over the lower part to darken it a little. The effect is very subtle, but I found using the Solid 20 fill felt too obvious, whereas this seemed to help the effect just enough to fool the eye - to me, at least 😎.
Often for the "darker" green I use the Marsh terrain, expanding its scale and controlling its translucency with edge fade inner and controlling the inner opacity of the same effect, depending on whether I want it darker or less.
And the "plain" green for the lighter and/or higher areas repeating the process above.
I like the Solid 10 color you used for the base is good, it gives the sensation of being deeper - or less high - than the upper parts.
Yes, I agree that the fill names often have little bearing on what I use them for either! It's often the colouring and texture that are key.
Back to topic!
Windy Tower: Sited near the east bank of Summer River in the Kara's Vale map's northwest, northeast of the line of Quarry Cliffs, and surrounded by jungle, is this fabulously ancient Tower, said to be a Wonder of the Ancient World. Notable for its unusual red stone.
Which is a slight paraphrase of the Kara's Vale map notes about it. I'm not sure quite why, but my thoughts for how this might be mapped drifted away to a 50-year-old fantasy skirmish wargame from 1976 called "Citadel: A Quest Within A Wizard's Tower" published by Fantasy Games Unlimited. This used basic thin-card-printed maps (brown ink on pale yellow card) drawn to 25 mm scale (the general height of cast-metal, normal-human-sized wargame miniatures back then), with square, thin card markers for the creatures defending the tower, the treasures and traps inside, and the connections between the different tower levels. Hero miniatures had to be provided by the players, and their relative strengths also decided that way, which made for quite a bit of work in advance, before being able to play the game originally. There were six card maps, printed on both sides, giving a dozen different floorplan layouts, only six of which were used per game, and the blank reverse counter sides created a fog-of-war situation, meaning the heroes had to check every counter to navigate their way between the tower's levels, find the treasure, and battle the monsters, without knowing what each counter might be in advance. As a game, it was OK, though often quite lengthy to play, and the card markers made it very easy to accidentally knock things out of position, albeit these were common elements in other games of the period. It also didn't look great, so we sometimes substituted monster miniatures for the card markers, only to then forget what strength each monster was meant to have... Joys of youth, eh?!
Feeling this to be a suitably Ancient Wonder of the World, I thought it would be interesting to adapt it for the Windy Tower maps. The floorplans meant the layouts for each level were available straight away, although those were amended in places to add doors (the original game had none) and a few extra walls. The connections between levels were originally portals in essence, because any on a given level might go to, or from, or both to and from, any other level in the tower, a concept retained here too, along with the two main treasure options, an amulet and a talisman, and the use of three types of defending creatures. In the original game these were "humans", "near-humans" and "non-humans" of varying numerical strengths. That, and the general "ancient" concept, drew me to warriors and mythological creatures from ancient Mesopotamia on Earth, because artworks from the 3rd to 2nd millennia BCE and later there show a similar range of beings - humans, demi-humans and non-human creatures. We know very little about any of these, even archaeologically for the human warriors, so there'd be options for some suitable expansion and interpolation of fantasy elements here.
Having got this far, with a list of possible options for all three defending creature types, some semi-random rolls helped decide what was where (limited so as not to have too many creatures or portals on any given level), after a further decision had been made to use all twelve tower floorplans, so Windy Tower would have twelve levels. Naturally, not all the creature options were chosen in the final version, but those that were are all provided with notes in the Atlas version (and here too for clarity), with statistics for the Shadowdark RPG, to help provide some pointers to their strengths, powers and abilities.
And so to the map. As each level in the Tower is an identically-sized square in area, there was the possibility of setting up twelve separate Atlas maps, using a simple copy & paste option between each map to draw their outlines and other basic features. However, that seemed a bit "ordinary", and as part of the point of this project has been to try new (for me) things from time to time, I decided instead to draw the Tower in a single map, with the contents for each level on its own Layer, and then to set-up hyperlinks for the portals on each level that would then allow one click on said portal to show each Tower level as it was encountered, using the FCW version of the map. After first checking with Remy Monsen to ensure A) that this wouldn't cause problems with the normal Atlas navigation processes, and B) that I had the correct macro commands to actually do this!
Following which, the mapping could begin. As the connections between levels were randomly set, including the surface entry point, the first level encountered when approaching from outside is Level Five:
While the original floorplans were fairly basic, they did commonly show variations between the flooring in separate areas, so something of that concept was adopted here too, with effects and furnishings to liven things up further.
One significant problem was finding suitable markers for the different defending creatures per level. I'd already decided that these would appear as statues until activated by intruders in their part of their own level, so their starting locations needed to be identified. However, the range of top-down statues and creatures in the Mike Schley style - even with all the monthly symbol options - is extremely limited, especially as some of the statues have large bases as well. Adding the original DD3 creature options only helps marginally, again thanks to a limited range of options, most of which don't include varicolor that will allow creatures to appear as statues instead. So the creature options used here were purely a compromise, using varicolor shading at times to separate the different kinds, and occasionally adjusting the sizing as well for the larger non-humans.
From Level Five, we have portal options to go to Levels 2 or 3, but rather than following such convoluted paths in showing the rest of the maps, the remainder will be presented simply in numerical sequence.
That though will have to wait for another time - like the notes on what a "Winged Lion-Dragon" might actually look like!
Level One here shows the general pattern adopted for all the non-surface Tower levels, where a neutral sheet has been used to hide the exterior surface features of Level Five, presenting a clearer backdrop for all the remaining levels. As there aren't any windows in the Tower, this also helps maintain a degree of uncertainty as to where each level is in relation to its physical place in the Tower, as there is meant to be a degree of confusion about the whole - seriously magical, after all.
The portal to the exterior drops anyone using it into the stone circle west of the Tower on the Level Five drawing - they can't get back into the Tower that way, and may have problems using the main doors without magic, or possession of the amulet or talisman found elsewhere in the Tower.
Lion Demons are strong, disease-bringing, lion-headed humanoids with raptor-clawed feet and legs, and upright donkey ears. This latter gives them powers of strength and alertness, judging by their use elsewhere in Mesopotamian art and some texts.
That flat panel labelled "Kish Warrior" is the marker for one of the nominally Human defenders. Rather than having this be a fully 3D creature, because the Kish, and on subsequent levels Mari, warriors are based on 2D inlay artworks only, I thought it would be fun to have them appear in 2D panels, and then come to life still as 2D creatures as well - albeit ones with human fighting abilities appropriate for the artworks. To clarify, I've added illustrations of such artworks to the PDF notes, that I drew and published in a series of journal articles around a decade ago now, discussing aspects of ancient Mesopotamian warfare. This is the Kish Warrior one:
It was drawn on the computer, because I wanted to better show it fully restored, with the coloured inlay background and the carved and filled bone inlay pieces, as the originals had quite a bit of damage to them.
This is the Mari warrior, a scan of the hand-drawn original on tracing film for the final published version:
Both original artworks date from the earlier 3rd millennium BCE.
Level Two:
This level has the special silver amulet hidden in a treasure chest. The amulet can be used to regain access to the Tower through the surface doors, and it's also essential to gain access to the Tower's Level Thirteen (yes, there IS another Level beyond Twelve - we'll get to that eventually!).
The Bird Man has here been treated as a trickster demi-god, with a human upper body, head and arms, feathered bird's tail, lower body, raptor legs and clawed feet. He is only known from artworks, where most depictions show him captive, apparently being judged by a seated deity, so some liberties have been taken with why this might be so.
Bull Men are humanoid fighters with a human upper body, head and arms, a bull's head horns and ears, bull's lower body, tail and legs. Such a creature has been sometimes thought of modernly as the legendary wild-man companion Enkidu to the hero Gilgamesh, albeit no period texts confirm this.
Level Three:
The Mesopotamian Sphinx isn't quite the sphinx you might think, as it's essentially a human-headed, winged, giant lion. Winged creatures aren't quite so cramped here as might be expected, because each Tower level has a 20 ft ceiling or so (6 m).
Level Four:
On the original "Citadel" floorplans, there were a few carpets shown, which were added here as well, although in the notes, it's mentioned that only this one on Level Four might also be a magical flying carpet, should GMs desire. As might be guessed, the Serpent-Necked Lion is indeed a lion with a long, serpentine neck. Artworks sometimes show pairs with intertwined necks, possibly as a decorative element only.
Level Five we did already, so next is Level Six:
Here, I should probably say what a Lahmu Hero is, and what the difference is between the Sphinx and the Winged Lion-Dragon (also seen on Level Five earlier). The Lahmu Hero is a sword-armed heroic fighter, shown in art with distinctive shoulder-length, curled hair, commonly three curls to either side of their face. They're typically either naked or shown in a simple loincloth, sometimes illustrated having apparently magical control over water and serpents. The Winged Lion-Dragon is a feather-winged lion with feathered giant raptor back legs and tail. Sometimes shown pulling a deity-ridden battle-car or chariot, and sometimes shown breathing something that may be lightning or fire.
The next six levels must wait for another day now though!
Back to the remaining half-dozen Tower levels with Level Seven:
This is the level the magical, golden talisman is on, which is required to activate the portal to access Level Thirteen (coming-up on Level Nine below), and either it or the amulet from Level Two may be needed to regain access to the Tower, if left at any stage. I decided to only wall-off parts of the two outlying cobblestone-floor sections here (derived from the original floorplan), because that helped make this level feel a bit more weird.
Lots of leonine critters in ancient Mesopotamia! The Lion-Headed Eagle though is something special, as it was either a demi-god, or a full-fledged deity (possibly at a period antedating the early 3rd millennium BCE) called Imdugud (later Anzu), which had the form of a giant eagle with heavy claws, a lion's head, and, from at least one myth-text, shining, multicoloured feathers and magical powers.
The Scorpion-Man is a bow or spear-armed humanoid with a human torso, arms and head, set on a chitinous giant scorpion's lower body, legs and stinging tail.
Level Eight:
A fairly straightforward level here for once, except for a couple of floor pit traps in front of two of the treasure chests.
Level Nine:
Here we find the portal that goes to Level Thirteen, which of course is the dungeon map that started this set of maps off. That's dealt with by a separate map in the Atlas now, however. Plus for variety, we also have a non-functioning portal.
The Seven-Headed Mushmahhu probably needs an explanation. It's an imposing, hydra-sized creature with a huge lion's body, and seven, writhing, giant serpent necks and heads. Known from several variant artworks from the early 3rd millennium BCE, sometimes such a creature has a purely serpentine body as well, and in either form, one or more - though not all - its heads may be shown as dead. In its lion-bodied form, it has rays rising from its back, which might be magical defences, or simply fire/heat, which rays seem to form one of its own powers. Sometimes shown with one or two deities in combat with it too. It's basically the top predator in the Tower.
Level Ten:
Some of the included elements were simply picked from the available symbols in the Mike Schley style, to flesh-out the bare bones original floorplans, although this level was largely populated from items randomly determined from those Story Engine card decks used earlier for the Kara's Vale map locations. The randomness of a level that has stores, an altar and huge braziers, a cage, a pool and a loom just appealed in that way weirdness sometimes can!
Level Eleven:
Which randomness was allowed to spill-over here too, with those three rooms of oddities in the north. Plus, be fair, this was the eleventh level in the group!
Bringing us finally to Level Twelve:
Did I mention the random weirdness? The Wall-Hangings Hall though was done deliberately, because it's a really odd shape for an empty passageway otherwise.
Which concludes the main Tower, leaving only Level Thirteen to come - perhaps next time...
I really like it.
The only thing I would change is the portals. They are a bit confusing to me. Suggestion: Color code the portals or something.
I did a really fast example. You could maybe use gems, or skulls or whatever to show which portal is linked to which. Couldn't find what you used as your portals so I just used some random shape.
Or possibly some stonework on the floor, or carpet.
Don, the portals are actually portal symbols from the Mike Schley Dungeon style, with varicolor in places. As the maps have been submitted for the Atlas already, they aren't going to be changed now.
Top-down symbols aren't always especially obvious in general, because humans aren't used to seeing most things that way. The labels, and in the FCW file, the pointing hand icon, help clarify things sufficiently to me, at least!
Well, as it's turned out, not quite "next time" for Level Thirteen after all!
As I was drawing the various Tower levels, and especially when setting-up the cross-level hyperlinks, it soon became obvious I was relying on my own hand-scrawled schematic showing how all the levels connected with one another to manage that. This suggested a further such properly mapped schematic might be helpful for GMs trying to run the Tower with the portals active in the sequence shown on the maps. Thus we also have the Windy Tower GM's Guide map:
Although it was relatively simple and quick to draw (especially compared with setting up multiple macro hyperlinks per level!), it proved a little more complex than anticipated, thanks to the number of crossing arrow lines. Plus the whole went through around six different hand-sketched iterations before settling on this layout, to try to keep the arrow-line patterning as relatively simple as possible.
Now it's done though, it has been quite entertaining to use it to navigate using the FCW file's hyperlinks between the levels, when checking them in comparison with the text notes ahead of the final Atlas submission.
And so REALLY next time, Level Thirteen!
That looks complicated.
Nah!
Once you start using it, you're simply concentrating on what links with the current level you're on, and everything else doesn't really matter. I also found it was really quick to work out how to get from one place to another through several levels rapidly just using this.
I was less sure about using just red and green arrow lines, given red-green colour-blindness is an issue for quite a number of folks, but having set up the portals with those colours already (because they looked a bit clearer on the individual Level maps), I didn't want to change them. Hopefully the single and double arrow heads will help alleviate any issues that way though.
And so finally...
My original idea was to set this dungeon map up as a cellar to the Tower. However, the use of portals to navigate between the main Tower maps, suggested this one could be set up instead as a further level, whose separate nature, while hinted-at by the need to use the golden talisman from Level Seven to operate the portal from Level Nine to it, would only become fully obvious once it began to be explored. It also leaves open the question as to whether this is genuinely just another main Tower level, one with a more secure, semi-secret accessway, and even whether most of the Tower levels might be on a completely different plane of existence to the outside that connects with Level Five.
Regardless of that, this is the final map, whose base was generated by a trio of the Inkwell Ideas Dungeonmorph dice faces from the Adventurer set, here with a few minor tweaks and adjustments:
As the labels indicate, there are alchemical aspects here that survived from my initial thoughts on this layout, now added-to by golems - and there are several of those here, including some variant levitating Iron Golems that can also freely teleport within this Level (only). There's also something horrifyingly vast and terrible magically held in stasis in the Great Holding Chamber. You'll have to read the notes in the Atlas version to find out more, but it's known as The Devourer of Deserts (no, not "Desserts"...) thanks to The Story Engine card draws.
There's a lot more weirdness here, including what seem to be randomly inlaid dark metal symbols in the floors, walls and ceilings in places (another card-generated idea), as well as more conventional dark metal inlay designs, courtesy of our own Loopysue's Marine Dungeons! Some of the accessways are incredibly narrow (that between chambers D and E is barely 18 inches, 45 cm, wide, for instance), raising questions as to how some of the large, bulky equipment ever got into the inner western and northern parts of this complex. Which is just as it should be for what's clearly an anciently-created place belonging to a highly powerful magic-using person/creature. Who seems to be nowhere at all in the complex currently...
The golems are intended to function much like the other guardians elsewhere in the Tower, in stasis until required to tackle intruders, except here, there are often passwords required to stop them activating, not to mention the silver amulet needed to open the door to and from the Entrance Chamber (A). The whole Windy Tower project was though a fascinatingly creative exercise, tying-together (sometimes very loosely!) the randomly-generated card-draw concepts, as well as the oddities of the dungeon layout.
One final piece of weirdness I only found an explanation for after consultations with Loopysue and, indirectly, Remy Monsen. It's been a very long while since I mapped using the Mike Schley Dungeon SS4 style. When I came to draw the Level Thirteen map, as usual, I imported a JPG version of the hand-redrawn dice design as a base to work from in CC3+. I always check the sizing of that, and adjust it when done if needed, using the drop-down Info menu's Distance command, measuring the separation of the graph-paper grid lines using the ortho setting. Ordinarily, that calls up an information panel that looks something like this (I'm just picking random points here to demonstrate):
However, what came up was this:
I thought I must have hit some unrecognised shortcut key by mistake, but then I couldn't find a way to reset it, either using the CC3+ Help menu, or anything in the Tome.
It turns out though that there are actually two commands you can type into the command line to find distances like this, DISTANCE (which gets you the first panel above) and DIST2 (which gets you the lower panel). Now quite why DIST2 has been set as the default in SS4 is a mystery nobody seems able to resolve, given that (thankfully!) it isn't used anywhere else like this. There probably are circumstances where being able to measure both bearing and distance together might be useful, and also the vertical and horizontal distances simultaneously, but it is appallingly confusing to have this thrown at you when all you want is a straight distance measurement. In this instance, it's fairly obvious, if not intuitively so, as to which is the correct value for what was being measured, although that wouldn't necessarily be so obvious under different circumstances. Something to be aware of when using SS4, though - and if you do just need a "normal" distance measurement, simply type-in DISTANCE to get it!
Now it's time to leave Doriant for the time being, and head off to Lanka in Kumarikandam for the next maps in this project...
The Windy Tower have now been added to the atlas. Thanks for the submission @Wyvern
Due to the nature of this map, it is best experienced in CC3+, as I can't simply hide and show layers on the website. Honestly though, Wyvern tend to put all kinds of toggles in his maps, so they are mostly all best experienced in CC3+.
But, that was always the intent with the atlas anyway, to provide people with a great hyperlinked set of CC3+ maps that can be either used as they are, modified for your own use, or simply used to learn from. The website is just a basic overview to show people what they get and help people find maps.
Thanks very much Remy. Hopefully, anyone confused by just the images can read the PDFs and work out what they need to do for best effect.
Speaking of PDFs... I see that for Windy Tower Level Thirteen has gone walkabout somewhere. Let me know if you need a fresh copy for the Atlas!
Fixed now.